
Photosmart 630 - Camera HP - Free user manual and instructions
Find the device manual for free Photosmart 630 HP in PDF.


| Product Type | Digital Camera |
| Model | HP Photosmart 630 |
| Effective Pixels | 2.02 MP (1636 x 1236) |
| Total Pixels | 2.11 MP (1688 x 1248) |
| Image Sensor | 1/3.2-inch CCD |
| Optical Zoom | 3x (5.2 mm to 14.4 mm) |
| Digital Zoom | 4x (via interpolation) |
| Focus Range (Normal) | 0.5 m (19.7 in) to infinity |
| Focus Range (Macro) | 0.1 m to 0.8 m (2.5 to 32 in) |
| Shutter Speed | 1/2000 to 2 seconds |
| Built-in Flash | Yes, 6-second recharge |
| Flash Working Distance | 0.1 m to 2.5 m (4 in to 8.2 ft) |
| Flash Modes | Auto, Red-Eye, Flash On, Flash Off, Night |
| Image Display | 1.6-inch color backlit LED |
| Viewfinder | Zooming optical viewfinder |
| Storage (Internal) | 16 MB |
| Memory Card Support | Secure Digital (SD) and MultiMediaCard (MMC) |
| Max Memory Card Capacity | 128 MB (tested by HP) |
| Image Quality Settings | Good (640x480), Better (full res, medium compression), Best (full res, low compression) |
| Video Recording | 320x240, 24 fps, MPEG1 with audio |
| Self-Timer | 10-second delay; single or two shots |
| Exposure Modes | Auto, Action, Landscape, Portrait, Macro |
| White Balance | Auto, Sun, Shade, Tungsten, Fluorescent |
| ISO Speed | Auto, 100, 200, 400 |
| Color Modes | Full Color, Black & White, Sepia |
| Battery Type | 2 AA batteries (NiMH, photo-lithium, or high-grade alkaline recommended) |
| Dimensions (L x W x H) | 100.8 mm x 41.7 mm x 66.3 mm (4.0 x 1.7 x 2.6 in) |
| Weight (without batteries) | 185 g (6.5 oz) |
| Connectivity | USB (to computer or printer), DC-IN, camera dock connector |
| TV Output | NTSC/PAL (via camera dock) |
| Software Companion | HP Photo & Imaging software (Windows/Mac) |
| Special Features | HP Instant Share, direct print (PictBridge via USB), audio capture with stills |
Frequently Asked Questions - Photosmart 630 HP
User questions about Photosmart 630 HP
0 question about this device. Answer the ones you know or ask your own.
Ask a new question about this device
Download the instructions for your Camera in PDF format for free! Find your manual Photosmart 630 - HP and take your electronic device back in hand. On this page are published all the documents necessary for the use of your device. Photosmart 630 by HP.
USER MANUAL Photosmart 630 HP
hp photosmart 630 series digital camera with hp instant share

user's manual

invent
Trademark and copyright information
© Copyright 2003 Hewlett-Packard Development Company, LP
Reproduction, adaptation or translation without prior written permission is prohibited, except as allowed under copyright law.
The information contained in this document is subject to change without notice. Hewlett-Packard shall not be liable for errors contained herein or for consequential damages in connection with the furnishing, performance, or use of this material.
Microsoft® and Windows® are U.S. registered trademarks of Microsoft Corporation.
Apple®, Macintosh®, and Mac® are registered trademarks of Apple Computer, Inc.
MultiMediaCard™ is a trademark of Infineon Technologies AG.
SD logo is a trademark.

Table of Contents
Chapter 1:
Getting started....8
Camera parts 9
Top and back of camera 9
Front, bottom, and side of camera 12
Setup 14
Attaching the wrist strap 14
Attaching the lens cap tether 14
Attaching the lens cap 15
Installing the batteries 15
Installing a memory card (optional) ..... 16
Turning on power 17
Understanding the status screen . . . . . . . . 17
Restoring previous settings ..... 18
Choosing the language 18
Setting the date and time 19
Installing the software 19
Windows 20
Macintosh 21
Camera states and menus 22
Chapter 2:
Taking pictures and recording video clips . . . .23
Taking still pictures 23
Recording audio with still pictures 24
Recording video clips 25
Taking self-timer pictures 27
Using the viewfinder 28
Using live view 29
Using auto focus 30
Using focus lock 31
Setting the flash 31
Using zoom 33
Optical zoom 33
Digital zoom 33
Using the capture menu 35
Help for the menu options 36
Image quality 36
Self-timer 38
EV compensation 39
Exposure mode 39
White balance 41
ISO speed 42
Color 43
Saturation 44
Sharpness 44
Setup 45
Chapter 3:
Reviewing images and video clips .....46
Using playback 46
Tagging images for direct print 48
Using the playback menu 49
Delete 52
Record audio 53
View thumbnails 54
Magnify 55
Rotate 56
Setup 57
Chapter 4:
Using hp instant share .....58
Setting up the share menu on the camera 59
Using the share menu 62
Tagging images for hp instant share destinations 63
How hp instant share e-mails images .....64
Windows 64
Macintosh....64
Customizing the share menu . . . . . . . . . . . . . . . . . . . . . . . . . . . . . . . . . . . . . . . . . . . . . . . . . . 65
Chapter 5:
Unloading and printing images 67
Unloading to a computer . . . . . . . . . . . . . . . . . . . . . . . . . . . . . . . . . . . . . . . . . . . . . . . . . . . . . . . . . 67
Printing images 69
Chapter 6:
Using the setup menu 71
Camera sounds....72
Date & time 72
USB configuration 73
TV configuration . . . . . . . . . . . . . . . . . . . . . . . . . . . . . . . . . . . . . . . . . . . . . . . . . . . . . . . 74
Language 74
Move images to card . . . . . . . . . . . . . . . . . . . . . . . . . . . . . . . . . . . . . . . . . . . . . . . . 75
Chapter 7:
Troubleshooting and support 76
Problems and solutions 76
Resetting the camera . . . . . . . . . . . . . . . . . . . . . . . . . . . . . . . . . . . . . . . . . . . . . . . . . . . . . . . . . . 86
Messages on the camera . . . . . . . . . . . . . . . . . . . . . . . . . . . . . . . . . . . . . . . . . . . . . . . . . 87
Messages on the computer . . . . . . . . . . . . . . . . . . . . . . . . . . . . . . . . . . . . . . 96
Getting assistance 99
HP accessibility website .....99
HP photosmart website .....99
Support process 99
Phone support in the United States .....101
Phone support in Europe, the Middle East, and Africa 102
Other phone support worldwide .....104
Appendix A:
Batteries and camera accessories .....106
Managing batteries 106
Extending battery life 108
Rechargeable batteries ..... 109
Power conservation 109
Purchasing camera accessories 110
Appendix B:
Specifications ....112
Memory capacity for still images ..... 117
Chapter 1: Getting started
Congratulations on your purchase of this digital camera! Your new camera has many features to enhance your picture-taking experience, including HP Instant Share™, direct printing capability, manual and automatic controls, on-camera Help, and an optional camera dock.
With HP Instant Share, you can easily tag images in your camera to be automatically sent to e-mail addresses (including group distribution lists), online albums, or other destinations the next time you connect the camera to your computer. And with the direct printing capability, you can easily tag images in your camera to be automatically printed the next time you connect the camera directly to any HP Photosmart printer or to any other HP printer with a front panel USB port.
To further enhance your experience, you may purchase an HP Photosmart 8886 camera dock. (For information on purchasing the camera dock, see page 110.) The camera dock allows you to easily download images to a computer, send images to a printer or television, recharge the camera batteries, and provide a convenient home for your camera.
NOTE A dock insert is included in your camera box which enables your camera (and others of the same model) to use the HP camera dock. Please do not use the dock insert without the camera dock and do not discard it. See the HP 8886 Camera Dock User's Manual for instructions on using the dock insert with the camera dock.

Camera parts
NOTE Refer to the pages in parentheses after the part names for more information about those specific camera parts.
Top and back of camera

| # | Name Description | |
| 1 | ON/OFF switch (page 17) | Turns the camera power on and off |
| 2 | Video button (page 25) | Starts and stops recording a video clip |
| 3 | Shutter button (pages 23, 27) | Takes a picture and records audio |
| 4 | Zoom lever with Zoom Out and Zoom In controls (page 33) | Zooms out the lens to the wide angle position, and zooms in the lens to the telephoto position |
| 5 | Flash button (page 31) | Allows you to select the flash setting |
| 6 | OK button (pages 35, 49) | Allows you to display the Capture and Playback menus and to select menu options on the Image Display |
| 7 |  | Allows you to move through menus and images on the Image Display |
| 8 | Power/Memory light (page 17) | Solid-camera is on Fast blinking-camera is reading from or writing to memory Slow blinking-camera is off and is charging the batteries Off-camera is off |
| 9 | HP Instant Share button (page 62) | Turns the Share menu on and off on the Image Display |
| 10 | Print button (page 48) | Allows you to tag images for printing |
| 11 | Playback button (page 46) | Turns Playback on and off on the Image Display |
| 12 | Live View button (page 29) | Turns Live View on and off on the Image Display |
| 13 | Image Display (pages 29, 46) | Allows you to frame pictures and video clips using Live View and review them afterward in Playback, and to view all the menus |
| 14 | Viewfinder lights:Video (page 25) and AF Auto Exposure/Auto Focus and Flash (page 30) | is solid red—video is recordingAF is solid green—after you pressed the Shutter button halfway down, the camera is ready to take a picture (auto exposure and auto focus are locked, and the flash is ready)AF is blinking green—either a focus error occurred when you pressed the Shutter button halfway down, the flash is charging, or the camera is still processing the last pictureBoth and AF are blinking—an error has occurred; for example, the memory is full (see the following NOTE)NOTE If an error prevents a picture from being taken, then an error message will display on the Image Display. See Messages on the camera on page 87. |
| 15 | Viewfinder (pages 23, 28) | Allows you to frame the subject of your picture or video clip |
Front, bottom, and side of camera
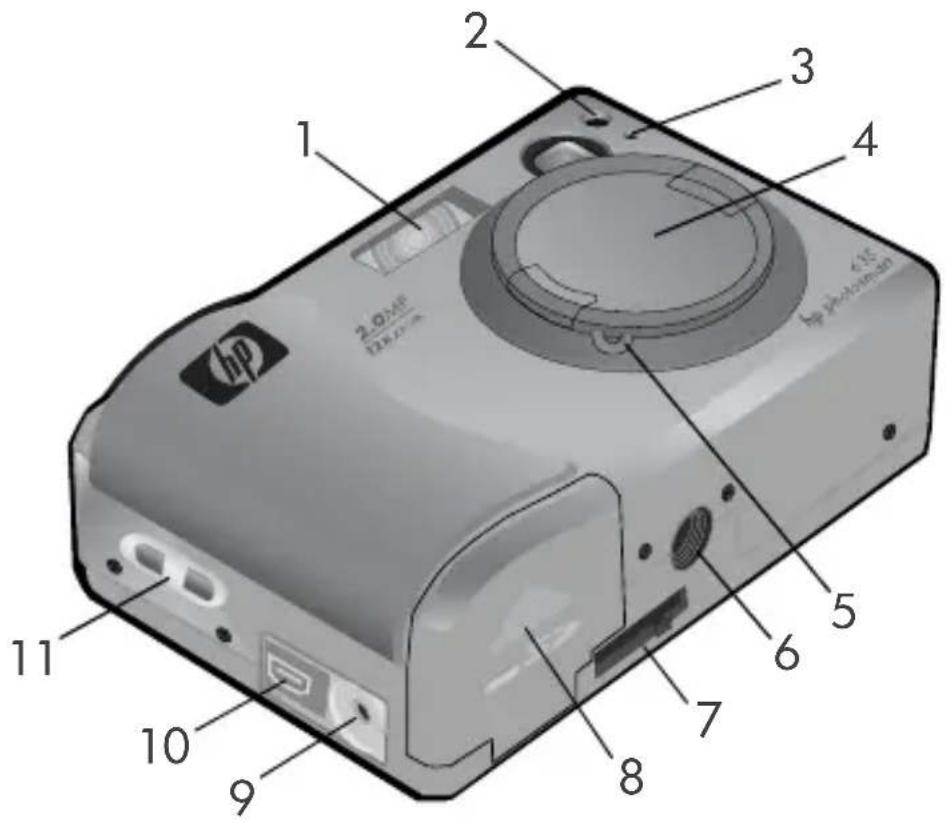
| # | Name Description | |
| 1 | Flash (page 31) Provides additional light to improve picture-taking | |
| 2 | Self - T (page 27) | Blinkseduring the 0-second count-down before taking a picture when Self-Timer in the Capture menu is set to On or On - 2 shots. When set to On - 2 shots, also blinks during the time between the first and second shots. |
| 3 | Microp (page 24) | Records audio clips |
| 4 | L e n s c a(page 15) | Protects the camera lens. You must remove the lens cap before taking pictures or recording video. |
| 5 | Lens cap tether mount (page 14) | Allows you to attach a tether to the lens cap |
| 6 | Tripod mount Allows you to mount the camera to a tripod | |
| 7 | Camera dock connector(page 110) | Allows you to connect the camera to the optional HP 8886 camera dock.(See page 110 for information on purchasing an HP 8886 camera dock.) |
| 8 | Battery/memory card door(page 15) | Allows you access to insert and remove the batteries and an optional memory card |
| 9 | Power adapter connector(page 111) | Allows you to connect an optional HP AC power adapter to the camera to either operate the camera without batteries, or recharge the batteries in the camera |
| 10 | USB connector(pages 67, 69) | Allows you to connect a USB cable from the camera to a USB-enabled computer or printer |
| 11 | Wrist strap mount (page 14) | Allows you to attach a wrist strap |
Setup
Attaching the wrist strap
Attach the wrist strap to the wrist strap mount on the side of the camera as shown.
NOTE It is easiest to install the wrist strap by inserting it from the bottom.

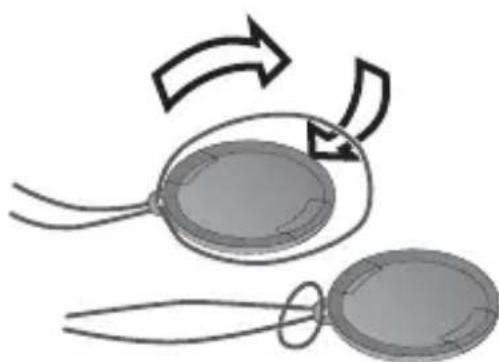
Attaching the lens cap tether
1 Wrap the small loop of the lens cap tether around the wrist strap between the plastic stay on the wrist strap and the wrist strap mount on the side of the camera.
2 Insert the long loop of the tether through the small loop and pull to tighten the knot.
3 Insert the long loop of the tether through the lens cap tether mount.
4 Pull the long loop over the sides of the lens cap and then under the lens cap as shown. Pull to tighten the knot.

Attaching the lens cap
1 Pinch the grips on the sides of the lens cap with your thumb and finger as shown.
2 Fit the lens cap into the lens ring on the front of the camera and release the grips on the lens cap. Make sure the lens cap snaps into place.
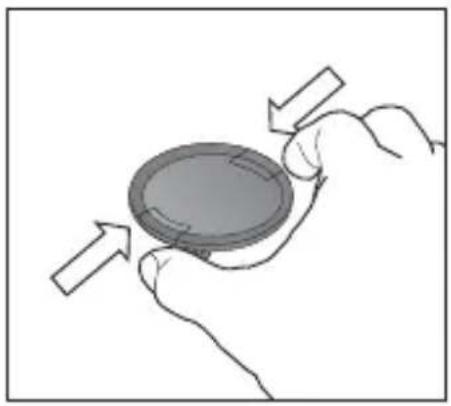
To remove the lens cap, pinch the grips on the sides of the lens cap with your thumb and finger, and pull the lens cap off the lens ring.
Installing the batteries
1 Open the battery/memory card door on the bottom of the camera.
2 Insert the batteries as indicated inside the door.
3 If you do not have an optional memory card to install in the camera, close the battery/

memory card door and skip to Turning on power on page 17. If you want to install an optional memory card, leave the battery/memory card door open and proceed to the next section, Installing a memory card (optional).
NOTE For more information, see Managing batteries on page 106. You can also use an optional HP AC power adapter to power the camera, and you can recharge batteries in the camera using an optional HP AC power adapter or HP 8886 camera dock. For more information, see Purchasing camera accessories on page 110.
Installing a memory card (optional)
Your digital camera contains 16 MB of internal memory that allows you to store images and video clips in your camera. However, you can use an optional memory card (purchased separately) instead to store images and video clips. For information on the memory cards that are supported with your camera, see Purchasing camera accessories on page 110.
NOTE If a memory card is installed in the camera, all new images and video clips will be stored only on the memory card. The internal memory and its file system are not available when a memory card is installed in the camera.
1 With the battery/memory card door open on the bottom of the camera, insert the memory card in the slot behind the batteries as shown. Make sure the memory card snaps into place.
2 Close the battery/memory card door.

To remove a memory card, press down on the top edge of the memory card, and it will spring outward from the slot.
NOTE You can install or remove an optional memory card while the camera is powered on with an optional HP AC power adapter.
Turning on power
NOTE You must remove the lens cap to be able to operate the camera. If you turn on the camera without removing the lens cap, an error message will display on the Image Display. See Messages on the camera on page 87.
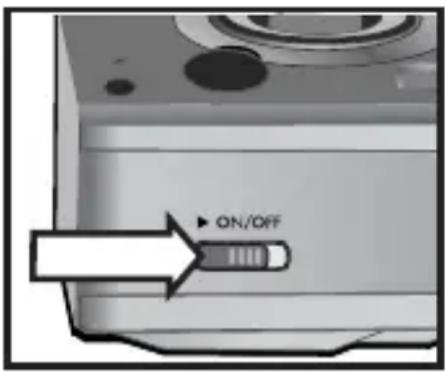
Remove the lens cap and then turn on the camera by sliding the
▶ ON/OFF switch to the right and releasing it.
The lens extends, the Image Display turns on for a few seconds (see the next subsection), and the Power/Memory light turns on solid.
Understanding the status screen
When you turn on the camera, the HP logo screen and then the status screen display for a few seconds on the Image Display.
The main part of the status screen shows the current Image Quality setting (designated by the stars), number of pictures remaining, battery level, and flash setting. Any non-default Capture menu settings are also shown across the top of the status screen.

The status screen is also displayed for a few seconds any time you change the flash settings on the camera. See Setting the flash on page 31.
Restoring previous settings
Some of the settings that you can change in the camera menus do not remain set after you turn off the camera. However, you can restore the settings from the last time the camera was on and had at least one non-default setting (which could actually be several power cycles ago) by holding down the OK button while also sliding the ▶ ON/OFF switch to turn on the camera. The restored settings are then displayed across the top of the status screen. (See the previous subsection.)
Choosing the language
The first time you turn on the camera, the following screen appears and prompts you to choose a language.
1 Scroll to the language that you want by using the buttons on the Controller.
2 Press the OK button to select the highlighted language.

NOTE You can change the language setting by using the Language menu option in the Setup menu. See Chapter 6: Using the setup menu on page 71, and then see Language on page 74.
Setting the date and time
The camera has a clock that records the date and time at which you take each picture. The first time you turn on the camera, the following screen appears after you choose the language.
1 Adjust the value of the highlighted selection by using the ▲▼ buttons.
2 Press the ◀ buttons to move to the other selections.
Repeat steps 1 and 2 until the correct date, time, and date/time format are set.

NOTE In the date/time format, mm=month, dd=day, and yyyy=year.
3 Press the OK button when the proper values are entered, and then press OK again to accept the values. The Image Display then turns off.
Installing the software
The HP Photo & Imaging software allows you to unload images from the camera, view them, print them, and e-mail them. It also allows you to configure the Share menu on the camera.
See Chapter 4: Using hp instant share on page 58 for information about configuring the Share menu on the camera, and Chapter 5: Unloading and printing images on page 67 for information about connecting the camera to a computer or printer.
NOTE Copies of this User's Manual are also located on the HP Photo & Imaging software CD. Look in the \docs\Readme file on the CD to see where the manual in your language is located.
Windows
NOTE For the HP Instant Share component of the HP Photo & Imaging software to function properly on your Windows computer, you must have installed at least Internet Explorer 5.01 on Windows 2000 or XP, or Internet Explorer 5.01 Service Pack 2 on Windows 98, 98 SE, or Me.
1 Close all programs and temporarily disable any virus protection software running on your computer.
2 Insert the HP Photo & Imaging software CD into the CD drive of your computer. The installation window automatically appears.
NOTE If the installation window does not appear, click Start, and then click Run. Type X:\Setup.exe, where X is the letter of your CD drive.
3 Click Next, and then follow the on-screen instructions to install the software.
Your Windows CD may also include bonus software from other manufacturers. To install any bonus software:
1 Click Start, click Run, and in the Open box, type X:\Bonus\setup.exe (where X is the letter of your CD drive).
2 Click OK, and then follow the on-screen instructions to install the bonus software.
Macintosh
1 Close all programs and temporarily disable any virus protection software running on your computer.
2 Insert the HP Photo & Imaging software CD into the CD drive of your computer.
3 Double-click the CD icon on the computer desktop.
4 Double-click the installer icon, and then follow the on-screen instructions to install the software.
NOTE Before you can unload images from the camera to a Macintosh computer, you must first change the USB Configuration setting to Disk Drive in the Setup menu on the camera. See Chapter 6: Using the setup menu on page 71, and then see USB configuration on page 73.
Your Macintosh CD may also include bonus software from other manufacturers. To install any bonus software:
1 Double-click the Bonus folder icon.
2 Double-click the installer icon for the bonus software.
3 Follow the on-screen instructions to install the software.
Camera states and menus
Your camera has three main states that allow you to complete certain tasks. Each of these states has an associated menu you can use to adjust camera settings or perform tasks in that state.
- Capture—Allows you to take still pictures and record video clips. For information on using Capture, see Chapter 2: Taking pictures and recording video clips on page 23.
- Playback—Allows you to review the still images and video clips that you capture. For information on using Playback, see Chapter 3: Reviewing images and video clips on page 46.
- Share—Allows you to use the HP Instant Share technology to tag images in your camera to be automatically sent to a variety of destinations the next time you connect the camera to your computer. For information on using Share, see Chapter 4: Using hp instant share on page 58.
Your camera also has a fourth menu, the Setup menu, which allows you to adjust a number of camera settings. For information on this menu, see Chapter 6: Using the setup menu on page 71.
Chapter 2: Taking pictures and recording video clips
Taking still pictures
You can take a picture almost any time the camera is on, regardless of what is being shown on the Image Display. For example, if a menu is currently displayed when you press the Shutter button, the menu will be canceled, and the camera will take a picture.
To take a still picture:
1 Frame the subject for your picture in the viewfinder (see page 28).
2 Hold the camera steady and press the Shutter button halfway down. The camera measures and then locks the focus and exposure.
3 Press the Shutter button all the way down to take the picture. You will hear a shutter click when the camera takes the picture.

After the picture is taken, the image is displayed for several seconds in Instant Review on the Image Display. You can delete the image during Instant Review by pressing the OK button. You can use Playback to review the pictures you have taken. See Using playback on page 46.
NOTE The Power/Memory light will blink while the camera is saving images to the internal memory or to an optional memory card. Do not remove a memory card while this light is blinking, because it might corrupt the card.
Recording audio with still pictures
You can record audio clips that are attached to the still pictures you take.
The following procedure explains how to record an audio clip while you are taking a still picture. You can also record an audio clip later to attach to a still image by using the Record Audio menu option in the Playback menu. See Using the playback menu on page 49, and then see Record audio on page 53.
1 Press the Shutter button all the way down to take the picture.
2 Continue to hold the Shutter button down to start recording the audio clip. Instant Review remains on the Image Display, and a microphone icon and audio counter appear on the Image Display as well.
3 Release the Shutter button to stop recording audio.
NOTE You must hold the Shutter button down for longer than 2 seconds after the picture is taken to have the recorded audio saved. Otherwise, it is discarded.
Audio recording stops when you release the Shutter button or the camera runs out of memory, whichever comes first. After recording has stopped, the image is displayed for several seconds in Instant Review on the Image Display. You can delete the image and the audio clip that is attached to the image during Instant Review by pressing the OK button.
NOTE Because the camera does not have a speaker, you cannot hear audio clips when using Playback on the camera. Instead, you must use a television (TV) or computer to hear audio clips. If you have an optional HP 8886 camera dock, you can review the audio clips attached to your still images by connecting the camera to a TV via the camera dock. For information on how to do this, see the HP 8886 Camera Dock User's Manual that was included with your camera dock.
Recording video clips
NOTE Zoom does not work while recording video clips.
A video clip includes audio.
1 Frame the subject for your video in the viewfinder (see page 28).
2 Press and release the Video button to start recording video. The Video viewfinder light turns on solid red. If Live View is on
button to start recording video. The Video
viewfinder light turns on solid red. If Live View is on
when the camera starts recording, a video icon, REC, and a video counter appear on the Image Display. See Using live view on page 29.

3 Press and release the Video 📋 button again to stop recording video.
NOTE If you have set Self-Timer to On or On - 2 shots in the Capture menu (see page 38), the camera will start recording 10 seconds after you press the Video button. However, with the On - 2 shots setting, the camera only records one video clip.
The camera automatically stops recording when you press and release the Video button again or the camera runs out of memory, whichever comes first. After recording has stopped, the first frame of the video clip and Processing... appear on the Image Display. While it is processing, you can delete the video clip by pressing the OK button.
NOTE The quality of the video recorded and the amount of video that can be stored in memory will vary based on the current Image Quality setting in the Capture menu (see page 36). The default Best Image Quality setting will result in the highest quality video recordings, but will consume more memory. In contrast, the Better or Good Image Quality settings will result in reduced video quality, but will use less storage space in memory.
You can use Playback on the camera to review the video portion of the video clips you have recorded. See Using playback on page 46.
NOTE Because the camera does not have a speaker, you cannot hear the audio portion of video clips when using Playback on the camera. Instead, you must use a television (TV) or computer to hear the audio portion. If you have an optional HP 8886 camera dock, you can review the audio portion of your video clips by connecting the camera to a TV via the camera dock. For information on how to do this, see the HP 8886 Camera Dock User's Manual that was included with your camera dock.
Taking self-timer pictures
You can also take still pictures using the Self-Timer settings in the Capture menu.
1 Set Self-Timer to either On or On - 2 shots in the Capture menu. See Using the capture menu on page 35, and then see Self-timer on page 38.
2 Secure the camera to a tripod or set it on a stable surface.
3 Frame the subject for your picture in the viewfinder (see page 28).
4 Press the Shutter button halfway down. The camera measures and then locks the focus and exposure. The camera will hold these settings for the 10 seconds until it takes the picture.
NOTE If you immediately press the Shutter button all the way down instead, the camera locks focus and exposure just before the end of the 10-second countdown. This is useful when one or more subjects will be entering the picture during the 10-second countdown period.
5 Press the Shutter button all the way down. If Live View is on, a 10-second countdown appears on the Image Display. The Self-Timer light on the front of the camera blinks slowly for 7 seconds and then quickly for the final 3 seconds before the camera takes the picture. If you set Self-Timer to On - 2 shots, the Self-Timer light blinks for a few more seconds until the second picture is taken.
Using the viewfinder
The viewfinder has a circle and three lines superimposed on it. You can use the circle in the viewfinder to center most of the pictures you take and all of the video clips you record. The only time you should not use the circle to center a picture is when you are taking close-up pictures using the Macro Exposure Mode setting on the camera.

NOTE The Exposure Mode setting does not apply when you are recording video clips.
If you use the viewfinder to take close-up pictures in Macro Exposure Mode, parallax error can occur. (This means that some of the subject you see through the viewfinder will not actually appear in your captured image.) The lines above and below the circle in the viewfinder can help you correct for this.
1 Set Exposure Mode to Macro 🎨 in the Capture menu. See Using the capture menu on page 35, and then see Exposure mode on page 39.
2 Frame the entire subject for your close-up picture within the three lines in the viewfinder. Be sure that you line-up the upper-left corner of the picture using the parallax lines.
NOTE It is strongly recommended, however, that you use Live View on the Image Display (see the next section), instead of the viewfinder, when using the Macro 🎨 Exposure Mode setting. (Live View turns on automatically when you set the Exposure Mode to Macro 🎨.) Live View alleviates parallax error when you are using Macro 🎨.
Using live view
The Image Display allows you to frame pictures and video clips using Live View. To activate Live View on the Image Display, press the Live View button. To turn off Live View, press the Live View button again.
NOTE Using Live View consumes a lot of battery power. To conserve batteries, use the viewfinder instead.
The following table describes the information that is displayed in the Live View screen of the Image Display when the camera settings are at their default values and no memory card is installed in the camera.
NOTE If you change other camera settings or install a memory card in the camera, icons for those settings and an icon for the memory card will also be displayed in the Live View screen.

| # Icon Description | ||
| 1 |  | Image Quality setting (default is Best, which is indicated by the three stars) |
| 2 12 Pictures remaining that you can take and store in the internal memory (depends on how much space is remaining in internal memory) | ||
| 3 |  or or | —Battery level (actual icon shown depends on the state of your camera batteries; see Managing batteries on page 106)—AC power when using the optional HP AC power adapter or HP camera dock |
| 4 Focus brackets (see the next section, Using auto focus) | ||
Using auto focus
The circle in the viewfinder and the two brackets in the middle of the Live View screen show the focus region for the picture you are taking. (See Using the viewfinder on page 28 and Using live view on page 29.) When you press the Shutter button halfway down, the camera uses this focus region to automatically measure and then lock the focus.
The AF viewfinder light turns on solid green and the focus brackets in the Live View screen turn green when the image is in focus and the camera can lock the focus. However, the AF viewfinder light blinks green and the focus brackets in Live View turn red when the camera is unable to focus.
If the viewfinder light blinks and the focus brackets turn red, release the Shutter button, re-frame the subject for your picture, and then press the Shutter button halfway down again. If the viewfinder light continues to blink and the focus brackets continue to turn red after several tries, the lighting may be too low, or there may not be enough contrast in the focus region. Try using Focus Lock (see the next section).
NOTE When set to Macro 🎨 Exposure Mode, the camera will not take a picture if it cannot find focus.
Using focus lock
Focus Lock allows you to focus on a subject that is not in the center of the picture, or to capture action shots more quickly by pre-focusing in the area where action will occur. You can also use Focus Lock to help achieve focus in low lighting or low contrast situations.
1 Center the subject for your picture within the circle in the viewfinder or within the focus brackets in Live View. (See Using the viewfinder on page 28 and Using live view on page 29.)
2 Press the Shutter button halfway down to lock the focus and exposure.
3 Continue to hold the Shutter button halfway down while you re-frame or adjust your subject for proper positioning.
4 Press the Shutter button all the way down to take the picture.
Setting the flash
NOTE The flash does not work while recording video clips.
The Flash button lets you cycle through the flash settings on the camera. To change the flash setting, press the Flash button. The status screen appears on the Image Display with the flash setting highlighted. Continue to press the
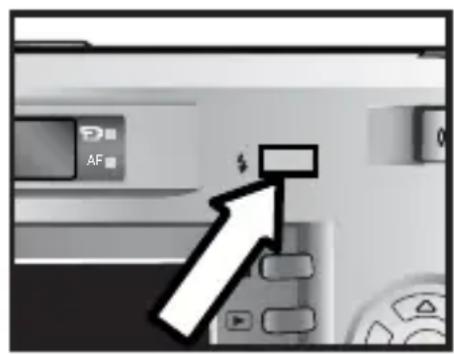
Flash button until the flash setting you want is displayed in the status screen.
Auto A is the default flash setting. The flash setting resets to Auto when you turn off the camera. The following table describes the flash settings.
| Icon Setting Description | |
| A↓ | Auto The camera measures the available light and fires the flash if necessary. |
| A↓ | Red-Eye The camera measures the available light and fires the flash with red-eye reduction if necessary. |
| ↓ | Flash On The camera always fires the flash. If the light is behind your subject, you can use this setting to increase the light on the front of your subject. (This is called "fill-flash.") |
| ∅ | Flash Off The camera will not fire the flash. |
| ∅ | Night The camera fires the flash with red-eye reduction to illuminate objects in the foreground. It then continues to expose as if the flash had not fired to gather the background. This setting only works when taking pictures of still objects. You may also want to use a tripod for better results. |
NOTE The red-eye phenomenon is caused by light from the flash reflecting off the blood vessels in the retinas of the subjects' eyes, which sometimes makes a human's or animal's eyes appear red in the captured image. When you set the flash to either Red-Eye A 4 or Night B 4 , the camera flashes twice, minimizing the red-eye in the captured images of humans or animals.
It will take longer to take a picture with either the Red-Eye A 4 or Night 📋 flash setting. The shutter is delayed because of the additional flash. In turn, make sure your subjects wait for the second flash.
Using zoom
NOTE Zoom does not work while recording video clips.
Optical zoom
NOTE Frequent or extended use of optical zoom consumes a lot of battery power and can drain your batteries quickly.
Optical zoom works like the zoom on a traditional film camera, with physical lens elements moving inside the camera to make the subject of your picture appear closer.
NOTE Press the Zoom Out 🔊 and Zoom In 🔊 controls on the Zoom lever to move the lens between wide angle and telephoto positions (1x to 3x).

Digital zoom
Unlike optical zoom, digital zoom uses no moving lens parts. The camera essentially crops the image, then uses interpolation to enlarge the image to give the appearance of the subject in the picture being from 1.25x to 4x closer.
1 Press the Live View 📷 button to turn on Live View.
2 Press the Zoom In ◆ control to optically zoom in to the maximum level, then release the control.
3 Press the Zoom In ♦ control again and hold it until you reach the desired size in the Image Display. A yellow cropping frame surrounds the area of the image that will be captured. The magnification is shown at the bottom of the screen.

4 When the cropping frame is at the right size, press the Shutter button to take the picture.
To turn digital zoom off and return to optical zoom, press the Zoom Out control until digital zooming stops. Release the control, and then press the control again. Digital zoom also automatically turns off when you exit Live View by pressing either the Live View button, Playback button, or Share button.
NOTE Digital zoom reduces the resolution of an image, so your picture will tend to be more pixilated than the same image taken with optical zoom. If you just intend to e-mail an image or post it to a website, this loss of resolution will not be noticeable. However, in situations where the highest quality counts (such as printing), do not use the digital zoom; instead, use the cropping tools in your image editing software to zero in on your subject. For better results when using digital zoom, you may also want to use a tripod to minimize camera shake.
Using the capture menu
The Capture menu allows you to adjust various camera settings that affect the traits of the images and video clips you capture with your camera, such as their exposure, color, and resolution.
1 To display the Capture menu, press the OK button at any time when the Image Display is turned off, or when Live View is turned on in the Image Display.


2 Use the ▲▼ buttons to scroll through the Capture menu options.
3 Either press the OK button to select a highlighted option and display its sub-menu, or use the ◀ buttons to change the setting for the highlighted option without going to its sub-menu.
4 Within a sub-menu, use the buttons and then the OK button to change the setting for the Capture menu option.
NOTE When you highlight a menu option within a sub-menu, a short Help description for that menu option is displayed at the bottom of the screen.
5 To exit the Capture menu, highlight the ← EXIT CAPTURE MENU option and press the OK button.
Help for the menu options
Help... is the last option in each of the Capture sub-menus. The Help... option provides information about that Capture menu option and its settings. For example, if you press OK when Help... is highlighted in the White Balance sub-menu, the White Balance Help screen is displayed, as

Use the buttons to scroll through the Help screens. To exit the Help and return to the particular Capture sub-menu, press the OK button.
Image quality
In the Capture menu (see page 35), if you press OK when the Image Quality option is highlighted, the Image Quality sub-menu displays. This sub-menu allows you to set the resolution and JPEG compression of your still images, as well as the compression of your video clips.

The Image Quality setting affects the quality of the still images and video clips that you capture with the camera. This setting also affects the amount of still images and video clips that can be stored either in the internal memory in the camera or on an optional memory card. For example, the default Best setting results in higher quality images and video clips, but consumes more storage space in memory, than the Better setting. Similarly, more still images and video clips can be stored in memory at the Good setting than at the Better setting.
NOTE The Pictures remaining: count for still images that is located at the bottom of the Image Quality screen updates when you highlight a new setting. For the approximate number of still images that can be stored in memory when the camera is set to the different Image Quality settings, see Memory capacity for still images on page 117.
The following table describes the Image Quality settings in relation to still images. The default setting is Best. The Image Quality setting remains set when you turn off the camera.
| Icon Setting Description | |
| ★ | Good Still images will be 640 by 480 resolution and have medium compression. This is the most memory-efficient setting, ideal for still images that you want to send via e-mail or post to the Internet. |
| ★★ | Better Still images will be full resolution and have medium compression. This setting produces high-quality still images and requires less memory than the Best setting. This is recommended for printing still images up to 12.7 by 17.8 cm (5 by 7 in). |
| ★★★ | Best Still images will be full resolution and have the lowest compression. This setting produces the highest-quality still images, but uses the most memory. This is recommended if you plan to enlarge still images, or print still images to a size of 18 by 24 cm (8 by 10 in) or larger. |
Self-timer
In the Capture menu (see page 35), if you press OK when the Self-Timer option is highlighted, the Self-Timer sub-menu displays. This sub-menu allows you to turn the self-timer on and off. When you set Self-Timer to either On or On - 2 shots, the
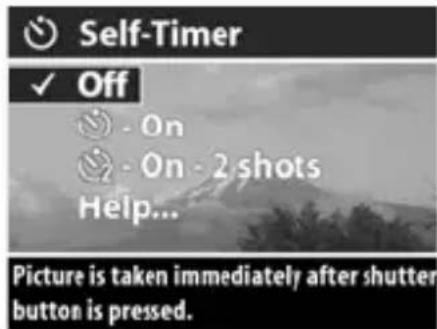
camera will take a picture 10 seconds after you press the Shutter button all the way down. If you set Self-Timer to On - 2 shots, the camera will also take a second picture about 2 seconds after the first picture is taken.
Self-Timer is good for situations where you need to minimize camera shake. For example, keeping the camera steady on a tripod for a long exposure is easier if you use Self-Timer.
You can also use Self-Timer when recording video clips. The camera will start recording video 10 seconds after you press the Video button. However, with the On - 2 shots setting, the camera only records one video clip.
The default Self-Timer setting is Off. The Self-Timer setting resets to Off after each picture is captured or video clip is recorded, and when you turn off the camera. For information on using Self-Timer, see Taking self-timer pictures on page 27, or Recording video clips on page 25.
EV compensation
In the Capture menu (see page 35), if you press OK when the EV Compensation option is highlighted, the EV Compensation screen displays. This screen allows you to change the exposure value (EV) that is used when capturing images and recording video clips.

In difficult lighting conditions, you can use EV Compensation to override the automatic exposure setting that the camera makes. EV Compensation settings range from -2.0 EV to reduce the exposure of the image or video clip (darkening it), to +2.0 EV to increase the exposure of the image or video clip (brightening it).
Use the ◆buttons to change the EV Compensation setting, then press OK. The default EV Compensation setting is 0.0 (zero). EV Compensation resets to the default 0.0 setting when you turn off the camera.
Exposure mode
NOTE The Exposure Mode setting does not apply when you are recording video clips.
In the Capture menu (see page 35), if you press OK when the Exposure Mode option is highlighted, the Exposure Mode sub-menu displays. The Exposure Mode setting determines how the camera selects the ISO speed, F-number (aperture), and shutter speed for the given scene brightness.

The default Exposure Mode setting is Auto. The Exposure Mode setting resets to Auto when you turn off the camera. The following table describes the Exposure Mode settings.
| Icon Setting Description | ||
| None | Auto The camera automatically selects an aperture and shutter speed. | |
 | Action The camera biases toward faster shutter speeds and higher ISO speeds to stop action. | |
 | Landscape The camera biases toward smaller apertures and lower ISO speeds for better depth of field and quality. | |
 | Portrait The camera biases toward wider apertures to blur the background. | |
 | Macro Use when taking close-up pictures of subjects between 0.1 to 0.8 m (2.5 to 32 in) away. | |
When you set the Exposure Mode to Action 🎥, Landscape ▲, or Portrait 🔒, the ISO Speed menu option is grayed-out in the Capture menu and the camera automatically selects the best ISO Speed setting.
When you set the Exposure Mode to Macro 🎨 to take close-up pictures, be sure to use Live View. (Live View turns on automatically.) Parallax error can occur at close range (which means that some of the subject you see through the viewfinder will not actually appear in your captured image), and Live View alleviates this problem while you are using the Macro 🎨 setting. If you want to use the viewfinder while using Macro 🎨 instead, see Using the viewfinder on page 28.
Finally, when set to Macro 🎨 Exposure Mode, the camera will not take a picture if it cannot find focus. In this case, both of the viewfinder lights blink green, and the focus brackets turn red in Live View. See Using auto focus on page 30.
White balance
In the Capture menu (see page 35), if you press OK when the White Balance option is highlighted, the White Balance sub-menu displays. In some cases, it may be necessary to pre-set the light source so the camera can reproduce colors more accurately and ensure that whites
appear white in the captured image. The setting in this sub-menu determines how the camera will adjust the colors in the image to match the scene illuminant.
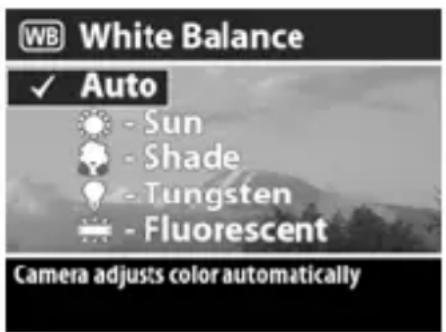
The default White Balance setting is Auto. The White Balance setting resets to Auto when you turn off the camera. Set the White Balance according to the situations explained in the following table.
| Icon Setting Description | |
| None Auto The camera automatically identifies and corrects for the scene illuminant. | |
 | Sun The camera balances color assuming it is outdoors under sunny or bright cloudy conditions. |
  | Shade The camera balances color assuming it is outdoors in shade, in dark cloudy conditions, or at dusk.Tungsten The camera balances color assuming incandescent or halogen lighting (typically found in homes). |
 | Fluorescent The camera balances color assuming cool or warm fluorescent lighting. |
ISO speed
NOTE The ISO Speed setting does not apply when you are recording video clips.
In the Capture menu (see page 35), if you press OK when the ISO Speed option is highlighted, the ISO Speed sub-menu displays. This sub-menu allows you to adjust the sensitivity of the camera to light.

Because lower ISO numbers allow slower shutter speeds, use the ISO 100 setting to capture higher quality images that have the least grain or “noise.” In contrast, because higher ISO numbers allow faster shutter speeds, use a higher ISO Speed setting when taking either pictures in dark areas without a flash, or pictures of fast moving objects. However, higher ISO speeds produce pictures with more grain or “noise” and, thus, can be of lower quality.
NOTE If you are taking a picture in low light conditions without a flash and have set the camera to ISO 100, you may want to use a tripod because of the resulting slow shutter speed.
The default ISO Speed setting is Auto, which allows the camera to pick the best ISO Speed for the scene. The ISO Speed setting resets to Auto when you turn off the camera.
NOTE When you set the Exposure Mode to Action ✗,
Landscape ▲, or Portrait 🚙, the ISO Speed menu option is grayed-out, and the camera automatically selects the best ISO Speed setting.
Color
In the Capture menu (see page 35), if you press OK when the Color option is highlighted, the Color sub-menu displays. This sub-menu allows you to set the color in which your images will be captured.

NOTE When you set Color to Sepia, your images will be captured in brown colors to make them look aged or old-fashioned.
NOTE Once you have taken a picture using either the Black & White or Sepia setting, the image cannot be adjusted back to Full Color later.
The default Color setting is Full Color. The Color setting resets to Full Color when you turn off the camera.
Saturation
In the Capture menu (see page 35), if you press OK when the Saturation option is highlighted, the Saturation sub-menu displays. This sub-menu allows you to set how saturated the colors will be in your captured images.
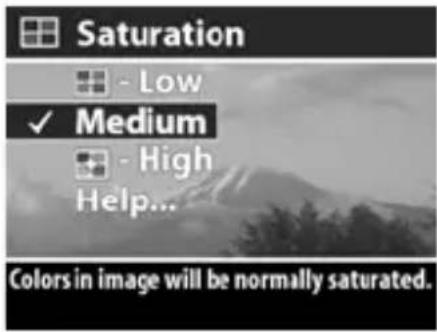
The following table describes the Saturation settings. The default setting is Medium. The Saturation setting remains set when you turn off the camera.
| Icon Setting Description | ||
 | Low The colors in your images will be more muted. | |
| None Medium The colors in your images will be normally saturated. | ||
 | High The colors in your images will be more vivid. | |
Sharpness
NOTE The Sharpness setting does not apply when you are recording video clips.
In the Capture menu (see page 35), if you press OK when the Sharpness option is highlighted, the Sharpness sub-menu displays. This sub-menu allows you to set how sharp the edges will be in your pictures.

The following table describes the Sharpness settings. The default setting is Medium. The Sharpness setting remains set when you turn off the camera.
| Icon Setting Description | ||
 | Low The edges in your images will be softer. | |
| None Medium The edges in your images will have normal sharpness. | ||
 | High The edges in your images will be more pronounced. | |
Setup
In the Capture menu (see page 35), if you press OK when the Setup option is highlighted, the Setup menu displays. See Chapter 6: Using the setup menu on page 71.
Chapter 3:
Reviewing images and video clips
Using playback
After you have taken pictures or recorded video clips, you can use Playback to review them.
1 Press the Playback ▶ button to activate Playback. The most recently taken or reviewed image or video clip appears on the Image Display.
NOTE Initially, you only see the first frame of each video clip, which is indicated by the Video icon. The video portion of a video clip will then play automatically after the first frame has been displayed for 2 seconds. To stop the clip while it is playing, press the button to move to the next image.
2 Use the ◀ buttons to scroll through your images and video clips. Press and hold the ◀ or ◀ button to scroll faster.
3 To turn off the Image Display after reviewing your images and video clips, press the Playback ▶ button again.
NOTE Because the camera does not have a speaker, you cannot hear audio clips that are attached to still images or the audio portion of video clips when using Playback on the camera. Instead, you must use a television (TV) or computer to hear audio. If you have an optional HP 8886 camera dock, you can review the audio by connecting the camera to a TV via the camera dock. For information on how to do this, see the HP 8886 Camera Dock User's Manual that was included with your camera dock.
The following table describes the information that you may see displayed for each image or video clip while in Playback.
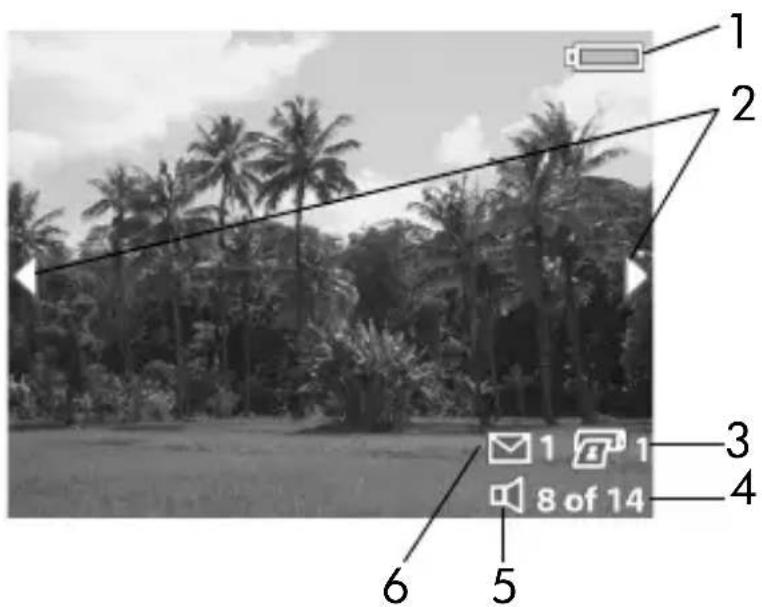
| # Icon Description | ||
| 1 |  | —Battery level (actual icon shown depends on the state of your camera batteries; see Managing batteries on page 106)—AC power when using the optional HP AC power adapter or HP camera dock |
| 2 | Displays for | the first few seconds when you enter Playback to indicate that you can scroll through all the images or video clips |
| 3 |  1 1 | Indicates this image has been tagged for direct printing one copy (see Tagging images for direct print on page 48), or does not display if it is a video clip |
| 4 | 8 of 14 | Shows the number of this image or video clip out of the total number of images and video clips in internal memory or on an optional memory card that is installed in the camera |
| 5 |  or or | —Indicates this image has an audio clip—Indicates this is a video clip |
| 6 |  | Indicates this image has one HP Instant Share destination selected (see Chapter 4: Using hp instant share on page 58), or does not display if it is a video clip |
Chapter 3: Reviewing images and video clips 47
Tagging images for direct print
The Print button on the back of the camera allows you to set how many copies of a still image you want to have printed automatically the next time you connect the camera directly to any HP Photosmart printer or to any other HP printer with a
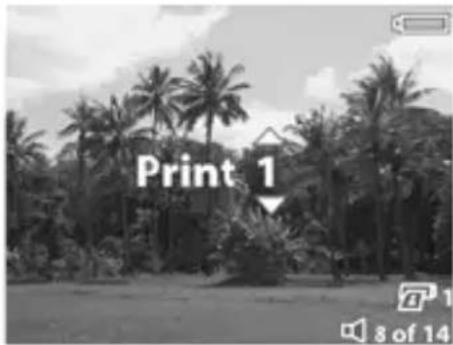
front panel USB port. The Print 📄 button is active any time that you see a still image displayed on the Image Display, such as during Playback, or when you access the main Playback menu or the Share menu. (See Using the playback menu on page 49 and Using the share menu on page 62.)
To tag a still image for direct print, press the Print button. Then use the buttons to set the number of copies you want to print. The printer icon with the number of copies that you set appears in the lower right-hand corner of the image. The maximum number of copies that you can set for a still image is 99. To print the still images that you have tagged via the Print button, see Printing images on page 69.
Using the playback menu
The Playback menu allows you to delete images and video clips, format an optional memory card, undelete images, record audio clips to attach to images, view thumbnails of the images and first frames of video clips, magnify an image on the Image Display, or rotate an image. From the Playback menu, you can also access the Setup menu to configure a number of preferences on the camera.
1 To display the Playback menu, press the OK button while you are in Playback. If you are not currently in Playback, press the Playback ▶ button first, then press the OK button.
2 Use the buttons to move to the image or video clip you want to use.
3 Use the buttons to highlight the menu options on the left of the Image Display. Select a highlighted option by pressing the OK button.
NOTE While a Playback menu option is highlighted, you can use the ◀buttons to scroll to other images and video clips. This is useful for performing the same action on several images or video clips, such as deleting multiple images or video clips.
4 To exit the Playback menu and return to viewing images in Playback, highlight the ← EXIT PLAYBACK MENU option and press the OK button.
The following table summarizes each of the Playback menu options and describes the information in the bottom right corner of each image while the Playback menu is displayed.
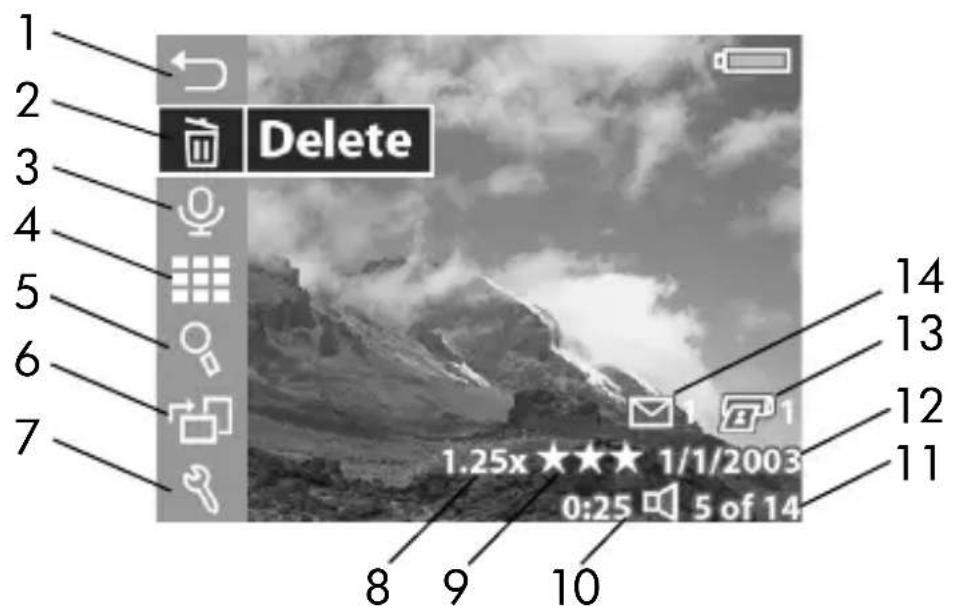
| # Icon Description | |
| 1 Exits the Playback menu | |
| 2 Provides options to either delete this image or video clip, delete all images and video clips, format the internal memory or an optional memory card, or undelete images | |
| 3 Records an audio clip to attach to this image (not available for video clips) | |
| 4 Displays all of the images and the first frames of video clips as thumbnails | |
| 5 Magnifies this image from 1.3x to 6x (not available for video clips) | |
| 6 Rotates this image automatically 90 degrees clockwise (not available for video clips) |
| # Icon Description | ||
| 7 | [6YT] | D i s p to configure a number of preferences on the camera |
| 8 | 1.25x | Shows that this image was digitally zoomed in to a particular magnification level (to the level of 1.25x in this example), or does not display if it is a video clip |
| 9 |  | Shows the Image Quality setting (such as the 3 stars for Best Image Quality) for this image, or does not display if it is a video clip |
| 10 |  | Visible if this image has an audio clip attached to it, with the length of the audio clip displayed to the left of the iconVisible if this is a video clip, with the length of the video clip displayed to the left of the icon |
| 11 |  | Shows the number of this image or video clip out of the total number of images and video clips in internal memory or on an optional memory card that is installed in the camera |
| 12 | date Shows | the date that either this image was captured or this video clip was recorded |
| 13 | [TGWS] 1 | Indicates this image has been tagged for direct printing of one copy (see Tagging images for direct print on page 48), or does not display if it is a video clip |
| 14 |  1 1 | Indicates this image has one HP Instant Share destination selected (see Chapter 4: Using hp instant share on page 58), or does not display if it is a video clip |
Chapter 3: Reviewing images and video clips 51
Delete
In the Playback menu (see page 49), if you press OK when the Delete option is highlighted, the Delete sub-menu displays, which lists several options:
- Cancel—Returns you to the Playback menu.
- This Image—Deletes the currently displayed image or video clip.
- All Images on Card/in Memory—Deletes all of the images and video clips either on the optional memory card that is installed or in internal memory.
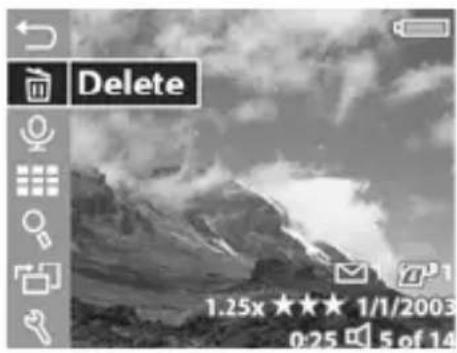

- Format Card/Memory—Deletes all of the images, video clips, and files either on the optional memory card that is installed or in internal memory, and then formats the memory card or internal memory.
- Undelete—Restores all recoverable images and video clips that were deleted during the most recent delete operation. Images and video clips are permanently deleted and unrecoverable when any of the following occurs:
- a new still image is taken or video clip is recorded
- another image or video clip is deleted
• the camera is turned off and turned on again
• the camera is connected to a computer
Use the buttons to highlight an option, and then press the OK button to select it.
Record audio
NOTE You cannot select this option if a video clip is currently displayed.
In the Playback menu (see page 49), if you press OK when the Record Audio option is highlighted, you can record an audio clip that will be attached to the currently displayed image. You can use the Record Audio option as many times as you wish to re-record an audio clip that will be attached to a still image.

If the image has no audio clip attached, audio recording starts immediately after you select this menu option. A microphone 🔒 icon and audio counter are displayed during recording. Audio recording stops when you press the OK button or the camera runs out of memory, whichever comes first.
If there is an audio clip already attached to this image, then the Record Audio sub-menu displays, which lists several options:

- Keep Current Clip—Returns you to the Playback menu.
- Record New Clip—Audio recording starts immediately as described above. The current audio clip is overwritten by the new recording.
- Delete Clip—The current audio clip is deleted, and you return to the Playback menu.
NOTE You can also record audio by continuing to hold down the Shutter button after taking a picture. See Recording audio with still pictures on page 24.
Chapter 3: Reviewing images and video clips 53
NOTE Because the camera does not have a speaker, you cannot hear audio clips when using Playback on the camera. Instead, you must use a television (TV) or computer to hear audio clips. If you have an optional HP 8886 camera dock, you can review the audio clips attached to your still images by connecting the camera to a TV via the camera dock. For information on how to do this, see the HP 8886 Camera Dock User's Manual that was included with your camera dock.
View thumbnails
In the Playback menu (see page 49), if you press OK when the View Thumbnails option is highlighted, the thumbnail view is displayed. Nine thumbnails of images and video clips are shown at a time in this view.
Use the ◆buttons to scroll horizontally, or the ▶buttons to scroll vertically, through all of the thumbnails of images and video clips. On the bottom left-hand corner of each thumbnail, a Share email ico signifies that the image is tagged for one or more HP Instant Share destinations, and a printer icon signifies that it is tagged for direct print. On the bottom right-hand corner of the thumbnail, a Video icon signifies that this is a video clip, and an Audio icon signifies that an audio clip is attached to this still image.
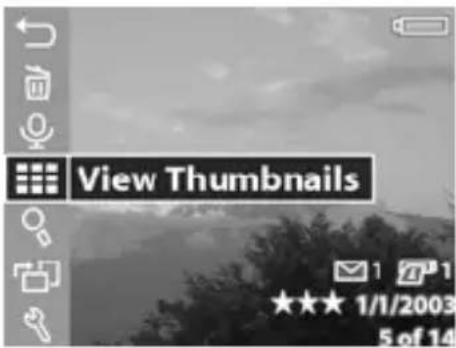
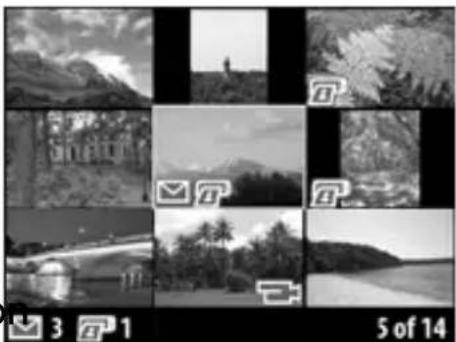
A yellow border highlights the currently selected image or video clip. The number of Share destinations and direct print copies, if any, for the currently selected image is shown in the bottom left-hand corner of the screen next to the Share icon and printer icon, respectively. The number of the currently selected image or video clip out of the total number of images and video clips in memory is shown in the bottom right-hand corner of the screen. Likewise, the Audio icon and audio clip length or Video icon and video clip length are shown if those apply.
To exit the View Thumbnails screen, press the OK button. The currently selected image or video clip is displayed in full view.
Magnify
In the Playback menu (see page 49), if you press OK when the Magnify option is highlighted, the currently displayed image is automatically magnified. This option is only for viewing a magnified image on the Image Display; it does not permanently alter the image.
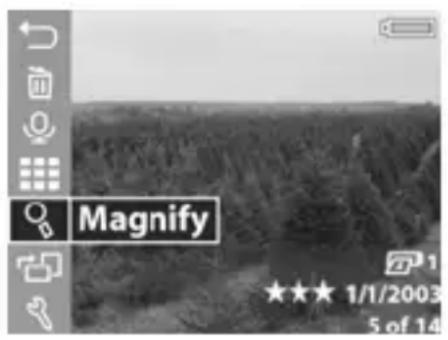
NOTE You cannot select this option if a video clip is currently displayed.
Selecting this option magnifies the image 3x. The center portion of the magnified image is displayed along with four arrows, which indicate that you can pan around the magnified image by pressing the and

buttons.
You can also use the Zoom controls to increase or decrease the magnification. Pressing the Zoom Out control will gradually zoom out to 1.3x magnification, and pressing the Zoom In control will gradually zoom in to 6x magnification.
To exit the magnified image and return to the Playback menu, press the OK button.
Rotate
NOTE You cannot select this option if a video clip is currently displayed.
In the Playback menu (see page 49), if you press OK when the Rotate option is highlighted, the currently displayed image is automatically rotated 90 degrees clockwise. If you continue to press OK with Rotate highlighted, the image will continue to be rotated.
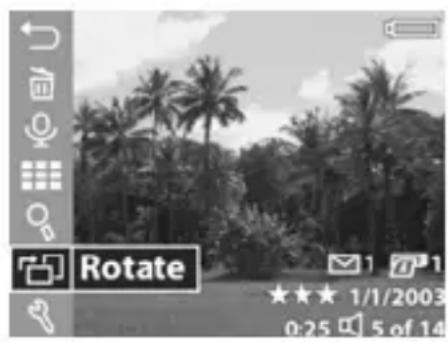
The rotated image is not saved until you exit the Rotate menu option by pressing either the or button to move to another Playback menu option, or any button that causes you to exit the Playback menu.
NOTE If you select this option for an image that was previously rotated, the image will be rotated again.
Setup
In the Playback menu (see page 49), if you press OK when the Setup option is highlighted, the Setup menu displays. See Chapter 6: Using the setup menu on page 71.

Chapter 4:
Using hp instant share
This camera has an exciting feature called HP Instant Share. This feature allows you to easily tag images in your camera to be automatically sent to a variety of destinations the next time you connect the camera to your computer. For example, you can tag images in your camera to be automatically sent to e-mail addresses (including group distribution lists), online albums, or other destinations the next time you connect the camera to your computer.
Once you have taken still pictures with your camera, using HP Instant Share is as easy as 1-2-3!
1 Set up the Share menu on your camera, as explained in the next section starting on page 59.
2 Use the Share menu to tag images in your camera for particular HP Instant Share destinations. First see Using the share menu on page 62, and then see Tagging images for hp instant share destinations on page 63.
3 Connect the camera to your computer and unload the images as explained in Unloading to a computer on page 67. Once the images are unloaded to your computer, they will be automatically sent to their respective HP Instant Share destinations.
NOTE Visit www.hp.com/go/instantshare to see HP Instant Share in action.
Setting up the share menu on the camera
Before you can use HP Instant Share, you must first set up the Share menu on your camera. The following procedure explains how to do this.
NOTE You will need an Internet connection to complete this procedure on a Windows computer.
1 Turn on the camera, and then press the HP Instant Share (Share) 📋 button on the back of the camera. A message appears on the Image Display asking you to connect the camera to your computer.
NOTE If your computer is running Windows XP, when you connect the camera to your computer in the next step, a dialog box may display that requests you to Select the program to launch for this action. Simply click on Cancel to close this dialog box.
2 Connect the camera to your computer by using the USB cable or an optional HP 8886 camera dock. This activates the Camera Share Menu Setup Wizard.
NOTE If you have a memory card installed in your camera, make sure that it is not locked and that it has some free space on it in order for the computer to recognize the camera from the Camera Share Menu Setup Wizard.
3 In the first window, click on either Retrieve from Camera on a Windows computer, or Next on a Macintosh computer.
4 You will first set up HP Instant Share E-mail for the Share menu on your camera. In the screen called Modify Share Menu:
- On Windows, check to see that HP Instant Share E-mail is visible above the Add... button, then click on the Add... button.
- On Macintosh, click on the Add... button.
5 If you are using a:
- Windows computer, you will be asked to sign in to HP's Passport program. HP Passport allows you to create a secure account for the images you share using HP Instant Share services. The first time you see this screen, you will need to register as a new user. Follow the instructions on the screen to register.
- Macintosh computer, add the e-mail addresses you want. Then skip to step 7.
6 Once you are successfully registered, sign in to HP Passport, and then the HP Instant Share E-mail Setup screen will appear. Here you can either enter individual e-mail addresses or create group distribution lists, and specify how you want them to appear in the camera's Share menu. You can also enter a subject and message to go with all e-mails that will be sent to each e-mail address or distribution list. After completing the form, click Next. In the confirmation screen that appears, click Finish.
7 The names you specified for your newly added e-mail destinations or group distribution lists should now appear in the Modify Share Menu screen (in the Current Share Menu section). To add additional e-mail addresses or distribution lists to the camera Share menu, repeat steps 4-6 on Windows, or steps 4-5 on Macintosh. If you are using a Windows computer, you will not need to sign in to the HP Passport program again.
NOTE You can configure a maximum of 31 Share destinations (such as individual e-mail addresses or group distribution lists) that can be listed in the Share menu on your camera.
8 Select any other HP Instant Share destinations that you would like to add to your camera's Share menu from the Modify Share Menu screen. Complete the forms for those other destinations. After completing each form, click Next. In the confirmation screen that appears, click Finish.
9 When you have finished adding HP Instant Share destinations, click on either Save to Camera on a Windows computer or Next on a Macintosh computer. The new destinations are then saved to the camera's Share menu. When the computer confirms they have been saved to your camera, disconnect the camera from the computer.
Using the share menu
Once you have set up the Share menu on the camera (see page 59), you can now use the Share menu. When you press the Share 📧 button on the camera, the most recently taken or viewed image appears on the Image Display. The Share menu also displays on the right side of the screen. The following table describes each of the Share menu options as shown in the following example Share screen.
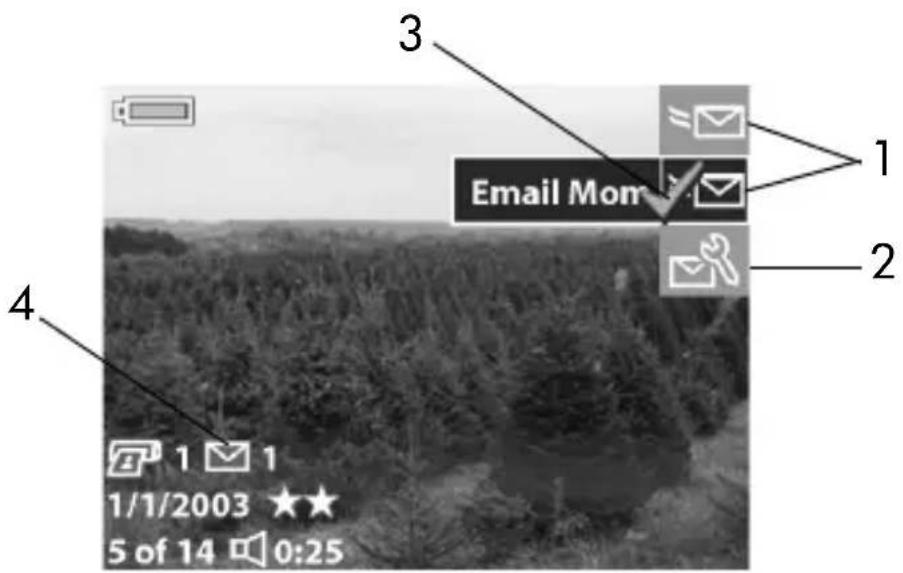
| # Icon Description | ||
| 1 E-mail destinations that were set up in this example Share menu. | ||
| 2 |  | Customize this menu... lets you add more e-mail and other HP Instant Share destinations to the Share menu. (See Customizing the share menu on page 65.) |
| 3 Check mark indicates this destination has been selected for the currently displayed image. (You can select more than one destination per image.) | ||
| 4 |  1 1 | Indicates that this image has one HP Instant Share destination selected for it. |
62 hp photosmart 630 series user's manual
Tagging images for hp instant share destinations
NOTE You can tag each still image for any number of HP Instant Share destinations. However, you cannot tag video clips for any HP Instant Share destinations.
1 Turn on the camera, and then press the Share ✉ button.
2 Use the buttons to scroll to a still image for which you want to select an HP Instant Share destination.
3 Use the buttons to scroll to the destination that you want to select in the Share menu for this image, such as an e-mail destination.
4 Press the OK button to select the destination, and a √ appears over that destination in the Share menu. To unselect the destination, press the OK button again.
5 Repeat steps 3 and 4 to select any other HP Instant Share destinations for this image.
6 Scroll to other images by using the ◀ buttons, and repeat steps 3 through 5 to select HP Instant Share destinations for each of the other images. You can also use the ◀ buttons to scroll to other images to review their destinations.
7 When you are finished selecting all of the HP Instant Share destinations for your images, press the Share ✉ button again to exit the Share menu.
8 Connect the camera to your computer and unload the images as explained in Unloading to a computer on page 67. Once the images are unloaded to your computer, they will be automatically sent to their respective HP Instant Share destinations.
How hp instant share e-mails images
The way images are e-mailed via HP Instant Share works differently on Windows and Macintosh computers.
Windows
Images are not e-mailed as attachments. Rather, a message is sent to each e-mail address or group distribution list that you selected in the Share menu. The message contains thumbnail images of the photos that you selected, as well as a link to a web page where the recipient can view the images. From that web page, the recipient can do things like reply to you, print the images, save the images to a computer, forward the images, and more. This makes it easy for people who use different e-mail programs to be able to see your images without the burden of handling e-mail attachments.
Macintosh
NOTE If you are using a Macintosh computer, you must have an active Internet e-mail account that is accessible when e-mailing any images that you selected for HP Instant Share e-mail destinations.
Images are e-mailed as attachments directly to recipients using the default e-mail program on your computer.
Customizing the share menu
The last option in the Share menu is Customize this menu... 📋. This menu option allows you to add more e-mail and other HP Instant Share destinations to the Share menu on your camera.
1 Use the ▼ button to highlight Customize this menu... 📋, and then press the OK button. A message on the Image Display appears asking you to connect the camera to your computer.
NOTE If your computer is running Windows XP, when you connect the camera to your computer in the next step, a dialog box may display that requests you to Select the program to launch for this action. Simply click on Cancel to close this dialog box.
2 Connect the camera to your computer by using the USB cable or an optional HP 8886 camera dock. This activates the Camera Share Menu Setup Wizard.
NOTE If you have a memory card installed in your camera, make sure that it is not locked and that it has some free space on it in order for the computer to recognize the camera from the Camera Share Menu Setup Wizard.
3 In the first window, click on either Retrieve from Camera on a Windows computer, or Next on a Macintosh computer.
4 Add any e-mail or other HP Instant Share destinations that you would like to add to your camera's Share menu from the Modify Share Menu screen. Complete the forms for those destinations. After completing each form, click Next. In the confirmation screen that appears, click Finish.
NOTE You can configure a maximum of 31 Share destinations (such as individual e-mail addresses or group distribution lists) that can be listed in the Share menu on your camera.
5 When you have finished adding e-mail and other HP Instant Share destinations, click on either Save to Camera on a Windows computer or Next on a Macintosh computer. The new destinations are then saved to the camera's Share menu. When the computer confirms they have been saved to your camera, disconnect the camera from the computer.
Chapter 5: Unloading and printing images
Once you have taken pictures, you can unload them from your camera to a computer or print them directly to a printer, as explained in this chapter.
NOTE You can also use the optional HP 8886 camera dock to unload images to a computer or print them directly to a printer, as well as display them on a television. See the HP 8886 Camera Dock User's Manual that was included with your camera dock.
Unloading to a computer
NOTE If you are using a Macintosh computer, you must first change the USB Configuration setting to Disk Drive in the Setup menu. (See Chapter 6: Using the setup menu on page 71, then USB configuration on page 73.)
1 Turn off the camera.
2 Your camera came with a special USB cable for connecting the camera to a computer. Connect the larger end of that USB cable to the computer.
3 Open the rubber door on the side of the camera and connect the small end of the USB cable to the USB connector on the camera.

NOTE If your computer is running Windows XP, when you turn on the camera in the next step, a dialog box may display that requests you to Select the program to launch for this action. Simply click on Cancel to close this dialog box.
4 Turn on the camera. The HP Image Unload software will launch on your computer. If you have set the software to automatically unload the images in the camera, the images will automatically unload to the computer. Otherwise, in the Welcome screen, click Start Unload.
Also, if there were any images in the camera that were tagged in the Share menu for HP Instant Share destinations (see Chapter 4: Using hp instant share on page 58), those images will be sent to their respective destinations after the images have been unloaded to the computer.
5 When the unload screen on the computer says Finished, your images have been saved and shared. You can now disconnect the camera from the computer.
NOTE To unload images to a computer that does not have the HP Photo & Imaging software installed on it, change the USB Configuration setting to Disk Drive in the Setup menu. (See Chapter 6: Using the setup menu on page 71, and then see USB configuration on page 73.) The Disk Drive setting allows the computer to recognize the camera as another disk drive on the computer so that you can easily copy the image files from the camera to the hard drive of your computer.
However, if you want to use the Disk Drive setting on your camera to unload images to a computer that is running Windows 98, you must first install the HP Photo & Imaging software on the computer.
Printing images
To print images that have been unloaded to the computer, you can use the HP Photo & Imaging software that was shipped with the camera.
You can also connect the camera directly to any HP Photosmart printer or to any other HP printer with a front panel USB port, then print either all images in the camera, or those images you have tagged for direct print via the Print button on the camera. (For information on how to use the Print button, see Tagging images for direct print on page 48.)
To print directly to an HP Photosmart printer or to any other HP printer with a front panel USB port:
1 Turn on the camera. 2 Check that the printer is turned on and is online. (There should be no blinking lights on the printer or printer error messages displayed.) Load paper into the printer, if needed.
3 Your camera came with a special USB cable for connecting the camera directly to a printer. Connect the square end of the USB cable to the printer.
4 Open the rubber door on the side of the camera and connect the small end of the USB cable to the USB connector on the camera.

The Print Setup menu displays on the camera. If you already tagged images to print via the camera Print button, the number of images selected will be shown, as in this example Print Setup menu. Otherwise, Images: ALL will be displayed.

5 Adjust the settings in the Print Setup menu by using the
buttons to highlight a menu option and the buttons to change the setting for each option.
NOTE There is a print preview in the lower right-hand corner of the Print Setup screen showing the page layout that will be used for printing images. This print preview updates as you change the settings for the Print Size and Paper Size.
6 Press the OK button to begin printing.
Chapter 6: Using the setup menu
The Setup menu allows you to adjust a number of camera settings, such as the date and time, and the configuration of the USB or TV connection. You can access the Setup menu from either the Capture or Playback menu.
1 To display the Setup menu, open either the Capture or Playback menu and use the buttons to highlight the Setup menu option. (For information about these other menus, see Using the capture menu on page 35, or Using the playback menu on page 49.) Then press the OK button.

2 Use the ▲▼ buttons to scroll through the Setup menu options.
3 Press the OK button to select a highlighted option and display its sub-menu or screen.
4 Within a sub-menu, use the ▲▼ buttons and the OK button to change the setting for the Setup menu option.
5 To exit the Setup menu and return to the Capture menu or Playback menu, highlight the ← EXIT SETUP MENU option and press the OK button.
Camera sounds
Camera sounds are the sounds that the camera makes when you press a button or take a picture. Camera sounds are not the audio sounds recorded with still images or video clips.
In the Setup menu (see page 71), if you press OK when the Camera Sounds option is highlighted, the Camera Sounds sub-menu displays. This sub-menu allows you to turn camera sounds off and on.
The default Camera Sounds setting is On.

Date & time
In the Setup menu (see page 71), if you press OK when the Date & Time option is highlighted, the Date & Time screen displays. This screen allows you to set the current date and time, as well as the date/time format, for the camera. This is
usually done when you first set up the camera; however, you may need to re-set the date and time when you are travelling to different time zones, or when the batteries are removed from the camera for more than 10 minutes.

To set the current date and time, as well as the date/time format, for the camera:
1 Adjust the value of the highlighted selection by using the ▲▼ buttons.
2 Press the buttons to move to the other selections.
Repeat steps 1 and 2 until the correct date, time, and date/time format are set.
NOTE In the date/time format, mm=month, dd=day, and yyyy=year.
3 Press the OK button when the proper values are entered.
USB configuration
In the Setup menu (see page 71), if you press OK when the USB option is highlighted, the USB Configuration sub-menu displays. This sub-menu determines how the camera is recognized when connected to a computer.
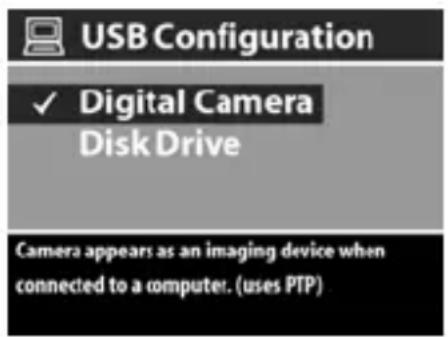
- Digital Camera—Causes the computer to recognize the camera as a digital camera using the Picture Transfer Protocol (PTP) standard. This is the default setting on the camera. Use this setting for unloading and sharing on a Windows computer that has the HP Photo & Imaging software installed on it.
- Disk Drive—Causes the computer to recognize the camera as a disk drive using the Mass Storage Device Class (MSDC) standard. Use this setting for unloading and sharing on a Macintosh computer, or on a Windows computer that does not have the HP Photo & Imaging software installed on it.
NOTE You cannot use the Disk Drive setting on the camera to unload images to a computer running Windows 98 without having installed the HP Photo & Imaging software on the computer.
TV configuration
In the Setup menu (see page 71), if you press OK when the TV option is highlighted, the TV Configuration sub-menu displays. This sub-menu allows you to set the format of the video out signal for displaying camera images on a television (TV) that is connected to the camera with an optional HP 8886 camera dock.

• NTSC—Format used primarily in North America and Japan
• PAL—Format used primarily in Europe
The default setting depends on the language that you selected when you powered on the camera for the first time.
For more information on connecting the camera to a TV, see the HP 8886 Camera Dock User's Manual.
Language
In the Setup menu (see page 71), if you press OK when the Language option is highlighted, the Language sub-menu displays. This sub-menu allows you to set the language used in the camera interface, including the text in menus and on the Image Display.

The default Language setting is English.
To set the language on the camera:
1 Scroll to the language that you want by using the ▲▼ buttons.
2 Press the OK button to select the highlighted language.
Move images to card
The Move Images to Card option appears in the Setup menu if an optional memory card is installed in the camera and the internal memory contains at least one image.
In the Setup menu (see page 71), if you press OK when the Move Images to Card option is highlighted and there is room to move all internal files to the memory card, a confirmation screen appears explaining that. If only some of the images will fit, then a confirmation screen appears explaining how many images in internal memory can be moved to the memory card. If no images can be moved to the memory card, then the screen displays CARD FULL.
During the move, a progress bar is shown. Once the move is complete, you return to the main Setup menu.
Chapter 7:
Troubleshooting and support
Problems and solutions
NOTE If you still cannot solve your problem after reviewing the troubleshooting information provided in the following table, you can run diagnostic tests on your camera to try to isolate and solve the problem yourself. The diagnostic tests for the HP Photosmart 630 series digital camera with HP Instant Share are provided on the following website: www.hp.com/support.
| Problem Possible cause Solution | ||
| The camera does not turn on. | The batteries are functioning incorrectly, are drained, are installed incorrectly, or are missing. | The charge in the batteries can be low or completely drained. Try installing new or recharged batteries.Ensure that the batteries are inserted correctly.Do not use ordinary alkaline batteries. For best results, use photo-lithium batteries or rechargeable NiMH batteries. If you must use alkaline batteries, use high-grade “ultra” or “premium” varieties. |
| The camera does not turn on. (continued) | The HP AC power adapter is not connected to the camera, or is not plugged into a power outlet. | Ensure that the HP AC power adapter is connected to the camera and is plugged into a working electrical outlet. |
| The HP AC power adapter is not functioning correctly. | Ensure that the HP AC power adapter is not damaged or defective and is plugged into a working electrical outlet. | |
| The optional memory card is not a supported card or is corrupted. | Ensure that the memory card is the proper type for your camera (see Purchasing camera accessories on page 110). If the card is the proper type, try formatting it (see the Format option in the Delete sub-menu on page 52). If the card will not format, it is probably corrupted. Replace the memory card. | |
| The wrong date and/or time is shown. | The batteries were drained or were removed from the camera for too long. | The date and time will be maintained for about 10 minutes without charged batteries installed. Reset the date and time by using the Date & Time option in the Setup menu. (See Date & time on page 72.) |
| I replace the camera batteries frequently. | Extended Image Display use for Live View or video recording, excessive flash use, and excessive zooming consume a lot of battery power. | Minimize the use of Live View and video, especially if using alkaline batteries. Also use the flash and zoom only when necessary.Use an HP AC power adapter to power the camera when you are using the Image Display for an extended period of time, or use the viewfinder instead of the Image Display whenever possible.Do not use ordinary alkaline batteries. For best results, use photo-lithium batteries or rechargeable NiMH batteries. If you must use alkaline batteries, use high-grade “ultra” or “premium” varieties. |
| The NiMH batteries you are using were recharged incorrectly, or have drained on their own because they have not been used lately. | When NiMH batteries are brand new or have not been used in several months, they should be charged and fully drained 3-4 times to reach optimum capacity. Also, NiMH batteries discharge on their own when not in use and when not installed in the camera. So if you have not used them in a week or more, they may benefit from being charged. | |
| The camera batteries will not charge. | Rechargeable batteries are not inserted. | Install NiMH batteries. Lithium and alkaline batteries cannot be recharged. |
| Batteries are already charged. | Battery charging will not start if the batteries were recently charged. Try charging them again after they have drained awhile. | |
| Battery voltage is too low for charging to start. | The camera will not attempt to charge batteries that may be damaged or over-discharged. Remove the batteries from the camera and charge them in an external battery charger, then try them in the camera again. If this does not work, it is likely that one or more of the batteries are bad. Purchase new NiMH batteries and try again. | |
| The wrong AC power adapter is being used. | Use only the HP AC power adapter approved for use with this camera. (See Purchasing camera accessories on page 110.) | |
| The batteries are damaged or bad. | NiMH batteries degrade over time and can fail. If the camera detects a problem with the batteries, it will not start charging or will stop charging prematurely. Purchase new batteries. | |
| The Power/Memory light blinks as if the batteries are being recharged, but there are no batteries installed. | The camera does not recognize that there are no batteries installed. | Do nothing. The blinking is harmless and should stop after 5-30 minutes. |
| The battery level indicator is erratic. For example, the level goes down quickly then goes back up. | You are using high-power camera modes followed by lower-power camera modes, or you are using partially discharged batteries that have not been used for awhile. | This behavior is not uncommon when you switch between operating modes that require more power, such as Live View or video, and operating modes that require less power, such as Playback. In this case, do nothing.The battery level indicator may also go down quickly if you are using the camera with partially discharged batteries that have not been used for awhile. In this case, replace or recharge the batteries when they are fully drained. |
| Problem Possible cause Solution | ||
| The camera does not respond when I press a button. | The camera is turned off or has shut down. | Turn on the camera, or turn it off and then on again. |
| The camera is connected to a computer. | Most of the camera buttons, except for the ▶ ON/OFF switch, do not respond when the camera is connected to a computer. If they respond, it is only to turn on the Image Display if it is off, or, in some cases, turn off the Image Display if it is on. | |
| The batteries are drained. | Replace or recharge the batteries. | |
| The optional memory card is not a supported card or is corrupted. | Ensure that the memory card is the proper type for your camera (see Purchasing camera accessories on page 110). If the card is the proper type, try formatting it (see the Format option in the Delete sub-menu on page 52). If the card will not format, it is probably corrupted. Replace the memory card. | |
| The camera has stopped operating. | Press the Reset switch to reset the camera. See Resetting the camera on page 86. | |
| Problem Possible cause Solution | ||
| The camera does not take a picture when I press the Shutter button. | You did not press the Shutter button hard enough. | Press the Shutter button all the way down. |
| The optional memory card is full. | Unload images from the camera to your computer, then delete all images on the memory card. Or replace the card with a new one. | |
| The optional memory card is locked. | Switch the locking tab on the memory card to the unlocked position. | |
| The flash is recharging. | Wait until the flash has recharged before taking another picture. | |
| The camera is set to Macro Exposure Mode in the Capture menu, but the focus is outside the macro (close-up) range. | Re-focus the camera so that it is within the macro (close-up) range. (See the range for the Macro setting in Exposure mode on page 39.) | |
| The camera is still saving the last picture you took. | Wait a few seconds for the camera to finish processing the last image before taking another picture. | |
| A long delay occurs between pressing the Shutter button and the camera taking a picture. | The camera needs time to lock focus and exposure. | Use Focus Lock. (See Using focus lock on page 31.) |
| The camera is taking a long exposure. | Use a tripod or the flash. | |
| The camera is set to either the Red-Eye or Night flash setting. | It will take longer to take a picture with either the Red-Eye or Night flash setting. The shutter is delayed because of the additional flash. In turn, make sure your subjects wait for the second flash. | |
| My image is too bright. | The flash provided too much light. | Use the Flash Off setting (see page 31). |
| You were too close to the subject to use the flash. | Move back from the subject or use the Flash Off setting (see page 31), and take the picture again. | |
| A natural or artificial source other than the flash provided too much light. | Try taking the picture from a different angle. Avoid pointing the camera directly toward a bright light or reflective surface on a sunny day. Try adjusting the Exposure Compensation (see page 39). | |
| The scene had many dark objects, such as a black dog on a black couch. | Decrease the Exposure Compensation (see page 39) so the dark objects in the scene will not look “washed-out.” | |
| My image is too dark. | There was not enough light. | Wait for natural lighting conditions to improve, add indirect lighting, use the flash (see page 31), or adjust the Exposure Compensation (see page 39). |
| The flash was on, but the subject was too far away. | Make sure your subject is within the flash working distance (see Appendix B: Specifications on page 112). If your subject is outside the flash working distance, try using the Flash Off setting (see page 31), which will require a longer exposure. | |
| A light shone behind the subject. | Use the Flash On setting (see page 31) to brighten the subject, or adjust the Exposure Compensation (see page 39). | |
| Your finger blocked the flash. | Be sure to move your fingers away from the flash when you take a picture. | |
| The scene had many light-colored objects, such as a white dog in snow. | Increase the Exposure Compensation (see page 39) so the light-colored objects in the scene will not look “muddy.” | |
| My image is blurry. | You moved the camera while you took the picture. | Hold the camera steady as you press the Shutter button or use a tripod. |
| The light is low and the flash is set to Flash Off. | In dim light, the camera requires a longer exposure. Use a tripod to hold the camera steady, improve lighting conditions, or set the flash to Flash On (see page 31). | |
| The camera focused on the wrong thing, or was unable to focus. | Use Focus Lock. (See Using focus lock on page 31.) | |
| The camera should have been set to Macro , Exposure Mode. | Set the camera to Macro Exposure Mode, and try taking the picture again. (See Exposure mode on page 39.) | |
| My audio or video recording stopped before filling up the memory card. | The optional memory card you are using is slow and the internal processing buffer filled up, which stopped the recording. | If recording video, try a lower Image Quality setting (see Image quality on page 36) to reduce the amount of video that needs to be streamed to and saved to the memory card.If that does not help, or you are recording audio, replace the memory card you are using with another one, or remove the card and switch to internal memory. |
Chapter 7: Troubleshooting and support 83
Chapter 7: Troubleshooting and support 85
Resetting the camera
If your camera does not respond when you press any buttons, use the Reset switch to reset the camera:
1 Open the battery/memory card door on the bottom of the camera. The Reset switch is the inset square located behind the memory card slot, as shown.
2 Press the straightened end of a paper clip into the Reset switch until the switch is depressed, then remove the paper clip. The camera is reset.
3 Close the battery/memory card door. You may now use the camera again.

Messages on the camera
| Message Possible cause Solution | ||
| Please remove the lens cover. | The lens cap must be removed to operate the camera. | Remove the lens cap and press the OK button on the camera. |
| BATTERIES DEPLETED. Camera is shutting down. | Battery power is too low to continue operation. | Replace or recharge batteries, or use an optional HP AC power adapter. |
| Batteries low Battery power is low (less than 1/3). | Either recharge or replace the batteries soon. | |
| Batteries are too low for Live View | Battery power is too low to use Live View on the Image Display. | Take pictures with the viewfinder instead of with Live View. Replace or recharge batteries, or use an optional HP AC power adapter. |
| Batteries are too low to record a video clip. | Battery power is too low to record a video clip. | Replace or recharge batteries, or use an optional HP AC power adapter. |
| Batteries cannot be charged | Either an error occurred during charging, an AC power disruption occurred during charging, the wrong AC power adapter is being used, batteries are defective, or no batteries are installed in the camera. | Retry charging the batteries a couple of times. If that fails, purchase new batteries and try again. |
| Memory full There | is insufficient room to save more images in internal memory. | Unload images from the camera to your computer, then delete all images in internal memory (see Delete on page 52). Or install a memory card in the camera (see Installing a memory card (optional) on page 16). |
| Unsupported card | The card in the memory slot is not a memory card or is not a supported memory card. | Ensure that the optional memory card is the proper type for your camera. (See Appendix B: Specifications on page 112.) |
| Card is unformatted | The optional memory card needs to be formatted. | Format the memory card (see the Format option in the Delete sub-menu on page 52). This will delete all data on the card. |
| Card has wrong format | The optional memory card is formatted for a different device such as an MP3 player. | Save any images on the card. Then re-format the card (see the Format option in the Delete sub-menu on page 52). This will delete all data on the card. |
| Unable to format | The optional memory card is corrupted. | Replace the memory card. |
| Card locked The option | optional memory card is locked. | Switch the locking tab on the memory card to the unlocked position. |
| The card is locked. Please remove the card from your camera. | A locked memory card is in the camera when Customize this menu... is chosen from the Share menu. | Either remove the card entirely (the camera will use internal memory) or unlock the card by switching the locking tab on it to the unlocked position. |
| Card is unreadable | The optional memory card is not a supported card or is corrupted. | Ensure that the memory card is the proper type for your camera. (See Appendix B: Specifications on page 112.) If it is the proper type, try formatting it (see the Format option in the Delete sub-menu on page 52). If it will not format, it is probably corrupted. Replace the memory card. |
| Card full There is | insufficient room to save more images on the optional memory card. | Unload images from the camera to your computer, then delete all images on the memory card (see Delete on page 52). Or replace the card with a new one. |
| PROCESSING..., PLEASE WAIT..., LOADING..., MOVING..., or SAVING AUDIO... | The camera is completing a process, such as saving the last picture you took. | Wait a few seconds for the camera to complete the process before taking another picture. |
| CHARGING FLASH | The camera is recharging the flash. | It takes longer to charge the flash when the batteries are low. If you see this message a lot, you may need to replace or recharge the batteries. |
| FOCUS TOO FAR | The focus distance is beyond where the camera can focus in Macro Exposure Mode. | Stay in the Macro range of 0.1 to 0.8 m (2.5 to 32 in), or change to the Auto Exposure Mode setting. (See Exposure mode on page 39.) |
| FOCUS TOO CLOSE | The focus distance is closer than the camera can focus in Macro Exposure Mode. | Stay in the Macro range of 0.1 to 0.8 m (2.5 to 32 in) by moving further away from the subject. (See Exposure mode on page 39.) |
| LOW LIGHT - UNABLE TO FOCUS | The scene is too dark and the camera cannot focus in Macro Exposure Mode. | Add an external light source, or use Focus Lock (see page 31) and point at a part of the scene that is brighter. Or change to the Auto Exposure Mode setting. (See Exposure mode on page 39.) |
| Unable to focus The subject did not provide enough contrast for the camera to focus properly. | Use Focus Lock before taking the picture (see page 31), or change to the Auto Exposure Mode setting. (See Exposure mode on page 39.) | |
| No images in memory (or) No images on card | There are no images or video clips in internal memory or on the optional memory card that is installed in the camera, and you are trying to review them in Playback. | Take some pictures or video clips, then review them in Playback. |
| Cannot display image | Possibly comes from copying images from a computer to the internal memory or to an optional memory card that is installed in the camera, or a corrupted image caused by the camera not shutting down properly. | Use the HP software to edit the images copied in internal memory or on the memory card. Also, do not remove batteries when the camera is turned on. |
| Unknown USB device | The camera is connected to a USB device that it does not recognize. | Make sure that the camera is connected to a supported printer, such as an HP Photosmart printer or another HP printer with a front panel USB port, or to a supported computer. |
| Unsupported printer | The camera is not connected to a supported printer. | Connect the camera to a supported printer, such as an HP Photosmart printer or another HP printer with a front panel USB port. Or connect the camera to a computer and print from there instead. |
| Unable to communicate with printer | There is no connection between the camera and printer. | Press the OK button on the camera to return to the Print Setup menu. Make sure the cable is connected between the camera or the optional HP 8886 camera dock and the printer. If that does not work, turn off the camera and disconnect it. Turn the printer off and then on again. Re-connect the camera and turn it on. |
| A supported printer is either turned off or not connected to the camera. | Press the OK button on the camera to return to the Print Setup menu. Make sure the camera is connected to a supported printer and that the printer is turned on. | |
| Selected print size is larger than selected paper size | The selected print size is larger than the paper size in the Print Setup menu. | Press the OK button on the camera to return to the Print Setup menu. Select a smaller print size and try printing again. |
| Selected paper size is too big for printer | The selected paper size is too big for the printer. | Press the OK button on the camera to return to the Print Setup menu. Select a smaller paper size and try printing again. |
| Disengage photo tray or select smaller paper size | The selected paper size cannot be used with the printer photo tray. | Press the OK button on the camera to return to the Print Setup menu.Disengage the printer photo tray, or change the paper size. |
| Printer top cover is open | The printer is open. | Close the top cover of the printer. |
| Incorrect or missing print cartridge | The printer cartridge is the incorrect model or is missing. | Press the OK button on the camera to return to the Print Setup menu. Install a new printer cartridge, turn the printer off, then turn it back on. |
| Printer has a paper jam or The print carriage has stalled | There is a paper jam or the printer carriage has stalled. | Press the OK button on the camera to return to the Print Setup menu. Turn off the printer. Clear any paper jam. Then turn on the printer and try again. |
| Printer is out of paper | Your printer is out of paper. | Load paper into the printer, and then press the OK or Continue button on the printer. To cancel the print job, press the OK button on the camera. |
| Printing canceled | The print job has been canceled. | Press the OK button on the camera. Complete the print request again. |
| Any error code numbers that appear | The camera may have a hardware or firmware problem. | Turn the camera off and then on again. If that does not fix the problem, try resetting the camera (see page 86). If the problem persists, call HP Support (see page 99). |
Messages on the computer
| Message Possible cause Solution | ||
| Connection between the imaging device and computer failed | The camera might be connected to a computer through a USB hub. | Try connecting the camera directly to the computer, or disconnect other devices attached to the USB hub. |
| The software cannot retrieve the Share Menu information from your camera | The computer needs to write files to memory during HP Instant Share setup, but the optional memory card that is installed in the camera is either full or locked. | Either make room on the memory card or unlock it by switching the locking tab on the card to the unlocked position. |
| The cable is not connected correctly. | Make sure that the cable is firmly connected to the computer and camera. | |
| Computer cannot find the connected camera | The camera is turned off. | |
| The camera is not working correctly. | ||
| Try connecting the camera directly to an HP Photosmart printer or an HP printer with a front panel USB port, and print an image. This will verify that the image, memory card, USB connection, and the USB cable are functioning correctly, or not. | ||
| The camera is set to the Digital Camera setting in the USB Configuration sub-menu of the Setup menu, but the computer cannot recognize the camera as a digital camera. | ||
| Computer cannot find the connected camera (continued) | The camera is connected to the computer through a USB hub, and your USB hub is not compatible with the camera. | |
| You are using the HP 8886 camera dock and forgot to press the Save/Print button. | ||
| The optional memory card is locked. | ||
| The optional memory card is not a supported card or is corrupted. | ||
| The USB connection failed. | ||
Getting assistance
This section contains support information for your digital camera, including support website information, an explanation of the support process, and support phone numbers.
HP accessibility website
Customers with disabilities can get help by visiting www.hp.com/hpinfo/community/accessibility/prodserv.
HP photosmart website
Visit www.photosmart.hp.com or www.hp.com/photosmart for the following information:
- Tips on using your camera more effectively and creatively
- HP digital camera driver updates and software
- Register your product
- Subscribe to newsletters, driver and software updates, and support alerts
Support process
The HP support process works most effectively if you perform the following steps in the order specified:
1 Review the troubleshooting section of this User's Manual, which starts on page 76.
2 Access the HP Consumer Support Website for support. If you have access to the Internet, you can obtain a wide range of information about your digital camera. Visit the HP website for product help, drivers, and software updates at www.hp.com/support.
Consumer Support is available in the following languages: Dutch, English, French, German, Italian, Portuguese, Spanish, Swedish, Traditional Chinese, Simplified Chinese, Japanese, Korean. (Danish, Finnish, and Norwegian support information is available in English only.)
3 Access HP e-support. If you have access to the Internet, connect with HP via e-mail by going to: www.hp.com/support. You will receive a personal reply from an HP Consumer Support technician. E-mail support is available in the languages listed at that website.
4 Contact your local HP dealer. If your digital camera has a hardware failure, take it to your local HP dealer for a solution. Service is free during your digital camera's limited warranty period.
5 Contact HP Consumer Support for support by phone. Please consult the following website to check the details and conditions of phone support in your country/region: www.hp.com/support. As a part of HP's continuing efforts to improve phone support information services, we advise you to check the HP website on a regular basis for new information regarding service features and delivery. If you cannot solve the problem using the above options, call HP while you are in front of your computer and digital camera. For faster service, please be prepared to provide the following information:
- The digital camera's model number (located on the front of the camera)
- The digital camera's serial number (located on the bottom of the camera)
- The computer's operating system
- The version of the digital camera software (located on the camera's CD label)
- Messages displayed at the time the situation occurred
The applicable conditions for HP phone support are subject to change without notice.
Telephone support is free from the date of purchase for the period specified unless otherwise noted.
| Location | Free Phone Support Period |
| Africa 30 days | |
| Asia Pacific 1 year | |
| Canada 1 year | |
| Europe 1 year | |
| Latin America 1 year | |
| Middle East 30 days | |
| United States 1 year |
Phone support in the United States
Support is available both during and after the warranty period.
Within the period of your warranty, telephone support is provided free of charge. Call (208) 323-2551. If this is a long distance call for you, long distance charges will apply.
US phone support is available in both English and Spanish 24 hours a day, 7 days a week (days and hours of support may change without notice).
After the warranty period, call (208) 323-2551. Charges are \$25.00 per issue, and are charged to your credit card. If you think your HP product needs service, call HP Consumer Support, which can help determine if service is required.
Phone support in Europe, the Middle East, and Africa
HP Consumer Support phone numbers and policies may change. Visit the following website to check the details and conditions of phone support in your country/region: www.hp.com/support.
Algeria +213(0)61 56 45 43
Austria +43 (0)820 87 4417
Bahrain +973 800 728
Belgium 070 300 005 (Dutch) 070 300 004 (French)
Czech Republic +42 (0) 2 61307310
Denmark +45 70202845
Egypt +20 02 532 5222
Finland +358 (0)203 66 767
France +33 (0)892 6960 22 (Euro 0.34/min)
Germany +49 (0)180 5652 180 (Euro 0.12/min)
Greece +30 10 6073 603
Hungary +36 (0) 1 382 1111
Ireland 1890 923902
Israel +972 (0) 9 830 4848
Italy 848 800 871
Luxembourg 900 40 006 (French) 900 40 007 (German)
Morocco +212 224 047 47
Netherlands 0900 2020 165 (Euro 0.10/minute)
Norway +47 815 62 070
Poland +48 22 865 98 00
Portugal 808 201 492
Romania +40 1 315 44 42
Russian Federation +7 095 797 3520 (Moscow) +7 812 346 7997 (St Petersburg)
Saudi Arabia +966 800 897 14440
Slovakia +421 2 6820 8080
South Africa 086 000 1030 (RSA) +27-11 258 9301 (outside RSA)
Spain 902 010 059
Sweden +46 (0) 77 120 4765
Switzerland 0848 672 672 (German, French, Italian—Peak time 0.08 CHF/Outside peak 0.04 CHF)
Tunisia +216 1 891 222
Turkey +90 216 579 7171
Ukraine +7 (380 44) 490-3520
United Arab Emirates 800 4910 (toll free)
United Kingdom +44 (0)870 010 4320
Chapter 7: Troubleshooting and support 103
Other phone support worldwide
HP Consumer Support phone numbers and policies may change. Visit the following website to check the details and conditions of phone support in your country/region: www.hp.com/support.
Argentina +54 0 810 555 5520
Australia +61 (3) 8877 8000 (or local (03) 8877 8000)
Brazil +55 (11) 3747 7799 (Grande São Paulo) +55 0800 157751 (outside Grande São Paulo)
Canada +1 905 206 4663 (during the warranty period) +1 877 621 4722 (after the warranty period)
Central America and the Caribbean +1 800 711 2884
Chile +56 800 22 5547 (Post-sales Business Computing +56 800 360 999 (Post-sales Home Computing))
China +86 021 38814518
Colombia +57 9 800 114 726
Guatemala +502 1 800 999 5105
Hong Kong SAR +852 3002 8555
India 1 600 112267 or +91 11 682 6035 (Hindi & English)
Indonesia +62 (21) 350 3408
Japan 0570 000 511 (inside Japan) +81 3 3335 9800 (outside Japan)
Korea, Republic of +82 (2) 3270 0700 (Seoul) 0 80-999-0700 (outside Seoul)
Malaysia +60 1 800 805 405
Mexico +52 58 9922 (Mexico City) +52 01 800 472 6684 (outside Mexico City)
New Zealand +64 (9) 356 6640
Peru +51 0 800 10111
Philippines +63 (2) 867 3551
Puerto Rico +1 877 2320 589
Singapore +65 6272 5300
Taiwan +886 0 800 010055
Thailand +66 (2) 661 4000
United States +1 (208) 323-2551
Venezuela +58 0 800 4746 8368
Vietnam +84 (0) 8 823 4530
Appendix A: Batteries and camera accessories
Managing batteries
Your camera uses two AA batteries. For best results, use photo-lithium or rechargeable NiMH batteries. If you must use alkaline batteries, use high-grade “ultra” or “premium” varieties instead of ordinary alkaline batteries.
The following table shows how different types of batteries perform in different types of use scenarios:
| Type of use Alkaline | Photo-Lithium | NiMH | |
| Most economical (more than 30 pictures per month) | Poor Fair | Good | |
| Most economical (less than 30 pictures per month) | Fair Good | Fair | |
| Heavy use of flash, frequent pictures | Poor Good | Good | |
| Heavy use of video | Poor Good | Good | |
| Heavy use of Live View | Poor | Good | Good |
| Longest overall battery life | Poor Good | Fair | |
| Low temperature/Winter use | Poor | Good | Fair |
| Infrequent use (without dock) | Fair Good | Fair | |
| Infrequent use (with dock) | Fair | Good | Good |
| Want to recharge batteries | No No | Good |
NOTE If you do not intend to use your camera for extended periods of time (more than a month), we strongly recommend that you remove the batteries.
The following battery levels may appear on the Image Display:
| Icon Description | |
 | Batteries have 65-100 percent battery life remaining. |
 | Batteries have 35-65 percent battery life remaining. |
 | Batteries have 10-35 percent battery life remaining. |
 | Batteries have less than 10 percent battery life remaining. Camera will power down soon. Live View is disabled. |
 Blinking Blinking | Batteries are depleted. Camera will proceed to power down. |
 | Camera is operating on AC power (with full or non-rechargeable batteries). |
| Animated battery filling up | Camera is operating on AC power and is charging the batteries. |
You may notice that the battery level icons occasionally fluctuate with the same set of batteries. This occurs because some operating modes like Live View and video recording consume much more power than other modes, and will cause the battery level icons to indicate your batteries are low, because battery operating time in those modes is short. When you switch to a mode that requires less power, like Playback, the battery level icon may appear to go back up, indicating there is more time left in the batteries if you stay in that mode.
NOTE When the batteries are removed from the camera, the date and time settings are preserved for about 10 minutes. If the camera is without batteries for longer than 10 minutes, the clock is set to the last date and time at which the camera was used. You may be prompted to update the date and time.
Extending battery life
- Minimize the use of Live View and video, especially when using alkaline batteries.
- Use the viewfinder to frame pictures instead of the Image Display. Leave the Image Display off whenever possible.
- Use zoom only when necessary.
- Use the Auto flash setting rather than Flash On.
- Minimize power cycling. If you expect to average more than one picture every five minutes, leave the camera on rather than turning it off after each shot. This minimizes the number of times the lens has to extend and retract.
- Use an optional HP AC power adapter or HP 8886 camera dock when the camera will be on for extended periods of time, or when unloading pictures to your computer or printing.
Rechargeable batteries
Nickel Metal Hydride (NiMH) batteries can be recharged by using a battery charger. NiMH batteries can also be recharged in the camera when the camera is connected to an optional HP AC power adapter or HP 8886 camera dock. Batteries are fully recharged via the HP AC power adapter or camera dock in 15 hours.
Some things to keep in mind when using NiMH batteries are:
- Always recharge both NiMH batteries at the same time. One low-charged battery will reduce the battery life for both batteries in the camera.
- For NiMH batteries to reach optimal capacity and performance, they should first be discharged completely and recharged four separate times.
- NiMH batteries discharge when not in use, whether they are installed in a device (such as in the camera) or not. If they have not been used for more than two weeks, recharge them before using them again.
Power conservation
The camera will conserve battery power by turning off the Image Display automatically if there is no button activity for 60 seconds. If no buttons are pressed for a total of 6 minutes, the camera turns off (unless it is printing or connected to a computer).
Purchasing camera accessories
You can purchase additional accessories for your camera from your local retailer or online at www.hpshopping.com. Some accessories for this digital camera are listed below:
- HP Photosmart 8886 camera dock (includes a camera dock, remote control, two rechargeable NiMH batteries, audio/video cable, USB cable, and an AC power adapter):
• United States and Canada—C8886A #A2L
• Mexico, Brazil, Chile, Argentina, and Uruguay—C8886A #ABM - Korea, Australia, and New Zealand—C8886A #UUF
- Europe (except for the United Kingdom, see the next option below)—C8886A #AC2
• United Kingdom and South Africa—C8886A #ABU
- HP Photosmart Digital Camera Deluxe Starter Kit (C8889A #A2L for North America, C8884B #UUS for continental Europe, and C8884B #ABU for the United Kingdom). Contents include:
- Padded camera case
- Battery recharger
• 4 rechargeable NiMH batteries
• DC car adapter for battery recharger
• 32 MB Secure Digital (SD) memory card
- HP Photosmart Digital Camera Starter Kit (Y1789B #A2L for North America, #UUS for continental Europe, and #ABU for the United Kingdom).
Contents include:
- Padded camera case
- Battery recharger
• 4 rechargeable NiMH batteries
- HP Photosmart 3.3V AC power adapter (HP supports only HP AC power adapters and other accessories expressly approved by HP):
• United States and Canada—C8912A #A2L
- Korea, Australia, and New Zealand—C8912A #UUF
• Europe—C8912A #UUS
- Memory card—Secure Digital (SD) or MultiMediaCard™ (MMC). 16 MB is the minimum usable card size and 128 MB is the largest memory card tested by HP. Larger sizes of cards have not been tested, but they should work—use at your own risk.
This product only supports the use of MMC memory cards that have been verified compliant to the MultiMediaCard™ specification as of January 2000. Compliant MMC memory cards have the MultiMediaCard logo on the card. The following memory cards are available from HP:
• 32 MB SD card—C8895A
• 64 MB SD card—C8896A
• 128 MB SD card—C8897A
- HP Photosmart padded camera case—C8905A
Appendix B: Specifications
| Feature Description | |
| Resolution | Still pictures:2.11 MP (1688 by 1248) total pixel count2.02 MP (1636 by 1236) effective pixel countVideo clips: 320 by 240 total pixel count |
| Sensor Diagonal | 5.68 mm (1/3.2-inch, 4:3 format)CCD |
| Storage 16 MB | internal memory. Slot for optional memory card; Secure Digital (SD) and MultiMediaCard (MMC) memory card supported, 16 MB minimum and 512 MB maximum. (A 128 MB memory card is the largest memory card tested by HP. Memory cards larger than 128 MB have not been tested and will probably work; however HP cannot guarantee that.) See Memory capacity for still images on page 117. |
| Lens | Focal length:Wide—5.2 mmTelephoto—14.4 mmF-Number:Wide—f/2.9Telephoto—f/4.95 |
| Viewfinder Zooming optical viewfinder | |
| Zoom 3x optical, 4x digital zoom | |
| Focus Auto focus. Focus range settings:Normal (default)—Auto focus range of 0.5 m (19.7 in) to infinity.Macro—Auto focus range of 0.1 to 0.8 m (2.5 to 32 in). | |
| Shutter speed 1/2000 to 2 seconds | |
| Tripod mount Yes | |
| Built-in flash Built-in flash assembly, 6-second recharge | |
| Flash working distance | 10 cm (4 in) to 2.5 m (8.2 ft) |
| External flash No | |
| Flash settings Auto (default), Red-Eye, Flash On, Flash Off, Night | |
| Image Display | 1.6-inch color backlit LED |
| Status LCD No | |
| Image capture options | Still (default)Self-Timer—Can be set to On or On - 2 shots through the Capture menu; 10 second delay for both settings. On - 2 shots setting takes a second shot about 2 seconds later.Video—24 frames per second; includes audio. |
| Audio capture | Still pictures—Audio can be captured with each picture if Shutter button is held down longer than 2 seconds after picture is taken.Video—Audio is captured automatically with video. |
| Image Quality settings | ★ - Good★★ - Better★★★ - Best (default) |
| EV Compensation | Can be set manually from -2.0 to +2.0 EV (Exposure Value) in 0.5 EV increments. |
| Exposure Mode settings | Auto (default), Action, Landscape, Portrait, Macro |
| White Balance settings | Auto (default), Sun, Shade, Tungsten, Fluorescent |
| ISO Speed settings | Auto (default), 100, 200, 400 |
| Color settings | Full Color (default), Black & White, Sepia |
| Saturation settings | Low, Medium (default), High |
| Sharpness settings | Low, Medium (default), High |
| Playback zoom | Yes, from 1.3x to 6x via the Magnify option in the Playback menu |
| Compression format | JPEG (EXIF) for still imagesMPEG1 for video clips |
| Interfaces | USB to a computer, or USB to an HP Photosmart printer or to any other HP printer with a front panel USB portDC IN 3.3—3.7VHP Photosmart 8886 camera dock |
| Standards • PTP transfer (15740)MSDC transferNTSC/PALJPEGMPEG1DPOF 1.1EXIF 2.2DCF 1.0 | |
| Power The camera has a maximum steady state power consumption of 2.0 Watts (667mA @ 3.0Vdc).2 AA batteries (2 non-rechargeable AA batteries included) or optional HP AC power adapter. Acceptable batteries include photolithium, “ultra” or “premium” grade alkaline, or rechargeable NiMH. NiMH batteries can be recharged in the camera using the optional HP camera dock or HP AC power adapter.Optional HP Photosmart 8886 camera dock:United States and Canada—C8886A #A2LMexico, Brazil, Chile, Argentina, and Uruguay—C8886A #ABMKorea, Australia, and New Zealand—C8886A #UUFEurope (except for the United Kingdom, see the next option below)—C8886A #AC2United Kingdom and South Africa—C8886A #ABU | |
| Power (continued) | Optional HP AC power adapter (Input: 100-240Vac; Output: 3.3-3.7Vdc @ 571-2500mA):United States and Canada—C8912 #A2LKorea, Australia, and New Zealand—C8912 #UUFEurope—C8912 #UUSSlow trickle recharging in camera with the optional HP AC power adapter or HP camera dock (100% in 15 hours maximum). |
| External body dimensions | 100.8 mm (L) by 41.7 mm (W) by 66.3 mm (H)4 in (L) by 1.7 in (W) by 2.6 in (H) |
| Weight 185 grams (6.5 ounces) without batteries | |
| Temperature range | Operational:5 to 45°C (41 to 113°F) at 15 to 85%Relative HumidityStorage:-30 to 65°C (-22 to 149°F) at 15 to 90%Relative Humidity |
| Warranty HP 1 | year exchange warranty |
Memory capacity for still images
The following table lists the approximate number of still images that can be stored in the internal 16 MB memory in the camera or on an optional 16 MB Secure Digital (SD) memory card when the camera is set to the different Image Quality settings available in the Capture menu (see page 36).
NOTE The actual file sizes and number of still images that can be stored in the internal memory in the camera or on an optional memory card will vary, depending on the content of each still image.
| ★- GoodImage Quality | 85 images(170 KB each) |
| ★★BetterImage Quality | 16 images(860 KB each) |
| ★★★ - BestImage Quality | 12 images(1.15 MB each) |
Index
A
AA batteries 106, 115
AC power adapter connector on camera 13 HP part number 115 purchasing 111
accessories for camera 110
alkaline batteries 106, 115
arrow buttons on Controller 10
audio clips, record 24, 53
Auto Exposure/Auto Focus and Flash light, description 11
auto focus, using 30
automatic exposure, override 39
B
batteries
door on camera 13
extend life of 108
icons 107
install 15
levels 107
rechargeable 109
types to use 106, 115
Best Image Quality setting 37
Better Image Quality setting 37
blinking lights on camera 10, 11, 12
bonus software 20, 21
brackets in Live View, using 30
brightening an image 39
C
camera
accessories 110
reset switch 86
specifications 112
states 22
turn on/off 17
Camera Sounds, setting 72
Capture menu
Help for menu options 36
using 35
circle in viewfinder, using 30
Color of images, setting 43
compression format 114
computer, connect camera to 67
connections
as a digital camera 73
as a USB Mass Storage Device Class (MSDC) 73
to computer 67
to printer 69
connectors, descriptions 13
Controller, description 10
customer support 99
D
darkening an image 39
Date & Time, setting 19, 72
delete
during Instant Review 23
images and video clips from memory 52
digital zoom 33
direct print
printing directly from camera 69
tagging images 48
disk drive, camera as 73
display, using 29
E
enlarge image 55
error messages
on camera 87
on computer 96
EV Compensation, setting 39
exposure compensation, setting 39
Exposure Mode, setting 39
F
files
delete from memory 52
Image Quality setting 36, 117
flash
description 12
setting 31
working distance 113
Flash button, description 10
focus
lock 31
range 113
using auto focus 30
focus brackets in Live View, using 30
format memory card 52
G
Good Image Quality setting 37
H
Help for Capture menu options 36
help from customer support 99
HP AC power adapter
connector on camera 13
purchasing 111
HP camera dock
connect to 13
description 8
dock insert 8
purchasing 110
HP Instant Share
customizing the Share menu 65
description 8, 58
Share button 10, 59
tagging images for HP Instant Share destinations 63
turn on/off 59
using the Share menu 62
HP web sites 99
|
Image Display
description 11
Live View button 10
status screen 17
using 29
Image Quality, setting 36
images
brightening 39
Color setting 43
darkening 39
delete 52
Exposure Mode setting 39
Image Quality setting 36
ISO Speed setting 42
magnify 55
memory capacity 36, 117
number remaining 29
record audio clips 24
rotate 56
Saturation setting 44
Self-Timer setting 38
share 58
Sharpness setting 44
too dark/light 39
undelete 52
unloading camera to computer 67
view thumbnails 54
White Balance setting 41
install
batteries 15
lens cap 15
lens cap tether 14
memory card 16
software 19, 21
wrist strap 14
internal memory, storage capacity 36, 117
ISO Speed, setting 42
L
Language
change setting 74
choose at first startup 18
LEDs (lights) on camera
Auto Exposure/Auto Focus and Flash 11
Power/Memory 10
Self-Timer 12
Video 11
length of video clips stored in memory 36
120 Index
lens cap tether
attaching 14
mount on lens cap 13
lens cap
attaching or removing 15
description 13
Live View
button 10
using 29
lock focus 31
M
Macintosh computer
bonus software 21
connect to 67
install software 21
magnify image 55
memory card
delete images or video clips 52
door on camera 13
image capacity 36, 117
install 16
pictures remaining 29
remove 16
video clip capacity 36
memory light 10
memory, move images to memory card 75
Menu/OK button, description 10
menus
Capture 35
list of 22
Playback 49
Setup 71
Share 62
messages
on camera 87
on computer 96
microphone, description 12
move images to memory card 75
N
NiMH batteries 106
number of images in memory 36, 117
O
online Help for Capture menu options 36
optical zoom 33
over-exposing an image 39
override automatic exposure 39
P
parallax error, definition 28
photo-lithium batteries 106
Picture Transfer Protocol (PTP) 73
pictures
record audio clips 24
share 58
take self-timer 27
take stills 23
pictures remaining in memory 29
play video clips 46
Playback
Playback button 10
using 46
Playback button, description 10
Playback menu, using 49
power
battery level icons 107
consumption 115
light 10
restoring previous settings 18
specifications 115
turn on/off 17
power adapter, HP AC
connector on camera 13
purchasing 111
Power ON/OFF switch, description 9
Power/Memory light, description 10
previous settings, restoring 18
Print button
description 10
using 48
print images
directly from camera 69
from computer 69
tagging images for direct print 48
printer, connect to camera 69
problems, troubleshooting 76
product support 99
R
range
EV Compensation 114
flash 113
F-number 112
focus 113
rechargeable batteries 109
record
audio clips 24, 53
video clips 25
remaining pictures in memory 29
remove
lens cap 15
memory card 16
Reset switch, using 86
restoring previous settings 18
reviewing images and video clips 46
rotate image 56
S
Saturation, setting 44
Self-Timer light, description 12
Self-Timer, setting 38
settings, restoring previous 18
Setup menu, using 71
Share button 59
Share button, description 10
share images 58
Share menu
customizing 65
description 62
set up 59
tagging images for HP Instant Share destinations 63
using 62
Sharpness, setting 44
Shutter button
description 9
lock exposure and focus 30
shutter speed range 113
software, install 19, 21
sounds of camera 72
space remaining in memory 29
specifications 112
states of camera 22
status messages
on camera 87
on computer 96
status screen 17
still pictures, take 23
support for users 99
T
tagging images
for direct print 48
for HP Instant Share destinations 63
technical support 99
tether to lens cap, attaching 14
thumbnails of images, view 54
Time & Date, setting 19, 72
tripod mount, description 13
troubleshoot problems 76
turn on/off
camera sounds 72
HP Instant Share 59
Live View 29
Playback 46
power 17
TV (television) configuration, setting 74
U
undelete images 52
under-exposing an image 39
unload images, camera to computer 67
USB
configuration setting 73
connector on camera 13
V
Video button, description 9
video clips
delete 52
memory capacity 36
play 46
record 25
undelete 52
Video light, description 11
view thumbnails of images 54
viewfinder
description 11
focus circle 30
using 28
viewfinder lights (LEDs),
description 11
viewing images and video
clips 46
W
web sites for HP 99
White Balance, setting 41
Windows computer
bonus software 20
connect to 67
install software 20
working distance of flash 113
wrist strap
attaching to camera 14
mount on camera 13
Z
zoom
specifications 112
use optical or digital 33
Zoom lever, description 10
Zoom Out and Zoom In
controls 10
www.hp.com/photosmart
Printed in China 2003

invent
Q2224-90101
- TRADEMARK AND COPYRIGHT INFORMATION
- TABLE OF CONTENTS
- CHAPTER 1
- GETTING STARTED....8
- CHAPTER 2
- TAKING PICTURES AND RECORDING VIDEO CLIPS . . . .23
- CHAPTER 3
- REVIEWING IMAGES AND VIDEO CLIPS .....46
- CHAPTER 4
- USING HP INSTANT SHARE .....58
- CHAPTER 5
- UNLOADING AND PRINTING IMAGES 67
- CHAPTER 6
- USING THE SETUP MENU 71
- CHAPTER 7
- TROUBLESHOOTING AND SUPPORT 76
- APPENDIX A
- BATTERIES AND CAMERA ACCESSORIES .....106
- APPENDIX B
- SPECIFICATIONS ....112
- CHAPTER 1: GETTING STARTED
- CAMERA PARTS
- FRONT, BOTTOM, AND SIDE OF CAMERA
- SETUP
- ATTACHING THE WRIST STRAP
- ATTACHING THE LENS CAP TETHER
- ATTACHING THE LENS CAP
- INSTALLING THE BATTERIES
- INSTALLING A MEMORY CARD (OPTIONAL)
- TURNING ON POWER
- UNDERSTANDING THE STATUS SCREEN
- RESTORING PREVIOUS SETTINGS
- CHOOSING THE LANGUAGE
- SETTING THE DATE AND TIME
- INSTALLING THE SOFTWARE
- WINDOWS
- MACINTOSH
- CAMERA STATES AND MENUS
- CHAPTER 2: TAKING PICTURES AND RECORDING VIDEO CLIPS
- TAKING STILL PICTURES
- RECORDING AUDIO WITH STILL PICTURES
- RECORDING VIDEO CLIPS
- TAKING SELF-TIMER PICTURES
- USING THE VIEWFINDER
- USING LIVE VIEW
- USING AUTO FOCUS
- USING FOCUS LOCK
- SETTING THE FLASH
- USING ZOOM
- OPTICAL ZOOM
- DIGITAL ZOOM
- USING THE CAPTURE MENU
- HELP FOR THE MENU OPTIONS
- IMAGE QUALITY
- SELF-TIMER
- EV COMPENSATION
- EXPOSURE MODE
- WHITE BALANCE
- ISO SPEED
- NOTE WHEN YOU SET THE EXPOSURE MODE TO ACTION ✗
- COLOR
- SATURATION
- SHARPNESS
- REVIEWING IMAGES AND VIDEO CLIPS
- USING PLAYBACK
- TAGGING IMAGES FOR DIRECT PRINT
- USING THE PLAYBACK MENU
- DELETE
- RECORD AUDIO
- VIEW THUMBNAILS
- MAGNIFY
- ROTATE
- USING HP INSTANT SHARE
- SETTING UP THE SHARE MENU ON THE CAMERA
- USING THE SHARE MENU
- TAGGING IMAGES FOR HP INSTANT SHARE DESTINATIONS
- HOW HP INSTANT SHARE E-MAILS IMAGES
- CUSTOMIZING THE SHARE MENU
- CHAPTER 5: UNLOADING AND PRINTING IMAGES
- UNLOADING TO A COMPUTER
- PRINTING IMAGES
- CHAPTER 6: USING THE SETUP MENU
- CAMERA SOUNDS
- DATE & TIME
- USB CONFIGURATION
- TV CONFIGURATION
- LANGUAGE
- MOVE IMAGES TO CARD
- TROUBLESHOOTING AND SUPPORT
- PROBLEMS AND SOLUTIONS
- RESETTING THE CAMERA
- GETTING ASSISTANCE
- HP ACCESSIBILITY WEBSITE
- HP PHOTOSMART WEBSITE
- SUPPORT PROCESS
- PHONE SUPPORT IN THE UNITED STATES
- PHONE SUPPORT IN EUROPE, THE MIDDLE EAST, AND AFRICA
- OTHER PHONE SUPPORT WORLDWIDE
- APPENDIX A: BATTERIES AND CAMERA ACCESSORIES
- MANAGING BATTERIES
- NOTE IF YOU DO NOT INTEND TO USE YOUR CAMERA FOR EXTENDED PERIODS OF TIME (MORE THAN A MONTH), WE STRONGLY RECOMMEND THAT YOU REMOVE THE BATTERIES
- EXTENDING BATTERY LIFE
- RECHARGEABLE BATTERIES
- POWER CONSERVATION
- PURCHASING CAMERA ACCESSORIES
- APPENDIX B: SPECIFICATIONS
- MEMORY CAPACITY FOR STILL IMAGES
- INDEX
- A
- B
- C
- D
- E
- F
- G
- H
Brand : HP
Model : Photosmart 630
Category : Camera