
119C - Satellite receiver NOKIA - Free user manual and instructions
Find the device manual for free 119C NOKIA in PDF.


| Product Type | Satellite Receiver |
| Brand | Nokia |
| Model | 119C |
| Dimensions (approx) | 250 x 150 x 40 mm |
| Weight | 0.5 kg |
| Power Supply | AC 220-240V, 50/60Hz |
| Input Frequency | 950-2150 MHz |
| Video Output | PAL / NTSC |
| Audio Output | Stereo RCA |
| Number of Channels | Up to 2000 |
| Remote Control | Included |
| Memory | Flash memory |
| Standby Power | <1W |
| Languages (OSD) | Multiple languages |
| Parental Control | Yes |
| EPG (Electronic Program Guide) | Yes |
| Automatic Channel Search | Yes |
| DiSEqC Support | 1.0 / 1.1 |
| LNB Power | 13/18V, 500mA max |
| Maintenance | Clean with soft dry cloth; avoid liquids. |
| Safety | Do not disassemble; keep away from heat and moisture. |
| Spare Parts & Repair | Contact authorized service center. |
| Warranty | 1 year (typical) |
Frequently Asked Questions - 119C NOKIA
User questions about 119C NOKIA
0 question about this device. Answer the ones you know or ask your own.
Ask a new question about this device
Download the instructions for your Satellite receiver in PDF format for free! Find your manual 119C - NOKIA and take your electronic device back in hand. On this page are published all the documents necessary for the use of your device. 119C by NOKIA.
USER MANUAL 119C NOKIA
natural_image
Exterior view of a Nokia remote control device with open case (no text or symbols on device body)Mediamaster 119 C
Contents
Remote control 4
Connecting the Mediamaster 5
Front and Rear panel 5
Connecting the Mediamaster 5-8
First-time installation 8
About Smart card 8
Connecting a Hi-fi system 8
First-time installation general information 8
Switching on and start 8
First-time installation 9
Watching TV & listening to the radio 10
General information 10
Programme information 10
Temporary settings 11
Programme Guide, EPG 11
External equipment 12
Sorting channels 12
Teletext 13
Folder functions 14
Bookmark functions 14
Bookmark selection mode 15
Navi Bars 16
Navigating with Navi Bars 16
The Settings folder 17
The User prefs folder 17
The TV folder 18
Access folder 19
Maintenance folder 20
Message folder 20
EPG (Electronic Programme Guide) 21
Help 21
Technical specifications 22
Nokia Mediamaster software
end-user license 23
Read this before using the Mediamaster
- Do not use any power supply other than the original unit delivered with the Mediamaster.
- Allow 10 cm of space around the Mediamaster for sufficient ventilation.
- Do not cover the Mediamaster's ventilation openings with items such as newspapers, tablecloths, curtains, etc.
- Do not place the Mediamaster on top of a heat-emitting unit.
- Do not place naked flame sources, such as lit candles, on the Mediamaster.
- Use a soft cloth and a mild solution of washing-up liquid to clean the casing.
- Do not expose the Mediamaster to dripping or splashing liquids.
- Do not place any objects filled with liquids, such as vases, on the Mediamaster.
- To give your Mediamaster extra protection, e.g. during a thunderstorm, we recommend that you connect it via an external surge protection device.
- Do not connect or modify cables when the Mediamaster is plugged in.
- Do not remove the cover.
- Do not allow the unit to be exposed to hot, cold or humid conditions.
• Service should only be carried out at a Nokia Authorised Service Centre. - Please note that the only way to isolate the Mediamaster completely from the mains supply is to unplug the power supply!
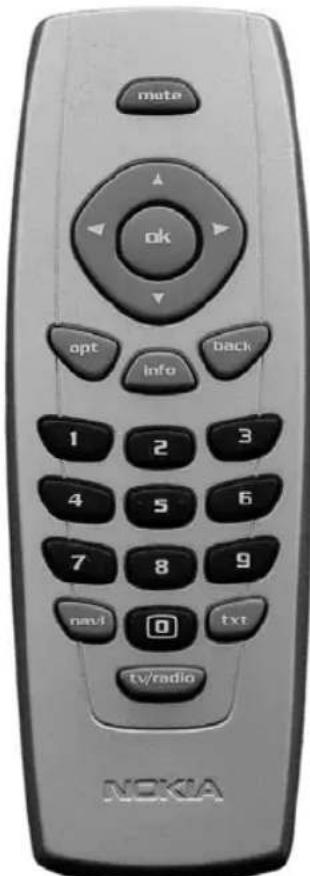
Remote control
This section describes how to operate the Mediamaster using the buttons on the remote control.
mute Press once to turn the sound off/on (mute/unmute).
Press and hold for a few seconds to switch the Mediamaster into standby mode. In addition, press this button to switch the Mediamaster on.
ok To confirm a selection.
To open Navi Bars
cursor up Move up in the menus and change to the next channel in viewing mode.
cursor down ▼ Move down in the menus and change to the previous channel in viewing mode.
cursor left Move left/change settings in menus.
Decrease the volume level in viewing mode.
cursor right Move right/change settings in menus.
Increase the volume level in viewing mode.
opt While watching TV: Pressing the opt button will give a menu from which you can make some temporary settings.
When the Navi Bars are visible: Pressing the button activates the Options menu.
info Three different functions:
Pressing once will show current programme name.
Pressing twice will show information about the current and next programme.
Pressing three times will give the 7-day programme guide (EPG).
back To go back one level at a time within menus.
To close the Navi Bars.
Toggle between the present and previous channel.
0 - 9 To change the channel and to select individual menu options.
NOTE: If 0 is entered as the first digit, the TV Release functionality is activated (see below).
0 To toggle between the Mediamaster reception or any
other reception to your TV (depending of TV model.)
navi To open and close the Navi Bars.
txt Press to enter Teletext (if available).
tv/radio Toggle between TV and radio mode.
Front and Rear panel
antenna cable
for connection of the antenna cable to the cable TV antenna socket
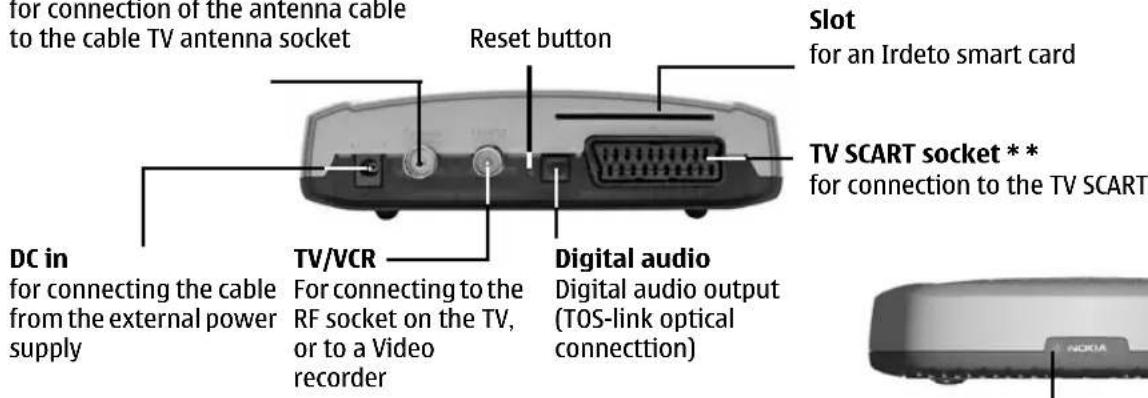
for an Irdeto smart card
for connection to the TV SCART
natural_image
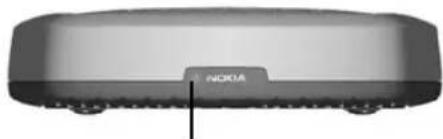
Front view of a Nokia smartphone (no visible text or symbols on body)A constant green light indicates that the Mediamaster is switched ON.
A constant red light indicates standby mode.
The light flashes red when commands from the remote control are received.
The light flashes green during software updates.
Connecting the Mediamaster
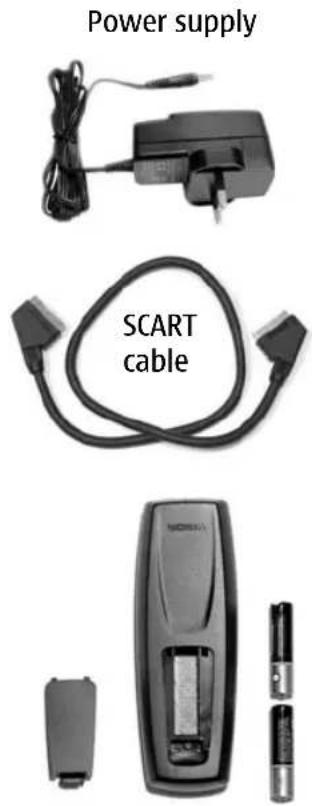
The box for your Mediamaster should contain the following items:
- the Mediamaster
• a remote control with 2 AAA batteries
• a SCART cable (fully connected; 1.0 m)
• an Introduction Guide
• a separate power supply - an RF cable
Preparing the remote control
- Remove the cover from the battery compartment at the bottom of the remote control.
- Insert the 2 AAA (1.5 V) batteries as shown in the diagram, taking care to observe the + and - markings indicated inside.
- Replace the cover.
\* \* The TV SCART Socket
When you connect other devices to this socket, always use a fully connected SCART cable like the one supplied. There are SCART cables available that do not have all the pins connected, which could reduce picture quality if you were to use them.
Connecting the Mediamaster
Common Connections
In this section, you will see some of the most common ways to connect your equipment.
If you have problems with your connections and need help, contact your retailer or Nokia Support
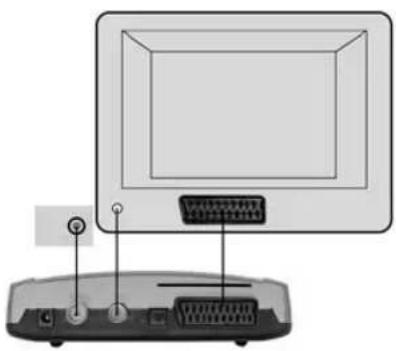
Connecting to the TV with SCART
- Connect an antenna cable from the cable TV antenna socket in the wall to the antenna cable input on the Mediamaster.
- Connect an RF cable from the TV/VCR output on the Mediamaster to the antenna input socket on the TV.
- Connect a SCART cable between the main SCART socket on the TV and the TV SCART socket on the Mediamaster.
- Switch on your TV, then plug in and switch on your Mediamaster.
You may need to select the AV (SCART) channel on your TV to watch digital TV. In some cases, your TV will automatically select this channel when the Mediamaster is switched on.
NOTE: The RF lead will need to be connected in order to watch analogue channels (the old 1, 2, 3, 4, 5)
It is always advisable to consult the user guide that came with your TV.
natural_image
Illustration of a computer monitor with an attached cable and ports (no text or symbols)Connecting a Video recorder with SCART
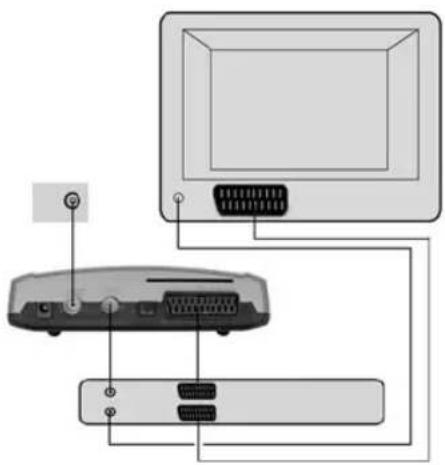
- Connect an antenna cable from the cable TV antenna socket in the wall to the antenna cable input on the Mediamaster.
- Connect a SCART cable between the main SCART socket on the TV and the TV SCART socket on the Video.
- Connect an RF cable from the TV/VCR output on the Mediamaster to the RF input socket on the video.
- Connect an RF cable from the TV/VCR output on the video to the RF input socket on the TV.
- Connect a SCART cable between the SCART socket on the video and the SCART socket on the Mediamaster.
- Switch on your TV, then plug in and switch on your Mediamaster.
- On your VCR, there should be an AV select button. This mode should be selected to record digital TV.
You may need to select the AV (SCART) channel on your TV. In some cases, your TV will automatically select this channel when the Mediamaster is switched on.
NOTE: In this set-up, your VCR has to be switched on or in standby mode to watch digital TV. To record a digital channel, you will need to select the AV (SCART) channel on your video.
It is always advisable to consult the user guides that came with your video and TV.
natural_image
Diagram of a computer monitor connected to an electronic device via cable, showing ports and connectors (no text or labels)Connecting the Mediamaster & First-time installation
About Smart card
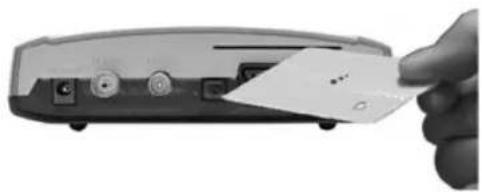
The Mediamaster is equipped with a built-in decoder for the Irdeto encryption system.
Insert a valid smart card fully into the slot on the back of the Mediamaster. The gold chip must face downwards and inwards.
natural_image
Close-up of a hand inserting a card into a device (no visible text or symbols)Connecting a Hi-fi system
It is possible to connect a TOS link cable from the Digital audio output on the Mediamaster to a Hi-fi system that is equipped with the corresponding audio input.
Also use the TOS link Digital audio output for connection to an external Dolby digital/DTS decoder
First-time installation general information
Once you have correctly connected the Mediamaster, you will also have to perform a "First-time installation." During this procedure, helpful information is displayed at the bottom of the menus.
The ok button always confirms a selection within the menus, and pressing it will take you to the next step in the installation procedure. However, more than one value sometimes have to be entered in a menu. First, perform all necessary settings on the different lines. Then, confirm them all simultaneously by pressing ok.
- You can always return to the previous menu by pressing back.
- Use the cursor up/down button to move upwards and downwards from one line to another.
- Use the cursor left/right button to change settings
- You also use the number buttons on the remote control to enter numeric values.
Switching on and start
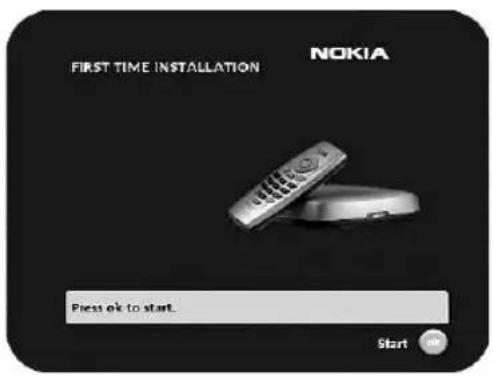
- Plug in your Mediamaster and the "First-time installation" menu is shown.
Press ok to continue.
First-time installation
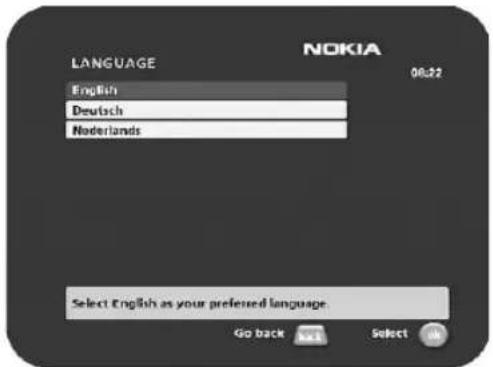
Language
Select the desired menu language using the cursor up/down button.
This will now become the main language for audio and subtitling.
When you now press ok again to confirm your choice of language, you simultaneously start the searching for TV/Radio channels.
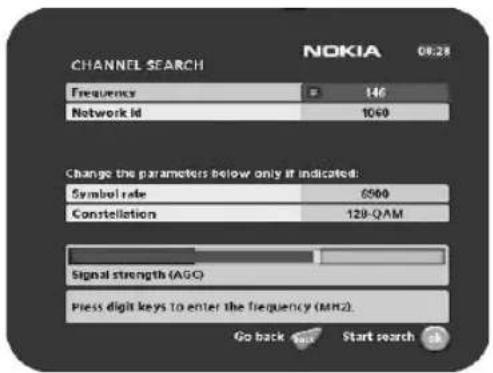
Channel search
Enter the valid values for the local network where your Media-master is connected. The values should be available from the Service provider or your landlord.
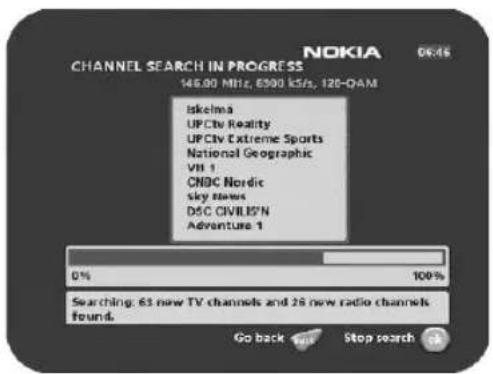
Channel search in progress
This menu will be shown while the Mediamaster is searching for TV and radio channels.
All channels that are found will be listed on the screen.
Please note that the search procedure may take a few minutes. You can cancel the search at any time by pressing ok.
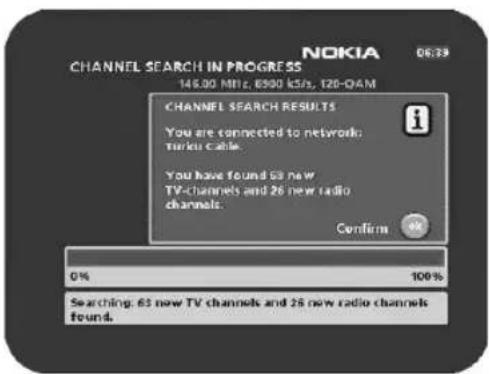
When the search procedure has ended, a message will tell you how many TV and radio channels have been found.
Press ok to finish the first time installation.
If no TV channel is automatically shown after you have finished the installation procedure;
Step up or down with the ▼buttons to select a channel.
Watching TV & listening to the radio
General information
You can watch digital TV and listen to digital radio with this Mediamaster.
- If no TV channel is automatically shown after you have finished the installation procedure, press any of the number buttons, or step up and down with cursor up/down to select a channel.
- If that does not work, open the Navi Bars with any of the ok or navi buttons.
- Scroll to the TV channels folder and select a channel. For more information on Navi Bars, see page 14.
You can leave a menu at any time, without affecting the settings, by pressing the back button.
Programme information
The Mediamaster can display information about TV and radio programmes that are currently being broadcast as well as those that will be broadcast next.
Some of the advanced functions described here can only be used if they are included in the programme information transmitted by the broadcasters.
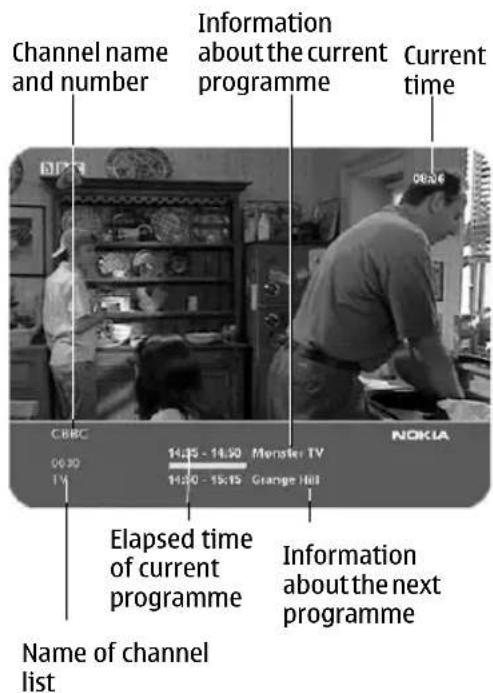
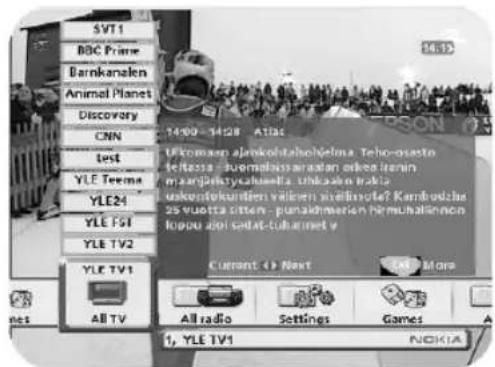
When you change channels, a programme information banner is displayed for a few seconds. You can also press the info button while watching TV to display the banner.
The programme information may include:
- the current time
- a channel list
- the channel name and number
- the names of the current and next programmes
- the start and stop times of the current programme
- a bar indicating the elapsed time of the current programme
- the start and stop times for the next programme
By pressing info again, you will display the extended information banner. Use the cursor left/right button to switch between the current and next programme information.
If the text scrolls out of the reading region, use the cursor up/down button to continue reading the next page.
Press back to continue watching TV/listening to radio.
When you are listening to a radio station and do not press any button on the remote control, the picture fades out after a while.
If the broadcaster is not transmitting programme information, the message "No information available" is shown.
Watching TV & listening to the radio
Temporary settings
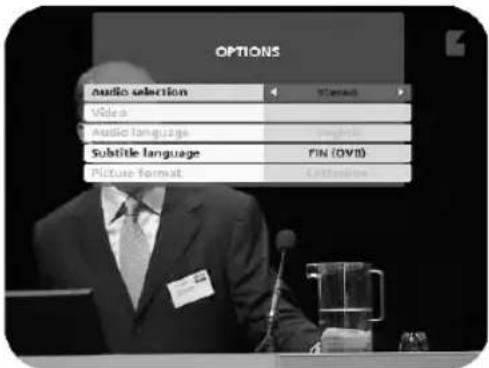
By pressing opt, a menu appears that allows you to configure temporary settings for the channel you are currently watching. If you leave the channel and return to it later, your temporary settings will be deleted.
Audio selection
Stereo is the default setting. When more than one language is transmitted you can select another language by choosing Left or Right audio channel.
Audio language
When available, you can select from different subtitle languages.
Picture format
If you do not have a Widescreen TV and the transmission is in wide-screen, you can select Fullscreen or Letterbox to change the display format. Fullscreen will fill up the screen vertically but cut some information from the left and right sides of the picture.
Letterbox will give a complete picture, but leave black areas at the top and bottom.
Press opt or back to return to TV/radio mode.
Programme Guide, EPG
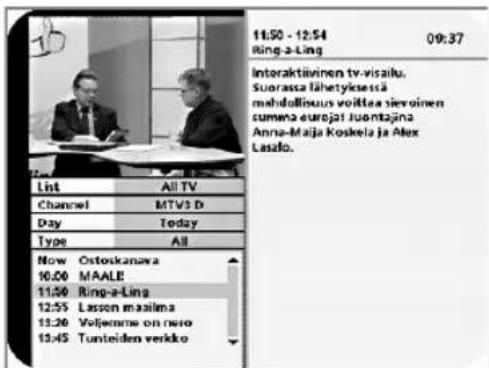
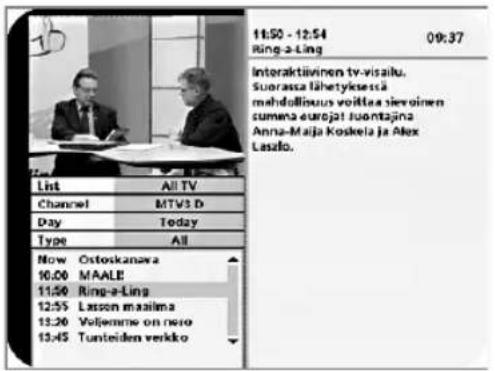
By pressing the info button three times while watching a channel you get access to the Mediamaster EPG (Electronic Programme Guide.) The Guide can also be selected from the Navi Bars folder named EPG.
In the EPG you will find information about the programmes for the current day and for the following seven days (provided that this information is included in the channel transmission from the distributor.)
You may also select the Type of programme you want information about, e. g. Movie, Sports or Music.
Use the arrow buttons to navigate within the guide.
Exit the guide by pressing the ok or back button.
Watching TV & listening to the radio
External equipment
With the 0 (zero) button, you can toggle between externally connected equipment, e.g., a VCR (the VCR must be switched on.)
This function may not be available on all TV and video models.
Sorting channels
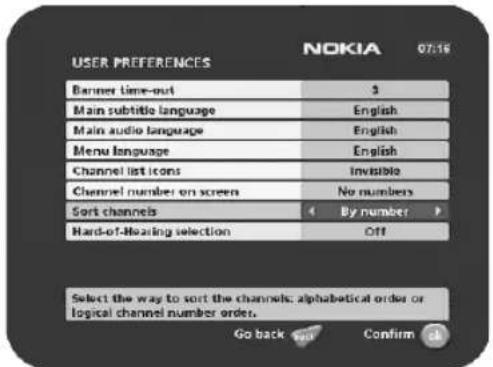
You can select how the channels shall be sorted in the All TV and All radio folders. Note! Sorting does not apply for Favourite folders.
- Select the User prefs folder in the Navi Bars
- press ok
- In the User Preferences menu, on the line Sort Channel, select "By name" or "By number".
Watching TV & listening to the radio
Teletext
Pressing txt will open a teletext page, if teletext is transmitted for that channel. Select teletext pages using the number buttons on the remote control (Fig. 1).
You can also quickly move to the different page options shown on any page by pressing cursor left/right.
- Press ok on a highlighted page number to go to that page.
- By pressing "0" you can alter between the last two pages that you have most recently watched.
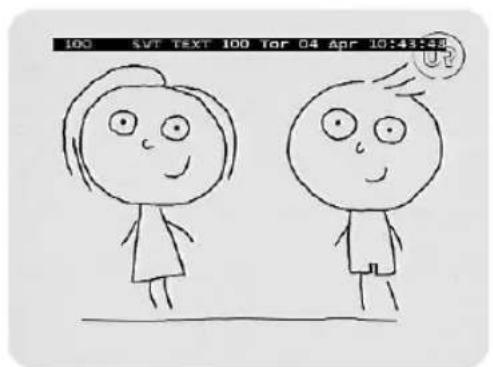
- Press info to hide everything on a teletext page apart from its headline (Fig. 2).
- Sometimes a teletext page may contain subpages. When subpages are available, they are numbered on the lower part of the screen (Fig. 3). To view a subpage, press ok when no page numbers have been highlighted. Move to the different subpages with cursor left/right.
NOTE: it may take some time before all of the subpages are available for selection.
- Press txt/back to return to TV/radio mode.
Cursor up/down will show the next or previous teletext page.
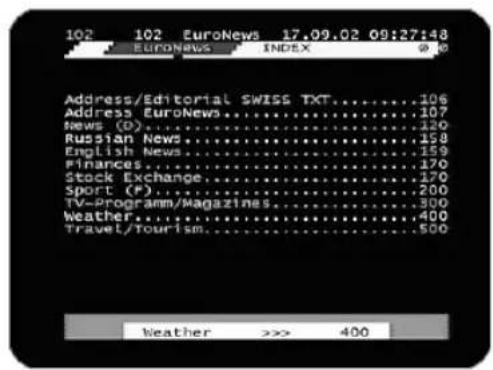
Figure 1
natural_image
Simple line drawing of two cartoon figures with expressive eyes and a smiling face, no text or symbols present.Figure 2
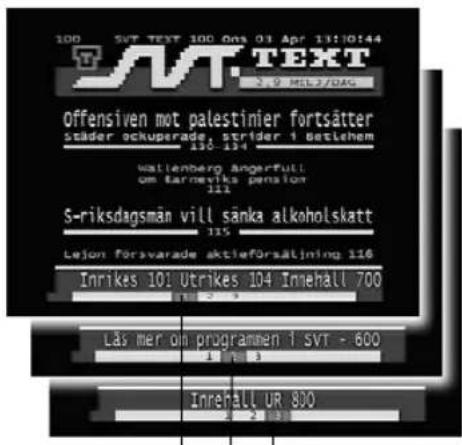
Watching TV & listening to the radio
Folder functions
The “All TV” folder can contain hundreds of channels. Create a new favourite folder, e.g. “Sports” or “Movies”, in which you can put the bookmarks of the channels you most often watch. That way you can make channel handling more convenient.
You can create your own favorite folders for both TV and Radio channels.
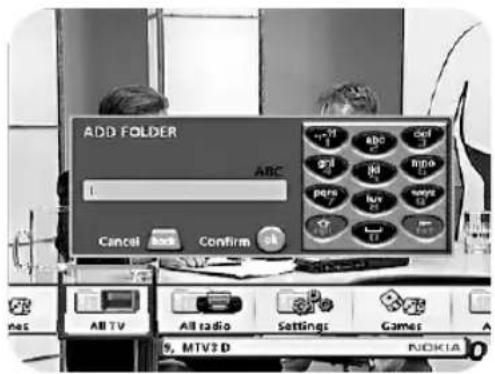
Add folder
This procedure is the same whether you enter a name for the fist time or make a change to an existing name.
- Press ok to create a new folder.
- To give it a specific name: Enter the characters by using the numeric buttons.
- Use the opt button to toggle between capital and lowercase letters.
- Use txt to delete the character located in behind the marker.
- In case you need to go back/forward within a word to add or delete a character, use to move the marker.
Edit name
From here you can change the name of an existing folder. The procedure is the same as when you first created the folder.
Please note that the system folders (All TV/Radio, Settings, Games) cannot be edited.
Edit icon
From here you can change the icon of an existing folder. The procedure is the same as when you created the folder.
Please note that the system folders (All TV/Radio, Settings, Games) cannot be edited.
Move folder
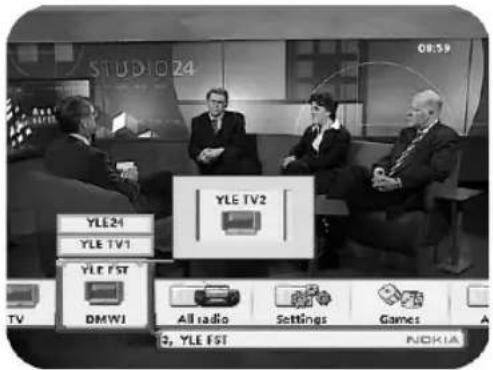
You can move the folder in the focus area to any location in the horizontal bar. Use the ◀▶ buttons to move. Press ok to confirm the new position or back to cancel.
Delete folder
This function deletes the folder in the focus area completely. Please note that the system folders (All TV/Radio, Settings, Games) cannot be deleted.
Bookmark functions
Copy bookmark
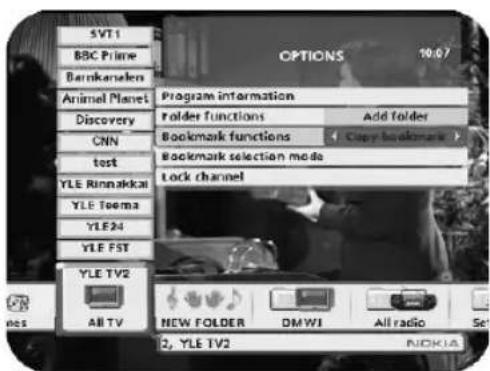
From here you can copy TV/Radio channel bookmarks to the favourite folder of your choice.
Watching TV & listening to the radio
- Open Navi Bars.
- Select the channel bookmark in the All TV/All Radio folder you want to copy.
- Press opt to open the Options menu and step down to Bookmark functions.
- Select copy bookmark.
- Step to the favourite folder where you want the channel bookmark to be included.
- Press ok to put the channel bookmark in the favourite folder.
Move bookmark
Channel bookmarks can be moved within a favourite folder and between favorite folders.
- Mark a channel bookmark in a favourite folder by pressing ok.
- Use the arrow keys to move the marked channel bookmark to the desired position within the same folder or to another favourite folder.
- Press ok when the channel bookmark is positioned where you want it.
Delete bookmark
Delete the channel bookmark in the focus area.
Please note that bookmarks in the System folders(All TV/Radio, Settings, Games) cannot be deleted.
Bookmark selection mode
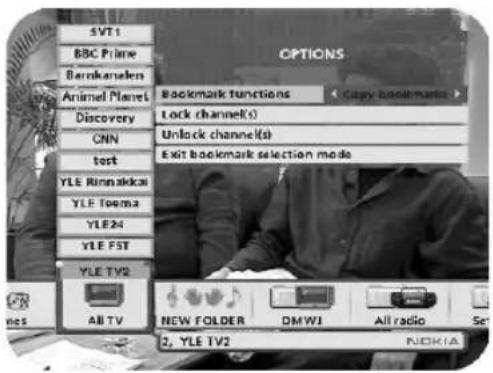
From the Bookmark selection mode you can mark several channel bookmarks at the same time.
- Select the folder where you want to mark several channel bookmarks.
- Press opt to open the Options menu
- Step to bookmark selection mode
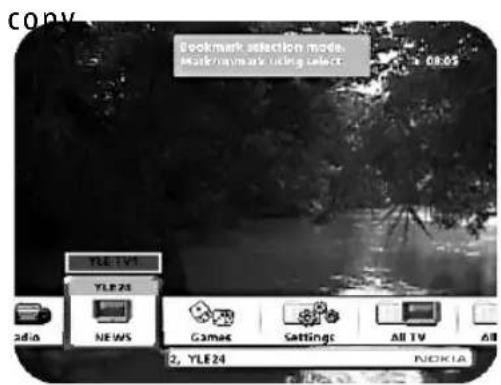
- Press ok and a banner will inform you that you are in the Bookmark selection mode.
- With the step to each of the desired channel bookmark
- Press ok on each of the channel bookmark you want to move or delete.
-
When all channel bookmarks are marked, press opt again and select what to do with the channels:
-
Copy, move or delete the channels
- Lock or unlock the channels.
To watch locked channels you need to enter the access code which is set to 1234 from the factory.
Navigating with Navi Bars
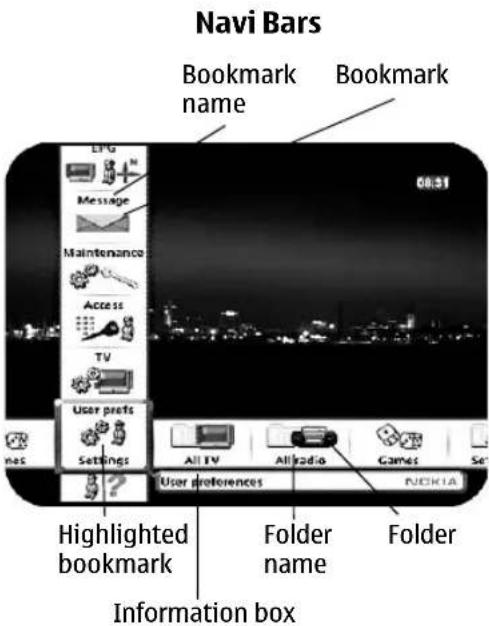
Navi Bars are used for selecting TV/Radio channels and to enter menus in which you can perform different settings.
- Display Navi Bars by pressing the navi or ok button; to hide them, press the back button.
- When Navi Bars are displayed, you can move the folders in horizontal and vertical directions with the ▼▲ ◀▶ cursor buttons.
The horizontal row contains folders, e.g. All TV, All Radio and the Settings folder. Each folder contains one or more bookmarks.
• To move a folder into focus, use the buttons.
- When a folder is in focus the bookmarks will be shown in the vertical row.
- You select a bookmark using the buttons.
- To confirm the selection of, e.g., a TV channel or to open a bookmark, press the ok button.
Below the horizontal folder bar, there is an Information box for the currently highlighted bookmark.
When scrolling through TV or radio channels, the programmes can be marked with the following symbols in the Information box:
⊗ = the channel is encrypted
Info displays extended information, if available, for a highlighted programme or function.
If you open the Navi Bars and do not press any buttons on the remote control, the Navi Bars will automatically close after half a minute.
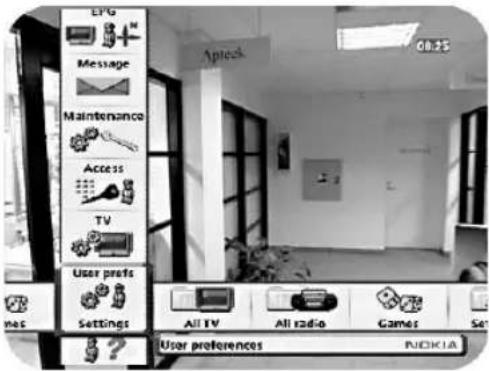
The Settings folder
Each of the bookmarks in the Settings folder contains menus from where you can change the settings of the Mediamaster.
For some of the menus, you will be asked to enter your access code.
The access code is set to 1234 at the factory.
The settings folders can not be deleted.
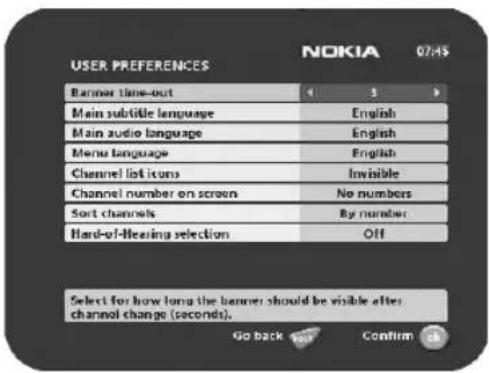
The User prefs folder
Banner time out
When you switch channels, an information banner will be shown for a few seconds. You can select the duration for which the banner will be shown.
Main subtitle language
If you select the "Visible" option for subtitling and more than one language is available, you may select a main language.
Main audio language
If more than one audio language is transmitted, you may select the main language.
Menu language
Select the language that you would like the menus to be shown in.
Channel list icons
In order to make the bookmark lists for TV and Radio channels shorter, you can hide the icons and only show the channel names.
Channel number on screen
Select whether you want the channel numbers to be displayed on the TV screen or not.
Sort channels
You can select how the channels shall be sorted in the All TV and All radio folders. Note! Sorting does not apply for Favourite folders.
Hard-of-Hearing selection
Some channels will transmit programmes that are automatically subtitled. Select On if you want the subtitling to be shown when it is included in the transmission.
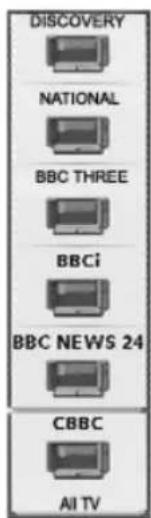
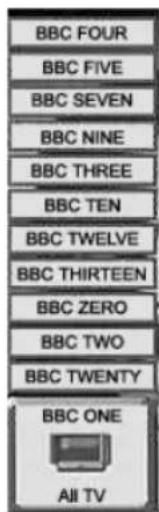
invisible iconsVisible icon
The TV folder
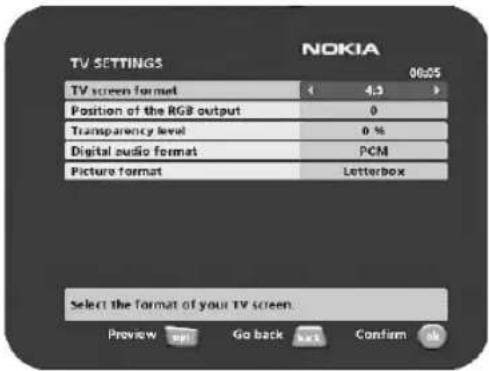
TV screen format
Select your TV screen format.
The 4:3 format is standard for most TV screens.
Select 16:9 for widescreen TV.
Press opt to get a TV programme in the background from which you can instantly watch the result of your choice.
Position of the RGB output
Adjust the horizontal position of the menus with the buttons.
Transparency level
From here you can adjust the transparency level of the menus shown on the TV screen.
Digital audio format
PCM (Puls Code Modulation) is the default setting when no external decoder is connected (e.g. a Dolby surround decoder.)
Select any of the appropriate alternatives AC-3, DTS or "AC-3 & DTS" when an external decoder is connected.
Picture format
If you do not have a widescreen TV and the transmission is in widescreen, you can select Fullscreen or Letterbox to change the display format. Fullscreen will fill up the screen vertically but cut some information from the left and right sides of the picture.
Letterbox will give a complete picture, but leave black areas at the top and bottom.
Press back to return to TV/radio mode.

natural_image
Black-and-white photo of a person covering their face with hands, no visible text or symbols'Fullscreen'

'Letterbox'
Access folder
To open this menu, you will be asked to enter your access code.
The access code is set to 1234 at the factory.
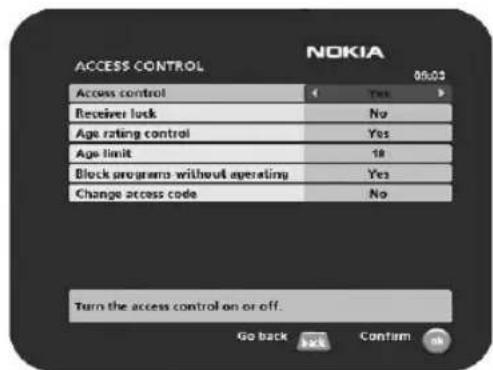
Access control
You can turn off the settings made in this Access Control menu by selecting "No".
Receiver lock
To open this menu, you will be asked to enter your access code.
The access code is set to 1234 at the factory.
If you select "Yes", you will have to enter the access code every time you start the Mediamaster from standby.
Age rating control
If you want everybody to have access to all available types of programmes, select "No".
If you select "Yes", you may block programmes unsuitable for children.
Age Limit
Select an age limit between 3 and 18 years on the line that appears.
NOTE: you should be aware that not all service providers have the necessary codes for these functions implemented in their transmissions.
Block programs without agerating
Select "Yes" and all programs will be blocked. You then will have to enter the access code every time you select a new channel to watch.
Change access code
You can change the access code from the standard factory setting of 1234.
NOTE: do not forget your access code as without it, you will not have access to any of the functions that require the code.
If you should forget it, please contact Nokia Support for help.
Maintenance folder
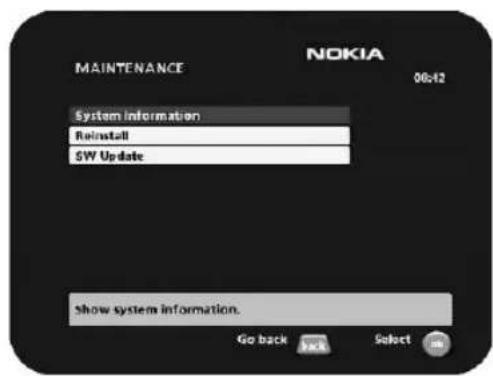
System Information
When you enter the Maintenance folder, you will find general information about which hardware and software version your Mediamaster is running on.
Reinstall
Only use this option if you have to start the complete installation procedure from scratch. If you continue from here, all your previous settings, access code and favourite channels, etc. will be erased.
If you do not want to reinstall, you can leave this menu when the warning is displayed by pressing "back".
SW update
Your Mediamaster will advise you from time to time of any new software upgrades using information sent via the cable network.
This will appear as a message on your TV screen asking you to press ok to start the download. You are strongly advised to accept the download as this might enable you to receive new features and/or services that may be available to you. You can choose to postpone the download for a more convenient time by pressing the back button. The message will appear again provided that the software is still being broadcast.
NOTE: These messages will only appear if your Mediamaster has been switched on from Standby.
It is advisable to put your Mediamaster into standby when not in use.
After downloading a new software version, all your previous settings, access code and favourite channels, etc. will be erased.
NOTE: It may take a while to complete the update.
NEVER turn off the Mediamaster, never use the remote control or disconnect the antenna cable during the download procedure as this will damage the software and the receiver will have to be sent in for service.
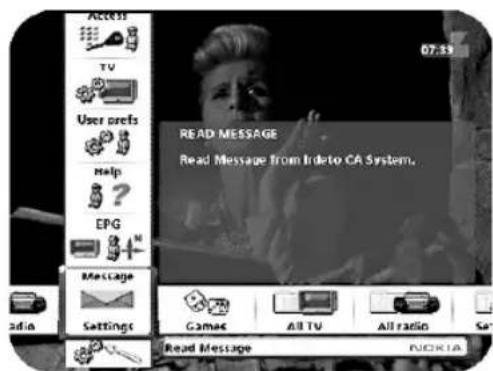
Message folder
Messages from the Service Provider can be shown in this menu.
EPG (Electronic Programme Guide)
In the EPG folder (Electronic Programme Guide) you will find information about the programmes for the current day and for the following seven days (provided that this
information is included in the channel transmission from the distributor.)
You may also select the Type of programme you want information about, e. g. Movie, Sports or Music.
Use the arrow buttons to navigate within the guide.
Exit the guide by pressing the ok or back button.
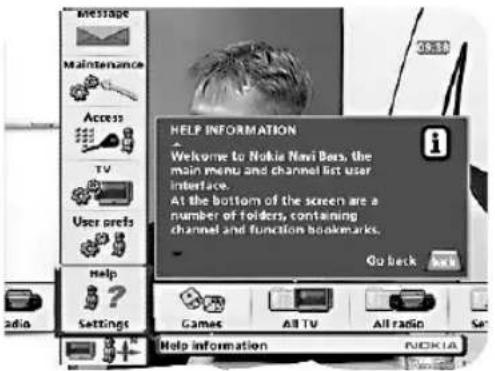
Help information. Select pages with the buttons.
Technical specifications
Supply voltage for the
separate Power Supply 110-240V AC, 50-60Hz
From the Power supply to the
box 16 V
Power consumption max 9 W
Power consumption in standby 2 W
Operating temperature +5°C to +45°C
Storage temperature - 40°C to +65°C
Humidity 25 to 90% rel humidity
Operating distance for remote control max 10 meters
Dimensions (w x d x h) 170 x 165 x 45 mm
Transmission standards DVB-C
Tuner input & Demodulator
Input connector 1 x IEC 169-2 (female)
RF input frequency 110-862 MHz
Input impedance 75 Ohm
Bypass frequency 47-862 MHz
Output connector 1 x IEC (male)
Modulation format 16 - 256 QAM
Symbol rate 2-6,95
TV SCART
Video output 1 V pp 75 Ohm
Audio output 0.5 V_rms/R_L > 10 Ohm
RGB output Internal RGB
RGB bandwidth 5.8 MHz ±3 dB
Fast blanking output Internal or from AUX SCART
Status output 0/6/12 V/ R _L 10 kOhm
DIGITAL AUDIO (S/PDIF)
Connector 1 x RCA
AUDIO
Optical TOS-link connector For PCM, DTS and Dolby Digital Bitstream audio output signals
The Irdeto Conditional Access (CA) System is embedded.
Nokia Mediamaster software end-user license
IMPORTANT: READ CAREFULLY BEFORE OR USING THE SOFTWARE NOKIA CORPORATION MULTIMEDIA END-USER SOFTWARE AGREEMENT
This Software Agreement (“Agreement”) is between You (either an individual or an entity), the End User, and Nokia Corporation Multimedia, (“Nokia”). The Agreement authorizes You to use the Software specified in Clause 1 below and which is included in this Nokia digital TV receiver. This is an agreement on end-user rights and not an agreement concerning sale.
Read this Agreement carefully before using the Software. By using this Nokia digital TV receiver, You agree to the terms and conditions of this Agreement. If You do not agree to all of the terms and conditions of this Agreement, return this Nokia digital TV receiver and accompanying documentation to the place of purchase. YOU AGREE THAT YOUR USE OF THE SOFTWARE ACKNOWLEDGES THAT YOU HAVE READ THIS AGREEMENT, UNDERSTAND IT, AND AGREE TO BE BOUND BY ITS TERMS AND CONDITIONS.
-
SOFTWARE. As used in this Agreement, the term "Software" means, collectively: (i) the software product identified above (ii) digital images, stock photographs, clip art, or other artistic works ("Stock Files") (iii) related explanatory written materials and any other possible documentation related thereto ("Documentation"); (iv) fonts, and (v) upgrades, modified versions, updates, additions, and copies of the Software, if any, licensed to You by Nokia under this Agreement.
-
END-USER RIGHTS AND USE. Nokia grants to You non-exclusive, non-transferable end-user rights to use the Software on this Nokia digital TV receiver only.
-
LIMITATIONS ON END-USER RIGHTS. You may not copy, distribute, or make derivative works of the Software except as follows:
(a) You may transfer all your rights to the Software at the same time as You transfer this Nokia digital TV receiver on a permanent basis, provided that You transfer this Nokia digital TV receiver and all copies of the related Documentation, do not retain any copies by yourself, and the recipient agrees to the terms and conditions of this Agreement.
(b) You may not use, modify, translate, reproduce, or transfer the right to use the Software or copy the Software except as expressly provided in this Agreement.
(c) You may not resell, except as set forth in clause 3 (a), sublicense, rent, lease, or lend the Software.
(d) You may not reverse engineer, decompile, disassemble, or otherwise attempt to discover the source code of the Software (except to the extent that this restriction is expressly prohibited by law) or create derivative works based on the Software.
(e) Unless stated otherwise in the Documentation, You shall not display, modify, reproduce, or distribute any of possible the Stock Files included with the Software. In the event that the Documentation allows You to display the Stock Files, You shall not distribute the Stock Files on a stand-alone basis, i.e., in circumstances in which the Stock Files constitute the primary value of the product being distributed. You should review the "Readme" files (if any) associated with such Stock Files that You use to ascertain what rights You have with respect to such materials. Stock Files may not be used in the production of libelous, defamatory, fraudulent, infringing, lewd, obscene, or pornographic material or in any otherwise illegal manner. You may not register or claim any rights in the Stock Files or derivative works thereof.
(f) You agree that You shall only use the Software in a manner that complies with all applicable laws in the jurisdiction in which You use the Software, including, but not limited to, applicable restrictions concerning copyright and other intellectual property rights.
-
COPYRIGHT. The Software and all rights, without limitation including proprietary rights therein, are owned by Nokia and/or its licensors and affiliates and are protected by international treaty provisions and all other applicable national laws of the country in which it is being used. The structure, organization, and code of the Software ae the valuable trade secrets and confidential information of Nokia and/or its licensor and affiliates. You must not copy the Software
-
COMMENCEMENT & TERMINATION. This Agreement is effective from the first date You use this Nokia digital TV receiver. You may terminate this Agreement at any time by returning, at Your own costs, this Nokia digital TV receiver, and all related materials provided by Nokia. Your end-user rights automatically and immediately terminate without notice from Nokia if You fail to comply with any provision of this Agreement. In such an event, You must immediately return at Your own cost, this Nokia digital TV receiver, and all related material to the place of purchase.
-
NO OTHER OBLIGATIONS. This Agreement creates no obligations on the part of Nokia other than as specifically set forth herein.
-
LIMITATION OF LIABILITY. TO THE MAXIMUM EXTENT PERMITTED BY APPLICABLE LAW, IN NO EVENT SHALL NOKIA, ITS EMPLOYEES OR LICENSORS OR AFFILIATES BE LIABLE FOR ANY LOST PROFITS, REVENUE, SALES, DATA, OR COSTS OF PROCUREMENT OF SUBSTITUTE GOODS OR SERVICES, PROPERTY DAMAGE, PERSONAL INJURY, INTERRUPTION OF BUSINESS, LOSS OF BUSINESS INFORMATION, OR FOR ANY SPECIAL, DIRECT, INDIRECT, INCIDENTAL, ECONOMIC, COVER, PUNITIVE,
SPECIAL, OR CONSEQUENTIAL DAMAGES, HOWEVER CAUSED AND WHETHER ARISING UNDER CONTRACT, TORT, NEGLIGENCE, OR OTHER THEORY OF LIABILITY ARISING OUT OF THE USE OF OR INABILITY TO USE THE SOFTWARE, EVEN IF NOKIA OR ITS LICENSORS OR AFFILIATES ARE ADVISED OF THE POSSIBILITY OF SUCH DAMAGES. BECAUSE SOME COUNTRIES/STATES/JURISDICTIONS DO NOT ALLOW THE EXCLUSION OF LIABILITY, BUT MAY ALLOW LIABILITY TO BE LIMITED, IN SUCH CASES, NOKIA, ITS EMPLOYEES OR LICENSORS OR AFFILIATES' LIABILITY SHALL BE LIMITED TO U.S. \$50.
Nothing contained in this Agreement shall prejudice the statutory rights of any party dealing as a consumer. Nokia is acting on behalf of its employees and licensors or affiliates for the purpose of disclaiming, excluding, and/or restricting obligations, and liability as provided in this clause 7, but in no other respects and for no other purpose.
-
EXPORT CONTROL. The Software, including technical data, includes cryptographic software subject to export controls under the U.S. Export Administration Regulations ("EAR") and may be subject to import or export controls in other countries. The EAR prohibits the use of the Software and technical data by a Government End User, as defined hereafter, without a license from the U.S. government. A Government End User is defined in Part 772 of the EAR as "any foreign central, regional, or local government department, agency, or other entity performing governmental functions; including governmental research institutions, governmental corporations, or their separate business units (as defined in part 772 of the EAR) which are engaged in the manufacture or distribution of items or services controlled on the Wassenaar Munitions List, and international governmental organizations. This term does not include: utilities (telecommunications companies and Internet Service Providers; banks and financial institutions; transportation; broadcast or entertainment; educational organizations; civil health and medical organizations; retail or wholesale firms; and manufacturing or industrial entities not engaged in the manufacture or distribution of items or services controlled on the Wassenaar Munitions List.)" You agree to strictly comply with all applicable import and export regulations and acknowledge that You have the responsibility to obtain licenses to export, re-export, transfer, or import the Software. You further represent that You are not a Government End User as defined above, and You will not transfer the Software to any Government End User without a license.
-
CONTACT DETAILS. If You want to contact Nokia in respect of this Agreement, contact Nokia at the following address:
Nokia Corporation Multimedia
Keilalahdentie 2-4,
P.O. Box 226
FIN-00045 Nokia Group, Finland
Tel. +358 7180 08000
- APPLICABLE LAW & GENERAL PROVISIONS.
This Agreement is governed by the laws of Finland. All disputes arising from or relating to this Agreement shall be settled by a single arbitrator appointed by the Central Chamber of Commerce of Finland. The arbitration procedure shall take place in Helsinki, Finland in the English language. If any part of this Agreement is found void and unenforceable, it will not affect the validity of the balance of the Agreement, which shall remain valid and enforceable according to its terms. This Agreement may only be modified in writing by an authorized officer of Nokia.
This is the entire agreement between Nokia and You relating to the Software, and it supersedes any prior representations, discussions, undertakings, end-user agreements, communications, or advertising relating to the Software
Nokia is a registered trademark of Nokia Corporation
www.nokia.com

- Mediamaster 119 C
- Contents
- Remote control 4
- Connecting the Mediamaster 5
- First-time installation 8
- First-time installation 9
- Watching TV & listening to the radio 10
- Navi Bars 16
- Technical specifications 22
- Nokia Mediamaster software
- end-user license 23
- Read this before using the Mediamaster
- Remote control
- Front and Rear panel
- antenna cable
- Connecting the Mediamaster
- Preparing the remote control
- \* \* The TV SCART Socket
- Common Connections
- Connecting to the TV with SCART
- Connecting a Video recorder with SCART
- Connecting the Mediamaster & First-time installation
- About Smart card
- Connecting a Hi-fi system
- First-time installation general information
- Switching on and start
- First-time installation
- Language
- Channel search
- Channel search in progress
- Watching TV & listening to the radio
- General information
- Programme information
- Temporary settings
- Audio selection
- Audio language
- Picture format
- Programme Guide, EPG
- External equipment
- Sorting channels
- Teletext
- Folder functions
- Add folder
- Edit name
- Edit icon
- Move folder
- Delete folder
- Bookmark functions
- Copy bookmark
- Move bookmark
- Delete bookmark
- Bookmark selection mode
- Navigating with Navi Bars
- The Settings folder
- The User prefs folder
- Banner time out
- Main subtitle language
- Main audio language
- Menu language
- Channel list icons
- Channel number on screen
- Sort channels
- Hard-of-Hearing selection
- The TV folder
- TV screen format
- Position of the RGB output
- Transparency level
- Digital audio format
- Access folder
- Access control
- Receiver lock
- Age rating control
- Age Limit
- Block programs without agerating
- Change access code
- Maintenance folder
- System Information
- Reinstall
- SW update
- Message folder
- EPG (Electronic Programme Guide)
- Technical specifications
- Transmission standards DVB-C
- Tuner input & Demodulator
- TV SCART
- DIGITAL AUDIO (S/PDIF)
- AUDIO
- Nokia Mediamaster software end-user license
Brand : NOKIA
Model : 119C
Category : Satellite receiver