
FR-2B - Hi-Fi System ROLAND - Free user manual and instructions
Find the device manual for free FR-2B ROLAND in PDF.


| Product Type | V-Accordion (Digital Accordion) |
| Model | Roland FR-2 / FR-2b |
| Keyboard (Right Hand) | FR-2: 34 piano keys (velocity sensitive); FR-2b: 82 buttons (velocity sensitive) |
| Keyboard (Left Hand) | 96 velocity-sensitive bass buttons |
| Bellows | Real pneumatic detection with high-resolution pressure sensor; bellows resistance regulator |
| Sound Engine | Physical Behavior Modeling (PBM); 64-voice polyphony; 16 MB waveform ROM |
| Accordion Sets | 8 Sets, each with 10 Treble registers, 5 Bass registers, 5 Orchestra Bass registers, 5 Orchestra Chord registers, 6 Orchestra sounds |
| Effects | Reverb (8 types), Chorus (8 types) |
| Musette Tuning | 15 presets (Dry, Classic, F-Folk, American L/H, North Europe, German L/H, D-Folk L/H, Alpine, Italian L/H, French, Scottish) |
| Power Supply | External AC adaptor (supplied) or 8 optional AA batteries |
| Power Consumption | 500 mA (with adaptor) |
| Battery Life | Approx. 5 hours (Ni-MH 2500 mAh) |
| Dimensions (FR-2b) | 388.4 (H) x 471.5 (W) x 247.2 (D) mm |
| Dimensions (FR-2) | 425.5 (H) x 471.5 (W) x 244.3 (D) mm |
| Weight | 7.5 kg (without straps or batteries) |
| Connectors | HEADPHONE (stereo), OUTPUT L/MONO & R/MONO, MIDI OUT/IN, DC IN |
| Included Accessories | AC adaptor, Owner's Manual, straps, battery holder (pre-installed), 6 traforo covers, (FR-2b: reference caps for treble buttons) |
| Maintenance | Clean with soft dry cloth; do not use benzene, thinner, alcohol or solvents |
| Safety | Follow warning instructions; use only supplied AC adaptor; avoid extreme temperatures; do not disassemble |
| Repair Service | Refer to nearest Roland Service Center or authorized distributor (see manual for worldwide list) |
Frequently Asked Questions - FR-2B ROLAND
User questions about FR-2B ROLAND
0 question about this device. Answer the ones you know or ask your own.
Ask a new question about this device
Download the instructions for your Hi-Fi System in PDF format for free! Find your manual FR-2B - ROLAND and take your electronic device back in hand. On this page are published all the documents necessary for the use of your device. FR-2B by ROLAND.
USER MANUAL FR-2B ROLAND
natural_image
Black and white photo of an old Poland accordion with visible branding and buttons (no text or symbols on the instrument itself)Owner's Manual
CE
For EU Countries
This product complies with the requirements of European Directive EMC 89/336/EEC.
This equipment has been tested and found to comply with the limits for a Class B digital device, pursuant to Part 15 of the FCC Rules. These limits are designed to provide reasonable protection against harmful interference in a residential installation. This equipment generates, uses, and can radiate radio frequency energy and, if not installed and used in accordance with the instructions, may cause harmful interference to radio communications. However, there is no guarantee that interference will not occur in a particular installation. If this equipment does cause harmful interference to radio or television reception, which can be determined by turning the equipment off and on, the user is encouraged to try to correct the interference by one or more of the following measures:
- Reorient or relocate the receiving antenna.
— Increase the separation between the equipment and receiver. - Connect the equipment into an outlet on a circuit different from that to which the receiver is connected.
- Consult the dealer or an experienced radio/TV technician for help.
This device complies with Part 15 of the FCC Rules. Operation is subject to the following two conditions:
(1) This device may not cause harmful interference, and
(2) This device must accept any interference received, including interference that may cause undesired operation.
Unauthorized changes or modification to this system can void the users authority to operate this equipment.
This equipment requires shielded interface cables in order to meet FCC class B Limit.
For Canada
NOTICE
This Class B digital apparatus meets all requirements of the Canadian Interference-Causing Equipment Regulations.
AVIS
IMPORTANT: THE WIRES IN THIS MAINS LEAD ARE COLOURED IN ACCORDANCE WITH THE FOLLOWING CODE.
BLUE: NEUTRAL
BROWN: LIVE
As the colours of the wires in the mains lead of this apparatus may not correspond with the coloured markings identifying the terminals in your plug, proceed as follows:
The wire which is coloured BLUE must be connected to the terminal which is marked with the letter N or coloured BLACK.
The wire which is coloured BROWN must be connected to the terminal which is marked with the letter L or coloured RED.
Under no circumstances must either of the above wires be connected to the earth terminal of a three pin plug.
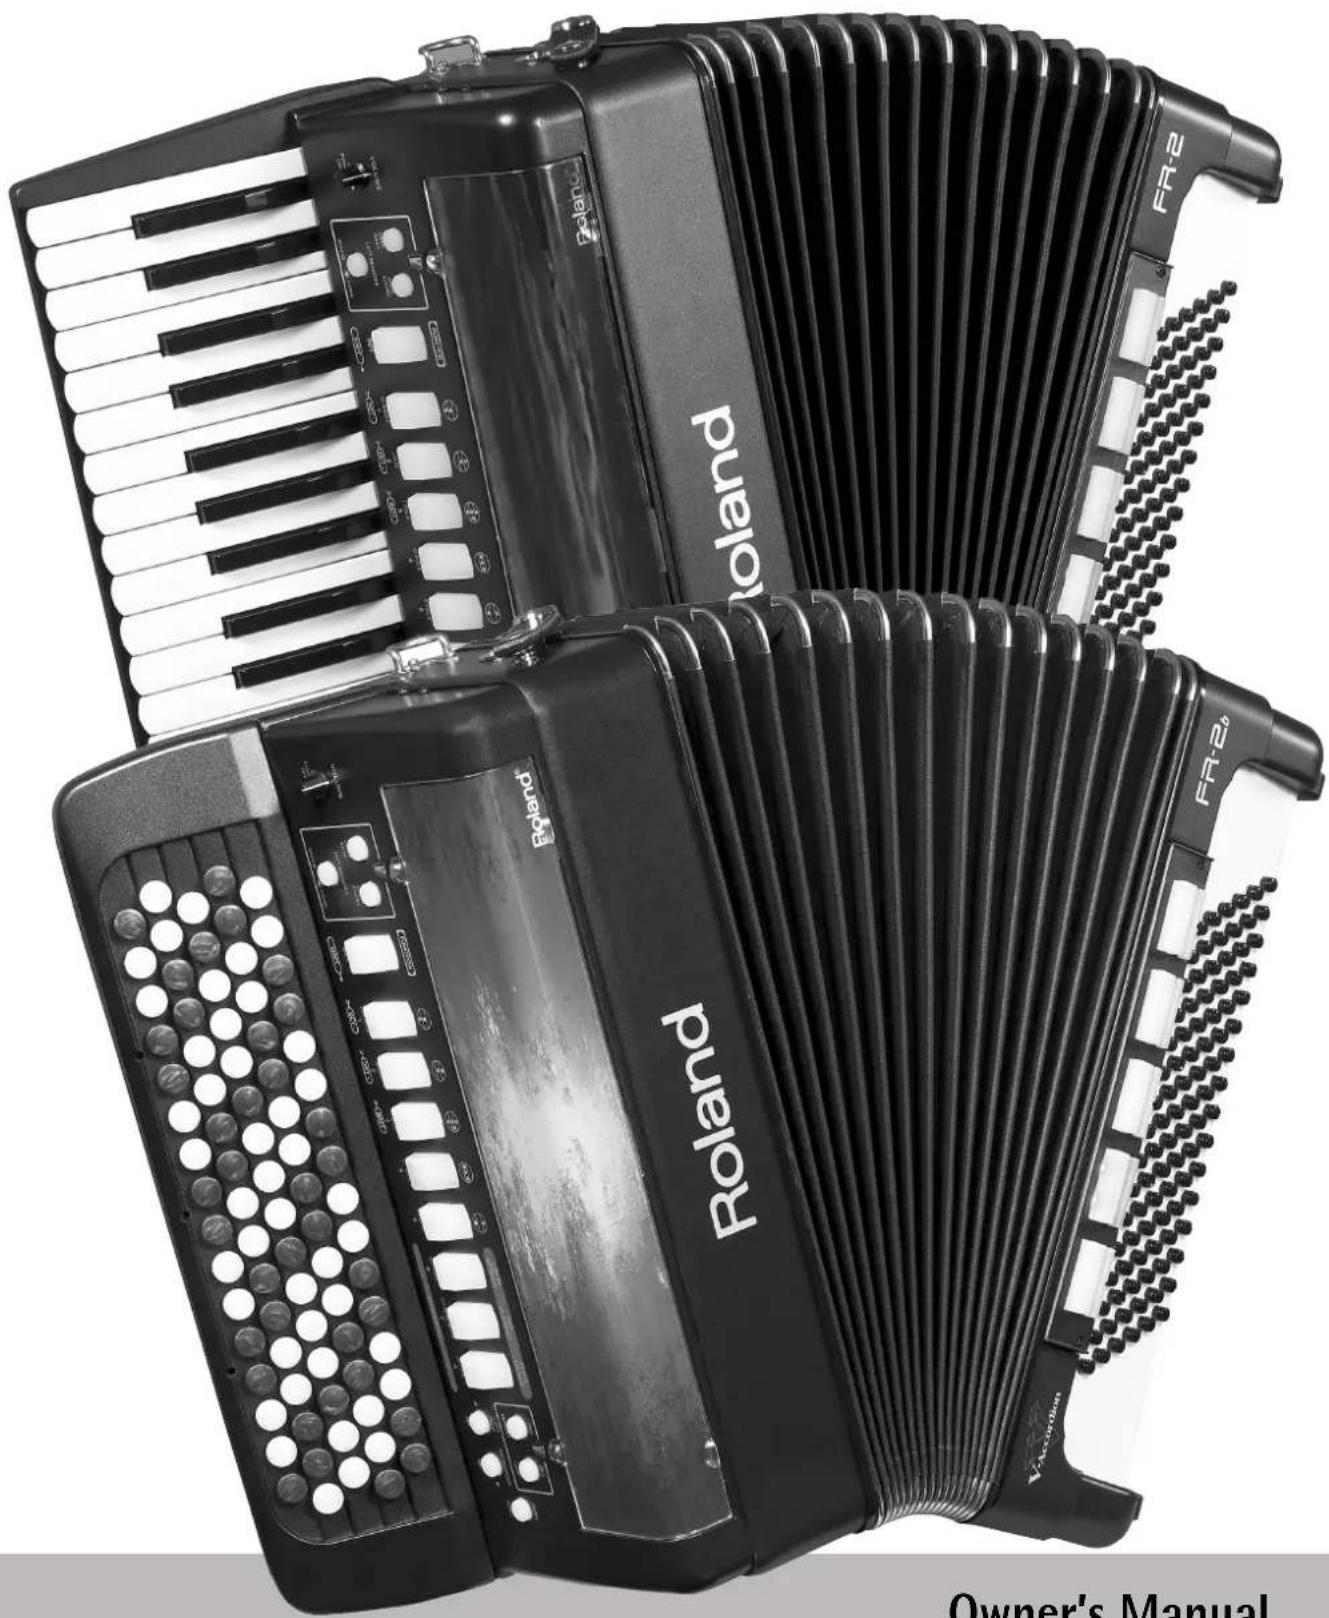
Thank you for purchasing the Roland FR-2/FR-2b V-Accordion. The FR-2/FR-2b is an amazingly versatile electronic instrument that can emulate the sounds of a vast array of accordions. The major advantage of the FR-2/FR-2b is that it allows you to change sounds without changing instruments. Apart from the financial benefit (the FR-2/FR-2b costs only a fraction of all emulated originals), this also means that you can use your familiar playing style and techniques while covering a host of different musical genres.
Before using this instrument, carefully read the "Important notes" (p. 5). They provide information concerning the proper operation of the FR-2/FR-2b. Be sure to keep this manual in a safe place for future reference.
This manual applies to two instruments:
FR-2 (the keyboard version) FR-2b (the button version)

This product must be disposed of separately at
your local waste recycling centre.
Do not dispose of in household waste bin.
The technology used in the FR-2 and FR-2b is covered by U.S. Patent No. 6.946.594.
1. Features
PBM (Physical Behavior Modeling)
The FR-2/FR-2b V-Accordion is based on Roland's sound generation technology called "PBM" (Physical Behavior Modeling) whose sonic result is very close to the sound of traditional accordions.
Super realistic accordion simulations
The FR-2/FR-2b provides 8 memories called "Sets", with 10 treble registers and 5 bass & chord registers. All sounds it produces were obtained by sampling popular traditional acoustic accordions. Different tuning systems are also available.
Orchestral sounds
6 orchestral sounds are available for use instead of the traditional accordion sounds. The FR-2/FR-2b also provides 5 orchestral bass and chord sounds for the Bass and Chord sections.
The digital advantage
The V-Accordion includes all functions and sounds of a traditional accordion, thus conveying a truly natural feel and sound. Yet it also provides the advantages only an electronic musical instrument can give you:
- reduced overall weight;
- possibility to choose among a wide variety of sounds;
- t uning stability over time and wear resistance of all mechanical parts;
- you can sound in a different key than the one you are playing in (transpose function);
- you can play with headphones, i.e. without disturbing your neighbors or family.
Superb performance flexibility
The V-Accordion allows you to control external MIDI-compatible instruments. The Treble keyboard and chord/bass buttons are velocity-sensitive, while the bellows controller provides more articulation possibilities than any other MIDI keyboard, MIDI wind instrument, etc., you may know.
Useful accessory
The FR-2/FR-2b has a compartment for optional AA-type batteries. Consider purchasing such batteries (you will need 8) when performing on stage.
- All product names mentioned in this document are trademarks or registered trademarks of their respective owners.
Contents
- Features .... 3
- Important notes .... 5
- Panel descriptions....7
Treble control panel 7
Bass control panel....8
Connection panel 9
Personalizing your FR-2/FR-2b 9 - Setting up 10
Connections.... 10
Switching the power on and off.... 10
Listening to the demo songs.... 11
Touring the FR-2/FR-2b's sections 11
Using the orchestral sounds.... 12 - Other practical functions.... 14
Switching off sections you don't need 14
Using the metronome.... 14
Pitch-related functions 15
Song function 15
PAD function 16 - Editing FUNCTION settings ..... 18
Selecting the desired function 18
Parameters.... 18 -
MIDI parameters (FUNCTION group)....20
MIDI parameters.... 21 -
Saving your settings (User Program) 22
- Changing your accordion's behavior ..... 23
Treble Mode (only on the FR-2b) 23
Bass & Chord Mode 23 - Restoring the factory defaults 26
- Using optional batteries 27
- Specifications 28
- Appendix....29
Demo Songs....29
MIDI Program change messages 29
MIDI Implementation Chart....30
USING THE UNIT SAFELY
INSTRUCTIONS FOR THE PREVENTION OF FIRE, ELECTRIC SHOCK, OR INJURY TO PERSONS
About ⚠ WARNING and ⚠ CAUTION Notices
| WARNING | Used for instructions intended to alert the user to the risk of death or severe injury should the unit be used improperly. |
| CAUTION | Used for instructions intended to alert the user to the risk of injury or material damage should the unit be used improperly.* Material damage refers to damage or other adverse effects caused with respect to the home and all its furnishings, as well to domestic animals or pets. |
About the Symbols
| The △ symbol alerts the user to important instructions or warnings. The specific meaning of the symbol is determined by the design contained within the triangle. In the case of the symbol at left, it is used for general cautions, warnings, or alerts to danger. | |
| The Ⓧ symbol alerts the user to items that must never be carried out (are forbidden). The specific thing that must not be done is indicated by the design contained within the circle. In the case of the symbol at left, it means that the unit must never be disassembled. | |
| The ● symbol alerts the user to things that must be carried out. The specific thing that must be done is indicated by the design contained within the circle. In the case of the symbol at left, it means that the power-cord plug must be unplugged from the outlet. |
ALWAYS OBSERVE THE FOLLOWING
WARNING
- Before using this instrument, read the instructions below and the Owner's Manual.
- Do not open (or modify in any way) the unit or its AC adaptor.
- Do not attempt to repair the FR-2/FR-2b or replace parts within it (except when this manual provides specific instructions directing you to do so). Refer all servicing to your retailer, the nearest Roland Service Center or an authorized Roland distributor, as listed on the "Information" page.
- Never use or store the FR-2/FR-2b in places that are:
- Subject to temperature extremes (e.g., direct sunlight in an enclosed vehicle, near a heating duct, on top of heat-generating equipment); or are
- Damp (e.g., baths, washrooms, on wet floors); or are
- Humid; or are
- Exposed to rain; or are
- Dusty; or are
- Subject to high levels of vibration.
- When not in use, do not place the FR-2b or FR-2 vertically due to instability. If placed in the vertical position on the floor/stage, ensure that it leans against a stable vertical surface e.g. a wall or a heavy musical instrument.
- The FR-2/FR-2b's adaptor should only be connected to a power supply of the type described in the operating instructions or as marked on the adaptor's label.
- Be sure to use only the AC adaptor supplied with the unit. Also, make sure the line voltage at the installation matches the input voltage specified on the AC adaptor's body. Other AC adaptors may use a different polarity, or be designed for a different voltage, so their use could result in damage, malfunction, or electric shock.
WARNING
- Do not excessively twist or bend the adaptor cord, nor place heavy objects on it. Doing so can damage the cord, producing severed elements and short circuits. Damaged cords are fire and shock hazards!
- Use only the attached power-supply cord. Also, the supplied power cord must not be used with any other device.
- This instrument, either alone or in combination with an amplifier and headphones or speakers, may be capable of producing sound levels that could cause permanent hearing loss. Do not operate for a long period of time at a high volume level or at a level that is uncomfortable. If you experience any hearing loss or ringing in the ears, you should immediately stop using the FR-2/FR-2b and consult an audiologist.


- Do not allow any objects (e.g., flammable material, coins, pins); or liquids of any kind (water, soft drinks, etc.) to penetrate the FR-2/FR-2b.
- Batteries must never be recharged (one-way batteries), heated, taken apart, or thrown into fire or water.
- In households with small children, an adult should provide supervision until the child is capable of following all rules essential for the safe operation of the FR-2/FR-2b.
- Protect the FR-2/FR-2b from strong impact. (Do not drop it!)
-
I immediately turn the power off, remove the adaptor from the outlet and request servicing by your retailer, the nearest Roland Service Center or an authorized Roland distributor, as listed on the "Information" page when:
-
The adaptor's cord or the plug has been damaged; or
- Objects have fallen into or liquid has been spilled onto the FR-2/FR-2b; or
- The unit has been exposed to rain (or otherwise has become wet); or
- The unit does not appear to operate normally or exhibits a marked change in performance.
- Do not force the adaptor to share an outlet with an unreasonable number of other devices. Be especially careful when using extension cords—the total power used by all devices you have connected to the extension cord's outlet must never exceed the power rating (watts/amperes) for the extension cord. Excessive loads can cause the insulation on the cord to heat up and eventually melt through.
WARNING
- Before using the FR-2/FR-2b in a foreign country, consult with your retailer, the nearest Roland Service Center or an authorized Roland distributor, as listed on the "Information" page.


CAUTION
- The FR-2/FR-2b should be located so that its location or position does not interfere with its proper ventilation.

- A Iways grasp only the plug on the power-supply cord when plugging into or unplugging from, an outlet or this unit.

- At regular intervals, you should unplug the AC adaptor and clean it by using a dry cloth to wipe all dust and other accumulations away from its prongs. Also, disconnect the power plug from the power outlet whenever the FR-2/FR-2b is to remain unused for an extended period of time. Any accumulation of dust between the power plug and the power outlet can result in poor insulation and lead to fire.

- If used improperly, batteries may explode or leak and cause damage or injury. In the interest of safety, please read and observe the following precautions.

- Carefully follow the installation instructions for batteries, and make sure you observe the correct polarity.
- Avoid using new batteries together with used ones. In addition, avoid mixing different types of batteries.
- Remove the batteries whenever the unit is to remain unused for an extended period of time.
- Used batteries must be disposed of in compliance with whatever regulations for their safe disposal that may be observed in the region in which you live.

- Try to prevent cords and cables from becoming entangled. Also, all cords and cables should be placed out of the reach of children.

- Never climb on top of, nor place heavy objects on the FR-2/FR-2b.

- Never handle the adaptor or its plugs with wet hands when plugging into or unplugging from, an outlet or this unit.

- If you need to move the FR-2/FR-2b, take note of the precautions listed below. Make sure to have a firm grip, to protect yourself from injury and the instrument from damage.

- D isconnect the adaptor.
• D isconnect all cords coming from external devices.
- Before cleaning the FR-2/FR-2b, turn off the power and unplug the adaptor from the outlet.

- Whenever you suspect the possibility of lightning in your area, disconnect the adaptor from the outlet.

- Should you remove screws, make sure to put them in a safe place out of children's reach, so there is no chance of them being swallowed accidentally.

2. Important notes
In addition to the items listed under "Using the unit safely" on p. 4, please read and observe the following:
Power supply
- Do not connect the FR-2/FR-2b to same electrical outlet that is being used by an electrical appliance that is controlled by an inverter (such as a refrigerator, washing machine, microwave oven, or air conditioner), or that contains a motor. Depending on the way in which the electrical appliance is used, power supply noise may cause this unit to malfunction or may produce audible noise. If it is not practical to use a separate electrical outlet, connect a power supply noise filter between this unit and the electrical outlet.
- Do not use this instrument on the same power circuit with any device that will generate line noise (such as an electric motor or variable lighting system).
- Before connecting the FR-2/FR-2b to other devices, turn off the power to all units. This will help prevent malfunctions and/or damage to speakers or other devices.
- The AC adaptor will begin to generate heat after long hours of consecutive use. This is normal, and is not a cause for concern.
- Although the LEDs are dark when the POWER switch is off, this does not mean that the unit has been completely disconnected from the power source. To turn off the power completely, first turn off the power switch (VOLUME knob), then unplug the power cord from the wall outlet. For this reason, the outlet to which you connect the power cord's plug should be one that is within easy reach.
Placement
- Using the FR-2/FR-2b near power amplifiers (or other equipment containing large power transformers) may induce hum. To alleviate the problem, change the orientation of this unit; or move it farther away from the source of interference.
- This device may interfere with radio and television reception. Do not use the FR-2/FR-2b in the vicinity of such receivers.
- Do not place the FR-2/FR-2b near devices that produce a strong magnetic field (e.g., loudspeakers).
• Install the FR-2/FR-2b on a solid, level surface. - Noise may be produced if wireless communications devices, such as cell phones, are operated in the vicinity of this unit. Such noise could occur when receiving or initiating a call or while conversing. Should you experience such problems, relocate such wireless devices so they are at a greater distance from this unit or switch them off.
-
Do not expose the unit to direct sunlight, place it near devices that radiate heat, leave it inside an enclosed vehicle or otherwise subject it to temperature extremes. Also, do not allow lighting devices that are normally placed very close to the unit (such as a piano light), or powerful spotlights to shine upon the same area of the unit for extended periods of time. Excessive heat can deform or discolor the unit.
-
To avoid possible breakdown, do not use the unit in a wet area, such as an area exposed to rain or other moisture.
- Do not allow rubber, vinyl or similar materials to remain on the instrument for long periods of time. Such objects can discolor or otherwise harmfully affect the finish.
- Do not put anything that contains water (e.g., flower vases) on the instrument. Also, avoid the use of insecticides, perfumes, alcohol, nail polish, spray cans, etc., near the unit. Swiftly wipe away any liquid that spills on the unit using a dry, soft cloth.
- Do not allow objects to remain on top of the keyboard or buttons. This can be the cause of malfunction, such as keys or buttons ceasing to produce sound.
- Do not paste stickers, decals or the like on this instrument. Peeling these off, particularly when strong adhesives have been used, can damage the instrument's exterior finish (the stickers provided with this instrument feature a weak adhesive).
Maintenance
- For everyday cleaning wipe the FR-2/FR-2b with a soft, dry cloth or one that has been slightly dampened with water. To remove stubborn dirt, use a mild, non-abrasive detergent. Afterwards, be sure to wipe the instrument thoroughly with a soft, dry cloth.
- Never use benzene, thinner, alcohol or solvents of any kind, to avoid the possibility of discoloration and/or deformation.
Repairs and data
- P lease be aware that all data contained in the instrument's memory may be lost when it is sent for repairs. In certain cases (such as when circuitry related to memory itself is out of order), we regret that it may not be possible to restore the data. Roland assumes no liability concerning such loss of data.
Additional precautions
- When moved from one location to another where the temperature and/or humidity is very different, water droplets (condensation) may form inside the FR-2/FR-2b. Damage or malfunction may result if you attempt to use the FR-2/FR-2b in this condition. Therefore, before using the FR-2/FR-2b, you must allow it to stand for several hours, until the condensation has completely evaporated.
- P lease be aware that the memory contents can be irretrievably lost as a result of a malfunction or the improper operation of the instrument.
-
Use a reasonable amount of care when using the instrument's buttons, other controls and jacks/connectors. Rough handling can lead to malfunctions.
-
When connecting/disconnecting cables, grasp the connector itself—never pull on the cable. This way you will avoid causing shorts or damage to the cable's internal elements.
- A small amount of heat will radiate from the instrument during normal operation. This is perfectly normal.
- To avoid disturbing your neighbors, try to keep the instrument's volume at reasonable levels. You may prefer to use headphones, so you do not need to be concerned about those around you (especially late at night).
- When you need to transport the instrument, package it in the box (including padding) that it came in. Otherwise, you will need to use equivalent packaging materials or a flightcase.
- Use Roland cables to make audio connections. If using some other make of connection cable, please note the following precautions. Some connection cables contain resistors. Do not use cables that incorporate resistors for connecting to this unit. The use of such cables can cause the sound level to be extremely low or impossible to hear. For information on cable specifications, contact the manufacturer of the cable.
Precautions for optional batteries
- The temperature range for use of the batteries depends on the battery type being used. Please see the documentation that came with the batteries.
- Do not use or store batteries at high temperature, such as in strong direct sunlight, in cars during hot weather or directly in front of heaters. This may cause battery fluid leakage, impaired performance and shorten the batteries' service life.
- Do not splash fresh or saltwater on a battery or allow the terminals to become damp. This may cause heat generation and formation of rust on the battery and its terminals.
- If newly purchased batteries exhibit rust, generate heat or seem abnormal in any other way, do not use them. Take them back to your dealer.
- Keep the batteries out of reach of babies or small children.
- Be sure to carefully instruct any person on the proper way of handling a battery.
- Never dispose of the battery in a fire. Never heat it. Doing so may melt the insulation, damage the gas release vents or protective devices, cause combustion through chemical reaction with generated hydrogen, ejection of battery fluid, bursting or fire.
- Do not use batteries with the positive (+) and negative (−) terminals reversed, as this may drain the batteries or cause abnormal chemical reactions.
- Do no strike or drop the batteries. Strong impact can cause leakage of battery fluid, heat generation, bursting or fire.
- Never try to connect several batteries in parallel as this may cause leakage of battery fluid, heat generation, bursting or fire.
- Do not alter or remove protective mechanisms or other parts. Never disassemble the batteries.
- If any fluid from a battery comes in contact with the eyes, flush the eyes immediately, washing them thoroughly with clean water from a tap or other source and consult a doctor. Strong alkaline fluid can damage the eyes and lead to permanent loss of eyesight.
- If skin or clothing comes in contact with any fluid from the battery, wash the area immediately with clean water from a tap. Battery fluid can cause skin damage.
- When a battery is no longer usable, dispose of it in accordance with all applicable local laws and regulations.
- If a battery leaks fluid, changes color or shape or changes in any other way, do not use it, otherwise it may cause heat generation, bursting or fire.
Battery handling
- Incorrect handling of batteries, rechargeable batteries, or a battery charger can cause leakage, overheating, fire, or explosion. Before use, you must read and strictly observe all of the precautions that accompany the batteries, rechargeable batteries, or battery charger. When using rechargeable batteries and a charger, use only the combination of rechargeable batteries and charger specified by the battery manufacturer.
Strap holder precaution
- Never unscrew the strap holder rings to avoid damaging the FR-2/FR-2b's plastic housing, which eventually compromises overall stability and safety.
3. Panel descriptions
Treble control panel
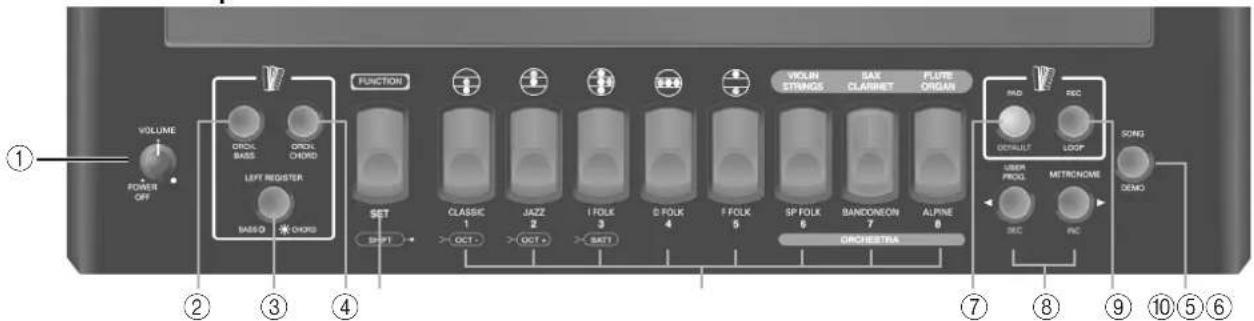
① VOLUME knob
This knob allows you to set the V-Accordion's overall volume. Turn it all the way to the left ("POWER OFF") to switch the FR-2/FR-2b off. Turn it towards the right to switch it on.
② ORCH BASS button
This button is used to switch the ORCHESTRAL BASS section on and off.
③ LEFT REGISTER button
This button is used to assign the 5 Bass registers to the BASS (light off) or CHORD section (light on). See page 13 for details.
④ ORCH CHORD button
This button is used to switch the ORCHESTRAL CHORD section on and off.
⑤ FUNCTION/SET register
This register has three functions: after pressing SET (it lights blue), you can use the Treble registers to select one of the following Sets: The Sets have been programmed at the factory and cannot be changed.
| 1 CLASSIC 5 F FOLK | |
| 2 JAZZ 6 SP FOLK | |
| 3 I | FOLK 7 BANDONEON |
| 4 D | FOLK 8 ALPINE |
By pressing and holding FUNCTION/SET, you gain access to "hidden" parameters and MIDI functions.
Press it together with register 1 or 2 to change octaves.
When you select Set 5, "F FOLK", the footages change as follows. This is not printed on the front panel, so please refer to the table below:
| Treble registers (Set 5) | |
| 1a Bossoon 4a Mr Gus | |
| 1b Jazy 4b Sw Valse | |
| 2a Arnold 5a SOS Muset | |
| 2b Bequine 5b Av Muset | |
| 3a 4wx | |
| 3b 4wx SW | |
⑥ Treble registers (1\~8)
The Treble section provides the following 5 switches ("registers") that allow you to select various accordion footages.
| Treble registers | |
| 1a Bassoon 4a Musette | |
| 1b Bagnon 4b Celeste | |
| 2a Clarinet | 5a Piccolo |
| 2b Ozone | 5b Organ |
| 3a Meater | |
| 3b Harmon | |
Each register 1\~5 allows you to select two registrations. When you select an accordion registration, the corresponding register lights green.
Registers 6\~8 can be used to select the following orchestral sounds (various musical instruments that are not related to the accordion):
| 6a | Violin | 8a | Flute |
| 6b | Strings | 8b | Organ |
| 7a | Sax | ||
| 7b | Clarinet |
Each register 6\~8 allows you to select two sounds. When you select an orchestral sound, the corresponding register lights yellow.
⑦ PAD/DEFAULT button
This button is used to switch the PAD function (see p. 16) on and off. While FUNCTION mode is active (see p. 18), this button allows you to recall the factory setting for the selected parameter.
⑧ USER PROG/DEC and METRONOME/INC buttons
The USER PROG button allows you to activate/switch off the FR-2/FR-2b's memory function (see p. 22). In FUNCTION mode, this button is used to decrease the value of the selected parameter.
The METRONOME button is used to switch the FR-2/FR-2b's metronome on and off (see p. 14). In FUNCTION mode, this button is used to increase the value of the selected parameter.
⑨ REC/LOOP button
This button is used to record a short drum/percussion phrase and to play it back repeatedly (see p. 17).
⑩ SONG/DEMO button
This button allows you to switch to SONG mode where you can practice your left- or right-hand playing using one of the 16 internal songs (the FR-2/FR-2b plays the part of the other hand). See page 15.
Press and hold this button to listen to the FR-2/FR-2b's demo songs.
Bass control panel
natural_image
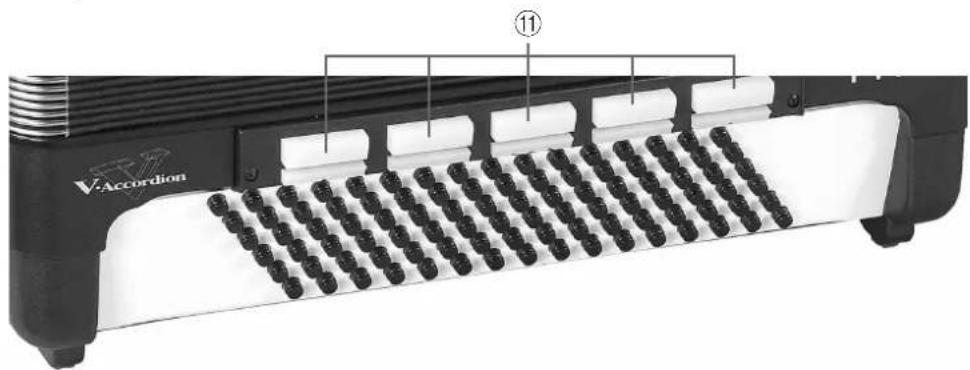
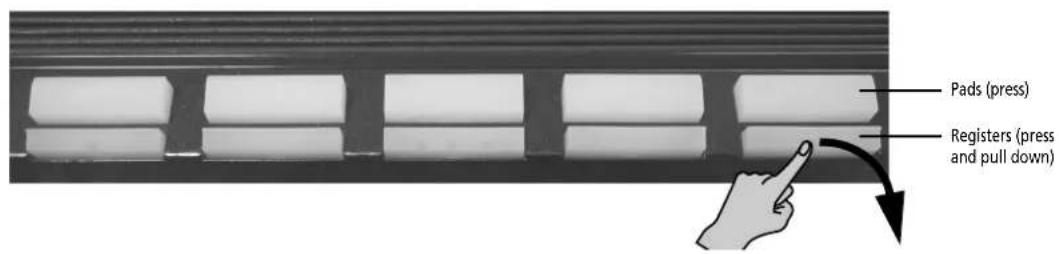
Black and white electronic device with black circular components, labeled with number 11 (no readable text or symbols beyond branding)⑪ Bass registers (lower row) and pads (upper row)
The lower switches allow you to select the desired bass mix (and chord). They include the following accordion footages:
| Bass registers | ||
| 1 | 2' | |
| 2 | 4' | |
| 3 | 16/858-4'/4'/2' | |
| 4 | 8 | '/4'/2' |
| 5 | 16/2" | |
Note: Each register is assigned to only one registration or sound (unlike the treble registers).
The FR-2/FR-2b allows you to play:
- a ccordion chord and bass sounds (like on an acoustic accordion);
- a accordion bass lines with orchestral chords (but no accordion chords);
- a accordion chord parts with orchestral bass notes (but no accordion bass notes).
That explains why the bass registers' assignments sometimes depend on the status of the LEFT REGISTER button. See p. 12 for details.
The bass registers are also used to select orchestral sounds for the Bass or Chord section.
The row closest to the bellows can be used to play drum and percussion sounds (PAD function, see p. 16).
Connection panel
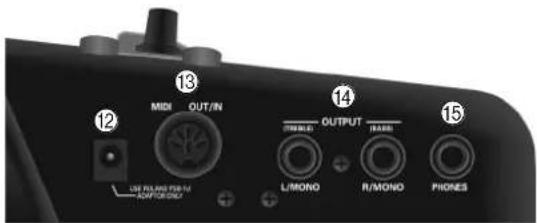
⑫ DC IN socket
This is where you can connect the supplied power adaptor (PSB-1U). Note that you can also purchase 8 optional batteries and use the FR-2/FR-2b without the adaptor.
⑬ MIDI OUT/IN socket
This socket can be used to receive or transmit MIDI data. Its function depends on the setting of the "MIDI Out/In" parameter (see p. 21).
Note: After selecting the "MIDI IN" setting, you will hear nothing when you play on the FR-2/FR-2b's keyboards: it will only respond to MIDI messages received from an external device.
⑭ OUTPUT L/MONO (TREBLE) & R/MONO (BASS) sockets
These sockets can be connected to an amplifier, a mixing console or a wireless system. If you use both connectors, the FR-2/FR-2b's output is stereo. In that case the signal of the Treble section is transmitted to the L/MONO socket, while the R/MONO socket trans-
mits the bass (and chord) signal. If you only use one jack (connected to the "L" or "R" socket), the FR-2/FR-2b's output is mono.
⑮ PHONES socket
This is where you can connect stereo headphones (Roland RH-A30, RH-200s or RH-300). Doing so does not mute the OUTPUT sockets.
Important remark
After connecting any cable to the FR-2/FR-2b, be sure to never place it on the side when not using it.
- A lways stand the V-Accordion on its rubber feet (and in the corresponding direction) to avoid damaging the plugs.
- A lways handle and move the FR-2/FR-2b with care and pay special attention to the cable slack to avoid damaging or bending the cables.
- If you place the FR-2/FR-2b on your lap, ensure that the audio and adaptor cables run between your legs (not sideways) to avoid damaging or bending the cables.
Personalizing your FR-2/FR-2b
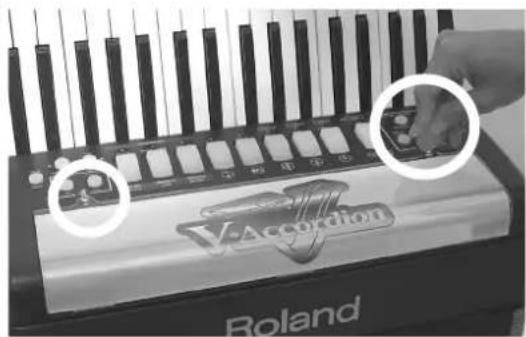
The artwork you see behind the treble registers (above the Roland logo) can be replaced either with one of the six sheets supplied with the FR-2/FR-2b or with a graphic you create yourself. To do so, proceed as follows:
(1) Use a coin to loosen the two screws holding the "traforo" cover:
natural_image
Close-up of a V-Anderson keyboard with a hand pressing a button (no visible text or symbols on the keys)Be careful not to turn the screws too far—they should remain in the traforo cover.
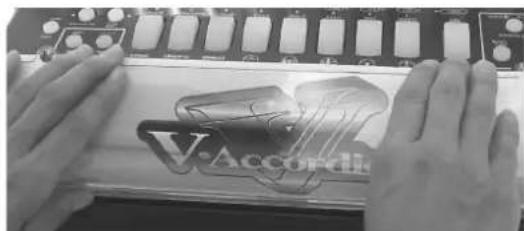
(2) After loosening both screws, you can open the traforo cover:
natural_image
Close-up of hands pressing a V-accordie logo on a computer monitor (no readable text or symbols)Note: Be careful not to scratch the housing of your FR-2/FR-2b.
(3) Remove the sheet from underneath the traforo cover and insert another one.
You can either insert one of the supplied sheets or create your own artwork. If you prefer to create your own, pay attention to the following:
- You can use your color printer and a graphic program to create your own artwork.
- Be sure to use paper or rather thin media-cardboard is usually too thick.
- F or a professional look, be sure to prepare a sheet with the following dimensions: 364mm (L) x 92.9mm (H).
(4) Secure the traforo cover by tightening the two screws using a coin.
4. Setting up
Connections
The FR-2/FR-2b has a compartment for 8 optional AA-type batteries. Consider purchasing such batteries when performing on stage.
Using the OUTPUT sockets
The FR-2/FR-2b needs to be connected to an amplification system. If you are using optional batteries and need to connect the FR-2/FR-2b to a PA system or mixer, we recommend using a wireless system to avoid having to use excessively long signal cables.
You can also use a pair of headphones (Roland RH-30A, RH-200, RH-200S or RH-300).
Note: To prevent malfunction and/or damage to speakers or other devices, always turn down the volume, and turn off the power on all devices before making any connections.
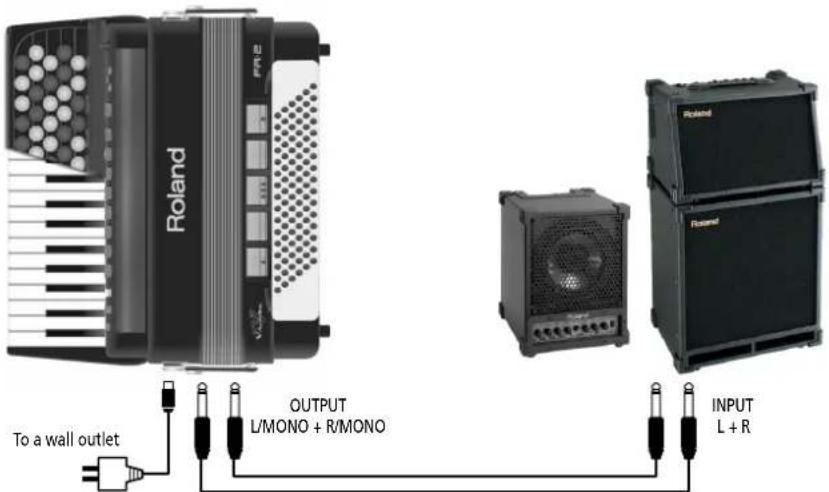
Use either a long signal cable (10m or more) or an optional wireless system (recommended).
Switching the power on and off
The power-on procedure depends on whether or not you are using optional batteries.
Note: If you decide to use rechargeable AA batteries, be aware that they cannot be recharged simply by leaving them in the FR-2/FR-2b's compartment and connecting the adaptor. You will need an external charging unit.
Note: Once the connections have been completed, turn on the power to your various devices in the order specified. By turning on devices in the wrong order, you risk causing malfunction and/or damage to speakers and other devices.
If you are using the supplied adaptor
(1) Connect the supplied adaptor to the FR-2/FR-2b's DC IN socket.
(2) Connect the adaptor to a wall outlet that meets the specifications (see p. 28).
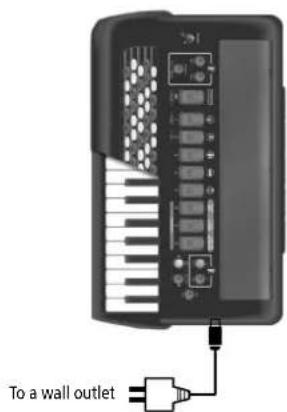
The adaptor should only be connected to a power source of the type marked on its label. For details on the power consumption, please refer to page 28.
(3) Turn down the output volume of the receiving audio device.
You can also simply switch it off.
(4) Connect the FR-2/FR-2b's OUTPUT sockets to the external audio device (amplifier, mixing console, etc.).
(5) Turn the FR-2/FR-2b's VOLUME knob ① from the "POWER OFF" position towards the right.
(6) Switch on the receiving audio device.
(7) Start playing.
Note: This unit is equipped with a protection circuit. A brief interval (a few seconds) after power up is required before the unit will operate normally.
—To switch off you system—
(8) Turn down the output volume of the receiving audio device or switch it off.
(9) Turn the FR-2/FR-2b's VOLUME knob ① all the way to the left ("POWER OFF").
If you are using batteries
The FR-2b needs to be connected to an amplification system of some sort (unless you want to use headphones).
(1) Install the required batteries into the FR-2/FR-2b's compartment (see p. 27).
(2) Turn down the output volume of the receiving audio device.
You can also simply switch it off.
(3) Connect the FR-2/FR-2b's OUTPUT sockets to the external audio device using two 1/4" guitar cables.
Note: You can also connect headphones to the PHONES socket, in which case you do not need to establish an audio connection.
(4) Turn the FR-2/FR-2b's VOLUME knob ① from the "POWER OFF" position towards the right.
(5) Switch on the receiving audio device.
(6) Start playing. —To switch off your system—
(7) Turn down the output volume of the receiving audio device, or switch it off.
(8) Turn the FR-2/FR-2b's VOLUME knob all the way to the left ("POWER OFF").
Listening to the demo songs
One of the most striking aspects of your V-Accordion may be that it can play all by itself! It contains a series of demo songs that illustrate its wide variety of sounds and applications. Here is how to listen to the demo songs:
(1) Switch on the FR-2/FR-2b.
See "Switching the power on and off" on p. 10.
(2) Press and hold the SONG/DEMO button ⑩.
Playback starts automatically with the first demo song (there are 16 demo songs in all). At the end of the first song, the FR-2/FR-2b starts playing songs 2, 3 etc. You can also directly jump to the song you're interested in:
(3) Use the USER PROG/DEC and METRONOME/INC buttons ⑧ to select the demo song you want to listen to.
(4) Use the VOLUME knob ① to change the volume if it is too loud or too soft.
Note: All demo songs are copyright ©2007 by Roland Europe. Public performance or recording of these songs is prohibited.
(5) Press SONG/DEMO ⑩ again to leave demo song mode.
Touring the FR-2/FR-2b's sections
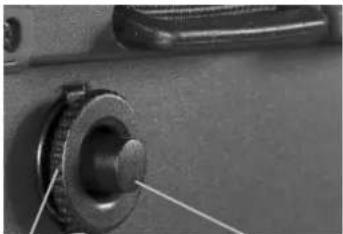
Bellows resistance regulator
Your FR-2/FR-2b is equipped with a bellows resistance regulator knob that allows you to specify the bellows' inertia (the force needed to push and pull it).
natural_image
Close-up of a mechanical component with a central knob and a handle, no visible text or symbolsBellows resistance regulator. Turn to select the bellows' resistance.
Air button. Press to purge remaining air after playing.
Located next to one of the bellows clips and mounted onto the air button (which allows you to release remaining air from the bellows without producing
sound). Setting it allows you to choose a lighter or stronger inertia. Choose the setting that feels most comfortable for you.
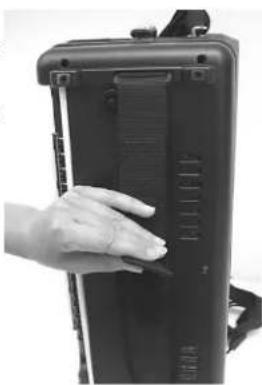
Bass strap
The FR-2/FR-2b's bass strap (used to move the bellows in and out) is made of fabric and fitted with a Velcro strip that allows you to adjust its slack:
natural_image
Hand placing a black plastic bag with visible internal components (no text or symbols)Treble section
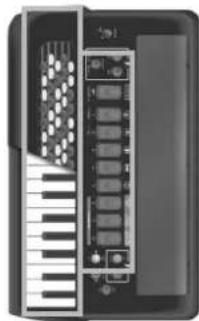
The Treble section can be played using the 34-key "piano" keyboard (FR-2) or the 82 treble buttons (FR-2b).
The sound it produces is determined by the register (1\~8) you pressed last. This section can be used as "accordion" or to play an orchestral sound.
natural_image
Interior view of a black electronic device showing front panel, keypad, and ports (no visible text or labels)(1) Connect the FR-2/FR-2b to an amplifier and switch it on. See p. 10.
(2) Grab the FR-2/FR-2b, press a Treble register and start playing on the keyboard.
Though the FR-2/FR-2b is an electronic musical instrument, it only produces sound when you move the bellows.
Note: When the FR-2/FR-2b is controlled via MIDI, there is no need to move the bellows.
(3) Press the SET register ⑤ (it flashes blue).
(4) Press one of the registers 1\~8 ⑥ to select a Set memory.
The SET button goes dark.
Note: If you don't press any register while the SET register flashes in blue, it will go dark again after a while. If you pressed the SET register by accident, press it again so that it goes dark. Note: See also the note about Set 5 on page 7.
(5) Play a few notes to audition the sound.
(6) Press one of the registers 1\~5 to select another register. See page 7.
(7) Press the same register again to select the "b" sound.
Press it yet again to revert to the "a" sound.
Each time you press a different register, the FR-2/FR-2b will automatically select the "a" sound
(8) If you think the sound is too loud or too soft, you can change the setting of the VOLUME knob ①.
■Using the FR-2/FR-2b's digital effects
While playing on the Treble keyboard, you may have noticed that the accordion sounds are enhanced by effects (probably reverb). The FR-2/FR-2b contains 2 digital effects:
Reverb: This effect creates the impression that you are playing in a concert hall, a church or a room. It adds "depth" to the sound.
Chorus: This effect creates the impression that several instruments of the same type are playing at the same time. You can change the type and the level settings of these two effects (see p. 19). Those settings apply to all sections and all Sets.
Bass section
natural_image
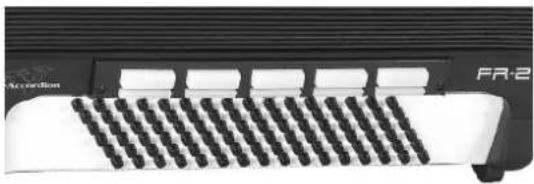
Close-up of a black and white electronic device with multiple slots and a labeled component (no readable text or symbols)The buttons in this section allow you to play both bass notes and chords. The chords use the (sound) register selected for the Bass section – hence the name of this section. The "real" bass notes are assigned to the two highlighted rows. The remaining buttons are used to play chords.
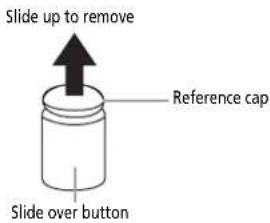
At the factory, three caps are installed on the black buttons in the following illustration. Feel free to remove them and to slide them over other buttons if that feels more comfortable.
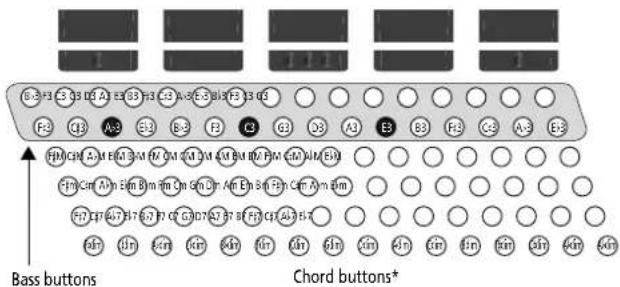
(*) This can be changed to 3 bass and 3 chord rows. See "Bass & Chord Mode" on p. 23.
Here is what the caps look like:
The overall sound the Bass section produces is determined by the register you activated last. This section can be used as "accordion", to play orchestral sounds, or both.
(1) Connect the FR-2/FR-2b and switch it on. See page 10.
(2) Grab the FR-2/FR-2b, press and pull down a register and start playing on the Bass (button) keyboard.
When you only use the accordion sounds (i.e. while the ORCH BASS ② and ORCH CHORD ③ buttons are dark), the bass and chord buttons use the same register, because they belong to the same accordion section.
(3) If you think the sound is too loud or too soft, you can change the setting of the VOLUME knob ①.
Using the orchestral sounds
Your FR-2/FR-2b contains PCM sounds (samples) of various instruments that are not related to accordion sounds. Those sounds allow you to expand your musical endeavours.
The FR-2/FR-2b's Orchestra functionality comprises three sections: one for the Treble keyboard (called "Orchestra"), another for the Bass buttons (first two rows, called "ORCH BASS"), and a third for the chord buttons (remaining rows, called "ORCH CHORD").
You can specify for each section whether or not the orchestral sounds should be used instead of the accordion sounds.
Orchestral sounds for the Treble section
Note: Only one orchestral sound can be selected at any one time.
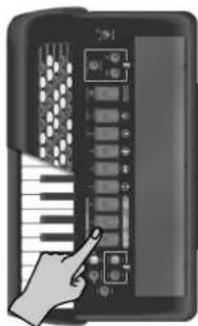
(1) Press one of the registers 6\~8 once or twice (it lights red). The "b" sounds can be selected by pressing the corresponding register twice. See page 7 (or the front panel) for the available sounds.
(2) Play a few notes on the Treble keyboard.
natural_image
Illustration of a hand interacting with an electronic device panel (no text or symbols visible)■Switching off the Orchestra part
To return to a state where only the Treble accordion section sounds:
(3) Press one of the registers 1\~5 ⑥ once or twice (it lights green).
Orchestral sounds for the Bass section
The orchestral bass part can be used instead of the Bass section (thus replacing the accordion sound assigned to the bass rows). It only applies to the bass rows (the ones closest to the bellows) and has no effect on the chord buttons.
(1) Press the ORCH BASS ② button (it must light).
(2) Check whether the LEFT REGISTER ④ button is dark. If it is not, press it.
(3) Use the Bass registers to select the desired sound (the register you press lights green).
| ORCH BASS sounds | |||||||
| 1 | Acoustic | 4 | Fretless | ||||
| 2 | Bowed* | 5 | Tuba Mix | ||||
| 3 | Fi | n | g | e | r | e | d |
Note: The dynamics of sounds marked with an asterisk (*) can only be controlled by bellows movements. Those sounds are not velocity sensitive.
■Switching off the Orchestra Bass part
(4) Press the ORCH BASS button again to return to normal Bass mode.
Orchestral sounds for the Chord section
The orchestral chord part can replace the accordion sound played by the chord rows of the button keyboard. It only applies to the chord rows and has no effect on the bass buttons.
(1) Press the ORCH CHORD ③ button (it lights).
(2) Check whether the LEFT REGISTER ④ button lights. If it doesn't, press it.
(3) Use the Bass registers to select the desired sound.
| ORCH CHORD sounds |
| 1* St. Strings* 4* St. Orch Brass* |
| 2* Chorus Organ* 5* Choir* |
| 3 Steel Guitar |
Note: The dynamics of sounds marked with an asterisk (*) can only be controlled by bellows movements. Those sounds are not velocity sensitive.
While ORCH CHORD mode is active, you can assign a different accordion register to the bass rows by pressing LEFT REGISTER (it must be dark) and the desired Bass register.
■Switching off the ORCH CHORD part
(4) Press the ORCH CHORD button again to return to normal Chord mode.
■Using two different sounds for the Bass button keyboard
The FR-2/FR-2b allows you to assign one orchestral sound to the bass rows of the button keyboard, and another to the chord rows, or to play one orchestral sound (bass or chords) and one accordion sound via the bass keyboard.
Use the ORCH BASS ② and ORCH CHORD ③ buttons to activate (button lights) or switch off (button dark) orchestral mode for the bass and/or chord rows.
To assign a different orchestral sound (or accordion register) to one of the two parts, you must assign the bass registers to the desired section.
This is usually done automatically, but you can also use the LEFT REGISTER ④ button to switch between the two.
If LEFT REGISTER lights, you can select an accordion register or orchestral sound for the chord rows of the bass keyboard.
If it is dark, you can select an accordion register or orchestral sound for the bass rows of the bass keyboard.
Note: The LEFT REGISTER button has no function when neither the ORCH BASS nor the ORCH CHORD button lights.
5. Other practical functions
Switching off sections you don't need
If, for some reason, you do not want one of the currently active parts to respond to your playing, you can switch it off: This may apply to any of the following combinations and mute the corresponding keys or buttons (where applicable):
Treble or Orchestra + Bass + Chord
Treble or Orchestra + ORCH BASS + Chord
Treble or Orchestra + ORCH BASS + ORCH CHORD
Treble or Orchestra + Bass + ORCH CHORD
(1) To switch off a section you do not want to hear, hold down any single register for a while.
Use a register in the Treble section to mute the Treble or Orchestra part; use a Bass register to mute the bass, chord, or any of the associated orchestral parts.
(2) To switch a muted section back on, briefly pressing and puling down any of the associated registers.
Using the metronome
Your FR-2/FR-2b contains a metronome that may come in handy when you are practising new pieces, or during your accordion classes. You can set the time signature, the tempo and the level.
■Setting the time signature
To set the time signature, proceed as follows:
(1) Before changing this value, it might be a good idea to switch the metronome on by pressing the METRONOME/INC ⑧ button (it lights).
(2) Press and hold the SET register until it starts flashing. The Treble keyboard can now be used to select the desired function.
(3) Press the F2 key or button number "10". See p. 18 for the location. The SET ⑤ register flashes rapidly, and the Treble keyboard can once again be used to play notes.
(4) Use registers 1\~8 ⑥ to select one of the following settings.
| Metronome time signature | ||||
| 1 | 1 | / | 4 | 5 |
| 2 | 2 | / | 4 | 6 |
| 3 | 3 | / | 4 | 7 |
| 4• 4/4 8 9/8 | ||||
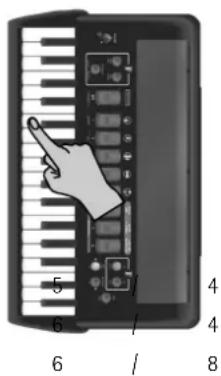
Note: Press the PAD/DEFAULT ⑦ button or register ④ to return to the factory setting of the currently selected parameter.
(5) Press the SET ⑤ register once (so that it flashes slowly) and proceed with the next parameter.
(Press the SET register twice to leave the FR-2/FR-2b's FUNCTION mode.)
■Setting the tempo
We'll assume that you are still in "FUNCTION" mode (SET ⑤ flashes slowly). To set this parameter at a later stage, press and hold the SET register until it starts flashing slowly.
(1) Press the E2 key (i.e. the lowest E) or button "9". See p. 18 for the location.
The SET register now flashes rapidly, and the Treble keyboard can once again be used to play notes.
Note: You can also select this parameter by pressing and holding the METRONOME/INC ⑧ button.
(2) Use registers 1\~8 ⑥ to select one of the following suggested values.
| Metronome tempo | |
| 1 Largo (40 BPM) 5 Moderato (120 BPM) | |
| 2 Larghetto (60 BPM) 6 Allegro (144 BPM) | |
| 3 Adagio (72 BPM) 7 Presto (192 BPM) | |
| 4• Andante (96 BPM) 8 Prestissimo (208 BPM) |
Alternatively, use the DEC or INC ⑧ button to decrease or increase the value in steps of "1".
You can also press and hold these buttons to quickly select a significantly higher or lower value. The setting range is J=20250 .
Note: Press the PAD/DEFAULT ⑦ button or register ④ to return to the factory setting of the currently selected parameter.
(3) Press the SET ⑤ register once (so that it flashes slowly and proceed with the next parameter.
(Press the SET register twice to leave the FR-2/FR-2b's FUNCTION mode.)
■Setting the metronome level
Here's how to set the desired metronome level to ensure that it is neither too loud, nor too soft. We'll assume that you are still in "FUNCTION" mode (SET) flashes slowly). To set this parameter at a later stage, press and hold the SET register until it starts flashing slowly.
(1) Press the (black) F#2 key (i.e. the lowest F#) or button "11". See p. 18 for the location.
(2) Use registers 1\~4 to select one of the following settings.
| Metronome level | |
| 1 Off | 3• Medium |
| 2 Low | 4 High |
Note: Press the PAD/DEFAULT ⑦ button to return to the factory setting.
(3) Press the SET ⑤ register twice to leave the FR-2/FR-2b's FUNCTION mode.
Using the metronome
After setting the metronome parameters to your liking, you can start using the metronome:
(4) Press the METRONOME/INC ⑧ button (it lights) to start the metronome.
(5) Press it again to switch the metronome back off.
Pitch-related functions
Transpose function
The FR-2/FR-2b contains a Transpose function that allows you to change the key of the music you are playing. The advantage of this system is that you can play a song in E major (for example), while using the fingering of the C major scale (for example). This may come in handy when you are used to playing a given song in one key and suddenly need to play it in a different key. Let's look at an example:
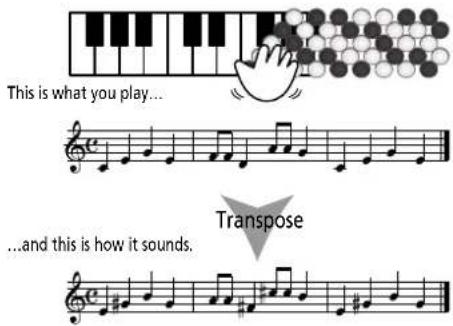
(1) Press and hold the SET ⑤ register until it starts flashing. The Treble keyboard can now be used to select the desired function.
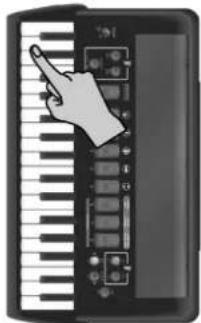
(2) Press the A1 key or button "3". See p. 18 for the location. The SET ⑤ register now flashes rapidly, and the Treble keyboard can once again be used to play notes.
(3) Use the DEC and INC ⑧ buttons to set the desired interval. You can also use registers 1\~8 ⑥ to set this parameter, in which case you may have to press the corre-
natural_image
Illustration of a hand interacting with a keyboard and playing piano (no text or symbols visible)sponding register twice to obtain the setting marked with an "*" in the table below. The "*" symbol represents sharp signs (#) and is indicated by the FR-2/FR-2b by means of a flashing register. If a Treble register flashes, you therefore know that you are transposing to a "black" key.
| Transpose | ||||||
| 1* | -6 F# 5•0 C | |||||
| 2 | - | 5 | G | 5 | * 1 | |
| 2* | -4 G# | 6 | 2 D | |||
| 3 | -3 | A | 6* | +3 | D# | |
| 3* | -2 | A# | 7 | +4 | E | |
| 4 | - | 1 | B | 8 | + 5 | |
The setting range is -6\~0\~5 (where "0" means that no transposition is used). The value refers to the interval. This can be calculated as follows:
- I n what key do you want to play? (This is your "0" value.) Example → C major
• What key does the song use? Example → E major
- How many semitones do you need to "shift" the notes? Example [C#, D, Eb, E] = 4 up, so register 7.
(4) Press the SET register twice to leave the FR-2/FR-2b's FUNCTION mode.
Note: This parameter is reset when you switch off the FR-2/FR-2b.
Transposing the Treble keyboard in octave steps
The parameter discussed here allows you to transpose the Treble accordion or Orchestra section one octave up or down.
(5) Simultanesouly press the SET ⑤ and 1 (+, one octave down) or 2 (-, one octave up) register.
Musette Detune
You probably know that an accordion's 8' Treble register may consist of 2 or even 3 reeds that are usually tuned apart to provide a richer sound (accordionists call it the "musette effect"). One reed is tuned slightly above, the other slightly below the correct pitch (and the third, if available, is tuned "properly").
Tuning those reeds is a specialist job and usually not performed by accordion players themselves.
On the FR-2/FR-2b, however, "tuning" the "reeds" (that do not really exist) is a matter of pressing a few buttons.
There are, in fact, more options than can be selected with the 8 registers: Dry, Classic, F-Folk, American L, American H, Nord Eur, German L, D-Folk L, Italian L, German H, Alpine, Italian H, D-Folk H, French, Scottish.
Note: This parameter is saved automatically for every register that contains the 8' footage.
Song function
Your FR-2/FR-2b contains 8 popular accordion songs that have been prepared for educational purposes. The left- and right-hand parts are on separate tracks, which allows you to mute one part (left or right hand) to play it yourself. The FR-2/FR-2b will play the other part.
Note: The Song function is not available while "Bellows Curve" on p. 20 is set to "Fixed Low", "Fixed Med" or "Fixed High".
Selecting a song
The FR-2/FR-2b contains the following educational songs:
| # | 1 | Can Can | 5 | Oh Susanna |
| 2 | Cielito Lindo | 6 | Red River Valley | |
| 3 | Ninna nanna | 7 | Little Brown Jug | |
| 4 | Carnevale di Venezia | 8 | Furusato |
(1) Briefly press the SONG/DEMO ⑩ button. (2) Press and hold the SONG/DEMO button.
(3) It flashes, and the register assigned to the last song you selected lights.
(4) Use registers 1\~8 to select the desired song (see the table above).
(5) Move the bellows.
The first movement of the bellows starts the song after a short while, subsequent moves allow you to control the song's volume (expression).
Playback stops at the end of the song. To stop it before the end of the song...
(6) Press the SONG/DEMO button again to leave the Song function.
(7) Select a different song or proceed with the following:
Note: The metronome is not available while the Song function is used.
Muting a part
The real purpose of the FR-2/FR-2b's Song function is to encourage you to play along with the FR-2/FR-2b. To do so, you need to mute (switch off) the song part you want to play yourself.
(1) Select the song you want to play (see above).
(2) Mute either the Treble or the Bass keyboard.
Muting the right-hand part: Press and hold any treble register (1\~8)
Muting the left-hand part: Press and hold any bass register (1\~5).
Note: You can only mute one part at a time.
(3) Move the bellows.
The first movement of the bellows starts the song, subsequent moves allow you to control the song's volume (expression).
This time, the FR-2/FR-2b only plays the part you didn't switch off. You can change registers (or sounds) for the section you are playing. It is also possible to use an orchestral sound instead of an accordion register.
Note: The PAD function is also available during Song playback.
(4) To switch the muted part back on, press and hold any Treble or Bass register.
(5) Press the SONG/DEMO button again to leave the Song function.
PAD function
Your FR-2/FR-2b contains a drum part that can be played in real-time and/or controlled by the PAD recorder. There are 8 sets of 5 drum and percussion sounds. Those sounds can be played in real-time using the 5 pads above the bass registers, using the bass and chord buttons (only 2 sounds of each PAD set), by the PAD recorder function or via MIDI (channel 10).
Playing drum sounds
■Playing drum sounds with the bass registers
(1) Briefly press the PAD ⑦ button.
(2) Press and hold the PAD ⑦ button until it starts flashing.
(3) Use Treble registers 1\~8 ⑥ to select the desired PAD set (i.e. a collection of 5 sounds).
| PAD Set 1 (Folk) PAD Set | 5 (Pop) |
| 1 Snare Ghost 1 Pop Stick | |
| 2 Snare Tambourine 2 Snare | |
| 3 Bass Drum/HiHat 3 Bass Drum | |
| 4 Conga Op 4 HiHat Closed | |
| 5 Conga Slap 5 HiHat Open | |
| PAD Set 2 (Jazz) PAD Set | 6 (Orchestra) |
| 1 Bass Drum 1 Snare Roll | |
| 2 Jazz Snare/Pedal HiHat 2 | Concert Snare/OpenTriangl |
| 3 Ride Cymbal | 3 Concert BD |
| 4 Tom Hi | 4 Concert Cym. |
| 5 Tom Lo | 5 Timpani |
| PAD Set 3 (Tarantel) | PAD Set 7 (TR-909) |
| 1 Tamorra 3 | 1 Techno Kick |
| 2 Tamorra 1 | 2 TR-909 Snare/909 Clap |
| 3 Tamorra 2 | 3 TR-909 Kick/Tambourine |
| 4 Conga Op 4 909 Tom Op | |
| 5 Conga Slap 5 909 Tom Lo | |
| PAD Set 4 (Latin) | PAD Set 8 (Ethnic) |
| 1 Pandeiro 4 | 1 Big Gong |
| 2 Pandeiro 5 | 2 Udo Long/Tabla Na |
| 3 Pandeiro 3/Bass Drum | 3 Req Dum/Timl Paila |
| 4 Hi Bongo | 4 Conga Slide |
| 5 Lo Bongo | 5 Mut Pandeiro |
The numbers refer to the pads you need to press. The correspondence is a follows.

Note: The numbers shown in the illustration above do not appear on the pads themselves. They have been added for your reference.
(4) Press the pads to play a drum part.
You'll notice that the pad you press briefly lights.
(5) Press the PAD button again to leave PAD mode.
Playing drum sounds with the bass and chord buttons
Though restricted to sounds 2 and 3 of each PAD set, the following is even more professional. You can assign sound "3" (see above) of the selected PAD set to the bass rows, and the "2" sound to the chord rows. That way, each bass note will be accompanied by a bass drum sound (usually), and each chord by a snare drum hit.
Feel free to use your other hand to play the remaining PAD sounds (by pressing the Bass registers).
■Adding drum sounds to your bass notes and chords
(1) Briefly press the PAD ⑦ button.
(2) Press and hold the PAD button until it starts flashing.
(3) Use Treble registers 18 to select the desired PAD set (i.e. a collection of 5 sounds).
See the table above.
(4) Press and hold Treble register ① ⑥ until it starts flashing.
(5) Start playing bass notes and chords.
Each button press also triggers the "3" sound (bass rows) or the "2" sound (chord rows) of the selected PAD set.
(6) Press and hold Treble register 1 again to "remove" the drum sounds from the bass and chord buttons without leaving PAD mode.
The PAD sounds can still be played using the Bass registers.
(7) Press the PAD button again to leave PAD mode.
■Playing only drum sounds via the bass and chord buttons
(1) Briefly press the PAD ⑦ button.
(2) Press and hold the PAD button until it starts flashing.
(3) Use Treble registers 18 to select the desired PAD set (i.e. a collection of 5 sounds).
See the table on p. 16.
(4) Press and hold Treble register ② ⑥ until it starts flashing.
(5) Start playing bass notes and chords.
Each button now only triggers the "3" sound (bass rows) or the "2" sound (chord rows) of the selected PAD set.
(6) Press and hold Treble register 2 again to "remove" the drum sounds from the bass and chord buttons without leaving PAD mode.
The buttons can now again be used to play the bass and chord sections. The PAD sounds can still be played using the Bass registers.
(7) Press the PAD button again to leave PAD mode.
Recording short drum patterns
The FR-2/FR-2b allows you to record a drum pattern by playing it in one of the ways described above. The recorded pattern is repeated over an over ("Loop" function).
(1) Briefly press the PAD ⑦ button (it lights green). The recording function is only available in PAD mode. See p. 16 for how to select a different PAD set, if necessary. Note: The metronome is not available while the PAD function is used.
(2) Press and hold the REC/LOOP ⑨ button until it starts flashing.
(3) Press a Bass register or button in the bass or chord button row (if the Bass buttons are set to play two drum sounds). Recording starts automatically.
(4) Press REC/LOOP when it's finished. The REC/LOOP ⑨ button lights steadily and your pattern is played back automatically in a loop.
(5) Use the Treble and Bass keyboards to play a song to the drum pattern.
(6) Press /LOOP again to stop the drum pattern. Press it yet again to restart the drum pattern.
(7) Switch off the PAD button to leave the FR-2/FR-2b's PAD mode. Note: The pattern is preserved until you replace it with another pattern. It is lost when you switch off the FR-2/FR-2b.
6. Editing FUNCTION settings
The FR-2/FR-2b provides a series of specialized parameters that may come in handy when you need to fine-tune the FR-2/FR-2b's response to your playing style. Some of these settings can be saved to the FR-2/FR-2b's User Programs (see p. 22).
Selecting the desired function
(1) Press and hold the SET ⑤ register until it starts flashing.
The Treble keyboard can now be used to select the desired function. If you own an FR-2b, please refer to the following illustration for the Treble buttons you need to press (depending on the selected Treble mode, the buttons may be assigned to different notes). For the sake of convenience, the note names of the keyboard version are also shown.
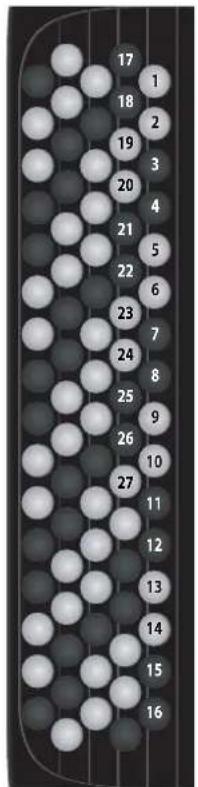
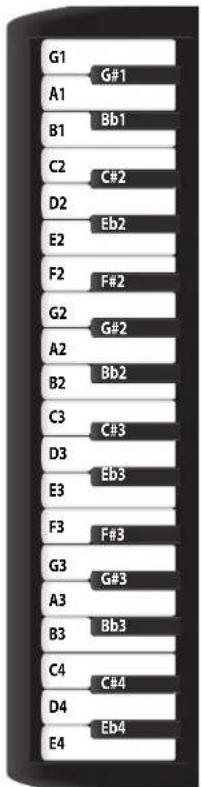
(2) Press the indicated key or Treble button.
(Key names with a “#” symbol refer to black keys.)
The SET register now flashes rapidly, and the Treble keyboard can once again be used to play notes.
(3) Use registers 1\~8 ⑥ to select one of the suggested values.
There may be fewer than 8 registers for the parameter you select.
Alternatively, use the DEC or INC button to select the desired turning. Sometimes, there are more options than can be selected with the 8 registers.
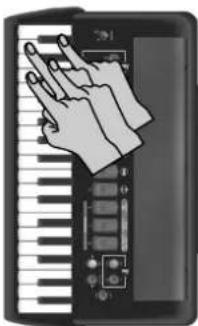
natural_image
Illustration of a hand pressing on a keyboard (no text or symbols visible)You can also press and hold these buttons to quickly select a significantly higher or lower value. Each time you select a setting that is also assigned to a register, the register in question lights.
Note: Press the PAD/DEFAULT ⑦ button or the register flagged with a “•” in the discussion below to return to the factory setting of the currently selected parameter.
(4) Press the SET register twice to leave the FR-2/FR-2b's FUNCTION mode.
If you want to set another FUNCTION parameter, press SET once (it flashes slowly), followed by the desired key, then proceed with step (3) above.
→ In the following, the messages at the right edge of the gray bars have the following meaning:
"OK": Can be saved in the Global area (common to all Sets).
"POW": Reset when you switch off the FR-2/FR-2b.
Parameters
| Master Tune [G1]/[1] | OK | |
| 415~440~466 (Hz) | Default setting: 440 | |
This parameter allows you to change the FR-2/FR-2b's overall tuning. The factory default, "440", represents the reference pitch used by all electronic musical instruments. The settings you can select with the registers are:
| 1 415 5 448 |
| 2 424 6 457 |
| 3 432 7 466 |
| 4• 440 |
| Musette Detune [G | #1]/[2] | OK |
Dry, Classic, F-Folk, American L, Default setting: Dry American H, Nord Eur, German L, D-Folk L, Italian L, German H, Alpine, Italian H, D-Folk H, French, Scottish
This parameter allows you to choose the system used for detuning the 8' reeds of the selected register. The settings you can select with the registers are:
| Musette Detune | ||
| 1 | C | lassic 5 Italian L |
| 2 | American | L 6 D-Folk L |
| 3 | Nord Eur | 7 French |
| 4 | A | Ipine 8 Scottish |
| Transpose [A1]/[3] | POW | |
| -6~0~5 | Default setting: 0 | |
This parameter allows you to transpose all sections of the FR-2/FR-2b, so as to play in one key and sound in another. The settings you can select with the registers are:
| Transpose | ||||||
| 1* | -6 F# 5•0 C | |||||
| 2 | - | 5 | G | 5 | * | 1 |
| 2* | -4 G# 6 2 D | |||||
| 3 | - | 3 | A | 6 | * | +3 |
| 3* | -2 A# 7 | +4 | E | |||
| 4 | - | 1 | B | 8 | + | 5 |
| Treble/Bass & Chord Balance | [B1]/[4] | POW |
| b1~63,0, t1~63 | Default setting: 0 |
This parameter is used to set the balance between the Treble and Bass sections. When you select "b1" (register 1), the Treble section is inaudible, while pressing register 7 ("t1") means that the Bass section is no longer audible. The settings you can select with the registers are:
| 1 | b60 | 5 | t20 |
| 2 | b40 | 6 | t40 |
| 3 | b20 | 7 | t60 |
| 4● | 0 |
| Orchestra Level | [C2]/[5] | OK |
| Pad Sound Level | [C#2]/[6] | OK |
| Orchestra Bass Level | [D2]/[7] | OK |
| Orchestra Chord Level | [D#2]/[8] | OK |
| -40~Std~40 | Default setting: Std | |
These parameters allow you to set the level of the ORCHESTRA, BASS or CHORD orchestral sound, or of the PAD function for a better balance with the other available sections. In that case, you can change its volume: The settings you can select with the registers are (for both parameters):
| 1 | -40 | 5 | +13 |
| 2 | -27 | 6 | +13 |
| 3 | -13 | 7 | +40 |
| 4● | 0 |
| Metronome Tempo | [E2]/[9] | OK |
| 20~250 | Default setting: 120 |
This parameter allows you to set the metronome tempo. The settings you can select with the registers are:
| 1 Largo (40 BPM) 5 | Moderato (120 BPM) |
| 2 Larghetto (40 BPM) | 6 Allegro (144 BPM) |
| 3 Adagio (72 BPM) 7 | Presto (192 BPM) |
| 4• Andante (96 BPM) | 8 Prestissimo (208 BPM) |
| Metronome Time Sign | [F2]/[10] | OK |
| 1/4, 2/4, 3/4, 4/4, 5/4, 6/4, 6/8, 9/8 | Default setting: 4/4 |
This parameter allows you to set the metronome's time signature. The settings you can select are:
| 1 | 1/4 | 5 | 5/4 |
| 2 | 2/4 | 6 | 6/4 |
| 3 | 3/4 | 7 | 6/8 |
| 4• | 4/4 8 | 9/8 | |
| Metronome Level | [F#2]/[11] | OK |
| Off, Low, Medium, High | Default setting: Medium | |
F This parameter allows you to change the metronome's level when it is too loud or too soft. See page 14 for details.
| 1 Off | 3• Medium |
| 2 Low | 4 High |
| Reverb Level | [G2]/[12] | OK |
| 0~127 | Default setting: 48 |
This parameter allows you to set the volume of the reverb effect with respect to the accordion and/or orchestral sounds. It applies to all sections that are currently switched on. The settings you can select with the registers are:
| 1 | 0 (no reverb) | 5 64 | |
| 2 | 16 | 6 | 80 |
| 3 | 32 | 7 | 96 |
| 4• | 48 | 8 | 127 |
| Reverb Type | [G#2]/[13] | OK |
| Room 1~3, Hall 1~2, Plate, Delay, Panning Dly | Default setting: Plate |
This parameter allows you to specify what kind of effect the Reverb processor should generate. The available options are:
| 1 Room12 Room23 Room3 | These reverbs simulate the reverberation of a room. They provide a well-defined spacious reverberation. |
| 4 Hall15 Hall2 | These types simulate the reverberation of a concert hall with a deeper reverberation than the Room reverbs. |
| 6 Plate • | This effect type simulates a plate reverb (a studio device using a metal plate to simulate natural Reverb). |
| 7 Delay | This is a conventional delay that produces echo effects. |
| 8 PanningDly | This is a special delay in which the delayed sounds move left and right. It is effective when you are listening in stereo. |
(The numbers between [] refer to the Treble registers.)
Chorus Level [A2]/[14]
OK
0\~127
Default setting: 16
This parameter allows you to set the volume of the chorus effect with respect to the accordion and/or orchestral sounds. It applies to all sections that are currently switched on. The settings you can select with the registers are:
| 1 | 0 | (no chorus) 5 64 | ||||
| 2• 16 6 80 | ||||||
| 3 | 3 | 2 | 7 | 9 | 6 | |
| 4 | 4 | 8 | 8 | 1 | 2 | 7 |
Chorus Type [A
2]/[15]
OK
Chorus 1\~4, FBack Chr, Flanger, Short Delay, Short Dly FB
Default setting: Short Delay
Chorus broadens the spatial image of the sound, adding richness. You can choose from 8 types of chorus. The available options are:
| 1 Chorus 12 Chorus 23 Chorus 34 Chorus 4 | These are conventional chorus effects that add spaciousness and depth to the sound. |
| 5 FBack Chr This | is a chorus with a flanger-like effect and a soft sound. |
| 6 Flanger This is | an effect that sounds somewhat like a jet airplane taking off or landing. |
| 7 Short Delay● This is a delay with a short delay time. | |
| 8 ShortDly FB This is a short delay with many repeats. | |
| 1 Chorus 12 Chorus 23 Chorus 34 Chorus 4 | These are conventional chorus effects that add spaciousness and depth to the sound. |
| 5 FBack Chr This | is a chorus with a flanger-like effect and a soft sound. |
| 6 Flanger This is an effect that sounds somewhat like a jet airplane taking off or landing. |
| 7 Short Delay● This is a delay with a short delay time. |
| 8 ShortDly FB This is a short delay with many repeats. |
Bellows Curve [B2]/[16]
OK
Fixed Low [1], Fixed Med [2],
Default setting: Standard
Fixed High [3], X-Light [4], Light [5],
Standard [6], Heavy [7], X-Heavy [8]
This parameter allows you to adapt the FR-2/FR-2b's expressive potential to your playing style. If you think the sounds don't respond the way you would like them to, try another curve that better "translates" your movements.
There are three "Fixed" curves that always use the same value, no matter how hard or lightly you push/pull the bellows (no dynamic control). "Low" means that a low value is used, "Med" represents a medium value and "High" a high value.
The remaining settings do depend on the strength with which you push/pull the bellows, but in different ways: "Light" means that you do not need to push/pull hard to achieve a meaningful effect. "X-Light" requires even less strength (the "X" stands for "extra"). "Standard" refers to a normal response. "Heavy" provides a greater variety of nuances and "X-Heavy" is even more detailed. It would be a good idea to select each curve without the "Fixed" addition, play a few notes, select the next curve, etc. until you find the response that feels just right.
Note: The "Song function" on p. 15 is not available while this parameter is set to "Fixed Low", "Fixed Med" or "Fixed High".
| Button Light Brightness [C | #4]/[25] | POW |
| Day, Night | Default setting: Day | |
This parameter allows you to change the brightness of the button lights. Use register ① to select the "day" setting (bright), and register ② to select "night" (darker).
7. MIDI parameters (FUNCTION group)
Your FR-2/FR-2b can also transmit or receive MIDI data. In this section, we'll look at what MIDI is and does and which MIDI functions are available on the FR-2/FR-2b. IMPORTANT REMARK: The FR-2/FR-2b has only one MIDI socket that can be used to either send ("OUT") or receive ("IN") MIDI data.
Connect the FR-2/FR-2b as follows to transmit MIDI data to an external device:
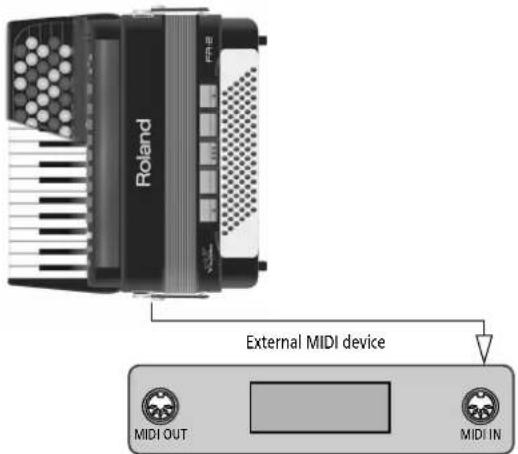
Then, set the "MIDI OUT/IN" parameter (see p. 21) to "Out".
Connect the FR-2/FR-2b as follows to receive MIDI data from an external device:
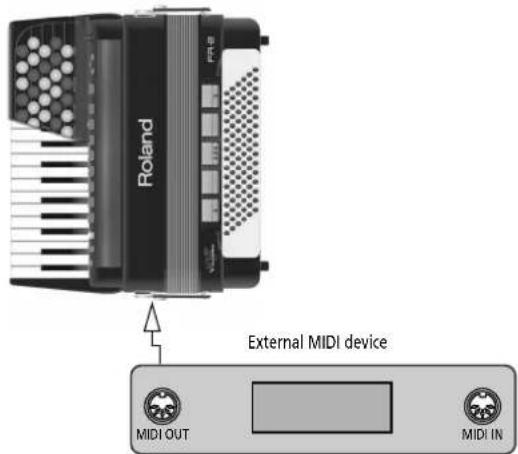
Set the "MIDI OUT/IN" parameter (page 21) to "In".
About MIDI
You can use your FR-2/FR-2b with other MIDI-compatible instruments, sequencers and computers to record your performances in the same way as keyboard players, drummers, guitarists, etc., have been doing for a while.
All MIDI-compatible sound sources allow you to use the FR-2/FR-2b's Treble and Bass keyboards for playing sounds the FR-2/FR-2b does not provide.
This is possible thanks to a common language for musical applications, which is called "Musical Instrument Digital Interface", or "MIDI" for short. MIDI has a lot in common with the internet: you can link one or several instruments to one another via a cable (but you don't need a telephone line). You can also use the FR-2/FR-2b as "master keyboard", i.e. an instrument that transmits MIDI messages to a device (or software program) that can record MIDI messages. Such a device or program is called a "sequencer".
MIDI can simultaneously transmit and receive messages on 16 channels, so that up to 16 instruments (or parts of a module or synthesizer) can be controlled. Nowadays, most instruments -like your FR-2/FR-2b- are multitimbral, which means that they can play several musical parts with different sounds. This requires the use of several MIDI channels. The FR-2/FR-2b, for instance, has several accordion and orchestral sections that can be played simultaneously. They can transmit and receive on different channels.
The FR-2/FR-2b's sections use the following MIDI channels:
| Part Channel |
| Treble 1 |
| Bass 2 |
| Chord 3 |
| Orchestra (Treble) 4 |
| Orchestra Bass 5 |
| Orchestra Chord 6 |
| Pad sounds (see p. 16) 10 |
| Basic channel (for selecting Sets) 13 |
MIDI parameters
The MIDI parameters belong to the FUNCTION environment. The setting procedure is therefore the same. See p. 18 for details.
Note: The FR-2/FR-2b's MIDI channels cannot be changed.
| Treble Octave Tx [C3]/[17] | OK | |
| -3~0~3 | Default setting: 0 | |
This parameter allows you to transpose the Note-on messages transmitted by the Treble section up to three octaves up or down. This can be used for songs where an accordion register of the Treble section (for example) should be doubled by a piccolo flute played by an external module whose notes would be far too low if they were used as is. Each MIDI note has a unique number. This parameter allows you to add (or subtract) 12 ("1" octave), 24 ("2"
octaves) or 36 ("3" octaves) to (from) the note numbers generated by your playing. The settings you can select are:
| 1 | - | 3 | 5 | + | 1 |
| 2 | - | 2 | 6 | + | 2 |
| 3 | - | 1 | 7 | + | 3 |
| 4♦ | 0 |
Note: "TX" means that this parameter only applies to the note messages transmitted to external devices. Messages the FR-2/FR-2b receives from another device are not affected by it.
| Orchestra Octave TX [D3]/[18] | OK | |
| -3~0~3 | Default setting: 0 | |
This parameter allows you to transpose the Note-on messages transmitted by the Orchestra section. The settings are the same as above.
| Bass Octave TX [E3]/[19] | OK | |
| -3~0~3 | Default setting: 0 | |
This parameter allows you to transpose the Note-on messages transmitted by the bass buttons up to three octaves up or down. The settings are the same as above.
| Chord Octave TX | [F3]/[20] | OK |
| -3~0~3 | Default setting: 0 |
This parameter allows you to transpose the Note-on messages transmitted by the chord buttons up to three octaves up or down. The settings are the same as above.
| Orchestra Bass Octave TX | [G3]/[21] | OK |
| -3~0~3 | Default setting: 0 |
This parameter allows you to transpose the Note-on messages transmitted by the ORCH BASS part. The settings are the same as above.
| Orchestra Chord Octave TX | [A3]/[22] | OK |
| -3~0~3 | Default setting: 0 |
This parameter allows you to transpose the Note-on messages transmitted by the ORCH CHORD part. The settings are the same as above.
| Bellows Expression TX | [B3]/[23] | OK |
| Off, On | Default setting: Off |
The strength/speed with which the bellows is pressed or pulled influences the sound – which corresponds to an acoustic accordion's response. This effect can be translated into a MIDI message most external instruments understand.
If you want to use the bellows for expressive purposes, switch this parameter on (register ②). If you don't (because the external instrument is too sensitive and therefore changes its volume too often), switch it off (register ①).
| MIDI Out/In | [C4]/[24] | POW |
| Out, In | Default setting: Out |
This parameter allows you to set the function of the FR-2/FR-2b's MIDI socket. Select "Out" (register 1) if you want to play on the FR-2/FR-2b's keyboards and transmit the MIDI data generated by your playing to an external device.
If you select "In" (register 2) here, the FR-2/FR-2b's sound source can no longer be played via its keyboards.
Note: See p. 21 for the MIDI channels the FR-2/FR-2b's parts use.
| Program Change TX [D4]/[26] | OK | |
| Off, On | Default setting: Off | |
This is a MIDI filter, i.e. a parameter that allows you to specify whether or not the given MIDI type should be transmitted. "TX", as you know, is short for "transmission". This means two things: (1) the filter only applies to program changes sent by the FR-2/FR-2b, and (2) it is only meaningful when the "MIDI Out/In" parameter is set to "Out".
Program change messages are used to select sounds or memories on the receiving instrument simply by recalling another sound (or memory) on the transmitting instrument. The FR-2/FR-2b transmits program changes when you select Sets (on the Basic Channel) and registers (on the MIDI channel assigned to the section for which you are selecting a different register). Select "Off" if you don't need that.
All of the FR-2/FR-2b's registers transmit program change/bank select clusters when pressed. And when you set the "MIDI Out/In" parameter to "IN", the FR-2/FR-2b also receives those messages.
| Arranger Control [E4]/[27] | OK |
Off, On
Default setting: Off
This parameter specifies which MIDI note numbers are sent by the Chord row buttons. You may have noticed that the chords generated by the FR-2/FR-2b (and indeed any accordion) are incomplete, because players are expected to supply the bass notes via the bass rows.
That information is fine if the resulting MIDI events you record with a sequencer are sent back to the FR-2/FR-2b. But if you want to control an arranger keyboard (like Roland's E-series), the "patchy" chord information may cause the music style patterns to play in the wrong key.
If you experience such problems, switch this parameter on (register [2] ). To record chord information that will be sent back to the FR-2/FR-2b at a later stage (with the bass notes sent on channel 2), however, switch this parameter off (register [1] ).
Note: The chord notes are transmitted on MIDI channel 3.
8. Saving your settings (User Program)
Your FR-2/FR-2b contains 8 memories where you can store the FUNCTION settings listed below. Working with those memories has the advantage that you can recall frequently used settings at the press of a button. The User Program settings also include the "address" of the last Set you selected. The following settings are saved to the User Programs:
| Set | Number (1~8) |
| Treble section | Register |
| Balance (with Bass section) | |
| Octave setting | |
| Orchestra section | Register |
| Octave setting | |
| Bass section | Register |
| Balance (with Treble section) | |
| Chord section | Register |
| Orchestral Bass | On/Off* |
| Register | |
| Level | |
| Orchestral Chord | On/Off* |
| Register | |
| Level | |
| Reverb | Type |
| Level | |
| Chorus | Type |
| Level | |
| PAD | On or off |
| Selected set | |
| Volume |
[*] Mutually exclusive with corresponding accordion (or orchestral) setting.
Saving the current settings
Here is how to save the current settings of the eligible parameters (see above) to the desired User Program memory.
(1) Select the Set whose number should be memorized.
(2) Set everything the way you want it to be when you recall the User Program you want to save.
(3) Press and hold the USER PROG button until it starts flashing. The Treble register corresponding to the last User Program you selected flashes red.
(4) Press the Treble register (1\~8 ⑥) of the User Program memory where you want to save your settings. Both the selected register and the USER PROG button
(5) Press the USER PROG button again to leave this mode.
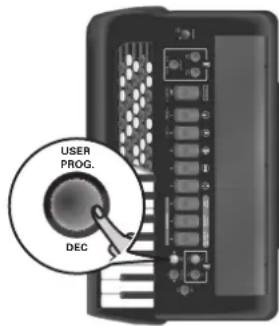
Recalling a User Program
Proceed as follows to recall a User Program you saved earlier:
(1) Press the [USER PROG] ⑧ button (it lights). The register of the last User Program you selected flashes yellow.
(2) Press the Treble register (1\~8) that is assigned to the User Program you want to use.
(3) Press the USER PROG button again to leave this mode.
9. Changing your accordion's behavior
Here are two settings you'll probably change only once. But it's nice to know that it exists in case you let a fellow accordion player from another country play your FR-2/FR-2b.
Treble Mode (only on the FR-2b)
Like for the accordion instrument itself, there are different varieties of chromatic (button-type) instruments, with different Treble button layouts. Your FR-2/FR-2b can simulate them.
Please look at the illustrations on page 23 to identify the setting you need. Pay attention to the note names (all Cs appear on a grey background) and look at how they are arranged, then make your selection. The numbers next to the letters refer to the octave. The numbers below the note names represent the corresponding MIDI note numbers.
Here is how to select the desired setting:
(1) Switch off the FR-2/FR-2b by turning the VOLUME ① knob all the way to the left ("POWER OFF").
(2) Hold down SET and one of the following registers while switching the FR-2/FR-2b back on to select the desired setting.
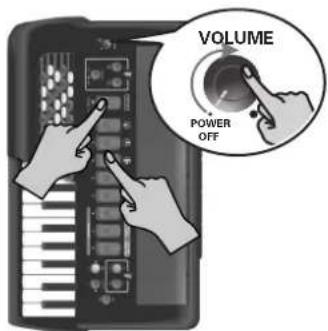
1• C-Griff Europe 4 B-Griff Fin
2 C-Griff 2 5 D-Griff 1
3 B-Griff Bajan 6 D-Griff 2
(3) Start playing.
(See pages 25 and 26 for the locations of the notes.)
You may have noticed that the Treble buttons are colored white (for notes without alteration) and black (notes with alteration, i.e. #/b). This coloring doesn't change when you select another system.
(You can, however, unscrew the buttons and
install the in the right places so as to make the white and black buttons correspond to the notes being played.)
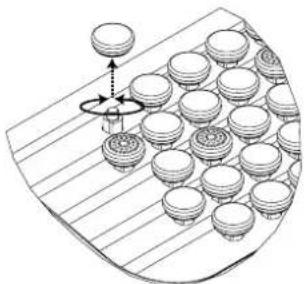
natural_image
Diagram of a circular arrangement of stacked coins on a curved surface, with an arrow indicating rotation or movement (no text or symbols)The FR-2/FR-2b is supplied with additional white and black buttons. The white buttons come in two varieties: normal buttons and knurled buttons. The latter are usually used to indicate the "C" and "F" notes.
Bass & Chord Mode
This parameter allows you to specify the number of button rows for playing bass notes. The default is 2 bass rows and 4 chord rows. By selecting "3 Bs Rows", you lose the "dim" chord buttons – but that may just be more convenient for you. See also the illustration on page 24.
There are four "3 Bs Rows" options: "A-7th" and "B-7th" mean that the 6th chord row plays seventh chords ("7") without the fifth. In the case of a C7 chord, you therefore hear C-E-Bb (but not the G). "A-7th" and "B-7th" differ in the arrangement of the bass notes (see the illustration on page 24).
The "A-5dim" and "B-5dim" options mean that those seventh chords don't contain the root note. A C7 chord is sounded with the notes E-G-Bb (but not the C). "A-5dim" and "B-5dim" differ in the arrangement of the bass notes (see the illustration on page 24).
The "Bx-7th" option reverses the "B-7th" settings (from right to left).
(1) Switch off the FR-2/FR-2b by turning the VOLUME ① knob all the way to the left ("POWER OFF").
(2) Hold and pull down one or two of the following bass registers while switching the FR-2/FR-2b back on to select the desired setting.
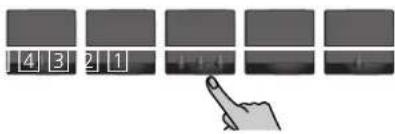
| 1 + 2• 2 Bass Rows | 3 3 Bass Rows B-7th |
| 1 3 Bass Rows A-7th | 4 3 Bass Rows B-5dim |
| 2 3 Bass Rows A-5dim | 5 3 Bass Rows Bx-7th |
(3) Start playing.
(See the tables below for the locations of the notes.)
![Bass & Chord Mode [1] + [2] 2 Bass Rows B+3 F3 C3 G3 D3 A3 E3 B3 F3 C3 Al-3 E-3 B+3 F3 C3 G3 F+3 C3 Al-3 E-3 B+3 F3 G3 D3 A3 E3 B3 F3 C3 Al-3 E-3 FM CM GM DM AM EM BM F+M CFM ALM EM Fm Fm Am Em Em Fm Cm Gm Dm Am Em Bm Fm CFm Alm E+m F7 C7 Ab7 E+7 Bf7 F7 C7 G7 D7 A7 E7 B7 F7 C7 Ab7 E-7 Fdm Fdm A+dim A+dim A+dim Fdm Fdm Fdm A+dim A+dim [1] & [2] 3 Bass Rows A D3 A3 E3 B3 F3 C3 Al-3 E+3 B+3 F3 C3 ○ ○ ○ E+3A+D+E+3 B+3 F3 C3 G3 D3 A3 E3 B3 F3 C3 Al-3 E+3 B+3 F3 C3 G3 F+3 C3 Al-3 E+3 B+3 F3 C3 G5 D3 A3 E3 B5 F+3 C+ Al-3 E-3 FM CFM ALM FM FM CM GM DM AM EM BM F=M CFM ALM CFM Fm CFM Alm E+m E+m E+m Fm Cm Gm Dm Am Em Bm Fm CFm Alm E+m F7 C7 Ab7 E+7 B+7 F7 C7 G7 D7 A7 E7 B7 F7 C7 Af7 E-7 [3] & [4] 3 Bass Rows B A3 E3 B3 F+3 C1A+3 E+3 B+3 F3 C1 ○ ○ ○ B+B+A+B+B B+3 F2 C2 G2 D2 A2 E2 B2 F2 C2 E2 A+2 E+2 B+2 F2 C2 G2 F+3 C#B Al-3 E+3 B+3 F2 C2 G2 D2 A2 E2 B+2 F2 C2 Al-3 E-3 FM CFM ALM E-M B+F M FM CM GM DM AM EM BM F=M CFM ALM E-M Fm CFM Alm E-m B+m FM CM GM DM AM EM BM F=M CFM ALM E-M Fm CFM Alm E-m B+m FM Cm Gm Dm Am Em Bm Fm CFM ALM E-m Ff7 C#7 Af7 E-7 B-7 F7 C#7 G7 D7 A7 E-7 B-7 F#7 C#7 Af-7 E-7 [5] 3 Bass Rows Bx E-M A-M CFM FM BM EM AM DM GM CM FM B-M E-M A-M CHM F=M E-m A-m CFM FM BM Em Am Dm Gm Cm Fm B-m Em Alm CFM "E-7 A-7 C-7 F-7 B-7 A-7 D-7 G-7 C-7 F-7 B-7 E-7 A-7 C-7 F-7 "E-7 A-7 C-7 F-7 B-7 A-7 D-7 G-7 C-7 F-7 B-7 E-7 A-7 C-7 F-7](/content/2026/05/862945/images/59dbad1cc67be7b4012c7d5ac7fac2f1bcc05009f1068a44e0c5c0effc6c01c5.jpg)
Treble Mode table (1/2)

scatter
| Label | Value | |-------|-------| | E3 | F#3 | | F3 | G3 | | Eb3 | F#3 | | E3 | G3 | | G3 | F#3 | | A3 | Bb3 | | G3 | A3 | | A3 | Bb3 | | C4 | C#4 | | Bb3 | C4 | | C4 | D4 | | C4 | E4 | | C4 | F#4 | | C4 | E4 | | F#4 | F#4 | | E4 | F#4 | | F#4 | G4 | | E4 | G4 | | F#4 | G4 | | A4 | Bb4 | | E4 | F#4 | | E4 | G4 | | A4 | G4 | | C5 | C#5 | | E5 | F#5 | | E5 | G5 | | E5 | G5 | | E5 | G5 | | E5 | G5 | | E5 | G5 | | E6 | Bb5 | | E6 | Bb5 | | E6 | Bb5 | | E6 | Bb5 | | E6 | Bb5 | | E6 | Bb5 | | E6 | Bb5 | | E7 | C#6 | | C#6 | C#6 | | C#6 | D6 | | C#6 | D6 | | C#6 | C6 | | C#6 | C6 | | C#6 | C#6 | | C#7 | F#6 | | F#6 | G6 | | F#6 | G6 | | F#6 | G6 | | F#6 | G6 | | F#6 | G6 | | F#6 | G6 | | F#6 | G6 | | F#6 | G6 | | F#6 | G6 | | F#6 | G6 | | F#6 | G6* | | F#6 | G6* | | F#6 | G6* | | F#6 | G6* | | F#6 | G6* | | F#6 | G6* | | F#6 | G6* | | F#6 | G6* | | F#6 | G6* | | F#6 | G6* |

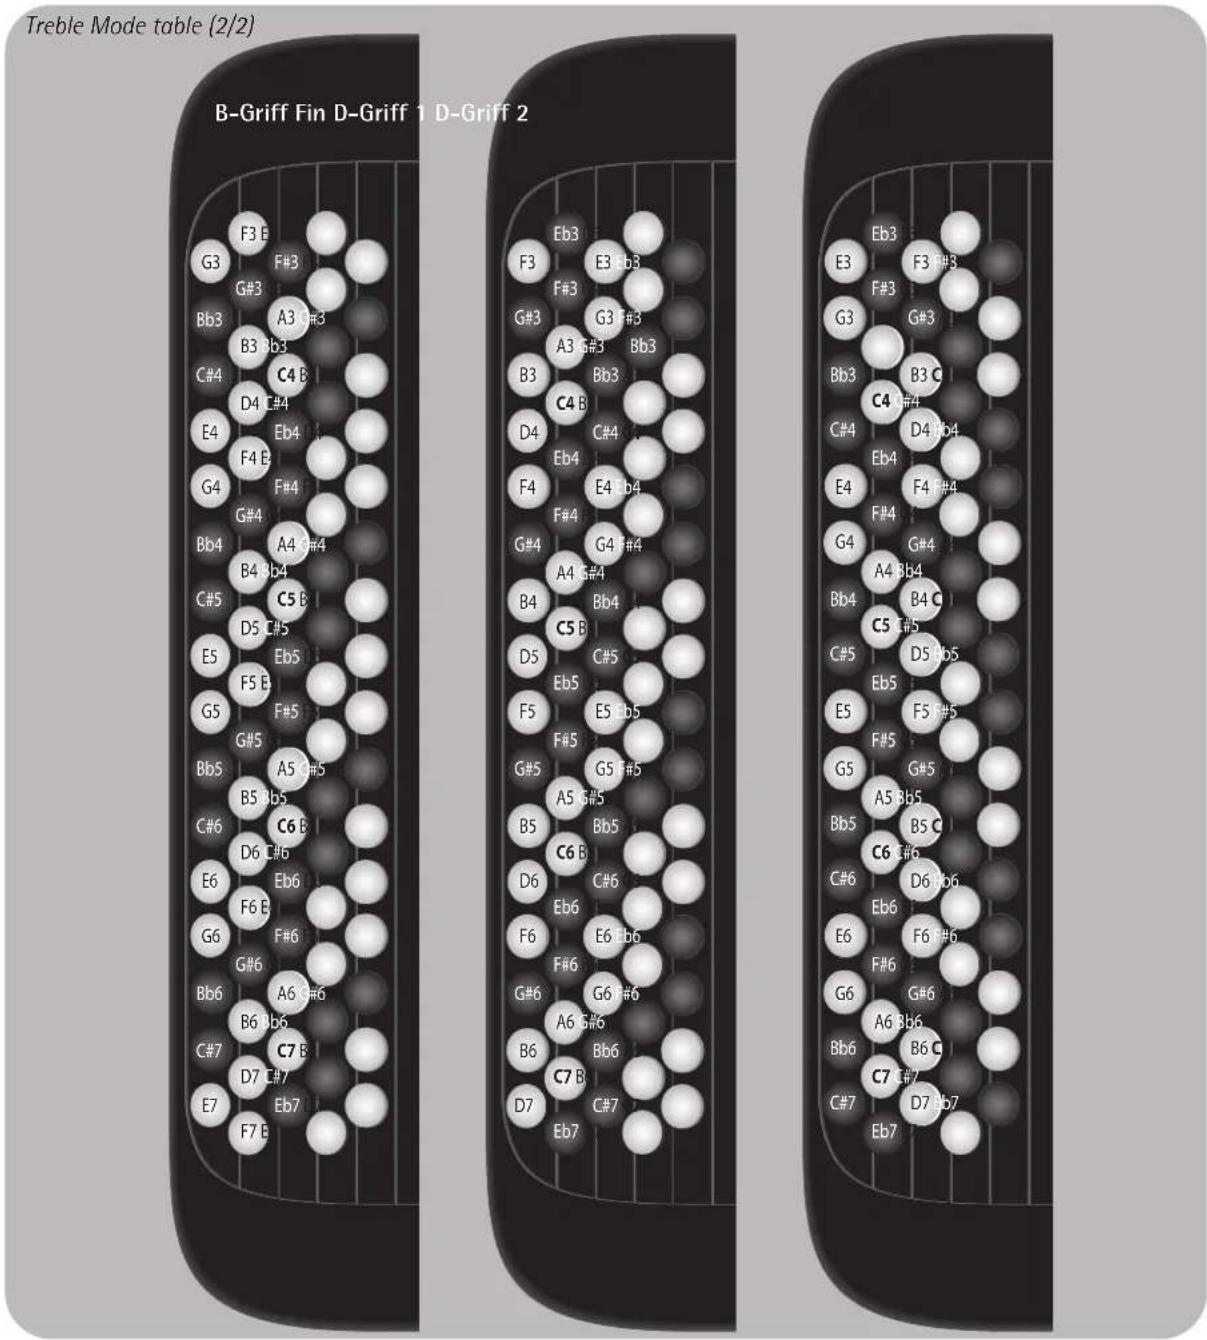
other
Treble Mode table (2/2) | Panel | Key | Frequency | | :--- | :--- | :--- | | 1 | F3 E | 1 | | 1 | F#3 | 1 | | 1 | G3 | 0 | | 1 | G#3 | 0 | | 2 | A3 #3 | 0 | | 2 | Bb3 | 0 | | 2 | B3 #b3 | 0 | | 2 | C4 B | 0 | | 2 | D4 C#4 | 0 | | 2 | E4 | 0 | | 2 | Eb4 | 0 | | 2 | F4 E | 0 | | 2 | G4 | 0 | | 2 | G#4 | 0 | | 2 | Bb4 | 0 | | 2 | B4 #4 | 0 | | 2 | B4 #b4 | 0 | | 2 | C5 B | 0 | | 2 | D5 C#5 | 0 | | 2 | E5 | 0 | | 2 | F5 E | 0 | | 2 | G5 | 0 | | 2 | G#5 | 0 | | 2 | Bb5 | 0 | | 2 | B5 #5 | 0 | | 2 | C6 B | 0 | | 2 | D6 C#6 | 0 | | 2 | E6 | 0 | | 2 | F6 B | 0 | | 2 | G6 | 0 | | 2 | Bb6 | 0 | | 2 | B6 #6 | 0 | | 2 | C7 B | 0 | | 2 | D7 C#7 | 0 | | 2 | E7 | 0 | The table contains three rows of dots representing different musical keys. The first row contains all four keys (Eb3, F3, G3, C4, etc.), and the second row contains all four keys (Eb3, F3, G3, C4, etc.). Each row contains a single letter corresponding to a specific musical key.10. Restoring the factory defaults
You can reset the FR-2/FR-2b to its factory settings, which means that your own settings (including the User Programs) are replaced by the settings the FR-2/FR-2b contained when you first got it. We recommend using this function as sparsely as possible: your own settings cannot be archived externally, and there is no way to restore them after initializing the FR-2/FR-2b.
(1) Switch off the FR-2/FR-2b by turning the VOLUME ① knob all the way to the left ("POWER OFF").
(2) Hold down SET and Treble register 8 while switching the FR-2/FR-2b back on. When all settings have been initialized, all Treble registers briefly flash in red. The FR-2/FR-2b now again sounds and behaves like when you first bought it.
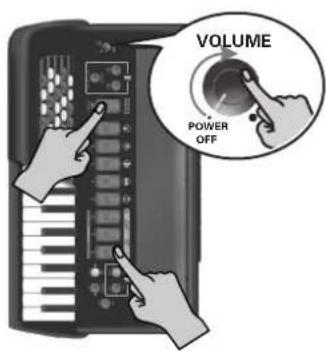
11. Using optional batteries
Your FR-2/FR-2b has a compartment that contains a special holder unit into which you can install 8 optional AA-type batteries. You can therefore play your instrument without connecting the supplied adaptor.
Installing and removing batteries
The FR-2/FR-2b provides a battery compartment with a special holder unit into which 8 AA-type (R6) batteries can be installed.
By pressing SET + register 3 (BATT), you can check the battery status. If all registers (the green and red ones) are lit, the batteries are fully charged. If only the red registers light, the remaining battery life is about 1 hour. (You may need to hold down SET to check the battery status). If the PAD button and only the last two ORCHESTRA registers light during this operation, the FR-2/FR-2b is powered by the supplied adaptor. If the REC button lights, the batteries are used to power the FR-2/FR-2b.
Note: Please see page 6 for notes on battery handing.
(1) Switch off the FR-2/FR-2b.
(2) Remove the cover from the FR-2/FR-2b's battery compartment by pressing the two tabs and lifting the cover.
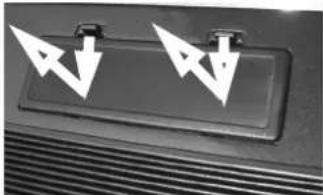
natural_image
Close-up of a black rectangular object with two white triangular arrows pointing downward (no text or symbols visible)You should now see a tab that allows you to remove the battery case:
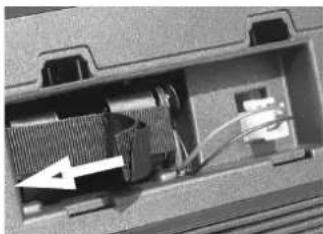
natural_image
Interior view of a device showing internal components and wiring (no visible text or symbols)(3) Use the tab to pull the battery case out of the compartment.
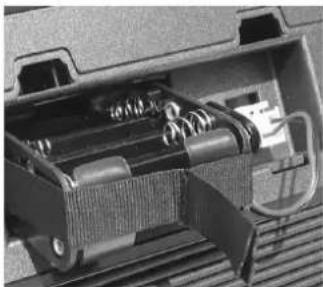
natural_image
Close-up of a mechanical device showing internal components and wiring (no visible text or symbols)The battery case is connected to the FR-2/FR-2b by means of a cable with a padded connector strip. You can disconnect the cable from the battery case by pulling off the pad-ded connector strip.
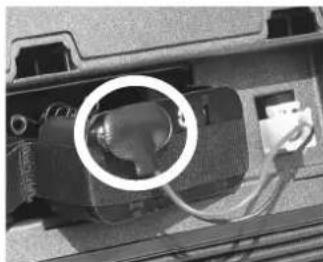
natural_image
Close-up of a mechanical component with a circular highlight and cable, no visible text or symbolsNote that this is unnecessary if you manage to install (or remove) the batteries without disconnecting the strip.
(4) Insert 8 AA-type (R6) batteries into the compartment (4 on either side), taking care to orient them in accordance with the "+" and "-" indications.
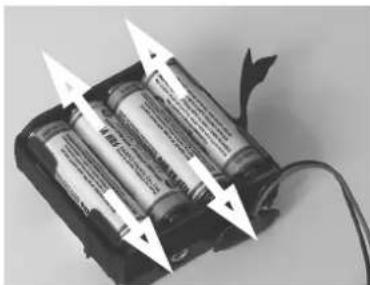
natural_image
Three cylindrical batteries with white arrows pointing upward, placed on a black base with a cable (no visible text or symbols)(5) Insert the case with the 8 batteries into the compartment.
(6) Close the FR-2/FR-2b's battery compartment.
Note about rechargeable batteries
Certain batteries can be recharged several times before they need to be replaced with a new ones. Note that it is normal for the batteries to last increasingly shorter as time goes by. At the end of their life cycle, they may only last one hour, for example. But that is a gradual process.
12. Specifications
■ Keyboards
Right hand: FR-2 34 piano-type keys, velocity sensitive (starting at a G key)
FR-2b 82 buttons, velocity sensitive
Left hand: FR-2/FR-2b 96 velocity-sensitive bass buttons
■ Bellows
Real pneumatic detection of bellows pressure (high-resolution pressure sensor) Bellows resistance regulator
■ Sound source
Max polyphony: 64 voices
Wave ROM: 16MB of waveforms
Tones: 8 accordion Sets, each including:
10 Treble registers, 5 Bass registers, 5 Orchestra Bass registers, 5 Orchestra Chord registers, 6 Orchestra sounds
Treble reed footages: 4
Bass reed footages: 5
Chord reed footages: 3
■ PBM (Physical Behavior Modeling)
Noises: stopping-reed growl, closing valve noise, left button noise Individual reed simulation: hysteresis threshold, Expression curve, pressure-variant filter, pressure-variant pitch deviation Reed sound wave switching: by bellows acceleration, by note repetition speed
■ Musette tuning
Micro tuning presets: 15 (Dry, Classic, F-Folk, American L/H, North Europe, German L/H, D-Folk L/H, Alpine, Italian L/H, French, Scottish)
■ Effects
Reverb: 8 types, Chorus: 8 types
■ Panel controls
Knob: VOLUME/POWER
Registers: 5x Treble + 3x Orchestra, Set, 5x Bass
Buttons: ORCH BASS, ORCH CHORD, LEFT REGISTER, PAD/DEFAULT, REC/LOOP, SONG/DEMO, USER PROG/DEC, METRONOME/INC
■ Operation modes
Bass & Chord modes: 2 Bs Rows, 3 Bs Rows A-7th, 3 Bs Rows A-5dim, 3 Bs Rows B-7th, 3 Bs Rows B-5dim, 3 Bs Rows Bx Treble modes (FR-2b): C-Griff Europe, C-Griff 2, B-Griff Bajan, B-Griff Fin, D-Griff 1, D-Griff 2
Octave: Down (−), 0, Up (+) (for Treble and Orchestra)
PAD: 8 drum/percussion sets, phrase recording function
SONG function: 8 preset songs with selectable mute function for left- or right-hand part
■ Power supply
Supplied external adaptor or optional batteries
■ Power consumption
500mA
■ Expected battery life under continuous use:
Ni-MH 2500mAh ±5 hours
This varies depending on the actual conditions of use.
Note: Carbon and alkaline batteries should not be used.
■ Others
Connectors: HEADPHONE socket (stereo), OUTPUT sockets (stereo), MIDI socket (Out/In function adjustable via FUNCTION parameter)
Power supply: external AC adaptor (100\~240V, universal)
Dimensions (mm):
FR-2: 425.5 (H) x 471.5 (W) x 244.3 (D) mm
FR-2b: 388.4 (H) × 471.5 (W) × 247.2 (D) mm
Weight (without straps or optional batteries):
FR-2: 7.5kg
FR-2b: 7.5kg
■ Supplied accessories
External AC adaptor
Owner's Manual
Reference caps for the treble buttons (FR-2b)
Straps
Battery holder (pre-installed in compartment)
Replaceable "traforo" covers: 6
■ Options
Accordion soft bag
AA-type batteries (8) from third-party suppliers
Note: In the interest of product improvement, the specifications and/or appearance of this unit are subject to change without prior notice.
13. Appendix
Demo Songs
| # SONG TITLE* | PERFORMED BY | |
| 01 Birdy Waltz Ludovic Beier | ||
| 02 Bal Musette Ludovic Beier | ||
| 03 Swingin' The Blues Ludovic Beier | ||
| 04 Forro de Janeiro Ludovic Beier | ||
| 05 Tango Dancers Ludovic Beier | ||
| 06 Eastern Wind Ludovic Beier | ||
| 07 Sax On The Phone Ludovic Beier | ||
| 08 Bossagroove 1 Marko Räsänen | ||
| 09 Aada Marko Räsänen | ||
| 10 Bandofunk Marko Räsänen | ||
| 11 Iida Marko Räsänen | ||
| 12 Finnish Waltz Marko Räsänen | ||
| 13 Hot And Brisk Petri Ikkelä | ||
| 14 Bezaubernder Sinaklia | Sergio Scappini | |
| 15 O Sole Mi (Traditional) | Sergio Scappini | |
| 16 Edelweiss | Sergio Scappini | |
[*] Copyright ©2007 Roland Europe Spa. All rights reserved. Unauthorized use of the demo songs for purposes other than private enjoyment is a violation of applicable laws. The performance data of the demo songs are not transmitted via MIDI.
PAD Sets
| Set 1 (Folk) 0-4-8* | Note no. | Set 5 (Pop) 0-4-4 | Note no. | ||
| 1 | Snare Ghost | 39 | 1 | Pop Stick | 37 |
| 2 | Sn a r e Tambourine | 3854 | 2 | Snare | 38 |
| 3 | Bass Drum HiHat | 3642 | 3 | Bass Drum | 36 |
| 4 | Conga Op | 63 | 4 | HiHat Closed | 42 |
| 5 | Conga Slap | 62 | 5 | HiHat Open | 46 |
| Set 2 (Jazz) 0-4-44 | Note no. | Set 6 (Orchestra) 0-4-49 | Note no. | ||
| 1 | Bass Drum | 36 | 1 | Snare Roll | 25 |
| 2 | Jazz Snare Pedal HiHat | 3832 | 2 | Concert Snare/OpenTriangl | 3881 |
| 3 | Ride Cymbal | 59 | 3 | Concert BD | 36 |
| 4 | Tom Hi | 47 | 4 | Concert Cym. | 59 |
| 5 | Tom Lo | 43 | 5 | Timpani | 41 |
| Set 3 (Tarantel) 0-4-8 | Note no. | Set 7 (TR-909) 0-4-31 | Note no. | ||
| 1 | Tamorra 3 | 4 | 1 | Techno Kick | 35 |
| 2 | Tamorra 1 | 2 | 2 | TR-909 Snare909 Clap | 4039 |
| 3 | Tamorra 2 | 3 | 3 | TR-909 Kick/Tambourine | 3654 |
| 4 | Conga Op | 63 | 4 | 909 Tom Op | 50 |
| 5 | Conga Slap | 62 | 5 | 909 Tom Lo | 47 |
| Set 4 (Latin) 0-4-8 | Note no. | Set 8 (Ethnic) 0-4-50 | Note no. | ||
| 1 | Pandeiro 4 | 13 | 1 | Big Gong | 45 |
| 2 | Pandeiro 5 | 14 | 2 | Udo LongTabla Na | 5258 |
| 3 | Pandeiro 3Bass Drum | 1236 | 3 | Req DumTiml Paila | 5568 |
| 4 | Hi Bongo | 60 | 4 | Conga Slide | 78 |
| 5 | Lo Bongo | 61 | 5 | Mut Pandeiro | 79 |
[*] Drum Kit address. First digit= CC00, second digit= CC32, third digit= PC
MIDI Program change messages
| BANK SELECT | PROGRAM CHANGE | SECTION | |
| MSB CC00 | LSB CC 32 | ||
| BANK SELECT AND PROGRAM CHANGE TX | |||
| 0 | 0 | 1~10 | Treble Register |
| 0 | 0 | 1~5 | Bass Register |
| 0 | 0 | 1~5 | Orch Bass Register |
| 0 | 0 | 1~5 | Orch Chord Register |
| 0 | 0 | 1~6 | Orchestra Register |
| 0 | 0 | 1~8 | Set |
| TREBLE REGISTER RX | |||
| — | — | 1 | Bassoon [IMAGE] |
| — | — | 2 | Bandon [IMAGE] |
| — | — | 3 | Clarinet [IMAGE] |
| — | — | 4 | Oboe [IMAGE] |
| — | — | 5 | Master [IMAGE] |
| — | — | 6 | Harmon [IMAGE] |
| — | — | 7 | Musette [IMAGE] |
| — | — | 8 | Celeste [IMAGE] |
| — | — | 9 | Piccolo [IMAGE] |
| — | — | 10 | Organ [IMAGE] |
| ORCHESTRA REGISTER RX | |||
| — | — | 1 | St r i |
| — | — | 2 | Vi o |
| — | — | 3 | Cl a r |
| — | — | 4 | Sax |
| — | — | 5 | Fl u t |
| — | — | 6 | Or g a |
| BASS REGISTER RX | |||
| — | — | 1 | 2' [IMAGE] |
| — | — | 2 | 4' [IMAGE] |
| — | — | 3 | 16'/8'/8-4'/4'/2' [IMAGE] |
| — | — | 4 | 8'/4'/2' [IMAGE] |
| — | — | 5 | 16'/2' [IMAGE] |
| ORCH BASS REGISTER RX | |||
| — | — | 1 | Ac o u |
| — | — | 2 | Bo w |
| — | — | 3 | Fi n g |
| — | — | 4 | Fr e t |
| — | — | 5 | Tuba Mix |
| ORCH CHORD REGISTER RX | |||
| — | — | 1 | St. Strings |
| — | — | 2 | Chorus Organ |
| — | — | 3 | Steel Guitar |
| — | — | 4 | St. Orch Brass |
| — | — | 5 | Ch o i |
| SET RX | |||
| — | — | 1 | CL A S |
| — | — | 2 | JA Z |
| — | — | 3 | I F O |
| — | — | 4 | D F O |
| — | — | 5 | F F O |
| — | — | 6 | SP FOLK |
| — | — | 7 | B A |
| — | — | 8 | ALPINE |
MIDI Implementation Chart
[V-Accordion] Date: July 2007
Model: FR-2/FR-2b Version: 1.00
| Function... Transmitted Recognized Remarks | ||||
| Basic Channel | Default Changed | 1~16 1~16, Off | 1~16 1~16, Off | 7 Parts: 1= Treble, 2= Bass, 3= Chord, 4= Orchestra, 5= Orchestra Bass, 6= Orchestra Chord, 10= Pad, 1 Logical part: 13= Basic MIDI Channel for SET change |
| Mode | Default Message Altered | Mode 3 ***** ***** | Mode 3 ***** | |
| Note Number True Voice | 0~127 ***** | 0~127 0~127 | ||
| Velocity | Note ON Note OFF | O O | O O | |
| After Touch | Key's Ch's | X X | X X | |
| Pitch Bend X X | ||||
| Control Change | 00,32 07 10 11 64 91 93 | O X X O *1 X X X X | O X X O X X X X | Bank Select Volume Panpot Expression Hold 1 Reverb Send Chorus Send |
| Program Change True # | O 0~127 | O 0~9 | Recognized: 1~10: 1~6: Treble Registers 1~5 Bass registrs 1~5 Orchestra Bass 1~5 Orchestra Chord 1~6 Orchestra 1~8 Set | |
| System Exclusive O O | ||||
| System Common | Song Position Pointer Song Sel Tune | X X X | X X X | |
| System Real Time | Clock Commands | X X | X X | |
| Aux Messages | All Sounds Off Reset All Controllers Local On/Off All Notes Off Active Sense Reset | X X X X O X | X X X X O X | |
| Notes | *1 O X is selectable *2 Recognized as M=1 even if M≠1 | |||
Mode 1: OMNI ON, POLY
Mode 3: OMNI OFF, POLY
Mode 2: OMNI ON, MONO
Mode 4: OMNI OFF, MONO
O: Yes
X: No
14. Information
When you need repair service, call your nearest Roland Service Center or authorized Roland distributor in your country as shown below.
AFRICA
EGYPT
Al Fanny Trading Office 9, EBN Hagar Al Askalany Street,
ARD E1 Golf, Heliopolis, Cairo 11341, EGYPT TEL: 20-2-417-1828
REUNION
Maison FO - YAM Marcel 25 Rue Jules Hermann, Chaudron - BP79 97 491 Ste Clotilde Cedex, REUNION ISLAND TEL: (0262) 218-429
SOUTH AFRICA
T.O.M.S. Sound & Music (Pty)Ltd. 2 ASTRON ROAD DEN JOHANNESBURG ZA 2 SOUTH AFRICA TEL: (011)417 3400
Paul Bothner(PTY)Ltd. Royal Cape Park, Unit 24 Londonderry Road, Ottery 7800 Cape Town, SOUTH AFRICA TEL: (021) 799 4900
ASIA
CHINA
Roland Shanghai Electronics Co., Ltd. 5F. No.1500 Pingliang Road Shanghai 200090, CHINA TEL: (021) 5580-0800
Roland Shanghai Electronics Co., Ltd. (BEIJING OFFICE) 10F. No.18 3 Section Anhuaxil Chaoyang District Beijing 10001 CHINA TEL: (010) 6426-5050
HONG KONG
Tom Lee Music Co., Ltd. Service Division 22-32 Pun Shan Street, Tsuen Wan, New Territories, HONG KONG TEL: 2415 0911
Parsons Music Ltd. 8th Floor, Railway Plaza, 39 Chatham Road South, T.S.T. Kowloon, HONG KONG TEL: 2333 1863
INDIA
Rivera Digitec (India) Pvt. Ltd. 411, Nirman Kendra Mahalaxmi Flats Compound Off. Dr. Edwin Moses Road, Mumbai-400011, INDIA TEL: (022) 2493-9051
INDONESIA
PT Cibra IntiRama Jl. Cideng Timur No. 15J-15O Jakarta Pusat INDONESIA TEL: (021) 6324170 KOREA
Cosmos
1461-9, Seocho-Dong, Seocho Ku, Seoul, KOREA TEL: (02) 3486-8855
MALAYSIA
Roland Asia Pacific Sdn. Bhd. 45-1, Block C2, Jalan PJU 1/39, Dataran Prima, 47301 Petaling Jaya, Selangor, MALAYSIA TEL: (03) 7805-3263
VIET NAM
Suoi Nhac Company, Ltd 370 Cach Mang Thang Tam St. Dist.3, Ho Chi Minh City, VIET NAM TEL: 9316540
PHILIPPINES
G.A. Yupangco & Co. Inc. 339 Gil J. Puyat Avenue Makati, Metro Manila 1200, PHILIPPINES TEL: (02) 899 9801
SINGAPORE
SWEE LEE MUSIC COMPANY PTE. LTD. 150 Sims Drive, SINGAPORE 387381 TEL: 6846-2676
TAIWAN
ROLAND TAIWAN ENTERPRISE CO., LTD. Room 5, 9fl. No. 112 Chung Shan N.Road Sec.2, Taipei, TAIWAN, R.O.C. TEL: (02) 2561 3339
THAILAND
Theera Music Co., Ltd. 330 Soi Vemg NakornKasem, New Road, Sumpantawongse, Bangkok 10100, THAILAND TEL: (02) 224-8821
AUSTRALIA/ NEW ZEALAND
AUSTRALIA/
NEW ZEALAND
Roland Corporation Australia Pty., Ltd. 38 Campbell Avenue Doc Why West. NSW 2099 AUSTRALIA
For Australia
Tel:(02)9982 8266 For New Zealand Tel:(09)3098 715
CENTRAL/LATIN AMERICA
ARGENTINA
Instrumentos Musicales S.A. Av.Santa Fe 2055 (1123) Buenos Aires ARGENTINA TEL: (011) 4508-2700
BARBADOS
A&B Music Supplies LTD 12 Webster Industrial Park Wildey, St.Michael, Barbados TEL: (246)430-1100
BRAZIL
Roland Brasil Ltda. Rua San Jose, 780 Sala B Parque Industrial San Jose Cotia - Sao Paulo - SP, BRAZIL TEL: (011) 4615 5666
CHILE
Comercial Fancy 11 S.A. Rut.: 96.919.420-1 Nataniel Cox #739, 4th Floor Santiago - Centro, CHILE TEL: (02) 688-9540
COLOMBIA
Centro Musical Ltda. Cra 43 B No 25 A 41 Boclodega 9 Medellin, Colombia
TEL: (574)381252
COSTA RICA JUAN Bansbach Instrumentos Musicales Ave.1. Calle 11, Apartado 10237, San Jose, COSTA RICA TEL: 258-0211
CURACAO
Zeelandia Music Center Inc. Orionweg 30 Curacao, Netherland Antilles TEL:(305)5926866
DOMINICAN REPUBLIC
Instrumentos Fernando Giraldez Calle Proyecto Central No.3 Fns.La Esperilla Santo Domingo, Dominican Republic TEL:(809) 683 0305
ECUADOR
Mas Musika Rumichaca 822 y Zaruma Guayaquil - Ecuador TEL:(593-4)2302364
EL SALVADOR
OMNI MUSIC 75 Avenida Norte y Final Alameda Juan Pablo II, Edificio No.4010 San Salvador, EL SALVAIXOR
TEL: 262-0788
GUATEMALA
Casa Instrumental Calzada Roosevelt 34-01/una 11 Ciudad de Guatemala Guatemala TEL:(502)599-2888
HONDURAS
Almacen Pajaro Azul S.A. de C.V. BO.Paz Barahona 3 Ave.11 Calle S.O San Pedro Sula, Honduras TEL: (504) 553-2029
MARTINIQUE
Roland East Europe Ltd. Warehouse Area 'DEPO' P£83 H-2016 Torokbalint, HUNGARY TEL: (27) 511011
IRELAND
Roland Ireland G2 Calmount Park, Calmount Avenue, Dublin 12 Republic of IRELAND TEL: (01) 4294444
ITALY
Roland Italy S. p. A. Viale delle Industrie 8, 20020 Arese, Milano, ITALY TEL: (02) 937-78300
NORWAY
Roland Scandinavia Avd. Kontor Norge Lilleakerveien 2 Postboks 95 Lillecaker N-0216 Oslo NORWAY TEL: 2273.0074
POLAND
ROLAND POLSKA SP. Z O.O. Ul., Gibraltar 4. PL-03 664 Warszawa POLAND
TEL: (022) 679
PORTUGAL
Roland Iberia, S.L. Portugal Office Cais das Pedras, 8/9-1 Dto 4050-465, Porto, PORTUGAL TEL: 22 608.00 60
ROMANIA
FBS LINES Piata Libertatii 1, 535500 Gibeorgheni, ROMANIA TEL: (266) 364 609
RUSSIA
MuTek Dorozhnaya ul.3,korp.6 117 545 Moscow, RUSSIA TEL: (095) 981-4967
SLOVAKIA
MOCO INC. No.41 Nike St., Dr.Shariyati Ave., Roberoye Cerahe Mirdamad Tehran, IRAN TEL: (021) 285-4169
ISRAEL
Halilit P. Greenspoon & Sons
Ltd.
8 Retzif Ha'alia Hashnia St. Tel-Aviv-Yafo ISRAEL TEL: (03) 6823666
JORDAN
MUSIC HOUSE CO. LTD. FREDDY FOR MUSIC P. O. Box 922846 Amman 11192 JORDAN TEL.: (06) 5692696
KUWAIT
EASA HUSAIN AL-YOUSIFI & SONS CO. Abdullah Salem Street, Safat, KUWAIT TEL: 243-6399
LEBANON
Chahine S.A.L. George Zeidan St., Chahine Bldg., Achrafieh, P.O.Box: 16- 5857 Beirut, LEBANON TEL: (01) 20-1441
OMAN
TALENTZ CENTRE L.L.C. Malatan House No.1 Al Noor Street, Ruwi SULTANATE OF OMÁN TEL: 2478 3443
QATAR
Al Emadi Co. (Badie Studio & Stores) P.O. Box 62, Doha, QATAR TEL: 4423-554
SAUDI ARABIA
aDawliah Universal Electronics APL Corniche Road, Aldossary Bldg., 1st Floor, Alkhobar, 31952 SAUDI ARABIA P.O.Box 2154, Alkhobar 31952 SAUDI ARABIA TEL: (03) 898 2081
SYRIA
Technical Light & Sound Center Rawda, Abdul Qader Jazairi St Bldg. No. 21, P.O.BOX 13520, Damascus, SYRIA
TURKEY
ZUHAL DIS TICARET A.S. Galip Dede Cad. No.37 Beyoglu - Istanbul / TURKEY TEL: (0212) 249 85 10
U.A.E.
Zak Electronics & Musical Instruments Co. L.L.C. Zabeel Road, Al Sherooq Bldg No. 14, Ground Floor, Dubai, U.A.F. TEL: (04) 3360715
NORTH AMERICA
CANADA
Roland Canada Ltd. (Head Office) 5490 Parkwood Way Richmond B. C., V6V 2M4 CANADA TEL: (604) 270-6626
Roland Canada Ltd.
(Toronto Office) 170 Admiral Boulevard Mississauga On L5T 2N6 CANADA TEL: (905) 362 9707
U.S.A.
Roland Corporation U.S. 5100 S. Eastern Avenue Los Angeles, CA 90040-2938, U. S. A. TEL.: (323) 890 3700
- CE
- NOTICE
- AVIS
- Features
- PBM (Physical Behavior Modeling)
- Super realistic accordion simulations
- Orchestral sounds
- The digital advantage
- Superb performance flexibility
- Useful accessory
- Contents
- USING THE UNIT SAFELY
- INSTRUCTIONS FOR THE PREVENTION OF FIRE, ELECTRIC SHOCK, OR INJURY TO PERSONS
- ALWAYS OBSERVE THE FOLLOWING
- WARNING
- CAUTION
- Important notes
- Power supply
- Placement
- Maintenance
- Repairs and data
- Additional precautions
- Precautions for optional batteries
- Battery handling
- Strap holder precaution
- Panel descriptions
- ⑦ PAD/DEFAULT button
- ⑧ USER PROG/DEC and METRONOME/INC buttons
- ⑨ REC/LOOP button
- ⑩ SONG/DEMO button
- ⑪ Bass registers (lower row) and pads (upper row)
- Connection panel
- ⑫ DC IN socket
- ⑬ MIDI OUT/IN socket
- ⑭ OUTPUT L/MONO (TREBLE) & R/MONO (BASS) sockets
- ⑮ PHONES socket
- Important remark
- Personalizing your FR-2/FR-2b
- Setting up
- Connections
- Using the OUTPUT sockets
- Switching the power on and off
- If you are using the supplied adaptor
- If you are using batteries
- Listening to the demo songs
- Touring the FR-2/FR-2b's sections
- Bellows resistance regulator
- Bass strap
- Treble section
- ■Using the FR-2/FR-2b's digital effects
- Bass section
- Using the orchestral sounds
- Orchestral sounds for the Treble section
- ■Switching off the Orchestra part
- Orchestral sounds for the Bass section
- ■Switching off the Orchestra Bass part
- Orchestral sounds for the Chord section
- ■Switching off the ORCH CHORD part
- ■Using two different sounds for the Bass button keyboard
- Other practical functions
- Switching off sections you don't need
- Using the metronome
- ■Setting the time signature
- ■Setting the tempo
- ■Setting the metronome level
- Pitch-related functions
- Transpose function
- Transposing the Treble keyboard in octave steps
- Musette Detune
- Song function
- Selecting a song
- Muting a part
- PAD function
- Playing drum sounds
- Playing drum sounds with the bass and chord buttons
- ■Adding drum sounds to your bass notes and chords
- ■Playing only drum sounds via the bass and chord buttons
- Recording short drum patterns
- Editing FUNCTION settings
- Selecting the desired function
- 2]/[15]
- MIDI parameters (FUNCTION group)
- About MIDI
- MIDI parameters
- Saving your settings (User Program)
- Saving the current settings
- Recalling a User Program
- Changing your accordion's behavior
- Treble Mode (only on the FR-2b)
- Bass & Chord Mode
- Restoring the factory defaults
- Using optional batteries
- Installing and removing batteries
- Note about rechargeable batteries
- Specifications
- ■ Keyboards
- ■ Bellows
- ■ Sound source
- ■ PBM (Physical Behavior Modeling)
- ■ Musette tuning
- ■ Effects
- ■ Panel controls
- ■ Operation modes
- ■ Power supply
- ■ Power consumption
- ■ Expected battery life under continuous use:
- ■ Others
- ■ Supplied accessories
- ■ Options
- Appendix
- MIDI Implementation Chart
- Information
- When you need repair service, call your nearest Roland Service Center or authorized Roland distributor in your country as shown below.
- AFRICA
- EGYPT
- REUNION
- SOUTH AFRICA
- ASIA
- CHINA
- HONG KONG
- INDIA
- INDONESIA
- Cosmos
- MALAYSIA
- VIET NAM
- PHILIPPINES
- SINGAPORE
- TAIWAN
- THAILAND
- AUSTRALIA/ NEW ZEALAND
- AUSTRALIA/
- NEW ZEALAND
- For Australia
- CENTRAL/LATIN AMERICA
- ARGENTINA
- BARBADOS
- BRAZIL
- CHILE
- COLOMBIA
- TEL: (574)381252
- CURACAO
- DOMINICAN REPUBLIC
- ECUADOR
- EL SALVADOR
- GUATEMALA
- HONDURAS
- MARTINIQUE
- IRELAND
- ITALY
- NORWAY
- POLAND
- TEL: (022) 679
- PORTUGAL
- ROMANIA
- RUSSIA
- SLOVAKIA
- ISRAEL
- JORDAN
- KUWAIT
- LEBANON
- OMAN
- QATAR
- SAUDI ARABIA
- SYRIA
- TURKEY
- U.A.E.
- NORTH AMERICA
- CANADA
- Roland Canada Ltd.
- U.S.A.
Brand : ROLAND
Model : FR-2B
Category : Hi-Fi System