
EQ700220 - Autres appareils de cuisine SIEMENS - Free user manual and instructions
Find the device manual for free EQ700220 SIEMENS in PDF.


| Product Type | Built-in electric hob |
| Brand | Siemens |
| Model | EQ700220 (series EA6..GH.., EA6..GE.., EA6..GF.., EA6..GN..) |
| Number of Hotplates | 4 |
| Hotplate Types | Single-circuit, dual-circuit, extended cooking zone |
| Control Type | Rotary knobs |
| Residual Heat Indicators | Yes |
| Power Supply | 220-240 V, 50/60 Hz (typical, refer to rating plate) |
| Installation Cut-out Dimensions (W x D) | 560 x 500 mm (approx.) |
| Hob Material | Ceramic glass |
| Cleaning | Use suitable ceramic cleaners; avoid abrasive agents |
| Safety Features | Overheat protection, residual heat indicators, child lock (if available) |
| Energy Saving Tips | Use lids, match pan size to hotplate, utilise residual heat |
| After-Sales Service | E-number and FD-number required; contact authorised service centre |
| Warranty | Standard manufacturer warranty (check documentation) |
| Depth of Unit | Minimum 600 mm (for installation) |
| Weight | Approx. 8-12 kg (estimate) |
Frequently Asked Questions - EQ700220 SIEMENS
User questions about EQ700220 SIEMENS
0 question about this device. Answer the ones you know or ask your own.
Ask a new question about this device
Download the instructions for your Autres appareils de cuisine in PDF format for free! Find your manual EQ700220 - SIEMENS and take your electronic device back in hand. On this page are published all the documents necessary for the use of your device. EQ700220 by SIEMENS.
USER MANUAL EQ700220 SIEMENS
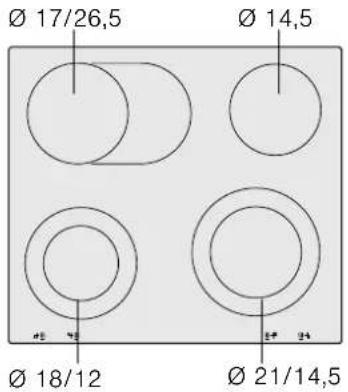
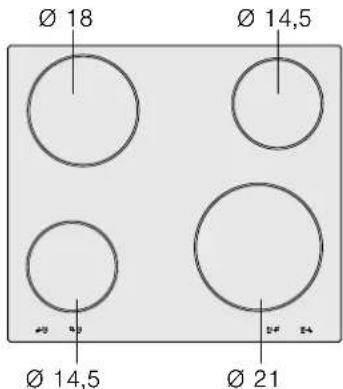
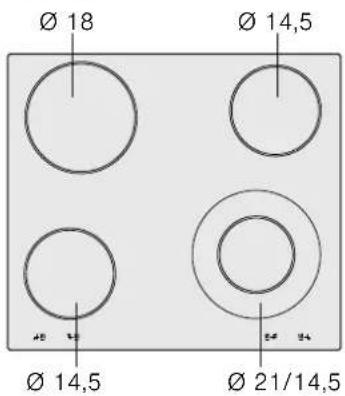
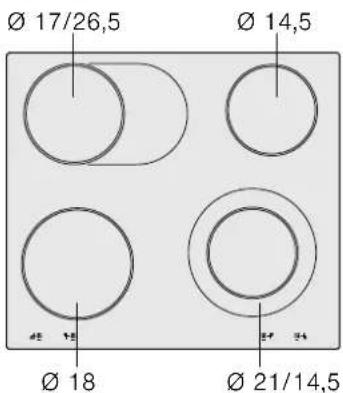
EA6..GH.. EA6..GE., EA6..GF.. EA6..GN..
[en] Instructions for installation and use 2
EA6..GH..
EA6..GE..
EA6..GF..
EA6..GN..
en Table of contents
Safety information....2
Safety information for this appliance....2
Causes of damage 3
Environmental protection....3
Environmental protection....3
Tips for saving energy 3
Getting to know your appliance....4
The hotplates 4
Hotplate and residual heat indicators....4
Setting the hob ....4
Switching the hob on and off 4
Setting a hotplate....4
Table of cooking times ....4
Cleaning and care ....5
Ceramic 5
Hob surround....5
After-sales service ....5
Installation instructions....6
The following must be noted 6
Preparing the units ....6
Installing the hob....6
Connecting the hob....6
Removing the appliance....6
⚠ Safety information
Please read this instruction manual carefully. This will enable you to operate your hob safely and correctly.
Please keep the instruction manual, installation instructions and the appliance certificate in a safe place. If the appliance changes owners, this documentation should always be included.
Check the appliance for damage after unpacking it. Do not switch on the appliance if it is damaged.
Safety information for this appliance
This appliance is intended for domestic use only. This appliance must only be used for food preparation. Do not leave the appliance unattended during operation.
Safe operation
Adults and children must not operate the appliance without supervision if:
■ they do not have the physical or mental ability,
■ or they lack the knowledge and experience required
Overheated oil and fat
Risk of fire!
Overheated oil or fat can ignite very quickly. Never leave hot oil or fat unattended. Never attempt to extinguish burning fat or oil with water. Extinguish the flames with a lid or a plate. Switch the hotplate off.
Hot hotplates
Risk of burning!
Never touch hot hotplates. Small children must be kept at a safe distance from the hob.
Risk of fire!
■ Never place combustible items on the hob.
- Do not keep combustible objects or aerosol cans in drawers directly underneath the hob.
Wet saucepan bases and hotplates
Risk of injury!
Steam pressure may build up if there is liquid between the saucepan base and the hotplate. This may cause the pan to jump suddenly. Always keep the hotplate and saucepan bases dry.
Overview
The following table provides an overview of the most frequent kinds of damage:
Cracks in the ceramic
Risk of electric shock.!
Switch off the circuit breaker in the fuse box if the ceramic has fractures, flaws or cracks. Call the after-sales service.
Incorrect repairs
Risk of electric shock.!
Incorrect repairs are dangerous. Switch off the circuit breaker in the fuse box, if the appliance is faulty. Call the after-sales service. Repairs may only be carried out by one of our qualified after-sales engineers.
Causes of damage
Caution!
■ Rough pot and pan bases scratch the ceramic.
- Avoid boiling pots dry. This may cause damage.
■ Never place hot pots or pans on the control panel, the display area or the surround. This may cause damage.
■ Damage can occur if hard or pointed objects fall on the hob.
■ Aluminium foil and plastic containers melt on hot hotplates. Oven protective foil is not suitable for your hob.
Damage Cause Action
| Stains Food spills Remove spills immediately with a glass scraper. | |
| Unsuitable cleaning agents Only use cleaning agents which are suitable for ceramic | |
| Scratches Salt, sugar and sand Do not use the hob as a work surface or storage space. | |
| Rough pot and pan bases scratch Check your cookware.the ceramic. | |
| Discolouration Unsuitable cleaning agents Only use cleaning agents which are suitable for ceramic | |
| Pan abrasion (e.g. aluminium) Lift the pots and pans when moving them. | |
| Blisters Sugar, food with a high sugar content Remove spills immediately with a glass scraper. | |
Environmental protection
Unpack the appliance and dispose of the packaging in an environmentally-responsible manner.
Environmental protection

This appliance is labelled in accordance with the European Directive 2002/96/EU concerning used electrical and electronic appliances (WEEE – waste electrical and electronic equipment). The guideline determines the framework for the return and recycling of used appliances as applicable.
Tips for saving energy
■ Always use the right lid for the pan in question. Cooking without the lid requires four times as much energy.
■ Use pots and pans with even bases. Using cookware with uneven bases increases energy consumption.
The diameter of the base of your pot or pan should match the size of the hotplate. In particular, if pots that are too small are placed on the hotplate, energy is wasted. Please note: Cookware manufacturers often specify the diameter of the top of the pan. This is usually bigger than the diameter of the base of the pan.
■ Use a small pan for small quantities of food. A larger, less full saucepan requires more energy.
■ Use only a little water when cooking. This saves energy. It also preserves vitamins and minerals in vegetables.
■ Switch to a lower heat setting as soon as possible.
■ Use the residual heat of the hob. For longer cooking times, you can switch the hotplate off 5 - 10 minutes before the end of the cooking time.
Getting to know your appliance
The instruction manual is the same for various different hobs. An overview of the models with their dimensions is given on page 2.
The hotplates
| Hotplate Activating and deactivating | |
| ○ Single-circuit hotplate | |
| ◎ Dual-circuit hotplate | To activate: turn the hotplate control clockwise to ◎. Set the heat setting. To switch off: turn the hotplate control to 0 and reset. Never turn the hotplate control beyond the ◎ symbol to 0. |
| ∞ Extended cooking zone | To activate: Turn the hotplate control clockwise to ∞. Set the heat setting. To switch off: turn the hotplate control to 0 and reset. Never turn the hotplate control beyond the ∞ symbol to 0. |
Hotplate and residual heat indicators
The hotplate and residual heat indicators light up when a hotplate is warm:
■ Hotplate indicator - during operation, shortly after you have switched on a hotplate.
■ Residual heat indicator - after cooking, when the hotplate is still warm.
You can use the residual heat to save energy, e.g. to keep a small dish warm or to melt chocolate.
Setting the hob
This section informs you how to set the hotplates. The table shows heat settings and cooking times for various meals.
Switching the hob on and off
You can switch the hob on and off with the hotplate controls.
Table of cooking times
The following table provides some examples.
Cooking times and heat settings may vary depending on the type of food, its weight and quality. Deviations are therefore possible.
Setting a hotplate
Adjust the heat setting of the hotplates using the hotplate controls.
Heat setting 1 = lowest setting
Heat setting 9 = highest setting
Note: Hotplate temperature is regulated by the heat switching on and off. The heat may also switch on and off at the highest setting.
When heating thick liquids, stir regularly.
For bringing liquids to the boil, use heat setting 9.
| Ongoing cooking setting | Ongoing cooking time in minutes | |
| Melting | ||
| Chocolate, cooking chocolate, gelatine | 1 | - |
| Butter | 1-2 | - |
| Heating and keeping warm | ||
| Stew (e.g. lentil stew) | 1-2 | - |
| Milk** | 1-2 | - |
| Poaching, simmering | ||
| Dumplings | 4* | 20-30 mins |
| Fish | 3* | 10-15 mins |
| White sauces, e.g. béchamel sauce | 1 | 3-6 mins |
* Continue cooking without a lid
** Without lid
| Ongoing cooking setting | Ongoing cooking time in minutes | |
| Boiling, steaming, stewing | ||
| Rice (with double the quantity of water) | 3 | 15-30 mins |
| Unpeeled boiled potatoes | 3-4 | 25-30 mins |
| Boiled potatoes | 3-4 | 15-25 mins |
| Pasta, noodles | 5* | 6-10 mins |
| Stew, soups | 3-4 | 15-60 mins |
| Vegetables | 3-4 | 10-20 mins |
| Vegetables, frozen | 3-4 | 10-20 mins |
| Cooking in a pressure cooker | 3-4 | - |
| Braising | ||
| Roulades | 3-4 | 50-60 mins |
| Pot roasts | 3-4 | 60-100 mins |
| Goulash | 3-4 | 50-60 mins |
| Frying** | ||
| Escalope, plain or breaded | 6-7 | 6-10 mins |
| Escalope, frozen | 6-7 | 8-12 mins |
| Steak (3 cm thick) | 7-8 | 8-12 mins |
| Fish and fish fillet, plain | 4-5 | 8-20 mins |
| Fish and fish fillet, breaded | 4-5 | 8-20 mins |
| Fish and fish fillet, breaded and frozen, e.g. fish fingers | 6-7 | 8-12 mins |
| Stir fry, frozen | 6-7 | 6-10 mins |
| Pancakes | 5-6 | continuous |
* Continue cooking without a lid
** Without lid
Cleaning and care
The information in this section provides help on how best to care for your hob.
Suitable maintenance and cleaning products can be purchased from the after-sales service or in our e-Shop.
Ceramic
Clean the hob after each use. This will prevent spills from burning onto the ceramic.
Only clean the hob when it has cooled down sufficiently.
Use only cleaning agents which are suitable for ceramic. Follow the cleaning instructions on the packaging.
Never use:
■ Undiluted washing-up liquid
■ Detergent intended for dishwashers
■ Scouring agents
■ Harsh cleaning agents such as oven spray or stain remover
■ Abrasive sponges
■ High-pressure cleaners or steam jet cleaners
Ground-in dirt can be best removed with a glass scraper, available from retailers. Please note the manufacturer's instructions.
You can also obtain a suitable glass scraper from our after-sales service or from the e-Shop.
Hob surround
To prevent damage to the hob surround, please observe the following instructions:
■ Use only warm, soapy water.
■ Do not use harsh or abrasive agents.
■ Do not use the glass scraper.
After-sales service
Our after-sales service is there for you if your appliance should need to be repaired. We are committed to find the best solution also in order to avoid an unnecessary call-out.
E number and FD number:
Please quote the E number (product number) and the FD number (production number) of your appliance when
contacting the after-sales service. The rating plate bearing these numbers can be found on the appliance certificate.
Please note that a visit from an after-sales service engineer is not free of charge, even during the warranty period.
Please find the contact data of all countries in the enclosed customer service list.
To book an engineer visit and product advice
GB 0844 8928999
Calls from a BT landline will be charged at up to 3 pence per minute. A call set-up fee of up to 6 pence may apply.
IE 01450 2655
Trust the expertise of the manufacturer, and rest assured that the repair will be carried out by trained service technicians using original spare parts for your domestic appliance.
Installation instructions
The following must be noted
The appliance must only be connected to the power supply by a licensed professional. Your safety when using the appliance can only be guaranteed if it has been correctly installed in accordance with these installation instructions. Any damage occurring due to the appliance being incorrectly connected is not covered under the guarantee. The individual who installed the appliance is liable for damage resulting from improper installation.
Protection against accidental contact must be ensured through the manner of installation. .
The hob and the cooker or control unit must be from the same manufacturer and be equipped with an identical combination mark.
They must have the same nominal voltage (see rating plate).
Take account of the cooker or control unit installation instructions.
The work surface must be stable, level and horizontal.
Preparing the units
After cutting the necessary holes in the work surface, remove the shavings.
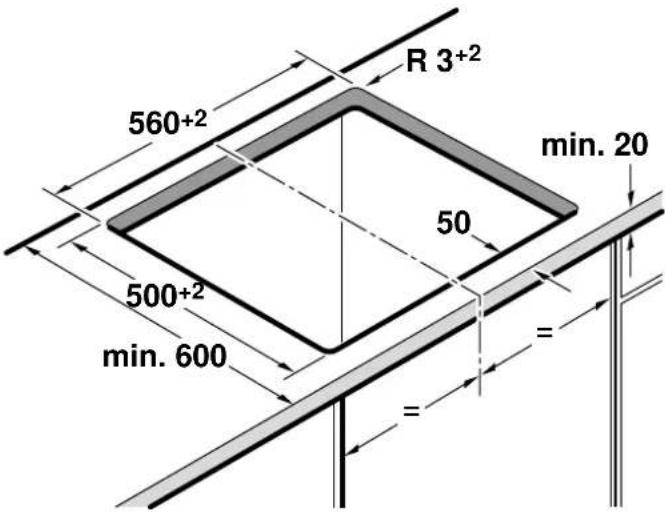
The units into which the hob and cooker are fitted must be heat-resistant up to 90 °C. Minimum distance to the side walls: 70 mm.
Seal the cut surfaces to make them heat-resistant. This prevents the surfaces from swelling as a result of moisture.
Installing the hob
Do not trap cables during installation. Push the hob in until it locks into place.
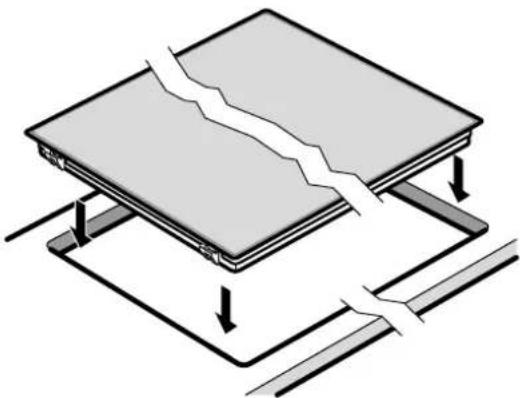
natural_image
Diagram of a mechanical or structural assembly with no visible text, numbers, or symbolsConnecting the hob
The cooker or control unit should be connected to the mains, but switched off.
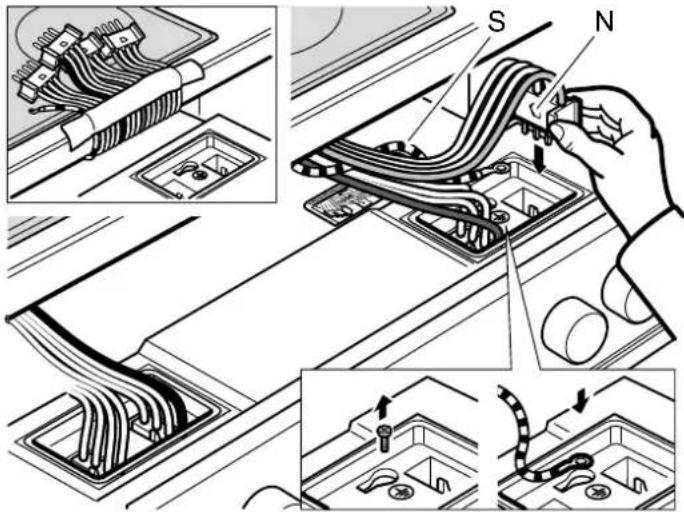
- Pull out the cooker far enough to make the socket accessible.
- Screw the hob's earthing conductor S (green/yellow) on to the cooker earthing point \$.
- Plug the hob connector into the cooker or control unit. The colour of the cable should agree with the colour shown on the label. The lug N on the plug must point to the left.
Slide the cooker back in. Do not trap cables while doing this.
Note: Seal the tile joints on tiled work surfaces with silicone rubber.
Removing the appliance
Disconnect the appliance from the power supply. Pull out the cooker a short distance. Pull out the hob connector. Finally remove the earthing conductor. Push out the hob from below.

- en Table of contents
- ⚠ Safety information
- Safety information for this appliance
- Safe operation
- Overheated oil and fat
- Risk of fire!
- Hot hotplates
- Risk of burning!
- Wet saucepan bases and hotplates
- Risk of injury!
- Overview
- Cracks in the ceramic
- Risk of electric shock.!
- Incorrect repairs
- Causes of damage
- Caution!
- Environmental protection
- Tips for saving energy
- Getting to know your appliance
- Hotplate and residual heat indicators
- Setting the hob
- Switching the hob on and off
- Table of cooking times
- Setting a hotplate
- Cleaning and care
- Ceramic
- Hob surround
- After-sales service
- E number and FD number:
- To book an engineer visit and product advice
- Installation instructions
- The following must be noted
- Preparing the units
- Installing the hob
- Connecting the hob
- Removing the appliance
Brand : SIEMENS
Model : EQ700220
Category : Autres appareils de cuisine