
Mexico 4370 - CD Player BECKER - Free user manual and instructions
Find the device manual for free Mexico 4370 BECKER in PDF.


| Product Type | Car Stereo CD Player with Cassette and Radio |
| Brand | Becker |
| Model | Mexico 4370 |
| Wavebands | FM (87.5 - 108 MHz), AM (531 - 1620 kHz), LW (153 - 282 kHz) |
| Output Power | 4 x 18 Watts (max) |
| Frequency Range | CD: 20 Hz - 20 kHz; Cassette: 50 Hz - 14 kHz; FM: 30 Hz - 15 kHz; AM/LW: 50 Hz - 2.5 kHz |
| Supply Voltage | 12 V DC (negative ground) |
| Dimensions (approx.) | 180 x 50 x 150 mm (single DIN) |
| Weight (approx.) | 1.5 kg |
| Anti-Theft System | Detachable faceplate with 4-digit code protection |
| Tone Controls | Bass, Treble, Balance, Fader, Loudness |
| Preset Memory | 10 stations per band (FM1, FM2, AM, LW) |
| RDS Features | PTY display/search, EON, TP, regionalization |
| Changer Compatibility | Becker Silverstone CD changer or Sony MD changer (MDX 60/61) |
| User Memory | 3 user profiles (tone and station settings) |
| GAL (Speed-dependent Volume) | Yes, adjustable from OFF to level 15 |
| Audio Inputs | AUX input (via CD changer connector), AF telephone input |
| Line Outputs | 4-channel analog line out (front/rear left/right) |
| Display | Fold-down panel with adjustable viewing angle (4 settings) and selectable illumination color (red/yellow on some models) |
| Maintenance | Clean CD with soft cloth; use cleaning cassette for tape deck (prompted every 30 hours) |
| Safety Features | Temperature protection circuit for CD laser; auto-off after 1 hour without ignition |
| Certifications | CE, e-mark (E1 021337) for vehicle use |
Frequently Asked Questions - Mexico 4370 BECKER
User questions about Mexico 4370 BECKER
0 question about this device. Answer the ones you know or ask your own.
Ask a new question about this device
Download the instructions for your CD Player in PDF format for free! Find your manual Mexico 4370 - BECKER and take your electronic device back in hand. On this page are published all the documents necessary for the use of your device. Mexico 4370 by BECKER.
USER MANUAL Mexico 4370 BECKER
Arrangement of Controls 41
Anti-theft Device 42
Code number entry 42
Remove portable panel 43
Inserting portable panel 43
General Operation 44
Switch on / off 44
Adjust volume 44
Mute function 44
Activate tone menu 44
Adjust bass 45
Adjust treble 45
Adjust balance 45
Fader
Loudness on /off 46
Linear adjustment 46
Adjust mono / stereo 46
Radio Operation 47
Select operating mode 47
Select waveband 47
Switch on radio menu mode 47
Setting procedures for transmitter selection 48
NBC (Next Best Chain) function 48
FM transmitter search 48
AM, LW transmitter search mode 49
Scan search 49
Direct frequency entry 49
Programme type display/search (PTY) 50
FM 1/FM 2 transmitter - request/store 50
AM, LW transmitter - request/store 51
AM, LW autostore 51
Manual tuning 51
Regionalisation 52
Traffic Program (TP) 53
EON transmitter - display / select 53
EON transmitter - switch on / off 53
Traffic program transmitter - display / select 53
Announcement stand-by - switch on/off 54
Mute function - switch on/off 54
Telephone mute function 55
Time request 55
Tape Operation 56 45
Cassettes - insert / eject 56
Track switching 56
Radio operation during forward / rewind 56
Fast forward / rewind 57
Music search - forwards / backwards 57
Dolby NR 57
Skip blank 58
Scan search 58
Cleaning the cassette mechanism 58
Table of Content
CD Operation 59
Compact Disc (CD) instructions 59
CDs - insert / eject 59
Track skip - forwards / backwards 60
Scan search 60
Fast forward / rewind 60
Relative time, number of tracks and total playing time 61
Random Play 61
Direct track selection 61
Temperature protection circuit 62
CD/MD Changer Operation 63
Operational readiness of CD/MD changer 63
CD magazine - load / unload 63
Playing CD/MDs 64
User Menu 65
User menu - request / quit 65
USER memory 65
Illumination colour setting (COLOR) (only 4327, 4337) 65
GAL setting 66
Telephone mute characteristics (PHONE) 66
DRIVER setting 67
AUX input (AUX IN) 67
Viewing angle setting (ANGLE) 67
Service Menu
68
Connection Instructions 69
Removal / Installation Guide 70
General Instructions 72
Frequency search 72
Chain search 72
RDS SYSTEM 72
EON (Enhanced Other Network) 72
PTY (Program Type) 73
Technical Data 74
NOTICE 75
DOLBY and the double D-symbol □ are trademarks of Dolby Laboratories Licensing Corporation.
Dolby noise reduction system manufactured under license from Dolby Laboratories Licensing Corporation.

1 Volume control
2 On / off switch () ON
3 Tone button ()
4 Road traffic announcement button () TP
5 Operating mode selector button ( MM _ode)
6 Function button ()
7 Waveband selector button ( IBD _and)
8 Tape/CD eject button ( )
9 Right rotary control
10 Multifunction buttons
11 Display
Anti-theft Device
Code number entry
If the car radio is disconnected from the power supply, it is theft-protected upon reconnection. After switching on at the Ⓞ button, the prompt CODE, followed by 4 stars is displayed.
The four-digit code must then be entered using the multifunction buttons "1-0".
Example : Code number 1530 (the code number can be found on the enclosed CODE CARD).
Enter code number using the multifunction buttons.
The first star is extinguished after entry of the first digit. The second star is extinguished after entry of the second digit, etc. The unit switches on automatically after entry of the 4th digit, if this and all other digits have been correctly entered.
Note : It is essential that the CODE CARD be kept in a safe place outside the vehicle. Thus, illegal use is not possible. The accompanying sticker should be attached to the inside of the vehicle windscreen/ window.
If an incorrect code number is entered, the prompt CODE with the four stars is displayed again. After entering incorrect code three times WAIT is displayed and the unit is disabled for approx. 60 minutes. Three further incorrect entries block the unit again for 60 minutes.
Attention: The waiting time applies only to ignition and unit switched on.


Remove portable panel
As effective anti-theft device, the portable panel (A) can be removed from the unit.
For this purpose, press and hold button. The display folds forwards.
The portable component can then be pulled out.
The volume is limited to a maximum value after the display has been folded down. After 20 seconds an audible signal indicates that the control component is folded down. The unit is switched to mute. The unit switches off after a further 10 seconds.
Note : For safety reasons, it is not permitted to leave the portable panel open when driving
Attention: Please insert the portable panel in the accompanying protective cover after removal.
Do not touch the metal contacts on the portable panel or on the radio.
Inserting portable panel
Insert the portable panel so that it engages first in the lower left catch and then in the lower right. Then press the portable panel into the upper catches.
Or position portable panel directly over all four catches and press in firmly to engage.
For proper functioning, ensure that the portable panel is firmly engaged in all four catches.
If a new portable panel or one from another unit is utilised, the code number must be entered, as previously described, in order to activate the unit.

General Operation
Switch on / off
Press ON button.
Further on / off switching possibilities: Via ignition. In order to switch on via the ignition, the unit must previously have been switched off via the ignition. After switching off the ignition, the unit can be prevented from switching off by pressing the Button within 3 seconds.
Note : The unit can also be switched on with the ignition switched off via the Cutton, but will switch off automatically after 1 hour.
Adjust volume
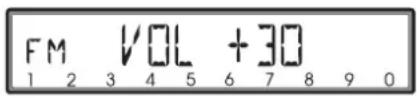
Turn volume control to right / left. The volume is increased or decreased. The current volume level is shown on the display.
Mute function
The unit can be switched to mute in each operating mode by pressing the volume control. In the display MUTE or TP INFO will appear. The mute function is cancelled by pressing the volume control, changing the operating mode or inserting tape / CD.
Activate tone menu
Press Button. The tone menu is activated. The following functions can be called up: BASS (Bass), TREB (Treble), BAL (Balance), FAD (Fader), LOUD (Loudness) and STEREO (Reception optimisation). Bass and treble settings for the AM/FM wavebands, for road traffic announcements and tape/CD operation are stored separately (values from -7 to +7). The settings for fader, balance and loudness (no loudness with AM) are stored together for all operating modes (values from -7 to +7).


General Operation
Adjust bass
Press 📄 button and then multifunction button “-” or “+”. BASS and the set value are displayed. Set the desired bass via both buttons.
Centre setting: Press both buttons simultaneously.
Adjust treble
Press 📄 button and then multifunction button “-” or “+”. TREB and the set value are displayed. Set the desired treble via both buttons.
Centre setting: Press both buttons simultaneously.
Adjust balance
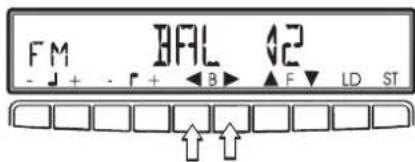
Press ⚫ button and then multifunction button “◀” or “▶”. BAL and the set value are displayed. Set the desired balance via both buttons.
Centre setting: Press both buttons simultaneously.
Fader
Press 📄 button and then multifunction button “▲” or “▼”. BASS and the set value are displayed. Set the desired fade level via both buttons.
Centre setting: Press both buttons simultaneously.



General Operation
Loudness on /off
Press 📋 button and then multifunction button "LD". LOUD ON or LOUD OFF are displayed. The loudness can be switched on or off alternately by pressing the multifunction button.
Linear adjustment
Press and hold Patton for more than 2 seconds. The tone values for the set signal source (e.g. radio/FM) are set to an average value FM LINEAR. Press and hold Patton for more than 4 seconds. All tone values for the signal sources radio and tape / CD are set to an average value ALL LINEAR.
Adjust mono / stereo
Three different reception optimisation settings can be set in order to suppress reception dependent interference and reflections. Repeatedly press multifunction button “ST” in tone menu until the desired optimisation is set.
AUTO: Setting for normal operation - i.e., the unit switches from stereo to mono and back depending upon reception location (provides the optimum setting for almost all reception areas).
STEREO: Setting for unusual reception situations - i.e. the unit is set permanently to stereo (e.g. for private radio stations in city areas)
MONO: Setting for reception conditions in which reflections constantly occur - i.e., the unit is set constantly to mono.
The setting is effective immediately after pressing the multifunction button "ST" and is also retained on switching off.

Select operating mode
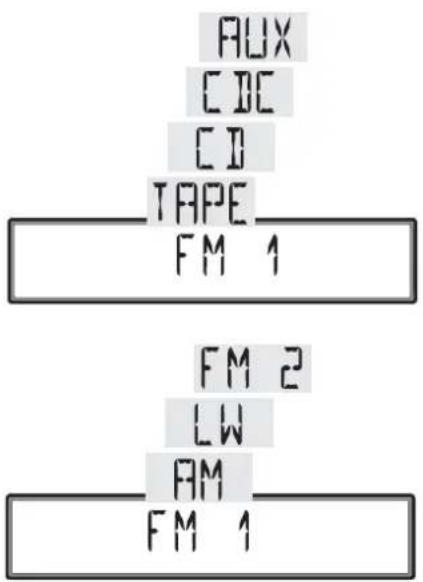
Press 📂 button. The operating modes Radio, CD or TAPE, CD/MD changer (for connected CD/MD changer) or AUX can be selected.
The last selected operating mode is set after the button is pressed for the first time. If the other operating modes are to be selected, the button is quickly and repeatedly pressed until the desired operating mode is selected.
Note : If you switch often between FM and CD, first select FM and then through quick pressing CD. Subsequently, press the Ⓜ button after a pause of more than 2 seconds, switching only takes place between FM and CD.
Select waveband
Press BD button repeatedly until desired waveband FM 1, FM 2, AM or LW is selected.
When changing the waveband the last selected transmitter is set.
Switch on radio menu mode
Press 📷 button. The radio menu mode is switched on and displayed. The unit switches back to the normal display if no button is pressed within the next 8 seconds.
Setting procedures for transmitter selection
The desired transmitter can be selected via NBC (Next Best Chain), transmitter search, scan search, manual tuning, direct frequency entry and station buttons.
NBC (Next Best Chain) function
The NBC function features a dynamic memory.
In order to call up the NBC function, select radio menu mode in FM mode.
Then press multifunction button “AS” (Auto Select) repeatedly until AUTO NBC is displayed.
The best transmitter is always displayed to the left of the normal display. Press the right rotary control in order to select this transmitter.
Transmitters with better/worse reception quality can be selected by turning the right rotary control to the left/right. The selected transmitter is set by pressing the right rotary control.
After setting, the best transmitter is displayed via NBC again after 8 seconds.
FM transmitter search
Turn the right rotary control to the left/right. The radio searches in descending/ascending order, according to selected search mode.
In order to select the various search modes, select radio menu mode in FM mode. Then press multifunction button “AS” repeatedly until the desired search mode is selected.
- SEEK FRQ (frequency) search of the waveband
- SEEK CHN (chain) search of transmitter chains in alphabetical order
Explanation of frequency search mode on page 72.
Explanation of chain search mode on page 72


AM, LW transmitter search mode
Turn the right rotary control to the left/right in desired waveband (AM, LW). The radio searches for reception frequencies in descending/ascending order of frequency.
Tuning steps of 9 kHz for AM and 3 kHz for LW are used.
Scan search
In the desired waveband (FM, AM or LW), press the right rotary control, SC is displayed. An automatic transmitter search is started. The first search is performed on an insensitive plane, all further searches on a sensitive plane. Receivable transmitters can be heard for 8 seconds. Press / turn the right rotary control if the received programme should be retained.
Note : In waveband FM, according to selected search mode, a frequency scan (display: SCAN FRQ) or a programme scan (display: SCAN CHN) is performed. Scan search is not possible if NBC is selected.

Direct frequency entry
Select radio menu mode and then, within 8 seconds, enter the frequency using the multifunction buttons.
Radio Operation
Programme type display/search (PTY)
Select radio menu mode and then and press multifunction button "PT". The selected transmitter program type is displayed for 10 seconds (e.g. POP M = pop music). If the selected transmitter has no PTY characteristic (see also page 73) NO PTY appears.
In order to activate search, select radio menu mode and then and press multifunction button "PT". Pre-select a currently available PTY using the multifunction button "◀or " ▶Turn the right rotary control within the next
10 seconds. PTY-SEEK is displayed. The previously heard programme is selected if no transmitter with the selected PTY is receivable. Switching over to station button plane takes place if there is no further actuation within 10 seconds.


FM 1/FM 2 transmitter - request/store
Store: 10 frequencies or programs can be stored on each of wavebands FM 1 and FM 2.
Press multifunction button for 2 - 4 seconds in order to store the desired transmitter or program.
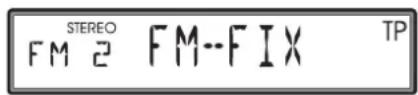
The frequency is stored on the station button if the multifunction button is pressed for longer than 4 seconds (display FM-FIX).
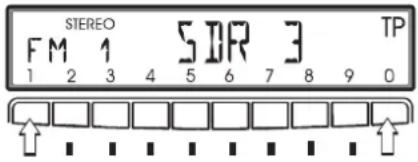
Request: Press multifunction button "1 - 0". The stored transmitter is requested.
The stored frequency is set if the transmitter cannot be identified.
No diversity or programme identification is performed after request if only one frequency is stored on the multifunction button. FM-FIX appears briefly on the display.
AM, LW transmitter - request/store
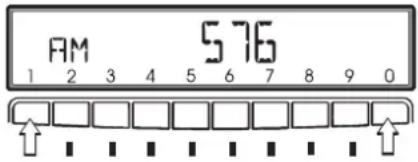
Request: Press multifunction button "1 - 0". The stored transmitter is requested.
Store: 10 transmitters can be stored under station buttons. Search for the desired transmitter and press the multifunction button until the station button number is displayed.
AM, LW autostore
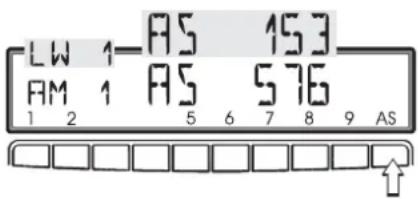
Select desired waveband. Select radio menu mode. Then press multifunction button “AS” repeatedly until AS-SEEK is displayed. The 10 transmitters with the best reception are stored under the station buttons in order of quality. The autostore plane is identified on the display by AS.
Select radio menu mode in order to quit the autostore storage plane. Then press multifunction button "AS". The radio switches back to the station button plane.
Manual tuning
Select radio menu mode and then turn the right rotary control.
100 kHz (FM and NBC), 9kHz (AM) or 3 kHz (LW) tuning steps are performed.
Pressing the right rotary control switches to fine tuning (1kHz steps) for AM and LW.
The function is quit if there is no further actuation within 10 seconds.
Radio Operation
Regionalisation
A regional identification is displayed if regional programmes are broadcast within the programme range of the selected transmitter. The abbreviation RP indicates that the selected transmitter is able to broadcast regional transmissions. In this case, the RDS - diversity function is restricted to the selected regional area.
Pressing the multifunction button "RP" enables a choice between REG ON (regionalisation switched on) and REG OFF (regionalisation switched off).
The RDS - diversity function is independent of region. Switching between various regional transmitters can occur in this mode. Regional operation must be selected again if this phenomenon occurs.

Traffic Program (TP)
The traffic programme system offers the advantage that current traffic news can be received and heard despite the fact that Tape/CD, AM, LW or FM transmitters (which are not special traffic programme transmitters) are selected. For this purpose, it is essential that a traffic programme or EON (enhanced other network) transmitter is selected in the FM waveband and that the traffic programme is activated.
The EON function is not available for AM and LW.
EON transmitter - display / select
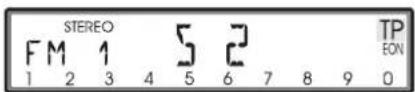
If an EON transmitter is selected, the prompt EON appears. The transmitter can be selected by transmitter search or by direct frequency entry.
EON transmitter - switch on / off
If the selected EON transmitter is to be activated for traffic announcements in the FM range or during tape/CD operation, the Futton must be pressed until the abbreviation TP is displayed.
If traffic announcements are not desired, the ☐tton must be pressed until the abbreviation TP is extinguished.

Traffic program transmitter - display / select
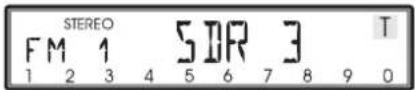
If a traffic program transmitter is selected, the abbreviation T appears. The transmitter can be selected by transmitter search or by direct frequency entry.
Radio Operation
Announcement stand-by - switch on/off
If the selected traffic programme transmitter should interrupt the AM, LW or tape/CD operation for traffic announcements, the 📂tton must be pressed until the abbreviation TP is displayed.
If traffic announcements are not desired, the button must be pressed until the abbreviation T appears.
If no traffic programme transmitter is selected, the automatic transmitter search is activated by pressing the 📄 button and a traffic programme transmitter is selected.
Note : During the traffic announcement, the desired increase in volume can be set via the volume button. An announcement which is currently being heard can be terminated by pressing the button. The unit then switches back immediately to the previously selected operating mode in the mute condition. However, the next traffic announcement is switched through again.

Mute function - switch on/off
After selection of a TP or EON transmitter, the mute function can be activated by pressing the TP button briefly. The prompt TP INFO appears. Thereafter, only traffic announcements are switched through. The mute function is cancelled by pressing the Tutton again or by turning the volume control.
If no TP or EON transmitter is selected, MUTE is displayed on actuating the button. For MUTE, no traffic announcements are switched through.

Telephone mute function
The telephone characteristics can be set in the user menu (see also page 66) if a telephone system is installed in the vehicle and the mute function lead for the car telephone is connected to the car radio.
For the setting PH OFF, the radio is switched to mute if a call is received.
For the setting PH ON, the telephone call is connected through the radio unit if a call is received.
However, this is only possible if, in addition to the telephone, a handsfree unit with loudspeaker output is installed and connected to the radio. In both cases, PHONE is displayed.
PHONE
Time request
Select radio menu mode in FM waveband. Then press multifunction button "T" (Time). The current time in hours and minutes is displayed. This display is only possible if the time signal is received via RDS. If no time signal has been received, --:-- is displayed.

Tape Operation
Cassettes - insert / eject
Press button briefly; the display folds downwards and the cassette slot becomes visible. Push in cassette with tape-side to the right until it engages and press lightly. The cassette is drawn in automatically. Then fold the display up again.
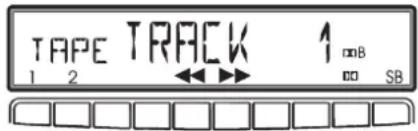
The unit switches automatically to cassette operation. TAPE and TRACK 1 are displayed.
If there is already a cassette in the cassette slot, press Mutton repeatedly until TAPE appears on the display.
In order to eject a cassette, press button briefly; the display folds downwards and the cassette is ejected and can be removed. Then fold the display up again.
Attention: The cassette is not ejected when the unit is switched off but remains in the cassette slot.
Track switching
The track is changed automatically at the end of the tape.
The tape track can be switched at any desired position by pressing briefly one of the multifunction buttons for track switching. The track currently playing is shown on the display.

Radio operation during forward / rewind
During forward / rewind, the radio (FM) can be connected through by turning the volume control. Operation of the radio functions is, however, not possible.
Fast forward / rewind
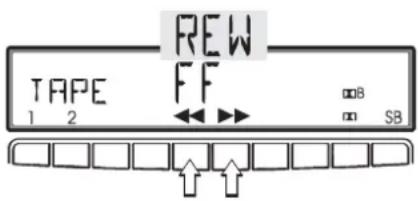
During cassette operation, fast forward / rewind can be activated using the multifunction buttons.
In order to cancel the function, press or turn the right rotary control, or press the track switching buttons or the fast forward / rewind buttons.
Music search - forwards / backwards
In order to activate the forward music search, turn the right rotary control to the right until the desired number of tracks to be skipped (max. 9) is set.
In order to activate the backward music search, turn the right rotary control to the left until the desired number of tracks to be skipped (max. 9) is set.
The beginning of a track can only be found if there is a pause of at least 4 seconds between tracks. In order to cancel the function, press or turn the right rotary control, or press the track switching buttons or the fast forward / rewind buttons.
Dolby NR
For the playing of cassettes which have been recorded using Dolby NR, press the multifunction button repeatedly until the desired noise reduction mode (Dolby B or Dolby C) appears on the display.
For the playing of non-Dolby cassettes, press the button repeatedly until the Dolby NR display is extinguished.
Tape Operation
Skip blank
If skip blank is active, automatic forward is activated at blank tape sections which are longer than 10 to 15 seconds.
In order to activate the function, press the multifunction button “SB” until SB is shown on the display.
Scan search
Press the right rotary control to start the scan search.
SC appears on the display. Each track is played for approx. 10 seconds.
In order to cancel the function, press the track switching buttons or the fast forward / rewind buttons.

Cleaning the cassette mechanism
After a time, the reproduction quality of cassettes is reduced due to unavoidable dirt and dust deposits on the sound head. The drive components in the cassette mechanism also become dirty. For this reason the cassette mechanism should be cleaned from time to time. The prompt CLEAN appears on the display after each 30 hours running time.
Use a cleaning cassette suitable for reverse operation for this purpose. The cleaning cassette should be removed again after 30 seconds.
Compact Disc (CD) instructions
Sound interruptions may occur if the CD is dirty. In order to ensure optimum tone quality, please note the following:
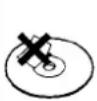
- Always touch the CD at the edges only. Keep the disc clean and never touch the surface.
- Never stick anything to the CD.
- Protect the CDs against direct sunlight and from heat sources such as heaters etc.
- Before playing, clean the CD with a commercially available cleaning cloth, wiping from the centre outwards. Solvents such as petrol, thinners or other commercially available cleaners and anti-static sprays must not be used.
 Correct Correct | [23W3] Incorrect Incorrect |
 Incorrect Incorrect |  Correct Correct |
Correct
Incorrect
Incorrect
Correct
CDs - insert / eject
Press button briefly; the display folds downwards and the CD slot becomes visible. Insert the disc into the CD slot with the printed side upwards. The unit pulls in the CD automatically and begins to play the disc from the first track. Then fold the display up again.
After playing the last track, the unit automatically begins to play the first track of the CD again.
If there is already a CD in the CD slot, press Ⓜ button repeatedly until CD appears on the display.
In order to eject a CD, press button briefly; the display folds downwards and the CD is ejected. Then remove the CD. Then fold the display up again.
Attention: The CD is not ejected when the unit is switched off but remains in the CD slot.

CD Operation
Track skip - forwards / backwards
Turn right rotary control to right / left.
If the track has been playing for longer than 8 seconds when the return function is triggered, the device returns to the beginning of the track.
Through further turning of the right rotary control, several tracks can be skipped over in forward or backward directions. The device switches to the first track when the last track has been reached. Analogously, it switches from the last track to the first track.

Scan search
Press the right rotary control, until the prompt SC appears on the display. All following CD tracks are played for 8 seconds each. Press the rotary control again to terminate the scan search.
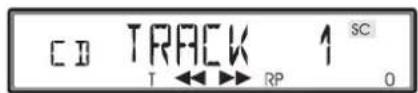
Fast forward / rewind
Fast forward (audible) is activated by pressing the multifunction button “▶” and fast rewind (audible) is activated by pressing the multifunction button “◀”. The relative time is displayed during this function.
Fast forward / rewind is terminated by releasing the multifunction button. The relative time is displayed for a further 8 seconds.

Relative time, number of tracks and total playing time
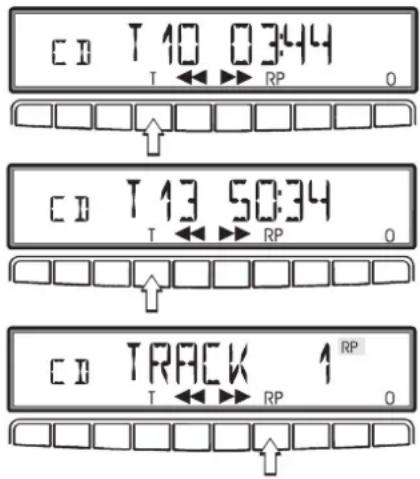
By pressing the multifunction button “T”, the relative time for the track currently being played is displayed for approx. 8 seconds.
By again pressing the multifunction button “T” (within 10 seconds), the number of tracks and total playing time of the CD currently being played are displayed for approx. 8 seconds.
Random Play
The random play is activated by pressing the multifunction button “RP”. The tracks of the current CD are then played in random order. The abbreviation RP appears on the display.
The random play function is terminated by repeated pressing of the multifunction button "RP".
Direct track selection
The unit is switched to select mode by pressing the multifunction button "0".
The digits 1 - 0 and TRACK ____ are displayed.
A track can be selected directly by using the multifunction buttons “1-0” (only real numbers are displayed). The unit switches back to CD menu mode if no buttons are actuated for approx. 8 seconds.

CD Operation
Temperature protection circuit
A temperature protection circuit is utilised in this unit in order to protect the laser diode against over heating.
When this protection circuit is activated, CD TEMP. appears for 8 seconds. The unit switches back to the last selected signal source (FM / AM / LW or CD/MD changer).
The single CD operation can be requested again after a short cooling phase. However, if the temperature is still too high, the unit again switches back to the previously selected signal source.
CD TEMP
Operational readiness of CD/MD changer
If a CD/MD changer is connected to the car radio, this is ready for operation as soon as it has been loaded with the filled CD magazine or with MDs. Close the sliding cover after loading. Further operation is performed via the car radio control panel.
CD magazine - load / unload
In order to remove the CD magazine, open the sliding cover on the changer and press the eject button. The magazine is ejected and can be removed. When inserting CDs in the magazine, please note imprint on magazine.
Attention: Incorrectly inserted CDs will not be played.
Note: In order to ensure the fastest possible CD change, the magazine should be fully loaded from compartment 1.
CD/MD Changer Operation
Playing CD/MDs
Press Mutton repeatedly until the CD/MD changer operation is switched on. The last CD/MD which was being played, is played from the position at which it was left before switching off.
The desired CD/MD can be selected via the multifunction buttons "1 - 0". During the selection time CD X LOADING or MD X LOADING is displayed. Subsequently, the magazine compartment number and the number of the current track for the selected CD/MD are displayed.
If no CD/MD is present in the selected magazine compartment (e.g. compartment 2), NO CD 2 or NO MD 2 appears briefly on the display.
After playing the last track of a CD/MD, the next CD/MD in the magazine is automatically selected and played.
For further operation see under CD operation (page 59):
- "Compact Disc (CD) instructions" on page 59
- "CDs - insert / eject" on page 59
- "Track skip - forwards / backwards" on page 60
- "Fast forward / rewind" on page 60 *
- "Relative time, number of tracks and total playing time" on page 61 *
- "Random Play" on page 61 *
- "Direct track selection" on page 61 *

Attention : For the points marked with *, the ⚙ button must be pressed before selection, in order to access the submenu.
User menu - request / quit
After requesting the user menu, the following basic settings can be selected according to your personal preference.
USER - user memory
GAL - speed-dependent volume control
DRIVER - LHD / RHD setting
COLOR - display colour setting (only 4327, 4337)
PHONE - telephone characteristics
AUX IN - aux input setting
ANGLE - viewing angle setting
END - quit user menu
The user menu is requested by pressing the button for more than 8 seconds.
SEL USER appears on the display. Further actuation must take place within four seconds, otherwise the user menu is quit automatically.
In order to quit the user menu, set END using the right rotary control. The user menu is quit after 4 seconds.

USER memory
Request user menu, then set USER using the right rotary control. Using the multifunction buttons “” or “” a choice of three different users is available.
Both tone settings and the last selected station when the unit was switched off, are stored in each user memory.
Illumination colour setting (COLOR) (only 4327, 4337)
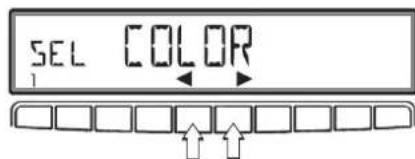
Request user menu, then set COLOR using the right rotary control. Using the multifunction buttons “◀” or “▶” enables a choice between red (RED) and yellow (YEL) illumination colour. The setting is effective immediately after actuating the multifunction button.

User Menu
GAL setting
The GAL is a car radio control circuit, which automatically adjusts the car radio volume according to vehicle speed. This results in compensation of the driving noise produced at higher speeds.
Request user menu, then set GAL using the right rotary control. Pressing the multifunction buttons “◀” or “▶” enables a choice between GAL OFF and GAL 15. The setting is stored automatically.

Explanation of terms:
GAL OFF - no volume adjustment
GAL 1 - volume adjustment initiated at low speed
GAL 15 - volume adjustment initiated at high speed
With the GAL setting, the start of volume adjustment can be specified according to vehicle speed.
Telephone mute characteristics (PHONE)
If a telephone system with handsfree unit is installed in the vehicle, the telephone conversation can be conducted via the car radio system. Thus, installation of the normally required additional loudspeaker is not necessary. However, the signal cables (AF - telephone input and earth - telephone input) must be connected to the car radio (see page 74).
In order to activate, request user menu then set PHONE using the right rotary control. Then, the multifunction buttons “◀ or ”▶ can be used to select between
PH OFF - telephone mute function and
PH ON - telephone conversation via car radio.
The setting is effective immediately after actuating the multifunction button.

DRIVER setting
If a telephone system with handsfree unit is installed the telephone conversation is conducted via one loudspeaker side. The relevant loudspeaker side (LHD / RHD) is selected using the DRIVER setting.
For selection, request user menu. Then set DRIVER using the right rotary control. Using the multifunction buttons “◀ or ”▶ select between DRV L (LHD) and DRV R (RHD). The setting is stored automatically.

AUX input (AUX IN)
This can be switched to ON if no CD/MD changer is connected. An external unit (Discman, Walkman, etc.) can then be operated via the CD changer AF connections (see page 74).
In order to activate, request user menu then set AUX IN using the right rotary control. Pressing the multifunction buttons “◀ or “▶ enables a choice between ON and OFF. The setting is effective immediately after actuating the multifunction button.

Viewing angle setting (ANGLE)
Request user menu, then set ANGLE using the right rotary control. Using the multifunction buttons “◀ or “▶ enables a choice between four different viewing angle settings (VIEW 1-4) for the display. The setting is effective immediately after actuating the multifunction button.

Service Menu
Service menu - request / quit
By repeatedly pressing the right rotary control, the following information can be requested in the service menu.
TYPE - display of model number
SN - display of serial number
DATE - display of software status
RESET - reset triggering for CDW or MDW
GAL - display of current GAL adjustment
SCD - data from CD drive (if present)
In order to select the service menu, press 📄Button repeatedly (within 8 seconds of switching on) until BECKER 1 is displayed.
On selection of menu function RESET, CD/MD changer reset is first performed after actuation of multifunction button "0".
The unit must be switched off in order to quit the service menu.
BECKER 1
Connection Instructions
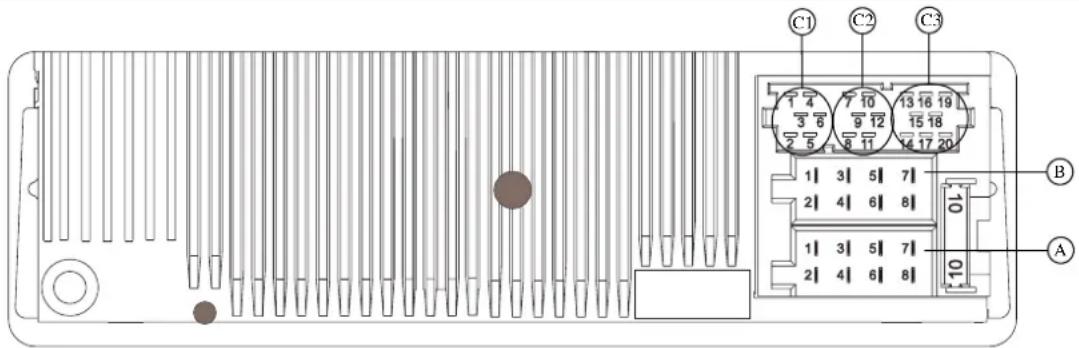
Warning! Terminal 30 and terminal 15 must always be connected separately, otherwise an excessive current consumption occurs when the unit is switched off. Connection socket A is not the same for all vehicle types. Therefore, always measure voltages before installation.
Socket A
1 Speed dependent volume control
2 not assigned
3 Telephone mute / clearing function
4 Permanent positive (terminal 30)
5 Control output for automatic aerial / amplifier
6 Illumination (terminal 58)
7 Switched positive (terminal 15)
8 Earth (terminal 31)
Socket B
1 Loudspeaker rear right +
2 Loudspeaker rear right -
3 Loudspeaker front right +
4 Loudspeaker front right -
5 Loudspeaker front left +
6 Loudspeaker front left -
7 Loudspeaker rear left +
8 Loudspeaker rear left -
Socket C1
1 LineOut rear left
2 LineOut rear right
3 AF earth
4 LineOut front links
5 LineOut front right
6 not assigned
Socket C2
7-12 Special connection for Becker CD changer / Sony MD changer
Socket C3
13 AF telephone input
14 Earth - telephone input
15-17 Special connection for Porsche CD changer / MD changer
18 CD AF earth (AUX)
19 CD AF left (AUX)
20 CD AF right (AUX)
Removal / Installation Guide
A universal bracket for DIN installation slots is integrated into this car radio. An installation frame is not required. The unit is inserted into the installation slot and secured using the slides supplied.
Complete the electrical connections. Then push the unit into the installation slot. Subsequently, push the slides into the apertures in the front of the unit to the first detent position (illustration A). Now lock the radio by pulling both slides, as shown in illustration B. Subsequently, remove the slides.

natural_image
Black-and-white photo of a Becker HEXICO CD audio recording device with two metal clamps and control knobs (no visible text or symbols on the device body)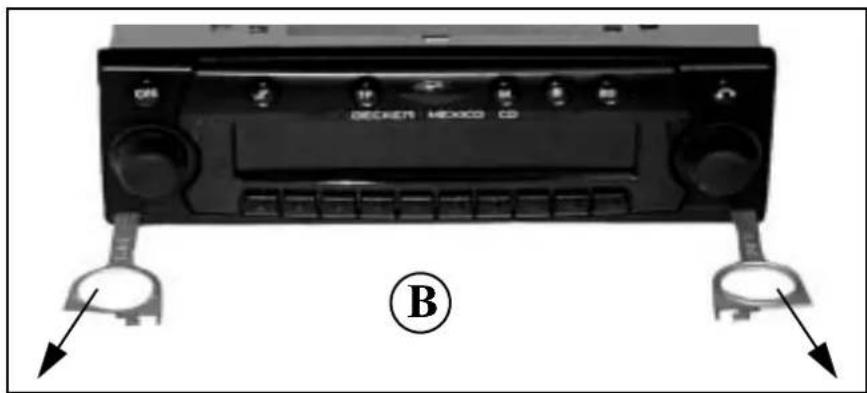
natural_image
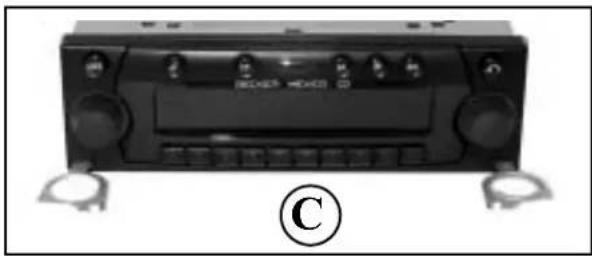
Front view of a black SEECHEM EXXICO CD driver with two attached buttons and indicator lights (no text or symbols on the device itself)For removal, the unit must first be unlocked. For this purpose, push in both slides to the second detent position, as shown in illustration A. Subsequently, withdraw the unit with both slides (illustration C). Then remove the slides by pressing the springs on the right and left sides of the unit.
If the unit has been installed in another vehicle, the unit's springs may have to be adjusted before installation. To adjust the springs, push in the slides as shown in illustration D and then adjust as shown in illustration E (press the slide lightly in direction 1 and simultaneously move the slide in direction 2).
natural_image
Front view of a black car dashboard with control knobs and buttons, labeled with a copyright symbol (no readable text or symbols on the device itself)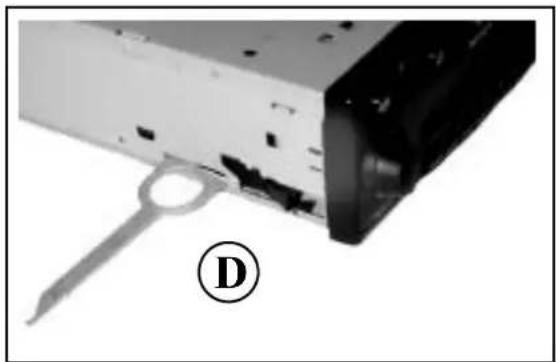
natural_image
Close-up of a mechanical component with a metal tool and a labeled part (D), no visible text or symbols.
General Instructions
Frequency search
In frequency search mode, the receivable frequencies are searched for in descending/ascending order of frequency. Each receivable frequency is set. Tuning steps of 100 kHz are used for the search.
Chain search
In chain search mode, all receivable and identifiable RDS programmes in FM can be selected in descending or ascending alphabetical order.
RDS SYSTEM
This car radio is capable of receiving RDS signals (RDS = Radio - Data - System) in the VHF range. RDS is a technique which enables the transmission of inaudible additional information in the VHF broadcasting range. This means that the transmitter broadcasts information which can be evaluated by the car radio.
EON (Enhanced Other Network)
EON (Enhanced Other Network) is inaudible information which is transmitted within the RDS data signal. The main purpose of the EON traffic programme system is to receive current traffic announcements from programmes which are not currently selected, but which are included in the selected programme range. For this purpose, certain transmitters broadcast EON information from other programmes containing traffic information, in their programmes.
PTY (Program Type)
Specific types of program, such as e.g. sport, pop music, classical music etc., can be selected using the PTY function.
The PTY is broadcast by the RDS transmitter, provided that the transmitter is equipped with this function. The selected transmitter program type can be displayed or a search of a specific PTY transmitter can be performed.
Examples of program types are:
| NEWS | News services | ROCK M | Rock music |
| AFFAIRS | Politics and current affairs | SCIENCE | Science |
| INFO | Special word programme | LIGHT M | Light music |
| EDUCATE | Learning and further education | CLASSICS | Classical music |
| DRAMA | Radio plays and literature | EASY M | Musical enter- |
| CULTURE | Culture, church, society tainment | ||
| VARIED | Light entertainment | SPORT | Sport |
| OTHER M | Special music programmes | WEATHER | Weather reports |
| FINANCE | Financial information | CHILDPRG | Childrens’ |
| SOCIAL | Social reports | programmes | |
| PHONE IN | Interviews | RELIGION | Religious report |
| LEISURE | Leisure time reports | TRAVEL | Travel reports |
| COUNTRY | Country music | JAZZ | Jazz music |
| OLDIES | Oldies | NATION M | Traditional mus |
| DOCUMENT | Documentation | FOLK | Folk music |
| POP M | Pop music | NO PTY | No programme type |
Technical Data
Wavebands : FM 87.5 MHz - 108 MHz
AM 531 kHz - 1620 kHz
LW 153 kHz - 282 kHz
Frequency range : 50 Hz - 14 kHz for cassette operation
20 Hz - 20 kHz for CD/MD operation
30 Hz - 15 kHz for FM
50 Hz - 2.5 kHz for AM, LW
Output power : 4 x 18 Watt
Line cross section : min. 0.75 mm ^4
Loudspeaker impedance : m i n . 4 Ω
Line out : 4 x analogue line out (Va max 3Veff at 10 kΩ)
GAL : In order to utilise the GAL, a square wave voltage
with an amplitude of +4 V - +12 V relative to earth, must be available from the electronic speedometer of the vehicle. The adjustment is performed in 7 steps of 2.5 dB.
Aerial : Impedance 50 Ω
AF telephone input : Max. input voltage 8 V (if interference occurs, a commercially available 1 : 1 transformer should be connected into the signal cable).
AUX input : 16 kΩ input impedance, max. input voltage 1.7 Veff
Telephone mute : Low active level < 2 Volt
Supply voltage : 1 2 V o l t
CD/MD connection : The Becker CD changer Silverstone (2660 or 2630), or the Sony MD changers MDX 60 and MDX 61 can be connected.
\Playable CDs \ : Only CDs which conform to DIN EN 60908 may be used.
The use of 8 cm CDs with adapter is not recommended.
NOTICE
Dear listener!
According to current EU guidelines, any person may operate this radio receiver.
This unit conforms to the current valid European or harmonised national regulations. The designation is your guarantee of conformance to the applicable specifications concerning electromagnetic compatibility for the unit. This means that interference affecting other electrical/electronic devices caused by your unit, as well as interfering influences on your unit from other electrical/electronic devices, can be largely prevented.
Current designations are:
- C E s y m b o l for issue according to European guideline 89/336/EEC.
-e - symbol according to European motor vehicle EMC guideline 95/54/EU, also permits operation in motor vehicles (classes M, N and O) which received their type approval after 1st January 1996
CE
e 1
021337
- Arrangement of Controls 41
- Anti-theft Device 42
- General Operation 44
- Radio Operation 47
- Tape Operation 56 45
- Table of Content
- CD Operation 59
- CD/MD Changer Operation 63
- User Menu 65
- Service Menu
- Connection Instructions 69
- Removal / Installation Guide 70
- General Instructions 72
- Technical Data 74
- NOTICE 75
- Anti-theft Device
- Code number entry
- Remove portable panel
- Inserting portable panel
- General Operation
- Switch on / off
- Adjust volume
- Mute function
- Activate tone menu
- Adjust bass
- Adjust treble
- Adjust balance
- Fader
- Loudness on /off
- Linear adjustment
- Adjust mono / stereo
- Select operating mode
- Select waveband
- Switch on radio menu mode
- Setting procedures for transmitter selection
- NBC (Next Best Chain) function
- FM transmitter search
- AM, LW transmitter search mode
- Scan search
- Direct frequency entry
- Radio Operation
- Programme type display/search (PTY)
- FM 1/FM 2 transmitter - request/store
- AM, LW transmitter - request/store
- AM, LW autostore
- Manual tuning
- Regionalisation
- Traffic Program (TP)
- EON transmitter - display / select
- EON transmitter - switch on / off
- Traffic program transmitter - display / select
- Announcement stand-by - switch on/off
- Mute function - switch on/off
- Telephone mute function
- Time request
- Tape Operation
- Cassettes - insert / eject
- Track switching
- Radio operation during forward / rewind
- Fast forward / rewind
- Music search - forwards / backwards
- Dolby NR
- Skip blank
- Cleaning the cassette mechanism
- Compact Disc (CD) instructions
- CDs - insert / eject
- CD Operation
- Track skip - forwards / backwards
- Relative time, number of tracks and total playing time
- Random Play
- Direct track selection
- Temperature protection circuit
- Operational readiness of CD/MD changer
- CD magazine - load / unload
- CD/MD Changer Operation
- Playing CD/MDs
- User menu - request / quit
- USER memory
- Illumination colour setting (COLOR) (only 4327, 4337)
- User Menu
- GAL setting
- Telephone mute characteristics (PHONE)
- DRIVER setting
- AUX input (AUX IN)
- Viewing angle setting (ANGLE)
- Service menu - request / quit
- Connection Instructions
- Socket A
- Socket B
- Socket C1
- Socket C2
- Socket C3
- Removal / Installation Guide
- General Instructions
- Frequency search
- Chain search
- RDS SYSTEM
- EON (Enhanced Other Network)
- PTY (Program Type)
- Technical Data
- NOTICE
- Current designations are:
Brand : BECKER
Model : Mexico 4370
Category : CD Player