
312-0002 - Receiver Neets - Free user manual and instructions
Find the device manual for free 312-0002 Neets in PDF.


| Product Type | Audio Amplifier (Receiver) |
| Model | 312-0002 |
| Output Power | 2 x 25 Watt RMS (8 Ohm) |
| Speaker Impedance | 8 Ohm |
| Audio Inputs | 4 unbalanced line inputs (3.82mm screw blocks) |
| Input Level (Nominal) | 0.316 VRMS (-10 dBV) |
| Channel Separation | >90 dB |
| Input Impedance | >15 kOhm |
| Total Harmonic Distortion | <0.35% @ 25W (1-10 kHz), <0.1% @ 1W (1 kHz) |
| Efficiency | Up to 90% (Class D) |
| Direct Button Control | Input select, Mute, Volume (momentary, active low <0.2 VDC) |
| RS-232 Remote Control | Port 1: 9600 baud, 8 data bits, 1 stop bit, no parity |
| RS-232 Loopthrough | Port 2: supports external device control (1200-115200 baud) |
| SD Card | Micro SD, max 1GB, FAT16 (for firmware upgrade) |
| Power Input (AC) | 100-240 VAC, 47-63 Hz |
| Power Input (DC) | 24 VDC, 2.5A regulated |
| Dimensions (without connectors) | 70mm x 150mm x 40mm (2.7" x 5.9" x 1.6") |
| Weight (without PSU) | 250g (0.5 lbs) |
| Operating Temperature | 0°C to 45°C (non-condensing) |
| Storage Temperature | -30°C to 70°C (non-condensing) |
Frequently Asked Questions - 312-0002 Neets
NEAMP1,VOL=20. The unit responds with NEAMP1,OK or NEAMP1,ERR. Refer to the protocol section in the manual for all commands.User questions about 312-0002 Neets
0 question about this device. Answer the ones you know or ask your own.
Ask a new question about this device
Download the instructions for your Receiver in PDF format for free! Find your manual 312-0002 - Neets and take your electronic device back in hand. On this page are published all the documents necessary for the use of your device. 312-0002 by Neets.
USER MANUAL 312-0002 Neets
natural_image
Abstract orange geometric logo with overlapping squares and a central black square (no text or symbols)How does it work?
Foreword:
The purpose of this document is to describe how to install and configure the 3 versions of the Neets Audio Amplifier.
COPYRIGHT - All information contained in this manual is the intellectual property of and copyrighted material of Neets. All rights are reserved. You may not allow any third party access to content, information or data in this manual without Neets' express written consent.
CHANGES - Neets reserve the right to change the specification and functions of this product without any notice.
Questions, AFTER reading this manual, can be addressed to your local dealer or:
Neets A/S - DK-8700 Horsens
by E-Mail: Support@Neets.dk
or you may use our contact form at www.neets.dk
Revision list:
| Author: Date | Description | Pages |
| TSA 21/01-09 | First release. | All |
| TSA 06/06-09 | Small adjustments to make things more clear. | 13, 14 |
| TSA 07/06-09 | Firmware upgrade done image, was wrong image. | 6 |
| TSA 07/06-09 | Image and text on page changed. | 19 |
| JML 23/06-09 | Added description of how to ask for current state and minor changes in examples. | 15,16 |
| SDV 27/01-10 | Text added | 5 |
| SDV 15/02-10 | New pictures | All |
| TSA 08/06-11 | Removed wake on signal | All |
| DB 13/12-11 | Contact information | 1 |
From serial number (and forward) there is no longer the possibility to use Wake on Signal:
312-0001: 110700050
312-0002: 100800450
312-0003: 090900091
Table of content
Foreword: 1
Revision list: 2
Table of content....3
Description: 4
What is class "D" amplifier?: 5
What is line level on our amplifier?: 5
Phantom power: 5
RS-232 cable connections: 5
RS-232 loopthru: 5
LAN to RS-232 loopthru: 5
Firmware upgrade of units: 6
Connections on units - 312-0001: 7
Left side: 7
Top end: 7
Right side: 7
Specifications 312-0001: 8
Connections on units - 312-0002: 9
Left side: 9
Top end: 9
Right side: 9
Specifications 312-0002: 10
Connections on units - 312-0003: 11
Left side:....11
Top end: 11
Right side:....11
Specifications 312-0003: 12
Special functions on 312-0003:.... 13
Amplifier Communications protocol 14
Admin audio 14
Input 1-4....14
Microphone....14
Admin 14
RS-232: 1 to 3....15
Global functions 15
Examples for use of the protocol 15
Examples for use of the protocol – continued 16
Application drawing 312-0001, 312-0002 and 312-0003....17
Application drawing 312-0002 and 312-0003 18
Application drawing 312-0003 19
Description:
The Neets Audio Amplifier version 1-3 are all intended for single room applications, they may be used for other things but the idea behind them is single room applications (ex. Class- or meeting-room).
All 3 versions are high performing class "D" amplifiers, and they can all be controlled over RS-232. Bellow you will find the specifications for the 3 models.
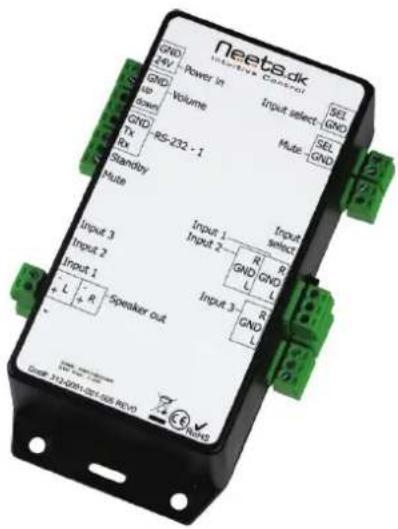
Version 1
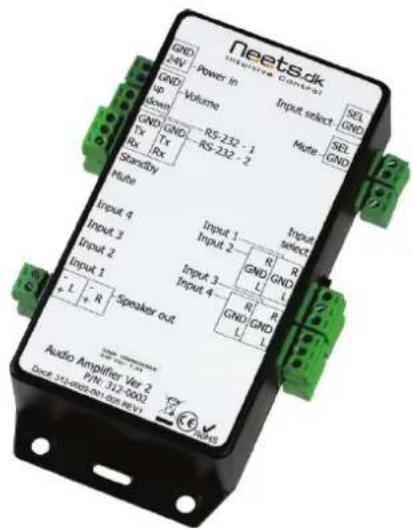
Version 2
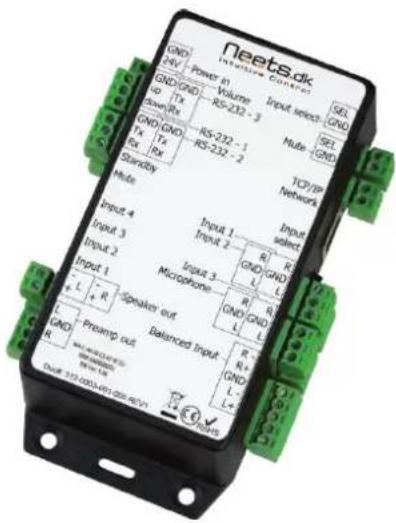
Version 3
| DescriptionPart number#: | Version 1312-0001 | Version 2312-0002 | Version 3312-0003 |
| Output power in 8 ohm RMS | 2*15 Watt | 2*25 Watt | 2*25 Watt |
| Class of operation | D | D | D |
| Short circuit safe speaker outputs | Yes | Yes | Yes |
| Unbalanced line input (0.316 VRMS, -10dBV) | 3 | 4 | 3 |
| Balanced line input (0.316 VRMS, -10dBV) | 0 | 0 | 1 |
| Preamplifier out (Level control depending on volume settings) | 0 | 0 | 1 |
| Microphone input (Phantom power possible 24VDC) | 0 | 0 | 1 |
| Direct connection for Mute button (Active pulse < 0.2 VDC) | Yes | Yes | Yes |
| Direct connection for volume up/down (Active pulse < 0.2 VDC) | Yes | Yes | Yes |
| Direct connection for input selection (Active pulse < 0.2 VDC) | Yes | Yes | Yes |
| RS-232 Control | Yes | Yes | Yes |
| RS-232 with loopthrough | No | Yes | Yes |
| LAN Loopthrough (LAN to RS-232) | 0 | 0 | 3 |
| LAN control | No | No | Yes |
| Homepage control (Thru web browser) | No | No | Yes |
| Channel select | Yes | Yes | Yes |
| Channel preset gain | Yes | Yes | Yes |
| Channel preset Balance | Yes | Yes | Yes |
| Channel preset Bass | Yes | Yes | Yes |
| Channel preset Treble | Yes | Yes | Yes |
| Master Volume | Yes | Yes | Yes |
| Master Bass | Yes | Yes | Yes |
| Master Treble | Yes | Yes | Yes |
| Mute | Yes | Yes | Yes |
What is class "D" amplifier?:
A switching amplifier or class-D amplifier is an electronic amplifier which, in contrast to the active resistance used in linear mode AB-class amplifiers, uses switching mode of transistor to regulate power delivery. The amplifier, therefore, features the high power efficiency (low energy losses), which additionally results in lower weight by eliminating the bulky heat sinks. Additionally, if voltage conversion is necessary, the on-the-way high switching frequency allows the bulky audio transformers to be replaced by small inductors. Low pass LC-filtering smoothes the pulses out and restores the signal shape on the load.
What is line level on our amplifier?:
Line level is a term used to describe the strength of an audio signal used to transmit analog sound information between audio components such as CD and DVD players, TVs, audio amplifiers, and mixing consoles, and sometimes MP3 players. In contrast to line level, there are weaker audio signals, such as those from microphones and instruments pickups, and stronger signals, such as those used to drive headphones and loudspeakers. The strength of the various signals does not necessarily correlate with the output voltage of a device; it also depends on the source's output impedance, or the amount of current available to drive different loads. The most common nominal level for consumer audio equipment is -10 dBV (0,316 V _RMS ), and the most common nominal level for professional equipment is 4 dBV.
Phantom power:
Phantom power (labeled as +48 V on some audio equipment - also +12 V or +24 V in some applications) is a method that sends a DC electrical voltage through microphone cables. It is best known as a common power source for condenser microphones, though many active DI boxes also use it. In Neets Audio Amplifier version 3 we use 24 V _DC as phantom power.
RS-232 cable connections:
To connect the Audio Amplifier you must wire the RS-232 cable as shown here to the right. This is a Female 9 pin SUB-D connector, what will fit into a standard computer RS-232 port, or any USB to RS-232 converter.
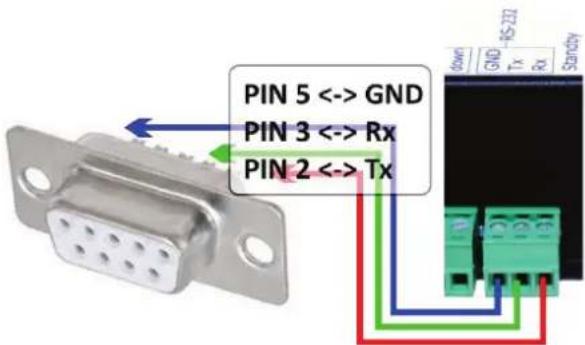
RS-232 loopthru:
312-0002 and 312-0003 has the possibility to make
"RS-232 loopthru" by this means, if the audio amplifier is connected to one of Neets Control systems (all systems except Neets Control QueBec) you will get an "extra" RS-232 port.
You control the audio amplifier thru RS-232 port 1 (connect this port to the control system), and you can connect (e.g. a projector) to RS-232 port 2 on the audio amplifier. When doing so and setting the system correct up in the "Neets Product Configurations Software" you will be able to control the audio amplifier and the projector from one (1) comport on the control system.
Please be aware that the first time you set up the system with a Neets Control system, the power must be connected to the Neets Control system AFTER the Audio Amplifier.
LAN to RS-232 loopthru:
The 312-0003 has the possibility to make “LAN to RS-232 loopthru” by this means that if you use our control system Neets Control – EU, professional (P/N#: 307-0002) and you connect both the Audio amplifier and the Neets Control – EU, professional to a LAN network, you will get additional 3 RS-232 ports to control external devices (located on the audio amplifier). So by using this function you will, on the Neets Control – EU, professional get in total 5 RS-232 ports, and on top of that have control over the audio amplifier.
Firmware upgrade of units:
This section describes how to firmware upgrade the units. On 312-0003 you can upgrade the unit by using the homepage (go to [maintenance] page and use the upgrade firmware). On all units you can use the procedure as bellow.
First you need to go to www.neets.dk and find the newest version (or the version you want). The filename of the firmware are "aud_0100.bin" for version 1.00 (version 2.03 will be named "aud_0203.bin").
Then you need to have a Micro SD to USB converter, you can get those from the internet (search google for "buy micro SD to USB converter" they cost from 10EUR) or by contacting Neets or you local distributor.
- When you have the correct firmware and a converter to copy the file to the Micro SD card from your computer you are ready to firmware upgrade you unit.
- First you MUST disconnect the power from the audio amplifier.
- Then remove the SD Card from the unit by pushing the SD Card gently into the unit about 1mm (either by using your finger tips or a flat screwdriver) and then let go and it will slide out.
- Place the Micro SD card into the adapter (e.g. USB adapter).
- Connect the adapter to your computer.
- Browse to the root of the folder of you SD card (e.g.: L:) and copy the file you have downloaded to the root folder (in this case "aud_0100.bin"). Please make sure that you do not delete anything else from the card.
![Mytbar disk (L): Funktioner Hjælp Visninger Abn E-mail Braend :k Drive (J:) e (K:) [L:] rver01) (R:) Navn Endringsdato Type system web aud_0100.bin aud_0100.bin](/content/2026/05/860805/images/cfa016eb829c927f6c13c6d0ab106647532addb66f4e8fe070afca57965e81ac.jpg)

- Use safe way of removing the Micro SD card from your computer.
- Insert the Micro SD card to the unit (while power still is off)
- Connect power
- Wait for LED to indicate "firmware done" (see the picture here to the right for LED indication). Input 1 will light up, while Standby and mute will make "light show"
- Disconnect power and reconnect power. YOU ARE DONE...!
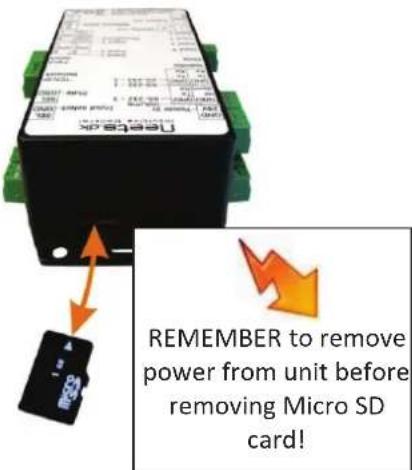
How to remove the SD-Card
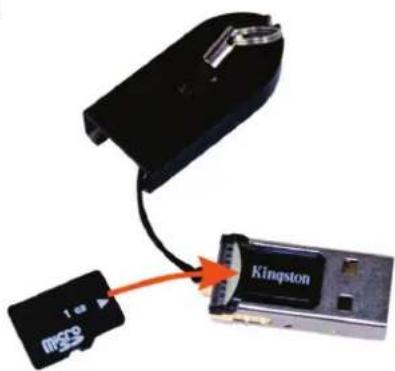
SD Card insert to computer
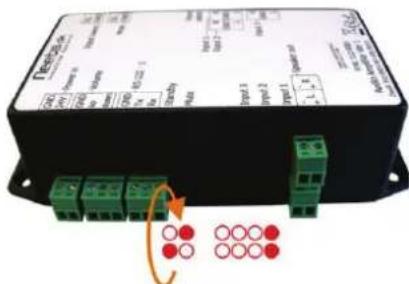
Firmware upgrade done..!
Connections on units - 312-0001:
Left side:
| Number | Description |
| 1: | Power in |
| 2: | Volume control |
| 3: | RS-232 control port |
| 4: | Standby LED |
| 5: | Mute LED |
| 6: | Input 3 LED |
| 7: | Input 2 LED |
| 8: | Input 1 LED |
| 9: | Right speaker |
| 10: | Left speaker |
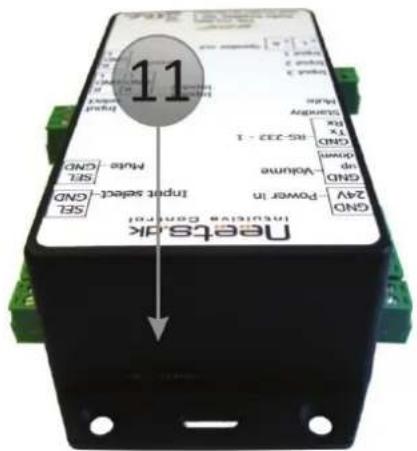
Top end:
| Number | Description |
| 11: | Micro SD-Card |
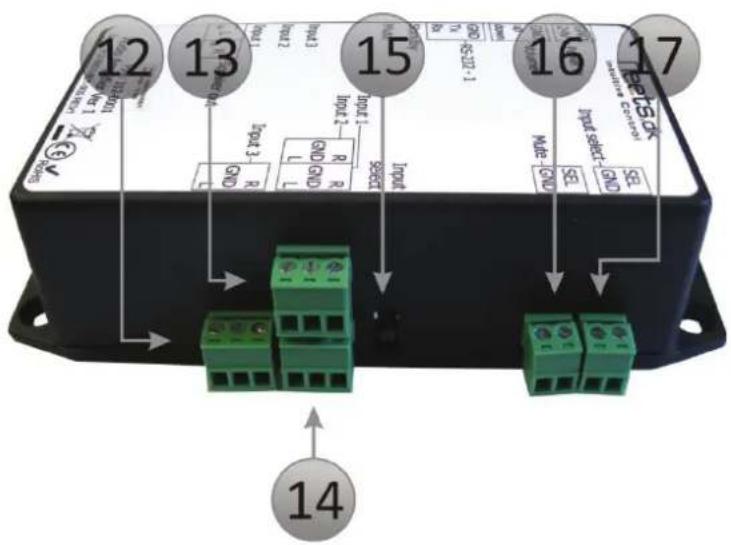
Right side:
| Number | Description |
| 12: | Line Input 3 |
| 13: | Line Input 2 |
| 14: | Line Input 1 |
| 15: | Input select switch |
| 16: | Mute input |
| 17: | Input select |
Specifications 312-0001:
Output (speakers):
| Power (@ 8 ohm): | 2 * 15 Watt |
| Connections (2 pcs.): | 2 pin 3.81mm screw block |
| Speaker impedance: | 8 ohm (Ω) |
| THD+N @ 25 Watt 8 ohm: | < 0.25% (@1KHz - 10KHz) |
| THD+N @ 1 Watt 8 ohm: | < 0.1% (@1KHz) |
| Output efficiency: | up to 90% |
Audio inputs:
| Unbalanced inputs: | 3 |
| Connectors: | 3 pin 3.82mm screw block |
| Input level (all inputs): | 0VRMS-2VRMS Nominal: |
| 0.316 VRMS (-10dBV) | |
| Channel separation: | >90 dB |
| Input impedance: | >15 K ohm (Ω) |
Direct buttons control
| Buttons functions: | Input sel, Mute, Volume |
| Button mode: | Momentary |
| Activation of button: | Low < (GND + 0.2 VDC) |
RS-232 Remote Control
| Control connected to: | RS-232-1 |
| Baud rate: | 9600 |
| Data bits: | 8 |
| Stop bits: | 1 |
| Parity: | None |
| Protocol: | Neets |
SD-Card (Storage card)
| Type: | Micro – SD, Standard type |
| Card: | Max size 1GB |
| File system: | FAT 16 |
General
| Power input (AC): | 100 – 240 VAC (47-63 Hz) |
| Power input (DC): | 24 VDC 2.5A (Regulated) |
| Storage temperature: | -30°C to 70°C (Non condensing) |
| Operating temperature: | 0°C to 45°C (Non condensing) |
| Dimension (without connectors): | 70mm (2.7") x 150mm (5.9") x 40mm (1.6") |
| Weight (no PSU): | 250gramm (0.5 lbs) |
| Weight (Shipping): | 1000g (2.2 lbs) |
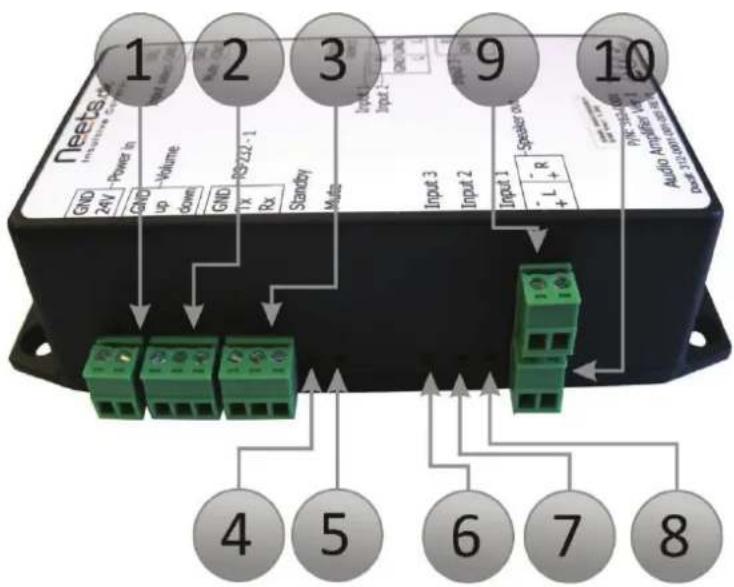
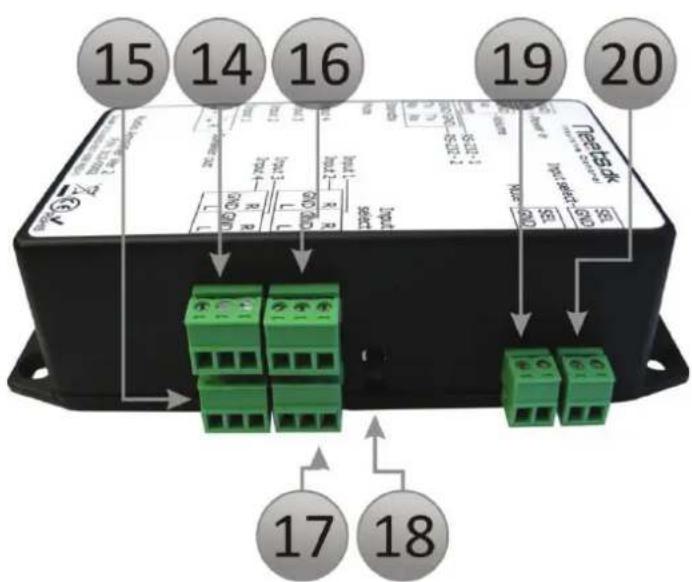
Connections on units - 312-0002:
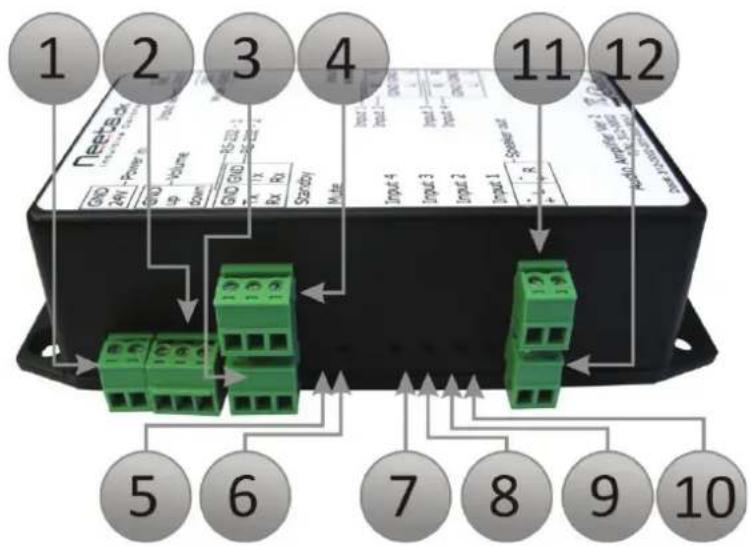
Left side:
| Number | Description |
| 1: | Power in |
| 2: | Volume control |
| 3: | RS-232 control port 1 |
| 4: | RS-232 control port 2 |
| 5: | Standby LED |
| 6: | Mute LED |
| 7: | Input 4 LED |
| 8: | Input 3 LED |
| 9: | Input 2 LED |
| 10: | Input 1 LED |
| 11: | Right speaker |
| 12: | Left speaker |
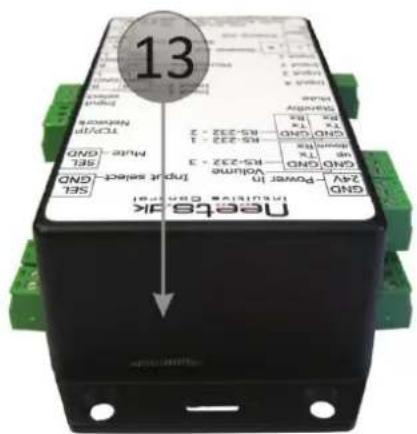
Top end:
| Number | Description |
| 13: | Micro SD-Card |
Right side:
| Number | Description |
| 14: | Line Input 4 |
| 15: | Line Input 3 |
| 16: | Line Input 2 |
| 17: | Line Input 1 |
| 18: | Input select switch |
| 19: | Mute input |
| 20: | Input select |
Specifications 312-0002:
Output (speakers):
| Power (@ 8 ohm): | 2 * 25 Watt |
| Connections (2 pcs.): | 2 pin 3.81mm screw block |
| Speaker impedance: | 8 ohm ( ) |
| THD+N @ 25 Watt 8 ohm: | < 0.35% (@1KHz - 10KHz) |
| THD+N @ 1 Watt 8 ohm: | < 0.1% (@1KHz) |
| Output efficiency: | up to 90% |
Audio inputs:
| Unbalanced inputs: | 4 |
| Connectors: | 3 pin 3.82mm screw block |
| Input level (all inputs): | 0VRMS-2VRMS Nominal:0.316 VRMS (-10dBV) |
| Channel separation: | >90 dB |
| Input impedance: | >15 K ohm ( ) |
Direct buttons control
| Buttons functions: | Input sel, Mute, Volume |
| Button mode: | Momentary |
| Activation of button: | Low < (GND + 0.2 VDC) |
RS-232 Remote Control
| Control connected to: | RS-232-1 |
| Baud rate: | 9600 |
| Data bits: | 8 |
| Stop bits: | 1 |
| Parity: | None |
| Protocol: | Neets |
RS-232 loopthru:
| External device: | |
| Baud rates: | 1200 – 115200 bits/sec |
| Parity: | Even, Odd, None |
| Data bits: | 7 – 8 |
| Stop bits: | 1, 1 12 , 2 |
| Other information: | |
| Control connected to: | RS-232-1 |
| Device connected to: | RS-232-2 |
| Control possible to use: | All Neets (minus: Neets Control QueBec) |
SD-Card (Storage card)
| Type: | Micro – SD, Standard type |
| Card: | Max size 1GB |
| File system: | FAT 16 |
General
| Power input (AC): | 100 – 240 VAC (47-63 Hz) |
| Power input (DC): | 24 VDC 2.5A (Regulated) |
| Storage temperature: | -30°C to 70°C (Non condensing) |
| Operating temperature: | 0°C to 45°C (Non condensing) |
| Dimension (without connectors): | 70mm (2.7") x 150mm (5.9") x 40mm (1.6") |
| Weight (no PSU): | 250gramm (0.5 lbs) |
| Weight (Shipping): | 1000g (2.2 lbs) |
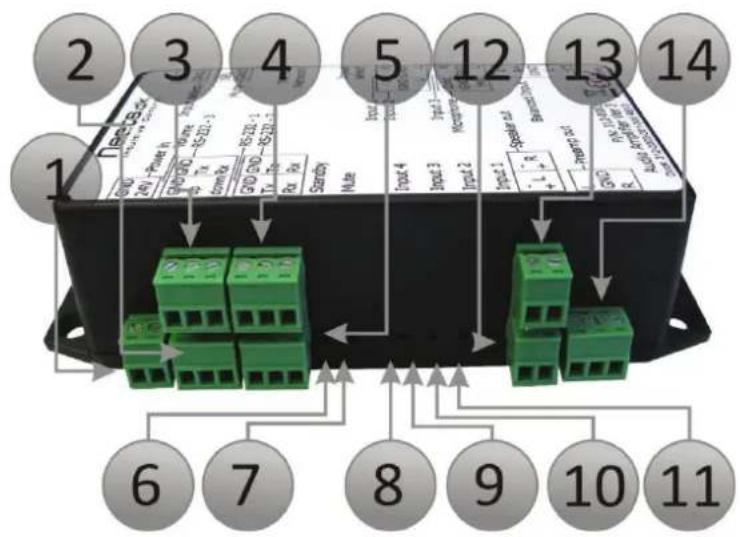
Connections on units - 312-0003:
Left side:
| Number | Description |
| 1: | Power in |
| 2: | Volume control |
| 3: | RS-232 control port 3 |
| 4: | RS-232 control port 2 |
| 5: | RS-232 control port 1 |
| 6: | Standby LED |
| 7: | Mute LED |
| 8: | Input 4 LED |
| 9: | Input 3 LED |
| 10: | Input 2 LED |
| 11: | Input 1 LED |
| 12: | Left speaker |
| 13: | Right speaker |
| 14: | Preamplifier out |
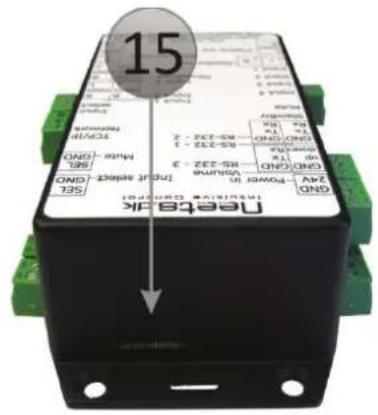
Top end:
| Number | Description |
| 15: | Micro SD-Card |
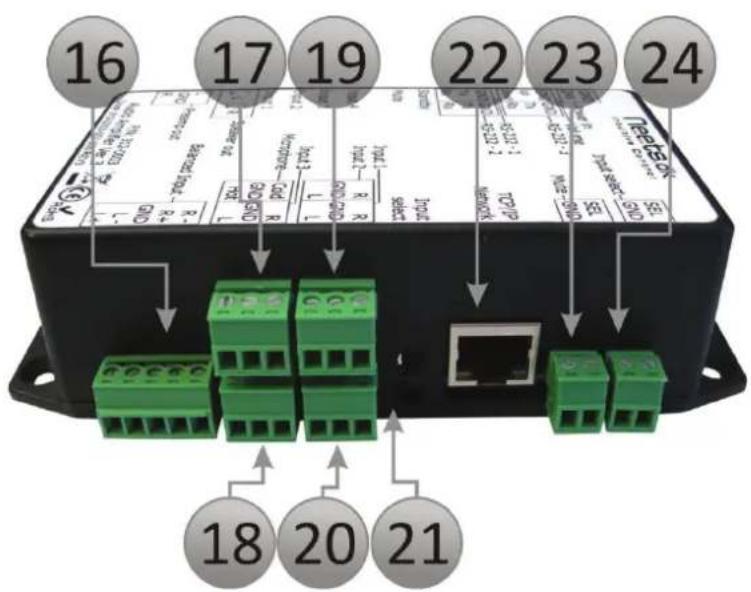
Right side:
| Number | Description |
| 16: | Balanced line Input 4 |
| 17: | Microphone input |
| 18: | Line Input 3 |
| 19: | Line Input 2 |
| 20: | Line Input 1 |
| 21: | Input select switch |
| 22: | LAN (network) connector |
| 23: | Mute input |
| 24: | Input select |
Specifications 312-0003:
Output (speakers):
| Power (@ 8 ohm): | 2 * 25 Watt |
| Connections (2 pcs.): | 2 pin 3.81mm screw block |
| Speaker impedance: | 8 ohm ( ) |
| THD+N @ 25 Watt 8 ohm: | < 0.35% (@1KHz - 10KHz) |
| THD+N @ 1 Watt 8 ohm: | < 0.1% (@1KHz) |
| Output efficiency: | up to 90% |
Audio inputs:
| Unbalanced inputs: | 3 |
| Connectors: | 3 pin 3.82mm screw block |
| Balanced inputs: | 1 |
| Connectors: | 5 pin 3.82mm screw block |
| Input level (all inputs): | 0VRMS-2VRMS Nominal:0.316 VRMS (-10dBV) |
| Channel separation: | >90 dB |
| Input impedance: | >15 K ohm ( ) |
Audio output (preamp out)
| Number of outputs: | 1 |
| Connectors: | 3 pin 3.82mm screw block |
| Output level: | 0VRMS – 0.316 VRMS |
| Channel separation: | >90 dB |
| Output impedance: | <500 ohm (Ω) |
Microphone input
| Number of inputs: | 1 |
| Phantom power: | 24 VDC |
| Input sensitivity: | 1.5mV/Pa to 5mV/Pa +/-3dB(Open circuit @ 1KHz) |
RS-232 Remote Control
| Control connected to: | RS-232-1 |
| Baud rate: | 9600 |
| Data bits: | 8 |
| Stop bits: | 1 |
| Parity: | None |
| Protocol: | Neets |
RS-232 loopthru:
| External device: | |
| Baud rates: | 1200 – 115200 bits/sec |
| Parity: | Even, Odd, None |
| Data bits: | 7 – 8 |
| Stop bits: | 1, 1 12 , 2 |
| Other information: | |
| Control connected to: | RS-232-1 |
| Device connected to: | RS-232-2 |
| Control possible to use: | All Neets (minus: Neets Control QueBec) |
Network (LAN)
| Speed: | 10/100Mbit |
| Duplex: | Half and full |
| DHCP: | Default set to OFF |
| Default IP address | 192.168.254.252 |
| Homepage address: | 80, non changeable |
| TCP Control port: | 5000, non changeable |
| Access RS-232-1 port: | 5010, non changeable |
| Access RS-232-2 port: | 5011, non changeable |
| Access RS-232-3 port: | 5012, non changeable |
SD-Card (Storage card)
| Type: | Micro – SD, Standard type |
| Card: | Max size 1GB |
| File system: | FAT 16 |
General
| Power input (AC): | 100 – 240 VAC (47-63 Hz) |
| Power input (DC): | 24 VDC 2.5A (Regulated) |
| Storage temperature: | -30°C to 70°C (Non condensing) |
| Operating temperature: | 0°C to 45°C (Non condensing) |
| Dimension (without connectors): | 70mm (2.7") x 150mm (5.9") x 40mm (1.6") |
| Weight (no PSU): | 250gramm (0.5 lbs) |
| Weight (Shipping): | 1000g (2.2 lbs) |
Special functions on 312-0003:
Homepage control:
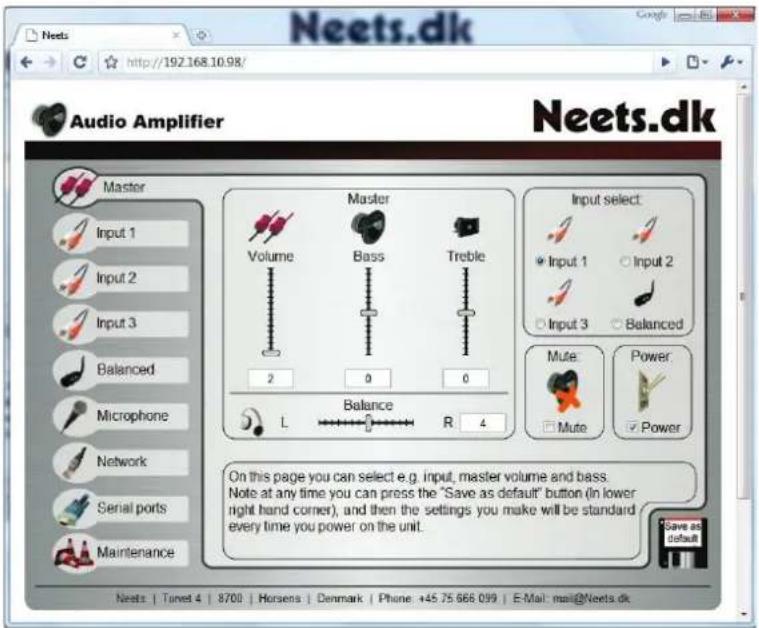
The unit has the possibility to be controlled thru a homepage, simple go to the IP address of the unit in a web browser, and you will see the homepage as shown here.
You can either make changes that work immediately (e.g. volume up/down, input select) or you can make default settings. To change immediately changed settings to default, simple press the "Save as default" button in lower right hand corner.
Please remember the default IP address is 192.168.254.252, username and password is both "Admin" case sensitive.
Fault finding:
Fault: Solution
LED indication on Audio amplifier:
| Speaker output Shortcut | Check you speaker cable, and reboot unit. Have you been playing to loud? | |
| Firmware update done | There has been put new firmware on the unit. Please reboot unit | |
| No Micro SD Card found | Did you remove the Micro SD card? Then insert it again. | |
| Unexpected system error | Please contact your distributor or Neets technical support. | |
| No serial number in audio amplifier | Please contact your distributor or Neets technical support. | |
| No firmware and no Micro SD card found | Copy firmware to Micro SD card and insert Micro SD card, and connect power | |
| No firmware and no firmware on Micro SD | Copy firmware to Micro SD card and insert Micro SD card, and connect power | |
| Firmware upgrading | WAIT, and do NOT disconnect power | |
| Firmware upgrading | WAIT, and do NOT disconnect power |
Amplifier Communications protocol
RS-232 Remote Control port settings
| RS-232 port: | 1 |
| Baud rate: | 9600 |
| Data bits: | 8 |
| Stop bits: | 1 |
| Parity: | None |
| Protocol: | As bellow |
Network LAN port settings
| TCP port: | 5000 |
| Protocol: | As bellow |
Admin audio
| Description | Syntax | Data | Read/Write | Default |
| Select input 1 – 4 | NEAMP1,INPUT=<data> | 1 – 4 (3 in 312-0001) | R/W | 1 |
| Set volume | NEAMP1,VOL=<data> | 0 – 51 | R/W | 0 |
| Set bass | NEAMP1,BASS=<data> | -7 – 7 | R/W | 0 |
| Set treble | NEAMP1,TREBLE=<data> | -7 – 7 | R/W | 0 |
| Set balance | NEAMP1,BAL=<data> | -79 – 79 | R/W | 0 |
| Mute | NEAMP1,MUTE=<data> | ON , OFF | R/W | OFF |
| Power state (When the amp are turned off it restores it defaults values) | NEAMP1,POWER=<data> | ON , OFF | R/W | OFF |
Input 1-4
| Description | Syntax | Data | Read/Write | Default |
| Preset input 1 – 4, bass | NEAMP1,INPUT:,BASS= | -7 – 7 | R/W | 0 |
| Preset input 1 – 4, treble | NEAMP1,INPUT:,TREBLE = | -7 – 7 | R/W | 0 |
| Preset input 1 – 4, gain | NEAMP1,INPUT:,GAIN= | 0 – 15 | R/W | 0 |
| Preset input 1 – 4, balance | NEAMP1,INPUT:,BAL= | -79 – 79 | R/W | 0 |
Microphone
| Description | Syntax | Data | Read/Write | Default |
| Microphone gain | NEAMP1,MICGAIN=<data> | 0 – 63 | R/W | 25 |
| Phantom power | NEAMP1,PHANTOMPOWER=<data> | ON, OFF | R/W | OFF |
Admin
| Description | Syntax | Data | Read/Write | Default |
| Set amp IP address | NEAMP1,IPADDRESS= | xxx.xxx.xxx.xxx | R/W | 192.168.254.252 |
| Set amp sub net | NEAMP1,IPSUBNET= | xxx.xxx.xxx.xxx | R/W | 255.255.255.0 |
| Set amp gateway | NEAMP1,IPGATEWAY= | xxx.xxx.xxx.xxx | R/W | 192.168.254.1 |
| Select if DHCP are used or not. | NEAMP1,IPDHCP= | ON, OFF | R/W | OFF |
| Amp, SN | NEAMP1,UNITSN= | 8 character | R | |
| Amp, Username for homepage | NEAMP1,WWWUSER= | Max 8 character | R/W | Admin |
| Amp, Password for homepage. | NEAMP1,WWWPSW= | Max 8 character | R/W | Admin |
| LAN speed (F = Full duplex, H = Half duplex) | NEAMP1,IPSPEED= | 10F, 10H, 100F, 100H | R/W | 100F |
RS-232: 1 to 3
| Description | Syntax | Data | Read/Write | Def. |
| Set the comport baudrate | NEAMP1,COM:,BAUDRATE= | 1200,2400,4800,9600,14400,19200,38400,57600,115200 | R/W | 9600 |
| Set the comport data bit | NEAMP1,COM:,DATABIT= | 7, 8 | R/W | 8 |
| Ser the comport parity | NEAMP1,COM:,PARITY= | NONE, ODD or EVEN | R/W | NONE |
| Set the comport stop bit | NEAMP1,COM:, STOPBIT = | 1 or 2 | R/W | 1 |
Global functions
| Description | Syntax | Data | Read/Write | Default |
| Save the current settings as the default startup values. | NEAMP1,SAVE=TRUE | W | ||
| Restore factory defaults values for the entire system. | NEAMP1,FACTORYDEFAULT= | AUDIO, COM, LAN or ALL. | W | |
| Set all the values to their default (last saved). | NEAMP1,RESET= | AUDIO, COM, LAN or ALL. | W |

All commands that are in a span (e.g. Set volume 0-51, Select input 1-4, or Set balance -79 – 79 and so on...) can be used with INC (increment 1) or DEC (decrement 1) commands. E.g. if the volume is 25 and you send NEAMP1, VOL=DEC
When asking for a current state of a command simply replace the in the command with “?”. All the commands must be terminated with
When a command is successful executed the amplifier retunes: NEAMP1, OK
If the commands that are sent are unknown the amplifier returns: NEAMP1,ERR
Examples for use of the protocol
Setup your RS-232 port to the following values:
• Baudrate: 9600
- Databits: 8
- Stopbits: 1
- Parity: None
E.g. for setting the audio amplifier to input 2 and gain for that input to 3
Set gain to 3 on input 2:
Send: NEAMP1,INPUT:2,GAIN=3
Response: NEAMP1,OK
Select the input 2 to be played:
Send: NEAMP1,INPUT=2
Response: NEAMP1,OK
E.g. ask for input gain on input 2:
Send: NEAMP1,INPUT:2,GAIN=?
Response: NEAMP1,OK,INPUT:2,GAIN=3
Examples for use of the protocol – continued
Here we will try to set up the audio amplifier to have some default parameters, turn on, mute on, mute off, and turn off again.
Default parameters:
- Default input: Input 2
- Default power: off
- Default volume: 20
To set up above default parameters (and leave the rest factory default) send the following commands to the audio amplifier (NOTE:
- Send: NEAMP1,FACTORYDEFAULT=ALL
• Response: NEAMP1,OK - Send: NEAMP1,INPUT=2
• Response: NEAMP1,OK - Send: NEAMP1,POWER=OFF
• Response: NEAMP1,OK - Send: NEAMP1, VOL=20
• Response: NEAMP1,OK - Send: NEAMP1,SAVE=TRUE
• Response: NEAMP1,OK
Now we want to turn on the unit, send the following commands to the audio amplifier (NOTE:
- Send: NEAMP1,POWER=ON
• Response: NEAMP1,OK
Now we want to mute and on mute the audio amplifier, send the following commands to the audio amplifier (NOTE:
- Send: NEAMP1,MUTE=ON
• Response: NEAMP1,OK
To get out of mute send:
- Send: NEAMP1,MUTE=OFF
• Response: NEAMP1,OK
Now we want to turn off the unit, send the following commands to the audio amplifier (NOTE:
- Send: NEAMP1,POWER=OFF
• Response: NEAMP1,OK
Application drawing 312-0001, 312-0002 and 312-0003
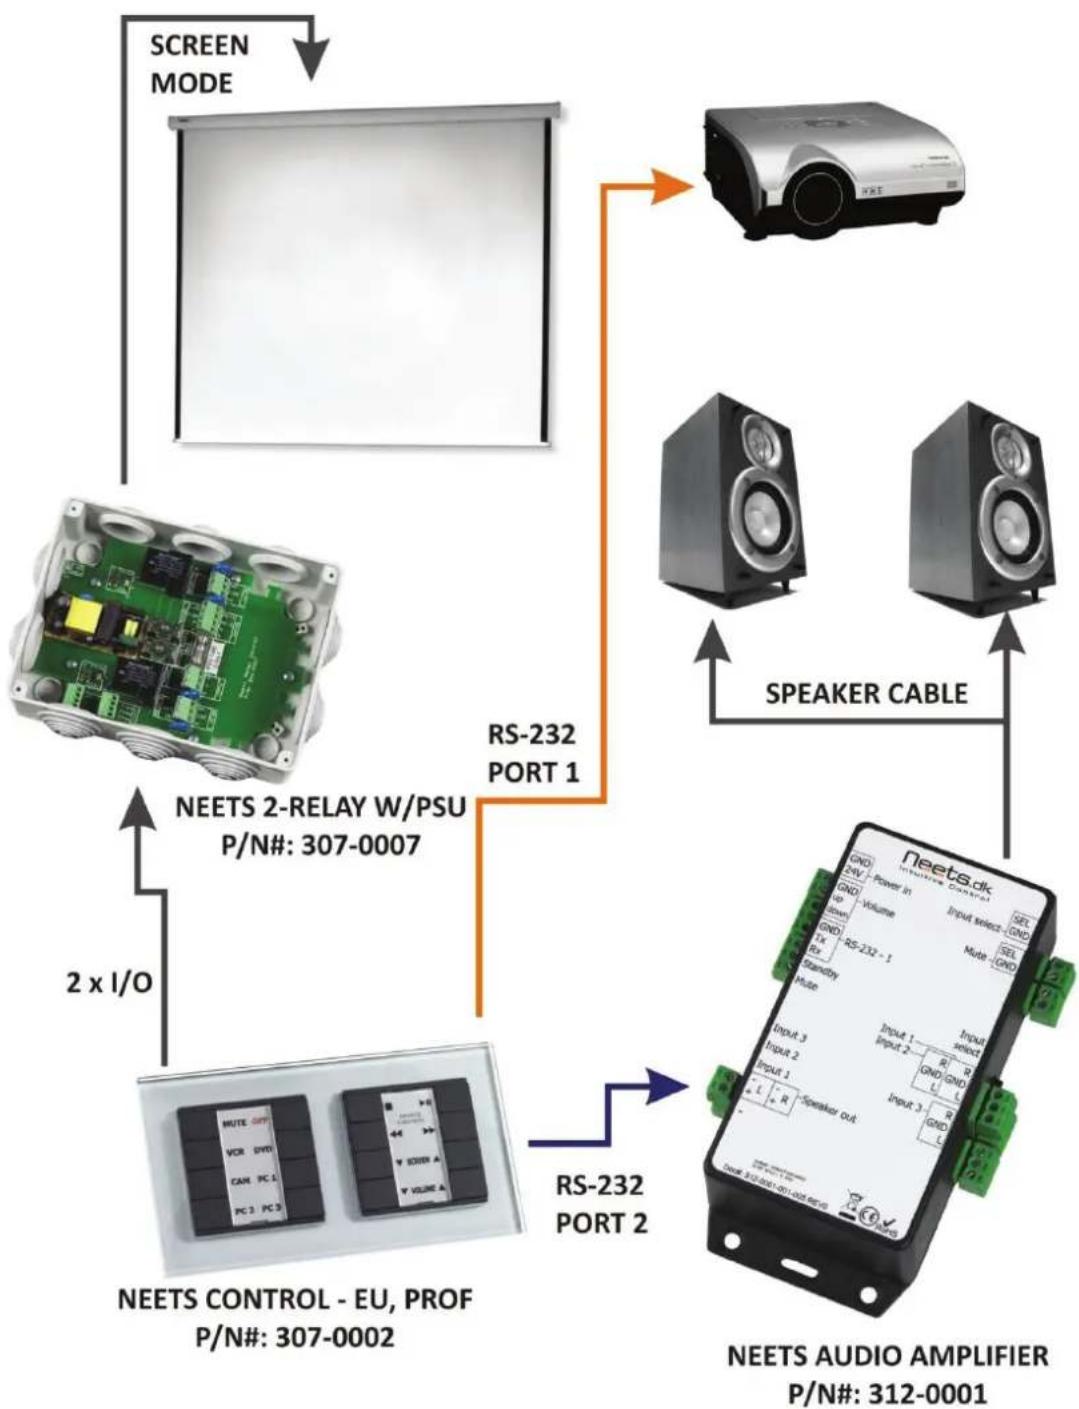
Bellow application for all models of our amplifier.
flowchart
graph TD
    A["SCREEN MODE"] --> B["RS-232 PORT 1"]
    B --> C["SPEAKER CABLE"]
    C --> D["NEETS AUDIO AMPLIFIER P/N#: 312-0001"]
    D --> E["RS-232 PORT 2"]
    E --> F["NEETS CONTROL - EU, PROF P/N#: 307-0002"]
    F --> G["2 x I/O"]
    G --> H["NEETS 2-RELAY W/PSU P/N#: 307-0007"]
    H --> I["Screen Mode"]
    I --> J["RS-232"]
The Neets Control – EU, professional is controlling the audio amplifier on RS-232 port 2 on the control system, and is connected to RS-232-1 on the audio amplifier. Furthermore the Neets Control – EU, professional is controlling the screen thru I/O and the projector on RS-232 port 1.
Application drawing 312-0002 and 312-0003
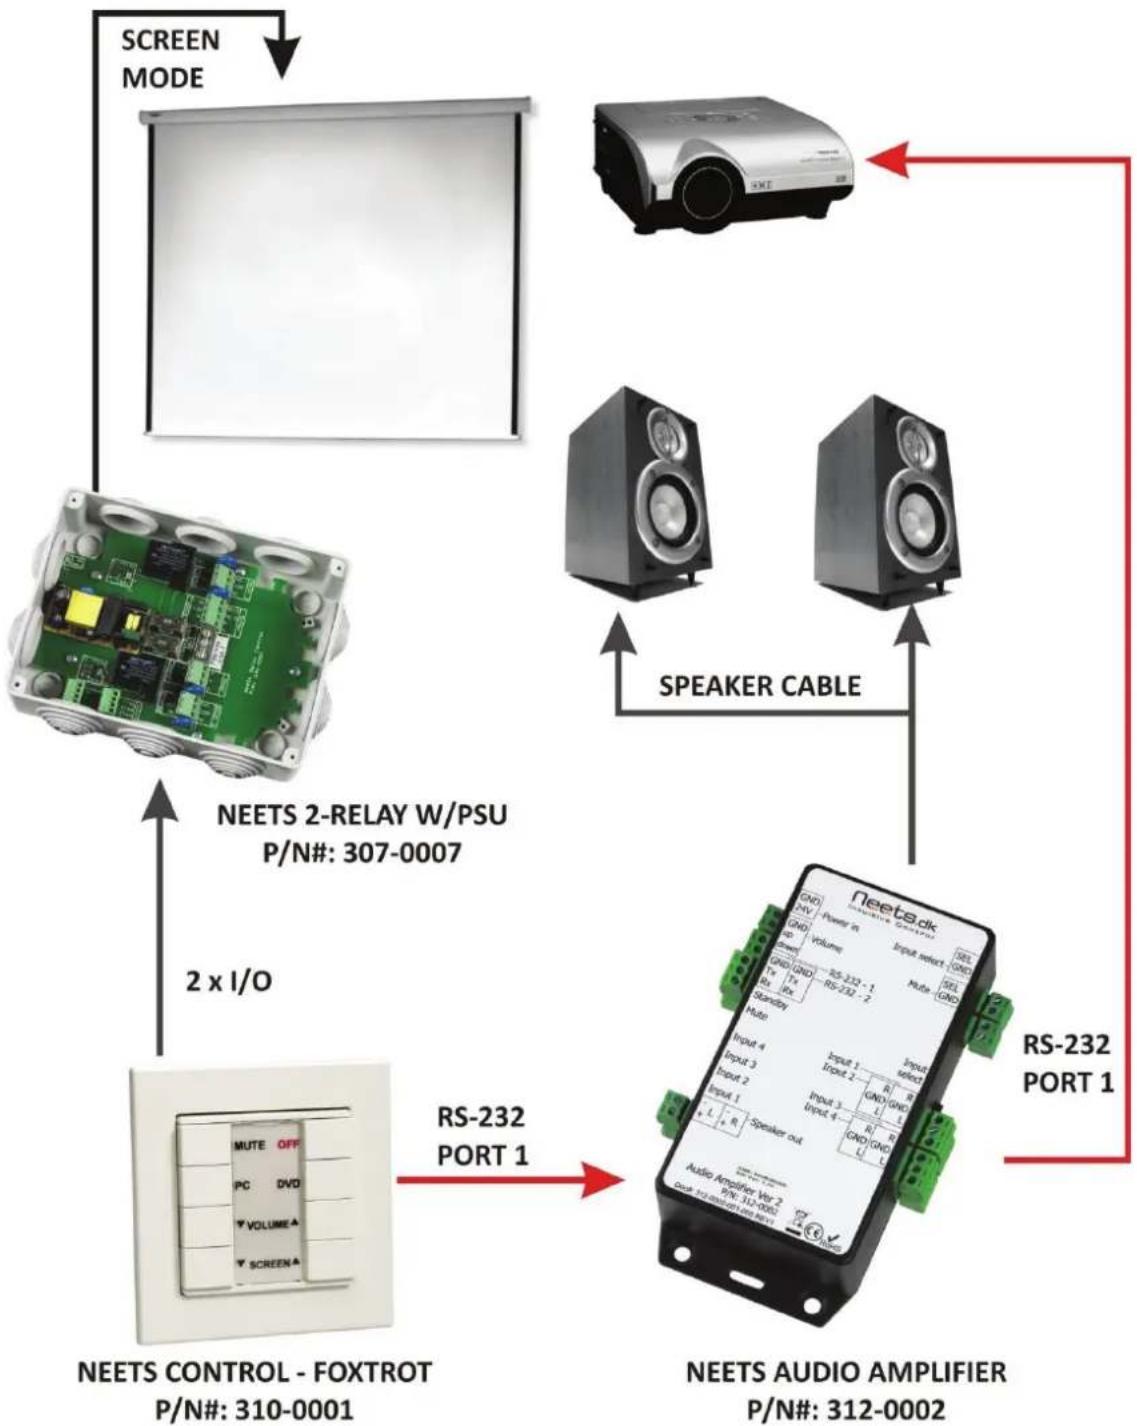
Bellow application for the 2 biggest models of our amplifier.
flowchart
graph TD
    A["SCREEN MODE"] --> B["NEETS 2-RELAY W/PSU P/N#: 307-0007"]
    B --> C["RS-232 PORT 1"]
    C --> D["NEETS AUDIO AMPLIFIER P/N#: 312-0002"]
    D --> E["NEETS CONTROL - FOXTROT P/N#: 310-0001"]
    E --> F["2 x I/O"]
    F --> G["Speaker Cable"]
    G --> H["RS-232 PORT 1"]
    H --> I["NEETS AUDIO AMPLIFIER"]
    I --> J["NEETS CONTROL - FOXTROT P/N#: 310-0001"]
    J --> K["2 x I/O"]
    K --> L["NEETS AUDIO AMPLIFIER"]
    L --> M["RS-232 PORT 1"]
    M --> N["NEETS CONTROL - FOXTROT P/N#: 310-0001"]
The Neets Control – FoXtrot is controlling the audio amplifier on the RS-232 port on the control system, and is connected to RS-232-1 on the audio amplifier. The projector is connected to the “loopthru port” on the amplifier (RS-232-2) and therefore the Neets Control – FoXtrot is also controlling the projector thru the audio amplifier. The two I/O on the Neets Control FoXtrot is controlling the screen up/down.
Application drawing 312-0003
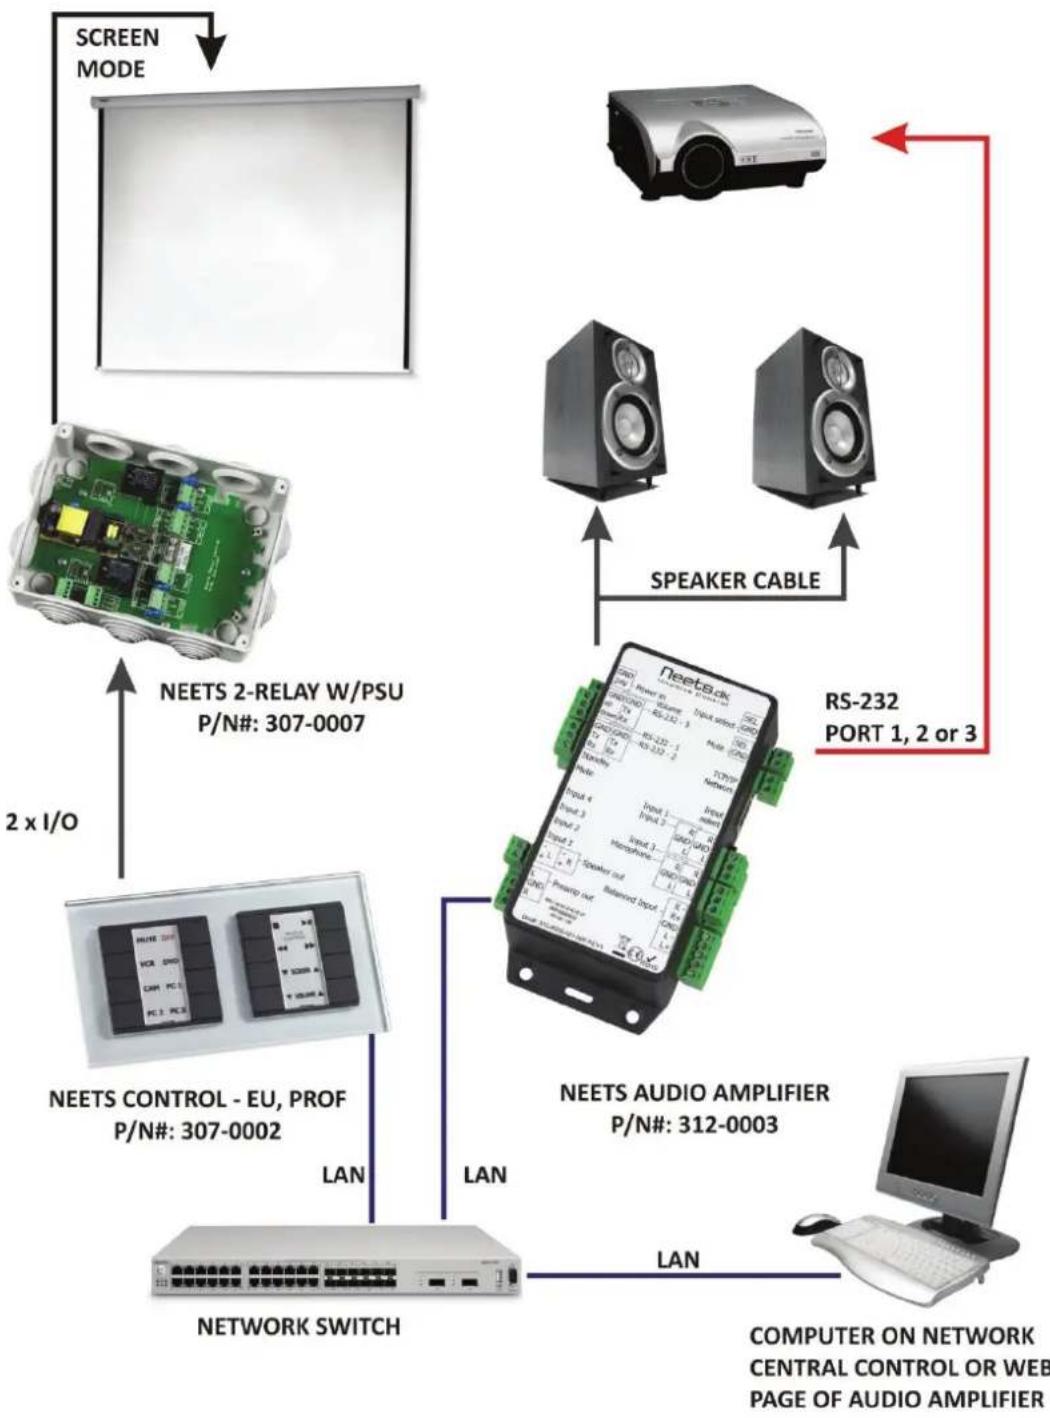
Bellow application for the biggest model of our amplifier.
flowchart
graph TD
    A["SCREEN MODE"] --> B["NEETS 2-RELAY W/PSU P/N#: 307-0007"]
    B --> C["NEETS CONTROL - EU, PROF P/N#: 307-0002"]
    C --> D["NETWORK SWITCH"]
    D --> E["COMPUTER ON NETWORK CENTRAL CONTROL OR WEB PAGE OF AUDIO AMPLIFIER"]
    E --> F["RS-232 PORT 1, 2 or 3"]
    F --> G["SPEAKER CABLE"]
    G --> H["NEETS Audio AMPLIFIER P/N#: 312-0003"]
    H --> I["Computer on Network Central Control or Web Page of Audio Amplifier"]
    I --> J["NEETS 2-RELAY W/PSU P/N#: 307-0007"]
    J --> K["2 x I/O"]
    K --> L["NEETS 2-RELAY W/PSU P/N#: 307-0007"]
    L --> M["NEETS 2-RELAY W/PSU P/N#: 307-0007"]
    M --> N["NEETS 2-RELAY W/PSU P/N#: 307-0007"]
    N --> O["NEETS 2-RELAY W/PSU P/N#: 307-0007"]
    O --> P["NEETS 2-RELAY W/PSU P/N#: 307-0007"]
    P --> Q["NEETS 2-RELAY W/PSU P/N#: 307-0007"]
    Q --> R["NEETS 2-RELAY W/PSU P/N#: 307-0007"]
    R --> S["NEETS 2-RELAY W/PSU P/N#: 307-0007"]
    S --> T["NEETS 2-RELAY W/PSU P/N#: 307-0007"]
    T --> U["NEETS 2-RELAY W/PSU P/N#: 307-0007"]
    U --> V["NEETS 2-RELAY W/PSU P/N#: 307-0007"]
    V --> W["NEETS 2-RELAY W/PSU P/N#: 307-0007"]
    W --> X["NEETS 2-RELAY W/PSU P/N#: 307-0007"]
    X --> Y["NEETS 2-RELAY W/PSU P/N#: 307-0007"]
    Y --> Z["NEETS 2-RELAY W/PSU P/N#: 307-0007"]
    Z --> AA["NEETS 2-RELAY W/PSU P/N#: 307-0007"]
    AA --> AB["NEETS 2-RELAY W/PSU P/N#: 307-0007"]
    F --> AC["RS-232"]
The Neets Control – EU, professional is controlling the audio amplifier on the LAN port on the control system. The Audio amplifier is controlling the projector on RS-232-1 and the 4 – Relay box on RS-232-2 (screen up/down), so here we uses 2 of the 3 RS-232 ports on the Audio amplifier, and only the LAN connector on the Neets Control EU, professional
- Foreword:
- Table of content
- Description:
- What is class "D" amplifier?:
- What is line level on our amplifier?:
- Phantom power:
- RS-232 cable connections:
- RS-232 loopthru:
- LAN to RS-232 loopthru:
- Firmware upgrade of units:
- Connections on units - 312-0001:
- Specifications 312-0001:
- Connections on units - 312-0002:
- Specifications 312-0002:
- Connections on units - 312-0003:
- Specifications 312-0003:
- Special functions on 312-0003:
- Homepage control:
- Fault finding:
- Amplifier Communications protocol
- Examples for use of the protocol
- Examples for use of the protocol – continued
- Default parameters:
- Application drawing 312-0001, 312-0002 and 312-0003
- Application drawing 312-0002 and 312-0003
- Application drawing 312-0003
Brand : Neets
Model : 312-0002
Category : Receiver