
CarDVR-210 - Dash cam ROLLEI - Free user manual and instructions
Find the device manual for free CarDVR-210 ROLLEI in PDF.


| Type | Dash cam / Action cam combo |
| Display | LCD panel |
| Video Resolution | Full HD (1920x1080) typical |
| Recording Modes | Normal, Loop, Emergency (G-sensor, Motion detection) |
| Memory | microSD up to 64GB (class 10 or higher recommended) |
| Connectivity | WiFi (2.4 GHz), Micro USB, Micro HDMI |
| Power | 5V DC via car charger or USB; built-in rechargeable battery |
| Battery | Rechargeable lithium-ion (typical 200-300 mAh) |
| GPS Receiver | Optional external GPS receiver (included with some packages) |
| Wide Angle Lens | 120°-140° (typical) |
| G-Sensor | 3-axis accelerometer with high/low sensitivity settings |
| Motion Detection | Automatically records when motion is detected while parked |
| Loop Recording | 3-minute segments, overwrites oldest files |
| WiFi Function | Local direct control and Internet cloud live view |
| Mobile App | Rollei Car-DVR (iOS & Android) for remote control and setup |
| Auto Record | Starts recording when car engine starts (Dash Cam mode) |
| Voice Recording | On/off in dash cam mode |
| Screen Auto Off | After 60 seconds of inactivity (dash cam mode) |
| Emergency Button | Locks current loop segment as emergency video |
| Date/Time Stamp | Embedded on video |
Frequently Asked Questions - CarDVR-210 ROLLEI
User questions about CarDVR-210 ROLLEI
0 question about this device. Answer the ones you know or ask your own.
Ask a new question about this device
Download the instructions for your Dash cam in PDF format for free! Find your manual CarDVR-210 - ROLLEI and take your electronic device back in hand. On this page are published all the documents necessary for the use of your device. CarDVR-210 by ROLLEI.
USER MANUAL CarDVR-210 ROLLEI
natural_image
Black Rollei digital camera with lens and control buttons (no visible text or symbols beyond branding)User Manual
Names of Parts

Tripod Mount

natural_image
Two electronic components: a rectangular box with a circular top and a flat base, next to a gray arrow pointing right (no text or symbols visible)LCD Panel

Power/Menu Button.
Record Button ____ — Emergency Button
Getting Started Inserting a microSD Card
Before initial use, insert a microSD card. (suggested at least 4GB, up to 64GB)

Charging the Unit
Fully charge Rollei Car-DVR for initial use by:
- Car charger
- PC USB port
• USB adapter (not included)
During charging, screen shows battery icon or status indicator flashes in orange. When Rollei Car-DVR is fully charged, the indicator turns off.
Shooting a Video
- Power on:
Press 📋 to turn on Rollei Car-DVR.
- Record:
Press Ⓞ to start recording.
Press again to stop.
- Playback:
Press 📷 to enter menu settings.
Press ⚠ to select [Playback ]
Press [Play▶] to play the video and press [■to stop.

- Return to preview:
Press [ 🔊 ] to return.
- Power off:
Press and hold 📋 for 2 seconds.
Rollei Car-DVR Operation
In preview, press 📄 to enter menu settings . Button functions indicated by ⚙️ ⚙️ !. Use ⚙️ ! to navigate menu settings and 📄 to back to preview .

natural_image
Close-up of a black handheld device with control buttons and navigation icons (no readable text or symbols)Menu Settings
Rollei Car-DVR has eight menu settings. Advanced settings can be set up via mobile APP.
| Menu Settings Descriptions | ||
 | Playback | Play recorded videos |
 | Action Cam | Switch between Action Cam and Dash Cam |
 | Dash Cam | |
 | WiFi - Local | Enable/Disable WiFi for wireless connection |
 | WiFi - Cloud | Enable/Disable internet cloud connection |
 | Voice Record | Enable/Disable voice recording (Dash cam mode only) |
 | Auto Record | Enable/Disable auto recording when car engine starts (Dash cam mode only) |
 | Screen Auto Off | Screen turns off after 60 seconds of non-operation (Dash cam mode only) |
 | Settings | Reset to factory default settings or format SD card. |
Note: After 10 seconds of non-operation in menu settings, screen returns to preview.
Record Modes
Rollei Car-DVR has two recording modes for different applications:

Action Cam: Shoot normal videos.

Dash Cam: Shoot loop and emergency videos.
Comparison between modes:
| Mode Action | Cam Dash Cam | ||
| Record type Normal Loop Emergency | |||
| Record trigger | Press in preview | • Car impact• Press ! during loop recording | |
| Record duration | Unlimited | Three min. sections | One min. section (30 seconds before and after the event) |
| Display info. | 00:06:36SD card remaining time | 2014/01/01 21:06:36Current date & time | |
Note:
1. During loop recording, oldest files are overwritten if microSD card is full.
2. During loop recording, press 📋 to enable/disable mute fuction.
Transfer Files to PC:
- Connect Rollei Car-DVR to PC via Micro USB cable.
- Find video at "My computer\Removable Disk\"
- Copy, move, delete, and playback videos on PC.
View Rollei Car-DVR Screen on TV:
- Connect Rollei Car-DVR to TV via Micro HDMI cable (not included).
- Turn on Rollei Car-DVR.
- Rollei Car-DVR screen displays on TV simultaneously.
Wireless & APP Operation
Before initial using wireless connections, download and install APP [Rollei Car-DVR] from Google Play Store and Apple Store. [Rollei Car-DVR] has two functions:
(1) Local - Direct control (2) Internet - Internet live view

(1) Local 【Local】
Mobile connects to Rollei Car-DVR directly via WiFi for remote control, live view, album management and Rollei Car-DVR setup.

flowchart
graph LR
    A["Local"] --> B["R"]
    style A fill:#f9f,stroke:#333
    style B fill:#bbf,stroke:#333
Mobile connects to cloud server to view live videos uploaded from internet remote Rollei Car-DVR.

flowchart
graph LR
    A["Mobile"] --> B["Unieye Server"]
    B --> C["Wireless Router"]
    B --> D["3G/4G Mobile Wireless Router"]
    B --> E["3G/4G Mobile Hotspot"]
    C --> F["Rollci Car-DVR"]
    D --> F
    E --> F

[Local] Function
Before using mobile APP's 【Local】 function, ensure Rollei Car-DVR WiFi is on and Rollei Car-DVR Cloud setting is off. Once WiFi is ready, preview shows Rollei Car-DVR name (R2-xxxxxxxx) for few seconds.
Mobile Connects to Rollei Car-DVR
- For Android: Turn on [Wi-Fi].
For iOS: Go to [Settings] [Wi-Fi].
Turn on [Wi-Fi] and select the Rollei Car-DVR name.
-
Run [Rollei Car-DVR].
-
Tap【Local】and select the Rollei Car-DVR to enter【Local】View Page. Tap [→] to scan again if Rollei Car-DVR is not found.
Note:
- Mobile cannot connect to Rollei Car-DVR while Rollei Car-DVR is recording.
- For first use, password is not required. User can set Rollei Car-DVR password in Setup Page.

iOS Settings


Local View Page Local Main Pa
- 【Local】 function has three function pages: View, Album and Setup.

View Page
| Items Descriptions | |
 | Shoot videos and files are saved into Rollei Car-DVR microSD card |
  | Shoot videos or Take photos and files are saved into mobile "Album\RolleiCar-DVR" |
 | For multiple Rollei Car-DVRs user :Enable Quad-View for multiple live view on mobileIn Quad-View, select a window for single view. |
 | Upside down image |
 | Talk to Rollei Car-DVR from mobile |

| Folders Descriptions | ||
 | View or delete video files recorded in action cam mode | |
 | View or delete video files recorded in dash cam mode | |
Setup Page
| Groups Descriptions | |
| Camcorder Settings | Edit name, password, format SD card, resolution etc. |
| Internet Settings | Edit Email and AP and save in Rollei Car-DVR. (For internet cloud server connection) |
| Car DVR Settings | Set motion detector, impact sensor, etc. |
Note: 1. In Setup Page, tap [Save] to complete settings to Rollei Car-DVR.
2. Mobile media player may not support SuperHD video.
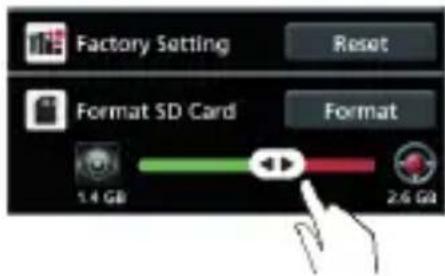
Rollei Car-DVR SD Card Setup
When SD card is first-time use or reformatted in Rollei Car-DVR, user should allocate memory for Portable Mode and Car Mode.
Go to [Setup] → [Rollei Car-DVR Settings] → Adjust slide bar and press [Format] button to complete SD card setup.
Rollei Car-DVR Internet Setup
Before using internet cloud service, Email and AP must be properly set up.
-
Go to [Setup] → [Internet Settings] → Edit Email and AP
-
Tap [Save] to complete Email & AP settings.

Note: AP(Access Point) can be
- Wireless Router or
• 3G/4G Mobile Wireless Router or
• 3G/4G Mobile Hotspot

Wireless Router
3G/4G Mobile
Wireless Router

3G/4G
Mobile Hotspot
Motion Detector Setup
When car's engine stops and motion is detected, Rollei Car-DVR will automatically records videos till no motion is detected.
-
Go to APP → [Setup] → [Car DVR Settings] → Turn on [Motion Detector] → Tap [Save].
-
Press [Home] to disconnect from Rollei Car-DVR.
-
Change Rollei Car-DVR to dash cam mode, will show on screen.
-
When car engine stops
→ [Motion Detector?] will pop up
→ Press √ to manually activate [Motion Detector], otherwise [Motion Detector] will automatically activate after 10 seconds
→ Choose ✗ to cancel [Motion Detector] for this time


G-Sensor Setup
When Rollei Car-DVR is recording and any impacts happen, Rollei Car-DVR automatically records emergency events if G-Sensor is set.
Go to APP → [Setup] [Car DVR Settings]
→ Select [G-Sensor], [H]/[L] Tap [Save].
Note : [H] High sensitivity. [L] Low sensitivity.
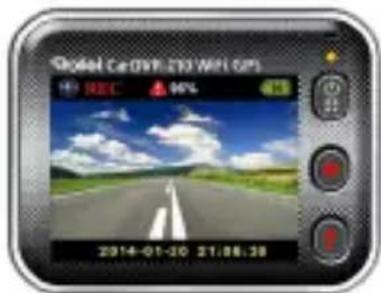

【Internet】Function
Before using APP's 【Internet】 function, ensure Rollei Car-DVR internet setup has been completed.
Rollei Car-DVR Connects to Cloud Server
Enable [Cloud ] in Rollei Car-DVR to upload video streaming to cloud server. Connecting status will be shown on screen.
| Status Descriptions | |
 | Connection successful. Preview shows [icon] and Rollei Car-DVR ID. |
 | Login fail:Invalid AP name or passwordWeak WiFi signal or not in WiFi coverage |
 | Connection fail:No internet or cloud server is not accessibleBlocked by some firewall |
Remote Internet Live View
-
Connect mobile to internet (via WiFi, 3G/4G).
-
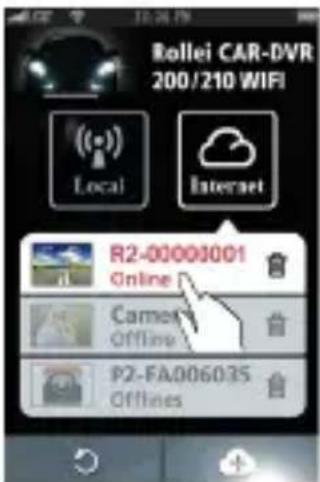
Run [Rollei Car-DVR] and tap 【Internet】.
-
For adding Rollei Car-DVR or using another mobile, tap [+] Enter the Rollei Car-DVR ID and password.
-
Tap Rollei Car-DVR ID/name to view internet live videos.
| Situation Cause/Solution | |
| Rollei Car-DVR cannot turn on | Power is low. Recharge battery |
| Rollei Car-DVR is frozen | Press and hold 📁 button for 5 seconds to force shutdown; press again to turn on |
| Rollei Car-DVR cannot record | No microSD card or microSD card is fullmicroSD card cannot be recognizedFormat microSD card or replace microSD card |
| Rollei Car-DVR cannot connect to AP or could server | Invalid AP name or passwordWeak WiFi signal or not in WiFi coverageNo internet or cloud server is not accessibleBlocked by some firewall |
| Mobile cannot find Rollei Car-DVR【Local】 | Rollei Car-DVR WiFi is disabled or not in WiFi coverageMobile WiFi is disablediOS user does not choose Rollei Car-DVR name in Wi-Fi SettingsTap [Refresh] button on [Rollei Car-DVR] |
| Mobile cannot watch live view【Local】 | Weak WiFi signalRollei Car-DVR is recordingRollei Car-DVR is occupied by other mobile |
| Mobile cannot connect to cloud server【Internet】 | Check mobile 3G/4G or WiFi internet connection |
| Mobile cannot watch live view【Internet】 | The internet bandwidth is insufficient for Rollei Car-DVR upload or mobile download |
| Forget Rollei Car-DVR password | Enter Rollei Car-DVR menu settings and select [Settings] ➔ [Factory Reset] to reset |
GPS Receiver
1. Hardware operation
Insert GPS receiver into your device.

natural_image
Close-up of a modern digital camera with lens and external port (no visible text or symbols)2. Install Software to Computer
- Connect camcorder to PC via standard Micro USB cable.
Note: The USB cable in accessory kit is only for power supply in car. Please use other Micro USB cable for
installation (ex. Android smart phone's usb cable). - Find Setup.exe in "My computer\Removable Disk\DCIM".
- Double click Setup.exe to install/
3. Software operation
- Take out the SD card from your device, and put it into the card reader of your computer.
- Click "Unieye Map 🔍" and run it on your computer.
- An active Internet connection is required to use Google Maps View.
Unieye Map Operation
1. Google Maps View
• The Start 🔒 and End location of the video will be marked on the map.

- Press to select your SD card. (Unieye Map only can read the video files in SD card)
- Press ◀◀▶■▶▶ to forward/play/stop/backward your video.
- Press 🏠 to adjust the volume of your video.
2. Speed Meter
• Show the speed information from the records of the video.
- Press □ to switch the scales of meter in Kilometer per hour.
- Press □ to switch the scales of meter in Mile per hour.
3. Compass
• Show the moving direction from the records of the video.


natural_image
Close-up of a compass rose with cardinal directions (N, E, S) marked, no additional text or symbols visible.4. Calendar
- Press ▶ : move to next month.
- Press move to previous month.
- Press the date in the calendar, the taken videos show dates information in the 24 hours meter.
- Click on color lines to view the video.

The length of video clip 60 minutes 24 hours
5. PIP Mode
- In Windows mode, press ☒ to change view to Full Screen mode.
- The default view of Full Screen mode : video in parent window, map in child window.
- In Full Screen mode, press 📄 to switch view back to Windows mode.

6. PIP Switch
- Press ←→ to switch map in parent window, video in child window.
- Press again to switch back.
Conformity
The Manufacturer hereby declares that the CE marking was applied to the Rollei CarDVR 210 in accordance with the basic requirements and other relevant provisions of the following CE Directives:
2011/65/EC RoHs Directive 2004/108/EC Low Voltage Directive 1999/5/EG R&TTE Directive 2006/95/EEC LVD Directive 2009/125/EG EuP Directive 2002/96/EG WEEE Directive

The EC Declaration of Conformity can be requested from the address specified on the Warranty card.
License Statement
The software used in this product is licensed subject to a license pursuant to the GNU – General Public License conditions.
We expressly draw attention to the fact that under the GNU – General Public License conditions no liability is accepted.
The starting point for the software is the software published online at
http://sg-gpl.net/
The software listed there is licensed pursuant to the GNU – General Public License conditions.
Device-related changes have been made to this software for the product in question. The source text of the software implemented in the product in question can be obtained in response to an enquiry sent to the e-mail address
info@rollei.com
In this instance your e-mail must contain details of what the relevant product is, the relevant serial number and documentary evidence of your commercial source of supply as well as documentary evidence of the date on which the product was purchased from the trade source of supply. We guarantee supply of the source text of the implemented software for a period of at least three years from date of purchase from the trade source of supply where the trade source of supply has sourced the product from us directly or via strictly trade-only dealers.


- Names of Parts
- Getting Started Inserting a microSD Card
- Charging the Unit
- Shooting a Video
- Rollei Car-DVR Operation
- Menu Settings
- Record Modes
- Transfer Files to PC:
- View Rollei Car-DVR Screen on TV:
- Wireless & APP Operation
- [Local] Function
- Mobile Connects to Rollei Car-DVR
- Rollei Car-DVR SD Card Setup
- Rollei Car-DVR Internet Setup
- Motion Detector Setup
- G-Sensor Setup
- 【Internet】Function
- Rollei Car-DVR Connects to Cloud Server
- Remote Internet Live View
- GPS Receiver
- Hardware operation
- Install Software to Computer
- Software operation
- Unieye Map Operation
- Google Maps View
- Speed Meter
- Compass
- Calendar
- PIP Mode
- PIP Switch
- Conformity
- License Statement
Brand : ROLLEI
Model : CarDVR-210
Category : Dash cam