4409706 - Robot vacuum IROBOT - Free user manual and instructions
Find the device manual for free 4409706 IROBOT in PDF.


| Product Type | Robotic Pool Cleaner |
| Model | 4409706 (iRobot Mirra 500 Series) |
| Dimensions (W x D x H) | 273mm x 242mm x 90mm (10.75in x 9.53in x 3.54in) |
| Weight | 1.9 kg (4.19 lbs) |
| Power Supply Input | 100-240V~, 50/60Hz, 210W |
| Power Supply Output | 29V, 6.3A |
| Power Supply Protection | IP54 |
| Operating Water Temperature | 13°C to 35°C (55°F to 95°F) |
| Optimal Water Temperature | 22°C to 32°C (72°F to 90°F) |
| Storage Temperature | -10°C to 60°C (14°F to 140°F) |
| Minimum Distance from Pool | 3.6m (11.8ft) from pool edge, 12cm (4.7in) above surface |
| Cable Length | Floating cable (exact length not specified) |
| Filter Type | Removable filter canisters |
| Cleaning Mechanism | Rolling brush and propeller suction |
| Intake Valve Adjustment | Adjustable for ground suction or clearance |
| Float Adjustment | Adjustable float blocks for turning behavior |
| Safety Requirements | Must be used with GFCI or RCD (≤30mA) |
| Recommended Maintenance | Clean filter after each cycle; clean propeller monthly |
| Warranty | Activate by registering at global.irobot.com |
| Customer Support (USA) | 877.855.8593 |
Frequently Asked Questions - 4409706 IROBOT
User questions about 4409706 IROBOT
0 question about this device. Answer the ones you know or ask your own.
Ask a new question about this device
Download the instructions for your Robot vacuum in PDF format for free! Find your manual 4409706 - IROBOT and take your electronic device back in hand. On this page are published all the documents necessary for the use of your device. 4409706 by IROBOT.
USER MANUAL 4409706 IROBOT
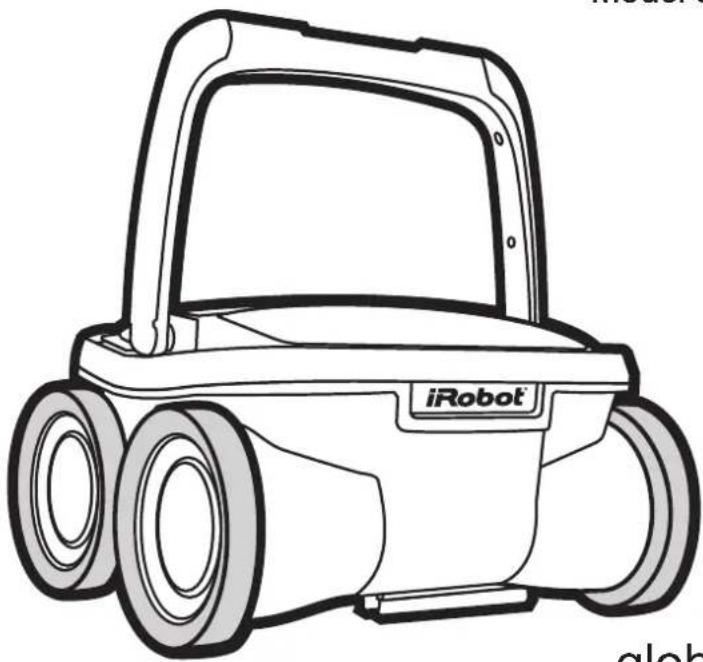
Model 530 Owner's Manual
natural_image
Line drawing of a robot with two wheels and a back cover, labeled 'iRobot' (no text or symbols on the vehicle itself)global.irobot.com
IMPORTANT SAFETY INSTRUCTIONS READ AND FOLLOW ALL THE INSTRUCTIONS
CAUTION: Do not plug the power supply into a grounded outlet or do not switch the pool cleaner "ON" if it is not fully immersed in water.
Operating the cleaner out of waterwill cause severe damage immediately and will result in loss of warranty.
Allow the cleaner to remain in the pool for 15 to 20 minutes following the end of its cleaning cycle. This will allow the motors to cool adequately. Do not leave the cleaner in the pool all the time. Always remember to turn the power supply "OFF" and unplug it from the power outlet before removing the cleaner from the pool.
WARNING: The cleaner must not be used when people are in the water. For use with swimming pool only.
Safety Note
- The unit must be supplied through a residual current device (RCD or GFCI) having a rated residual operating current not exceeding 30 mA
- The connection to the branch circuit should be consistent with the local and national wiring rules (electrical code).
- Mishandling of the unit can result in leakage of lubricants.
- If the supply cord is damaged, it must be replaced by the manufacturer's service agent or a qualified and trained person in order to avoid hazards.

This appliance is not intended for use by persons (including children) with reduced physical, sensory or mental capabilities, or lack of experience and knowledge, unless they have been given supervision or instruction concerning use of the appliance by a person responsible for their safety. Children should be supervised to ensure that they do not play with the appliance.

WARNING: A Ground Fault Current Interrupter (GFCI-USA) or a Residual Current Device (RCD-EUROPE) must be installed to protect your electric outlet and prevent any possible electric shock.
SAVE THESE INSTRUCTIONS
Please read this manual completely before operating your pool cleaner.
Registration and Warranty
Please visit www.irobot.com/register to register your product and activate your warranty.
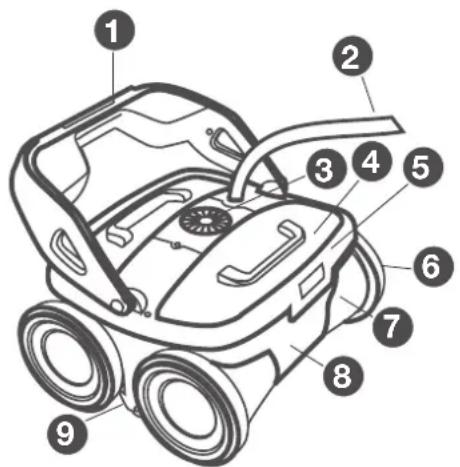
Components
While the appearance of your cleaner and some of its components may differ from those shown here, the function of the cleaner, operating procedures and maintenance practices are the same.
2 iRobot Mirra 500 Series Owner's Manual
Your new automatic pool cleaner contains:
- The robotic pool cleaner with its floating cable.
• The Power Supply (transformer).
Welcome
iRobot®
Dear Mirra Owner,
Thank you for choosing a new generation iRobot Mirra pool cleaning robot. You're joining a very special community of people - 7.5 million worldwide and growing - who are discovering just how useful, convenient and straightforward having a home robot is. In fact, owners tend to like their robots so much they've even given them nicknames.
We're passionate about our robots too. Not surprisingly, given that making robots is all we've ever done in the 20 odd years of our existence.
Now, you're probably itching to give your Mirra a go, but it's worth having a quick read of this manual first. That way it will be even easier to use and save you even more time.
I hope you will have many enjoyable experiences with your Mirra and on behalf of all the team thank you for choosing iRobot.
Best Wishes,

Colin Angle
Chairman, CEO and Co-Founder
iRobot Corporation
iRobot®
Table of Contents
Getting Started.... 5
Maintenance and Adjustment 6-7
Cleaning the Filter/ Changing the Rolling Brush 8
Accessing and Cleaning the Propeller 9
Operating Your Pool Cleaner....10-12
Troubleshooting.... 13
Power Supply 14
Declaration of Conformity 15
iRobot Customer Care 16
Getting Started
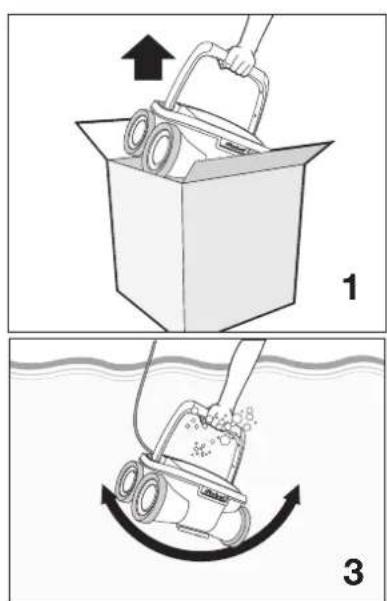
natural_image
Line drawing of a hand holding a wire with a car nearby, no text or symbols present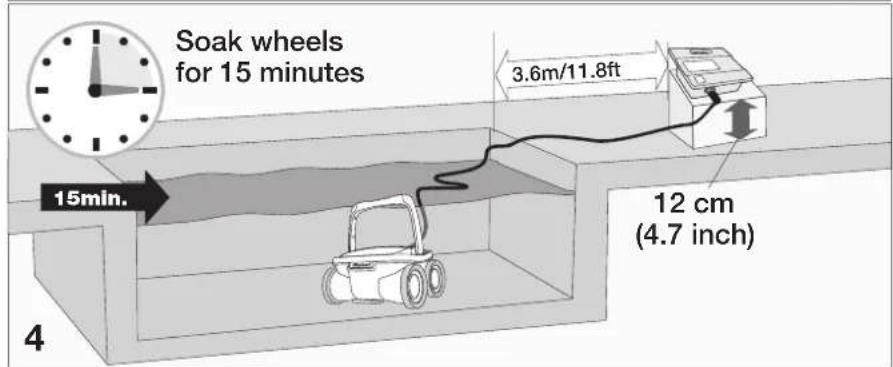
natural_image
Hand inserting a plug into a device component (no text or symbols visible)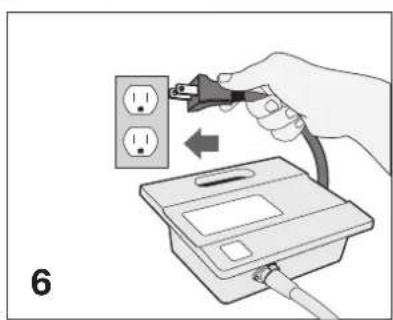
natural_image
Illustration of a hand inserting a plug into an electrical outlet, with no text or symbols present.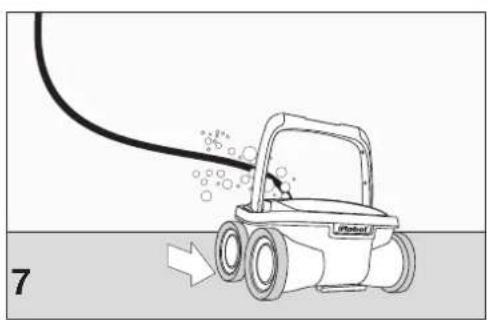
natural_image
Illustration of a water purifier with a hose and spray bubble, showing fluid flow direction (no text or symbols)Maintenance and Adjustment
INTAKE VALVES ADJUSTMENT
Adjust filter valve to get best suction on ground.
Adjust filter valve to get best clearance on ground.
PVA WHEELS SOAKING
Soak wheels after extended period of storage.
Maintenance and Adjustment Continued
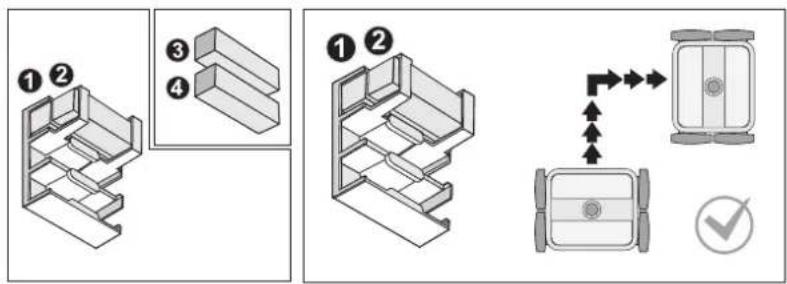
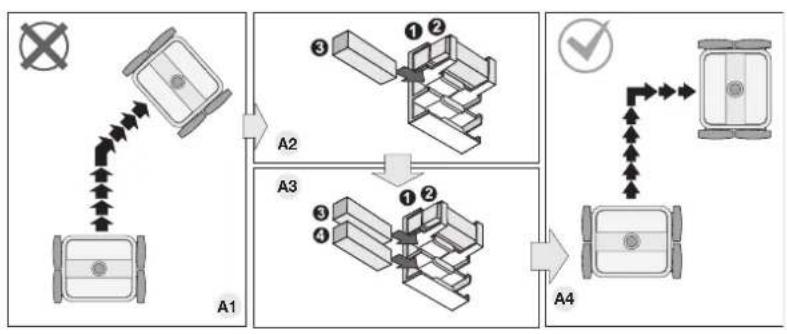
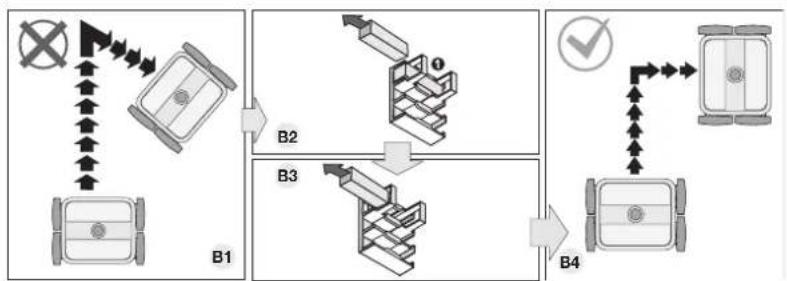
FLOAT INSTALLATION
Robot should turn 90 degrees on the first turn of a new cleaning cycle.
Remove filter canister to access float block holder
Adjust amount of float blocks to achieve desired turning behaviors.
flowchart
graph TD
    A["Vehicle"] --> B{Assembly}
    B --> C["Check Point"]
    C --> D["Order"]
    D --> E["Inspection"]
    E --> F["Output"]
flowchart
Automotive parking maneuver flowchart showing directional movement from vehicle B1 to B4 with checkmark indicating decision point.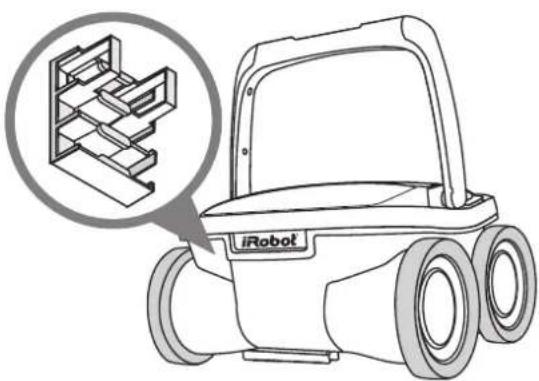
natural_image
Line drawing of a iRobot mobile phone with an inset showing its internal structure (no text or symbols)global.irobot.com7
Cleaning the Filter
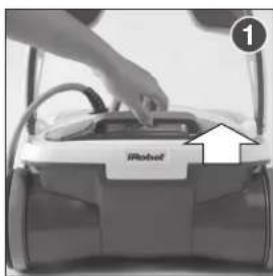
natural_image
Close-up of a hand placing a component into a device labeled 'iRobot', with an arrow pointing to it (no text or symbols on the device itself)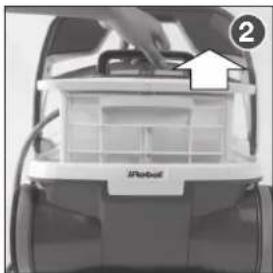
natural_image
Close-up of a hand placing a component into a device labeled 'iPhone' (no text or symbols on the device itself)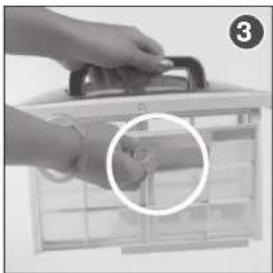
natural_image
Close-up of a hand holding a tool inside a container with a magnified inset showing a finger insertion (no text or symbols visible)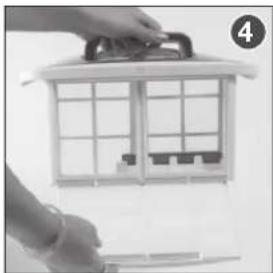
natural_image
Person holding a white plastic container with internal compartments and handle (no visible text or symbols)It is recommended to clean the filter after each working-cycle.
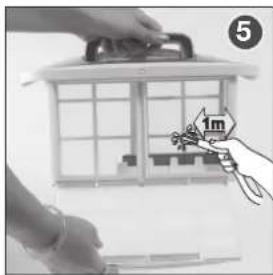
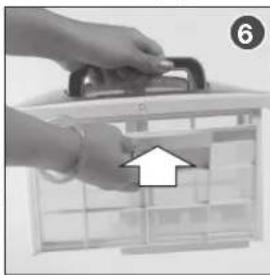
natural_image
Hand placing a tray into a transparent toolbox with an arrow pointing to the tray (no text or symbols visible)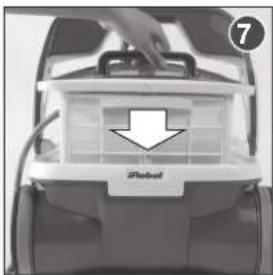
natural_image
Close-up of a portable air conditioner unit with a hand inserting a tray (no visible text or symbols)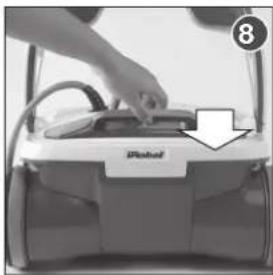
natural_image
Close-up of a hand placing a component into a device labeled 'iPocket' with an arrow pointing to it (no text or symbols on the device itself)Changing the Rolling Brush
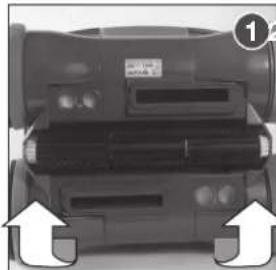
natural_image
Front view of a vehicle chassis with visible engine compartment and two white arrows pointing to the front (no text or symbols)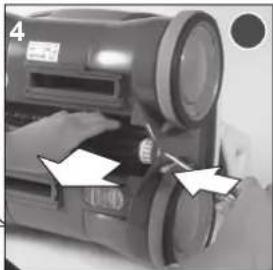
natural_image
Close-up of a vintage digital camera with a tool inserted, showing no visible text or symbols.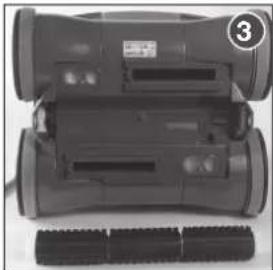
natural_image
Top-down view of a gray robotic device with visible mechanical components and a textured base (no text or symbols)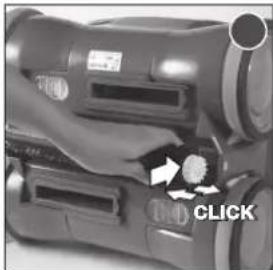
natural_image
Close-up of a handheld electronic device with a hand interacting with its screen (no visible text or symbols)8 iRobot Mirra 500 Series Owner's Manual
Accessing and Cleaning the Propeller

DISCONNECT THE ROBOT FROM THE POWER-SUPPLY BEFORE PERFORMING THIS ACTION
Clean the propeller if experiencing poor suction.
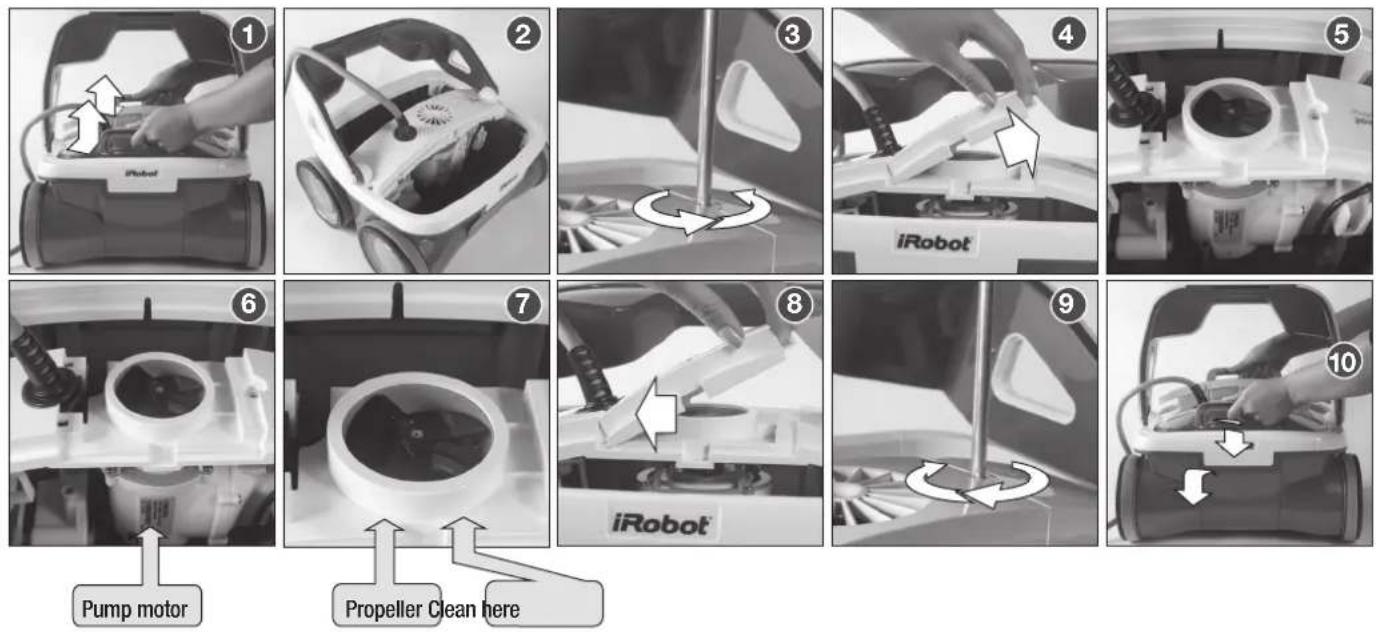
flowchart
graph TD
    A["Step 1: Pump motor"] --> B["Step 2: iRobot"]
    B --> C["Step 3: Propeller Clean is inside"]
    C --> D["Step 4: iRobot"]
    D --> E["Step 5: iRobot"]
    E --> F["Step 6: Pump motor"]
    F --> G["Step 7: iRobot"]
    G --> H["Step 8: Propeller Clean is inside"]
    H --> I["Step 9: iRobot"]
    I --> J["Step 10: iRobot"]
Operating Your Pool Cleaner - Set Up
- Place the power supply (transformer) at least 3.6 meters / 11.8 feet from the pool and atleast 12 cm / 4 inch above the surface. The transformer will supply low voltage to the cleaner.
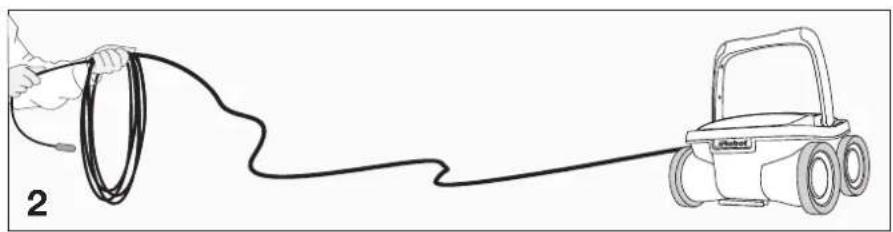
- Uncoil the cable.
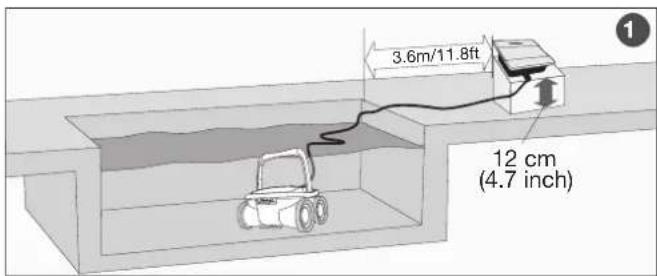
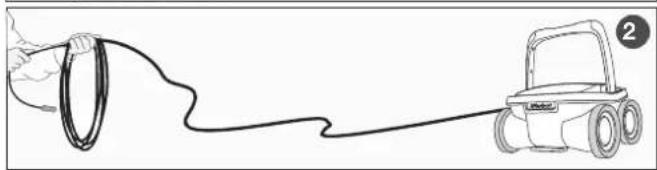
natural_image
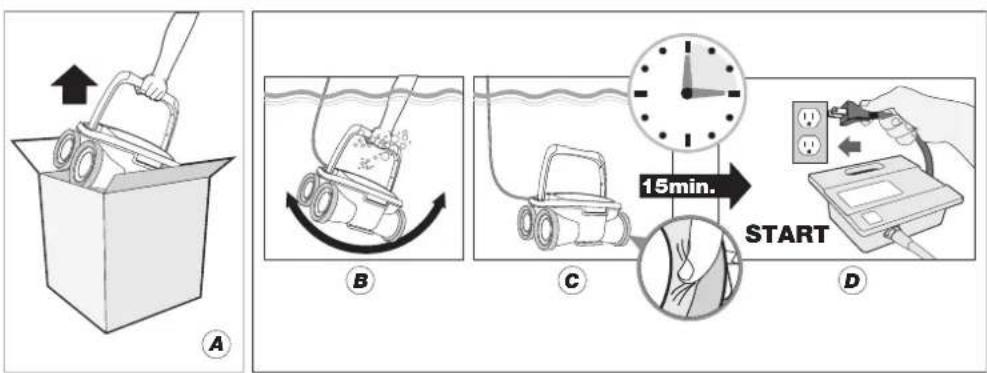
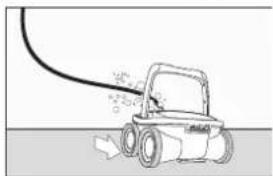
Line drawing of a hand holding a coiled cable connected to a car (no text or symbols)- Place the unit in the water. Turn the unit side to side in the water to allow air to escape from the body and then let the cleaner sink to the bottom of the pool. Then, spread the cable over the surface of the pool asevenly as possible.
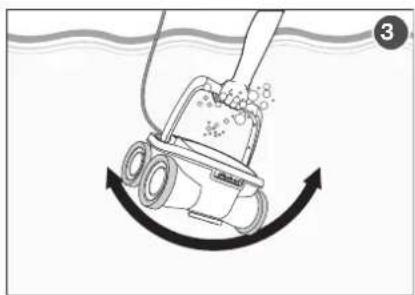
natural_image
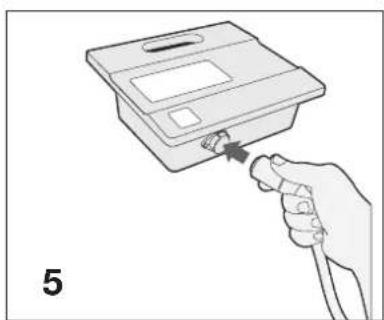
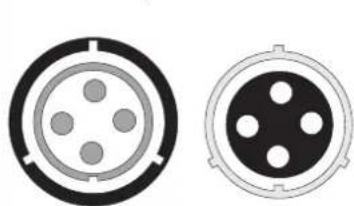
Diagram of a robotic vacuum cleaner performing a circular motion with fluid flow (no text or symbols)- Plug the cable into the power supply. Make sure the key on the plug corresponds exactly with the key slot on the socket of the power supply. (See details on the next page)
- Plug the power supply into a grounded outlet. Ensure that the electric outlet has been properly grounded.
- Press the CLEAN button and the light will glow indicating that the system is "ON" and the pool cleaner will start the cleaning cycle.
natural_image
Two circular electrical connector pin symbols, one with gray and black segments and the other with four dots (no text or labels)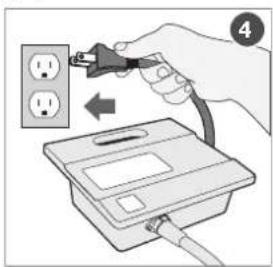
natural_image
Simple line drawing of a wheeled vehicle with motion lines and spray (no text or symbols)IMPORTANT:
Please be sure to always keep your pool cleaner properly stored anywhere between 10 to 40 degrees Celsius (50 to 104 degrees Fahrenheit). This will keep the motors, plastics and seals protected.
Robot can be used in water with temperatures ranging from 13°C to 35°C (55°F to 95°F). However, the recommended optimal temperature is between 22°C and 32°C (72°F and 90°F)
Operating Your Pool Cleaner - Plugging the Cable
Plug Type
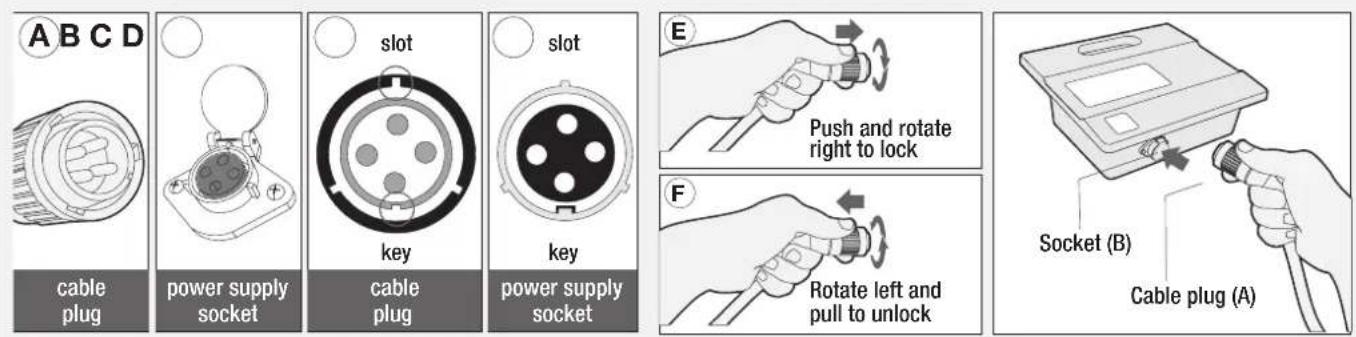
To plug the cable (Fig A) into the socket on the power supply (Fig. B), please do the following:
1. Prepare the plug as seen in (Fig. C) with the key and 3 outside slots exactly as shown.
2. Fit exactly the key and the slots from cable plug with the corresponding key and slots from the power supply socket. (Fig. D)
3. Push the plug all the way into the socket of the power supply.
4. Once the plug is in, rotate the plug to the right to lock it into place (Fig. E).
5. To remove the plug, first rotate the plug to the left to unlock it, then pull it out (Fig. F).
Operating Your Pool Cleaner - Power Button
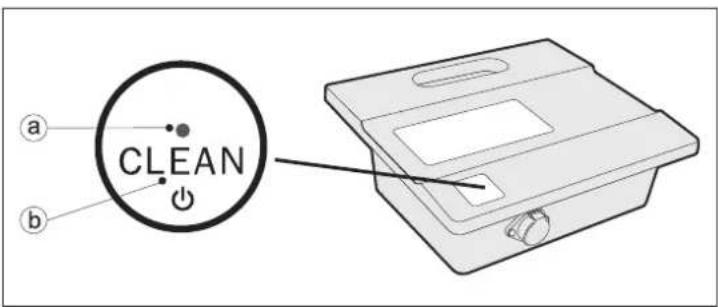
a. Power LED
The blue LED flashes when the power supply is in standby mode and lights continuously when the pool cleaner is operating.
b. "CLEAN" button
The button switches between "ON" and "STANDBY".
IMPORTANT- After every cycle the pool cleaner will automatically go to "stand-by". In case you want to turn the machine off during the working cycle, press the CLEAN button once and the LED will start flashing, indicating that the machine has stopped running.
Maintenance Tips
- Shut off and unplug the power supply every time you remove the cleaner from the water.
- It is recommended to clean the filter after every cycle.
• Periodically straighten out the floating power cord. -
Save your cleaner's packaging for off-season storage or for shipping the unit to your dealer if service is required.
-
Do not leave your cleaner in direct sunlight when not in use.
- Never leave the power supply in direct sunlight and avoid leaving it in the rain.
• Occasionally, you should rinse your cleaner in clean, fresh water.
This will lengthen the service life of your cleaner. - Clean the propeller once a month.
Troubleshooting
PLEASE CHECK THE FOLLOWING BEFORE CALLING YOUR SERVICE CENTER
Before troubleshooting, the pool cleaner must be disconnected from the power supply and the power supply must be unplugged from the electrical outlet to prevent damage to the unit and possible personal injury.
- Unit does not pump water or move:
a) Check to see if electric outlet has power.
b) Check if transformer is plugged into a grounded outlet and the cable assembly is plugged into the transformer.*
c) Switch the power supply "OFF" and "ON" a few times. Allow 45 seconds between "ON" and "OFF".
d) Check for and remove any debris such as hair, string, or leaves that may be obstructing the free movement of the wheels.
- Unit does not pump water at all, or pumps slowly but moves:
a) Check to see if propeller is seized due to accumulation of hair or debris on the propellers. Remove the top screw on the outlet top and clean the propeller. When reassembling the top cover, do not overtighten the screw.
b) Check to see if the filter canisters are thoroughly clean. Clean as necessary.
c) After following all of the above, if there is still a problem, visit global.irobot.com
- Unit does not move but does pump water:
a) Check to see if forward/reverse motion is obstructed by foreign matter; hair, debris, etc. on wheels or there is an entanglement with the power cord.
b) Check there is no debris stuck inside the wheel between gears
c) Verify if the rolling brush is properly positioned and not broken. The brush is transferring the rotation to the wheels and - if broken- the robot will not move properly.
d) After following all of the above, if there is still a problem, visit global.irobot.com
- Unit does not climb the wall:
a) Check to see if the filter canisters are thoroughly clean. Clean as necessary.
- Unit does not pick up dirt and debris:
a) Check 2a and 2b of this guide.
b) Extend the water intake (see page 6)
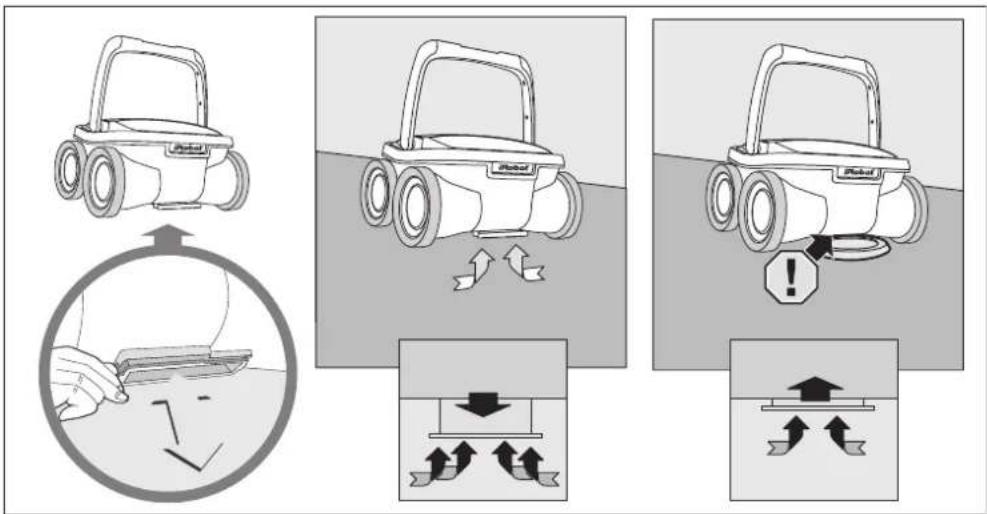
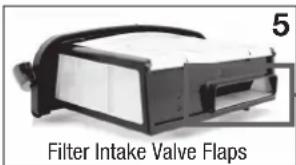
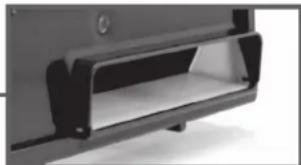
c) Check the Filter Intake Valve Flaps on the underside of your unit (see image below). The Flaps should move freely to open and close. Clean and free the Valve Flaps if necessary.
natural_image
Close-up of a mechanical component with a rectangular opening and mounting holes (no visible text or symbols)- Unit does not seem to cover the entire pool:
a) Most likely a thorough cleaning of the filter is needed.
b) Verify that the unit rotates by 90 degrees on the first turn of a new cycle. If not - add or remove floats according to the instructions on page 7.
c) Check to see that the floating cable is properly spread out and is untangled.
d) Allow the unit to run in the pool for the entire cleaning cycle.
e) Check that the Motor is operating.
f) After following all of the above, if there is still a problem, visit global.irobot.com
- Debris Comes Out Of The Unit When Removing It From Pool
a) Filter lock handle (Top Access Lid Does Not Close Properly) - Check that the Lock handle release mechanism is not damaged. The lid edges should be aligned with the unit's body and the top filter is properly locked.
b) Intake Valves - Check that the Filter Intake Valve Flaps (see image above) move freely to open and close. Clean flaps if necessary.
Power Supply
natural_image
Line drawing of a rectangular electronic device with a lid and mounting bracket (no text or symbols)Physical
Dimensions (W * D * H) ____ 273mm * 242mm * 90mm
10.75in * 9.53in * 3.54in
Weight 1.9 Kg / 4.19 lbs
Electrical
Input rating 100-240V\~, 50/60Hz, 210W
Output rating 29V, 6.3A
Storage temperature ____ -10°C - 60°C (14°F - 140°F)
Operating temperature ____ 0°C - 45°C (32°F - 113°F)
Ingress protection IP54
Grounding
The power supply must be connected to a grounded 3 conductor socket. The main power supply must be connected via a GFCI (ground fault circuit interrupter) or RCD (residual current device) having a rated residual operating current not greater than 30mA.
Maintenance and safety
The cover should not be removed except by an authorized service agent or trained and qualified person. No internal adjustment or component replacement can be carried out by the user. The power cable must be disconnected before removing the cover. If the power supply cord is damaged, it must be replaced by an authorized service agent or trained and qualified person. Do not operate the supply if the cord is damaged.
Environmental conditions
The power supply is designed to work both indoors and outdoors. However, the unit should not be operated in direct sunlight or be exposed to water. The power supply should not be operated in an ambient temperature in excess of 40^ C.
Declaration of Conformity
Test Standards
EN60335-1 Household and similar electrical appliances-Safety Part 1: General requirements
EN60335-2-41 Household and similar electrical appliances-Safety Part 2 Particular requirement for pumps
EN62233 Electromagnetic fields-Methods for evaluation and measurement
FCC Notice: This equipment has been tested and found to comply with the limits for a Class B digital device, pursuant to Part 15 of the FCC Rules. These limits are designed to provide reasonable protection against harmful interference in a residential installation. This equipment generates uses and can radiate radio frequency energy and, if not installed and used in accordance with the instructions, may cause harmful interference to radio communications. However, there is no guarantee that interference will not occur in a particular installation. If this equipment does cause harmful interference to radio or television reception, which can be determined by turning the equipment off and on, the user is encouraged to try to correct the interference by one or more of the following measures:
- Reorient or relocate the receiving antenna.
- Increase the separation between the equipment and receiver.
- Connect the equipment into an outlet on a circuit different from that to which the receiver is connected.
- Consult the manufacturer, dealer, or an experienced radio/TV technician for help.

WARNING: Changes or modifications not expressly approved by robot could void your warranty.
Get Robot Updates
Register your Robot! Go to global.irobot.com
iRobot Customer Care USA
If you have questions or comments about this product please contact iRobot before contacting a retailer.
Please visit the iRobot home support site at
www.irobot.com/support for support tips, frequently asked questions, or information about accessories and other iRobot products.
Should you still need assistance:
Call our Customer Care team at 877.855.8593.
iRobot Customer Care Hours:
• Monday – Friday 9AM – 7PM Eastern Time
- Saturday 9AM – 6PM Eastern Time
iRobot Customer Care Outside USA & Canada
Visit global.irobot.com to:
- Learn hints and tips to improve the performance of your robot
• Get answers to questions - Download a detailed product manual
- Contact your local distributor

- IMPORTANT SAFETY INSTRUCTIONS READ AND FOLLOW ALL THE INSTRUCTIONS
- Safety Note
- SAVE THESE INSTRUCTIONS
- Registration and Warranty
- Components
- iRobot Mirra 500 Series Owner's Manual
- Welcome
- iRobot®
- Table of Contents
- Getting Started
- Maintenance and Adjustment
- INTAKE VALVES ADJUSTMENT
- PVA WHEELS SOAKING
- Maintenance and Adjustment Continued
- FLOAT INSTALLATION
- Cleaning the Filter
- Changing the Rolling Brush
- Accessing and Cleaning the Propeller
- DISCONNECT THE ROBOT FROM THE POWER-SUPPLY BEFORE PERFORMING THIS ACTION
- Operating Your Pool Cleaner - Set Up
- IMPORTANT:
- Operating Your Pool Cleaner - Plugging the Cable
- Plug Type
- Operating Your Pool Cleaner - Power Button
- Maintenance Tips
- Troubleshooting
- PLEASE CHECK THE FOLLOWING BEFORE CALLING YOUR SERVICE CENTER
- Power Supply
- Physical
- Electrical
- Grounding
- Maintenance and safety
- Environmental conditions
- Declaration of Conformity
- Get Robot Updates
- iRobot Customer Care USA
- If you have questions or comments about this product please contact iRobot before contacting a retailer.
- Should you still need assistance:
- iRobot Customer Care Hours:
- iRobot Customer Care Outside USA & Canada
Brand : IROBOT
Model : 4409706
Category : Robot vacuum