
Edison 3 min - Tablet bq - Free user manual and instructions
Find the device manual for free Edison 3 min bq in PDF.


| Product type | Tablet |
| Brand | bq |
| Model | Edison 3 mini |
| Operating system | Android 4.4 KitKat |
| Processor | Intel Atom |
| Internal memory | Expandable up to 32 GB via microSD card |
| Battery | 4500 mAh, non-removable, rechargeable via micro-USB |
| Screen | 7-inch capacitive multi-touch, 5-point detection |
| Rear camera | 5 MP with autofocus and flash |
| Front camera | Yes, lower resolution than rear |
| Connectivity | Wi-Fi 802.11 b/g/n, Bluetooth 4.0, GPS, micro-USB, miniHDMI |
| Audio | Dolby Digital Plus, built-in speaker, 3.5 mm headphone jack |
| Dimensions | Approx. 190 x 110 x 10 mm (7.5 x 4.3 x 0.4 in) |
| Weight | Approx. 300 g (0.66 lb) |
| Power input | 100-240V AC, 50/60 Hz, 0.3A max; output 5V / 2.1A |
| Main functions | Internet browsing, email, gaming, app installation, e-books, Bluetooth file transfer, audio recording, video playback, camera, music, GPS navigation |
| Cleaning | Switch off and disconnect all cables. Use a soft, lint-free cloth; mild cleaner if needed. Do not pour liquids directly. |
| Safety alerts | Do not use near pacemakers (keep >15 cm), in hospitals, or in explosive environments. Switch off on aircraft. |
| Spare parts and repairability | Battery is non-removable; removal by unauthorized personnel voids warranty. No user-serviceable parts. |
| General information | Includes USB cable, charger, quick start guide, warranty manual. SAR value: 0.246 W/kg (body). |
Frequently Asked Questions - Edison 3 min bq
User questions about Edison 3 min bq
0 question about this device. Answer the ones you know or ask your own.
Ask a new question about this device
Download the instructions for your Tablet in PDF format for free! Find your manual Edison 3 min - bq and take your electronic device back in hand. On this page are published all the documents necessary for the use of your device. Edison 3 min by bq.
USER MANUAL Edison 3 min bq
Edison 3 mini
Complete User Manual
Edison 3 mini
The bq team would like to thank you for purchasing your new tablet Edison 3. We hope you enjoy using it.
With this device you can browse the internet, check your email, play games, use apps (which you can download directly onto the device), read e-books, transfer files via Bluetooth, record audio, watch movies, take photos and videos, listen to music, chat with your friends and family.
About This Manual
• To make sure that you use your tablet correctly, please read this manual carefully you start using it.
- Some of the images and screenshots shown in this manual may differ slightly from those of the final product.
- Due to firmware updates, it is possible that some of the information in this manual does not correspond exactly to the operation of your device. To obtain the most up-to-date version of this manual, please go to www.bq.com.
- bq shall not be held liable for any issues relating to performance or compatibility resulting from modification of the registry settings by the user. Nor shall it be held liable for any incompatibility issues with third-party applications available through the app stores.
Icon guide

Danger: This icon indicates situations that could pose a risk to personal safety or health.

Warning: Situations which pose no risk to personal safety or health, but could pose a risk to the correct functioning of the device.

Tip: Additional information to help you get the best out of your device.
Trademarks
The bq logo is a registered trademark of Mundo Reader, S.L.
The Android and Google Search ^TM logos are registered trademarks of Google Inc.
Wi-Fi ^® is a registered trademark of the Wi-Fi Alliance.
Bluetooth® is a registered trademark of Bluetooth SIG, Inc.
MicroSD ^TM and the corresponding logo are registered trademarks of SD-3D, LLC.
Dolby and the double-D symbol are registered trademarks of Dolby Laboratories.
Intel, Intel Atom, Intel Inside, the Intel logo and the Intel Inside logo are trademarks of Intel Corporation in the U.S. and/or other countries.
All other trademarks are the property of their respective owners. All rights reserved.
Contents
7 BEFORE YOU START
7 Box Contents
8 Product Overview
9 GETTING STARTED
9 Inserting/Removing the MicroSD Card
10 Switching the Device On and Off
11 Charging the Tablet and Transferring Files
13 Setup Wizard
14 HOME SCREEN
14 Screen Lock
15 Home Screen
16 Extending the Home Screen
16 Adjusting Screen Rotation
17 Customising the Home Screen
17 Moving and Deleting Icons on the Home Screen
17 Creating App Folders
18 Taking Screenshots
18 Making Screen Recordings
18 Learning to Use the Multi-Touch Screen
21 Buttons and Icons
21 Status Bar
22 Notifications Bar
24 Keyboard
25 SETTINGS
25 WIRELESS SETTINGS
25 Wi-Fi
26 Bluetooth
27 Data Usage
28 More...
29 DEVICE SETTINGS
29 Sound
30 Display
31 Storage
32 Battery
32 Apps
33 Users
33 Intel® Smart Video
34 PERSONAL SETTINGS
34 Location
35 Security
36 Languages and Text Input
37 Backup Copies
38 ACCOUNT SETTINGS
39 SYSTEM SETTINGS
39 Date and Time
40 Accessibility
42 Printing
43 About Tablet
43 Developer Options
45 PERFORMANCE SETTINGS
45 Optimising Battery Life
45 Monitoring Battery Usage Information
46 EMAIL
46 Setting up a Gmail Account
47 Setting up Other Email Accounts
47 Sending an Email
48 Replying to an Email
49 MULTIMEDIA
49 Camera
50 Photo Settings
51 Video Settings
52 Preset Image Modes
53 Image Gallery
57 Playing Music
58 Playing Videos
56 APPS
56 App Store
56 Apps from Unknown Sources
57 Preinstalled Apps
57 Internet Browser
59 Text Editor, Spreadsheets and Presentations
59 Calendar
60 Maps and GPS Navigation
60 File Explorer
61 Dolby
62 News & Weather (Genie Widget)
63 TOOLS
63 Calculator
63 Clock
64 Voice Recorder
64 Voice Search
65 APPENDICES
65 APPENDIX A: OTA Updates
66 APPENDIX B: Technical Specifications
67 APPENDIX C: Cleaning and Safety
70 APPENDIX D: Information on Exposure to Radio Waves and SAR (Specific Absorption Rate)
71 APPENDIX E: Disposing of this Product Correctly
72 APPENDIX F: Declaration of Conformity
BEFORE YOU BEGIN
Box Contents
Before using your bq device for the first time, please check the contents of the box. If any of the following items are missing, contact the retailer that sold you the device.
√ Edison 3 mini
√ USB to micro-USB cable
√ Mains charger
√ Documentation:
Quick Start Guide
Warranty and Safety Manual
bq Accessories
Product Overview

Do not attempt to remove the rear cover of your bq Edison 3 mini, as this may damage the device.
Do not remove the battery by any means. Removing it may invalidate the warranty.
Do not insert any pointed objects into the opening as this may damage the microphone.
GETTING STARTED
Inserting/Removing the MicroSD CardD
Your bq Edison 3 mini has an internal memory that can be expanded to 32 GB by using a MicroSD card.
To insert a MicroSD card, follow these steps:
Insert the MicroSD card into the slot, making sure the metal pins are at the bottom and facing backwards (i.e. towards the back of the device).

natural_image
Simple line drawing of a boat hull with a small boat and a small container, no text or symbols present.Push the card in until you hear a slight click, which indicates that it has been inserted correctly. If the card is not inserted correctly, the device may not recognise it and its content will not be available.

To remove the MicroSD card, follow the steps above in reverse, bearing in mind the following recommendations:
a. For greater security, switch the device off before removing the MicroSD card.
b. If you need to remove the MicroSD card while the device is switched on, first unmount it in order to avoid damaging the card and losing any data.
To unmount the card, open the Settings menu on your device and go to Storage > Remove SD card.
Push the card in until you hear a slight click to indicate that the card has been released. When you remove your finger, the card will slide partially out of the slot, allowing you to remove it completely.

You can choose whether to store your multimedia files on the tablet's internal memory or directly onto the MicroSD card. Remember that any content stored on the MicroSD card will not be available when the card is removed, and any apps stored on there will no longer function.
Switching the Device On and Off
To switch on your bq Edison 3 mini, press and hold down (for a few seconds) the On/Off button located on the side of the tablet.

To switch off the device, press and hold down the On/Off button until a pop-up menu appears, containing a number of different options. Select the Power off option in order to switch your device off completely.


If you press briefly on the On/Off button, the screen will switch off but not the device.
Charging the Tablet and Transferring Files
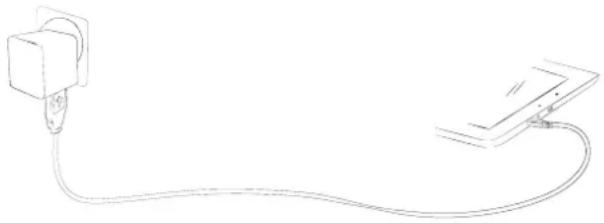
Your tablet has a rechargeable (non-removable) 4500 mAh battery which is charged via the micro-USB port at the bottom of the device. A USB to micro-USB cable and mains adapter are provided with the tablet. To charge it, follow these simple steps:
A) Using the mains adapter:
- Plug the USB cable into the mains adapter.
- Connect the mains adapter to any standard plug socket (220 V/50 Hz).
- Plug the other end of the cable into the micro-USB port on your tablet.
natural_image
Simple line drawing of a plug connected to a battery (no text or symbols)
natural_image
Line drawing of a laptop connected to a smartphone via cable (no text or symbols)B) Using a laptop or desktop computer:
- Plug the USB cable into a compatible USB port on your computer.
- Plug the other end of the cable into the micro-USB port on your tablet.

The battery in your bq Edison 3 mini is non-removable. If it is removed by anyone other than our Technical Support staff, your device could be damaged and the warranty invalidated.

Allowing the battery to charge fully is recommended when you charge it for the first time, as this will help calibrate the battery meter. Bear in mind that some batteries perform better after a number of full charge/discharge cycles.

The time required to charge your device may vary slightly depending on whether it is charged via the mains adapter or via a computer USB port.
If you connect your tablet to a computer using the USB cable, you can also transfer files between the two devices (to/from the internal memory, or the MicroSD card, if one is in use). This will allow you to use, copy or store images, videos, music, text documents, etc. on one or both devices.
You can select the file transfer mode when you connect your bq Edison 3 to a computer. Swipe down (with a single finger) from the top of the screen in order to display the various options for USB computer connection. The tablet will be connected as a Media device (MTP) by default or you can also connect it as a Camera (PTP). There are a number of ways to transfer files. The steps below will show you how to transfer them via USB:
- Connect your bq Edison 3 mini to a computer using the micro-USB to USB cable supplied. Insert the micro-USB connector into the corresponding port on the device, and the generic USB connector into the corresponding port on the computer.
- Select and copy the desired files onto your tablet or computer. Remember that you can store them on either the internal memory or on the MicroSD card if you are using one.


To transfer files in MTP or PTP mode from your tablet (internal memory or MicroSD card) onto a computer running Mac OS (and vice versa), you will need to download and install the free Android File Transfer app onto your computer: www.android.com/filetransfer/.

Do not disconnect the cable while files are being transferred.
Setup Wizard
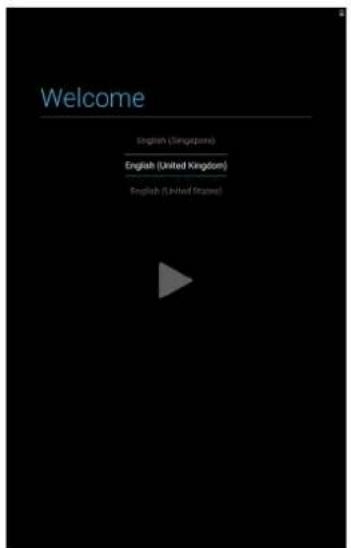
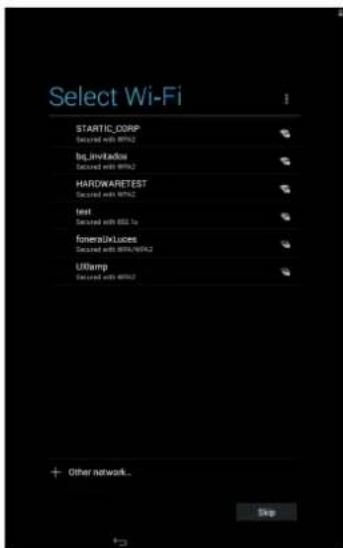
The first time you switch on your bq Edison 3 mini, a setup wizard will help you to configure the basic settings for your device:
- Language
• Wi-Fi network - Google Account
- Location and Google settings
- Device name
- bq Extended Protection


HOME SCREEN
Screen Lock
Your tablet screen will lock itself after a prolonged period of inactivity. To configure the screen timeout interval, press the Menu button 🎨, go to Settings > Display > Sleep and select the desired time interval. To switch the screen off manually, briefly press the On/Off button.
To unlock the screen, press (but do not hold down) the On/Off button and the screen will come on, displaying the unlock option. To change the unlock option, press the Menu button, go to Settings > Security > Screen lock and choose from the following options: None, Slide, Face Unlock, Pattern, PIN and Password. For more information on each of these options, go to Settings > Security.

If you forget how to unlock the screen, after various wrong attempts, the Forgot pattern message will appear at the bottom of the screen. If you press this message you will be asked to enter the email address and password used to set up your tablet. The screen lock will then be removed.
Home Screen
The Home screen, or Start screen, is your main access route to the tools and apps installed on your device. From here, you can check the status of your device, visit websites, open apps, and much more.
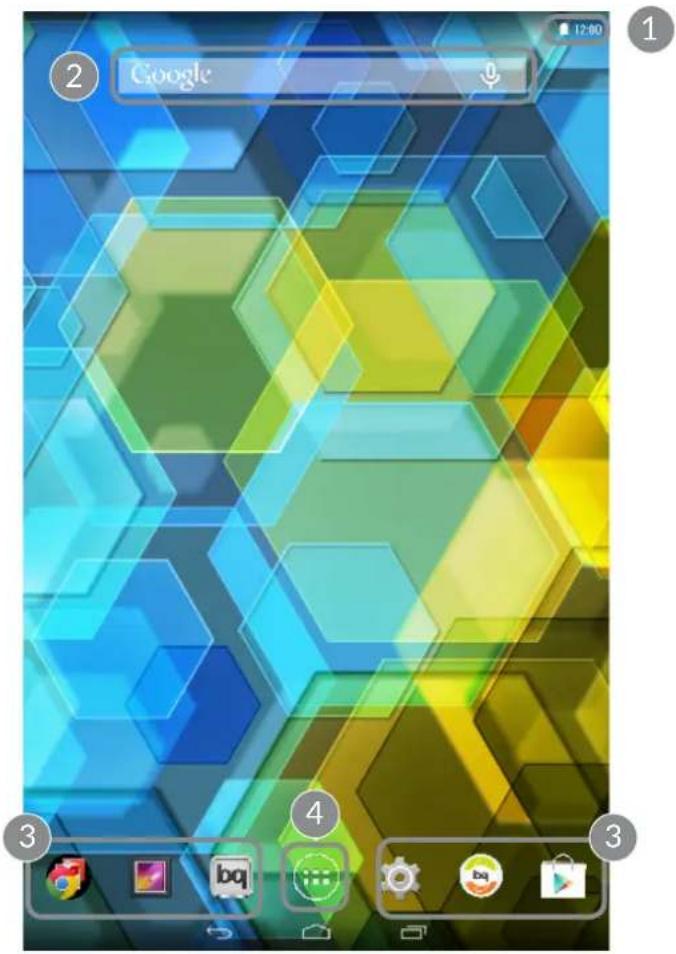
1 Status and Notifications bar. Displays the time, Wi-Fi and Bluetooth connection status, the signal strength for each SIM, the sound profile and the remaining battery life. Slide the bar downwards from the left to check your notifications, or from the right to access the quick settings menu.
2 Google search. Press the search bar to enter the text you want to search for on the internet. You can also carry out a voice search.
3 Shortcuts. These give you quick access to the apps you use most frequently.
4 Appmenu. Here you can access all the apps installed on your device.
From the Home screen you can also press the Menu button, or touch and hold an empty area of the screen, to bring up the customisation options. These options consist of the following:
- Wallpaper: You can select which image to use as a background for the Home screen and extended screens.
- Widgets: You can add different widgets to the Home screen. Widgets are small apps or programs whose main function is to provide quick and easy access to the tablet's features, and to display information on various subjects such as the news, weather, etc.
- Settings: This option takes you directly to the device's Settings menu, which can also be accessed via the Notifications bar and the App menu.
As well as widgets, you can also add shortcuts to your Home screen that give you direct access to apps, contacts, etc. To do this, go to the App menu, touch and hold the app you want to create a shortcut for, and drag it into the desired position onto the Home screen.
Extending the Home Screen
The Home Screen has a screen that can expand up to four desktops more, you can customise with shortcuts, applications or widgets. To scroll through the Home screen and extended screens, simply slide the screen to the left or right using your finger.
Adjusting Screen Rotation
For some apps, the screen will rotate automatically from portrait (vertical) into landscape (horizontal) mode and vice versa, depending on how you are holding your device. If you want to stop the screen from rotating, press the Menu button, go to Settings > Display and untick the Auto-rotate screen option.
You can also activate and deactivate automatic screen rotation via the corresponding toggle (Auto-Rotate) in the Quick Settings menu.
Customising the Home Screen
You can customise your tablet's Home screen and Extended screens by using your own images as wallpaper, adding icons, widgets and shortcuts to your favourite apps, etc.
To change the wallpaper or add a widget, press briefly on the background image of the Home screen or any of the Extended screens. A pop-up window will appear enabling you to choose between Wallpapers, Widgets or Settings.
If you click on the Wallpapers option, you can select your desired image and then press Set wallpaper to confirm your choice. If you have selected a large image, you will need to crop it accordingly.
Moving and Deleting Icons on the Home Screen
To move an element on the Home screen, press down to detach it from the background, then drag it to the desired position and release. You can also move icons from one extended screen to another by dragging them to the edge.
To delete an icon, drag it to the top of the screen until an X and the word "Remove" appear. When the icon turns red, release it to delete.
Creating App Folders
To create a folder, drag one icon on top of another that you want to store in the same folder. A folder will automatically be created and the icons placed inside it. You can add more icons to the folder by simply dragging them into it. To name a folder (or rename an existing one), press briefly on it and then on the “Unnamed folder” option. You can remove icons from the folder by opening it and dragging them out.
Taking Screenshots
You can take a screenshot at any time by simply pressing and holding the lower volume button and the On/Off button down simultaneously. The screenshot will be automatically saved in the Gallery, in the Screenshot folder. If you are accessing the tablet via your computer, go to Pictures > Screenshots.
Making Screen Recordings
Making a screen recording is very similar to taking a screenshot. Press the upper volume button and the On/Off button at the same time in order to start recording, and press them again to stop. The video will be saved in the same folder as the screenshots.

You can also take screenshots and make screen recordings by pulling down the Notifications bar with two fingers and selecting the corresponding option from the pull-down menu.
Learning to Use the Multi-Touch Screen
Your tablet has a capacitive multi-touch screen with five simultaneous detection points. Different movements can be made over these points which are linked to different functions:
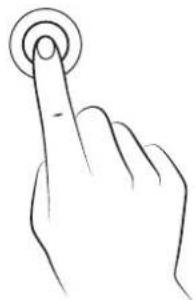
Touch. Touch the screen briefly to select an icon, open an app, activate a text-entry box, etc.

natural_image
Line drawing of a hand with a finger pointing at the index finger (no text or symbols)Touch and hold. Touch the screen (on either a clear area or on an icon) with your finger and hold for approximately 2 seconds to bring up a menu of available options.
natural_image
Line drawing of a hand pressing a circular button (no text or symbols)Drag. To move an icon, press and hold down, drag it to the desired position and then release.
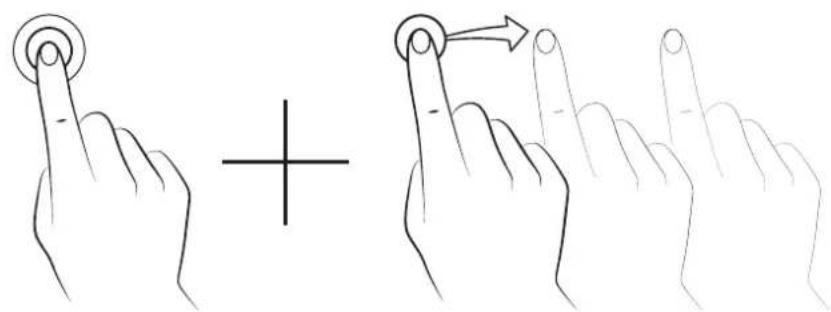
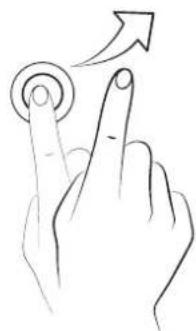
Swipe or slide. On the Home screen, slide your finger left or right across the screen to access the extended screens, or slide your finger up and down the screen to scroll through a webpage, list or menu.
natural_image
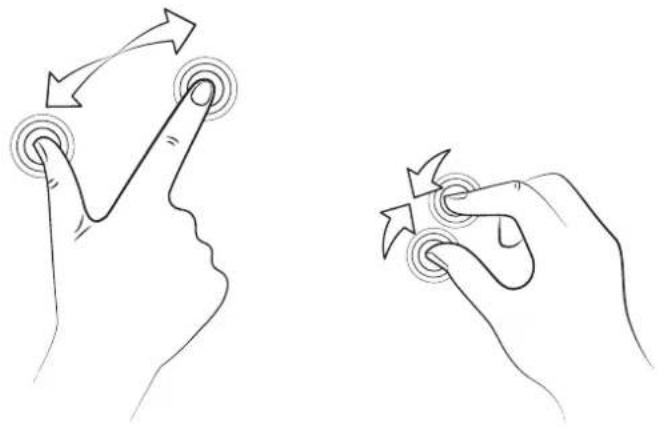
Hand gesture showing finger pressing a circular button with an upward arrow (no text or symbols)Pinch. Place two fingers on the screen at the same time and move them towards one another or spread them apart to reduce or enlarge an image.
natural_image
Line drawings of two hands interacting with a finger and a button, both with curved arrows indicating rotation (no text or symbols)Double-tap. Tap the screen twice in quick succession to zoom in on an image, and tap twice again in order to zoom back out. You can also double-tap the screen to activate it when switched off.

natural_image
Line drawing of a hand with index finger pressing a button (no text or symbols)Buttons and Icons
Below is a short description of the different buttons and icons, along with recommendations for how to use them.
While you are using an app, you can return to the previous screen by pressing the Back button ↩.
You can go to the Home screen at any time by pressing the Home button ⏻. You can also touch and hold to access the Google Now application.
You can access the options menu for an app by pressing the Menu button ☐.
Status Bar
The Status bar contains important information and is always visible at the top of the screen.
The main icons it displays include the following:
Battery almost empty.
Battery charging.
Battery fully charged.
Wi-Fi enabled and connected to a network.
Sound off and vibrate on.
Sound and vibrate off.
Flight mode activated
USB connected.
Bluetooth enabled.
Notifications Bar
Pull the bar down from the top left of the screen to view the notifications. Delete all notifications by pressing the icon, or delete each one by swiping it to the side of the screen. Pull the bar down from the top right of the screen to view the Quick Settings.

This list of options enables fast and easy access to a wide range of settings, such as brightness, connectivity, etc.
These options can also be enabled and disabled from the Quick Settings menu (accessed by pulling down the Status bar from the top left) include:

Brightness: Lets you select between automatic and manual brightness adjustment and set the desired brightness level.

ttings: Opens the general Settings menu.

i-Fi: Activates/deactivates Wi-Fi.

Auto-Rotation: Activates/deactivates automatic rotation of the screen.

Battery: Gives you direct access to Settings > Battery.

roplane mode: Activates/deactivates your phone signal.

leuetooth: Activates/deactivates the Bluetooth function.

Location: Activates/deactivates GPS on your tablet.

utdown: Lets you switch off the tablet via the pull-down menu.

ck/Sleep: Activates the screen lock.

Screenshot: Lets you save a screenshot under the pull-down menu.

Screen record: Lets you make a real-time video recording of what is being shown on the screen.

Volume: Lets you control audio volume.

Sound record: Gives you access to the app for making audio recordings.

You can access advanced settings for certain functions such as Wi-Fi and Bluetooth by touching and holding the corresponding icon on the list.

When automatic brightness is deactivated, you can adjust the brightness level of the screen by sliding your finger to the left or right.
Keyboard
Pressing on any text field will bring up the virtual keyboard.

1 Enable/disable Caps lock.
2 Open/close the number and symbol keyboard.
3 Activate the dictation function.
4 Space bar.
5 Enter/return.
6 Delete.

The keys in the bottom right-hand corner with “...” on them give you access to extra functions when you touch and hold them.

You can find more information about the keyboard settings and input languages at Settings > Personal > Language & input.
SETTINGS
WIRELESS SETTINGS

Wi-Fi
Before browsing the internet via Wi-Fi, you will need to connect to a Wi-Fi network and configure it in some cases. To do this, go to Settings > Wireless and Networks.
If Wi-Fi is disabled, move the selector to the right. Press Wi-Fi and your device will automatically search for and display a list of available Wi-Fi networks, which updates automatically.


Press the name of the network you want to connect to, enter the password if necessary and press Connect. If the tablet connects successfully, Connected will appear below the name of the network.
There is a time limit for entering the Wi-Fi password, after which the Wi-Fi will be disabled. Selecting the Show password option is recommended before entering the password, to ensure you can enter it quickly and correctly.
When Wi-Fi is enabled, the device will automatically connect to the chosen network. If your device detects a network that has never been configured, it will notify you.
To access the Scan, WPS Pin Entry, Wi-Fi Direct and Advanced settings for the Wi-Fi network, go to Settings > Wireless and networks > Wi-Fi, then press the Menu button.
PIN WPS. Depending on the router you are using, this tool allows you to connect to your Wi-Fi network more easily and securely. You can connect and synchronise your tablet with your router by pressing the 🎨 icon on your device (or going to Menu : > PIN WPS) and the PIN WPS on your router simultaneously.
Advanced settings. Here you can request to receive notifications when networks are available, adjust the WiFi during sleep mode settings, optimise battery usage and access the IPv4/IPv6 and MAC addresses (the unique ID numbers assigned to each device).

Bluetooth
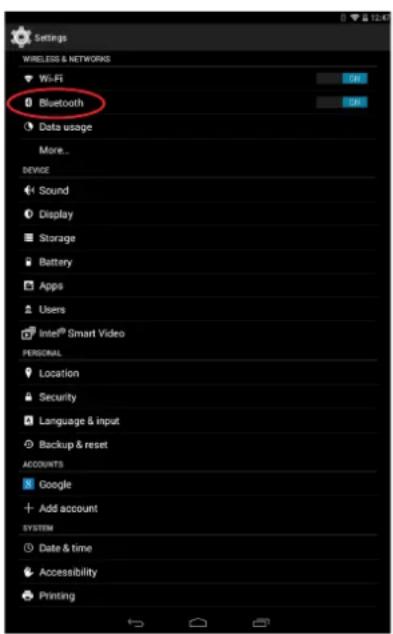
To connect to and share files with other Bluetooth devices, you will need to enable Bluetooth. Go to Settings > Bluetooth and slide the tab to the right.
To configure the visibility timeout, check the name assigned to your tablet, show received files or access advanced settings, press the Menu button.
To connect your tablet to other devices, go to Settings > Wireless and networks > Bluetooth and select the name that corresponds to your tablet. Your device will then be visible to other devices for a period of 2 minutes.

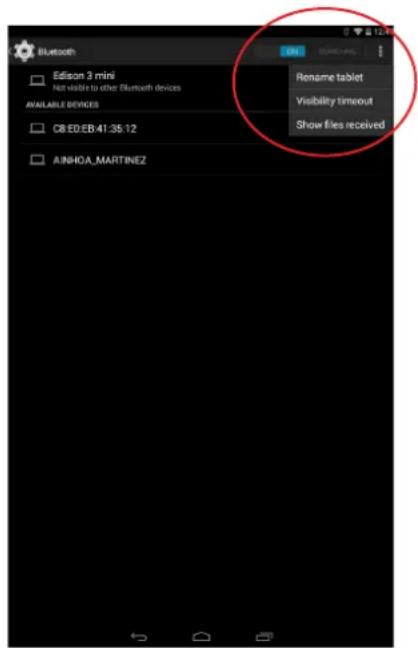
To connect to another device, and provided both devices are visible, simply press the name of the device you want to connect to. A pop-up window will appear on your screen with a Bluetooth pairing request; accept the request and then synchronise it with the other device.

Data Usage
Here you can view statistics for data transfer over Wi-Fi. You can find data usage figures for the current 24-hour period and in total for each application.


More...
Here you can activate Aeroplane mode, manage Tethering and the virtual private network (VPN) settings on your device.
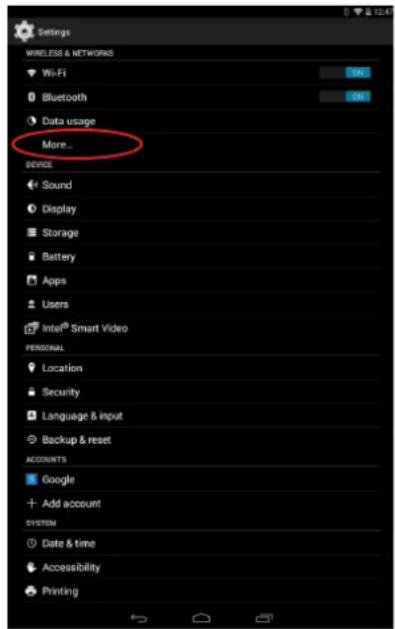

Aeroplane Mode: Selecting this option will deactivate all wireless connections.
Tethering: You can convert your bq into a USB or Bluetooth access point to share the connection with one or multiple devices.
To share your connection via USB, connect your tablet to a computer using the cable and select the USB tethering option.
To share your connection via Bluetooth, select the Bluetooth Tethering option. To share your device's network with a computer, Bluetooth must be enabled on both devices.
VPN: This option allows you to configure a virtual private network.
DEVICE SETTINGS

Sound
Here you can adjust the volume for music, videos, games, multimedia files, notifications and alarms individually.


Under Dolby Digital Plus, you can Launch App to configure the application which is explained further on, or you can select a Profile.
You can also activate/deactivate sounds and vibration alerts for some system features such as Touch sounds, Screen lock sounds and Vibrate on touch.
You can also adjust the volume for notifications or multimedia content by pressing the volume buttons.

Display


Brightness: Lets you adjust the screen brightness level.
Wallpaper: Lets you select an image or video to use as wallpaper. You can choose between live wallpaper, system wallpaper, photos from your Gallery or video images.
Auto-rotate screen: Activate or deactivate automatic screen rotation when you change the orientation of your tablet.
Sleep: Select how long to wait before the screen automatically switches off.
Daydream: Activate or deactivate your tablet's screensaver.
Font Size: Lets you choose between four different font sizes.
HDMI: Activate the HDMI connection to link your bq to another device using a miniHDMI cable. You can also adjust the resolution of the video output.
Cast screen: you can use your tablet to send an audio/video signal to a remote screen (or another tablet, smartphone, television, etc.) using the Wi-Fi network to display its screen on both devices. The remote screen must be compatible with the Miracast/DLNA protocol in order to do this.

Storage
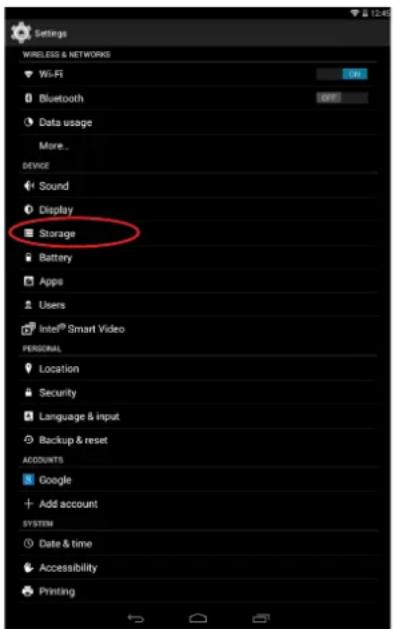
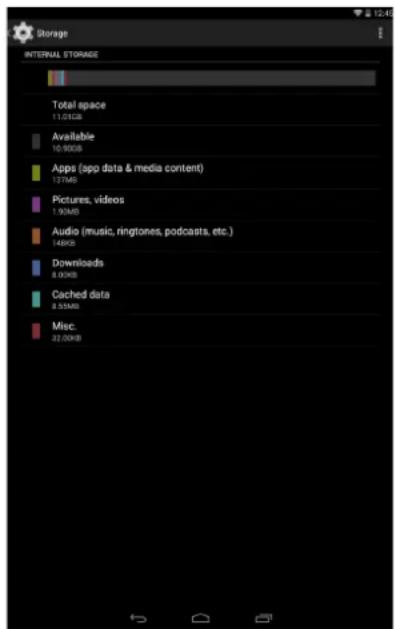
In this section you can set the Default write disk for your device, check the usage of the various storage units, Unmount the SD card to remove it safely and Erase all data from the SD card or internal memory.


If you remove the MicroSD card from your tablet and continue to use the device, some of your apps might not function until you reinsert it. Make sure you switch off the tablet or safely remove the MicroSD card (via the Storage menu) every time you remove it or insert it, otherwise the card could get damaged and data could be lost.

Battery
Here you can choose to display the remaining battery life as a percentage next to the meter in the status bar.
You can also view a graph showing battery duration and usage. Press the graph or the individual apps and resources on the list to view specific details on their usage.

bar
| Device | Battery Percentage (%) | | :--- | :--- | | Android System | 26 | | Wi-Fi | 25 | | Android OS | 13 | | Google Play services | 11 | | com android systemui | 5 | | Media server | 5 | | Tablet idle | 3 | | Media | 2 | | Google+ | 2 | 11m 41s on battery

Apps
Here you can access all the apps on your tablet: downloaded apps, apps stored on the internal memory and MicroSD card, apps currently running and a list of all apps (to see these lists, slide the screen left or right). Press the name of an app or resource to find out more.

Users
If you want to share this device with others you can create additional users.
Each user has their own space and can personalise it with their own applications. The users can also modify the tablet configuration options, such as the WiFi connection, which will affect all users after configuration.
Please note that any user can accept update app permissions on behalf of all users.


Intel® Smart Video
Intel® application which improves video quality by reducing noise and eliminating artifcats with interlaced content.
PERSONAL SETTINGS

Location
Activating this option allows access to your location for those apps that request it (e.g. preinstalled navigation maps). Additionally, the Power Control widget allows you to activate the GPS satellites option; alternatively, it can be activated by pulling the Notifications bar down with two fingers and selecting the Location option.


There are two ways of providing access to your location: GPS satellites and Wi-Fi & mobile network location.
Under Mode you can choose from:
• High accuracy: GPS, Wi-Fi and mobile network
- Battery saving: Only Wi-Fi and mobile network
- Device only: GPS only
While the GPS function is always the most accurate, using your mobile network allows for faster positioning, making it easier to start navigating and to change of direction.
Under the Location menu, you can also view a list of apps that have recently requested location access and the battery usage involved.

Security
Here you can configure your tablet's Screen lock (i.e. the type of lock and the owner information to be displayed on the lock screen), activate the Encrypt tablet option with a PIN or password to access your device.

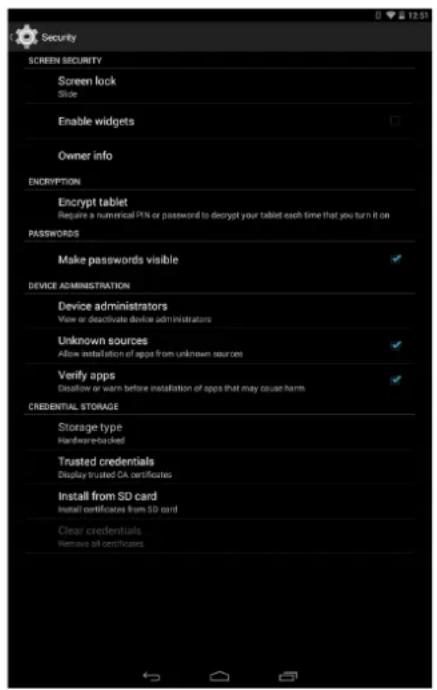
Under Device administration, you can view or deactivate administrators, and enable or disable installation of apps from outside the preinstalled app store (to find out how to install such apps, see the Apps section of this manual). You can also manage the Credential storage, view trusted CA certificates and install certificates from your SD card.

Language and Text Input
Here you can set up the system language, activate spell checker and personal dictionary. You can also configure the keyboard, text input methods, voice typing and pointer speed.
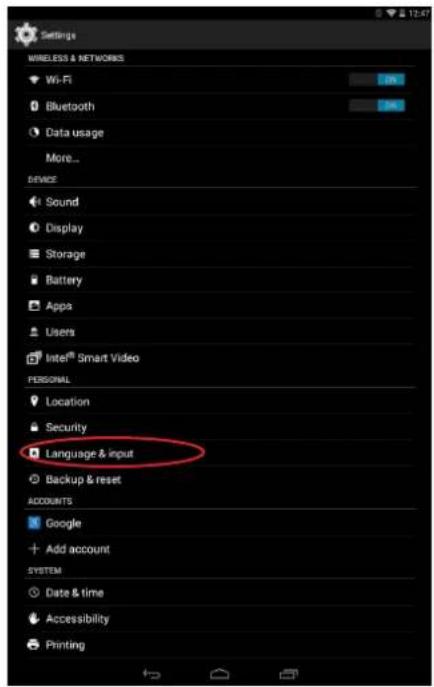

The advanced settings for each entry method allow various options such as vibrate and sound on keypress to be selected.


Backup & reset
Here you can back up your app data and settings, Wi-Fi passwords, etc. on the Google data servers. (To back up your data a Google account must be configured on your device).


You can also carry out a factory data reset and delete all pending DRM (digital content protection) licences if you have already deleted the corresponding files.

Carrying out a factory data reset will erase all the data on your tablet's internal SD and remove any additional programs and apps installed. Making backup copies of all your multimedia files is therefore recommended before restoring the factory settings.
ACCOUNTS
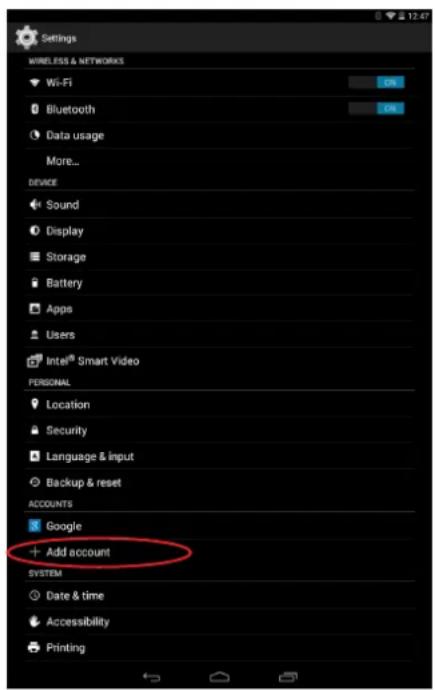
Here you can choose which email accounts (POP, IMAP or Exchange) you want to synchronise with your tablet. To add a new account, press the Add account icon and choose from Email, Corporate (linked to a Microsoft Exchange server) or Google. Set up the account by following the instructions that appear on the screen. Then press the email address to synchronise your email, contacts, calendar and other options (provided that syncing is permitted by the service provider).

SYSTEM SETTINGS

Date & time

Automatic date & time: Adjust the time automatically based on location information or mobile network. Deactivating this option will activate the manual configuration of date and time.
Automatic time zone: This option lets you automatically activate/deactivate the automatic time zone provided by the network. Deactivating this option will automatically activate the Select time zone option so that you can configure it manually.
Use 24-hour format: Activate/deactivate the 24-hour time display format.
Choose date format: Lets you choose the format for displaying the date.

Accessibility
Here you can access certain system services to facilitate access to the device, such as large text, spoken word, physical buttons as virtual buttons, spoken passwords, quick boot, etc.

Your tablet also includes the TalkBack app, which offers spoken feedback and visual settings specially designed for visually impaired users.
When you open the app for the first time, a tutorial will guide you through the basic settings:
Speech volume: Lets you adjust the volume of speech in relation to multimedia volume.
Use pitch changes: Activates/deactivates the use of lower tones when a key is pressed.
Keyboard echo: This option speaks typed keys aloud. Speech is activated/deactivated when the screen is switched off.
Speak when screen is off: This option activates/deactivates voice notifications when the screen is off.
Use proximity sensor: Activates/deactivates the proximity sensor to turn off speech whenever you want.
Shake to start continuous reading: Lets you activate the continuous reading function by shaking your device.
Vibration feedback: Activates/deactivates vibration feedback when an option is selected.
Sound feedback: Activates/deactivates sound feedback when an option is selected.
Focus speech audio: Activates/deactivates the option of reducing multimedia volume during a conversation.
Sound volume: Lets you adjust sound volume in relation to multimedia volume.
Explore by touch: Activates/deactivates the touch explore function, which enables you to navigate through your tablet using gestures, by pressing options once to select and twice to accept.
Automatically scroll list: Activates/deactivates automatic scrolling of lists.
Single-tap selection: Activates/deactivates the option to select an option with a single tap, when the option has been selected beforehand.
Launch 'Explore by touch' tutorial: Launches the tutorial for touch navigation.
Manage gestures: Lets you modify and configure a range of gestures in order access various accessibility options.
Manage customised labels: Lets you edit the contents of your custom labels.
Resume from suspend: Lets you specify whether the program resumes when the screen is activated, when the lock screen is shown or only via the Notifications bar.
Developer settings: Settings for developers and advanced users.
Captions: this function allows you to configure the captions. Standard options are:
Language: lets you specify the language you want to view.
Text size: lets you increase or decrease the font size.
Caption style: allows to set the style of the subtitles having the possibility to personalise them.
Magnification gestures: This function allows you to zoom in or out of the screen. The gestures provided are as follows:
To zoom in, triple-tap the area you want to magnify.
To zoom out, triple-tap the magnified area.
To move normally around the screen, slide a finger left or right.
To scroll freely, slide two or more fingers across the screen.
To decrease the zoom, pinch the screen with two fingers or spread them apart to increase it.
To expand the content temporarily, triple-tap the area you want to expand and move around the page without lifting your finger off the screen.
Magnification will not affect the keyboard.
Large text: Activates/deactivates magnification of the system font size and the font size for apps, in order facilitate viewing of content.
Power button ends call: Activate/deactivate the option of ending a call by pressing the On/Off button.
Auto-rotate screen: Activates/deactivates automatic screen rotation when the screen is placed in a horizontal position. This option is not activated via the Home screen and the native App menu.
Speak passwords: Activates/deactivates the option to speak passwords when the TalkBack service is activated.
Accessibility shortcut: Lets you activate/deactivate, using YES/NO commands, direct access to accessibility functions by pressing the On/Off button until you hear a sound or feel a vibration. Then touch and hold the screen with two fingers until a confirmation is received.
Text-to-speech output: Direct access to options for text-to-speech output. For settings, go to Settings > Language and text input > Text-to-speech output.
Touch & hold delay: Lets you configure the delay between pressing and holding an option and displaying the corresponding options. You can choose between Short (default), Medium and Long options.
Quick boot: This option enables quick booting of the system by putting it on Hibernate instead of total power off.

Printing
Android 4.4 comes with wireless printing included as standard and the application also allows you to connect your printer to the internet (check compatibility with your printer manufacturer). This feature lets you synchronise the printer with your smartphone, tablet or computer wirelessly, in order to print your documents from any location.
i About tablet
This section displays the status of the device (battery, network, serial number, etc.), legal information, Android version, model number, baseband and kernel versions and the build number. You can search manually for updates (for more information on firmware updates, see APPENDIX A at the end of this manual).
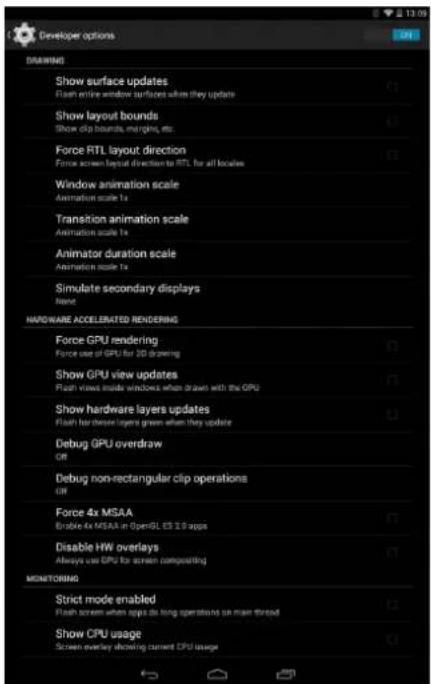
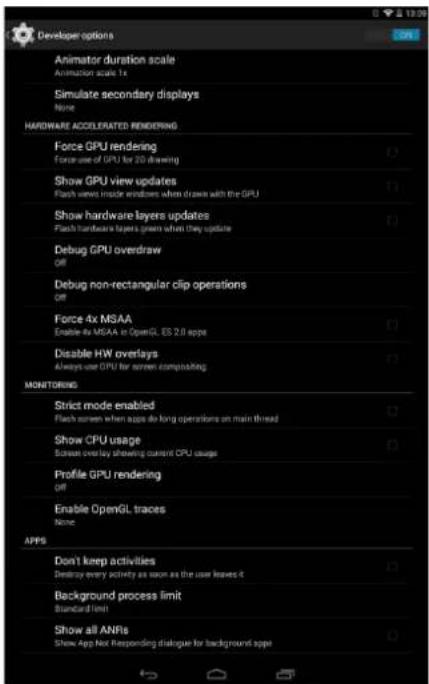
{ } Developer options
This section is only intended for advanced users, as it contains settings that are useful for app developers. These settings should not be modified if you are not an advanced user.
The menu includes various options, such as:
• Take bug report
- Stay awake
- Process stats
- USB debugging
- Allow mock locations
- Force GPU rendering
- Show CPU usage
- Background process limit

The Developer options menu is hidden in Android by default. To enable it, go to Settings > About tablet and press the last option (Build number) repeatedly until a message appears to say that you have correctly enabled it. You will then be able to access these options via the main Settings menu.

PERFORMANCE SETTINGS
Optimising Battery Life
You can prolong the life of your battery by disabling features you don't need. You can also configure how the system resources and apps consume battery power, by pressing the Menu button 🎯 and going to Settings.
- If you are not using Wi-Fi, Bluetooth or GPS, you can adjust your Settings accordingly, as explained earlier.
- Any maps and navigation apps that you are not using should be closed, as they require GPS access and consumer more power.
- Set your display brightness to AUTO. You can access these settings directly by pulling down the Notifications bar with two fingers.
- Select a short screen timeout interval, by going to Settings > Display > Sleep.
- Disable the auto-sync feature for certain apps, by going to Settings > Accounts. Note that you will have to synchronise your email accounts manually, and you will not receive any notification when updates becoming available.
- Switch to Flight mode by pressing and holding down the On/Off button until a pop-up window appears containing the corresponding option. Alternatively, access this option by pulling the Notifications bar down with two fingers.
Monitoring Battery Usage Information
To optimise your battery configuration, go to Settings > Battery. The list at the bottom of the screen shows battery use for the various apps and services on your tablet. Press the graph to access more detailed information. The screen showing use details for some apps also has buttons with recommendations on how to adjust your settings for maximum energy saving.
Setting Up a Gmail Account
You will need to set up a Gmail account the first time you switch your tablet on or whenever you carry out a factory data reset (deleting all data).
If you don't have an account already, the system will ask you to set one up to access certain features of the device. If you already have an account, you can use it for this initial setup process.
Some apps will not be available until you have correctly set up an account.
From within the app (which can be accessed via the App menu) you can access your inbox and configure a variety of different settings, such as how emails are displayed, how you can read them and reply to them and the notifications you receive. You can also group several different accounts together, so that you can receive emails from different addresses at the same time.
Setting up Other Email Accounts
The Email app allows you to send and receive emails from any other accounts you may have, regardless of provider. This app can be accessed via the App menu, or through the Home screen.
When you open this app for the first time you will be asked to enter an email address and password, as shown in this image.
- Enter your email address, then press Next.
- Configure the account settings (syncing, notifications, etc.).
- Configure the account settings (syncing, notifications, etc.).
- After the setup process is complete, it may take a few minutes for the account to be synchronised and for your emails to appear on the screen.

Sending an Email
- Open the Email app and press Compose
- Enter the recipient's email address, add a subject heading and then write your message.

3. PressSend

To attach files, or add extra recipients (CC or BCC), press the icon and select the corresponding option from the list.
Replying to an Email
You can reply to an email you have opened by using one of the following three options:
- Replay: Only the person who sent the message will receive your reply.
- Replay all: All the people who received this email will receive your reply.
- Forward: Lets you send a copy of the email to someone else.
With certain email clients, only the Forward option enables you to preserve any files that may have been attached to the original message.
MULTIMEDIA
Camera
Your tablet has a front and a rear camera. To activate them, go to Menu > Camera or directly access the camera from the home screen. Both cameras capture images and videos with different resolutions, with those of the rear camera being higher. The rear camera also has autofocus and flash.
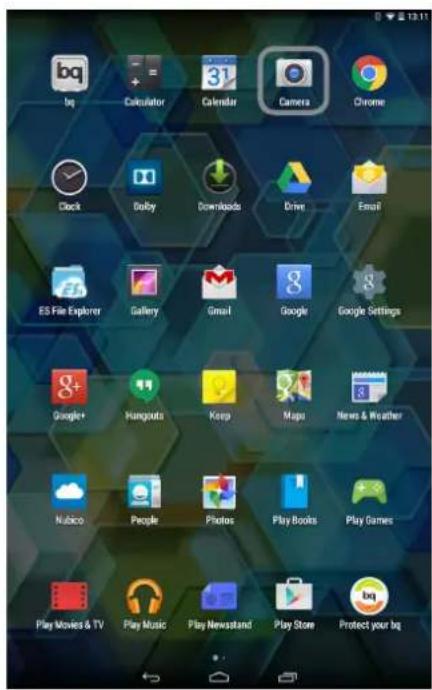

On opening the application, a window will appear offering the option to tag the location of the photos and videos.
To select between image or video capture, press the camera icon 📄 and select the camera or the video icon 📋. The change the settings of the camera enabled, press the first icon . The shutter is the blue circle, which turns red for the video camera.
Photo and Video Settings
To use the zoom function while taking photos or recording video, use the "pinch" gesture on the screen before pressing the shutter button or commencing recording. By pressing the ○ or 📷on, you will access the general settings and an icon to enable the front or rear camera:

Exposure: Choose a value from 3 to -3 to specify the exposure level for the photo. The default setting is 0.

More options: Allows adjustment of the general configuration of the camera activated.

Front/rear camera: Enables the front or rear camera.
On pressing the More options icon, you will access another menu to adjust the photo and video settings.
- Photo Settings

Store location: Activate this option to add information on where your multimedia file was created.
Timer: Adjust the countdown timer (from 1s to 60s, or disable it). You can enable the sound by selecting Beep during countdown.
Picture size: Set image quality by choosing values ranging from QVGA up to 5 megapixels.
White balance: Choose from seven types of light setting. The default setting is Auto.

Scene mode: Choose from 6 automatic scene modes (night, portrait, landscape, night-portrait, sports or barcode), or none.
White balance: Choose from five types of light setting. The default setting is Auto.
Time lapse interval: Sets the time interval between each photo or frame (from 1 second up to 10 seconds). Remember that 30 frames are required for each second of time-lapse video. Faster-moving scenes require shorter time intervals.
Store location: Activate this option to add information on where your multimedia file was created.
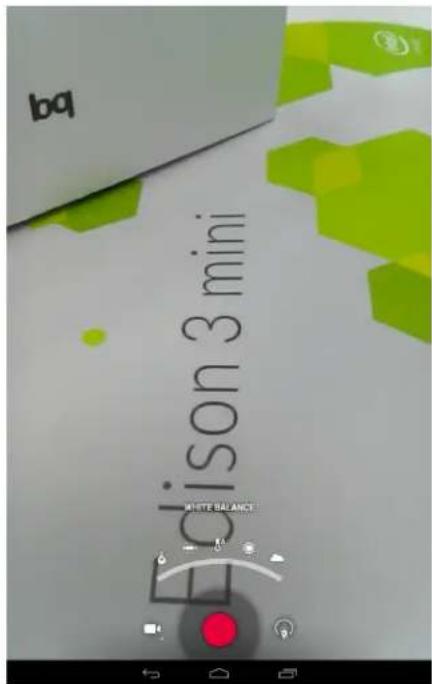

Preset Image Modes
Press the Panoramic icon and a progress bar will appear, to indicate how far you can pan your camera. Panoramic photos can be taken in portrait (vertical) as well as landscape (horizontal) format. As you pan your camera across, an arrow will guide its movement so that the different shots blend into one another to create the panoramic image. Once the progress bar is full (i.e. nine sequential photos have been taken), the panoramic image will be automatically created and saved. You can also make a panoramic image from fewer than nine sequential images by simply pressing the Accept icon when you have finished panning the camera.
Image Gallery
To view the images and videos stored on your device, press the Gallery icon located on the Home screen. (It can also be accessed from within the App menu).
The main screen of the Gallery allows you to browse the images and videos stored in the various different locations on your tablet.
Press a folder to access its content. To view an image, simply press it; and to view a video, press it to activate the Video player.
You can also access the Gallery directly after taking a photo or recording a video, by pressing the thumbnail of the photo or video that will subsequently appear in the bottom right-hand corner of the screen.
While you are viewing an image you can also access the following options:
- Press the Menu button or the icon to display the following options: Delete, Slideshow, Edit, Rotate left/right, Crop, Set picture as, Details and Print.
- Pressthe icon to display a list of various apps and social networks through which you can share the photo or video.
- Pressthe icen to open an image-editing program containing filters, frames, special effects and other tools.
To zoom in on an image, simply double-tap the screen to magnify it and double-tap again to return to its original size. You can also pinch to zoom by spreading your fingers apart to zoom in, and moving them together to zoom out.

By default, Android does not allow the creation of new folders within the Gallery or the moving of files from one folder to another. However, there are some free third-party apps that allow this, as well as other features. An example is the file explorer preinstalled on your bq device.
Playing Music
Your tablet comes with a preinstalled audio player, which allows you to play your favourite music and audio tracks and is also integrated with the app store, allowing you to buy and download music to play whenever and wherever you like.
There are two ways you can load music onto your device:
- Connect your tablet to your computer in Mass storage mode and transfer the music onto the tablet's internal memory. To do this, simply connect the tablet to the computer using the supplied USB cable, copy the files from your computer and paste them into the Music folder in your tablet's internal memory (you can also store the music on a MicroSD card if you are using one).
- Open the Play Music appand go to the Play Store (the icon located in the top left-hand corner on the main page). In the Store you can search for and browse a large quantity of artists and songs, purchase them and add them to your own music collection.
Once you have downloaded the music onto your tablet, you can find it by going to the main menu in the Play Music app and selecting the My music option. You can organise your music by genre, artist, album or song list.

The artist, album and other information used by the app to create the playlists can also be modified using your computer. Right-click on the file you wish to edit, then select Properties > Details in the pull-down and pop-up menus, respectively.
You can also conduct a keyword search within your music library in order to locate all the albums, songs, etc. that match the description you have entered.
Once you have selected a song, simply press it and a bar will scroll across the screen displaying information about the song currently playing. To open the panel of player options, press the bar located at the bottom of the screen. This panel gives you options such as continuous playback (press the icon on the left to play the list of selected songs again when it has finished), repeat the last song, pause, skip and random.
On this screen you can also use the 👍 and 🎯 cons to rate the song. You can also press the icon (located in the top right corner) to access more options, such as adding the current song to an existing playlist or creating a new playlist.
The main screen of the Play Music app also contains the Playlist option, where you can find all the playlists previously created, and the icon to show a list of the songs you have liked.
Playing Videos
Your tablet comes with a preinstalled video player. It gives you a list of all the videos stored on your device, and allows you to play them, edit them, and much more.
After opening the app you will see a list of available videos. If you press your chosen video, it will start playing automatically. On the bottom right of the screen, you will find an icon that lets you select viewing options such as zoom, original aspect ratio, full screen (stretching the image) and full screen (cropping the image).
Pressing the bar at the top of the screen also allows you to share the video via other apps, play the video on a loop and edit it. The Edit option lets you choose where the video starts and ends; press Save to store the edited file.
APPS
App store
The App store gives you access to an enormous range of programs, games, music, movies, books, and more. Each category contains further sub-categories that will help you find exactly what it is you are looking for.

Important: Remember that not all downloads are free; some of them may incur additional costs. For all non-free downloads, the price is shown next to the app information, and in order to prevent accidental charges you will be asked to confirm your choice prior to downloading the app.
Apps from Unknown Sources
Occasionally you might want to download apps and/or games from an alternative app store, or directly from a website. In order to install these apps, which generally do not have an electronic signature, you will have to instruct the system to accept apps from unknown sources. Go to Settings > Security and tick the Unknown sources option, then press Accept after reading the security warning. Remember to only install apps from trusted sources.

To install apps you have downloaded from outside the App store, you must be able to access the *.apk file on your device. These types of apps have often been compressed using a program such as WinRAR, which means the downloaded file is a *.rar file and will need to be unzipped using a computer, or a file management program such as ES File Explorer (already installed on your device).
Upon opening the *.apk file, the system will ask you to confirm installation of the app. After you press Accept, the app will then be installed.
Preinstalled Apps
To access the list of preinstalled apps, press the icon on the Home screen to be shown a list of all the apps installed on your device.
Internet Browser
The browser allows you to surf the internet, with the option of opening several tabs to access various websites at the same time. To open a new tab, press the square icon with a number inside, located in the top right corner of the screen. The number indicates how many tabs are currently open. Pressing the icon lets you choose between viewing one of the active tabs or creating a new one. After you have created a new one, enter the website address manually in the white text field at the top of the screen, or press one of the suggested websites displayed in the centre of the screen (suggestions are based on the websites you visit most frequently).
Go back/forward ← →: This option lets you return to webpages you have recently visited, and move forward again to the most recent page you viewed.
Reload page C: Allows you to update the active page in order to refresh its content.
Add bookmark/favourite ☆: This option lets you bookmark a page so that you can easily return to it later. Bookmarks are organised into files.
Enable voice search 🤨: Allows you to enable voice recognition in order to perform a Google search automatically.
To close a tab, simply press the tab icon (the square with the number inside, at the top right of the screen) and then press the ✗ symbol on the tab you want to close. Alternatively, you can pinch it and drag it to the left or the right in order to close it.
Press the Menu button to access the following options:
- New tab: Opens a new tab so you can visit different websites at the same time.
- New incognito tab: Lets you browse the internet via a tab that will not be stored in the browser history.
• Bookmarks: Lets you access the list of saved bookmarks. - Recent tabs: Lets see recently opened tabs.
- History: Gives you a chronological list (most recent first) of the websites you have visited.
- Request desktop site: Selecting this option allows you view the desktop version of the page you are currently visiting, rather than the version designed for mobile devices.
- Settings: Gives you access to the basic and advanced browser settings.
- Help & feedback: This option allows you to view the opinions of other users, give your own opinion and access the Help section.
Text Editor, Spreadsheets and Presentations
Your tablet includes a Quickoffice management tool as standard which allows you to create and edit text documents, spreadsheets and presentations. You can also synchronise the app with your Drive account, save your files in the cloud and access them remotely from any compatible device. This app is compatible with Microsoft Word, Excel and PowerPoint formats, and also lets you read documents in PDF format. Additionally, you can attach files to an email directly from the app.
Calendar
The Calendar app allows you to manage your daily schedule and synchronise it with your email, which lets you share your appointments, meetings and events with your contacts. You can also configure alerts and notifications to remind you of upcoming commitments, making sure you never miss a meeting again! What's more, the app allows you to synchronise your calendar so that you can view it from any other mobile device.
You can create a new event by going to the + icon at the right top or by selecting the + icon that appears when you press on any free day in the calendar. You can specify the date and time of the event, its location, the people invited, enable and disable alerts, add a description of the event and even configure the availability status that will be shown while you are attending the event.
Maps and GPS Navigation
Your tablet has a preinstalled Maps app that allows you to find out your current location on the map (for greater precision, activate the system's GPS option), view satellite images or even an actual view of a given location. You can also select the Navigation option to allow your device to give you instructions on how to reach your destination from your current position, whether travelling on foot or by car. The app can also help you locate a wide variety of companies and establishments that have signed up to the location service.

Bear in mind that none of the above information (including the maps) is preloaded onto your device; therefore, whenever you use the navigation feature, the tablet will need to access your data connection, which could have cost implications depending on your network operator's mobile price plan and tariffs.

Important: As your Edison 3 mini does not have a 3G connection, you must use it in conjunction with an external wireless connection such as a smartphone or USB router (these are not supplied with the tablet).
File Explorer
This app allows you to explore the folders stored in your tablet's internal memory and on the MicroSD card, if in use. It also allows you to copy and move files from one folder to another, unzip compressed files and extract their contents, without the need to connect your tablet to a computer. Additionally, you can rename files and create new files and folders.

You can hide certain multimedia folders so that they are not shown in the Gallery. To do so, open the File explorer, go to the folder you want to hide and, from within the file path, press the New icon +, select the File option, name the new file ".nomedia" and press OK to finish. You can access the hidden file and its contents via the File explorer app whenever you like. If you want to reverse the process and show the folder in the Gallery, simply delete the ".nomedia" file you created previously.
Dolby
To access the Dolby app and improve your tablet's audio, go to Menu > Dolby.
You can choose any of the four preset modes from within the app, or select them directly by going to Settings > Audio profiles > Profile and choosing between Movie, Music, Game and Voice.
After selecting a mode you will be a shown a graphic equaliser, where you can directly adjust the audio settings by moving the equaliser tabs with your finger. Alternatively, you can choose one of the smart equalisers: Open, Rich, Focused and Customise. If you adjust any of the modes manually, an G icon will appear next to the name of the Smart equaliser you have selected (or next to the words Graphic equaliser: Custom if you have not selected a smart equaliser). Pressing on this icon will restore the initial values and delete any manual settings you have selected.
Enable the Volume leveller function to provide a constant level of volume for all content and apps, in accordance with the volume setting defined by the tablet's physical volume controls.
Enable the Dialogue Enhancer function to make voices sound clearer when playing any multimedia content.
Enable the Surround Virtualiser function to generate a realistic surround sound effect, compatible with all stereo speakers or headphones (this function will only work with headphones or external speakers, not with the phone's own speaker).
When enabled the Dolby icon will be displayed on any video or music players you have installed. You can deactivate the app by pressing the ⏻ icon.

If you use any other apps that have their own equaliser, the Dolby app will be automatically deactivated in order to prevent any conflict between the two equalisers.
News & Weather (Genie Widget)
This app offers services such as real-time weather information, international news headlines, etc. Your tablet's Home screen can hold up to three different widgets, allowing you to access information quickly and easily. These three widgets include both weather and news; you can choose to display them both simultaneously if you want.
For more information on how to add widgets to your tablet, see the section on customising your Home screen in this manual.
TOOLS
Calculator
Your tablet's tools include a practical calculator, which allows you to carry make basic as well as scientific/advanced calculations.

Clock

Go to Menu > Clock and you will find the Alarms option, where you can manage all your alarms.
You can set several different alarms at the same time, and adjust other settings, such as the name of the alarm, whether it repeats and on which days of the week (if you have selected this option), the alarm tone and whether or not the tablet vibrates when the alarm sounds.
You can create new alarms and delete them as often as you want. To temporarily enable or disable an alarm (without deleting it), simply slide the icon located to the right of the alarm time over to the left.
The Clock app also allows you to view the local time in any location around the world, and contains other useful functions such as a fully configurable timer and a stopwatch with interval feature.
Sound Recorder
Another of your tablet's tools is the Sound Recorder. This app allows you to record audio with ease.
To start recording, simply press the red icon located in the middle of the top part of the screen. The counter and gauge in the centre of the screen will then be activated. Use the icons at the bottom of the screen to pause or end the recording. After you have finished recording, you will be asked if you want to save or delete the audio file. If you decide to save it, you can access it again (with any other recordings you have made) by pressing the :≡ icon.
Voice Search
On the Home screen there is a widget containing a microphone icon, which will launch the Voice search app when pressed. This app allows you to quickly find information on any subject you search for, and gives you quick access to other apps such as Maps.

The headphones must be connected to your device to be able to use the radio application, as the headphones themselves serve as the antenna.
APPENDICES
APPENDIX A: OTA Updates
OTA stands for “Over The Air”, and refers to the way in which firmware updates are sent to your tablet; i.e. via your data connection, with minimal intervention required on the part of the user and without any complex updating procedures to go through.
Your tablet will periodically check whether updates to the operating system are available. Updates generally incorporate improvements to system performance or additional features for your device. If an update is available, a pop-up window will appear to inform you of this fact and will request permission to install the update. Using a Wi-Fi connection to download the update package is recommended. The system will guide you through the installation process, to ensure that it is completed as quickly and conveniently as possible.
You can also check for updates manually, by going to Settings > About tablet > Update. A message will appear to tell you that the system is searching for available updates. If an update is found, the installation process is the same as described above.
APPENDIX B: Technical Specifications
You can find all the technical information for your device by visiting this link and selecting the corresponding model: http://www.bq.com/gb/tablets-prices-sale.html
After selecting your model, you can access the full description by clicking on Specifications in the bar at the top of the page.
There, you can find information on the following:
•Screen
- Internalmemory
- Processor
•Battery
- Operating system
-Connectivity
- Systemfunctions
• Dimensions and weight
APPENDIX C: Cleaning and Safety
Cleaning
Before cleaning your device, make sure you have switched it off and disconnected all cables. After cleaning, make sure the screen is completely dry before reconnecting any cables and switching the device back on.
Do not pour or spray any liquids directly onto the tablet. To clean it, do the following:
Screen: Use a clean, soft, lint-free cloth to remove dust and dirt from the screen. To remove fingerprints and marks, you may apply a small amount of mild cleaning product to the cloth.
Casing: Use a soft cloth with a small amount of mild cleaning product. After cleaning, rinse the cloth in clean water, wring it out thoroughly and wipe the casing to remove any leftover cleaning product
Safety
To reduce the risk of an accident, follow these safety instructions:
- Do not use power cables, connectors or plugs that are damaged or contain loose wiring. Do not bend or damage the power cable. Do not touch the power cable with wet hands. Do not pull on the cable to unplug the charger
- Do not use the device while it is charging. Do not touch it with wet hands.
- Do not hit the charger or cause it to fall. Do not charge the battery using chargers that have not been approved by the manufacturer
- Do not use the device during electrical storms. Handle and dispose of the battery and charger with caution.
- Do not handle Li-ion batteries that are damaged or leaking.
- Do not use the device in the vicinity of a pacemaker. If possible, try to use it at a distance of more than 15 cm from the pacemaker, as it could interfere with the pacemaker's operation.
- Do not use the device in a hospital or in the vicinity of any medical equipment that may be susceptible to radio frequency interference.
- If you habitually use medical equipment, make sure it is protected against radio frequency interference. If you wear a hearing aid, consult the manufacturer with regard to potential interference.
- In potentially explosive environments, switch the device off. Always observe the site regulations, instructions and warning signs ⚠️!
- Do not use the device in refuelling areas (e.g. petrol stations) or in the vicinity of flammable and/or explosive chemical products
- Do not store or transport flammable liquids or gases or explosive materials in the vicinity of the device or any of its parts or accessories ⚠️
- Switch off the device upon boarding an aeroplane. The electronic components of a motor vehicle may malfunction as a result of radio frequency interference from the device.
- Prolonged exposure to high levels of sound pressure may cause permanent damage to hearing. It is recommended that you do not wear headphones while cycling, running or walking through areas with heavy traffic or excessive noise.
- Use of the device while driving: Some car manufacturers prohibit the use of mobile devices in their vehicles unless they are equipped with a hands-free kit and external antenna. Ask the vendor of your vehicle whether your mobile device or hands-free Bluetooth kit will interfere with your car's electrical systems. Always devote your full attention to the road while driving and respect the local regulations and laws on the use of wireless devices while at the wheel.
- Location/GPS-based functions: Location-based functions are offered “as is” and “for all corresponding effects”. Mundo Reader, S.L. does not claim or in any way guarantee the accuracy of any location-based information.t
- When the device is using location-based information, it may suffer from interruptions or failures and its dependence on network availability will increase. Note that functionality may be reduced or obstructed in certain areas, such as inside buildings or in areas close to buildings.
- Use the GPS function with caution, to make sure you are not distracted while driving.
- Antenna: Use of the device with an antenna other than that supplied by Mundo Reader, S.L. may damage it, impair its performance and generate SAR levels (see Appendix D) that exceed the limits established by law. Do not cover the antenna with your hand, as this may affect call quality and energy consumption and may shorten the talk time and standby availability.
- Aeroplane mode: Use of Bluetooth and WLAN functions may be prohibited on aeroplanes and in other places where radio transmissions are not permitted. In these locations, please request authorisation before enabling any of the device's Bluetooth or WLAN functions, even in Flight mode.
Warning!
This product must be used with a power supply that has the following specifications:
INPUT: 100-240 V \~ 50/60 Hz 0.3 A máx.
OUTPUT: 5.0 V = 2.1 A
Polarity must be as indicated below:
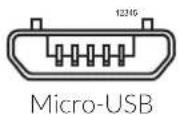
Pin 1 "+" Pin 5 "-"
The use of power sources other than the ones indicated may damage your device and present a risk to the safety of people and property.
APPENDIX D: Information on Exposure to Radio Waves and the SAR (Specific Absorption Rate)
The design of this mobile device complies with the current regulations governing exposure to radio waves. These regulations are based on scientific guidelines that include safety margins designed to ensure the safety of everyone, regardless of age or state of health.
The guidelines on exposure to radio waves use a unit of measurement known as the SAR (Specific Absorption Rate). SAR tests are carried out using standardised methods, with the mobile device transmitting at the highest certified level of power on all the frequency bands it uses.
The maximum SAR levels recommended by the ICNIRP (International Commission on Non Ionizing Radiation Protection) is 2 W/kg, measured on 10 g of tissue.
The highest SAR levels recorded for this tablet are as follows:
| Edison 3 mini | |
| When used in direct contact with the body 0.246 W/Kg (10 g) | |
This device complies with the guidelines on exposure to radio frequency both when it is used in the normal position next to the ear and when it is positioned at least 1.5 cm from the body.
In order to send data files or messages, this device requires an adequate network connection. On certain occasions, the transmission of data files or messages may be delayed until an adequate connection becomes available. Until the transmission has been completed, make sure you follow the instructions on separation distance mentioned above.
APPENDIX E: Disposing of this Product Correctly

(Electrical and electronic waste).
(Applies within the European Union and in European countries with selective waste collection systems).
To prevent any damage to the environment or human health, separate these products from other types of waste and recycle them correctly. This will help promote the sustainable use of material resources.
Household users should contact the retailer that they purchased the product from or the relevant local authorities to find out how and where they can recycle this product safely and without harming the environment.
Business users should contact their supplier and consult the terms and conditions of the purchase agreement. This product and its electronic accessories should not be disposed of with other waste materials such as the box and non-electronic materials.
APPENDIX F: Declaration of Conformity
Mundo Reader, S.L.
Pol. Ind. Európolis
Calle Sofía, 10
Tax Code (CIF): B85991941
Made in China
Declares that this tablet:
bq Edison 3 mini
complies with the provisions of Directive 1999/5/EC on Radio and Telecommunications Terminal Equipment (R&TTE), Directive 2006/95/EC on Electrical Safety for Low Voltage Equipment, and Directive 2004/108/EC on Electromagnetic Compatibility, in addition to the following harmonised standards:
EN60950-1/A2:2013, EN 50566: 2013, EN 62479: 2010, EN 62311: 2008, EN 62209-2: 2010, EN 301489-1 V1.9.2, EN301489-3 V1.6.1, EN 301489-17 V2.2.1, EN 55022:2010/AC:2011, EN55024: 2010, EN 61000-3-2/A2:2009, EN 61000-3-3: 2008, EN 300328 V1.8.1, EN 300440-2 V1.4.1.
You can request a copy of the Declaration of Conformity by writing to the address given above.
Madrid, November 2014.

Alberto Méndez Peydró CEO
C€0168
Firmware version
bq Edison 3 mini: 1.0.0_20141112-1100

www.bq.com www.mibqyyo.com
- Edison 3 mini
- About This Manual
- Icon guide
- Trademarks
- Contents
- BEFORE YOU START
- GETTING STARTED
- HOME SCREEN
- SETTINGS
- MULTIMEDIA
- APPS
- TOOLS
- APPENDICES
- BEFORE YOU BEGIN
- Box Contents
- Product Overview
- GETTING STARTED
- Inserting/Removing the MicroSD CardD
- Switching the Device On and Off
- Charging the Tablet and Transferring Files
- Setup Wizard
- HOME SCREEN
- Screen Lock
- Extending the Home Screen
- Adjusting Screen Rotation
- Customising the Home Screen
- Moving and Deleting Icons on the Home Screen
- Creating App Folders
- Taking Screenshots
- Making Screen Recordings
- Learning to Use the Multi-Touch Screen
- Buttons and Icons
- Status Bar
- Notifications Bar
- Keyboard
- SETTINGS
- WIRELESS SETTINGS
- Wi-Fi
- Bluetooth
- Data Usage
- More...
- DEVICE SETTINGS
- Sound
- Display
- Storage
- Battery
- Apps
- Users
- Intel® Smart Video
- PERSONAL SETTINGS
- Location
- Security
- Language and Text Input
- Backup & reset
- ACCOUNTS
- SYSTEM SETTINGS
- Date & time
- Accessibility
- Printing
- i About tablet
- { } Developer options
- PERFORMANCE SETTINGS
- Optimising Battery Life
- Monitoring Battery Usage Information
- Setting Up a Gmail Account
- Setting up Other Email Accounts
- Sending an Email
- PressSend
- Replying to an Email
- MULTIMEDIA
- Camera
- Photo and Video Settings
- Preset Image Modes
- Image Gallery
- Playing Music
- Playing Videos
- App store
- Apps from Unknown Sources
- Preinstalled Apps
- Internet Browser
- Text Editor, Spreadsheets and Presentations
- Calendar
- Maps and GPS Navigation
- File Explorer
- Dolby
- News & Weather (Genie Widget)
- TOOLS
- Calculator
- Clock
- Sound Recorder
- Voice Search
- APPENDICES
- APPENDIX A: OTA Updates
- APPENDIX B: Technical Specifications
- APPENDIX C: Cleaning and Safety
- Cleaning
- Safety
- Warning!
- APPENDIX D: Information on Exposure to Radio Waves and the SAR (Specific Absorption Rate)
- APPENDIX E: Disposing of this Product Correctly
- APPENDIX F: Declaration of Conformity
- bq Edison 3 mini
Brand : bq
Model : Edison 3 min
Category : Tablet