
MM008UKV2 - Digital photo frame SWEEX - Free user manual and instructions
Find the device manual for free MM008UKV2 SWEEX in PDF.


| Product Type | Digital Photo Frame |
| Brand | Sweex |
| Model | MM008UKV2 |
| Screen Size | 7 inches |
| Display Resolution | Typical 480x234 (estimated) |
| Supported Memory Cards | SD/MMC |
| USB Port | Yes (USB 2.0 for memory sticks) |
| Power Supply | DC 5V (adapter included) |
| Image Formats Supported | JPEG (most common, not specified explicitly) |
| Slideshow Effects | Multiple transitions (e.g., fade, slide) |
| Slideshow Interval Settings | Adjustable |
| Calendar Function | Yes (displays date and time) |
| My Favorites Mode | Allows saving preferred images |
| Date/Time Setting | Yes (in Settings menu) |
| OSD Language | Multiple (selectable) |
| Color Adjustment | Yes (settings) |
| Dimensions (Approx.) | 190 x 130 x 25 mm (estimated) |
| Weight (Approx.) | 0.35 kg (estimated) |
| Accessories Included | Power adapter, stand/bracket, user manual |
| Power Consumption | Approx. 5W (typical) |
| Cleaning | Wipe with soft dry cloth; no liquids |
| Safety | Use only provided adapter; keep away from moisture |
| Spare Parts / Repairability | Not specified; contact Sweex support |
Frequently Asked Questions - MM008UKV2 SWEEX
User questions about MM008UKV2 SWEEX
0 question about this device. Answer the ones you know or ask your own.
Ask a new question about this device
Download the instructions for your Digital photo frame in PDF format for free! Find your manual MM008UKV2 - SWEEX and take your electronic device back in hand. On this page are published all the documents necessary for the use of your device. MM008UKV2 by SWEEX.
USER MANUAL MM008UKV2 SWEEX
natural_image
Black-and-white photo of two people on a beach, one holding a large object, no visible text or symbols7" Digital Photo Frame
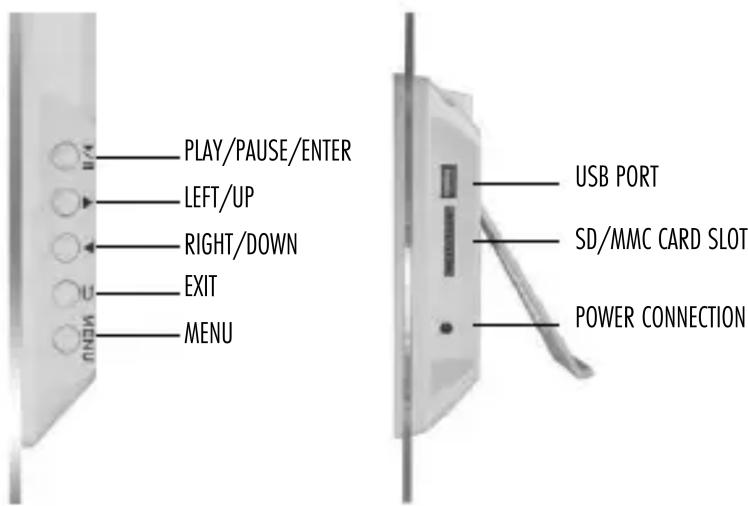
Accessories
- Power supply adapter
- User manual
- Bracket
First steps
- Standing up the Photo Frame
- Connecting storage media
Insert a memory card containing supported files into the card slot of the Photo Frame or use USB memory. Supported card formats: SD/MMC
- Connecting the power supply
Insert one end of the power adapter into the AC power socket and the other end into the DC socket at the back of the Photo Frame.
- Switching on
The Photo Frame switches on automatically when it is connected to the power supply. - Switching off
If you pull out the power supply adapter, the Photo Frame will switch off.
Functions
Main Menu
- After the device is switched on, it will display the main menu by default.
- You can now use the arrow buttons to select the option you require.
- You can select from the following options: Memory Card, USB Drive, My favourites, Calendar and Settings.
- Existing storage media or the option that is currently selected is highlighted in white.

Memory Card/USB Drive/My Favorites Modes:
1, when you select any of above mentioned modes, press "PLAY/PAUSE" to enter. You will see the six pictures mode shown as below:

Use the ▲utions to select pictures.
Use "PLAY/PAUSE" button to enter the slide show mode. It will display the pictures in the selected storage media automatically.
Use "PLAY/PAUSE" button to pause or play the pictures.
Single Picture Edit
A: only for Memory and USB Drive modes
- In the slide show mode, when you see the picture you want to edit, press "Play/Pause" button to stop the picture from slide show.
2, Press "Setup" button to enter the sub menu as below
3, Follow the instructions to edit the picture.
B: only for "my favorites" mode
1, In the slide show mode, when you see the picture you want to edit, press "Play/Pause" button to stop the picture from slide show.
2, Press "Setup" button to enter the sub menu of "Delete" and "Exit"
3, Follow the instructions to edit the picture.
Calendar Mode
1, when "Calendar" is selected, press "PLAY/PAUSE" button to enter the calendar display mode, you will see the calendar shown as below:

Please note only the pictures saved in "my favourites" can be shown in the right window.
Use "exit" button to go back to the main menu. To set the date and time, please enter into "settings" mode.
Settings Mode
When "setting" is selected, press "Play/Pause" mode to enter the sub menu as below:

Use the ▲ buttons to select the sub menu and press "Play/Pause" to enter the sub menu.
Use the ▲▼ buttons to select the option you require and press "Play/Pause" to save. After the option saved, it will go back to the sub menu automatically. If you don't want to save the new settings, press "exit" to go back to sub menu without saving.
Date/Time setting:
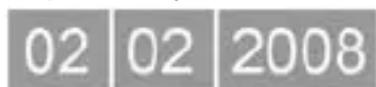
Use ▲ buttons to change the values and use "setup" button to change the column.
Notice
Under the six pictures mode or calendar display mode, you can press "setup" button to enter the sub menu also, please refer to "Setting" instructions.


Brand : SWEEX
Model : MM008UKV2
Category : Digital photo frame