
SRT 6201 - Digital decoder STRONG - Free user manual and instructions
Find the device manual for free SRT 6201 STRONG in PDF.


| Product Type | Digital Decoder (DVB-S/S2) |
| Brand | STRONG |
| Model | SRT 6201 |
| Dimensions (approx.) | 15 x 10 x 3 cm |
| Weight (approx.) | 0.3 kg |
| Power Supply | DC 12V / 1A |
| Input Connector | F-type for satellite dish |
| Output Connectors | HDMI, SCART |
| Supported Standards | DVB-S/S2, MPEG-2/4 |
| Max Resolution | 1080p |
| Channel Memory | Up to 4000 channels |
| Electronic Program Guide (EPG) | Yes |
| Parental Lock | Yes |
| Favorite Lists | Yes |
| Timer Recording | Yes (via USB) |
| USB Port | For recording and media playback |
| Software Updates | Via USB or OTA |
| Cleaning | Use a soft dry cloth |
| Safety | Do not expose to moisture; use only supplied power adapter |
| Spare Parts | Remote control, power adapter (available as accessories) |
| Repairability | Not user-serviceable; contact service center |
Frequently Asked Questions - SRT 6201 STRONG
User questions about SRT 6201 STRONG
0 question about this device. Answer the ones you know or ask your own.
Ask a new question about this device
Download the instructions for your Digital decoder in PDF format for free! Find your manual SRT 6201 - STRONG and take your electronic device back in hand. On this page are published all the documents necessary for the use of your device. SRT 6201 by STRONG.
USER MANUAL SRT 6201 STRONG
User Manual
Fig. 1
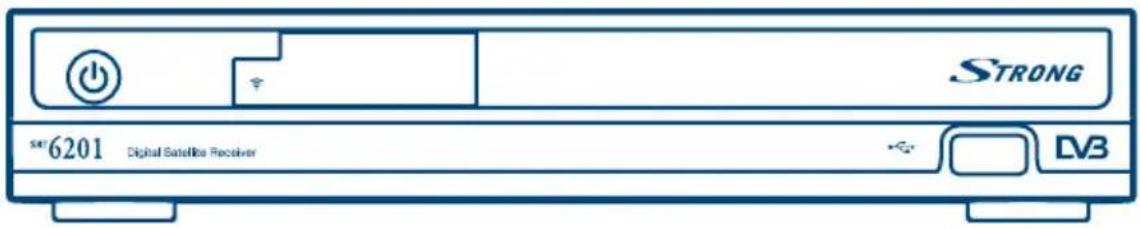
Fig. 2
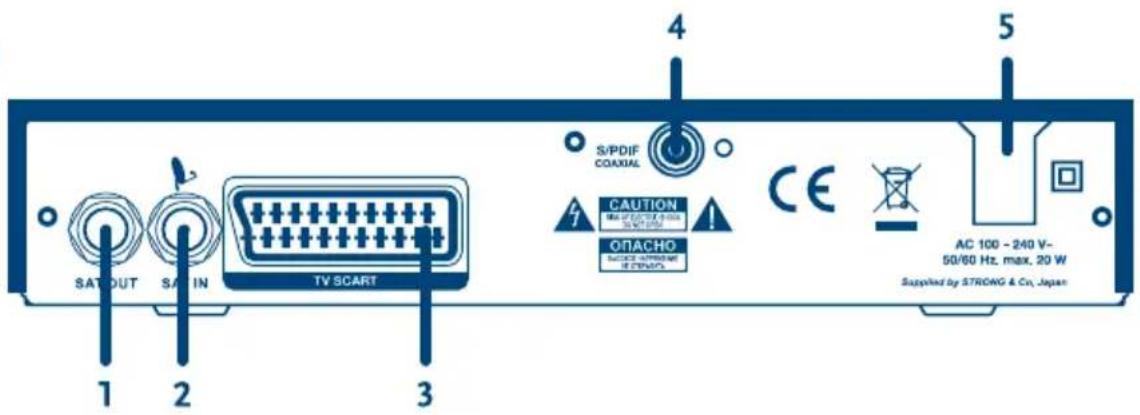
Fig. 3
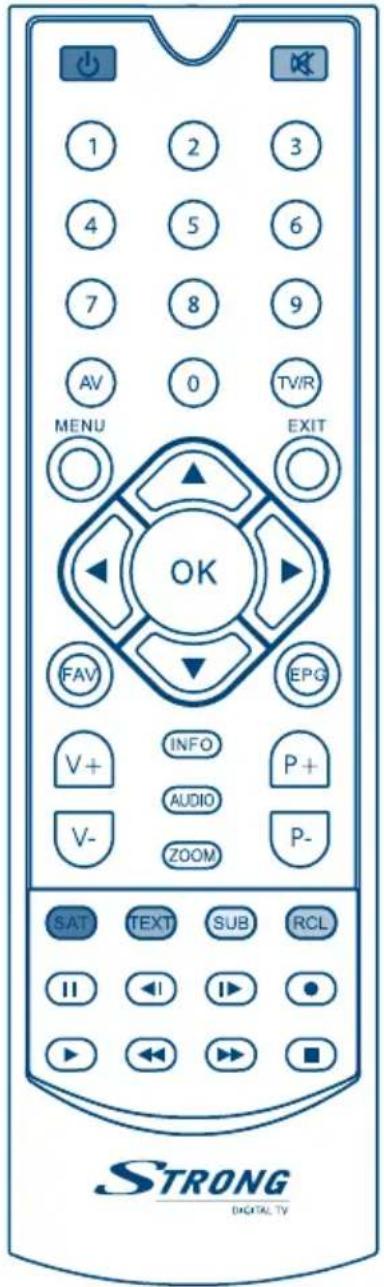
Fig. 4
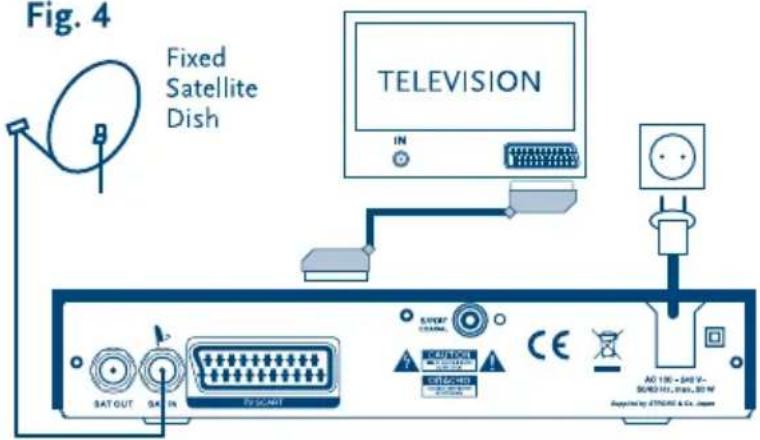
Fig. 5
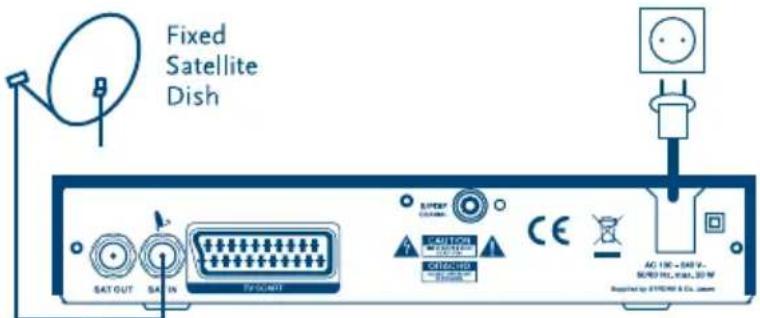
Fig. 6
Fixed Satellite Dish 1 (ex. pointed at Astra)
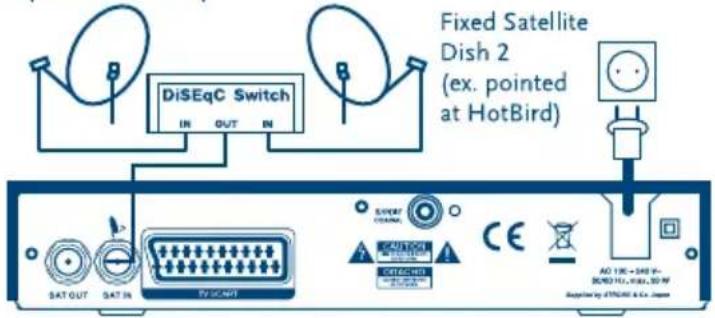
Fig. 7
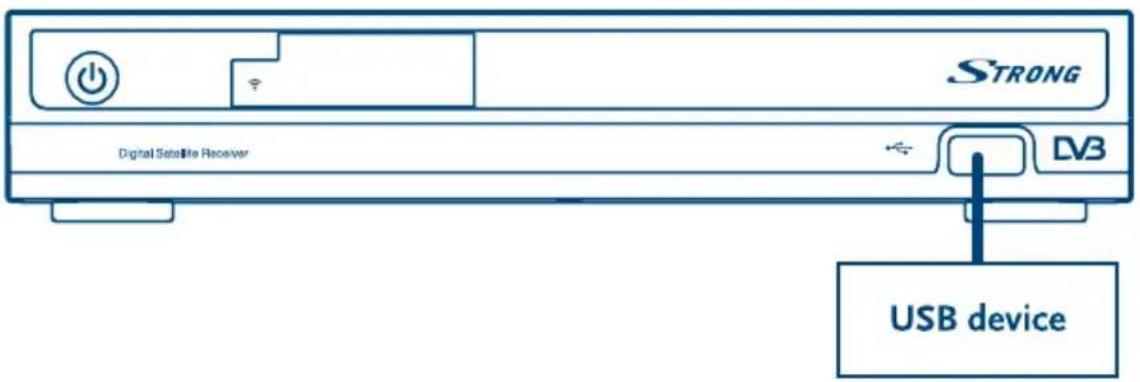
TABLE OF CONTENTS
1.0 INTRODUCTION 2
1.1 Safety Instructions 2
1.2 Storage 2
1.3 Equipment Set-up 3
1.4 Accessories 3
1.5 Usage of external USB devices 3
2.0 YOUR RECEIVER 3
2.1 Rear Panel 3
2.2 Remote Control Unit 4
2.3 Default PIN code: 0000 4
3.0 CONNECTIONS 4
3.1 Basic connection with SCART cable 4
3.2 Connecting to Satellite Dish 4
3.3 Connecting USB device 4
4.0 STARTING UP 5
4.1 Language Selection 5
4.2 Select Satellite 5
4.3 Antenna mode 5
5.0 MAIN MENU
5.1 Channel Organiser 6
5.2 Installation 6
5.3 System setting 7
5.4 Timer 10
5.5 Multimedia 10
6.0 WATCHING TV AND LISTENING TO THE RADIO
6.1 Program Information 11
6.2 EPG (Electronic Program Guide) 11
6.3 Changing channel list mode between TV, Radio and Favourite 11
6.4 Selection Audio Language 12
6.5 Teletext function 12
6.6 Subtitles function 12
A.1 TROUBLESHOOTING
A.2 SPECIFICATIONS 13
STRONG declares that this item complies with the basic requirements and other relevant regulations of directives CE 2004/108/EEC and 73/23EEC; RoHS 2002/95EEC
Subject to alterations. In consequence of continuous research and development technical specifications, design and appearance of products may change. All product names are trademarks or registered trademarks of their respective owners. © STRONG 2010. All rights reserved. 02/2010

0180 501 49 91*
* €0,14/Min. from German wind line * €0,42/Min. max. from mobile network
0820 400 150*
*€0,12/Min. from Austrian wired line
0826 029 928*
€0,14/Min. from French wired line
per March 2010
1.0 INTRODUCTION
1.1 Safety Instructions
DO NOT INSTALL YOUR RECEIVER:
In a closed or poorly ventilated cabinet; directly on top of or under any other equipment; on a surface which might obstruct the ventilation slots.
DO NOT EXPOSE THE RECEIVER OR ITS ACCESSORIES:
■ To direct sunlight or near any other equipment that generates heat; to rain or intense moisture; to intense vibration and to any shock which may cause permanent damage to your receiver or to any magnetic objects, such as loudspeakers, transformers, etc.
- Do not use a damaged power cord. It may cause a fire or an electrical shock. Do not touch a power cord with wet hands. It may cause an electric shock.
■ When the receiver is not used for a long period of time, you should unplug the power cord from the wall socket.
- Do not use alcohol or ammonia based liquids to clean the receiver. If you wish, you may clean your receiver with a soft lint-free cloth slightly made damp with a mild soap solution, only after disconnecting from the mains voltage supply. Make sure no foreign objects fall through the ventilation slots because this could cause fire or an electric shock.
■ Do not place any objects on top of the receiver because this might prevent proper cooling of the components inside.
SAFETY PRECAUTIONS
■ Never open the receiver cover. It is dangerous to touch the inside of the receiver due to high voltage currents and possible electrical hazards and your warranty will be void. Refer all maintenance or servicing to suitably qualified personnel.
■ When you are connecting cables, be sure that the receiver is disconnected from the mains supply voltage. Wait a few seconds after switching off the receiver before you move the receiver or disconnect any equipment.
It is a necessity that you only use an approved extension and compatible wiring that is suitable for the electrical power consumption of the installed equipment. Please ensure that the electrical power supply corresponds with the voltage on the electrical identification plate at the back of the receiver.
If the receiver does not operate normally even after strictly following the instructions in this user manual, it is recommended to consult your dealer.
1.2 Storage
Your receiver and its accessories are stored and delivered in a packaging designed to protect against electric shocks and moisture. When unpacking it, make sure that all the parts are included and keep the packaging away from children. For transporting the receiver from one place to another or if you are returning it under warranty conditions, make sure to repack the receiver in its original packaging with its accessories. Failing to comply with such packaging procedures could void your warranty.
1.3 Equipment Set-up
We recommend you consult a professional installer to set up your equipment. Otherwise, please follow the instructions below:
■ Refer to the user manual of your TV and your antenna.
■ Make sure that the SCART cable and outdoor components are in a good condition and the SCART connections are well shielded
This manual provides complete instructions for installing and using this receiver. The following symbols will serve as follow.
WARNING: Indicates warning information.
Tips: Indicates any other additional important or helpful information.
MENU Represents a button on the remote control or the receiver (Bold Character) Move to Represents a menu item within a window. (Italic Character)
1.4 Accessories
■ User's Manual
■ 1 Remote control unit
■ 2x Batteries (AAA type)
Note: The batteries should not be recharged, disassembled, electrically short-circuited, be mixed or used with other types of batteries.
1.5 Usage of external USB devices
It is recommended to use USB 2.0 storage devices. If your device is not compatible to USB 2.0 specifications, multimedia functions of the receiver would not work properly.
■ STRONG cannot guarantee compatibility to all types of USB storage devices.
It is advised not to store important information on USB storage devices used with the receiver. Always make backups of data on USB storage device before usage with receiver. STRONG will not take responsibility for any loss of information or circumstances caused by loss of information.
2.0 YOUR RECEIVER
2.1 Rear Panel
Fig. 2
-
SAT OUT To connect an extra receiver to the satellite signal from dish
-
SAT IN To connect to the LNB for satellite signal from dish
-
TV SCART To connect to your TV set using a SCART cable.
-
S/PDIF Digital audio output To connect to the input of your digital audio amplifier.
-
Power Cord Your receiver requires a current of 100\~240 V AC (Auto-selectable), 50/60Hz ±5%. Make sure to check the power specification before connecting your receiver to the wall outlet.
2.2 Remote Control Unit
Fig. 3

Turns the receiver On/Stand-by.
Mutes audio output of the receiver.
0\~9 Changes channel and controls numeric functions
AV Toggles between TV and receiver (AV) mode
TV/R Toggles between TV or radio mode
MENU Shows the main menu and exits from any level of menu to view mode
EXIT Exits from the menu or sub-menu and cancels the progressing function if applicable.

Changes the current program to the previous/next program in TV mode. Moves the cursor upward/downward in menu mode.

Increases/decreases the volume level in TV mode. Changes the setting values in specific menu item in menu mode.
OK Activates the highlighted menu item. Displays a channel list according to TV/radio mode in TV mode.
FAV Toggles favourite mode ON / OFF.
EPG Shows the EPG (Electronic Program Guide) when menu is off.
V+ / V- Increases/decreases the receiver volume level
INFO Shows information banner
AUDIO Selects available audio language(s) for the watched channel. Selects stereo ((•)), left-mono ((• or right-mono •)).
ZOOM Zooms in selected part of TV video
P+ / P- Page up and down in menu list
SAT/RED Selects satellite lists in channel list mode
TEXT/GREEN Shows current service's teletext on OSD
SUB/YELLOW Shows list of subtitled languages available within current channel
RCL/BLUE Recalls the last viewed channel
2.3 Default PIN code: 0000
3.0 CONNECTIONS
3.1 Basic connection with SCART cable
Fig. 4
3.2 Connecting to Satellite Dish
Connecting a fixed satellite dish to your receiver (Fig. 5)
Connecting multiple fixed dishes to your receiver using a DiSEqC 1.0 switch (Fig. 6)
3.3 Connecting USB device
Fig. 7
4.0 STARTING UP
Ensure your satellite signal is of good quality. It is recommended that you perform the first time installation following the Installation Wizard step by step. It will help you to easily achieve system configuration and channel installation.
4.1 Language Selection
Press ▲▼ to choose your language, press OK to confirm. The Select Satellite menu will appear. Future installation steps are depending from satellite where your dish is aimed.
4.2 Select Satellite
a) Your dish is aimed to Astra 1C, 1E, 1F or HOT BIRD satellite.
Press ▲▼ to select the ASTRA or HOT BIRD satellite and press OK. Follow the instructions. When you have fixed your dish at correct direction choose NEXT and press OK. The Channel Setup menu will appear.

Note:
If OSD language “German” and satellite “Astra 19.2E” is chosen, the receiver will automatically load German pre-installed channels at the beginning of the channel list. If OSD language “Italian” and satellite “HOT BIRD 13E” is chosen, the receiver will automatically load Italian pre-installed channels at the beginning of the channel list.
b) Your dish is aimed at another satellite
Select Other in Select satellite menu and press OK, more satellites will be listed. If you select one out of the satellite list, the Configure Antenna menu will appear, please set the LNB Type, LNB Low Freq, LNB High Freq, Band control, Polarisation control, DiSEqC Switch and Antenna mode.
4.3 Antenna mode
a) Fixed dish
Set Antenna mode to Fixed, select NEXT and press OK. The Adjust antenna screen appears, select transponder receivable at your location and adjust the antenna position for maximum level for the signal strength and quality. When adjustment is completed, choose NEXT and press OK. The Channel Setup menu will appear.
b) Dish mounted on DiSEqC 1.2 motor
Set Antenna mode to DiSEqC 1.2, choose NEXT and press OK. The menu Adjust antenna will appear. Select transponder receivable at your location (choose Transponder field and select transponder by pressing ◀). Then choose field Move Dish and adjust position of the dish by pressing the ◀. Once you adjusted the dish position choose Store position, set number of the position by pressing ◀. Then choose NEXT and press OK. The Channel Setup menu will appear.
c) Dish mounted on GOTO X motor
Set Antenna mode to GOTO X, choose NEXT and press OK. The menu Adjust antenna will appear. Select transponder receivable at your location (choose Transponder field and select transponder by pressing ◀▶). Then choose field My Longitude and using numeric buttons enter value of your longitude. Use ◀▶ to select hemisphere East or West. Then choose field My Latitude and numeric buttons to enter value of your latitude. Use ◀▶ to select hemisphere Nord
or South. Choose field Goto Position and press OK. Your dish will be turned to the position of satellite. Then choose NEXT and press OK. The Channel Setup menu will appear.
Choose NEXT and press OK to start the scan. When the scan is completed, the receiver will save the services information automatically and exit to the normal play state.
5.0 MAIN MENU
All the important settings and features of your receiver can be operated in Main Menu. It consists of the sub-menus: "Channel Organizer", "Installation", "System setting", "Timer" and "Multimedia". To open the MAIN MENU press MENU.
5.1 Channel Organiser
In MAIN MENU press ▲▼ to move to Channel Organiser and press OK to enter the Channel Organiser menu. It consists of sub-menus “Channel Manager” and “Favourites Manager”.
5.1.1 Channel Manager
You can change the order of the channels, move, delete and edit channels. To change the satellite, use the RED button.
| Sort (GREEN button) | You can sort channels by “Name a~z”, “Name z~a”, “Free-CA”, “Fav–NO Fav” or “Frequency Low-High”. |
| Edit (YELLOW button) | Select the channel you want to edit and press YELLOW (Edit) to move into the modify program menu to modify Program Name, Frequency, Symbol rate, Video PID, Audio PID. |
| Move channel | Press ▲▼ to focus on channel, press ◀▶ to point the focus to column “Move” and press OK to confirm selection of the channel. Use ▲▼ to move the channel to its new location and press OK to confirm. Repeat this for every channel you want to move. |
| Delete channel | Press ▲▼ to focus on channel, press ◀▶ to point the focus to column “Del” and press OK to mark the channel to be deleted. Press EXIT and confirm the channel’s deletion by selecting OK and pressing OK. |
| Delete all channels | To delete all channels from current satellite, press BLUE (Del All). You will be asked to confirm operation. |
5.1.2 Favourites Manager
Press ▲▼ to select the channel and ◀▶ to point the focus to the favourite group. Press OK to add the selected channel to the favourite group. Repeat same operation to remove the channel.
5.2 Installation
The installation menu contains sub-menus "Antenna Installation", "Auto Scan" and "Manual Scan".
5.2.1 Antenna Installation
You can add, edit and delete a satellite in this menu.
| Add satellite | Press RED button, a satellite list will appear. Press ◀ to select the satellite. If the satellite is not in the list, select “NEW SAT1”. After selection of a satellite, the Configure Antenna menu will appear. Please set the LNB Type, LNB Low Freq, LNB High Freq, Band control, Polarisation control, DiSEqC Switch and Antenna mode. Further steps of installation are described in 4.2. |
| Edit satellite | If the parameters of the satellite were changed or the satellite is a new satellite, you must set the parameters of the satellite, such as LNB type, LNB low Freq, LNB High Freq, Transponder, LNB Power, 22k Tone, DiSEqC and Antenna Mode. Sequence of editing of satellite parameters is same as sequence of “Add satellite” described in 4.2 |
| Delete satellite | If you want to delete a satellite from the list, press YELLOW. A warning message will appear. Select OK and press OK to confirm. |
5.2.2 Auto Scan
Press GREEN to set the scan mode to Free or Free+Scrambled. If mode is Free only Free-to-Air channels will be added to the channel list. If mode is Free+Scrambled all channels from selected satellite will be added.
Press YELLOW to set the Blind Scan to ON or OFF. Blind scan function is useful to scan new added satellite, but scan may take longer time.
Press BLUE to set the scan type to NIT OFF or NIT ON while Blind Scan is set to OFF and to Quick Search or Detail Search while Blind Scan is set to ON.
When set-up is completed, press RED to start the scan.
5.2.3 Manual Scan
You can scan single transponder, add a new transponder, edit or delete the transponder. You can switch between satellites with the RED button.
Scan transponder: Use ▲▼ to select the transponder. Press OK to start the scan.
Add Transponder: Press GREEN, the Add Transponder sub-menu will appear.
Frequency: input the frequency of the new transponder.
Symbol Rate: input the symbol rate of the new transponder.
Polarity: Select the Polarity of the new transponder.
Edit Transponder: Press YELLOW, the Edit Transponder sub-menu will appear. This menu is similar to Add Transponder menu.
Delete Transponder Press BLUE to delete a transponder. You need to confirm operation. Press ◀ to select OK, press OK to confirm.
5.3 System setting
You can configure the system, such as Language Setting, OSD Style, Parental Control, TV Settings and Time Setting.
5.3.1 Preference
5.3.1.1 Language Setting
You can change the language of the OSD, preferred audio and subtitles.
Use ▲▼ to select the OSD language, Audio language or Subtitles language. Press OK or ▶ to enter the language list and press ▲▼ to select the language. Press OK to confirm.
5.3.1.2 TV settings
You can set the TV mode, Screen mode and Video output settings..
TV mode Press OK or ▶ to select mode and OK to confirm. If you don't know which standard your TV has, select AUTO.
Screen mode Press OK or ▶ to select 4:3 or 16:9 and OK to confirm.
Video output Press OK or ▶ to select CVBS or RGB and OK to confirm.
Modulator settings Use ▲▼ to select RF Audio mode or RF channel. Use ◀▶ to change the settings and press OK to confirm or EXIT to cancel the settings.
5.3.1.3 Time Settings
If a broadcaster provides GMT, you can set the time using GMT or set the time manually. If the GMT usage is ON, you need to set the Time Zone. If you set GMT Usage to OFF, Set Data and Set Time are displayed. To set the time value manually, move the cursor to the time item and use the numeric buttons on the remote control.
5.3.1.4 Auto Standby
This option allows you to set the desired Auto Standby time or to disable Auto Standby. Auto Standby will switch the receiver to standby automatically when it doesn't receive commands from the remote control for a given period of time. Possible settings are: 1\~6 Hours and Disable. The default setting for Auto Standby is 3 hours. To avoid the automatic switch off, set Auto Standby to Disable.
5.3.1.5 Set Factory Default
Please be careful when using this function, as it will erase all the data and parameters you may have set earlier. Once you set the factory default you will have to re-install your preferences and re-scan channels. To reset your receiver to factory default, apply the following steps:
Select Set Factory default and press OK. Confirm warning message with OK and press OK. The receiver will return to its factory default state and all user data will be deleted.

Note:
IYour PIN code will change back to the factory setting "0000".
5.3.2 OSD Style
You can set the Menu Colour, Transparency Level and Border Pattern.
5.3.3 Parental Control
You can set Channel lock status (ON or OFF), the Menu lock status, Parental setting and Change PIN code. The default PIN code is 0000.
Channel Lock Set the system channel lock to ON or OFF. If lock is ON, the parental PIN code needs to be entered to watch the locked channel.
Menu Lock Press OK to select whether the menu should be locked or not (YES or NO), press OK to confirm. If the menu lock is ON, you need to enter the PIN for some operations such as search program and set factory default.
Parental Setting If a channel is locked, the parental PIN code needs to be entered to watch the locked channel. Use ▲▼ to select the channel you want to lock. Press OK to lock the channel.
Change PIN To change the PIN, you need to enter a 4 digits PIN and confirm it again. The system PIN will be changed to the new PIN.
5.3.4 System info
It shows information about your receiver such as software and user interface version.
5.3.5 System Update
You can select "OAD", "Update by USB" or "Backup to USB".
Over Air Download (OAD)
Select this option in order to update your receiver with the latest software version.
Software update service is available from satellite ASTRA 19.2E.
Note: If needed, parameters can be changed. Please ask your local STRONG dealer in case software update was not successful.
■ Update by USB
a) Download the required update file for your receiver model from our website www.strong.tv > Support
b) Unzip the file, copy it to your USB device and connect it to the USB port of receiver.
c) Select "Update by USB" and the update file and press OK.
Do not power off your receiver during update process and flashing data. Do not unplug the USB device during update. This may cause damage of the data in the flash memory and the receiver will need to be repaired.
d) When update is completed, receiver returns to normal view and is ready to use.
■ Backup to USB
Select this option in order to store your settings, channels or complete software.
This can be helpful to re-load your channels after a factory reset or to load the channel order to more receivers.
a) Connect USB device to USB port of receiver.
b) Select "Backup to USB" and press OK.
c) Choose between "Loader + App" or "User Database" and press OK to start back-up. "Loader + App" will backup system loader and application, while "User Database" will backup channel database and settings.
Do not power off your receiver during update process and flashing data. Do not unplug the USB device during update. This may cause damage of the data in the flash memory and the receiver will need to be repaired.
d) When backup is completed, receiver returns to "System Update" menu.
e) File "Idapp1.ssu" will be created on USB device if "Loader + App" has been selected. resp. file "userdb.ssu" if "User Database" has been selected.
■ To restore user data
a) Connect USB device with backup of database to USB port of receiver.
b) Go to System Setting – System Update and select "Update by USB".
c) Select a file with database backup (by default name of the file "userdb.ssu") and press OK.
d) Confirm update.
Do not power off your receiver during update process and flashing data. Do not unplug USB device during update. This may cause damage of the data in the flash memory and the receiver will need to be repaired.
e) When update of database is completed, the receiver will start with channel #1 on screen.

WARNING: INCORRECT OPERATION MAY CAUSE UNREPAIRABLE DAMAGE TO THE RECEIVER.
- DO NOT POWER OFF THE RECEIVER DURING THE PROCESS OF DOWNLOAD.
- DO NOT PLUG IN OR UNPLUG THE USB DEVICE WHEN RECEIVER IS POWERED ON.
5.4 Timer
You can set the timer to make the receiver perform designated actions. Use ▲▼ to select timer. Press OK to enter your selected timer settings. Press RED to activate/inactivate current timer.
5.5 Multimedia
The receiver can play music and view pictures from USB device. You can play Gomoku or check the days in the calendar.
5.5.1 My Album
You can watch pictures in JPEG and BMP formats. Use navigation buttons and help tips to select pictures and display them.
5.5.2 My Music
You can play audio files in MP3 and WMA formats. Use navigation buttons and help tips to select and play music files.
5.5.3 Gomoku
You can play game Gomoku. Use help tips to set and play the game.
5.5.4 Calendar
To display calendar.
6.0 WATCHING TV AND LISTENING TO THE RADIO
6.1 Program Information
In normal operation status (no menu operation), press INFO. The program information banner will be displayed showing channel number, channel name, current, next program name (if available from broadcast) and current time.
To check technical information about channel press INFO twice. In Program Information menu you'll see the current program information such as satellite name, program name and number, local frequency, polarity, 22K tone, DiSEqC, down frequency, symbol rate, video PID and audio PID and also the signal strength of the current program and its signal quality.
6.2 EPG (Electronic Program Guide)
The EPG shows a program schedule of the channels.

Note: not all broadcasters provide programme information.
From normal view mode press EPG and ▲▼ to choose the channel, ▶ to display programs schedule of the current channel.
In EPG programme schedule menu:
Press ▲▼ to choose the program items. Use ◀▶ to get programme schedules for previous/next dates. Press EXIT to return to EPG Menu. For details of the current program press GREEN.
In programme details:
Press ▲▼ to scroll information (next/previous page). Press ◀ or EXIT to return to the EPG schedule menu.
Programming Timer from EPG
You can set up the event timer by pressing RED or OK from the EPG program schedule.
To set up a timer event: Press ▲▼ to move the cursor to the program for which you want to add a timer. Press RED to add a timer. You can also modify each value. To save the settings, press OK. To quit event timer setup, press EXIT.
6.3 Changing channel list mode between TV, Radio and Favourite
To change between TV and radio channel lists use TV/R in normal operation mode or in channel list mode. To change channel list to favourite in normal operation mode, press FAV. Use ◀ to select favourite group, press OK to confirm selection. Then select channel of your choice and press OK to switch to full screen mode.
To select another favourite group or exit from favourite channel list mode, press FAV. List of favourite channels will appear. Press RED or FAV to move focus to selection of group. Use ◀▶ to select the desired group. Select group “NO FAV” and press OK to exit from favourite channel list mode.
6.4 Selection Audio Language
Press AUDIO to select the audio language. Select Audio Channel or Sound mode with ▲▼ and Audio channel number or Sound mode (Stereo, Left or Right channel). Press OK to confirm your selection. Your selection will be memorized for current channel. Receiver will play always the last selected audio track when you select this channel in future.

Note:
Audio track with “(AC3)” can only be listened if receiver is connected to digital audio amplifier and amplifier is ON.
6.5 Teletext function
Press TEXT in view mode and ▲▼ to add/subtract displayed page number. Press numeric buttons to input a page directly.
6.6 Subtitles function
Press SUB in view mode. If channel has subtitle information, Subtitle Language selection menu will appear. Use ◀ to select between DVB and Teletext subtitles. Use ▲▼ to select subtitle language and press OK to confirm.
A.1 TROUBLESHOOTING
There may be various reasons for the abnormal operation of the receiver. Check the receiver according to the procedures shown below. If the receiver does not work properly after checking it, please contact the dealer. Don't open the receiver cover. This may cause a dangerous situation and the warranty will get void.
| Cause Remedy | ||
| The display on front panel does not light up. | The power cord is not plugged in. Receiver is in stand-by mode. Your model is without display. | Check, that the power cord is plugged into the wall outlet. Switch ON receiver. Your model is without display. |
| No picture or sound W | Wrong connection of the Audio/Video output of the receiver to TV. | Connect the Audio/video output of the receiver to TV correctly. |
| Audio muting. Audio selection is on AC 3 | Press the Mute button. Press AUDIO button and select other audio channel | |
| TV power off, wrong channel or input. | Turn on TV, select correct channel or input. | |
| No picture The receiver | can't receive the signal Check the ant | tenna cable, replace the cable, or connect the cable to the receiver tightly. |
| Incorrect values of some tuner parameters. | Set the values of the tuner parameters correctly in the installation menu. | |
| Wrong direction of the dish Check the | signal strength with a spectrum analyzer and adjust your dish correctly. | |
| Receiver tries to start-up, switches ON/OFF/ON/OFF... or displays “LOAD” | Receiver detected short cut in your cable system or detected “Antenna Power Overload”. | Disconnect receiver from main power Check your cable system. Remove short cut.Replace LNB.Restart receiver. |
| The remote control does not work | The batteries of the remote control are not inserted or exhausted | Check whether the batteries are inserted correctly in your remote control. Check the batteries, and if exhausted replace the batteries in the remote control. |
| The USB storage device is not recognized. | Wrong formatted Make sure that your | USB device' file system is FAT32. |
| The external USB HDD does not start. | Power consumption is too high. Connect extra power supply adaptor to your USB HDD. | |
| The receiver switches off automatically. | Auto Standby function enabled. Disable | Auto Standby. See section 5.3.1.4 for details. |
A.2 SPECIFICATIONS
General Data:
Input Voltage Range: 100-240 V AC 50/60 Hz
Power consumption: max 20 W (with external memory device)
Stand-by power consumption: 1.00 W (without external memory device)
Operating Temperature: +0°C \~ 40 °C
Storage Temperature: -30°C \~ 80°C
Operating Humidity Range: 10% - 85%, RH, Non-condensing
Size (WxDxH) in mm: 230 x 165 x 45
Weight: ca. 0,8 kg
09 Mar 2010 15:12


- TABLE OF CONTENTS
- INTRODUCTION 2
- YOUR RECEIVER 3
- CONNECTIONS 4
- STARTING UP 5
- MAIN MENU
- WATCHING TV AND LISTENING TO THE RADIO
- A.1 TROUBLESHOOTING
- A.2 SPECIFICATIONS 13
- INTRODUCTION
- Safety Instructions
- DO NOT INSTALL YOUR RECEIVER:
- DO NOT EXPOSE THE RECEIVER OR ITS ACCESSORIES:
- SAFETY PRECAUTIONS
- Storage
- Equipment Set-up
- Accessories
- Usage of external USB devices
- YOUR RECEIVER
- Rear Panel
- Remote Control Unit
- Default PIN code: 0000
- CONNECTIONS
- Basic connection with SCART cable
- Connecting to Satellite Dish
- Connecting USB device
- STARTING UP
- Language Selection
- Select Satellite
- Note:
- Antenna mode
- Channel Organiser
- Channel Manager
- Favourites Manager
- Installation
- Antenna Installation
- Auto Scan
- Manual Scan
- System setting
- Preference
- Language Setting
- TV settings
- Time Settings
- Auto Standby
- Set Factory Default
- OSD Style
- Parental Control
- System info
- System Update
- Over Air Download (OAD)
- ■ Update by USB
- ■ Backup to USB
- ■ To restore user data
- Timer
- Multimedia
- My Album
- My Music
- Gomoku
- Calendar
- Program Information
- EPG (Electronic Program Guide)
- Programming Timer from EPG
- Changing channel list mode between TV, Radio and Favourite
- Selection Audio Language
- Teletext function
- Subtitles function
- A.2 SPECIFICATIONS
- General Data:
Brand : STRONG
Model : SRT 6201
Category : Digital decoder