
I-SX 50 BK - Docking Station SCOTT - Free user manual and instructions
Find the device manual for free I-SX 50 BK SCOTT in PDF.


| Product Type | Docking Station |
| Brand | SCOTT |
| Model | I-SX 50 BK |
| Power Supply (AC) | 230 V ~ 50 Hz |
| Battery Backup | 6 x UM2/C size (not supplied) |
| Remote Control Battery | 3V lithium CR2025 (supplied) |
| Output Power (RMS) | 2 x 4.5 W (AC power) |
| Power Consumption | 20 W |
| Radio Tuning Range FM | 87.5 - 108 MHz |
| Radio Tuning Range MW | 522 - 1620 kHz |
| FM Antenna | Telescopic |
| MW Antenna | Built-in ferrite bar |
| Preset Stations | 15 FM, 10 MW |
| USB Port | USB 2.0, max 2GB, FAT/FAT32 |
| Compatible iPod Models | iPod with dock connector (adapters 4-14) |
| Supplied iPod Adapters | Nos. 4, 5, 6, 7 |
| Video Output | VIDEO OUT jack (cable not supplied) |
| Audio Input | AUX IN (3.5mm jack) |
| Headphone Output | 3.5mm jack |
| Sound Enhancement | XBASS, Surround (Low/High), EQ (POP, JAZZ, CLASSIC, ROCK, FLAT) |
| Display | LCD with clock, frequency, track info |
| Cleaning Instructions | Soft cloth with mild soap solution; no benzene or thinner |
| Safety Certifications | CE, WEEE compliance |
Frequently Asked Questions - I-SX 50 BK SCOTT
User questions about I-SX 50 BK SCOTT
0 question about this device. Answer the ones you know or ask your own.
Ask a new question about this device
Download the instructions for your Docking Station in PDF format for free! Find your manual I-SX 50 BK - SCOTT and take your electronic device back in hand. On this page are published all the documents necessary for the use of your device. I-SX 50 BK by SCOTT.
USER MANUAL I-SX 50 BK SCOTT
natural_image
Technical line drawing of a device interior with control panel and buttons (no text or symbols)Instruction Manual
CE
PRECAUTIONS
Follow the advice below for safe and appropriate operations.
INSTALLATION
. Do not use the unit in places which are extremely hot, cold, dusty, or humid.
. Place the unit on a flat and even surface.
. Do not restrict the airflow of the unit by placing it in a place with poor airflow, by covering it with a cloth, or by placing it on a carpet.
. Do not place naked flame sources such as lighted candles on the apparatus.
. Use the apparatus only in moderate climates (not in tropical climates).
. Do not expose the apparatus to dripping or splashing.
. Do not place objects filled with liquids, such as vases, on the apparatus.
SAFETY
. When connecting and disconnecting the AC power cord from the AC mains outlet, pull the plug and not the cord itself. Pulling the cord may damage it and may be dangerous.
. The mains plug must remain readily operable.
. When you are not going to use the unit for a long period of time, disconnect the AC power cord from the AC mains outlet.
AC VOLTAGE
. Before use, check that the rated voltage of your unit matches your local voltage.
CONDENSATION
. When there is condensation inside the unit, it may not function normally.
. Unplug the unit for 1 to 2 hours before turning the power back on, or gradually heat the room up and dry the unit before use.
. Ensure a minimum distance of 5 cm around the apparatus for sufficient ventilation.
. Do not impede the ventilation by covering the ventilation openings with items such as newspapers, tablecloths, curtains, etc.
BATTERIES
. Pay attention to the environmental aspects of battery disposal.
| CAUTIONRISK OF ELECTRIC SHOCKDO NOT OPEN | ||
| The lightning flash with an arrowhead symbol within a triangle is a warning sign alerting the user to the presence of “dangerous voltage” inside the unit. | ATTENTION:To reduce the risk of electric shock, do not remove the cover. There are no user serviceable parts inside the unit. Refer all servicing to qualified personnel. | The exclamation mark within a triangle is a warning sign alerting the user to the presence of important instructions accompanying the product. |
. In case of malfunction due to electrostatic discharge, the apparatus has to be reset by disconnecting it from mains supply.
TABLE OF CONTENTS
| PRECAUTIONS | 1 |
| TABLE OF CONTENTS | 2 |
| BOX CONTENTS | 2 |
| LOCATION OF CONTROLS | 2 |
| POWER SUPPLY | 4 |
| BASIC OPERATION | 5 |
| RADIO OPERATION | 6 |
| USB DEVICE OPERATION | 7 |
| PLAYING AN iPod AND CHARGING THE INTERNAL iPod BATTERY | 8 |
| AUX IN FUNCTION | 9 |
| MAINTENANCE | 9 |
| TROUBLESHOOTING GUIDE | 10 |
| TECHNICAL SPECIFICATIONS | 10 |
BOX CONTENTS
| 1. Main unit | 4. AUX IN cable |
| 2. AC power cord | 5. Instruction manual |
| 3. Remote control with battery | 6. Adapters for different iPod models (4x) |
LOCATION OF CONTROLS
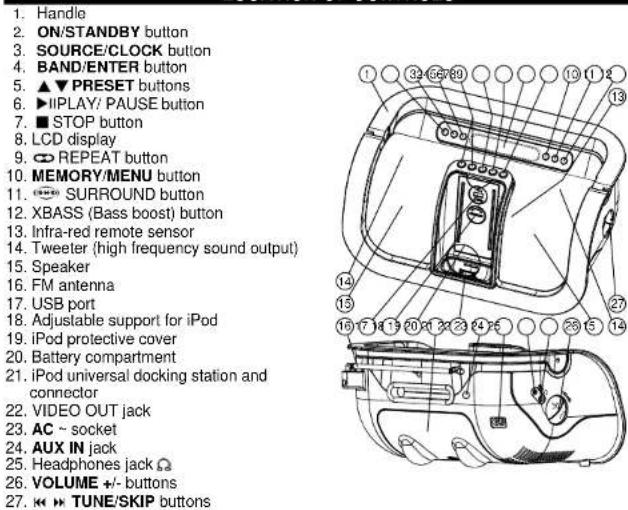
Remote control
- EQ (Equalizer)
- XBASS (Bass boost)
- ON/STANDBY
- SOURCE/CLOCK
- BAND/ENTER
- MUTE
- VOLUME +/-
- ▶TUNE/NEXT
- ■STOP
- ▼ PRESET/FOLDER
- ∞ REPEAT
- ▶ II PLAY/ PAUSE
- ◀TUNE/PREVIOUS
- MEMORY/MENU
- SURROUND
- ▲ PRESET/FOLDER
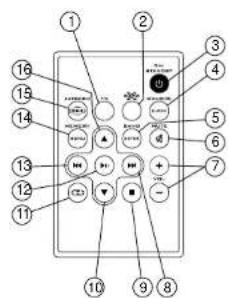
LCD display
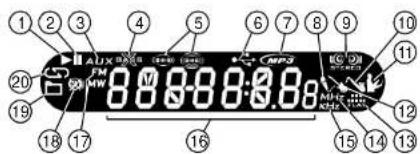
- ▶ Play
- II Pause
- AUX IN mode
- XBASS (Bass boost)
- Surround sound (low, high)
- USB mode
- MP3 file
- POP in EQ presets
- STEREO mode in FM radio
-
JAZZ in EQ presets
-
CLASSIC in EQ presets
- ROCK in EQ presets
- FLAT in EQ presets
- MHz: Unit of FM radio frequency
- kHz: Unit of MW radio frequency
- Digit and text display
- Radio FM/ MW mode
- Mute function
- Repeat folder
- Repeat
POWER SUPPLY
Using AC power supply
Insert the AC power cord into the AC mains outlet with a 230V AC \~ 50Hz power source and the other end to the AC \~ socket at the back of the unit.
Using batteries
- Open the battery compartment.
- Insert 6 x UM2/ "C" size batteries (not supplied) with the polarities (+/-) matching the engraved markings in the battery compartment. Reversed batteries may damage the unit.
- Close the battery compartment.
Note: When AC power is supplied, the battery power is cut off automatically.
When an AC power failure or interruption occurs and the unit does not have batteries installed, the time and preset stations will be lost. It is recommended to install the batteries as back up. When replacing batteries replacement, always connect the AC power supply to avoid losing the time and preset stations.
Installing the remote control battery
- Remove the battery compartment cover on the bottom of the remote control, by pressing the tab to the right while removing the cover.
- Insert a 3V lithium battery (CR2025 or equivalent) with the polarity (+) matching the indication inside the battery compartment cover.
- Replace the battery compartment cover.
Note: The remote control battery normally lasts for about one year, although it depends on how often and for what operations the remote control is used.
If the remote control fails to work even when it is operated near the unit, replace the battery.
Precautions when using batteries
- CAUTION: Danger of explosion if battery is incorrectly replaced. Replace only with the same or equivalent type.
- Do not mix different types of batteries together (e.g. alkaline, rechargeable and standard (carbon zinc)) or old batteries with fresh ones.
- Exhausted batteries must be removed to prevent any battery leakage.
- Dispose of batteries properly according to environmental regulations.
BASIC OPERATION
ON/ Standby mode
After connecting the power supply (refer to "POWER
SUPPLY"), the unit goes to standby mode and the clock time is displayed. Press the ON/STANDBY button to turn on the unit and press it again to go to standby mode.
Setting the clock time
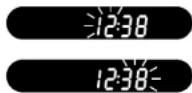
- In standby mode, press the SOURCE/CLOCK button. The hour digits will flash.
- Press the 🎯/▶ buttons to set the hour.
- Press the SOURCE/CLOCK button to confirm and the minute digits will flash.
- Press the ◀/▶ buttons to set the minutes.
- Press the SOURCE/CLOCK button again to confirm the time setting.
Selecting the source
When the unit is switched on, press the SOURCE/CLOCK button repeatedly to select one of the following sources: iPod, USB, AUX or Radio.
VOLUME control
Press the VOLUME +/- buttons to adjust the volume level.
MUTE function
Press the MUTE button on the remote control to turn off the sound. The symbol “☒” is displayed. Press it again or use the VOLUME +/- buttons to resume the sound.
XBASS function
Press the "×" button to boost the bass effect. The symbol "×" is displayed.
Surround sound
Press the SURROUND button repeatedly to select the surround sound effect: Low High or off.
EQ function
Press the EQ button on the remote control repeatedly to select your desired music mode in the following sequence:

Connecting headphones
Plug in headphones (not supplied) to the headphones jack at the side of the unit for private listening. The speaker output will be shut off automatically.
RADIO OPERATION
Listening to the radio
- When the unit is switched on, press the SOURCE/CLOCK button to select Radio mode.
- Press the BAND/ENTER button to select FM or MW.
- Press and hold down the ◀/▶ button to launch an automatic search up / down. Release the button when the unit receives a radio station that you would like to listen to. For manual fine-tuning, you can press the button repeatedly to adjust the frequency step by step.
FM Stereo
In FM mode, is displayed when the unit receives a station with a strong signal station and stereo sound.
Achieving optimum reception
In FM mode, extend and position the FM antenna to achieve optimum reception.
In MW mode, orientate the main unit to achieve optimum reception.
Preset radio stations
You can store up to 15 stations for FM and 10 stations for MW.
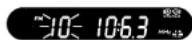
- Use the / buttons to search for a desired station. Press the MEMORY/MENU button to store a station. A preset number will flash.
- Press the ▼/▲buttons to select a preset number that you would like to allocated to this station.
- Press the MEMORY/MENU button again to confirm the setting.
- Repeat above steps (1) to (3) to store any other desired stations.
Listening to a preset station
When listening to the radio, press the PRESET ▼/▲ buttons to select a preset radio station.
Insert a USB device into the USB port on the front panel of the unit. When the unit is switched on, press the SOURCE/CLOCK button to select USB mode.
Note: Due to technical differences, some models of USB storage devices or MP3 players may take longer to be read. In some cases, they may not even be read.
Start playback
- The unit will read the files on the USB device and will then display the total number of folders and tracks.
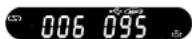
- Press the ▶Ibutton to start playback from the first track. The track number and elapsed track duration will be indicated.

will be displayed. The elapsed track duration and the folder number will briefly be displayed together, then the track number and - if relevant - the folder number and so on.
Note: Default playback mode is Repeat All "G".
Pause playback
Press the ▶I button to pause the playback and press it again to resume playback.
Stop playback
Press the ■ button to stop playback. Press the ▶ button to start playback from the first track.
Skip function
Skip to next/ previous track
-
Press the ▶ button to skip to the next track.
-
Press the ◀ button once to skip to the beginning of the current track. Press it twice to skip to the previous track.
Skip to next/ previous folder
Press the ▼/▲ buttons to skip to the next/ previous folder.
Repeat modes
Press the 📋 button to select one of the following repeat modes listed in the table below.
| Playback mode | Icons displayed | Description |
| Repeat All | Repeat all the tracks (default mode). | |
| Repeat Folder | Repeat the tracks in the folder. | |
| Repeat One blinks Repeat the current track. | ||
PLAYING AN iPod AND CHARGING THE INTERNAL iPod BATTERY
Installing an adapter on the iPod docking station
-
Select the iPod adapter that corresponds to your iPod model from the table below. The adapter number is marked at the back of the adapter.
-
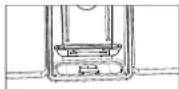
Insert the adapter into the docking station at the top of the unit, with the two tabs facing forwards.
-
To remove the adapter, press the back of the adapter and pull it up.
| Adapter No. | IPod description | Capacity | Adapter supplied with this unit (yes/ no) | |
| 4 | 4G iPod & U2 iPod 20GB yes | |||
| 5 | 4G iPod | 40GB | yes | |
| 6 | iPod photo & Color U2 iPod iPod with color display | 20GB & 30GB 20GB | yes | |
| 7 | iPod photo iPod with color display | 40GB & 60GB 60GB | yes | |
| 8 | iPod nano | 2GB | & | |
| 9 | 5G iPod & U2 iPod with video | 30GB | no | |
| 10 | 5G iPod with video iPod classic | 60GB & 80GB 160GB | no | |
| 11 | iPod nano ( 2^nd generation) | 2GB, 4GB, 8GB | no | |
| 13 | iPod nano ( 3^rd generation) | 4GB & 8GB | no | |
| 14 | iPod touch | 8GB & 16GB | no | |
Note: 1. Only the adapter Nos. 4, 5, 6 and 7 are supplied with this unit. Adapter numbers 8 to 14 should be supplied with their corresponding iPod model and they can also be used with this universal docking station.
2. Ensure that you use the adapter corresponding to your iPod in order to ensure that it is installed in a stable way and that the electrical contact is good.
Listening to your iPod
- With the correct iPod adapter installed, use a coin to turn the adjustable support so that it will fit a large iPod and gently dock the iPod (without its protective cover) into the unit's universal docking station.
- The internal iPod battery will be charged until it is fully charged.
- When the unit is switched on, press the SOURCE/CLOCK button to select "iPod".
- You can now use the remote control to control iPod functions.
- Press the MEMORY/MENU button on the remote control to access the iPod menu.
- Press the ▼/▲ buttons to move within the menu and make a selection.
- Press the BAND/ENTER button to confirm your selection.
. Press the MEMORY/MENU button to return to previous menu. - When a song is selected, press the BAND/ENTER button to play the music.
- During playback, you can press the MEMORY/MENU button to return to the menu.
- To pause/ stop play or skip, refer to the instructions in the "USB DEVICE OPERATION" section.
- Alternatively, you can use the controls on your iPod.

IPod
Watching a video recorded on your iPod
Connect the VIDEO IN jack on the external video device, such as a TV, to the unit's VIDEO OUT jack with a video cable (not supplied) to transfer the video signal from your iPod, (if available), to the TV. Next, refer to the "Listening to your iPod" section. Note: Check that the TV output on your iPod (TV OUT) is set to "ON".
iPod Protective cover
With the iPod docked into the unit, place the protective cover over the iPod in order to protect it for portable use.

Note:
- Adjust the volume to the desired level using the VOLUME +/- buttons on the unit or the VOL +/- button on the remote control.
- This unit display cannot show any file information (e.g. file name) contained on your iPod. Please view the file information through your iPod display.
- To prevent sound distortion during iPod playback on this unit, the EQ function in your iPod must be set to "Off".
- The unit is not designed for playing or charging an iPod Shuffle, but it is possible to connect the iPod's line out or headphones jack to the AUX IN jack on the unit.
AUX IN FUNCTION
This unit has an AUX IN jack and is provided with a cable to connect your external audio devices such as MP3 players or an earlier iPod model.
- Plug the AUX IN cable (supplied) into the AUX IN jack.
- When the unit is switched on, press the SOURCE/CLOCK button to select "AUX".
- Operate your external audio device as usual to select and play music.
- Adjust the volume controls on both your external audio device and this unit to the desired volume level.
Note: In AUX IN mode, this unit display cannot show any music information (e.g. track number) for your external audio device.
MAINTENANCE
Care and maintenance
To clean the casing, unplug the unit and wipe off dust and stains with a soft cloth moistened with a mild soap and water solution only. Do not use benzene, thinner or similar chemicals to clean the casing.

If at any time in the future you should need to dispose of this product, please note that waste electrical products should not be disposed of with household waste. Please recycle where facilities exist. Check with your local authority or retailer for recycling advice. (Waste Electrical and Electronic Equipment Directive).
| TROUBLESHOOTING GUIDE | |
| Problems | Recommendations |
| 1. The player or display does not work properly | 1.1 Press the ON/STANDBY button to go to Standby mode and press it again to turn on the unit.1.2 Reset by unplugging the AC power cord far few seconds, then plug it back in. |
| 2. No sound, poor sound 2.1 Check the cable connections. | |
| 3. USB device is not read 3.1 Check that the USB device file system is in FAT or FAT32 format.3.2 Due to different formats, some models of USB storage devices or MP3 players may not be read. | |
| 4. Noise or distorted sound in radio mode. | 4.1 FM mode: Extend and position the FM antenna to achieve the best reception.4.2 In MW mode, orientate the unit to achieve optimum reception. |
| 5. No sound, poor sound in iPod mode | 5.1 Check that you have chosen the correct adapter.5.2 The EQ function in your iPod must be set to "Off". |
| 6. No video output 6.1 Check that your iPod TV output (TV OUT) is set to "ON". | |
TECHNICAL SPECIFICATIONS
| USB | ||||||||||||||||||||||||||||||||||||||||||||||||||||||||||||||||||||||||||||||||||||||||||||||||||||||||||||||||||||||||||||||
| Compatible files MP3 | ||||||||||||||||||||||||||||||||||||||||||||||||||||||||||||||||||||||||||||||||||||||||||||||||||||||||||||||||||||||||||||||
| USB port type 2.0 | ||||||||||||||||||||||||||||||||||||||||||||||||||||||||||||||||||||||||||||||||||||||||||||||||||||||||||||||||||||||||||||||
| USB maximum handling capacity: 2GB | ||||||||||||||||||||||||||||||||||||||||||||||||||||||||||||||||||||||||||||||||||||||||||||||||||||||||||||||||||||||||||||||
| Radio | 2GB | |||||||||||||||||||||||||||||||||||||||||||||||||||||||||||||||||||||||||||||||||||||||||||||||||||||||||||||||||||||||||||||
| Tuning range | FM: MW: 522 - 1620 kHz FM: telescopic MW: built-in ferrite bar antenna | 87.5 | - | 108 | MHz | |||||||||||||||||||||||||||||||||||||||||||||||||||||||||||||||||||||||||||||||||||||||||||||||||||||||||||||||||||||||||
| Antenna | ||||||||||||||||||||||||||||||||||||||||||||||||||||||||||||||||||||||||||||||||||||||||||||||||||||||||||||||||||||||||||||||
| General Output power (RMS) 2 x 4.5 W (AC power) | 2 | X | 2 | W | ( | b | a | t | t | e | r | y | p | o | w | e | r | s | u | |||||||||||||||||||||||||||||||||||||||||||||||||||||||||||||||||||||||||||||||||||||||||||||||||||||||||||
| Power consumption | 20 | W | ||||||||||||||||||||||||||||||||||||||||||||||||||||||||||||||||||||||||||||||||||||||||||||||||||||||||||||||||||||||||||||
Note: Due to continuing improvements, the technical specifications are subject to change without notice.
Where to place the item:
Today's furniture is coated with a wide variety of lacquers and synthetic-coatings that are treated with an extensive range of cleaning products. Therefore, the possibility that some of these substances contain components that react adversely to the rubber feet of the item and soften them, cannot be completely excluded. The rubber feet of the appliance can cause discoloring to furniture surfaces. If necessary, place the appliance on a non-slide surface.

- PRECAUTIONS
- INSTALLATION
- SAFETY
- AC VOLTAGE
- CONDENSATION
- BATTERIES
- Remote control
- LCD display
- POWER SUPPLY
- Using AC power supply
- Using batteries
- Installing the remote control battery
- Precautions when using batteries
- BASIC OPERATION
- ON/ Standby mode
- Setting the clock time
- Selecting the source
- VOLUME control
- MUTE function
- XBASS function
- Surround sound
- EQ function
- Connecting headphones
- RADIO OPERATION
- Listening to the radio
- FM Stereo
- Achieving optimum reception
- Preset radio stations
- Listening to a preset station
- Start playback
- Pause playback
- Stop playback
- Skip function
- Repeat modes
- PLAYING AN iPod AND CHARGING THE INTERNAL iPod BATTERY
- Installing an adapter on the iPod docking station
- Listening to your iPod
- IPod
- Watching a video recorded on your iPod
- iPod Protective cover
- AUX IN FUNCTION
- MAINTENANCE
- Care and maintenance
Brand : SCOTT
Model : I-SX 50 BK
Category : Docking Station