
CPSW1000H - Subwoofer SHARP - Free user manual and instructions
Find the device manual for free CPSW1000H SHARP in PDF.


| Brand | Sharp |
| Model | CPSW1000H |
| Product Type | Active Subwoofer |
| Dimensions (W x H x D) | 430 mm x 151 mm x 323.5 mm (16-15/16" x 5-15/16" x 12-3/4") |
| Weight | 6.4 kg (14.11 lbs) |
| Power Supply | AC 220-240 V ~ 50 Hz (Europe) / 50-60 Hz (others) |
| Power Consumption | 18 W (On), 0.6 W (Stand-by) |
| Output Power (RMS) | 100 W (50 W + 50 W) (DIN 45324) |
| Impedance | 4 ohms x 2 |
| Crossover Frequency | 80 Hz - 220 Hz (adjustable) |
| Amplification System | Pulse Width Modulation (PWM) |
| Audio Input | Analog RCA (1 pair L/R) |
| Driver Technology | Tymphony Linear Array Transducer (LAT) |
| Magnetic Shielding | Yes (built-in speakers) |
| Auto Power Off | After 20 minutes of no signal |
| Cooling Fan | Built-in at rear |
| Remote Control | Included (CR2025 battery) |
| Accessories Included | Remote control, AC power lead, RCA cables (2-pin to 2-pin and 1-pin to 2-pin), cleaning cloth, subwoofer stand x2, spikes x4, foot cushions x4 |
| Placement | On firm level surface, free from vibration; at least 10 cm clearance on sides, top, back |
| Maintenance | Wipe cabinet with soft cloth; do not use chemicals |
| Safety Precautions | Do not remove cover; refer service to Sharp; avoid high volume; do not place objects on top; keep away from moisture and heat |
| Repairability | Internal service by Sharp service facility only |
| Warranty Note | Specifications subject to change without notice |
Frequently Asked Questions - CPSW1000H SHARP
User questions about CPSW1000H SHARP
0 question about this device. Answer the ones you know or ask your own.
Ask a new question about this device
Download the instructions for your Subwoofer in PDF format for free! Find your manual CPSW1000H - SHARP and take your electronic device back in hand. On this page are published all the documents necessary for the use of your device. CPSW1000H by SHARP.
USER MANUAL CPSW1000H SHARP
Thank you for purchasing this SHARP product. To obtain the best performance from this product, please read this manual carefully. It will guide you in operating your SHARP product.
Features
This subwoofer incorporates the Tymphony Linear Array Transducer (LAT) technology developed by Tymphony Corporation. This Technology uses a linear array of multiple smaller diaphragms to generate sound as opposed to the single diaphragm used in the conventional cone speakers. Such arrangement enables:
- Powerful low bass without the need for large enclosures compared to the conventional speakers, hence the sleek and compact design of this subwoofer.
- Minimization of structural vibrations which makes it possible to place the subwoofer close to your audio system without affecting the critical circuitry.
Accessories
Please confirm that the following accessories are included.

Remote control x 1 AC power lead x 1


RCA cable (2 pins - 2 pins) x 1 RCA cable (1 pin - 2 pins) x 1
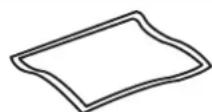
Cleaning cloth x 1 Subwoofer stand x 2


Spike x 4 Foot cushion x 4
Contents
Page
■ General Information Page
Precautions 2
Controls and indicators....3
■ Preparation for Use
Subwoofer preparation....4
Placing the subwoofer 4
Subwoofer connections to TVs 5
AC power connection 6
Remote control 6-7
■ Basic Operation
General control 7 - 8
■ Advanced Feature
Operating the TV with the remote control 8
■ References
Troubleshooting chart 9
Maintenance 10
Specifications....10
Precautions
General
- Please ensure that the equipment is positioned in a well-ventilated area and ensure that there is at least 10 cm (4") of free space along the sides, top and back of the equipment.
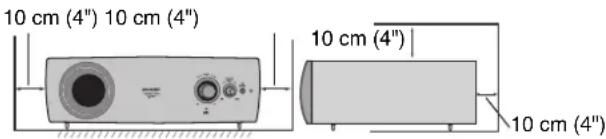
- Use the unit on a firm, level surface free from vibration.
- Keep the unit away from direct sunlight, strong magnetic fields, excessive dust, humidity and electronic/electrical equipment (home computers, facsimiles, etc.) which generate electrical noise.
- Do not place anything on top of the unit.
- Do not expose the unit to moisture, to temperatures higher than 60^ (140°F) or to extremely low temperatures.
- If your system does not work properly, disconnect the AC power lead from the wall socket. Plug the AC power lead back in, and then turn on your system.
- In case of an electrical storm, unplug the unit for safety.
- Hold the AC power plug by the head when removing it from the wall socket, as pulling the lead can damage internal wires.
- The AC power plug is used as a disconnect device and shall always remain readily operable.
- Do not remove the outer cover, as this may result in electric shock. Refer internal service to your local SHARP service facility.
-
The ventilation should not be impeded by covering the ventilation openings with items, such as newspapers, tablecloths, curtains, etc.
-
No naked flame sources, such as lighted candles, should be placed on the apparatus.
- Attention should be drawn to the environmental aspects of battery disposal.
- This unit should only be used within the range of 5^ - 35^ (41^ - 95^) .
● The apparatus is designed for use in moderate climates.
Warning:
The voltage used must be the same as that specified on this unit. Using this product with a higher voltage other than that which is specified is dangerous and may result in a fire or other type of accident causing damage. SHARP will not be held responsible for any damage resulting from use of this unit with a voltage other than that which is specified.
■ Cooling fan
This unit is fitted with a cooling fan at the rear for improved cooling. Do not cover the opening in this section with any obstacles.

Caution:
The unit will get warm whilst being used. Do not touch the warm areas of the unit for prolonged periods to avoid injury.
Volume control
The sound level at a given volume setting depends on speaker efficiency, location, and various other factors. It is advisable to avoid exposure to high volume levels. Do not turn the volume on to full at switch on. Listen to music at moderate levels.
Controls and indicators

Note:
Before using remote control, please remove plastic shield at battery holder.
■ Front panel
Reference page
- Bass Reflex Duct....4
- Remote Sensor 7
- Volume Control 8
- Crossover Frequency Control 8
- ON/STAND-BY Button 7
- STAND-BY Indicator 7
■ Rear panel
Reference page
- AC Input 6
- Cooling Fan 2
- Audio Input 5
■ Remote control
Reference page
- Remote Control Transmitter ..... 7
- On/Stand-by Button 7
- TV Operation Buttons 8
- Volume Up and Down Buttons 8
| TV Operation Buttons (Only SHARP TV): | |||
| On/Stand-by ButtonON/STAND-BY | Sets the TV power to “ON” or “STAND-BY”. | Input Select Button (TV)INPUT SELECT | Press the button to switch the input source. |
| Volume Up and Down Buttons[DKZZ] | Turn up/ down the TV volume. | Channel Up and Down ButtonsCH UP | Switch up/ down the TV channels. |
Note:
Some models of SHARP TV may not be operable.
Subwoofer preparation
Make sure to unplug the AC power lead before installing the main unit or changing the position.
Select from three installation methods according to the preferred position.
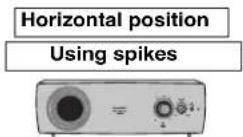
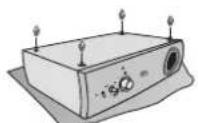
1 Tighten all spikes as shown
Notes:
- When attaching the spikes, place the subwoofer on a cushion or soft cloth to avoid damage.
● The subwoofer can be leveled by adjusting the spikes.
Caution:
When using these spikes on glossy or slippery table such as on glass top, this subwoofer may slip and fall off the table.

1 Attach the foot cushions as shown
Note:
When attaching the foot cushions, place the subwoofer on a cushion or soft cloth to avoid damage.
Vertical position
1 Place subwoofer stand as shown

Placing the subwoofer
Installation image:
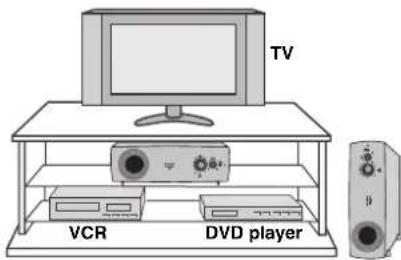
Place the subwoofer as shown.
Notes:
- As the bass sound from the subwoofer is omni-directional, you can place the subwoofer anywhere you like. However, it is recommended to place it as close to the TV as possible.
● The front panel of the subwoofer is not removable.
Caution:
- Do not change the installation direction when the subwoofer is turned on.
- Do not allow any objects to fall into or to be placed in the bass reflex ducts.
- Do not stand or sit on the subwoofer as you may be injured.
■ Magnetically shielded speakers
The subwoofer can be placed near a TV set as the built-in speakers are magnetically shielded. However, uneven colours may appear on the screen depending on the type of TV.
If colour variation occurs.
Turn off the TV (from the power switch).
After 15 - 30 minutes, turn the TV on again.
If the colour variation is still present.
Move the subwoofer further away from the TV. Do not place the unit near any kind of magnet or an electromagnet as irregular colours may appear on the TV screen.
Subwoofer connections to TVs
Caution:
Turn off all other equipment before making any connections.
Notes:
● Refer to the operation manual of the equipment to be connected.
● Fully insert the plugs to avoid fuzzy pictures or noises.
Caution:
Tuner receiving for other audio system
- Placing the aerial near the subwoofer unit AC power lead may cause noise pick up. Place the aerial away from the subwoofer unit for better reception.
■ Connecting to a TV
If the TV/monitor has an audio output, connect it to the AUDIO INPUT sockets on the rear of the subwoofer.

■ Connecting to a TV (with subwoofer pre-out)
If the TV/monitor has subwoofer pre-out, connect it to the AUDIO INPUT sockets on the rear of the subwoofer.

AC power connection
After checking all the connections have been made correctly, connect the AC power lead to the AC power input socket, then to the wall socket.

Wall socket
(AC 220 - 240 V \~ 50 Hz (Europe))
(AC 220 - 240 V \~ 50/60 Hz (others))
Notes:
- Never use a power lead other than the one supplied. Otherwise, a malfunction or an accident may occur.
- Unplug the AC power lead from the wall socket if the unit will not be in use for a prolonged period of time.
Remote control
■ Battery installation
1 Whilst pushing the locking tab towards the centre of the remote control, slide out the battery holder.

2 Remove the old battery from the battery holder, insert the new battery and then slide the battery holder back into the remote control.
Battery holder

Locking tab

Precautions for battery use:
- Remove the battery if the unit will not be used for long periods of time. This will prevent potential damage due to battery leakage.
Caution:
- Do not use rechargeable battery (nickel-cadmium battery, etc.).
- Replace only with the same or equivalent type.
● Installing the battery incorrectly may cause the unit to malfunction.
● Danger of explosion if battery is incorrectly replaced. - Batteries (battery pack or batteries installed) shall not be exposed to excessive heat such as sunshine, fire or the like.
Remote control (continued)
Notes concerning use:
- Replace the battery if the operating distance is reduced or if the operation becomes erratic. Purchase "CR 2025", coin lithium battery.
- Periodically clean the transmitter on the remote control and the sensor on the unit with a soft cloth.
- Exposing the sensor on the unit to strong light may interfere with operation. Change the lighting or the direction of the unit if this occurs.
- Keep the remote control away from moisture, heat, shock, and vibrations.
■ Test of the remote control
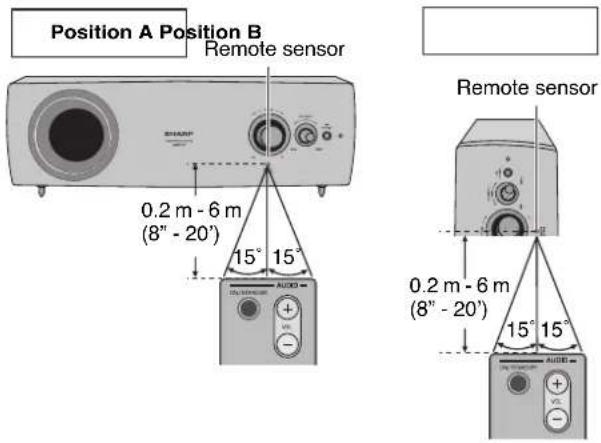
Point the remote control directly at the remote sensor on the unit.
The remote control can be used within the range shown below: Press the ON/STAND-BY button. Does the power turn on? Now, you can enjoy your system.
General control

■ To turn the power on
Press the ON/STAND-BY button.
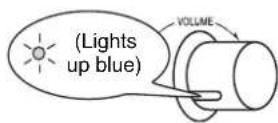
The volume indicator lights up blue.
If the power does not turn on, check whether the power lead is plugged in properly.
To set the unit to stand-by mode:
Press the ON/STAND-BY button again.
The STAND-BY indicator lights up red.

Volume control
Main unit operation:
Turn volume knob clockwise to increase the volume and anticlockwise to decrease the volume.
Remote control operation:
Press the VOL + button to increase the volume and the VOL - button to decrease the volume.
Note:
Do not turn the volume knob manually in reverse direction when operating it by remote control.
■ Crossover frequency control
Adjust the high frequency cut-off point. Frequencies higher than the set frequency are removed.
To emphasise the bass, turn this control towards 80 Hz and increase the volume.
Notes:
Observe the following to avoid malfunction and sound distortion.
- Do not set the volume too high on the audio system. The subwoofer may be damaged.
- Before you switch on/off the subwoofer, minimise the volume on the audio system.
■ Auto power off
If no signal is detected for 20 minutes during power on, the subwoofer will automatically go to stand-by mode.
Operating the TV with the remote control
You can operate SHARP TV with this system's remote control.

■ Watching TV
Point the remote control at the TV.
1 Press the TV POWER button to turn on the TV.
2 Press the CH UP /or CH DOWN button to set the channel.
Pressing the CH UP ∧ or CH DOWN ∨ button enables TV channel switching.
3 Press TV VOL + or - button to adjust the TV volume.
Other operable button
Press the Input Select button to switch the input source. (TV)
Note:
Some models of SHARP TV may not be operable. In this case, use the remote control supplied with each product.
Troubleshooting chart
Many potential problems can be resolved by the owner without calling a service technician. If something is wrong with this product, check the following before calling your authorised SHARP dealer or service centre.
General
| Symptom Possible cause | |
| No sound is heard. ● | Is the input signal (selection) set properly?● Is the volume level set to “0”? |
| Noise is heard during playback. | ● Move the subwoofer away from any computers or mobile phones. |
| When a button is pressed, the unit does not respond. | ● Set this unit to the stand-by mode and then turn it back on. |
| The power is not turned on. | ● Is the unit unplugged? (Refer to page 6)● The protection circuit may be activated. Unplug and plug in the power lead again after 5 minutes or more. |
■ Remote control
| Symptom Possible cause | |
| The remote control does not operate properly. | ● Is the battery polarity correct? ● Is the battery dead? ● Is the distance or angle incorrect? ● Are there any obstructions in front of the subwoofer? ● Is there a strong light shining on the remote sensor? ● Is the remote control for another equipment used simultaneously? |
| The subwoofer cannot be turned on with the remote control. | ● Is the AC power lead of the subwoofer plugged in? ● Is the battery inserted? |
| TV cannot be operated with the remote control. | ● Depending on the model, some or all functions may not be operable using the remote control of this unit. In this case, use the remote control supplied with the TV. |
Condensation
Sudden temperature changes, storage or operation in an extremely humid environment may cause condensation inside the cabinet. Condensation can cause the unit to malfunction. If this happens, leave the power on until normal playback is possible (about 1 hour). Wipe off any condensation on the transmitter with a soft cloth before operating the unit.
■ If problem occurs
When this product is subjected to strong external interference (mechanical shock, excessive static electricity, abnormal supply voltage due to lightning, etc.) or if it is operated incorrectly, it may malfunction.
If such a problem occurs, do the following:
- Set the unit to the stand-by mode and turn the power on again.
- If the unit is not restored in the previous operation, unplug and plug in the subwoofer, and then turn the power on.

Maintenance
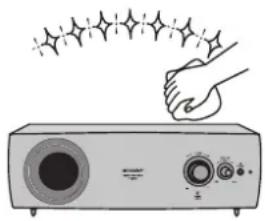
■ Cleaning the cabinet
Periodically wipe the cabinet with a soft cloth.
Caution:
- Do not use chemicals for cleaning (petrol, paint thinner, etc.). It may damage the cabinet finish.
- Do not apply oil to the inside of each component. It may cause malfunctions.
natural_image
Illustration of a washing machine with hands cleaning it (no text or symbols)Specifications
As part of our policy of continuous improvement, SHARP reserves the right to make design and specification changes for product improvement without prior notice. The performance specification figures indicated are nominal values of production units. There may be some deviations from these values in individual units.
General
| Power source AC 220 - | 240 V ~ 50 Hz (Europe)AC 220 - 240 V ~ 50/60 Hz (others) |
| Power consumption Power on: 18 WPower stand-by: 0.6 W(*) | |
| Amplification system Subwoofer: Pulse width modulation | |
| Output power RMS: 100 W (50 W + 50 W) (DIN 45 324) | |
| Audio input terminal Analog input: RCA type x 1 pair (L/R) | |
| Type Subwoofer system | |
| Impedance 4 ohms x 2 | |
| Dimensions Width: 430 mm (16-15/16")Height: 151 mm (5-15/16")Depth: 323.5 mm (12-3/4") | |
| Weight 6.4 kg (14.11 lbs.) | |
| Crossover frequency 80 Hz - 220 Hz | |
(*) This power consumption value is obtained when in the power stand-by mode.
- Features
- Accessories
- Contents
- Precautions
- General
- Warning:
- ■ Cooling fan
- Caution:
- Volume control
- Controls and indicators
- ■ Front panel
- ■ Rear panel
- ■ Remote control
- Subwoofer preparation
- Notes:
- Note:
- Placing the subwoofer
- ■ Magnetically shielded speakers
- If colour variation occurs.
- If the colour variation is still present.
- Subwoofer connections to TVs
- Tuner receiving for other audio system
- ■ Connecting to a TV
- ■ Connecting to a TV (with subwoofer pre-out)
- AC power connection
- Remote control
- ■ Battery installation
- Precautions for battery use:
- Remote control (continued)
- Notes concerning use:
- ■ Test of the remote control
- General control
- ■ To turn the power on
- Main unit operation:
- Remote control operation:
- ■ Crossover frequency control
- ■ Auto power off
- Operating the TV with the remote control
- ■ Watching TV
- Other operable button
- Troubleshooting chart
- Condensation
- ■ If problem occurs
- If such a problem occurs, do the following:
- Maintenance
- ■ Cleaning the cabinet
- Specifications
Brand : SHARP
Model : CPSW1000H
Category : Subwoofer