
DVBT-43 - Digital decoder DENVER - Free user manual and instructions
Find the device manual for free DVBT-43 DENVER in PDF.


| Product Type | Digital Decoder (Set-Top Box) |
| Model | DVBT-43 |
| Brand | DENVER |
| Frequency Range | VHF: 174–230 MHz, UHF: 470–862 MHz |
| Bandwidth | 6/7/8 MHz |
| Demodulator | COFDM |
| Video Decoding | MPEG-2 MP@ML |
| Video System | PAL/NTSC/AUTO |
| Aspect Ratio | 4:3 / 16:9 switchable |
| Audio Format | MPEG Layer I & II, 32/44.1/48 KHz |
| Video Output | CVBS, RGB |
| Media Player | JPEG, MP3, WMA, MPG (MPEG-2) |
| RF Input Connector | 1 x D-Type, IEC169-2, Female |
| SCART Connectors | TV x1, VCR x1 |
| USB Port | USB 2.0 Full Speed x1 |
| Power Supply | 220-240V, 50/60Hz |
| Power Consumption | Max. 5W |
| Recording | Yes, via USB (FAT/FAT32/NTFS) |
| Timeshift | Yes (requires USB with 512MB free) |
| EPG | Yes (Electronic Program Guide) |
| Parental Lock | Yes (default password 0000) |
| Games | Snake, Othello |
| Software Upgrade | Via USB or OTA (if available) |
| Remote Control | Included |
Frequently Asked Questions - DVBT-43 DENVER
User questions about DVBT-43 DENVER
0 question about this device. Answer the ones you know or ask your own.
Ask a new question about this device
Download the instructions for your Digital decoder in PDF format for free! Find your manual DVBT-43 - DENVER and take your electronic device back in hand. On this page are published all the documents necessary for the use of your device. DVBT-43 by DENVER.
USER MANUAL DVBT-43 DENVER
First Time Installation.... 4
Volume Control 4
Channel Scan 4
Setup Menu 5
Tools 6
EPG(Electronic Program Guide)---- 6
Media Player 7
Recording and Timeshifting....7
SPECIFICATIONS 10
SAFETY INFORMATION
TO REDUCE THE RISK OF FIRE AND ELECTRIC SHOCK, DO NOT EXPOSE THIS UNIT TO RAIN OR MOISTURE. ·Do not use unsuitable (unprotected) power
CAUTION : To reduce the risk of fire and electric shock, do not remove the cover (or back) of
the unit. Refer servicing only to qualified service personnel.

The lightning flash with arrowhead symbol, within an equilateral triangle, is intended to alert the user to the presence of uninsulated "dangerous voltage" within product's enclosure that may be of sufficient magnitude to constitute a risk of electric shock.

The exclamation point within an equilateral triangle is intended to alert the user to the presence of important operation and servicing instructions in the literature accompanying the appliance.
WARNING: TO REDUCE THE RISK OF FIRE OR ELECTRIC SHOCK, DO NOT EXPOSE THIS APPLIANCE TO RAIN OR MOISTURE. CAUTION: TO PREVENT ELECTRIC SHOCK, MATCH WIDE BLADE OF PLUG TO WIDE SLOT AND FULLY INSERT.
The apparatus shall not be exposed to dripping or splashing, and that no objects filled with liquids, such as vases, shall be place on the apparatus.
IMPORTANT SAFEGUARDS
In addition to the careful attention devoted to quality standards in the manufacture of your video product, safety is a major factor in the design of every instrument. However, safety is your responsibility, too. This sheet lists important information that will help to assure your enjoyment and proper use of the video product and accessory equipment. Please read them carefully before operation and using your video product.
- Do not overload wall outlets, extension cords or convenience receptacles beyond their capacity, since this can result in fire or electric shock.
- Do not use unsuitable (unprotected) power outlet, this may be dangerous.
- Check the connection regularly. If there is any rupture or failure in the insulation of the cable and the unit, disconnect immediately and have the unit check by a qualified technician.
- Do not use the power cable connection anywhere near water or liquids, such as bath, sink, swimming pool, laundry tub or inside a wet/ moist basement, etc.
Do not place the unit on an unstable object. The set may fall, causing serious injury to a child or an adult and also serious damage to the unit.
- Never place the unit near or on top of any heat radiating apparatus, such as heaters, ovens, stoves, radiators, fan heaters, amplifiers, etc. Also never expose the unit to direct sunlight as this may lead to the unit overheating.
- Unplug the unit from the wall outlet before cleaning or polishing it. Do not use liquid or aerosol cleaners, alcohol or other cleaning sprays! Use a dry, soft cloth to clean the exterior of the unit only! - Never place a heavy object onto the unit!
- Do not defeat the safety purpose of the power plug. If the provided plug does not fit into your outlet, consult an electrician for replacement of the obsolete outlet. Do not force the plug into the outlet!
- Protect the power cord from being walked on or pinched particularly at plugs, convenience receptacles, and the point where they exit from the apparatus.
•Unplug this apparatus during lightening storms or when unused for long periods of time.
• Refer all servicing to qualified personnel. Servicing is required when the apparatus has been damaged in any way.
- Switch off the main power when the unit is not in use. (Disconnect the power plug from the power outlet when you do not intend to use the unit for a prolonged period of time). Remove the disc before moving or switching of the unit.
- Do not cover or touch any of the components inside the unit!
• Install the unit on a flat surface with good air circulation. Please ensure the ventilation holes are not covered, otherwise the unit will overheat and malfunction.
1 ·Read through this manual before installation and use.
INTRODUCTION
FRONT PANEL:
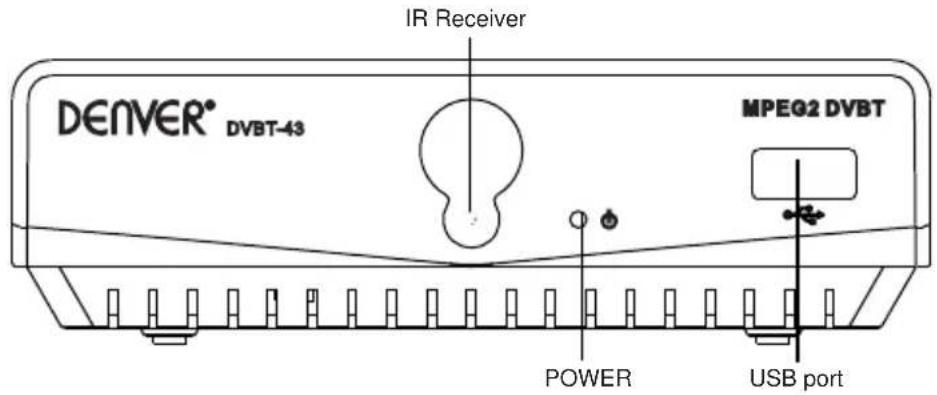
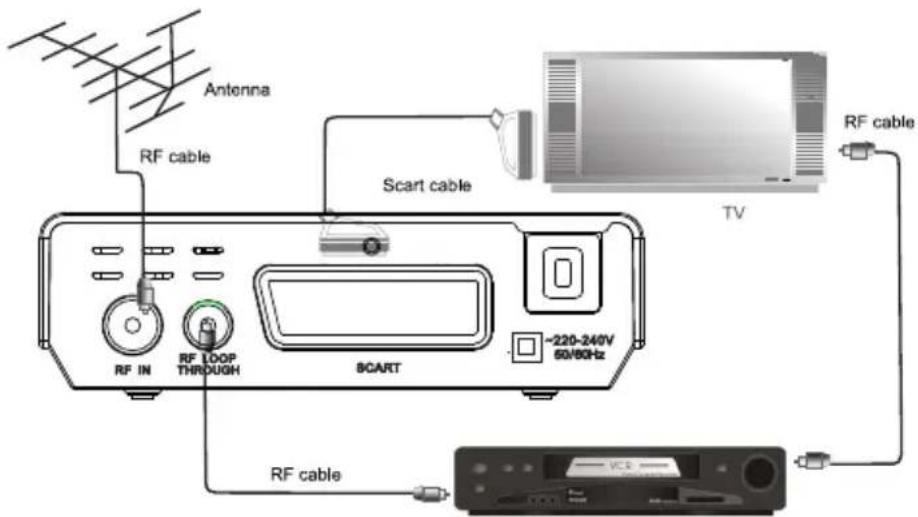
INTRODUCTION
REMOTE CONTROL:
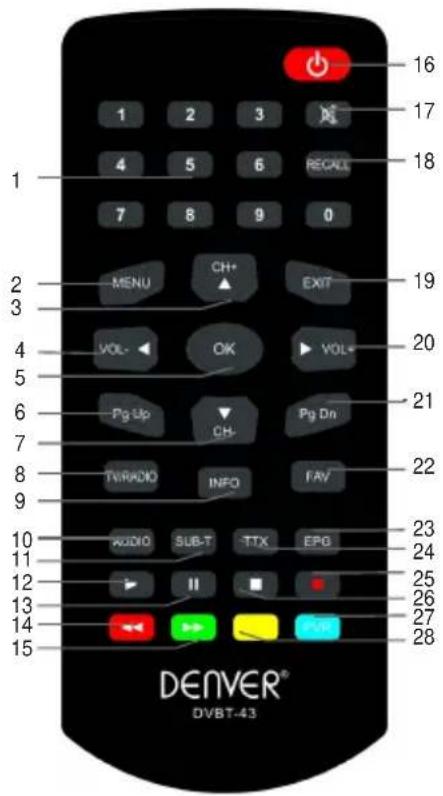
1.Numeric entry 16.Stand-by on/off
2. MENU 17.MUTE
3. CH+ or UP 18.RECALL
4. VOL- or LEFT 19. EXIT
5.OK (confirm) 20.VOL+ or RIGHT
6.PAGE UP 21.PAGE DOWN
7.CH- or DOWN 22.FAV
8.TV/RADIO 23.EPG
9.INFO 24.TTX
10.AUDIO 25.REC
11.SUB T 26.STOP
12.PLAY 27.Blue E
13.PAUSE 28.Yellow Button
14.Red Button/FB
15.Green Button/FF
USING THE SET TOP BOX
1. First Time Installation
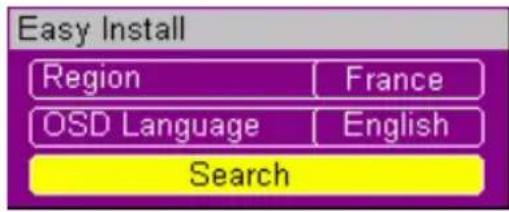
- When the Set Top Box is switched on for the first time, a "Welcome Page" will be displayed.
- Use the arrow keys ▲▼◀▶ to select the "Region" and "OSD Language".
- Move highlight to "Search" button and press "OK" to begin the channel scan.
2. Volume Control
Use the "VOL+" and "VOL-" keys to increase or decrease the volume.

By pressing the "Mute" key, the audio will be turned off. Press the "Mute" again or press the Volume Keys to turn on the audio.
3. Channel Scan
There are two different ways to Scan Channels.
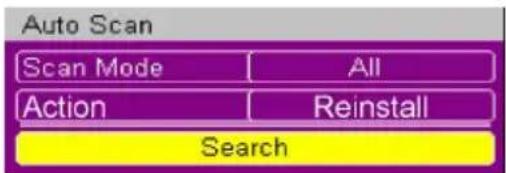
In the Main Menu* Installation* Auto Scan, Move the highlight bar to "search" button. Press [OK] key to scan all the Channels.
In Main Menu* Installation* Channel Scan, set the appropriate parameter. Move the highlight bar to "search" button. Press [OK] key to scan Channels.
USING THE SET TOP BOX
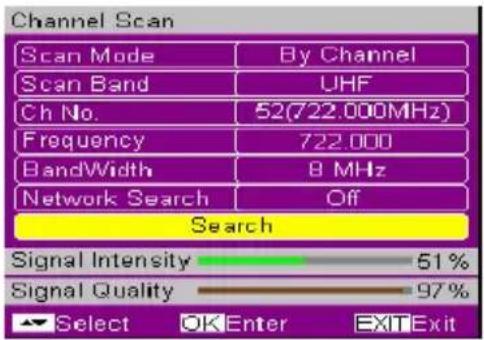
Tuner setting: choose off for home external antenna; choose on for powered antenna.
4. Setup Menu
Press the"MENU" key to activate the main menu. Select the "Setup" option and press the "OK" key to enter the menu.
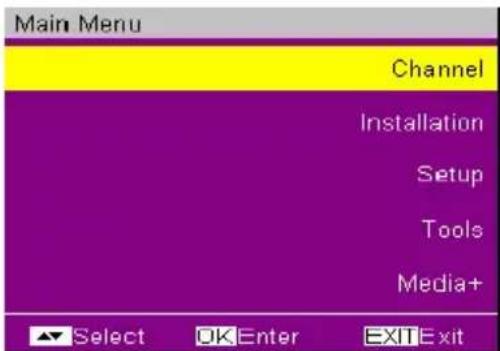
Change the OSD Language
Change the TV system: PAL/NTSC/AUTO. mode; 4:3 LB, 4:3 PS, 16:9PB, 16:9AUTO.
Timer Setting: for more information, refer to the next section.
Setting OSD attribute
Parent Lock Setting:
Channels or Menu operations can be locked using password. The original password is "0000".
The universal password is "3330".
USING THE SET TOP BOX
5. Tools
Receiver info: technical data about the receiver
Game: there are two games (Snake, Othello)
Load default settings: insert the new password or default one and confirm to return to default settings.
Software Upgrade: the upgrade file will be available on New Majestic S.p.A. website only when the unit will need it.
Upgrade setting: software upgrade and automatic channels upgrade
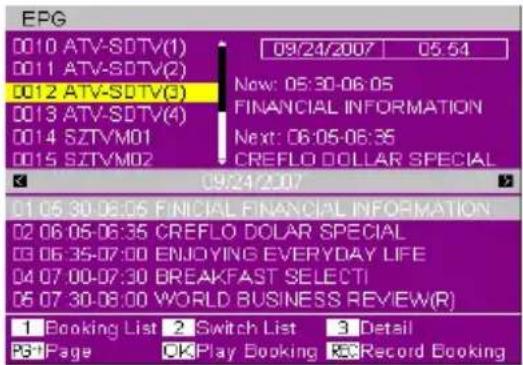
6. EPG(Electronic Program Guide)
Press the "EPG" key to display all the information of the Channels.
The following operations can be used in the EPG menu:
Switch List: Press "2" to switch between program list and event list
Play Booking: Select the Event and Press "OK" to book for play REC Booking: Select the Event and Press "REC" to book for record.
Booking List: Press "1" to display the booking list
7. Media Player
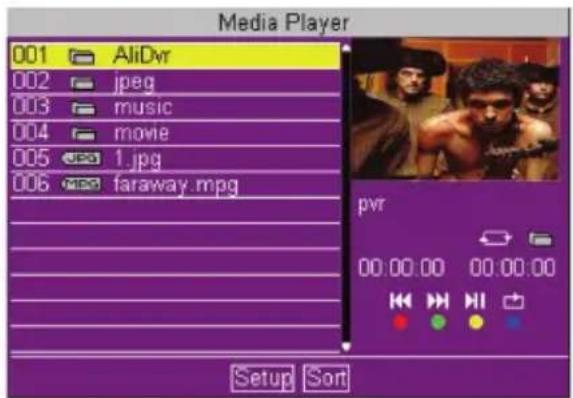
USB port can play MPEG, JPEG, MP3 and WMA files USB flash disk 2.0 high speed/USB hard disk is supported on this Set Top Box. But when a USB hard disk is used, please use a power adapter to connect the hard disk driver.
- When USB disk is mounted, you can enter Main Menu*Media+*Media Player menu to play music, MP3 and WMA, video or browse pictures JPEG.
- In Main Menu* Media+* PVR Manage, the recorded video files are listed on the display. You can Lock, Delete or Rename the files or press [OK] key to play.
USING THE SET TOP BOX
For the Recording or Time shift functions, a USB High Speed disk is needed. 1 hour video recording will need about 2Gbytes space. (The storage space is related to the program content.)
8. Recording and Timeshifting
An USB disk is needed to record and to use the timeshifting function.
8.1. Recording
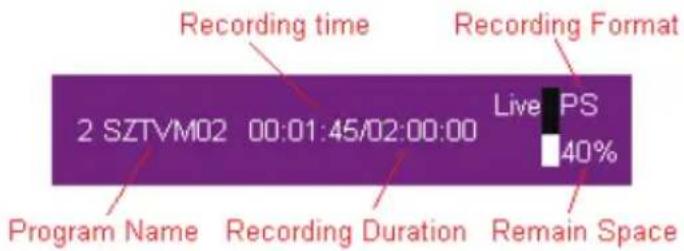
After pressing the [REC] key, the recording begins and a "REC" bar appears.
USING THE SET TOP BOX
The default recording duration is 3 hours. When "REC" bar is displayed, press "REC" key, and a "Record Duration box" appears, press [OK] key and you can set the recording duration. Press [OK] key again to confirm and then [EXIT] key to exit duration setup.
When "REC"Bar is displayed, press [EXIT] key then the "REC" bar will disappear. A "REC" icon is displayed on the up-left corner.
To stop the recording, Press [STOP] key and after you confirm, the recording will stop.
We advise to use USB high speed item(USB disk or HD) to record, the compatibility with all USB itehs in the market is not warranted. The supported system files are FAT, FAT32, NTFS.
While there is only one chanel recording, you can't watch another chanel by press "CH+/CH-" or numeric key.
8.2 Timeshifting (512MB minimum free space)
If you set timeshift to "OFF" and you press pause button, the program will be paused only.
To activate the Timeshifting function, you need to confirm that the "TimeShift" in "Main Menu*Media+*PVR configuration* is "On".
The video data will be stored in the "Timeshift Buffer". When the Set Top Box is in timeshifting mode, you can rewind and watch the program from the beginning while the unit is still recording, you just have to pause the program and start watching again whenever you want pressing play button.
Using the "PLAY" "PAUSE" "FB" "FF" keys, you can watch/pause/fast backward/fast forward/ the program.
Pressing the "STOP" key, will exit the timeshifting mode and return to the to live program.
8.3 PVR Configuration
In the"Main Menu*Media+*PVR configuration" menu, you can set the following functions:
USING THE SET TOP BOX
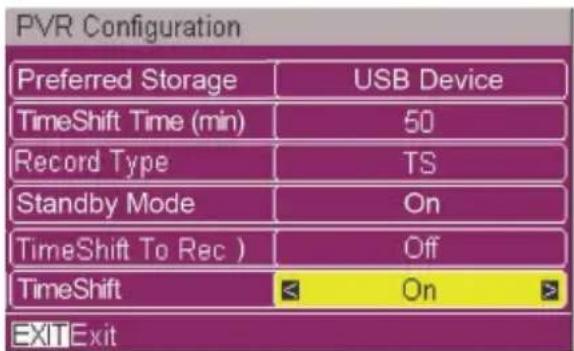
- Preferred Storage: USB partition (select the logic unit tostore the datas)
- TimeShift Time (min): you can reserve the time of Timeshifting. From 10 to 60 minutes.
- Record Type:
"TS"* Transport Stream format(*.dvr). This format can only be played in Set Top Box.
"PS"* Program Stream format(*.mpg). This format can be played in your computer.
- Stand-by mode: After recording finished, if you want the decoder to be off, set this option to "ON"
- TimeShift To Rec:
"On"* When you press "REC" key, the data in timeshift buffer will be stored in the recorded file.
"Off"* When you start to record, it just records from the current time.
- TimeShift:
"On"enable the Timeshifting
"Off"disable the Timeshifting
Disc format: System file FAT or NTFS.
Note:
Please don't remove the recording device before it is unmounted.
SPECIFICATIONS
| TUNER & CHANNELBAND WIDTHDEMODULATOR | RF INPUT CONNECTOR x1(D-TYPE, IEC169-2, FEMALE)FREQUENCY RANGE:174MHz ~ 230MHz (VHF) & 470MHz ~ 862MHz (UHF)6/7/8 MHZCOFDM |
| DECODERTRANSPORT STREAMPROFILE LEVELDECODER MODULEVIDEO FORMATSAudio FormatVIDEO OUTPUTMEDIA PLAYER | MPEG-2 ISO/IEC 13818-1MPEG-2 MAIN PROFILE @MAIN LEVEL,PAL-NTSC-AUTO4: 3/16: 9 SWITCHABLEMPEG Layer I & II, 32 / 44.1 / 48KHzCVBS,RGBJPEG*MP3*MPG(MPEG2) |
| CONNECTIONMAIN POWER CABLETUNERSCARTUSB | FIXED TYPEANTENNA INPUTx1TV x1 VCRx1USB2.0 FULL SPEED X1 |
| POWER SUPPLYPOWER CONSUMPTION | ~ 220-240V 50/60HzMAX. 5W |
Recycling of electronic devices
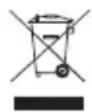
Electric and electronic equipment and included batteries contains materials, components and substances that can be hazardous to your health and the environment, if the waste material (discarded electric and electronic equipment and batteries) is not handled correctly.
Electric and electronic equipment and batteries is marked with the crossed out trash can symbol, seen below. This symbol signifies that electric and electronic equipment and batteries should not be disposed of with other household waste, but should be disposed of separately.
As the end user it is important that you submit your used batteries to the appropriate and designated facility. In this manner you make sure that the batteries are recycled in accordance with legislature and will not harm the environment.
All cities have established collection points, where electric and electronic equipment and batteries can either be submitted free of charge at recycling stations and other collection sites, or be collected from the households. Additional information is available at the technical department of your city.

www.facebook.com/denverelectronics
DENVER ELECTRONICS
www.denver-electronics.com
INTER SALES A/S
ADDRESS: STAVNEAGERVEJ 22 8250 EGAA-AARHUS, DENMARK
TEL: 0045 86 22 61 00
FAX: 0045 86 22 81 00

- SAFETY INFORMATION
- TO REDUCE THE RISK OF FIRE AND ELECTRIC SHOCK, DO NOT EXPOSE THIS UNIT TO RAIN OR MOISTURE. ·Do not use unsuitable (unprotected) power
- IMPORTANT SAFEGUARDS
- INTRODUCTION
- REMOTE CONTROL:
- USING THE SET TOP BOX
- First Time Installation
- Volume Control
- Channel Scan
- Setup Menu
- Tools
- EPG(Electronic Program Guide)
- Media Player
- Recording and Timeshifting
- Recording
- Timeshifting (512MB minimum free space)
- PVR Configuration
- Recycling of electronic devices
Brand : DENVER
Model : DVBT-43
Category : Digital decoder