
LR4DM - Projector Accessories OPTOMA - Free user manual and instructions
Find the device manual for free LR4DM OPTOMA in PDF.


| Product Type | Presentation laser pointer with wireless USB controller and flash drive |
| Brand | Optoma |
| Model | LR4DM |
| Dimensions (L x W x H) | 13 cm x 3.5 cm x 2.2 cm |
| Weight | 78 g (including battery) |
| Power Source | 1 x AAA 1.5V battery |
| Battery Life (Continuous Use) | Approximately 6 hours |
| Wireless Technology | 2.4 GHz RF |
| Transmission Distance | Up to 10 meters (33 feet) |
| Interface | USB 2.0 |
| Supported Operating Systems | Windows 2000/Me/XP, Mac OS 9.0 and higher |
| Laser Wavelength | 630-680 nm |
| Laser Output Power | Class IIIa, <5 mW (or Class II, <1 mW) |
| Laser Pointer Icons | 5 different pointer images (e.g., dot, circle, arrow, etc.) |
| Remote Control Modes | Keyboard (K/B), Mouse, Media Player, Timer |
| Display | Backlit LCD menu |
| Built-in Storage | 1 GB USB flash drive (optional, integrated in receiver) |
| Timer | Countdown up to 24 hours (HH:MM:SS) |
| Alarm Type | Vibrate alert (final 3 minutes, final minute, at zero) |
| Auto Power-Off | After 30 minutes of standby |
| System Restore | Remembers previous state after power off or battery change |
| Package Contents | LR4 controller, wireless USB receiver, AAA battery, user manual |
| Safety Certification | Laser class IIIa/II; avoid eye exposure |
| Cleaning Instructions | Wipe with a dry, soft cloth; do not use liquids or abrasives |
Frequently Asked Questions - LR4DM OPTOMA
User questions about LR4DM OPTOMA
0 question about this device. Answer the ones you know or ask your own.
Ask a new question about this device
Download the instructions for your Projector Accessories in PDF format for free! Find your manual LR4DM - OPTOMA and take your electronic device back in hand. On this page are published all the documents necessary for the use of your device. LR4DM by OPTOMA.
USER MANUAL LR4DM OPTOMA
Congratulations on your purchase of LR4. It is a versatile presentation laser pointer, wireless USB controller, and combined flash drive.
About This User's Guide
This manual is designed to guide you through setup and operation of LR4. The introduction details quick setup and operation. The OSD chapter details how to use LR4 menu, and the final chapter explains additional functions available.
Quick Start Guide
The Quick Start Guide is designed to help you set up and operate LR4 as quickly as possible. It contains basic information to get started.
Syntax Convention
- Buttons with captions, and menu options begin with capital letters
- Buttons without captions are referenced by their graphical representation
Frequency Search
Should the receiver not respond to the controller after installing the driver see “Installing the Wireless USB Receiver” on page 7, reset the transmission and reception frequency between controller and wireless USB receiver using the following procedure.
1 Plug the wireless USB receiver into an available USB port.
2 Press the Connect Key on the wireless USB receiver. The Status LED starts flashing. If the frequency search is not complete within 1 minute, the LED will still stop flashing.
3 Remove the battery on the LR4.
4 Press the Power button while re-install the battery.
While inserting the battery, the LCD screen lights up for 1 second and then go out.
5 Release the Power button after the LCD screen goes out.
The Status LED will go out at the same time.
6 The wireless transmission is reset. Now the LR4 is ready to use.
Table of Contents
Introducing LR4 1
Features 1
Package Contents 3
LR4 Components 4
Specifications 5
Laser Pointer Icons 5
Preparing for Use 6
Installing the Battery 6
Removing the Wireless USB Receiver ..... 7
Installing the Wireless USB Receiver ..... 7
LR4 Menu Display...... 8
Introducing the Display 8
On-Screen Display (OSD) Modes ..... 9
KEYBOARD (K/B) 9
MOUSE 10
MEDIA Player 10
TIMER 11
Additional Information......13
Operating the Laser 13
Timer Quick Settings 13
OSD Backlight 13
Vibrate Alert ....14
Frequency Search 14
CHAPTER 1
Introducing LR4
This chapter details the uses, features, and installation of LR4
1.1 Features
Wireless USB Transceiver
LR4 is an all-in-one transmitter and receiver. The wireless USB receiver separates from the main controller unit and plugs directly into any USB port. The controller can transmit up to 10 meters.
Remote Keyboard and Mouse
Control the mouse or keyboard during presentations over the wireless connection.
Remote Multimedia
Use LR4 as a remote control for playing multimedia content.
Laser Pointer Icons
Project five different pointer images and enhance the appeal of your presentations.
1GB USB Flash Drive (optional)
LR4 wireless USB receiver is also a USB flash drive that can store up to 1GB of your data. Now you can carry all your multimedia and presentations in one convenient drive.
LR4 User Manual Chapter 1 Introducing LR4
Backlit LCD Menu
Always know the current status of your LR4 with an easily viewable display.
Navigation Pad
The ergonomic LR4 provides simple thumb control for easy navigation of the LCD Menu and replacing the mouse during presentations.
Countdown Timer
Set the timer to countdown from up to 24 hours to remind you of important events, or how much time is left for your presentation.
Vibrate Alarm
The vibrate lets you discretely acknowledge timed alerts without creating a distraction.
Power-saving Mode
The LR4 will automatically turn off after 30-minutes standby.
System Restore
LR4 remembers and restore the previous state of operation after switching off or even changing the batteries.
1.2 Package Contents
Please check the package contains the following items.
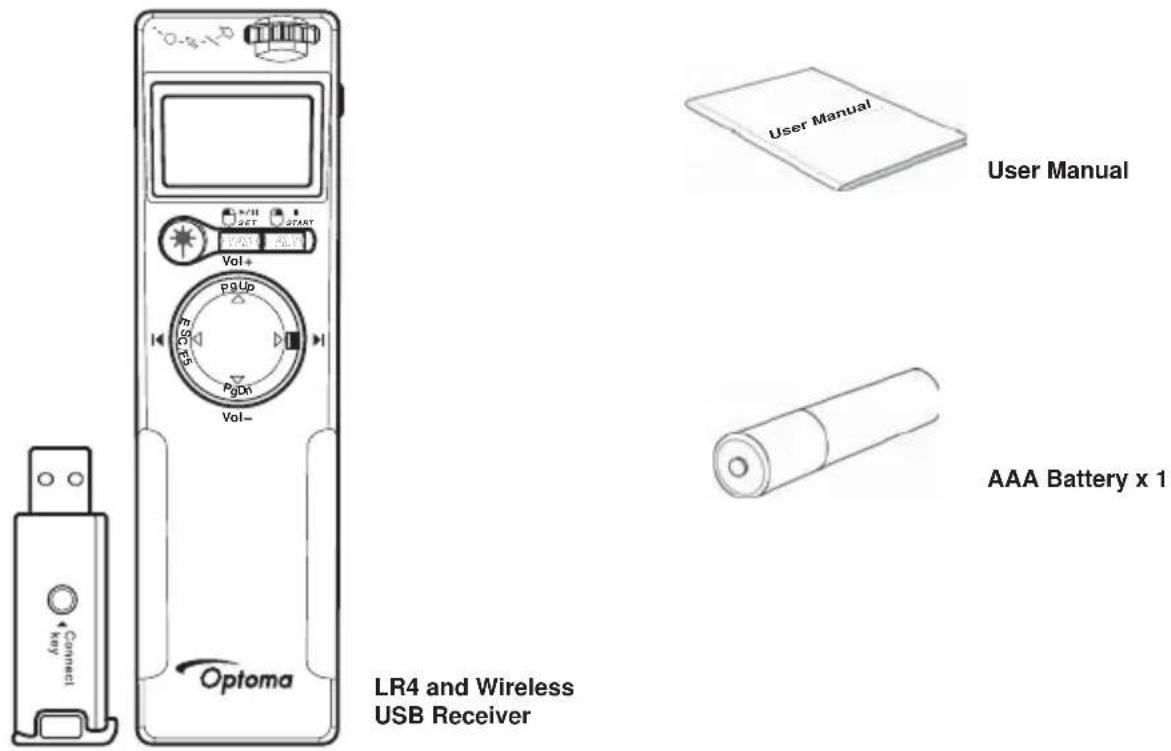
LR4 User Manual Chapter 1 Introducing LR4
1.3 LR4 Components
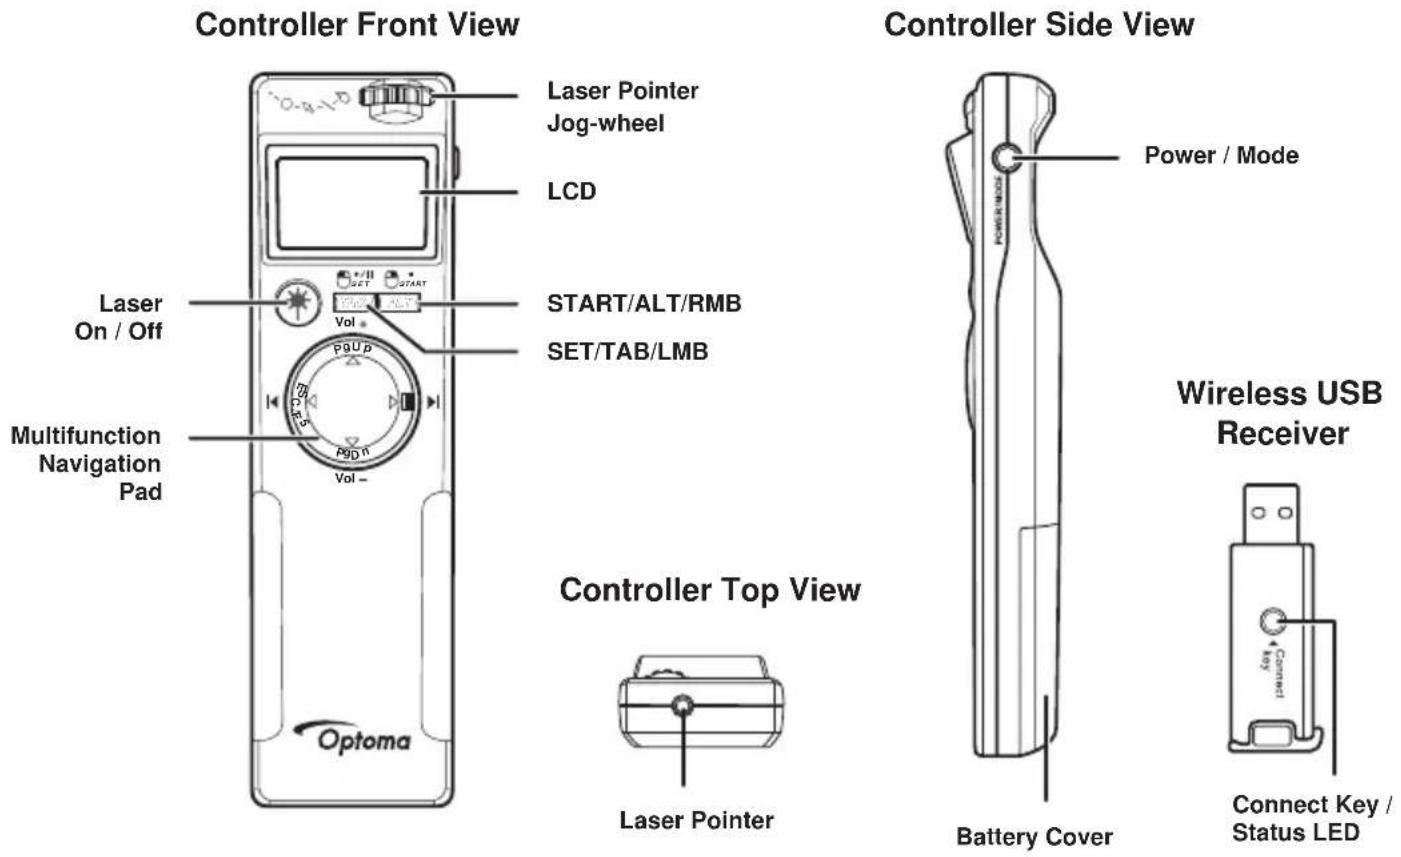
LR4 User Manual Chapter 1 Introducing LR4
1.4 Specifications
Dimensions 13(L) x 3.5 (W) x 2.2 (T) cm
Weight 78g (including battery)
Transmission Distance 33 feet (10 meters)
RF Frequency 2.4G
Interface USB 2.0
OS Supported Windows 2000/Me/XP/Mac OS 9.0 & higher
Laser Wavelength 630\~680nm
Output Power CL IIIa, <5mW CL II, <1mW
Power 1x AAA 1.5V battery
Battery Burn Time 6 hours
1.4.1 Laser Pointer Icons
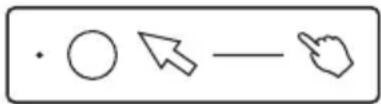
Warning : Laser radiation is harmful to the eyes. Do not stare directly into the beam.
Caution : Use of controls, adjustments or procedures other than those specified in this manual could result in hazardous exposure to laser radiation.

LR4 User Manual Chapter 1 Introducing LR4
1.5 Preparing for Use
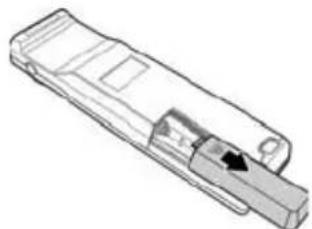
1.5.1 Installing the Battery
For first use, or should the battery indicator on the LCD show empty. Please use the following guidelines to install a new battery.
1 Push the battery cover down and away from the controller.
2 Align the AAA battery according to the (+) and (-) markings on the battery compartment.
3 Replace the battery cover sliding back until it clicks into place.
natural_image
Technical line drawing of a mechanical component with a handle and internal structure (no text or symbols)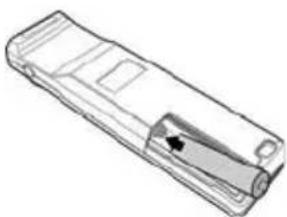
natural_image
Line drawing of a rectangular electronic device with a black arrow pointing to its side (no text or symbols)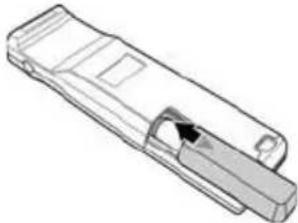
natural_image
Technical line drawing of a mechanical component with a handle and internal slot (no text or symbols)Caution:
• Only use the specified AAA battery.
- Insert battery according to (+) and (-) markings. Inserting the battery incorrectly may result in cracking or leakage, which may pose a risk of fire or lead to personal injury.
- Dispose of the battery in accordance with local laws and regulations. Please turn in your batteries at the responsible collecting point, or place of purchase.
- When the controller is not used for extended periods, please remove the battery.
Warning: Never dispose of batteries in fire, as they could explode.
1.5.1.1 Powering LR4
To switch LR4 on or off, press and hold the Power/Mode button for two seconds, at the same time, the LCD illuminates for 3 seconds. The LR4 will automatically turn off after 30-minutes standby.
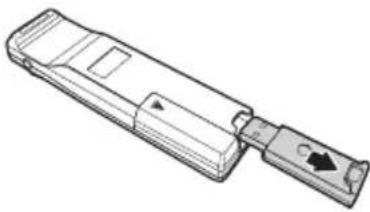
1.5.2 Removing the Wireless USB Receiver
Locate the raised edge at the rear-end of the controller module. Push and slide out the wireless USB receiver.
natural_image
Technical line drawing of a mechanical component with a handle and arrow indicator (no text or symbols)1.5.3 Installing the Wireless USB Receiver
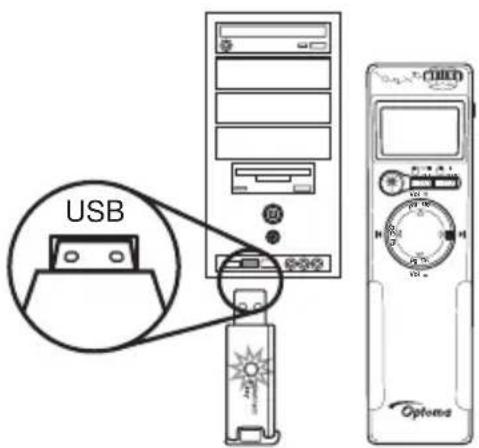
The wireless USB receiver is used like a regular USB flash drive. Plug the receiver directly into an available USB port of your notebook or computer. Windows 2000/XP/Mac OS 9.0 operating systems and later, the drive is automatically recognized and installed.
Note: If after installation, the USB receiver does not respond to the controller, please see "Frequency Search" on page 14 for how to match the frequency between controller and receiver.
LR4 User Manual Chapter 1 Introducing LR4
CHAPTER 2
LR4 Menu Display
This chapter explains how to use the OSD menus
2.1 Introducing the Display
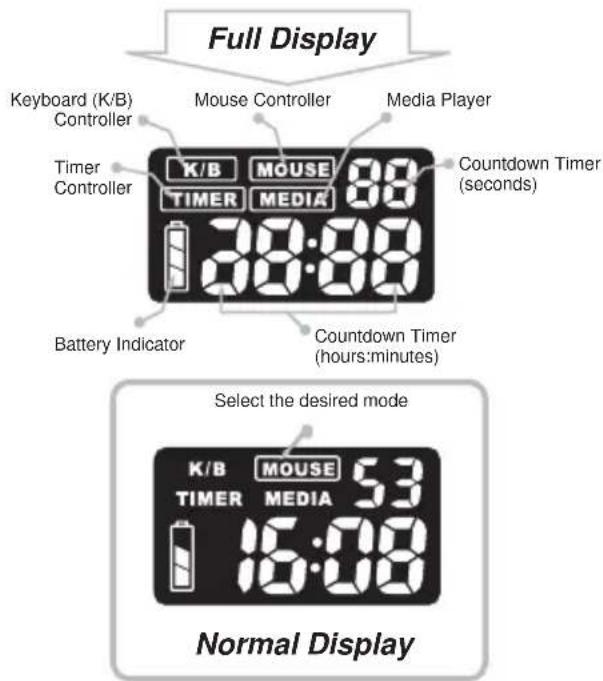
LR4 User Manual Chapter 2 LR4 Menu Display
2.2 On-Screen Display (OSD) Modes
LR4 has four modes of operation. Press the Power/Mode button to cycle though the different methods of using the controller.
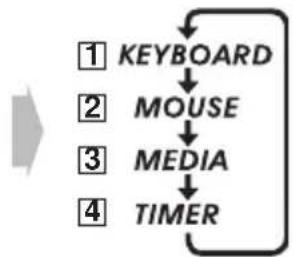
flowchart
graph TD
    A["1"] --> B["KEYBOARD"]
    B --> C["2"] --> D["MOUSE"]
    D --> E["3"] --> F["MEDIA"]
    F --> G["4"] --> H["TIMER"]
2.2.1 KEYBOARD (K/B)
Press the Power/Mode button until K/B is highlighted on the OSD.
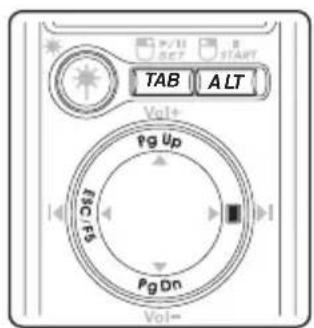
ALT + TAB
ALT
TAB
PgUp
PgDn
ESC
F5

Enter K/B mode to replace the computer keys.
Press ALT and then press TAB to scroll through open windows and programs.
ALT, TAB, PgUp, PgDn, ESC/F5 also replace their keyboard equivalents.
The right-hand multifunction navigation pad button turns the screen blank.
2.2.2 MOUSE
Press the Power/Mode button until MOUSE is highlighted on the OSD.
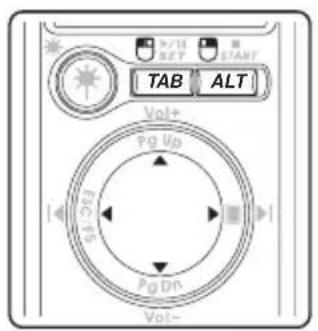
Enter MOUSE mode to replace the computer's mouse.
ALT ALT replaces the right mouse button.
TAB TAB replaces the left mouse button.
The multifunction navigation pad moves the mouse pointer.
2.2.3 MEDIA Player
Press the Power/Mode button until MEDIA is highlighted on the OSD.
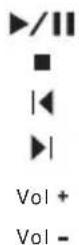
Enter MEDIA mode to play your media with the controller. Remotely play, pause, stop, skip tracks or adjust the volume.
2.2.4 TIMER
Press the Power/Mode button until TIMER is highlighted on the OSD.
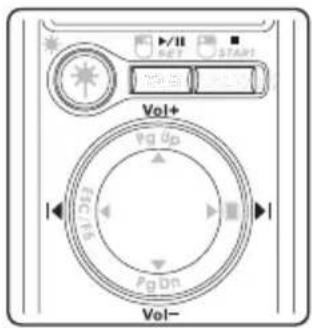
Enter TIMER to set and start a countdown from a maximum of 24 hours using HH:MM:SS.
Press SET to start the timer and edit that value or press START to exit timer if countdown function is not needed.
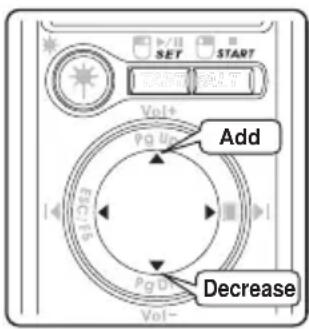
Press the plus(+)/minus(-) sign to increase/decrease the highlighted number.
Press the left/right arrow to highlight the desired number to change.
Press SET to stop the timer and edit that value.
Press START to begin the countdown.
The following example details how to edit the timer settings.
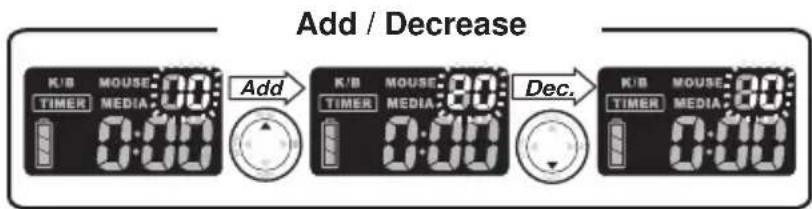
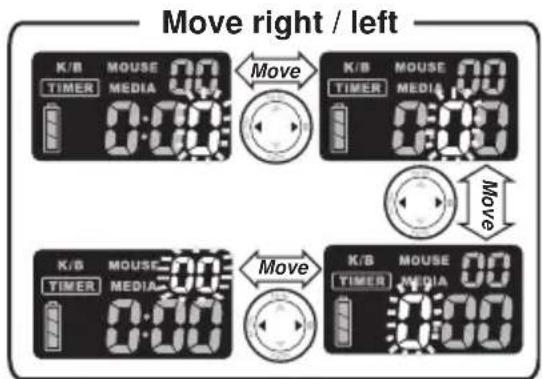
Quick Timer Setup: When starting the timer setting, press SET to setup the timer quickly. Press once to add 5 minutes, and so on.
CHAPTER 3
Additional Information
This chapter details additional functions of LR4
3.1 Operating the Laser
While pressing the Laser Pointer button, rotate the jog-wheel and cycle through the various pointers to the desired icon.

3.2 Timer Quick Settings
To quickly set the timer, press the Mode/Power button until TIMER is highlighted. Now press SET, the countdown setting increases by 5 minutes with each subsequent press (i.e. 5,10,15,20), until the maximum of 24-hours is reached.
3.3 OSD Backlight
The controller's OSD is backlit for viewing under virtually any lighting conditions, and turns on for three seconds after the following events.
- Pressing the Power/Mode button
- Pressing the PgDn (down arrow) on the multifunction navigation pad during K/B (keyboard) mode
Note: During Timer mode, the backlight remains illuminated.
3.4 Vibrate Alert
LR4 has a vibrate alert to discretely inform:
- The final three minutes of the timer; three short vibrations
- The final minute of the timer; short vibration
- When the timer reaches zero; long vibration
3.5 Frequency Search
Should the receiver not respond to the controller after installing the driver see "Installing the Wireless USB Receiver" on page 7, reset the transmission and reception frequency between controller and wireless USB receiver using the following procedure.
1 Plug the wireless USB receiver into an available USB port.
2 Press the Connect Key on the wireless USB receiver. The Status LED starts flashing. If the frequency search is not complete within 1 minute, the LED will still stop flashing.
3 Remove the battery on the LR4.
4 Press the Power button while re-install the battery.
While inserting the battery, the LCD screen lights up for 1 second and then go out.
5 Release the Power button after the LCD screen goes out.
The Status LED will go out at the same time.
6 The wireless transmission is reset. Now the LR4 is ready to use.
- About This User's Guide
- Quick Start Guide
- Syntax Convention
- Frequency Search
- Table of Contents
- Introducing LR4 1
- LR4 Menu Display...... 8
- Additional Information......13
- CHAPTER 1
- Introducing LR4
- Features
- Wireless USB Transceiver
- Remote Keyboard and Mouse
- Remote Multimedia
- Laser Pointer Icons
- 1GB USB Flash Drive (optional)
- Backlit LCD Menu
- Navigation Pad
- Countdown Timer
- Vibrate Alarm
- Power-saving Mode
- System Restore
- Package Contents
- LR4 Components
- Specifications
- Laser Pointer Icons
- Preparing for Use
- Installing the Battery
- Caution:
- Powering LR4
- Removing the Wireless USB Receiver
- Installing the Wireless USB Receiver
- CHAPTER 2
- LR4 Menu Display
- Introducing the Display
- On-Screen Display (OSD) Modes
- KEYBOARD (K/B)
- MOUSE
- MEDIA Player
- TIMER
- CHAPTER 3
- Additional Information
- Operating the Laser
- Timer Quick Settings
- OSD Backlight
- Vibrate Alert
- Frequency Search
Brand : OPTOMA
Model : LR4DM
Category : Projector Accessories