
VPL-100 - DJ Equipment DENVER - Free user manual and instructions
Find the device manual for free VPL-100 DENVER in PDF.


| Product Type | USB Turntable with digital audio output |
| Speeds | 33 1/3, 45, 78 rpm |
| Drive System | Belt drive (implied) |
| Automatic Stop | Yes, at end of record |
| Tonearm | With damped cueing lever and security latch |
| Cartridge/Stylus | Replaceable stylus (user-replaceable) |
| Outputs | USB digital audio, Phono line level (RCA), AUX OUT |
| Input | AUX IN |
| Included Accessories | USB cable, 45 rpm adaptor, software CD (Audacity), instruction manual |
| Power Supply | AC 230V / 50Hz |
| Power Switch | Front mounted with LED indicator |
| Software | Audacity (free audio editor) included for recording and editing |
| Computer Connection | USB 1.1/2.0 (USB PnP Audio Device) |
| Supported Audio Formats | WAV, MP3 (requires LAME encoder) |
| Dust Cover | Hinged, raises for record access |
| Safety Features | Overload protection plug, automatic shut-off |
| Dimensions | Not specified in manual |
| Weight | Not specified in manual |
| Cleaning | Use soft damp lint-free cloth; avoid chemicals |
Frequently Asked Questions - VPL-100 DENVER
User questions about VPL-100 DENVER
0 question about this device. Answer the ones you know or ask your own.
Ask a new question about this device
Download the instructions for your DJ Equipment in PDF format for free! Find your manual VPL-100 - DENVER and take your electronic device back in hand. On this page are published all the documents necessary for the use of your device. VPL-100 by DENVER.
USER MANUAL VPL-100 DENVER
natural_image
Black vinyl record with open lid and reflective cover, showing music excerpt (no visible text or symbols)MODEL: VPL-100
INSTRUCTION MANUAL
PLEASE READ THIS OPERATING MANUAL COMPLETELY BEFORE OPERATING THIS UNIT AND RETAIN THIS BOOKLET FOR FUTURE REFERENCE.
SAFETY INSTRUCTIONS
WARNING: TO PREVENT FIRE OR SHOCK HAZARD, DO NOT EXPOSE THIS APPLIANCE TO RAIN OR MOISTURE.
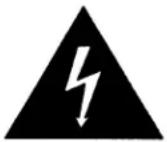
The lightning flash and arrow head within the triangle is a warning sign alerting you of "dangerous voltage" inside the product
CAUTION
RISK OF ELECTRIC SHOCK DO NOT OPEN
CAUTION : TO REDUCE THE RISK OF ELECTRIC SHOCK DO NOT REMOVE COVER (OR BACK) NO USER SERVICEABLE PARTS INSIDE. REFER SERVICING TO QUALIFIED SERVICE PERSONNEL

The exclamation point within the triangle is a warning sign alerting you of Important Instructions accompanying the product
IMPORTANT SAFETY INSTRUCTIONS
- Read instructions - All the safety and operating instructions should be read before the appliance is operated
-
Retain instructions - The safety and operating instructions should be retained for future reference.
-
Heed Warnings - All warnings on the appliance and in the operating instructions should be adhered to.
- Follow instructions - All operation and use instructions should be followed.
- Water and Moisture - The appliance should not be used near water; for example, near a bathtub, washbowl, kitchen sink, laundry tub, in a wet basement, or near a swimming pool, and the like.
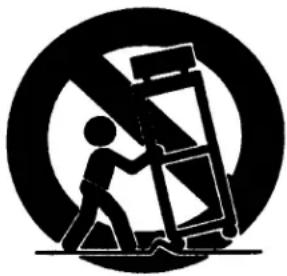
- Carts and Stands - The appliance should be used only with a cart or stand that is recommended by the manufacturer.
An appliance and cart combination should be moved with care. Quick stops, excessive force, and uneven surfaces may cause the appliance and cart combination to overturn.
natural_image
Silhouette of a person climbing a ladder inside a circle with a diagonal line (no text or symbols)- Wall and Ceiling Mounting - The appliance should be mounted to a wall or ceiling only as recommended by the manufacturer.
- Ventilation - The appliance should be situated so that its location or position does not interfere with its proper ventilation. For example, the appliance should not be situated
on a bed, sofa, rug, or similar surface that may block the ventilation openings; or placed in a built-in installation, such as a bookcase or cabinet that may impede the flow of air through the ventilation openings.
- Heat - The appliance should be situated away from heat sources such as radiators, heat registers, stoves or other appliances (including amplifiers) that produce heat.
- Power Sources - The appliance should be connected to a power supply only of the type described in the operating instructions or as marked on the appliance.
- Grounding or Polarization - Precautions should be taken so that the grounding or polarization means of an appliance is not defeated.
- Power-Cord Protection - Power supply cords should be routed so that they are not likely to be walked on or pinched by items placed upon or against them, paying particular attention to cords at plugs, convenience receptacles and the point where they exit from the appliance.
- Protective Attachment Plug - The appliance is equipped with an attachment plug having overload protection. This is a safety feature. See Instruction Manual for replacement or resetting of protective device. If replacement of the plug is required, be sure the service technician has used a replacement plug specified by the manufacturer that has the same overload protection as the original plug.
- Cleaning - The appliance should be cleaned only as recommended by the manufacturer.
- Power Lines - An outdoor antenna should be located away from power lines.
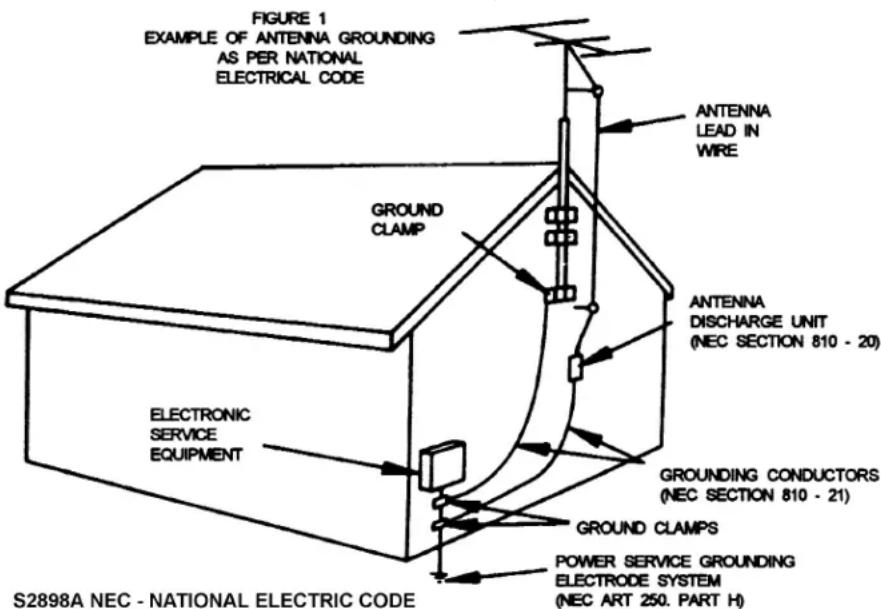
- Outdoor Antenna Grounding - If an outside antenna is connected to the receiver, be sure the antenna system is grounded so as to provide some protection against voltage surges and built up static charges. Section 810 of the National Electrical Code, ANSI/ NFPA No.70-1984, provides information with respect to proper grounding of the mast and supporting structure, grounding of the lead-in wire to an antenna discharge unit, size of grounding conductors, location of antenna discharge unit, connection to grounding electrodes, and requirements for the grounding electrode. See figure 1.
- Nonuse Periods - The power cord of the appliance should be unplugged from the outlet when left unused for a long period of time.
- Object and Liquid Entry - Care should be taken so that objects do not fall and liquids are not spilled into the enclosure through openings.
-
Damage Requiring Service - The appliance should be serviced by qualified service personnel when:
A. The power supply cord or the plug has been damaged; or
B. Objects have fallen, or liquid has been spilled into the appliance; or
C. The appliance has been exposed to rain; or
D. The appliance does not appear to operate normally or exhibits a marked change in performance; or
E. The appliance has been dropped, or the enclosure damaged. -
Servicing - The user should not attempt to service the appliance beyond that described in the operating instructions. All other servicing should be referred to qualified service personnel.
Getting Started
Remove appliance from the box.
Remove any packaging from the product.
Place packaging inside the box and either store or dispose of safely.
In the box
USB Turntable
Software Installation CD
USB cable
45 rpm adaptor
Instruction manual
Features
- USB digital audio output
- Software included to record and process your recordings.
●Three speed turntable 33, 45 and 78rpm
●Automatic stop at the end of the record - Separate line level output via Phono connections.
- Damped cueing lever to manually raise and lower the Tonearm
●Front mounted Power switch.
- 45 rpm single adaptor.
Important Safety Information
- When using electrical appliances, basic safety precautions should always be followed.
- Check that the voltage indicated on the data plate corresponds with that of the local network before connecting to the mains supply.
- This appliance is not intended for use by persons (including children) who are not mentally able, physically capable, experienced or do not understand the product. They should be given supervision and instruction in the use of the appliance by a person responsible for their safety.
- Children should be supervised to ensure that they do not play with the appliance.
- Do not leave appliance unattended whilst connected to the mains supply
- To reduce the risk of electric shock, do not use outdoors or on wet surfaces.
- Do not immerse in water or any other liquids.
- Unplug the appliance from mains outlet when not in use and before servicing.
- Do not unplug by pulling the cord. To unplug, grasp the plug, not the cord.
- Do not use the appliance with a damaged mains cord or plug.
- Do not pull the mains cord, close the door on it or run it over sharp edges.
- Do not use if unit has been dropped or damaged in any way.
- Repairs to electrical equipment should only be performed by a qualified electrician. Improper repairs may place user at serious risk
- Place the unit on sound, level surface free of vibrations and away from sources of heat.
- Do not leave unit plugged in for long periods.
- Do not use with wet hands.
- Do not put objects into openings.
- Keep free of dust, lint, hair, etc.
- Keep hair, loose clothing, fingers and all parts of the body away from moving parts.
- Do not use this unit for anything other than its intended use.
- Never place unit on top of or near loudspeakers as acoustic feedback will occur.
FUNCTIONS AND CONTROLS
TURNTABLE/PHONO
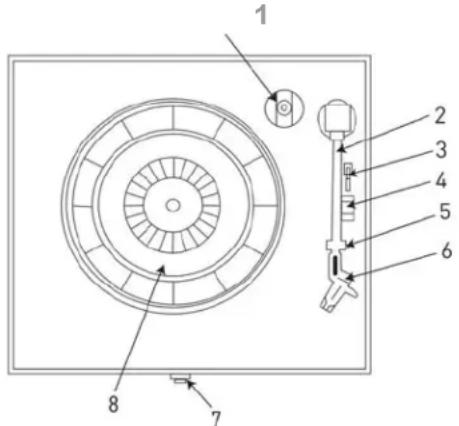
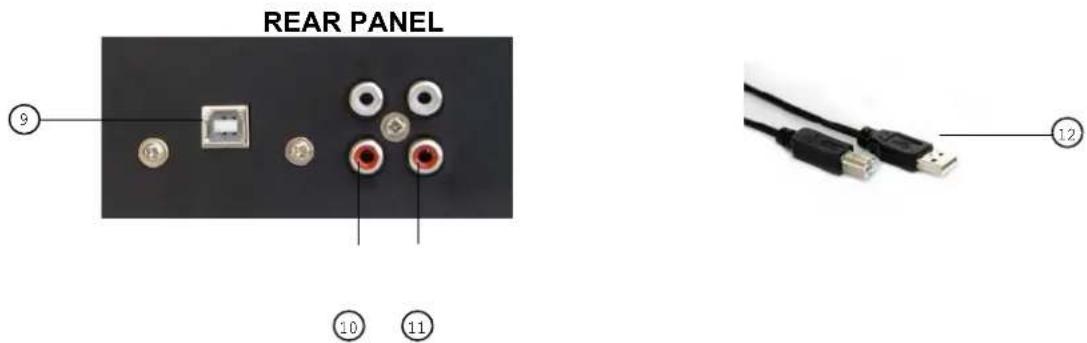
- 45 Single adaptor
- Cue lever
- Tone arm rest and security latch
- Power switch
- USB OUTPUT
-
AUX IN
-
Tone arm
- Speed control switch
- Cartridge/Stylus
- Turntable
- AUX OUT
- USB CABLE
S etting up the USB Turntable
- Remove all packaging from the unit.
- Ensure that the security latch is closed so that the tone arm is not free to move.
- Ensure unit is on a solid level surface, away from sources of heat, sunlight, etc.
- Remove the protective stylus guard from the tone arm cartridge by gently pulling forwards.
Installing the software
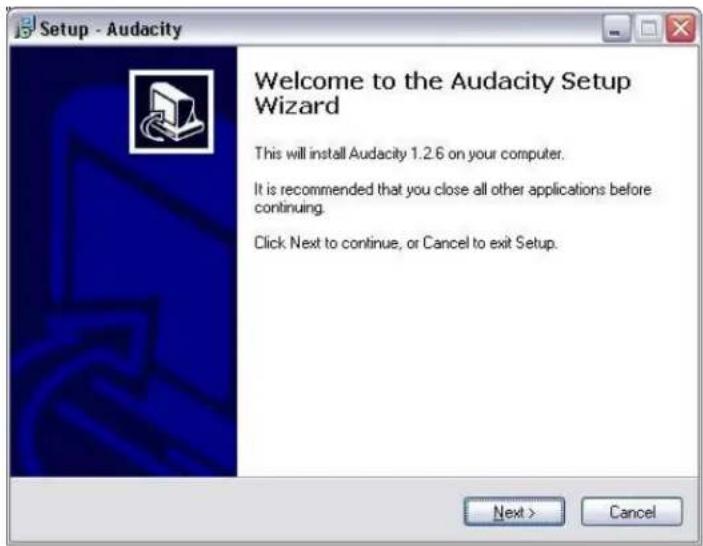
- Place the supplied CD into the drive of your computer, follow the instructions and the software will automatically install as follows:
- Click 'Next'
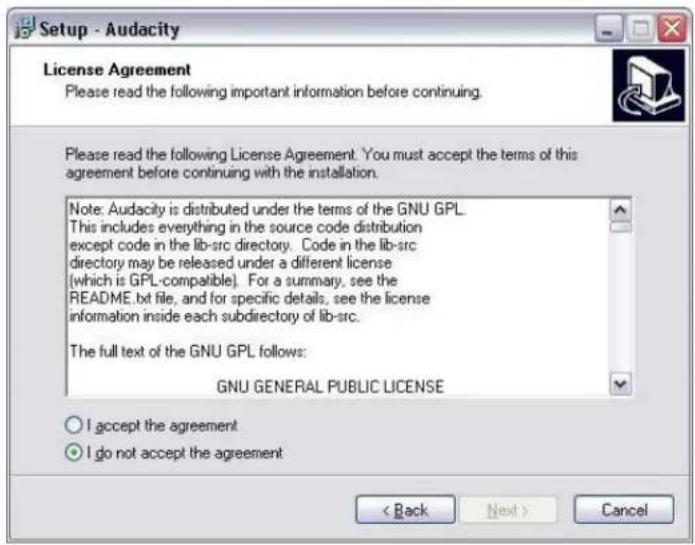
- Select 'I accept' option then click 'Next':
- Click 'Next':
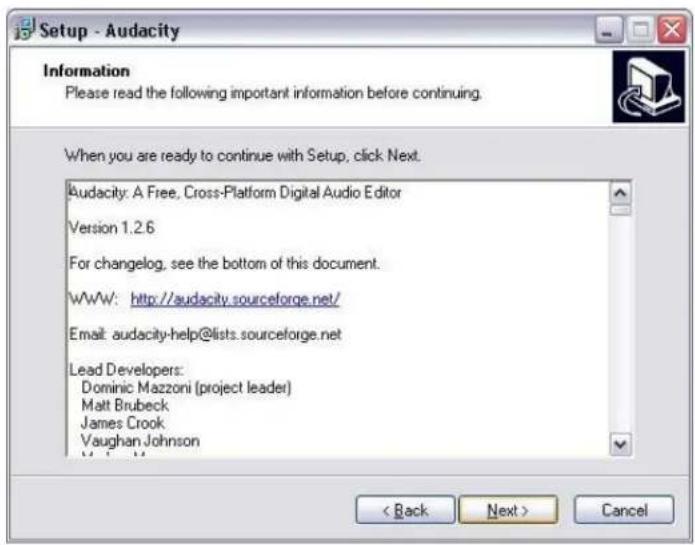
- Here either select another location or click 'Next' to continue (recommended):
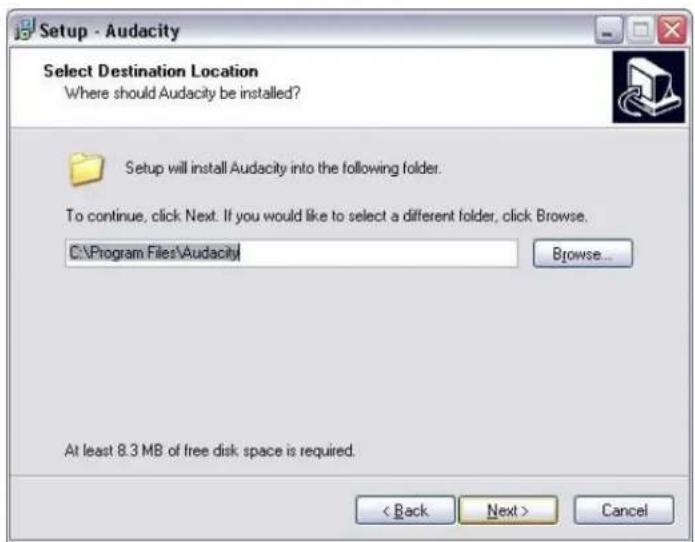
- Click 'Install' to continue:
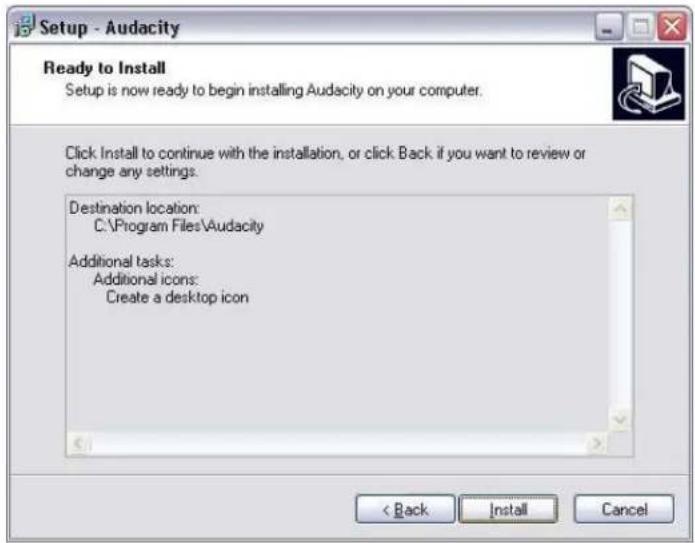
- The software will
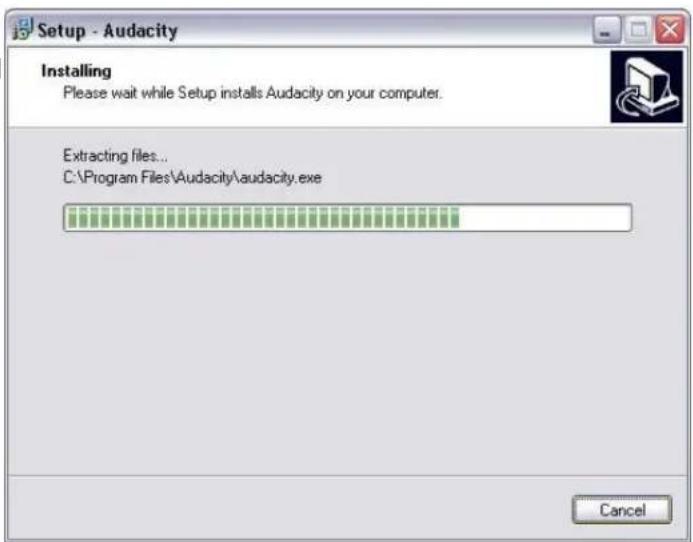
- Click on 'Finish' to complete the installation:
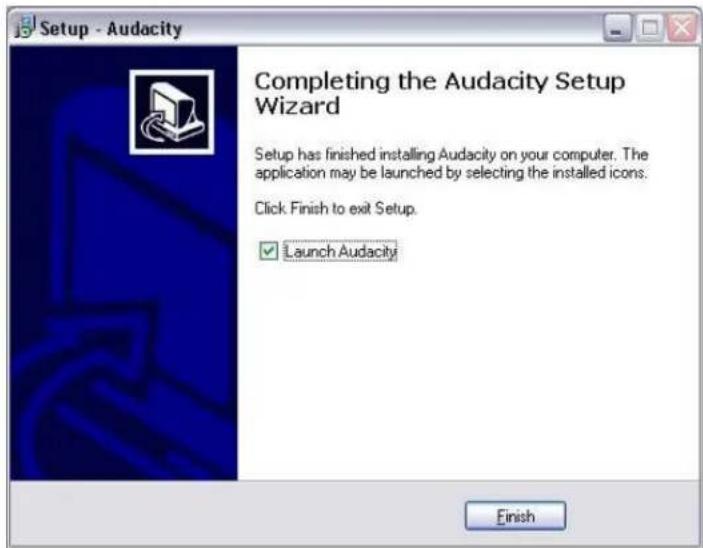
- Audacity should automatically start up, if not follow the next sequence:
- The Audacity icon will now be seen on the desktop, double click on it to start Audacity running, if an icon does not appear, go to the 'C' drive under 'My Computer', click on 'Program files' and then 'Audacity'. Right click on the 'orange ball wearing Headphones' icon and select 'Send to' then 'Desktop (create shortcut)'.
Using Audacity
- Plug the USB cable into the back of the unit and the other end into a spare USB port on your computer.
- Insert the mains plug into the nearest mains socket and switch on if applicable.
- Run the Audacity software by double clicking the Audacity icon.
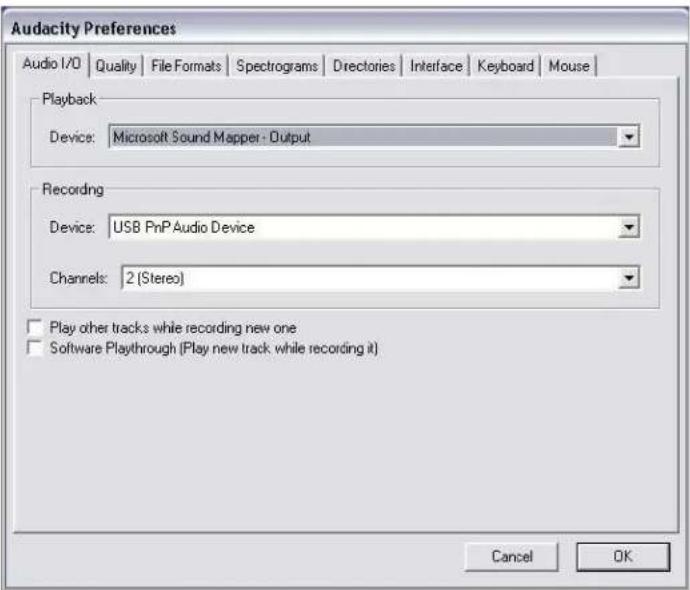
- Before recording, click on Edit at the top of the main page; select Preferences at the bottom of the menu which will open up Preferences.
- At the recording part of the window open the Device menu by using the down arrow on the right hand side. Select the USB PnP Audio Device option from the menu. Also tick the box next to 'Software Play through (Play new track while recoding it)'.
- The lower box enables the number of recording channels to be set, 1 is Mono and 2 is Stereo, select the Stereo option.
- Click 'OK' once the options have been selected:
Playing a record
- This PIASTIC TURNTABLE PLAYER operates from AC 230V/50Hz power. Insert the plug of the AC power cord into a wall outlet with AC power supply
- Switch on the unit by pressing the power switch on the front, the LED above it will light...
- Raise the dust cover and push it back far enough until it stays upright.
- Release the Security latch from the tone arm by moving it to the right.
-
Place the record to be played on the turntable.
-
Select the correct playing speed for the record (33, 45 or 78 rpm) using the •Speed control switch on the top right hand side of the unit.
- Push the cue lever back to raise the tone arm.
- Moving the arm from its rest will start the turntable rotating.
- At the desired point on the record, pull the cue lever forward to lower the arm.
- At the end of the record the Turntable will automatically stop rotating.
- NOTE: lowering the lid whilst the record is on the Turntable will reduce the build up of dust, etc on the record which would impair the performance of the unit.
Recording to computer using Audacity
- Start the record playing as described above, and press Record at the top of the Audacity window to start recording to the computer.
- Once recorded use the Transport controls at the top of the screen to, Go to start, Play, Record, Pause, Stop and Go to end of Wave form as below:
Pause - Play -Stop - Go to Start - Go to End - Record
![17 Flamboyant File Edit Slow Project Generate Bflog Analyze Help 30 .15 0 15 30 45 1:00 1:15 1:30 1:45 2:00 2:15 2:30 2:45 3:00 3:15 3:30 3:45 17 Fantasy Stermy, 441.0Hz 32-bit font Multi Audio L R Waveform 1.0 0.5 0.0 -0.5 -1.0 1.0 0.5 0.0 -0.5 -1.0 Project role: 44100 Cursor: 0.05.00000 min/sec [Snap-To GIF]](/content/2026/05/858437/images/aacebdd9ea438515b20d04e549f012f324c6275844584c1db855dcb8b7d21ab4.jpg)
- Use the file, Edit, View, Project, Generate, Effect and Analyse menus to Save, Export and Manipulate your music.
- If the recording level requires adjustment, click on 'START', 'SETTINGS' and select control panel. Under Control Panel select 'SOUNDS and AUDIO DEVICES', click on the 'VOLUME' tab and select 'ADVANCED'.
- On the Master volume window select options at the top left hand corner, click on properties in the drop down menu.
- In the Properties window select "USB PnP Audio Device" from the drop down menu at the top. Click on "OK" to confirm the selection and a window will now appear with a control for the recording level. Move this control up if the recording is too quiet and down if the recording is too loud
- NOTE: the blue wave form should sit in the Audacity window such that the peaks of it stop short of the top and bottom
- Before editing your music, the recorded waveform will need to be highlighted.
- To highlight your wave form, click with the left mouse button on the left hand side of the waveform (under the L+R controls) and the waveform will go darker.
- At this point the whole waveform can be edited. However if only a section of the waveform needs to be edited (or saved) the section required can be highlighted by placing the mouse over the beginning of the section holding the left button down and dragging it right over the area required and releasing it when the end of the desired section is reached. This darkened section will now be the only audio that will be edited.
- Alternatively click on the EDIT menu at the top left and then click on SELECT then choose from: All (whole wave form), Start to Cursor or Cursor to end.
- NOTE: after recording to the Computer, the USB cable may have to be removed from the USB port in order to enable playback later from the Computer.
Exporting your music files (.WAV)
- Once you have recorded and edited your music, you will need to save your files to the computer. To do this, click on file and move down to Export as WAV tab.
- Click on this and you will promptly be asked for the file name of the music recorded which will be saved in the location shown. At this point either make a note of the folder where your music is saved or save it in a folder of your choice.
- This can either be an existing one or a new folder.
Exporting your music files (.Mp3)
- Once you have recorded and edited your music, you will need to save your files to the computer. To do this click on file and move down to Export as Mp3 tab.
- Click on this and you will promptly be asked for the file name of the music recorded which will be saved in the location shown. At this point either make at note of the folder where your music is saved or save it in a folder of your choice.
- This can be either be an existing one or a new folder.
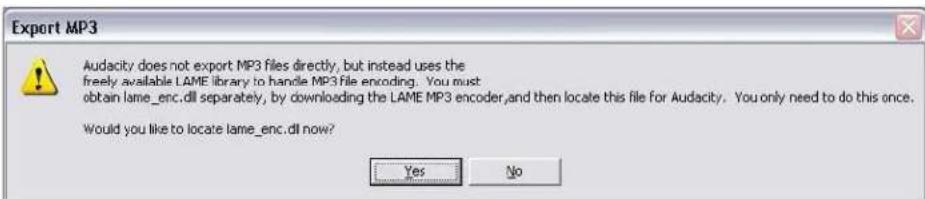
- NOTE: In order to activate the Export to Mp3 feature, it will be necessary to copy a file named lame_enc.dll from the installation CD and paste it in the AUDACITY folder that contains the software on the hard drive that was copied earlier from the CD. The software will automatically detect this file and exporting as an mp3 will now be possible.
HOW TO REPLACE THE STYLUS
- Hold the tone arm with one hand to support it as you take either side of the stylus with your thumb and forefinger of the other. Gently pull the stylus forward slightly then move it downwards then pull clear.
- Fitting a new stylus is the reverse of removal
- NOTE: Never play records with a worn or damaged Stylus.
Do's and don'ts
- Do not place unit on top of or near loudspeakers as acoustic feedback will occur.
- Do not play badly worn or chipped records.
- Ensure Stylus is clean and free of fluff and dust.
Care and Maintenance
- Clean the unit with a soft, damp lint free cloth, never use chemicals or harsh abrasives.
- Use a good quality record cleaner to optimise results.
Instructions on environment protection
natural_image
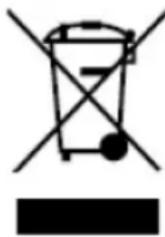
Symbol of a trash bin with crossed lines indicating no waste, and a solid black rectangle below (no text or labels)Electric and electronic equipment contains materials, components and substances that can be hazardous to your health and the environment, if the waste material (discarded electric and electronic equipment) is not handled correctly.
Electric and electronic equipment is marked with the crossed out trash can symbol, seen below. This symbol signifies that electric and electronic equipment should not be disposed of with other household waste, but should be disposed of separately.
All cities have established collection points, where electric and electronic equipment can either be submitted free of charge at recycling stations and other collection sites, or be collected from the households. Additional information is available at the technical department of your city.
ALL RIGHTS RESERVED DENVER ELECTRONICS A/S

WWW.DENVER-ELECTRONICS.COM
- INSTRUCTION MANUAL
- SAFETY INSTRUCTIONS
- CAUTION
- IMPORTANT SAFETY INSTRUCTIONS
- Getting Started
- In the box
- Features
- Important Safety Information
- FUNCTIONS AND CONTROLS
- S etting up the USB Turntable
- Installing the software
- Using Audacity
- Playing a record
- Recording to computer using Audacity
- Exporting your music files (.WAV)
- Exporting your music files (.Mp3)
- HOW TO REPLACE THE STYLUS
- Do's and don'ts
- Care and Maintenance
- Instructions on environment protection
- ALL RIGHTS RESERVED DENVER ELECTRONICS A/S
Brand : DENVER
Model : VPL-100
Category : DJ Equipment