
42812 - Oven Gastroback - Free user manual and instructions
Find the device manual for free 42812 Gastroback in PDF.


| Product Type | Countertop Oven |
| Brand | Gastroback |
| Model | 42812 Design Bistro Oven Advanced |
| Capacity | 28 L |
| Power Consumption | 1500 W |
| Voltage / Frequency | 230 V, 50 Hz |
| Weight | Approx. 7.5 kg |
| Dimensions (W x D x H) | 52.4 x 41.4 x 29.4 cm |
| Functions | Bake, Broil, Toast, Convection, Defrost, Auto Menu (Pizza, Beef, Chicken, Fish, Cookie, Cake) |
| Temperature Range | 70 °C to 235 °C (adjustable in 15 °C steps) |
| Timer | 1 to 99 minutes |
| Child Lock | Yes, press and hold START/STOP for 3 seconds |
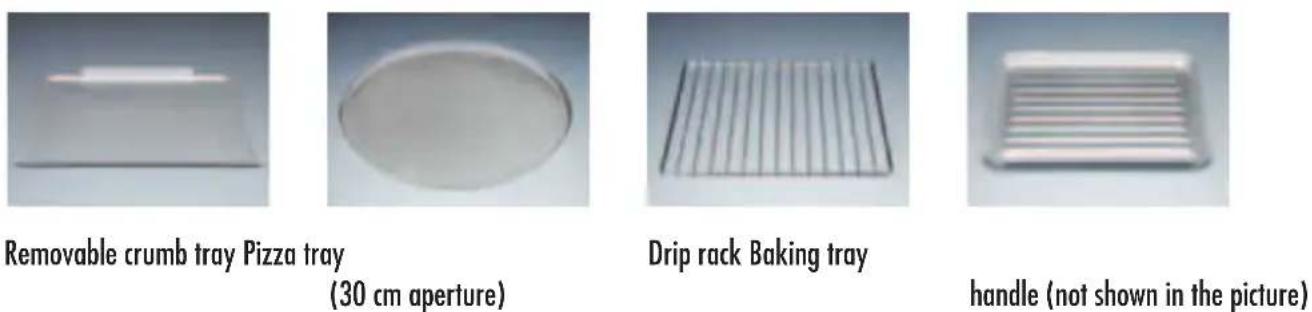
| Accessories Included | Baking tray, Drip rack, Pizza tray, Crumb tray, Handle |
| Interior Coating | Non-stick coating |
| Exterior Material | Stainless steel |
| Door Type | Glass door with handle |
| Control Type | Digital display with rotary switches and buttons |
| Cleaning | Crumb tray, baking tray, pizza tray hand wash only; drip rack and handle dishwasher safe |
| Safety Features | Automatic shut-off, child lock, overheat protection (implied), cool-touch handle |
| Warranty | Standard legal warranty (manufacturing defects) |
| Certification | CE marked |
Frequently Asked Questions - 42812 Gastroback
User questions about 42812 Gastroback
0 question about this device. Answer the ones you know or ask your own.
Ask a new question about this device
Download the instructions for your Oven in PDF format for free! Find your manual 42812 - Gastroback and take your electronic device back in hand. On this page are published all the documents necessary for the use of your device. 42812 by Gastroback.
USER MANUAL 42812 Gastroback
Operation instructions
DESIGN BISTRO OFEN ADVANCED 28 L
natural_image
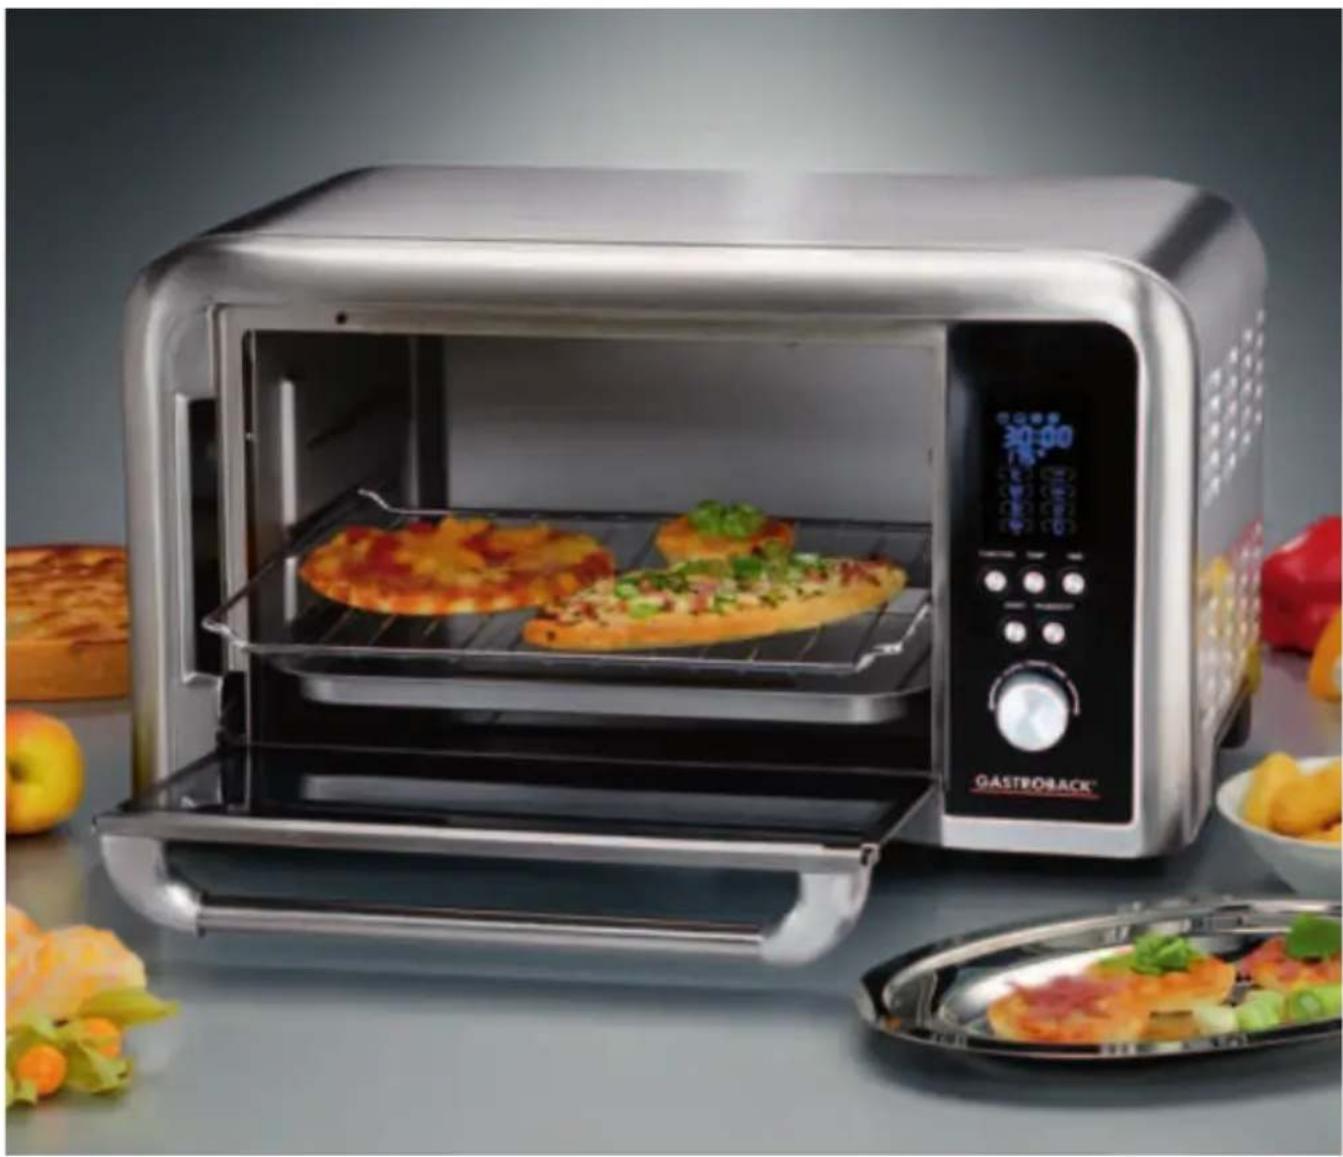
Modern stainless steel toaster oven with two pizza slices and a digital display, surrounded by fresh fruit and menu items (no text or symbols on main objects)Art.-No. 42812 Design Bistro Oven Advanced 28 L
Read all provided instructions before first usage!
Model and attachments are subject to change!
For domestic use only!
Carefully read all provided instructions before you start running the appliance and pay regard to the warnings mentioned in these instructions.
Table of Contents
Knowing your Design Bistro Oven Advanced 28 L....27
Important Instructions....29
Important Safeguards 30
First use....33
Operating the Design Bistro Oven Advanced 28 L....33
Using the handle....34
Time setting....34
Operating the appliance....34
Functions....35
Care and Cleaning 37
Tips for baking time and baking temperature....39
Recipes 42
Storage....45
Waste disposal....45
Warranty 45
Technical Specifications 46
Information and Service 46
Dear Customer!
With the Design Bistro Oven Advanced 28 L you can easily broil and bake your food. The oven has a practical application for multifunctional purposes. With the electronically controlled multifunctional oven you achieve best results in browning your food to suit your taste.
Equipped with bake, broil, toast and convection function including child lock. Use the programs to defrost and prepare e.g. casserole, chicken, pomme frites, bred, pizza, cakes, cookies, meats and fish.
These instructions for use will inform you about the various functions and features which makes it easy to take pleasure in your new Bistro Oven.
We hope that you will enjoy your new Design Bistro Oven Advanced 28 L.
Your Gastroback GmbH
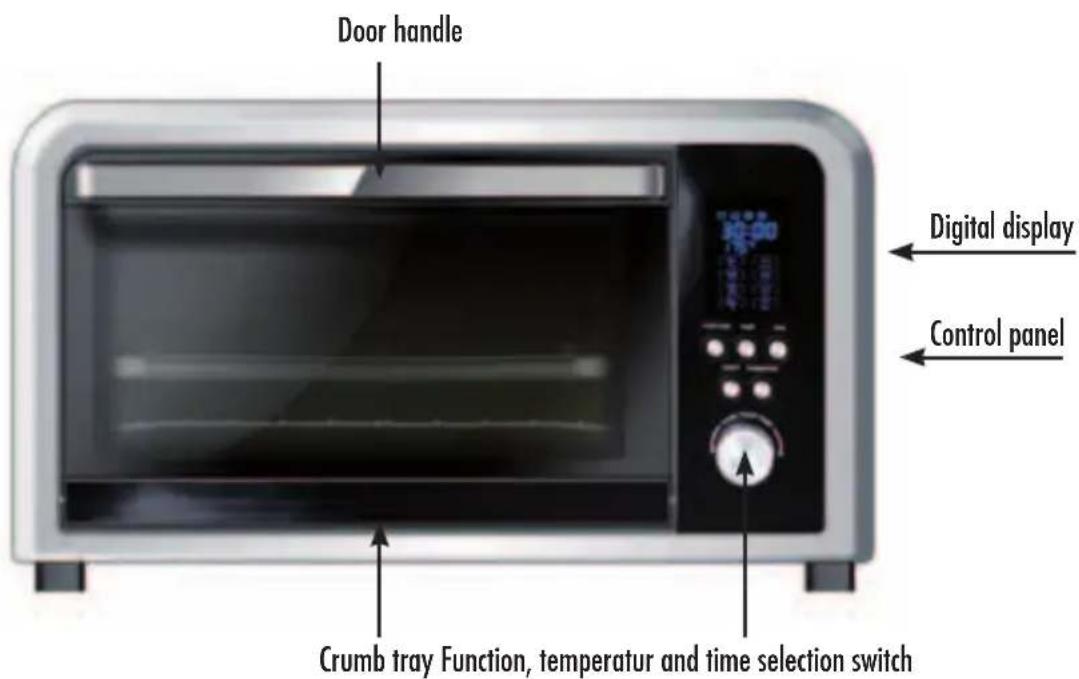
Knowing your Design Bistro Oven Advanced 28 L
Enclosed accessories:
Digital display
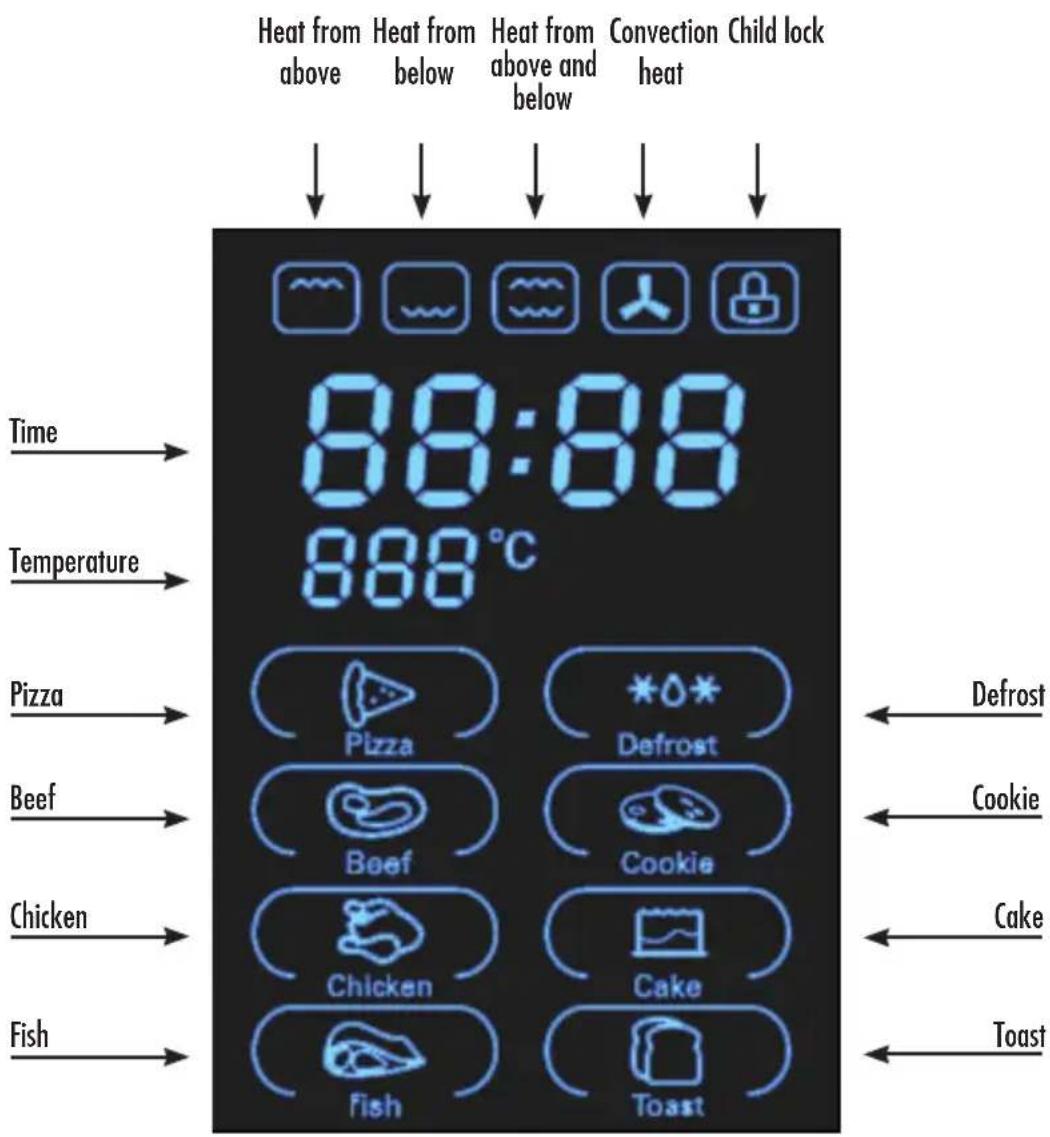
Control panel
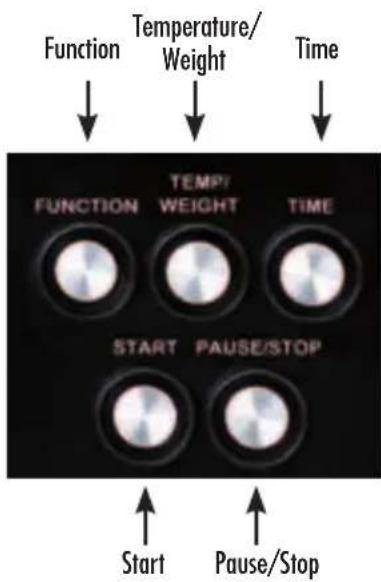
flowchart
graph TD
    A["Function"] --> B["Temperature/Weight"]
    B --> C["TIME"]
    D["START"] --> E["PAUSE/STOP"]
    F["Pause/Stop"] --> G["Start"]
Function:
Heat from above: Temperature can be set from 70 to 175°C
Heat from below: Temperature can be set from 70 to 175°C
Heat from above and below: Temperature can be set from 70 to 235°C
Convection: Default time is 30 minutes for 235°C
Child lock
Temperature/Weight:
Default time: 30 minutes at 175°C / optional from 70 to 235°C
Time:
Time can be manually set from 1 to 99 minutes
Important Instructions
• Always clean the appliance accurately after each use.
- Food can catch fire, when overheated! During operation keep the appliance in an appropriate distance to furniture, walls, boards, curtains and other inflammable objects. Do not operate the appliance near inflammable liquids (i.e. high-proof alcohol) or beneath any heat-sensitive or moisture-sensitive materials or beneath boards or drop-lights to avoid damage caused by steam, condensate or fire.
- The exterior of the oven and the glass door get very hot during operation.
- Do not place any of the following materials in the oven: paper, cardboard, plastic wrap, and the like and do not place foreign objects, food that is too big or wrapped in plastic wrap into the oven to avoid risk of fire, electric shock, and damage. Immediately unplug the appliance, if there is any kind of malfunction or problem (i.e. overheating or smoke is coming out of the Design Bistro Oven Advanced 28 L). If materials in the appliance catch fire, leave the door closed. Switch OFF immediately, and remove the plug from the wall socket.
- Only use dishes, tins and other kitchen utensils that are intended for use in ovens, e.g. glass, fireproof ceramics or metal items.
- Do not clean with metal sourcing pads. Pieces can break off the pads and touch electrical parts resulting in a risk of electrical shock.
- Cooking can be temporarily interrupted any time by pressing the stop button. The oven will beep and the display will flash and show the remaining cooking time. The lights in the oven will go out. Cooking is recommenced by pressing the start button. You will hear a beep, the lights in the oven will go on and the cooking time continues to count down. To stop the cooking completely, press the select/start and stop button and hold the button down until you will hear a beep sound and the display shows the clock.
- WARNING: Always turn the appliance OFF, unplug from the wall outlet and let the appliance cool down before removing the accessories, cleaning or moving the appliance.
- Never use abrasive cleaners, cleaning pads or any hard and sharp objects (i.e. metal scouring pads) for cleaning to avoid damage to the non stick coating or the glass door. Do not use the appliance if there are cleaning agent residues inside it.
- Always place accessories such as baking tray, drip rack and pizza tray after use on heat resistant surfaces only.
- The appliance has a child safety lock and can not be operated as long as the child safety lock is active.
- During a cooking procedure you can not operate any other buttons then the start and stop button. You can only operate the other buttons when cooking is finished or when stopping the cooking procedure completely by pressing the stop button for a longer time.
- Do not operate the appliance outdoors. This appliance is for household use only.
Important Safeguards
Carefully read all instructions before operating this appliance and save the instructions for further reference. Do not attempt to use this appliance for any other than the intended use, described in these instructions. Any other use, especially misuse, can cause severe injuries or damage by electric shock, heat or fire. Never leave the appliance unattended when in operational mode.
Any operation, repair and technical maintenance of the appliance or any part of it other than described in these instructions may only be performed at an authorised service centre. Please contact your vendor.
Important Safeguards for Daily Operation
- This appliance is for household use only and NOT intended for use in moving vehicles. Do not operate or store the appliance in humid or wet areas or outdoors. Do not attempt to operate the appliance using any parts or accessories not recommended by the manufacturer as this to avoid risk of fire, electric shock, and damage.
- Check the entire appliance regularly for proper operation—especially the power cord. The pins of the power cord must be clean, smooth, and without discolouration. Do not operate the appliance, when the appliance or any part of it is likely to be damaged, to avoid risk of fire, electric shock or any other damage or injuries to persons. The appliance is likely to be damaged if the appliance was subject to inadmissible strain (i.e. overheating, mechanical or electric shock, moisture) or if there are any cracks, excessively frayed parts, or distortions. In this case, immediately unplug the appliance and return the entire appliance (including all parts and accessories) to an authorised service centre for examination and repair.
- Food can catch fire, when overheated! Never operate the appliance close to curtains, table decoration and other flammable objects. Do not operate the appliance near inflammable liquids (i.e. high-proof alcohol) or beneath any heat-sensitive or moisture-sensitive materials or beneath boards or drop-lights to avoid damage caused by steam, condensate or fire. Do not store any items on top of the appliance when operating. Do not store any material, other than manufacturer's recommended accessories, in this oven when not in use. Before operating, always ensure that there are no foreign objects in the Design Bistro Oven Advanced 28 L. Do not insert wrapped foods (i.e. kitchen foil) or oversized food, to avoid risk of fire, electric shock, and damage. Do not place any of the following materials in the oven: paper, cardboard, plastic wrap, and the like. Immediately unplug the appliance, if there is any kind of malfunction or problem i.e. overheating or smoke is coming out of the oven.
- Only use dishes, tins and other kitchen utensils that are intended for use in ovens, e.g. glass, fireproof ceramics or metal items. Do not use airtight container as food extends when heated.
- Only use accessories provided by the manufacturer.
- Do not cover crumb tray or any other parts of the oven with metal foil. This will cause overheating of the oven.
- Do not clean with metal sourcing pads. Pieces can break off the pads and touch electrical parts resulting in a risk of electrical shock.
- Close supervision is necessary when the appliance is used near young children. Do not let young children play with any parts of the appliance. The appliance is not intended for use by children or infirm persons without supervision. For storage always keep the entire appliance dry and clean and where young children cannot reach it. Do not place any hard and/or heavy objects on the appliance or on any parts of it.
- Operate the appliance on a well accessible, stable, level, dry, and suitable large table or counter. The appliance should be placed on a solid flat surface, with clearance of at least 10 cm from the sides (including rear and top) to ensure sufficient ventilation. The appliance is not suitable for built-in fitting.
- Do not place any cloth or tissue beneath or on the appliance, to avoid any risk of fire, electric shock and overheating. Always keep the table or counter clean and dry and immediately wipe off spilled liquids. Do not place the appliance near the edge of the table or counter or on inclined or wet surfaces or where it can fall. Always place the appliance on a heat resistant surface.
- Do not place the appliance or any parts of it on or near hot surfaces (heater, gas burner, grill or oven). Never place the appliance inside an oven.
- During operating, cakes, pastries or other food can fall to pieces and catch fire when over-heated. Do not leave the appliance unattended, when connected to the power supply. Always disconnect the appliance from the power supply, when the appliance is not in use and before cleaning or moving. Always allow the appliance to cool down before cleaning. The exterior and the glass door can get hot during operation. Use oven gloves when moving or touching hot accessories or parts of the oven.
- Cooking can be temporarily interrupted any time by pressing the stop button. The oven will beep and the display will flash and show the remaining cooking time. The lights in the oven will go out. Cooking is recommenced by pressing the start button. You will hear a beep, the lights in the oven will go on and the cooking time continues to count down. To stop the cooking completely press stop button and hold the button down until you will hear a beep sound and the display shows the clock.
- Never use abrasive cleaners, cleaning pads or any hard and sharp objects (i.e. metal scouring pads) for cleaning to avoid damaging i. e. the glass door. Never place the appliance in an automatic dishwasher.
- Do not handle the appliance or any part of it with violence. Do not insert any foreign objects in the oven and do not poke in the heating rod, to avoid risk of electric shock and damage of the heating elements. For the case that cakes, pastries or other food catch fire or when over-heated. Always switch OFF the appliance immediately and disconnect the appliance from the power supply. Always allow the appliance to cool down and wait for the food to stop smoking before opening the oven door and before cleaning. Always pay attention not to damage the heating elements when cleaning.
- Do not operate the appliance without the crumb tray in proper position.
- This appliance is not intended for use by persons (including children) with reduced physical, sensory or mental capabilities. Or lack of experience and knowledge unless they have been given supervision or instruction concerning use of the appliance by a person responsible for their safety.
Hot Surfaces - Risk of Burns
- During operation do not place any objects or tissue on the appliance, to avoid risk of fire.
- The exterior of the oven and the glass door will become very hot during use. Never move whilst hot. When the oven is hot, only touch the oven door handle and the controls, and be very careful when handling hot dishes, oven accessories or foods – use oven gloves! Let the appliance and accessories cool down before cleaning. Do not touch the exterior of the oven while the appliance is in use. Always keep your hands, face and arm as well as any clothing and other heat-sensitive objects away from the Design Bistro Oven Advanced 28 L during operation. Use the side handles when moving the appliance.
- Pay attention when moving hot liquids and food - risk of getting burned.
Important Safeguards for Electrical Appliances
- Ensure that the voltage rating of your mains power supply corresponds to the voltage requirements of the appliance (220/240 V, 50 Hz, AC, rated for 16 A). Always connect the appliance directly to a separately protected mains power supply wall socket with protective conductor (earth/ground) connected properly. Before operation completely unwind the power cord. Do not use any extension cord or multi socket outlet.
The installation of a residual current safety switch with a maximum rated residual operating current of 30 mA in the supplying electrical circuit is recommended. If in doubt, contact your electrician for further information.
- Always handle the power cord with care. The power cord may never be knotted, twisted or squeezed. Do not pull or strain the power cord. Do not let the plug or power cord hang over the edge of the table or counter. Take care that no one will pull the appliance by the power cord, especially when young children are near. Always grasp the plug to disconnect the appliance from the power outlet. Do not touch the plug or appliance with wet hands, when the plug is connected to the power supply.
- Do not place the appliance or any parts of it on or near hot surfaces (heater, gas burner, grill or oven). Do not place the appliance on the power cord. If the power cord warms up during operation or is likely to be damaged, it must be replaced by an authorised service centre. Do not attempt to repair the power cord!
- Do not immerse the Design Bistro Oven Advanced 28 L or power cord in water or any other liquid. Do not spill or drip any liquids on the oven or power cord to avoid risk of fire and electric shock. When liquids are spilled on the exterior of the appliance, immediately turn the appliance OFF, unplug the power cord and dry the appliance.
- Do not place the appliance in an automatic dishwasher.
First use
Unpack the appliance carefully and check, if there are any parts damaged or missing.
CAUTION: It is important to carefully remove all packing and shipping materials as well as any price-tags, but do not remove any warning or model labels on the appliance. Ensure that there are no foreign objects (i.e. packing materials) inside the oven before operating the appliance. Wash all parts as instructed in the 'Care and Cleaning' section and insert the crumb tray.
The heating elements were oiled during manufacture and these will therefore smoke slightly when the oven is first used. This is entirely safe and will stop after a few minutes. However, so that the food does not taste of this smoke, we recommend that you take the following action before using the appliance for the first time.
If the burnt smell occurs again on later use, clean the oven (see: 'Care and Cleaning'). If the burnt smell persists stubbornly even after thoroughly cleaning the appliance, return the appliance to an authorised service centre for examination and repair.
- Connect the power cord to the power outlet and press the function button.
- Turn the function/time and temperature switch to heat from below.
- Press the temperature button. Set the temperature to 175 degrees.
- Press the time button. Set the cooking time to 15 minutes.
- Press the start-button. The symbol and the temperature begin flashing to indicate that the appliance is being preheated. Once the set temperature has been reached, the timer starts counting down. The remaining cooking time will be shown in the display.
Note: The count down of the cooking time only starts after the preheating is finished. Reduce the cooking time accordingly or place the food in the oven after the preheating is finished.
Once the cooking time set has elapsed, the oven will switch off automatically.
Operating the Design Bistro Oven Advanced 28 L
WARNING: Always completely unwind the power cord, before connecting the appliance to the power supply. Ensure, that there are no foreign objects (i.e. shipping material) inside the oven. Do not insert any foreign objects as knives, spoons, or other cooking utensils in the oven, to avoid risk of fire, electric shock, burns or damage. Always handle with care, especially, when removing burned food.
IMPORTANT: Ensure, that the crumb tray is in place before operating the oven. Otherwise crumbs may become charred on the bottom of the oven and stick to the surfaces.
Wash all parts as instructed in the 'Care and Cleaning' section and insert the crumb tray.
Using the handle
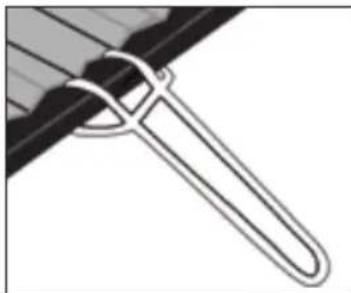
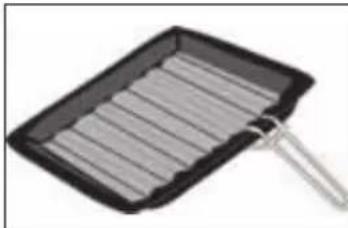
You can use the handle to hold the hot tray or rack. Therefore you have to hook the handle onto the edge of the tray/rack.
natural_image
Close-up of a metallic object with a looped handle, possibly a tool or bracket (no text or symbols visible)ATTENTION: Make sure that the handle is hooked on correctly. Otherwise it can cause injuries (view picture).
ATTENTION: Always hold the tray/rack horizontal otherwise the bake pan will slide sideways and you will loose hold of the tray/rack (view picture).
natural_image
Black rectangular plate with horizontal stripes and a metal hook attached (no text or symbols visible)Time setting
- When power is connected, a beep is heard and the display will show „0:00“.
- Press the time button. Then turn the selection switch to set the hour figure. The range of hour is from 0 to 23.
- Press the time button to confirm the hours setting.
- Press the time button. Then turn the selection switch to set the minutes figure. The range of hour is from 0 to 59.
- Press the time button to confirm the minutes setting.
Operating the appliance
- Connect the power cord to the power outlet.
- Set the clock as described in 'Setting the clock' above.
- Check that the crumb tray is correctly positioned. Insert the crumb in the opening underneath the closed oven door.
- Place the food in the oven using the desired rack or tray and close the oven door.
NOTE: If the oven needs to be preheated, place the food in the oven after the temperature setting is not shown in the display anymore and the cooking time is displayed.
-
Press the function button. Turn the function/time and temperature to the desired function (functions are described a little bit further in the instructions manual).
-
Press the temperature button. Set the temperature to the desired temperature. You can only set the temperature in 15 degrees steps.
-
Press the function button. Turn the function/time and temperature to the desired function (functions are described a little bit further in the instructions manual).
- Press the temperature button. Set the temperature to the desired temperature. You can only set the temperature in 15 degrees steps.
NOTE: You can set the temperature using all functions except for Defrost. The Defrost function is preset to 70 degrees and therefore has non-adjustable temperature. The preset temperature will be shown in the display for 3 seconds when pressing the start-button.
- Press the time button. Set the desired cooking time.
Note: The count down of the cooking time only starts after the preheating is finished. Reduce the cooking time accordingly or place the food in the oven after the preheating is finished.
- Press the start-button to commence cooking. The symbol and the remaining cooking time will be shown in the display (after preheating where appropriate).
NOTE: Cooking can be temporarily interrupted at any time by pressing the stop-button (practical if the food needs turning). When cooking is temporarily interrupted, the light inside the oven goes out, and the remaining cooking time will flash on the display. Cooking is recommended by pressing the start-button again.
Once the cooking time set has elapsed, the oven will beep 3 times and then switch off automatically. The light inside the oven go out and the display will return to showing the clock.
NOTE: If the stop-button is held down during setting, the oven will beep once, the programming is reset, and the display returns to showing the clock.
- Open the oven door once the cooking procedure is finished and take out the food using oven gloves.
ATTENTION: The oven is very hot during operation. Do not let your skin touch any surface.
NOTE: Empty the crumb tray after every use and clean the used accessories. This way you can be sure that no leftover food is getting burned or set on fire. Never use the oven without the crumb tray in proper position.
Functions
Toast
- Press "FUNCTION", the default function is TOAST, and the icon 🐘 will light.
- Turn the switch to select toast, the icon 🕿️ will light.
- Press "TEMP/WEIGHT", turn the switch to set the temperature.
- Press "TIME", turn the switch to set the cooking time.
- Press "START" the oven start working, the LED begins to count down time. The icon will light.
- When cooking finished, it beep 3 times, the LED turn back to waiting state.
Convection
- Press "FUNCTION", the default function is TOAST and the icon 📌 will light.
- Turn the switch to select convection, the icon 🖱️ will light.
- Press "TEMP/WEIGHT", turn the switch to set the temperature.
- Press "TIME", turn the switch to set the cooking time.
- Press "START", the oven start working, the LED begins to count down time. The icon will light.
- When cooking finished, it beep 3 times, the LED turn back to waiting state.
Bake
- Press "FUNCTION", the default function is TOAST, and the icon 📌 will light.
- Turn the switch to select bake, the icon 📌 will light.
- Press "TEMP/WEIGHT", turn the switch to set the temperature.
- Press "TIME", turn the switch to set the cooking time.
- Press "START", the oven start working, the LED begins to count down time. The icon will light.
- When cooking finished, it beep 3 times, the LED turn back to waiting state.
Broil:
- Press "FUNCTION" the default function is TOAST, and the icon 🐘 will light.
- Turn the switch to select broil, the icon 📌will light.
- Press "TIME", turn the switch to set the time.
- Press "TEMP/WEIGHT", turn the switch to set the temperature.
- Press "START" the oven start working, the LED begins to count down time. The icon will light.
- When cooking finished, It will beep 3 times, the LED turn back to waiting state.
Note: In setting state, press "FUNCTION" key can be change function state.
Auto Menu:
- Press"FUNCTION", the default function is TOAST, and the icon 📌 will light.
- Turn the switch to select the menu. Pizza, beef, chicken, fish, defrost, cookie, cake and toast can be selected. LED will display the default weight and temperature of the current menu.
- Press "TEMP/WEIGHT", screen display its weight. Turn the switch to select the weight.
- Press "START" to start working, the LED shows count-down time.
- The oven will sound 3 times to indicate cooking finished. LED turn back to waiting state.
Note: When choosing "TOAST" function, LED display "4-1". "4" stands for pieces and "4" & "6" can be chosen. "1" stands for burnt class.
| Program Weight Function & Temperature Timer (min) | |||
| PIZZA 23 cm | 30 cm | Toast 235 °C | 16,50 |
| Toast 235 °C | 17,10 | ||
| DEFROST 500 g | 1000 g | Convection 70 °C | 25,00 |
| Convection 70 °C | 35,00 | ||
| BEEF 500 g | 1000 g | Convection 235 °C | 20,00 |
| Convection 235 °C | 28,00 | ||
| 1500 g | Convection 235 °C | 32,00 | |
| COOKIE 300 g | 500 g | Convection 235 °C | 14,00 |
| Convection 235 °C | 18,00 | ||
| CHICKEN 1000 g | 1500 g | Convection 220 °C | 50,00 |
| Convection 220 °C | 54,00 | ||
| 2000 g | Convection 220 °C | 59,00 | |
| 2500 g | Convection 220 °C | 65,00 | |
| CAKE 800 g | 1000 g | Convection 175 °C | 40,00 |
| Convection 175 °C | 49,00 | ||
| 1200 g | Convection 175 °C | 52,00 | |
| FISH 500 g | 1000 g | Convection 235 °C | 16,00 |
| Convection 235 °C | 27,00 | ||
| 1500 g | Convection 235 °C | 29,00 | |
| 2000 g | Convection 235 °C | 31,00 | |
| TOAST 4 - 1 | Toast 235 °C | 4,00 | |
| Toast 235 °C | 4,10 | ||
| Toast 235 °C | 4,15 | ||
| Toast 235 °C | 4,10 | ||
| Toast 235 °C | 4,45 | ||
| Toast 235 °C | 4,60 | ||
NOTE: The oven needs time to preheat. The symbol and the temperature begin to flash indicating that the oven is preheating. When the set temperature is reached, two beeps sound and the time begins to count down. Reduce the cooking time accordingly or place the food in the oven after the preheating is finished.
NOTE: Convection heat is more efficient than other functions such as heat from above/below. Reduce cooking time/temperature accordingly to avoid burning food.
Stop/Start:
- After finishing the setting, press "START", the oven starts working.
- Press "STOP" during the cooking process, it will beep one time and stop working. LED flash.
- Press "START" again in the pause state, toaster oven restart to work and count down the time.
- To stop the oven, keep pressing on "STOP", the oven will beep one time, then stop working and turn back to waiting state.
Child Safety Lock:
The child safety lock prevents small children from using the appliance. The appliance cannot be operated as long as the child safety lock is active. To activate the child safety lock, press and hold the select/start and stop button for 3 seconds. One beep will be heard, and the display shows a lock symbol. To deactivate the child safety lock again, press and hold the select/start and stop button for 3 seconds. The symbol will then disappear from the display and the clock will be shown.
Cooking Containers
Metal, ovenproof glass without lids or ceramic bakeware can be used in your oven. Follow manufacturer's instructions. Be sure the top edge of the container is at least 1" (2.54 cm) away from the upper heating elements.
Care and Cleaning
WARNING: Always turn the appliance OFF, pull the plug and wait for the appliance to cool down before cleaning the oven or accessories.
Never clean the appliance in an automatic dishwasher. Never use abrasive cleaners, cleaning pads or any hard and sharp objects (i.e. metal scouring pads) for cleaning to avoid damaging i. e. the glass door. Never use hard or sharp-edged objects working with or cleaning the appliance.
Do not handle the appliance or any part of it with violence. Do not insert any foreign objects in the oven and do not poke in the heating rod, to avoid risk of electric shock and damage of the heating elements.
- Turn off the appliance, unplug from wall outlet and let it cool down before cleaning.
- Clean the glass door with a nylon pad and sudsy water. Do not use a spray glass cleaner.
- To remove used accessories, open the door, pull the rack forward and out. Wash in warm, sudsy water or in the dishwasher. To remove stubborn spots, use a polyester or nylon pad and let the accessories soak for a few minutes in warm sudsy water. Do not use abrasive cleaners, cleaning pads, corrosive chemicals (disinfectant, bleach) or any sharp or hard objects (i.e. metal scouring pads) for cleaning, for this could damage the surfaces. Rinse under running water and dry thoroughly. Leave all parts dry naturally.
NOTE: Do not clean the crumb tray, the baking tray and the pizza tray in the dishwasher. Drip rack and handle are dishwasher safe.
Cleaning stubborn residues inside the oven
You can burn off stubborn residues such as grease and spillage.
Connect the power cord to the power outlet and press the function button. The function button and the function/time and temperature switch will illuminate in blue. Turn the function/time and temperature to a function where you can set a temperature (heat from below, convection heat or pizza). Press the temperature button. The temperature button and the function/time and temperature switch will illuminate in blue. Set the temperature to 235 degrees. Press the time button. The time button and the function/time and temperature switch will illuminate in blue. Set the cooking time to 30 minutes. Turn off the oven by pressing the select/start and stop button once the heating element is no longer smoking. Pull the plug, and leave it to cool off completely. Wipe the oven compartment once more to remove burned remnants. Clean the oven compartment and the heating elements with a tightly wrung cloth that has been soaked in water with detergent (refer to 'Cleaning the inside - nonstick coating').
Cleaning the inside - nonstick coating
WARNING: Turn off the appliance, unplug from wall outlet and let it cool down before cleaning. Clean the inside of the appliance by wiping it with a damp cloth. A little detergent can be added if the appliance is heavily soiled. Do not use any abrasive cleaners or scouring pads as they may harm the coating. Dry with paper towel or soft cloth.
Cleaning the exterior
WARNING: Turn off the appliance, unplug from wall outlet and let it cool down before cleaning the outer surface. Wipe with a damp cloth or sponge and dry with paper towel or soft cloth.
WARNING: Make sure that no water gets into the vent holes when cleaning the exterior.
Tips for baking time and baking temperature
• Preheat the oven and the baking dish for the meat.
- Small pieces with short cooking time should have room temperature. Do not put the meat straight into the oven after taking it out of the fridge.
- Before you start baking with low temperature you should sauté the meat in a frying pan from all sides. The pores of the meat have to close and the outside should become a crust. Sauté small pieces of meat. Roast bigger pieces of meat gently with a lower temperature. Season the meat with salt and pepper directly in the frying pan and not before hand.
- Do not sauté too many pieces of meat at a time. The discharge of liquid should be able to evaporate immediately. If the liquid stays in the frying pan too long the meat starts to simmer instead of roasting.
- Roast small portions at a time and ensure the frying pan is really hot before putting in the next load of meat.
- After roasting the meat shortly in the frying pan you can finish cooking the meat in the oven at 70^ to 80^ (refer to recipe and cooking time table). Keep a constant oven temperature.
- The cooking time of a piece of meat depends on the thickness of the roast and the oven temperature. You can use a cooking thermometer to get the same cooking results. Penetrate the cooking thermometer into the thickest part of the piece of meat to check the temperature inside the roast. This way you can easily check if the meat is still rare (too cold) or too dry (cooked thoroughly).
- The higher the temperature of the oven the more weight the roast will loose. 130^ at convection heat and 145^ at heat from above and below are high enough.
- If the roast has no crust or looks to light in colour from the outside after the core temperature is reached you can turn up the temperature of the oven to 175°C- 205°C and cook the roast for another 20 minutes.
- When the roast is finished you can keep the roast warm for 25 to maximum 45 minutes. Turn the oven to 70^ . Serve the roast on warm dishes.
Roasting in the oven
| Meat | Weight | Cookingtime | Heat from above and below |
| Duck 1,5 - 2 kg | 1 1/2 hours | 200°C | |
| Goose 4 - 5 kg | 3 hours | 200°C | |
| Meat loaf | 1 kg | 1 1/2 hours | 200°C |
| Knuckle of veal | 1 1/2 kg | 2 hours | 220°C |
| Roast veal with kidney | 1 kg | 1 1/2 hours | 220°C |
| Leg of lamb | 1 kg | 2 hours | 180°C |
| Back of lamb 1 kg 2 hours 180°C | ||
| Turkey 2,5 kg 2 - 2 1/2 hours 200°C | ||
| Turkey, filled 3 kg 3 hours 200°C | ||
| Back oh deer 1,5 kg 1 hours | 220°C | |
| Beef loin 1 kgje 500 g mehr | 15 minthen15 - 20 min15 min longer | 235°C200°C |
| Roast beef 1 kgje 500 g mehr | 15 minthen15 - 20 min15 min longer | 235°C200°C |
| Rolled roast 1 kg 15 min | then 1 1/2 hours | 220°C180°C |
| Roast pork 1 kg 15 min | then 1 1/2 hours | 220°C180°C |
| Knuckle of pork 1 kg 15 min | then 1 1/2 hours | 235°C220°C |
Cooking table for low temperture baking
You can reduce the long cooking time when you sauté the meat in a frying pan before cooking it (refer to the cooking table). Sauté small pieces of meat twice as long on the first side then on the other side but keep the cooking time. The optimum core temperature is between 65^ C (rare) and 75^ C (well done).
| Meat | Time to sauté | Cooking-time | Oven temperature |
| PoultryChicken breastFilled chicken breast | 5 min middle temperature8-10 min depending on size temperature | ca. 25 minca. 30 min | 85°C85°C |
| Duck breast 6 min | middle temperature sauté the side with fat first | ca. 30 Min. | 85°C |
| RabbitBack filet no bones | 2 min high temperature ca. 20 Min. | 70°C | |
| LambLeg of lamb(1 kg no bones)Lamb cutletLamb back filet(400 g piece) | 10 min bei mittlerer Temperatur3 min middle temperature3-4 min middle temperature | ca. 80 min(8 min/100 g)ca. 20 minca. 30 mi | 85°C85°C85°C |
| Beef/CalfBeef SteakRump StaekScotch filet(1000 g)Roast beef(2 kg) | 4 min high temperature3 min high temperature7 min high temperature10 min middle temperature | ca. 25 minca. 30 minca. 90 minca. 2 hoursca. 1 hours | 85°C85°C85°C85°C85°C70°C |
Check the doneness; core temperature should be 57°C
| calf steakCutlet | 4 min middle temperature5 min middle temperature | ca. 25 minca. 25 min | 85°C85°C |
Pig meat should never be raw but always well done
| Filet(400 g)Loin or back | 9 min middle temperature10 min middle temperature | ca. 35 min(8 min/100 g)ca. 120 min | 85°C85°C |
Check the doneness; core temperature should be 70^ C
| Chops Cutlet | 5 min middle temperature2 min middle temperature | ca. 30 min ca. 20 min | 85°C 85°C |
NOTE: The temperature alludes to the function heat from above and below.
NOTE: The cooking time depends on the size of meat and the temperature of the meat to start with (did it come right out of the fridge or did the meat have room temperature).
Core temperature
| Lamb | Beef | ||
| Back of lamb, raw | 70 °C | Roast beef, raw | 53 °C |
| Back of lamb, well done | 80 °C | Roast beef, well done | 58 °C |
| Leg of lamb, raw | 75 °C | Roast of beef, raw | 50 °C |
| Leg of lamb, well doen | 82 °C | Roast of beef, well done | 58 °C |
| Marinated beef | 85 °C | ||
| Boiled filet of beef | 85 °C | ||
| Ox breast | 83 °C | ||
| Calf | Pig | ||
| Back of calf | 65 °C | Back of pig | 60 °C |
| Leg of calf | 70 °C | Knuckle of pork | 85 °C |
| Shoulder of calf | 75 °C | Leg of ham | 70 °C |
| Poultry 85 °C |
Recipes
Lamb loin with lemonthyme crust
Lamb loin
3 garlic clove
2 lamb loins each approx. 350g
4 branches of fresh thyme
80 ml olive oil
2 table spoons olive oil
salt, Pepper
Peel the garlic cloves and cut them in small pieces. Place the lamb loins, garlic and olive oil in a plastic bag. Close the bag and marinate the lamb loins for 2 hours. Preheat the oven at 130^ C using heat from above and below. Take the lamb loins out of the bag and let them drain. Keep the marinade. Heat the 2 table spoons of olive oil in a frying pan. Sauté the lamb loins from all sides adding the marinade, herbs, salt and pepper.
Place the lamb loins on the backing tray on a piece of baking paper sprinkle it with the condiments. Cook the lamb loins for approx. 15 to 20 minutes until done. Let the meat rest for 5 minutes when it is done.
Lemonthyme crust
1 table spoon Dijon mustard, mild lemonthyme
2 table spoons bread crumbs
50 g butter, in thin slices
Brush the lamb loins with mustard. Sprinkle with lemonthyme and bread crumbs and cover with butter. Place in hot oven at 175°C using heat from above to cook „au gratin“
Pizza Italia
Dough
1kg flour
0,5 | water
25 g salt
30 ml olive oil
25 g brewer's yeast
Solve the yeast and the salt separated from each other in approx. 30^ C warm water. Place the flour in a ceramic bowl. Mix flour with the solved salt and afterwards add the yeast. Stir in the remaining water and olive oil. Cover with linen sheet and let it rise for 2 hours. Preheat the oven to 235^ C using pizza function. Split the dough in 5 pieces and roll out the dough.
Topping
mozzarella
tomatoes
rocket salad
raw ham
parmesan cheese
Cover the dough pieces with mozzarella and tomatoes and bake for approx. 15 minutes in the oven at 235^ C using the pizza function. After cooking cover the pizza with rocket salad, ham and fresh parmesan.
Lasagna
Tomato meat filling
1 onion
2 garlic cloves
1 carrots
1 stalk celery
3 table spoon olive oil
400 g minced meat (beef or beef and pig)
800 g tomatoes cut in pieces (tin)
1/8l milk
1/8l red wine
1 bay leaf, salt, pepper, sugar
Peal, cut and clean onions, garlic, carrots and cut in small pieces. Heat the oil in frying pan and stir-fry vegetables and minced meat. Add the milk, red wine, tomatoes and bay leaf and let it simmer for 30 minutes. Stir from time to time. Take out the bay leave and season with salt, pepper and a pinch of sugar to taste.
Béchamelsauce
1/2 | milk
50 g butter
2 table spoon flour
100 g parmesan, fresh grated
approx. 350 g Lasagna pasta (not pre-cooked)
Heat the milk and butter. Add flour and combine. Let mixture cook for 2 minutes on high heat. Take from heat and fold in half of the parmesan.
Preheat the oven to 190^ C using convection heat. Cover the bottom of a big heat resisted casserole dish, spread one third of the tomato-meat filling on top of the Lasagna and cover with sauce. Repeat this order of layers until the filling and the sauce are finished. Cover with parmesan and place in the hot oven. Bake at 190^ C using convection heat for approx. 30 minutes.
Coal fish with spinach crust
2 slices of toast
100 g spinach leaves (defrosted)
2 chopped rehydrated sun-dried tomatoes
80 g halloumi cheese
1 garlic clove
3 table spoons cream
salt, pepper
400 g coal fish filets
3 tea spoon lemon juice
1 table spoon oil
Preheat the oven to 190^ C using convection heat. Toast the bread. Squeeze out the spinach and chop into small pieces. Dice the cheese and toast. Peel garlic and chop in small pieces. Combine toast, spinach, tomatoes, cheese, garlic and cream and season with salt and pepper. Wash and dry the fish filets. Springle with lemon juice and season with salt. Brush a small casserole dish with oil. Place the fish in the oven dish and cover with spinach mixture. Bake at 175^ C using convection heat for approx. 20 minutes until the crust is golden in colour.
Grilled vegetables
4 persons
1200 g waxy potatoes
6 table spoons olive oil
2 tea spoons coarse salt
2 red pepper
1 yellow pepper
3 small zucchini
1 garlic head
pepper
4 branches of rosemary or 2 table spoons rosemary needles
Wash and brush the potatoes, quarter them lengthwise and place on baking tray. Sprinkle with half of the oil and half of the salt. Bake at 205^ C using heat from above and below or at 175^ C convection heat for approximately 30 minutes. Turn the potatoes over after 15 minutes.
In the meantime wash the peppers and cut into slices. Cut the zucchini with angular and cut the garlic head once in halves. Place the vegetables besides the potatoes on the tray and cover with the rest of oil and salt. Season with pepper and rosemary. Bake for another 20-25 minutes. Serve with salad and fresh bread.
Sweet casserole
2 apples
lemon juice of halve a lemon
2 eggs
250 g curd
3 table spoons milk
2 table spoons honey
grease for the casserole dish
2 table spoons chopped almonds
Peel and quarter the apples, cut out the core and slice in thin slices. Sprinkle with lemon juice. Mix egg yolk, milk, curd and honey. Whisk the egg whites in separate bowl until stiff and fold the stiff egg whites and the apple slices into the curd mixture. Fill mixture into casserole dish and bake at 175^ C using convection heat for approximately 35 minutes. Serve sprinkled with almonds.
Easy apple cake
5 Boskop or Cox Orange apples
lemon juice
2 eggs
300 g sugar
1 package vanilla sugar
100 g butter, liquid
100 g flour
1 tea spoon baking powder
100 ml milk
butter and flour for the baking pan
icing sugar for serving
Peel and quarter the apples, cut out the core and slice in thin slices. Sprinkle with lemon juice. Mix all the other ingredients and fold in the apple slices.
Pour mixture into greased and floured baking pan. Bake at 205^ C using heat from above and below or at 175^ C using convection heat for approx. 50-60 minutes until the cake has a golden colour.
Storage
Store the entire appliance on a clean and dry surface, where it may not tilt or fall and no other objects could fall on it and where it is safe from frost and inadmissible strain (mechanical or electric shock, heat, moisture, direct sunlight) and where it is out of reach of young children. Do not place any hard or heavy objects on the appliance or any parts of it.
Always switch OFF the appliance and unplug the power connector, if the appliance is not in use.
If the appliance is not in use for a long period of time, clean the appliance before storage (see 'Care and Cleaning').
Waste disposal
Dispose of the appliance must be effected in accordance with the corresponding local regulations and requirements for electrical appliances. Please contact your local disposal company.
Warranty
We guarantee that all our products are free of defects at the time of purchase. Any demonstrable manufacturing or material defects will be to the exclusion of any further claim and within warranty limits of the law free of charge repaired or substituted. There is no Warranty claim of the purchaser if the damage or defect of the appliance is caused by inappropriate treatment, over loading or installation mistakes. The Warranty claim expires if there is any technical interference of a third party without an written agreement.
The purchaser has to present the sales slip in assertion-of-claim and has to bear all charges of costs and risk of the transport.
Technical Specifications
| Model: Art.-No. 42812 | Design Bistro Oven Advanced |
| Power supply: 230 V, 50 Hz | |
| Power consumption: 1.500 W | |
| Weight: ca. 7,5 kg | |
| Dimensions: (width x depth x height) ca. 52,4 cm x 41,4 cm x 29,4 cm | |
| Capacity: 28 L | |
| Certification: |   |
Information and Service
Please check www.gastroback.de for further information. For technical support, please contact Gastroback Customer Care Center by phone: +49 (0)4165/22 25-0 or e-mail info@gastroback.de.
GASTROBACK GmbH

- Operation instructions
- DESIGN BISTRO OFEN ADVANCED 28 L
- Table of Contents
- Dear Customer!
- Function:
- Temperature/Weight:
- Time:
- Important Instructions
- Important Safeguards
- Important Safeguards for Daily Operation
- Hot Surfaces - Risk of Burns
- Important Safeguards for Electrical Appliances
- First use
- Operating the Design Bistro Oven Advanced 28 L
- Using the handle
- Time setting
- Operating the appliance
- Functions
- Toast
- Convection
- Bake
- Broil:
- Auto Menu:
- Stop/Start:
- Child Safety Lock:
- Cooking Containers
- Care and Cleaning
- Cleaning stubborn residues inside the oven
- Cleaning the inside - nonstick coating
- Cleaning the exterior
- Tips for baking time and baking temperature
- Cooking table for low temperture baking
- Recipes
- Lamb loin with lemonthyme crust
- Lamb loin
- Lemonthyme crust
- Pizza Italia
- Dough
- Topping
- Lasagna
- Tomato meat filling
- Béchamelsauce
- Coal fish with spinach crust
- Grilled vegetables
- Sweet casserole
- Easy apple cake
- Storage
- Waste disposal
- Warranty
- Technical Specifications
- Information and Service
- GASTROBACK GmbH
Brand : Gastroback
Model : 42812
Category : Oven