
Bravo 20 - Loudspeaker BOSTON ACOUSTICS - Free user manual and instructions
Find the device manual for free Bravo 20 BOSTON ACOUSTICS in PDF.


| Product Type | High performance multi-purpose speaker |
| Brand | Boston Acoustics |
| Model | Bravo 20 |
| Speaker Type | 2-way |
| Frequency Range (±3dB) | 50Hz - 200Hz |
| Recommended Amplifier Power | 12 - 125 watts |
| Nominal Impedance | 8 ohms |
| Sensitivity | 85 dB (SPL/2.4V at 1m) |
| Woofer | 4.5" (115 mm) copolymer |
| Tweeter | 1" (25 mm) aluminum dome with AMD |
| Crossover Frequency | 2500 Hz |
| Dimensions (with corner fillers) | 14 x 6.5 x 3.5 inches (562 x 165 x 134 mm) |
| Dimensions (without corner fillers) | 14 x 6.5 x 4.25 inches (562 x 165 x 108 mm) |
| Weight | 5 lbs (2.29 kg) |
| Finish | White or black, textured ABS with matching metal grille |
| Mounting Options | Wall, ceiling, corner, flat surface, with included bracket and rear stand |
| Warranty | 5 years (limited) |
Frequently Asked Questions - Bravo 20 BOSTON ACOUSTICS
User questions about Bravo 20 BOSTON ACOUSTICS
0 question about this device. Answer the ones you know or ask your own.
Ask a new question about this device
Download the instructions for your Loudspeaker in PDF format for free! Find your manual Bravo 20 - BOSTON ACOUSTICS and take your electronic device back in hand. On this page are published all the documents necessary for the use of your device. Bravo 20 by BOSTON ACOUSTICS.
USER MANUAL Bravo 20 BOSTON ACOUSTICS
natural_image
Line drawing of a cylindrical object with a small logo on its side (no text or symbols present)Bravo 20
High performance multi-purpose speaker
Specifications
| Frequency Range (±3dB) : 50Hz to 200Hz | |
| Recommended Amplifier Power: 12-125 watts | |
| Nominal Impedance: 8 ohms | |
| Sensitivity 85dB (SPL/2.4V at 1m): | 95dB |
| Woofer: 4V* (115mm) co eyelmer | |
| Tweeter: 1" (25mm) VP* aluminum dome with AMD | |
| Crossover Frequency 2500Hz | |
| Dimensions: (H x W x D)with corner fillers 14x6% x 34" (562 x 165 x 134mm)without corner fillers 14x6% x 44" (562 x 165 x 108mm) | |
| Weight: 5 lbs (2.29kg) | |
Finish: White or black, textured ABS
with matching metal grile
Introduction
Thank you for choosing Boston Acoustics. The Boston home ^® 20 is a much purpose, high performance compact loudspeaker. The Brave 20, which uses Boston's patented one-inch aluminum dome W7 sweater with AMU and a 45-inch washer, can be combined with its supplied mounting bracket or rear sand to be mounted or placed virtually anywhere in any room.
How to Connect Your Speakers
Correctly wiring your speakers's important for achieving the best sound quality. Wiring should take just a few minutes, but 1.5 important to do it carefully, since present wiring such as reversed connection can result in a post-soundage and poor bass
We recommend 13-gauge wire or thicker for runs up to 15 feet (4.5m) and 16-gauge wire or thicker for longer runs. Separate the first few inches of the wire conductors. Strip of 19-inch (2mm) of insulation from the ends of each speaker wire, to expose the two conductors and tightly twin the wire strands.
WARNING: To prevent electrical shock hazard, always switch off the amplifier or recover when making connections to the speaker.
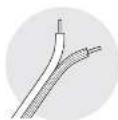
IMPORTANT: Typically, one side of the wire is smooth. Connect this side to the -black connection. The other side has a rib or stripe. Connect this to the 1 (red) connection.
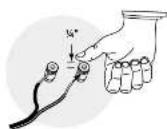
Using the spring terminal posts: The spring terminal posts perm to easy connection to become plugs, spade lugs, and bare wire. Push the top of the terminal down by approximately Vench, excusing the hole. Insert the wire in the hole and release the terminal
Connecting the Boston Bravo to Your Amplifier or Receiver
-
Connect the speaker terminals to the amplifier speaker outputs
-
Make sure the speaker cable is correctly routed through the mounting bracket. (see Mounting Options)
-
When making all connections, he sure to connect to a kind and to another.
- If using the Bravo 20 with a subsorder, set the receiver's base management to SMALL in the speaker setup menu. This will differ very low frequencies away from the center channel to the main speakers and/or subsorder.
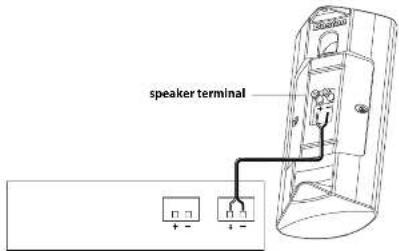
amplifier or receiver
Using the Bravo 20 on a Flat Surface
The Bravo 20 can be used on a flat surface, such as a table, shell on the floor. For horizontal placement, that angles use at 5^ both corner fillers must be used and the bucket must be removed. For unfilled horizontal placement, the rear sand must be used with the mounting brackets attached (beed, the Speaker to the Bracket) and the Rear Stove Installation Instructions' financing on page 6. For vertical applications, request the rear supplied naster feet to the bottom of the socket. Attach two of the supplied self-adohesive rubber feet so that its edge contracts the back edge of the cabinet. Apply two more self-adhesive rubber feet to the releases at the front of the cabinet.
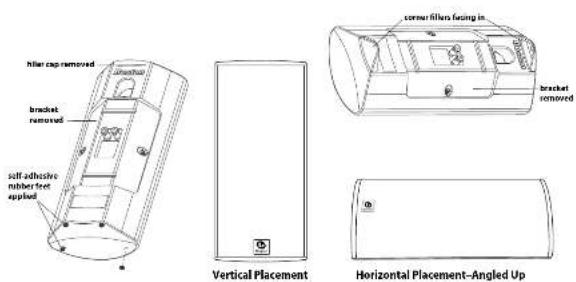
Mounting the Bravo 20 Identify the Bracket
In a packing material, the Bravo 20's mounting bracket is fitted in to the back of the speaker. Remove the rape that it temporarily holding the bracket to the speaker, and then pull the bracket away from the back of the speaker. Determine how the Bravo 20 is to be mounted to the wall or ceiling. I can be mounted other horizontally or vertically, either on an open section of wall, or where two or three room surfaces meet. Refer to the illustration here to determine what scene holes on the Bravo 20 brackets should be used for your application.
NOTE: The large rectangular hole in the middle of the bracket will fit a single gang electrical outlet to route the speaker wire through a conduit.
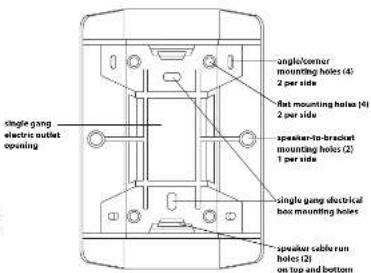
Mount the Bracket to the Wall
Decise where to mount bracket
IMPORTANT: See "Ceiling Clearance" on page 6.
Determine what mounting holes in the bracket will be used.
Mark the hoes on the wall or ceiling using bracket as a template.
Drill the holes using the appropriate drill bit size to accommodate the mounting hardware that you plan to use (ie. 24-inch diameter to clear the toggle bolts for hollow surfaces or small enough to allow self-tapping screws in a solid surface).
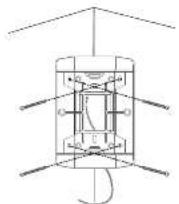
Mount the crack flat or into a corner as shown below. We recommend the use of four fasteners wherever possible. Consult a knowledgeable installer regarding the proper hardware to use on your wall.
Sup the seeker wires, and lets the speaker wire through the appropriate bracket opening.
Connect the wire to the speaker's terminals, taking care to maintain speaker polarity. (See "how to Connect Your Speakers" on page 2). Both the Brave 20 and its brakes are symmetrical, so the speaker can be mounted with either its woster or sweeter on too in general bars performance will be enhanced with the woster as close to as many more surfaces as possible.
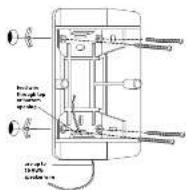
Flat Mount Example Corner Mount Example
Corner Fillers
If the Bravo 2015 being mounted in a corner, then one or both of the supplied corner fillers may be inserted into the slots on the back of the speaker. These accessories will enhance the appearance of the installation by making it appear that the back of Bravo XI extends into the corner.
NOTE: Up to 16 gauge speaker wire will fit between the fillets and the corner.
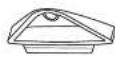
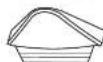
corner filler (2)
Ceiling Clearance
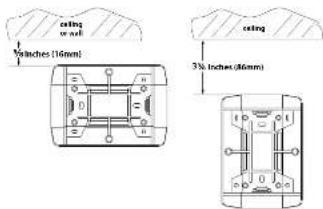
If the Bras 2015 to be mounted so that the top or the side of the speaker will meet a flush surface, either a wall horizontally or the ceiling (vertically), then measure the exact distance as shown here from that surface to the top or side of the bracket.
Mount the Speaker to the Bracket
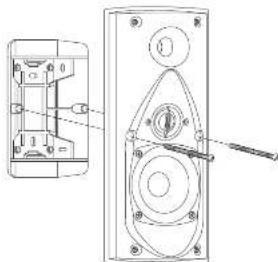
Remove the speaker's grille by grasping the back of the cabinet in one hand, while gently pulling the grille away with the other hand.
Align the openings in the back of the speaker with the two paces protruding from the braces as shown below.
Gently remove any sack in the speaker were as you push the speaker firmly onto the bracket.
Attach the speaker to the bracket by inserting the supplied screws through the holes in the front of the speaker and into the bracket as shown below (do not over-tighten the screws).
Replace the grille on the speaker.
NOTE: The Bravo 20 is not securely attached to its bracket unless the screws are used.
Rear Stand Installation Instructions
The Boston Brown 2D can be used norizontally on an unbilled flat surface, such as a table, she for the top of a rear projection IV using the included rear braces stand.
First mount the speaker to the bracket (see above).
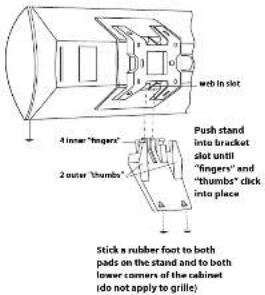
Next, place the speaker in the location that you intro to use it in the correct drill/stop and sweeter/woyer orientations. Lord let stand in an upright position as indicated (note the, the standing away away from the bracket, I run up the stand with the lower slot in the bracket so that the 2 middle fingers are on a chair side of the web that binds the slot. Slightly angle the stand away from the bracket and push the stand fingers into the slot so that the 4 inner fingers' are placed inside the slot and the 2 outer "thousands" are placed outside the slot. Grantly push the stand using the bracket set until the finger's and "thousands" move into place.
Attach the rubber feet to the stand and cabinet (detailed on page 4).
Mounting Possibilities of the Bravo 20
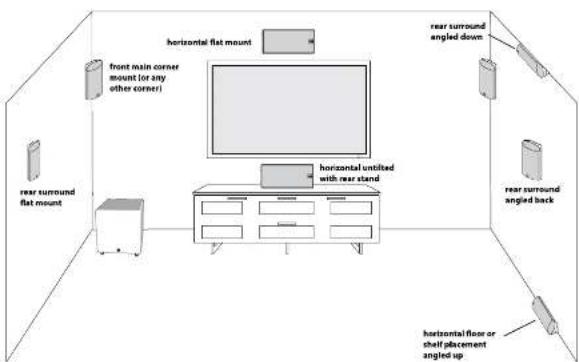
We design the Bravo 20 to be mounted or placed in a wide variety of configurations. Shown below are seven of the most common possibilities for you to consider
Rotating the Logo for Horizontal Mounting or Placement
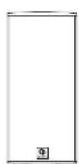
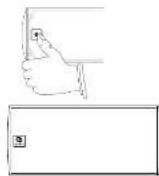
The logo plate on the Bravo 20's grille can be rotated 90° in either direction to enhance the speaker's appearance when mounting or placing it in a horizontal position. To rotate the logo
Remove the grille and turn it near.
Locate the logo's spring leased post past using through the bottom inside portion of the grille.
Have your thumb against the post and press firmly until the logo pops forward
Rotate the logo to the desired position and release pressure on the post allowing it to snap back into the seated position.
Listening Levels and Power Handling
The stand power recommendations in the Specifications section assume you will operate your system in a way that will not produce direction. Even these rugged speakers can be damaged by a modest amplifier if a produces direction. If you hear a harsh, gritty notice, turn down the volume. Prolonged or repeated operation of your speaker with a distorted signal from the amplifier can cause damage that is no covered by the warranty.
Limited Warranty
Boston Acquisitov warrants as the original purchaser of our passive loudwisters that they will be left of defect in business and workmanship for a period of 5 years from the date of purchase. Your responsibilities are to install and use them according to the instructions supplied, to provide safe and secure portions to an authorized Boston Acquisitov service representative, and its permit proof of purchase in the form of your sales slip from requesting service. Excluded from this warranty is damage that returns from abuse, misuse, improper installation, accidents, shipping, or resale/medications by anyone other than an authorized Boston Acquisitov service representative. This warranty is limited to the Boston Acquisitov, product and does not cover damage to any unauthorized court. This warranty does not over the cost of removal or reinstatement on this warranty is void. If the set of number has been removed or delivered, this warranty gives you specific legal rights, and you may also have other rights, which vary from state to date.
If Service Seems Necessary
United States
First, contact the dealer from whom
you purchased the product if that is
not possible, send an email to support@bostona.com
or write to
Boston Acoustics, Inc.
100 Corporate Drive
Vansah NJ07490 USA
Canada
First, contact the dealer from whom
you purchased the product. If that is
no. possible, send an email to: support@dmcanada.ca
or write to
DSM Canada
S-506 Apple Creek Blvd
Markham, ON LSI 981
All Other Countries
Contact the dealer from whom you purchased the product or contact your local distributor. For more information, please visit bostonacoustics.com/support

- Bravo 20
- Introduction
- How to Connect Your Speakers
- Connecting the Boston Bravo to Your Amplifier or Receiver
- Using the Bravo 20 on a Flat Surface
- Mounting the Bravo 20 Identify the Bracket
- Mount the Bracket to the Wall
- Corner Fillers
- Ceiling Clearance
- Mount the Speaker to the Bracket
- Rear Stand Installation Instructions
- Mounting Possibilities of the Bravo 20
- Rotating the Logo for Horizontal Mounting or Placement
- Listening Levels and Power Handling
- Limited Warranty
- If Service Seems Necessary
- United States
- Canada
- All Other Countries
Brand : BOSTON ACOUSTICS
Model : Bravo 20
Category : Loudspeaker