
MPCD471 - Hi-Fi System COBY - Free user manual and instructions
Find the device manual for free MPCD471 COBY in PDF.


| Product Type | Hi-Fi System |
| Brand | Coby |
| Model | MPCD471 |
| Player Type | CD Player with AM/FM Radio |
| Power Source | AC 100-240V, 50/60Hz; DC 9V (6 x C batteries) |
| Dimensions (Approx.) | 320 x 250 x 150 mm |
| Weight (Approx.) | 2.5 kg |
| Audio Output Power | 2 x 5W RMS |
| CD Compatibility | CD, CD-R, CD-RW |
| Radio Bands | AM (520-1710 kHz), FM (87.5-108 MHz) |
| Additional Inputs | AUX 3.5mm, Headphone 3.5mm |
| Antenna | Telescopic FM antenna; built-in AM ferrite bar |
| Playback Functions | Play, Pause, Stop, Skip, Repeat, Shuffle, Program |
| Display | LED display with track/time/radio frequency |
| Controls | Buttons on unit; includes remote control |
| Care Instructions | Clean with soft dry cloth; avoid liquids and extreme temperatures |
| Safety Warnings | Do not expose to rain or moisture; unplug during storms; keep away from heat sources |
| Replacement Parts | Contact Coby customer service or visit cobyusa.com for accessories |
| Repairability | Refer to qualified service personnel; no user-serviceable parts inside |
| General Information | Designed for home use; supports CD, radio, and external audio sources |
Frequently Asked Questions - MPCD471 COBY
User questions about MPCD471 COBY
0 question about this device. Answer the ones you know or ask your own.
Ask a new question about this device
Download the instructions for your Hi-Fi System in PDF format for free! Find your manual MPCD471 - COBY and take your electronic device back in hand. On this page are published all the documents necessary for the use of your device. MPCD471 by COBY.
USER MANUAL MPCD471 COBY
PORTABLE MP3/CD PLAYER with AM/FM RADIO and USB PORT
MODEL NO: MP-CD 471
natural_image
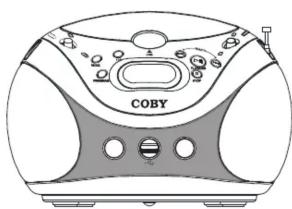
Line drawing of a CD or DVD device with labeled buttons and front panel (no readable text or symbols)INSTRUCTION MANUAL
Please read instruction manual before use.
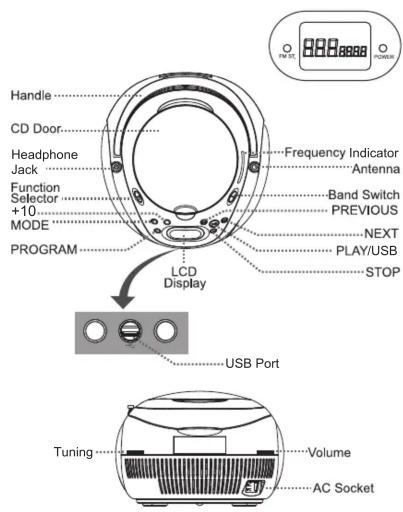
LOCATION OF CONTROLS
WARNING:
To prevent fire or shock hazard, do not expose this device to rain or moisture. Dangerous high voltage is present inside the enclosure. Do not open the cabinet. CAUTION:
To prevent electric shock, match wide blade of plug to wide slot of outlet and fully insert.
WARNING:
Handling the cords on this product will expose you to lead, a chemical known to the State of California to cause cancer, and birth defects or other reproductive harm. Wash hands after handling.
IMPORTANT SAFEGUARDS
Always operate the product from a power supply of the same voltage, frequency and rating as indicated on the product identification plate.
Do not operate this product with a damaged cord or plug Never install the unit where there are heat sources such as radiators, heat registers, stoves, direct sunlight, excessive dust or where there is mechanical vibration or shock. Switch off and unplug from AC outlet when not in use.
ATTENTION
The CD mechanism and the sensitive circuitry may cause interference to a radio tuner nearby. Do not operate this unit while operating other radio devices.
Danger This product utilizes invisible laser radiation. Avoid direct exposure to the beam.

Caution Use of controls, adjustments or procedures not listed in this manual may result in hazardous radiation exposure.
CONCERNING COMPACT DISC
Only compact discs identified with this mark can be played by this player.
CARE and MAINTENANCE
● Handle your unit with care to extend the life of the unit.
- Use a soft and clean cloth damped with plain lukewarm water to clean the surface of the unit.
- Never use solvents such as benzene or other strong chemical cleaners as these could damage your unit.
- Do not spill any water on the player.
- Do not touch the CD laser part or look directly at it.
INTRODUCTION
Please read the instructions carefully before operating to avoid any damage to the unit.
POWER SUPPLY
- To use AC power
Insert one end of the AC power cord into the AC socket on the rear of the unit and the other end into a standard wall outlet.
- By using batteries
Insert 6x"C"size batteries (not included) in the battery compartment on the bottom of the unit by matching the polarities on the bottom of the compartment.
- The unit will not operate on battery power when the AC power cord is plugged into the AC socket.
- Replace batteries when the power indicator is dims, the volume decrease or the sound distorted.
- Use high quality batteries and check them regularly. Alkaline batteries are recommended.
- Do not mix new batteries with used batteries.
● Use only batteries of the same brand and type. - Batteries should not be left in the unit if they are exhausted or if the unit is not to be used for a long period of time as they may leak and damage the unit. Battery leakage is not covered under the warranty.
HEADPHONES(Not included)
You can use headphones with 3.5mm diameter stereo plug and have impedance of 32ohms. When the headphones are connected, the speakers are disconnected automatically.
Set the VOLUME to a low level before using headphones and gradually adjust the Volume Control to the comfortable level.
Do not play in very high volume level to avoid damage to your hearing.
RADIO OPERATION
- Slide the Function Selector to RADIO.
- Select the desired AM or FM with the band switch.
- Tune in the desired station by turning the Tuning dial.
- Adjust the volume with Volume control as desired.
- Extend Telescopic Antenna and adjust the direction to obtain the optimum reception.
- Set the Function Switch to OFF position to turn off the player.
NOTE: ● To play MP3 discs, follow the steps for CD playback below. The LCD will display the corresponding MP3 Playback screen.
- In MP3 Mode, press and hold +10 button to select the desired folder. The 'F' on screen is short for Folder.
CD/MP3 PLAYBACK
Set the FUNCTION Selector to the CD position and insert a CD or MP3 disc.
When the disc has been loaded in the CD compartment, the tracks will be played automatically.
- PLAY/Pause Mode
- When CD track data has been read, LCD screen will display the current track number elapsed time.
The player will play the tracks in sequence.
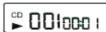
- Press PLAY/USB button to pause playback. Press again to resume
NOTE: LCD screen will display "NO DISC", if no disc in the unit.
- USB & Stop Mode
- Press and hold PLAY/USB for usb playback, the audio tracks stored in USB stick will be played in sequence automatically.
- Press and hold PLAY/USB again for CD playback. The LCD will display CD/MP3 playback screen.
- Press STOP to stop play. LCD will display total number of tracks and total playback time. ▶ 01773:15 (In MP3 mode, LCD show total number of tracks only)
- SEARCH TRACKS & FAST FORWARD, REVERSE
- Repeatedly press the ◀ button to go to the previous track.
- Press the ▶ button to go to the next track.
- To fast reverse/fast forward through the track.
press and hold the ◀◀/▶▶ button - The track will be played automatically.
● TO PLAY A DESIRED TRACK
- The first press of +10 will change the track number to 10, and each press would be the multiple of 10, if the left tracks are not enough for another multiple of 10, the LCD will display the last track number.
- REPEAT PLAY
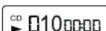
Press MODE button once to repeat one track. CD 011 00:00
Press MODE button twice to repeat all tracks. CD 0110000 (Repeat ALBUM in MP3 Mode)
● RANDOM PLAY
Press MODE three times for Random playback.
( Repeat ALL in MP3 Mode)
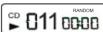
- INTRO PLAY
Press MODE four times for INTRO playback, in which the tracks will be played several seconds in sequence as a introduction.
( RANDOM playback in MP3 Mode)
CD 011 00:00
● PROGRAM PLAY
- Make sure it's in stop mode. Press the PROGRAM button, PROGRAM flashes on LCD.
- [ In MP3 Mode, press and hold +10 button to select the desired folder .The 'F' on screen is short for Folder. ] Press the ◄◀, ▶▶ and/or press +10 button to select the desired track, and then press PROGRAM to confirm.
- Repeat step 2, you can program as many as 20 tracks.
- Press the PLAY/USB button to start program playback.
- To stop the program playback, press the STOP button.
- To exit program mode, press STOP again, the PROGRAM indicator disappears and the programmed files are erased at the same time.
- Press PLAY/USB button for normal playback.
TROUBLE SHOOTING
Should your player develop a problem, please check trouble shooting list below before requesting service.
| Problem | Check and Action |
| System malfunction | · Check if the power cord has been properly connected to the power outlet.· Be sure to select a sound source.· Unplug the main unit, and then reconnect it. This allows the unit to reset itself after a power surge or power interruption. |
| No sound | · Increase the volume.· Disconnect any headphones. |
| CD does not play | · No disc. Load a disc.· Disc has been loaded upside down. Place the disc with the label side up.· Disc is damaged or dirty. Clean the disc or try another one.· Moisture may be condensed inside the player. Remove the disc and leave the unit power on for one or two hours.· Disc is incorrect type for the player. |
| Radio does not work | · You may be in an area of weak signal coverage. |
SPECIFICATION
Power Supply: 110V\~60Hz/220V\~50Hz dual voltage
Applicable disc: CD/CD-R/MP3
Power Consumption: 4.2W
Output Power: 1W x2
Speaker: 8 OHM
Dimensions: 210(L) x143.5 (H) x220 (W) mm (main unit)
Weight: 1650g (main unit)
RADIO
Frequency Range: AM: 530KHz - 1700KHz
FM: 88MHz - 108MHz
CD Player
Laser Wavelength: 760 \~ 800 nm
Tracking Method: 3-spot error detection/3.86 mm lens
Design and specifications are subject to change without notice.

Brand : COBY
Model : MPCD471
Category : Hi-Fi System