
PE 9038M - Coffee maker AEG - Free user manual and instructions
Find the device manual for free PE 9038M AEG in PDF.
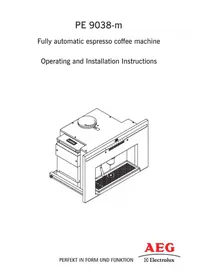


| Product Type | Fully automatic espresso coffee machine |
| Brand | AEG |
| Model | PE 9038M |
| Dimensions (W x D x H) | 594 mm x 475 mm x 378 mm |
| Net Weight | 28 kg |
| Water Reservoir Capacity | 2.5 L |
| Coffee Bean Container Capacity | 200 g |
| Supply Voltage | 230 V |
| Rated Power | 2000 W |
| Heating Element Power | 1700 W |
| Pump Power | 50 W |
| Working Pressure | 12 bar |
| Fuse Rating | 13 A |
| Control Panel | Touch controls with LED indicators |
| Grinder | Adjustable ceramic burr grinder |
| Beverages | Espresso, regular coffee, hot water, steam for milk |
| Programmable Settings | Coffee volume, grind amount, water hardness |
| Water Filter | Brita filter (replace every 3 months or 2000 cups) |
| Used Coffee Drawer | Capacity for approx. 20 servings |
| Drip Tray | Removable, dishwasher safe |
| Installation | Built-in cabinet with telescopic runners |
| Safety Features | Overheat protection, child lock, auto shut-off |
| Guarantee | 24 months (household use) |
Frequently Asked Questions - PE 9038M AEG
User questions about PE 9038M AEG
0 question about this device. Answer the ones you know or ask your own.
Ask a new question about this device
Download the instructions for your Coffee maker in PDF format for free! Find your manual PE 9038M - AEG and take your electronic device back in hand. On this page are published all the documents necessary for the use of your device. PE 9038M by AEG.
USER MANUAL PE 9038M AEG
Fully automatic espresso coffee machine
Operating and Installation Instructions
ENGLISH
CONTENTS

- Safety instructions
- Description of the coffee machine
- Description of the control panel: touch control
- Instructions for the first use of the machine
- Making Coffee
- Hot water
- Steam
- Programming the amount of coffee beans to be grinded
- Programming the volume of coffee dispended in the cup
- If you wish to reset the standard values
- Signals and alarms
- Coffee menus
- Cleaning
- Installation
- Something not working....
- Technical specifications
- After-sales Service, spare parts and guarantee
1. SAFETY INSTRUCTION
Please read this instruction book before using the appliance and retain for future reference. These warnings are provided in the interests of your safety, ensure you understand them fully before using the appliance.
Intended use
- The appliance is intended for use in the home. If the appliance is used for purposes other than those intended or used incorrectly, no liability can be accepted by the manufacturer for any damage or injury that may be caused.
- Alterations or changes to the appliance are not permitted for reasons of safety.
Prior to initial start-up
- Check the appliance for transport damage. Under no circumstance should a damaged appliance be plugged in! In the event of damage, please contact your retailer.
Safety of children
- Keep packaging material away from children. Risk of suffocation!
- Please make old appliances unusable prior to disposal. Pull out the mains plug, and cut off the mains cable.
DURING USE

CAUTION:
The filtering unit will always be kept very hot to obtain an excellent coffee. Therefore please empty the "used" coffee tank with extreme care to avoid being scalded.
- This machine must be used only by adults. Make sure that children cannot touch the controls nor play with the machine.
- Modifying or merely trying to modify the characteristics of this product is very dangerous, and will invalidate your guarantee.
• Always keep this machine clean.
- The external parts of this machine become very hot while it is operating and they will not cool down immediately after the machine is switched off. Keep children out of reach.
- Before cleaning or servicing the machine, make sure that it is disconnected from the power supply.
- In case of malfunction, never try to repair the machine yourself. Consult this manual and if the necessary information cannot be found, please contact the nearest Service Force Centre. This machine must be serviced exclusively by an authorised Service Force Centre. Always ensure the use of genuine spare parts.
FOR INSTALLATION AND SERVICING
Keep this instruction manual together with the machine for any future reference. If the machine is sold or transferred to another person, make sure that this instruction manual is given to the new user, so that he/she can become familiar with the machine's functions and with the recommendations given.
- This machine must be installed and connected to the mains by a COMPETENT PERSON. Make sure that the machine is DISCONNECTED from the power supply before any servicing operation.
- After unpacking the machine make sure that the product has not suffered any damage and that the power cord is in perfect condition. In case of damage, please contact your retailer or our customer service dept.
- The Manufacturer declines all responsibility if the safety rules are not complied with.
SOME HINTS OF ENVIRONMENTAL PROTECTION
PACKAGE
- All the packing materials are environmentally friendly and they can be recycled. Please help in preserving the environment, by using the proper channels of separate collection of rubbish.
DISPOSAL
Appliance Packaging Information
All materials are environmentally sound.
The plastics can be recycled and are identified as follows:
PE< for polyethylene, e.g. the outer covering and the bags in the interior.
PS< for polystyrene foam, e.g. the pads, which are all free of chlorofluorocarbon.
The carton parts are made from recycled paper and should be disposed of at a waste-paper recycling collection location.
Disposal of Old Appliances
- Use an authorised disposal site.
Contact your Local Council or Environmental Health Office to see if there are facilities in your area to recycle the appliance.

The symbol 🐘 on the product or on its packaging indicates that this product may not be treated as household waste. Instead it shall be handed over to the applicable collection point for the recycling of electrical and electronic equipment. By ensuring this product is disposed of correctly, you will help prevent potential negative consequences for the environment and human health, which could otherwise be caused by inappropriate waste handling of this product. For more detailed information about recycling of this product, please contact your local city office, your household waste disposal service or the shop where you purchased the product
CE
This machine complies with the directive BT 73/23
Electrical safety rules EN 60335-1 (August 1995 - Safety for electrical household and similar appliances – General Standard) and EN 60335-2-15 (April 1996 – Specific Rules concerning the equipment for heating liquids).
Directive EMC 89/336 in conformity with the following standards:
- 55014-1; 55014-2; 61000-3-2; 61000-3-3
ELECTRICAL CONNECTION
Any electrical work required to install this appliance should be carried out by a qualified electrician or competent person.

WARNING: THIS APPLIANCE MUST BE EARTHED.
Should the appliance power supply cable need to be replaced, this must be carried out by a Service Force agent. The manufacturer declines any liability should this safety measure not be observed.
Before switching on, make sure the electricity supply voltage is the same as that indicated on the appliance's rating plate.
The appliance should be fitted with a 13amp plug. The plug should be fitted with a 13amp ASTA approved BS1363/A fuse. The mains lead of the appliance should be connected as described below. The wires in the mains lead are coloured in accordance with the following code:

- Green and Yellow - Earth
- Blue - Neutral
- Brown - Live
In the plug the colours of the wires may not correspond with the markings identified with the terminals in your plug:
1) Connect the Green and Yellow (earth) wire to the terminal in the plug which is marked with the letter "E" or the earth symbol or coloured green and yellow. 2) Connect the Blue (neutral) wire to the terminal in the plug which is marked with the letter "N" or coloured black. 3) Connect the Brown (live) wire to the terminal in the plug which is marked with the letter "L" or coloured red. 4) Upon completion there must be no cut, or stray strands of wire present and the cord clamp must be secure over the outer sheath.
THE PLUG MUST STILL BE ACCESSIBLE AFTER THE APPLIANCE HAS BEEN INSTALLED.
THE APPLIANCE SHOULD NOT BE CONNECTED TO THE ELECTRICAL SUPPLY BY MEANS OF AN EXTENSION CABLE.
PERMANENT CONNECTION
In the case of permanent connection, it is necessary to install a double pole switch between the appliance and the electricity supply (mains), with a minimum gap of 3mm between the switch contacts and of a type suitable for the required load in compliance with the current electrical regulations.
The switch must not break the yellow and green earth cable at any point.
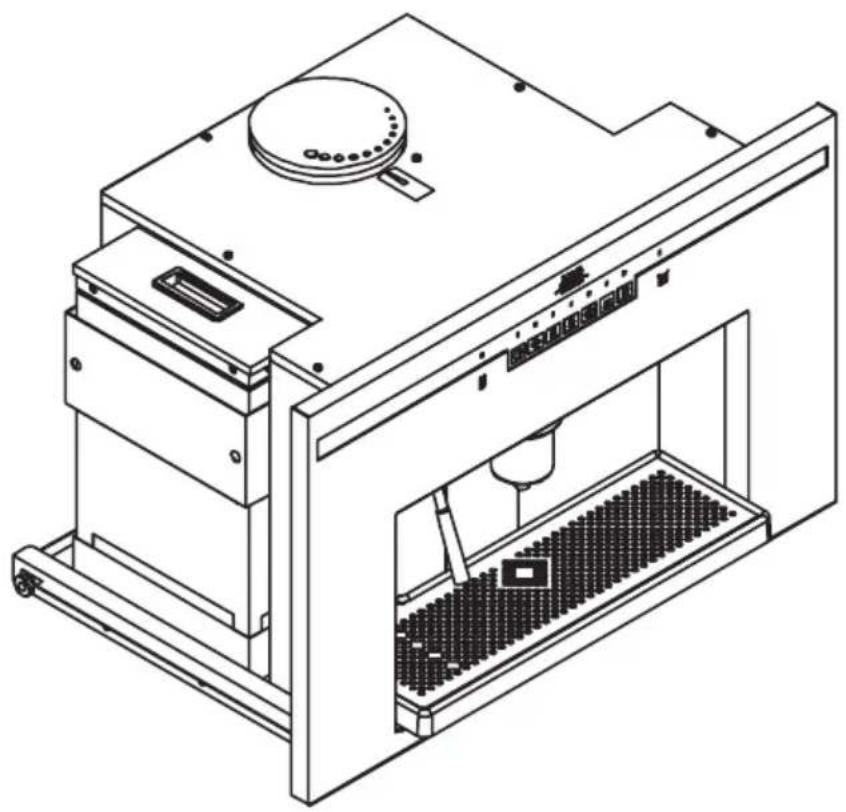
2. DESCRIPTION OF THE COFFEE MACHINE

- Water reservoir
- Brita filter
- Coffee outlet
- Steam/water nozzle
- Drip tray
- Coffee beans container
- Grinding regulation knob
- Control panel
- "Used" coffee drawer
3. DESCRIPTION OF THE CONTROL PANEL: TOUCH CONTROLS
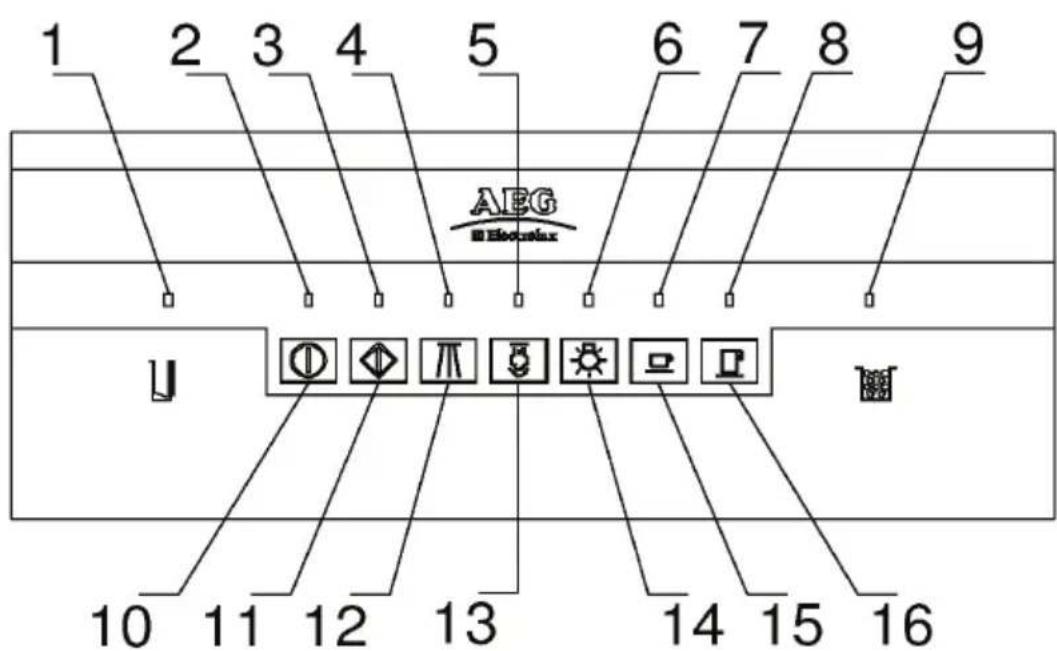
- Water refill indicator
- ON-OFF/stand-by indicator
- Start indicator
- Hot water selector indicator
- Steam selector indicator
- Light selector indicator
- Espresso coffee indicator
- Regular coffee indicator
- Used Coffee 'drawer full' indicator
- ON-OFF/stand-by control
- Start control
- Hot water selector control
- Steam selector control
- Light selector control
- Espresso coffee control
- Regular coffee control
TOUCH CONTROLS: Instructions for use
These touch controls must be pressed precisely to prevent functions from being enabled accidentally. Pressing lightly on the respective symbol will enable the corresponding function.
4 INSTRUCTIONS FOR THE FIRST USE OF THE MACHINE
FILLING UP THE WATER RESERVOIR
- Squeeze together the unlocking levers found under the drip tray

• Gently pull the coffee machine forward from the housing by sliding it along the telescopic runners.

Hardness of water:
- Before filling up the water reservoir, make sure that the decalcifying Brita filter has been soaked in cold water for at least 30 min. Follow the instructions printed on the filter package. After this operation insert the filter into position inside the water reservoir as shown in the figure.
- If the machine will not be used for long periods, empty the water from tank.
- Brita filters are available from most supermarkets and domestic goods outlets, at our After-Sales Service Centres or at the Shops of Authorized Spare Parts.
- Remove the reservoir and fill it with approximately 2.5 litres of water as shown.
- replace the water reservoir in its own housing taking care to fully engage the water valve into the docking station.


- Ensure the mains ON/OFF switch(at rear) is ON
- Push the machine back into the housing until a "CLICK" can be heard. This indicates that the machine has been locked in position.

FILLING THE CONTAINER WITH COFFEE BEANS
- Press the unlocking levers located under the drip tray and pull the machine as shown in the figure.
- Pull the coffee machine forward from the housing along the telescopic runners.

- Pour approximately 200g of coffee beans into the container on the top as shown in the figure.
- Push the machine back into the housing until a "CLICK" can be heard. This indicates that the machine has been locked in position.
INITIAL START-UP
- Put the main switch in position 1.
- The LED corresponding to the ON-OFF control will blink rapidly for 3 minutes.


•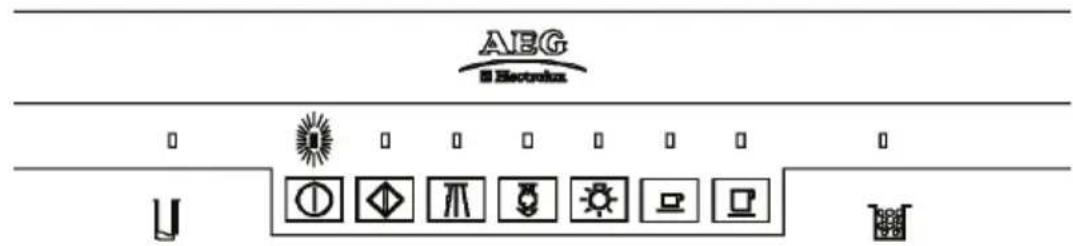
- The machine is in stand-by mode when the ON-OFF LED is blinking slowly; it is then ready to be switched on.

- Ensuring the water reservoir and the coffee beans container are full, switch the coffee machine on by pressing the on-off control and the corresponding LED stops flashing and remains lit.
- This machine is calibrated in the factory for an optimum level of ground coffee. Too "coarse" ground coffee will result in a weaker coffee. Too "fine" ground coffee will result in very strong coffee, delivered by "drops" and tasting "bitter".
The time required for an espresso will range from 20-30 seconds.
- Press the unlocking levers located under the drip tray and pull the machine as shown in the figure.
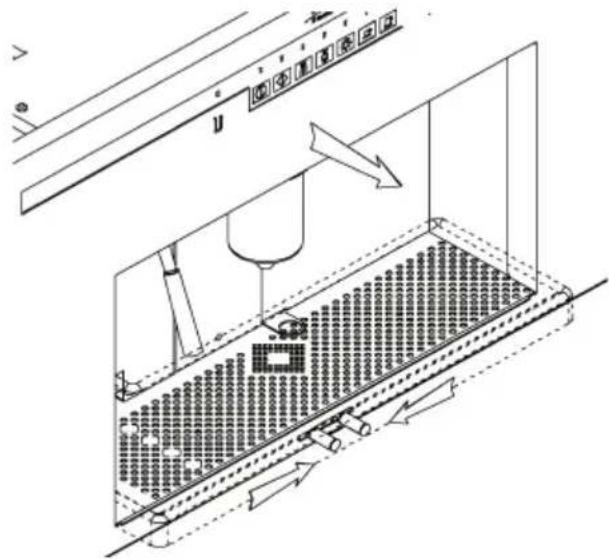
- Pull the coffee machine forward from its housing by sliding it along its telescopic runners.
- Turning the knob will adjust the coffee texture. Before adjusting, make a note of the original setting so that the machine can be reset, if required, to the factory settings. Turning the knob in the clockwise direction will lead to a fine texture for a stronger coffee. Turning the knob anti-clockwise will lead to a coarse texture for a weaker coffee. The set grinding level can be read on the lid of the coffee case: bigger circles means "coarse" grinding level (fast-flowing weak coffee), whereas smaller circles means "fine" grinding level (slow-flowing strong coffee).
- Push the machine back into the housing until a "click" can be heard. This indicates that the machine is locked in position.


STAND-BY MODE
- Once powered and inserted into the cabinet, the machine is in stand-by mode: this will be signaled by the on/off LED blinking.
- Press the on/off control to switch on the machine: the start LED will be illuminated.

• To come back to the stand-by mode, press the on/off control once again.

CAUTION:
On start-up, the machine initiates the pre-warming phase for the first 3 minutes. During this phase the ON/OFF LED will blink quickly and the machine will be not able to execute any operation. Then the LED blinks slowly and the machine is ready to operate.
5 MAKING COFFEE

- Press the control corresponding to the desired selection.

- Press the start control within 10 seconds and the machine will make the coffee selected. • The machine will stop automatically
CAUTION: the desired function will be disabled if the start control is not pressed within 10 seconds. It will then be necessary to repeat the procedure.

HOW TO OBTAIN AN EXCELLENT ESPRESSO
- The brewing time for an excellent espresso will be about 15 - 25 seconds. Elements affecting this brewing time are the grinding level of the coffee and the quantity of ground coffee. If necessary, the grinding level, as well as the quantity of ground coffee can be modified (refer to Chapters 8 & 9. Instructions for the first use of the machine).
Useful advice: coffee is a hygroscopic element, meaning its quality and characteristics strictly depend on weather (humidity). Coffee should be ground coarser if humidity in the air is very high, otherwise it will become thick and not flow freely; on the contrary, the coffee should be ground finer in dry conditions.
6 HOT WATER
- The steam/water pipe can be moved to the back of the cabinet when not in use. Pull forward when required. Do not touch when HOT!

- To dispense hot water, place a container under the steam/water nozzle; then press the water control.

- Press and hold the start control within 10 seconds until the desired amount is dispensed. To stop the water flowing, simply release the control.
CAUTION: the desired function will be disabled if the start control is not pressed within 10 seconds. It will then be necessary to repeat the procedure.
7 STEAM
HEATING LIQUIDS
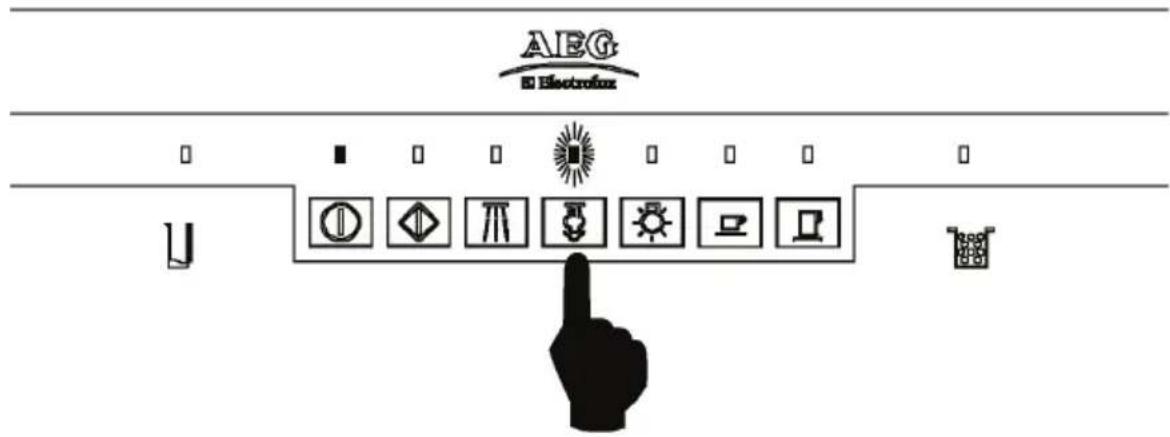
- Press the steam control and the corresponding indicator blinks for 20 seconds. The machine will be ready to make steam when the indicator stops blinking and remains lit.

- Place a jug with the liquid to be heated under the steam nozzle.
- Press and hold the start control within 10 seconds and wait for the steam function to commence.
CAUTION: the desired function will be disabled if the start control is not pressed within 10 seconds. It will then be necessary to repeat the procedure.
• The steam will continue to spray till the start control is released.
MILK FOR CAPPUCCINO: Pour some cold milk (100cc min.) in a deep jug and heat it using steam. Agitate the milk jug a little and wait until the foam is ready (one minute min.). To improve the result, gently beat the jug a little on the table after that the foam is ready.
8 PROGRAMMING THE AMOUNT OF COFFEE BEANS TO BE GRINDED
- This espresso machine has already been calibrated in the factory to dispense the ideal measure of ground coffee for one cup of espresso.
- However, this quantity of ground coffee can be increased or reduced, and the selected measure is then stored. The programmable measure of ground coffee applies to both the espresso selection and the regular coffee selection.
- Put the machine on stand-by mode as described.
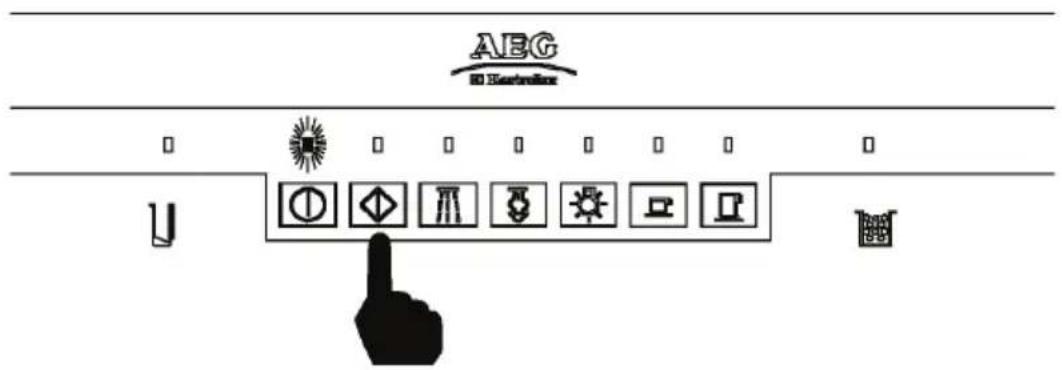
- Keep the start control pressed for 10 seconds.

- Some LEDs will flash as indicators (the more LEDs illuminated, the greater the quantity of coffee). Before adjusting, make a note of the original setting so that the machine can be reset to factory settings if required.
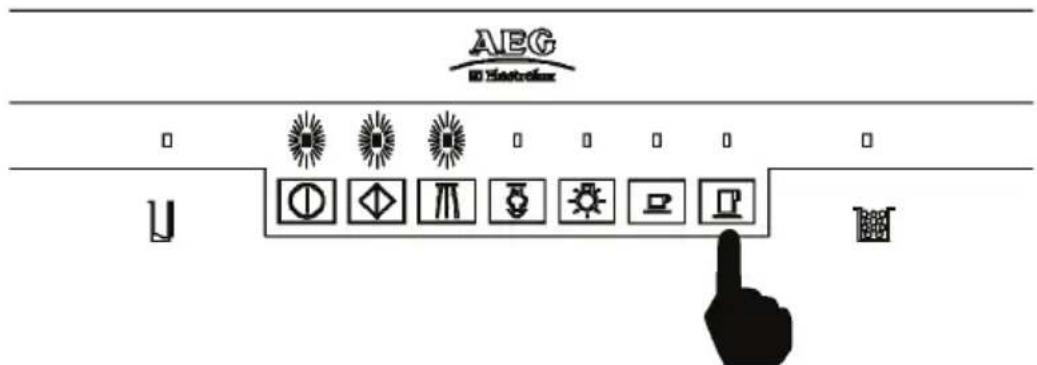
- To increase or decrease the quantity of ground coffee, press the "espresso" control to decrease and the "regular coffee" control to increase.
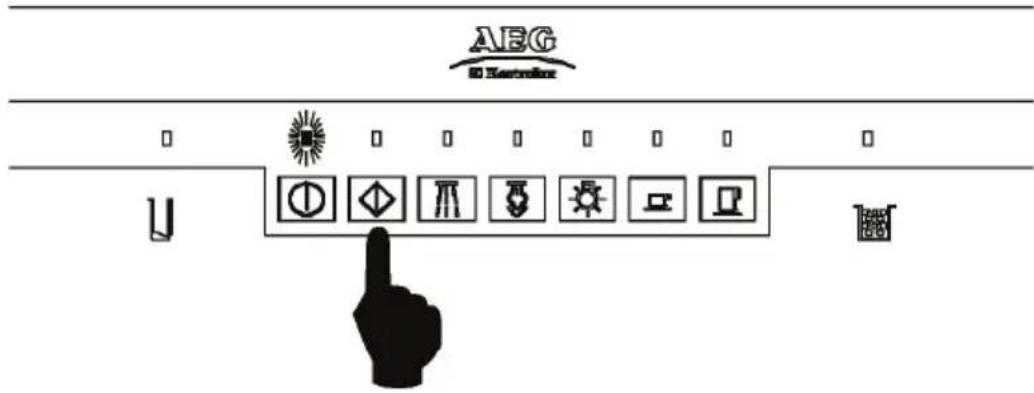
- Once you have modified the ground coffee quantity, press the start control for 10 seconds and the machine will automatically save the desired quantity and return to stand-by mode.

CAUTION: The correct grinding time can change if a different type of coffee is used.
If any unpressed coffee powder is found when emptying the "used" coffee drawer, it means that the grinding time is too long and should be decreased.
The "exhaust" coffee pods in the "used" coffee drawer can help achieve correct regulation of the grinding time.
The coffee pods must be 1 cm in thickness: this is the correct coffee quantity.
If its thickness is lower, it means that the grinding time is too short and should be increased.

IMPORTANT: Increasing or decreasing the grinding time can affect the coffee taste.
A stronger coffee taste and a rich aroma can be obtained by slightly increasing the programmed time.
A weaker coffee can be obtained by slightly decreasing the programmed time.
9 PROGRAMMING THE VOLUME OF COFFEE DISPENSED
The volume of coffee dispensed can be adjusted as desired as follows:

Press the espresso control.

Keep the start control pressed until the programme starts (approximately 5 seconds); the start control LED flashes.

When the desired quantity of coffee has been dispensed, press the start control. The machine will stop the cycle and the coffee measure will be stored automatically on the correspondent selection.
10 IF YOU WISH TO RESET THE STANDARD VALUES
RESETTING STANDARD VALUES
This coffee machine is calibrated in the factory to make the optimum Italian espresso. The values set for the espresso coffee distribute 30 cc, the values set for the regular coffee is 80 cc.

If the standard values have to be reset from the stand-by control switch on the machine, then press both the on/off and hot-water controls at the same time for 5 seconds.

All the LEDs will briefly illuminate to indicate the factory values have been reset.

Press the ON/OFF control. Each selection will use the factory values.
N.B.: Only the quantity of water required for each cup of coffee is reset. The measures of ground coffee will not alter.
11 SIGNALS AND ALARMS
WATER REFILL INDICATOR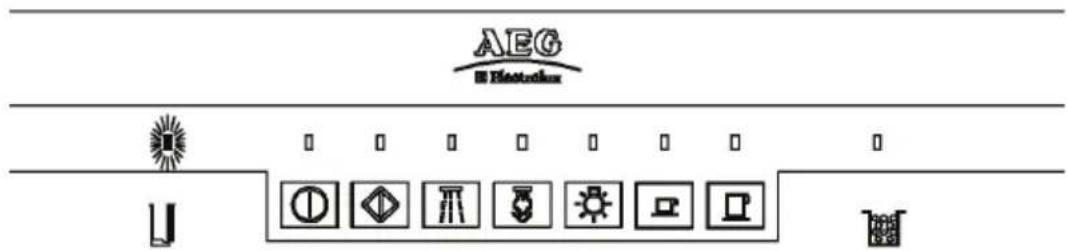
This machine has a sensor which detects when the water reservoir is empty. The reservoir empty LED will illuminate. The machine will not operate until the water reservoir is refilled.
VOLUMETER COUNTER FAULT
- This machine has a volumeter counter which detects the amount of water distributed by the machine. If the water reservoir is empty or if the volumeter counter is faulty, the reservoir empty LED will blink and the machine will not operate. To reset this alarm, please put the machine in standby mode then turn it on again.
"USED COFFEE DRAWER FULL" / COFFEE BEANS REFILL INDICATOR
- Every 20 coffees, the machine shows you that the coffee beans container is empty and that the "used coffee drawer" is full.
- When the corresponding LED is illuminated, you must empty the drip tray and the "used coffee drawer" and refill the coffee beans container.
- For instructions on how to empty the "used" coffee drawer, see chapter 13 "CLEANING".
FAULT INDICATOR

L
- The machine incorporates an automatic system that, detecting a fault in operation, will illuminate all the LEDs. Switch OFF the machine and contact the nearest Service Force Centre.
12 COFFEE MENUS
ITALIAN CAPPUCCINO
This is a normal espresso with steam-heated milk giving the coffee a milder flavour and a rich, delicious frothy topping. Serve in a large cup.
Pour some cold milk into a deep jug and heat using the steam jet. Pour only the froth onto the espresso, tilting and rocking the jug slightly or scoop off the froth with a spoon.
Some cocoa powder can also be dusted on the milk froth.
VIENNESE CAPPUCCINO
This variation is the result of the age-old Austrian tradition.
Prepare a 'weak' espresso on the machine for 30-35 seconds, then add hot milk topped by whipped cream. Serve in a medium-sized cup (midway between an espresso cup and a cappuccino cup).
Decorate with flakes of chocolate.
COLD ESPRESSO SHAKE
Frothy and extremely refreshing, this drink is delicious on hot days.
Prepare an espresso, add sugar and pour into a shaker with large ice cubes. Shake for few seconds. Serve in a tumbler or flûte.
IRISH COFFEE
Energy-giving and invigorating drink.
Warm a long glass and mix eight parts of hot coffee with one part whisky and brown sugar.
Gently pour some freshly whipped cream over the back of a spoon so that it floats on the coffee: the result is a layer of cool white cream on top of the hot dark coffee.
13 CLEANING
OUTER PARTS
- Clean the stainless steel parts of the machine with a soft cloth without using aggressive detergents. Never use any abrasive sponges nor steel wool to clean the parts of steel. Dry well with a soft cloth.

STEAM NOZZLE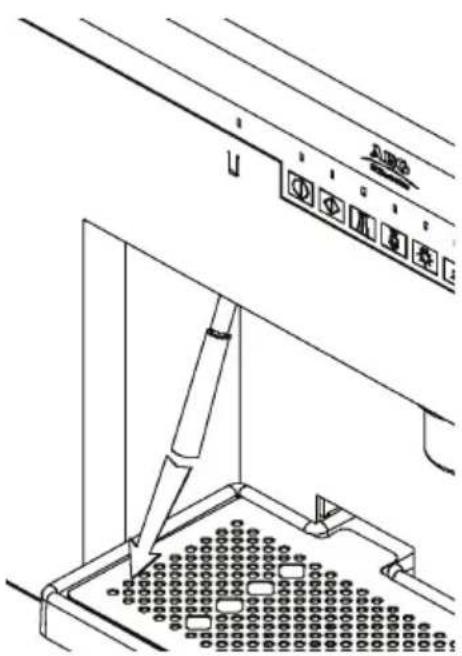
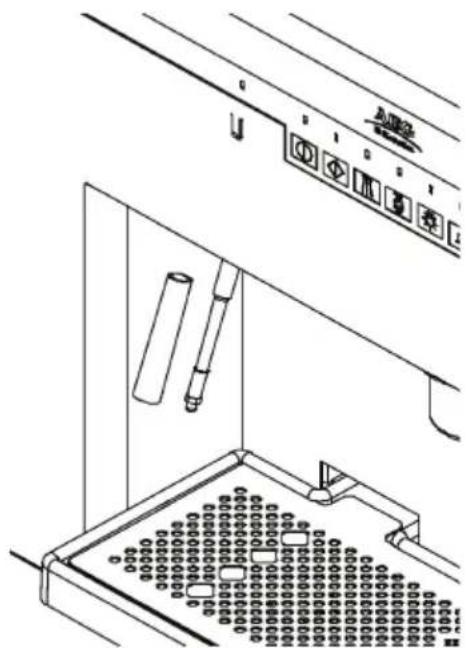
- Remember to clean the steam nozzle periodically as it can get internally dirty when frothing the milk. Remove the nozzle as shown in figure above and wipe it, together with its cap, using a sponge and hot water.
Caution: to clean the nozzle, switch OFF the machine and wait 20 minutes after use to allow it to cool, to prevent risks of burns.
DRIP TRAY


- Remove the drip tray from the machine as it is shown in the figures above.
- Make sure that the drip tray is periodically drained to prevent any liquid from seeping out and dirtying/damaging the underlying furniture. Drip tray and relevant grill can be washed in a dishwasher.
TO EMPTY THE "USED" COFFEE DRAWER
It is necessary to remove the drip tray as it is shown in the figure, and drain it.

Pull open the door and remove the drawer and empty it.
The drawer can be washed in a dishwasher or simply with hot water.
Replace the drawer and close the door. Replace the drip tray.


WATER RESERVOIR
- If the machine is not used for long periods, change the water in the reservoir and drain the boiler by pressing the coffee button several times.
- Clean the water reservoir periodically.
- The water reservoir can be washed in a dishwasher.
- When using the Brita filter, replace it after approximately 2000 cups of coffee or at least every three months.
CLEANING CYCLE OF THE BOILER
- This coffee machine is an appliance using water, therefore it is normal that some limescale can form in its boiler. • It is recommended to carry out the following operations every six months:
- Fill up the water reservoir with 2 litres of water adding half a glass of vinegar or citric acid.
- Carry out the same operations as preparing some cups of coffee (refer to the previous Chapter "Coffee"), and some cups of hot water until the reservoir is completely empty.
- Fill the reservoir again with cold water and repeat the above process to rinse the boiler.
INSTALLATION
BUILDING-IN
Installing the machine into kitchen furniture with proper characteristics will ensure a correct operation of the equipment.
Complying with the safety rules, ensure a proper protection against any contact with the electric components and with the parts protected only by functional insulation, by housing the machine correctly into the furniture.
All components that guarantee protection, even a cover panel (for instance, when the machine is positioned at one of the ends of the modular furniture), should be firmly fixed so that they cannot be removed without tools.
Install this machine at a certain distance from refrigerators or freezers, because the heat it emits can impair their functioning.
COMPONENTS FOR INSTALLING THE MACHINE
This coffee machine and drawer can be installed into cabinets with height of 450 mm and width ranging from 560 mm to 570 mm. The machine is equipped with the following components for the installation:
- 1 fixing base
- 9 self-threading screws 3.9X19
- 1 cable clamp
- 2 side slides
- 2 side-plates of 1 mm
- 4 side-plates of 2 mm

ELECTRICAL CONNECTION
- Fix the power cable onto the left side of the cabinet using one of the self-threading screws of the equipment and the proper cable clamp as shown in the figure.
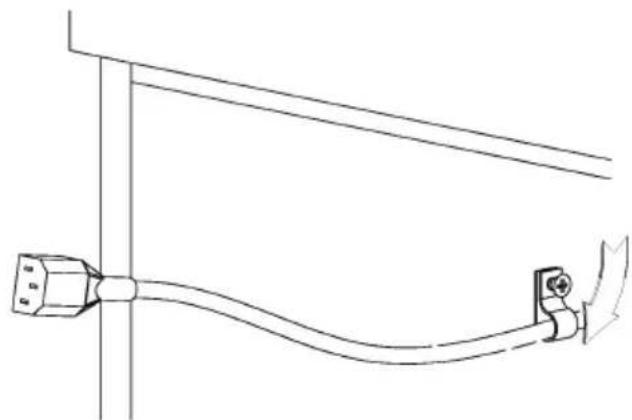
- Unscrew the cable clamp available on the machine.

- Fix the power cable onto the machine as shown in the figure.

- Connect the power cable as shown in the figure. This machine is designed for a single phase voltage of 230V. The power supply requires only outlets of 13A fuse and a double pole isolation switch with at least 3 mm between contacts.
INSTALLING THE MACHINE
- Lay the U base plate of the machine on the shelf of the cabinet.
- Insert the L plates, compensating for any space. The width of the housing unit the coffee machine depends on the thickness of the cabinet's sides. six side plates (four being 2 mm thick and two 1 mm thick) are provided to compensate for the different possible measures.


- They should be used to compensate for the internal width of the compartment, leading to a width of 560/570 mm.
- Fix the U base plate inserting 4 self-threading screws into the 4 front holes of the same plate. Then screw the telescopic runners to each side with the remaining 8 self-threading screw.
- Insert the machine into the housing by coupling the machine to the runners fixed to the sides of the carcass.


- Slide the machine into the cabinet until the "click" indicates that it is locked into Position.
15 SOMETHING NOT WORKING.....
If this machine does not work, please make sure that the fault is not due to:
- no power
- no water in the reservoir.
If the power cable is damaged or the machine needs servicing, please contact the nearest SERVICE FORCE CENTRE
16 TECHNICAL SPECIFICATIONS
- Width 594 mm
- Depth 475 mm • Height 378 mm • Capacity of water reservoir 2.5 l • Net weight 28 kg • Gross weight 31 kg • Supply voltage 230 V • Rated power 2000 W • Power absorbed by the heating element 1700 W • Power absorbed by the pump 50 W • Working pressure 12 bar
- Fuse 13 A
17 AFTER-SALES SERVICE, SPARE PARTS AND GUARANTEE
SERVICE & SPARE PARTS
If you wish to purchase spare parts or require an engineer, contact your local AEG Service Force Centre by telephoning:
08705 929 929
Your telephone call will be automatically routed to the Service Centre covering your postcode area.
For the address of your local Service Force Centre or for further information regarding Service Force, please visit the website at www.serviceforce.co.uk
When you contact the Service Centre they will need the following information:
- Your name & address, including postcode.
- Your telephone number
- Clear and concise details of the fault.
- The model, serial and production number.
This information can be found on the rating plate. The rating plate is on the inner edge of the door on the right.
- Date of purchase. Please note that it will be necessary to provide proof of purchase for any in-guarantee service call.
In-guarantee customers should ensure that the chapter headed "What to do if..." has been read, as the engineer will make a charge if the fault is not a mechanical or electrical breakdown.
CUSTOMER CARE
For general enquiries concerning your AEG appliance or for further information on AEG products please contact our Customer Care Department by letter or telephone at the address below or visit our website at www.aeg.co.uk
Customer Care Department
AEG Domestic Appliances
101 Oakley,
Luton,
Beds,
LU4 9XF
Tel. 08705 350350 (*)
(*) Calls to this number may be recorded for training purposes.
GUARANTEE CONDITIONS
AEG offers the following guarantee to the first purchaser of this appliance.
- The guarantee is valid for 24 months commencing when the appliance is handed over to the first retail purchaser, which must be verified by purchase invoice or similar documentation. The guarantee does not cover commercial use.
- The guarantee covers all parts or components which fail due to faulty workmanship or faulty materials. The guarantee does not cover appliances where defects or poor performance are due to misuse, accidental damage, neglect, faulty installation, unauthorised modification or attempted repair, commercial use or failure to observe requirements and recommendations set out in the instruction book. This guarantee does not cover such parts as light bulbs, removable glassware or plastic.
- Should guarantee repairs be necessary, the purchaser must inform the nearest AEG Service Force Centre (manufacturer's service or authorised agent). AEG reserves the right to stipulate the place of the repair (i.e. the customer's home, place of installation or AEG workshop).
- The guarantee or free replacement includes both labour and material.
- Repairs carried out under guarantee do not extend the guarantee period for the appliance.
Parts removed during guarantee repairs become property of AEG.
- The purchaser's statutory rights are not affected by this guarantee.
EUROPEAN GUARANTEE
If you should move to another country within Europe, then your guarantee moves with you to your new home, subject to the following qualifications:
* The guarantee starts from the date you first purchased your product.
* The guarantee is for the same period and to the same extent for labour and parts as exist in the new country of use for this brand or range of products.
* This guarantee applies to you and cannot be transferred to another user.
* Your new home is within the European Community (EC) or European Free Trade Area.
* The product is installed and used in accordance with our instructions and is only used domestically, i.e., a normal household.
* The electrical supply complies with the specification given on the rating label.
* The product is installed taking into account regulations in your new country.
Before you move, please contact your nearest Customer Care Centre, listed below, to give them details of your new home. They will then ensure that the local Service Organisation is aware of your move and able to look after you and your appliances.
France +33 (0)3 44 62 2929
Germany +49 (0)800 2347378
Italy +39 (0)800 117511
Sweden +46 (0)8 672 5360
UK +44 (0)1582 588809
AEG Hausgeräte GmbH
Postfach 1036
D-90327 Nürnberg
- ENGLISH
- CONTENTS
- SAFETY INSTRUCTION
- INTENDED USE
- PRIOR TO INITIAL START-UP
- SAFETY OF CHILDREN
- DURING USE
- CAUTION
- FOR INSTALLATION AND SERVICING
- SOME HINTS OF ENVIRONMENTAL PROTECTION
- PACKAGE
- DISPOSAL
- APPLIANCE PACKAGING INFORMATION
- DISPOSAL OF OLD APPLIANCES
- CE
- ELECTRICAL CONNECTION
- WARNING: THIS APPLIANCE MUST BE EARTHED
- PERMANENT CONNECTION
- DESCRIPTION OF THE COFFEE MACHINE
- DESCRIPTION OF THE CONTROL PANEL: TOUCH CONTROLS
- TOUCH CONTROLS: INSTRUCTIONS FOR USE
- INSTRUCTIONS FOR THE FIRST USE OF THE MACHINE
- FILLING UP THE WATER RESERVOIR
- HARDNESS OF WATER
- INITIAL START-UP
- STAND-BY MODE
- MAKING COFFEE
- HOW TO OBTAIN AN EXCELLENT ESPRESSO
- HOT WATER
- STEAM
- HEATING LIQUIDS
- PROGRAMMING THE AMOUNT OF COFFEE BEANS TO BE GRINDED
- PROGRAMMING THE VOLUME OF COFFEE DISPENSED
- IF YOU WISH TO RESET THE STANDARD VALUES
- RESETTING STANDARD VALUES
- SIGNALS AND ALARMS
- FAULT INDICATOR
- COFFEE MENUS
- ITALIAN CAPPUCCINO
- VIENNESE CAPPUCCINO
- COLD ESPRESSO SHAKE
- IRISH COFFEE
- CLEANING
- OUTER PARTS
- DRIP TRAY
- TO EMPTY THE "USED" COFFEE DRAWER
- WATER RESERVOIR
- CLEANING CYCLE OF THE BOILER
- INSTALLATION
- BUILDING-IN
- COMPONENTS FOR INSTALLING THE MACHINE
- INSTALLING THE MACHINE
- SOMETHING NOT WORKING
- TECHNICAL SPECIFICATIONS
- AFTER-SALES SERVICE, SPARE PARTS AND GUARANTEE
- SERVICE & SPARE PARTS
- CUSTOMER CARE
- GUARANTEE CONDITIONS
- EUROPEAN GUARANTEE
Brand : AEG
Model : PE 9038M
Category : Coffee maker