
Quest Running Pack - Sports Watch SUUNTO - Free user manual and instructions
Find the device manual for free Quest Running Pack SUUNTO in PDF.


| Product Type | Sports Watch |
| Brand | Suunto |
| Model | Quest |
| Weight (device) | 40 g / 1.41 oz |
| Weight (HR belt) | 55 g / 1.95 oz |
| Water Resistance (device) | 30 m / 100 ft (ISO 2281) |
| Water Resistance (HR belt) | 20 m / 66 ft (ISO 2281) |
| Operating Temperature | -10°C to +50°C / +14°F to +122°F |
| Storage Temperature | -30°C to +60°C / -22°F to +140°F |
| Battery Type (device & HR belt) | 3V CR2032, user-replaceable |
| Battery Life | Approximately 1 year (2.5 h/week exercise with HR and POD) |
| Transmission Frequency (HR belt) | 5.3 kHz inductive and 2.465 GHz Suunto-ANT |
| Transmission Range | ~ 2 m / 6 ft |
| Log Recording Time | Up to 20 hours |
| Heart Rate Display Range | 30 to 240 bpm |
| Warranty Period (device) | 2 years |
| Warranty Period (accessories) | 1 year |
| Care Instructions | Rinse with fresh water and mild soap; clean with moist soft cloth. Avoid solvents and insect repellent. Keep buttons dry. |
| Safety Precautions | Consult doctor before exercise; allergic reactions possible; do not submerge while pressing buttons. |
| Spare Parts & Repairability | Battery available; O-ring should be replaced with battery; contact authorized Suunto service for repairs. |
Frequently Asked Questions - Quest Running Pack SUUNTO
User questions about Quest Running Pack SUUNTO
0 question about this device. Answer the ones you know or ask your own.
Ask a new question about this device
Download the instructions for your Sports Watch in PDF format for free! Find your manual Quest Running Pack - SUUNTO and take your electronic device back in hand. On this page are published all the documents necessary for the use of your device. Quest Running Pack by SUUNTO.
USER MANUAL Quest Running Pack SUUNTO
Types of safety precautions: 5
Safety precautions: 5
2 Welcome 7
3 Display icons and segments 9
4 Using buttons 10
5 Getting started 12
5.1 Using backlight and button lock 13
5.2 Testing your rest HR 14
6 Putting on HR belt 15
7 Starting training session 17
7.1 Troubleshooting: No HR signal 18
8 During training 19
8.1 During guided training 21
9 After training 23
9.1 After training 23
9.2 Recovery time 24
9.3 Reviewing recovery time and previous Move 25
9.4 Previous Move 25
10 Adjusting settings 27
Time and personal settings 27
Training settings 28
General settings 28
Pairing 29
10.1 Estimating your activity class 29
10.2 Sleep mode and initial settings 30
10.3 Changing language 32
11 Customizing Suunto Quest 33
11.1 Connecting to web 33
11.2 Customizing displays in Movescount 35
12 Training with custom training program 37
12.1 Activating training program 37
12.2 Taking program into use 38
12.3 Training guidance 38
12.4 Making laps during training 39
13 Pairing POD/HR belt 41
Example: Pairing Suunto Dual Comfort Belt 42
13.1 Troubleshooting 42
13.2 Calibrating PODs 42
14 Care and maintenance 44
14.1 Replacing battery 44
14.2 Replacing HR belt battery 46
15 Specifications 47
15.1 Technical specifications 47
15.2 Trademark 48
15.3 FCC compliance 48
15.4 CE 48
15.5 ICES 48
15.6 Copyright 49
15.7 Patent notice 49
16 Warranty 50
Warranty Period 50
Exclusions and Limitations .... 50
Access to Suunto warranty service 51
Limitation of Liability 51
1 SAFETY
en
Types of safety precautions:
⚠ WARNING: - is used in connection with a procedure or situation that may result in serious injury or death.
CAUTION: - is used in connection with a procedure or situation that will result in damage to the product.
NOTE: - is used to emphasize important information.
Safety precautions:
WARNING: ALLERGIC REACTIONS OR SKIN IRRITATIONS MAY OCCUR WHEN PRODUCT IS IN CONTACT WITH SKIN, EVEN THOUGH OUR PRODUCTS COMPLY WITH INDUSTRY STANDARDS. IN SUCH EVENT, STOP USE IMMEDIATELY AND CONSULT A DOCTOR.
WARNING: ALWAYS CONSULT YOUR DOCTOR BEFORE BEGINNING AN EXERCISE PROGRAM. OVEREXERTION MAY CAUSE SERIOUS INJURY.
⚠️ CAUTION: DO NOT APPLY SOLVENT OF ANY KIND TO THE PRODUCT, AS IT MAY DAMAGE THE SURFACE.
CAUTION: DO NOT APPLY INSECT REPELLENT ON THE PRODUCT, AS IT MAY DAMAGE THE SURFACE.
CAUTION: DO NOT THROW THE PRODUCT AWAY, BUT TREAT IT AS ELECTRONIC WASTE TO PRESERVE THE ENVIRONMENT.
CAUTION: DO NOT KNOCK OR DROP THE DEVICE, AS IT MAY BE DAMAGED.
2 WELCOME
Thank you for choosing Suunto Quest!
This User Guide is here to help you get the most out of your training session with Suunto Quest. Read it through to make using your new Suunto Quest even more enjoyable.
There's nothing like it. Being out amongst nature, doing the sport you love best. Constantly searching for the perfect trail. Training for your next big event. Enjoying every moment of it. It's what you live for. It's what you were built for.
The robustly designed Suunto Quest lets you:
\_PLAN
_Create tailor-made training plans or choose from existing plans online.
\_PLUG
_Download training program to Suunto Quest.
_Upload training data to Movescount.com.
_Customize display and settings at Movescount.com.
\_PLAY
_Get heart rate and speed based information during training, and recovery time.
\_PROGRESS
_Analyze your performance online and share your achievements with the community at Movescount.com.
Continue your training experience online and get even more out of every move at Movescount.com. With Suunto Movestick you can connect your Suunto Quest to Movescount.com, upload training logs, share your progress with friends, and exchange emotions and thoughts. You can also download a training program straight to your Suunto Quest. Check out Movescount.com today and sign up.
NOTE: Be sure to register your device at www.suunto.com/register to get the full range of Suunto support.
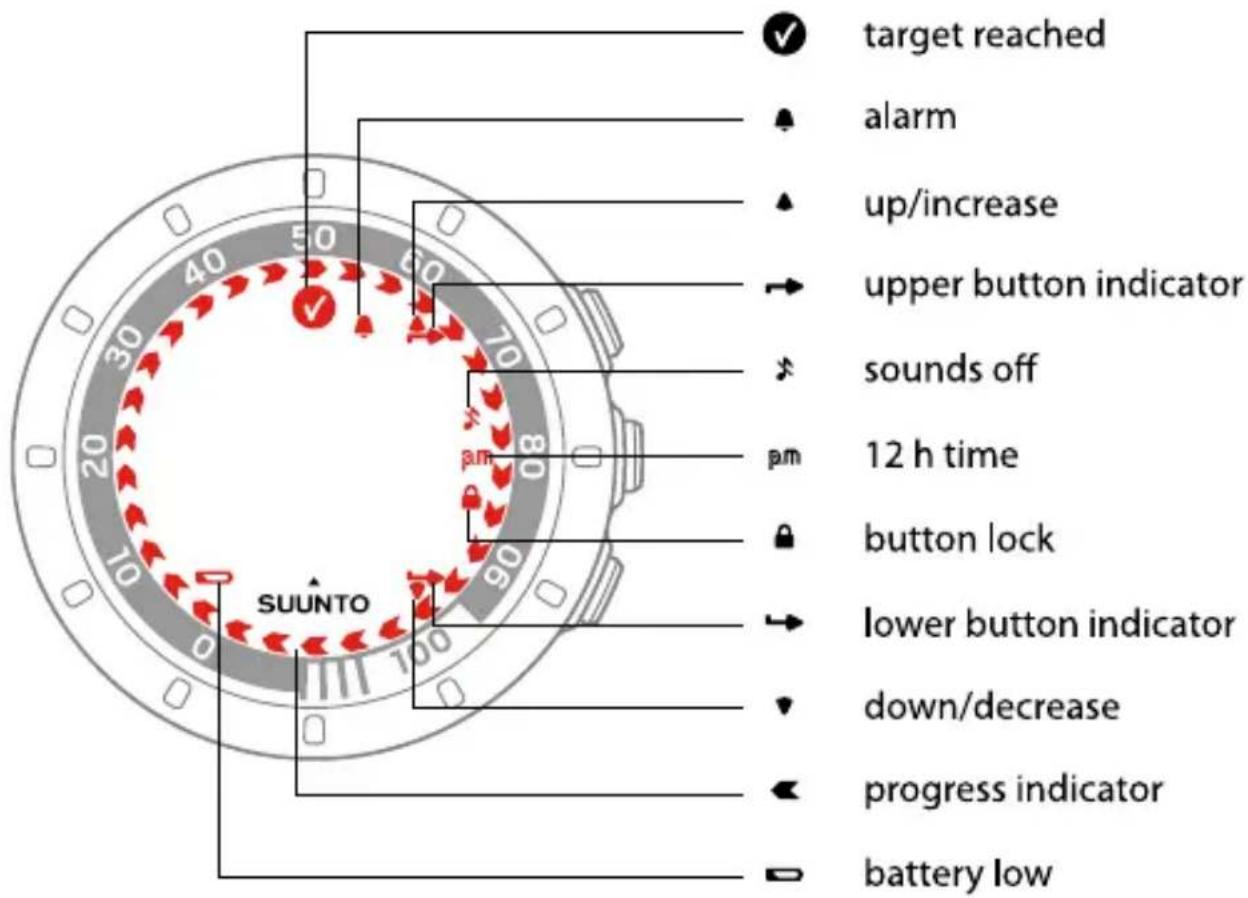
3 DISPLAY ICONS AND SEGMENTS
en
4 USING BUTTONS
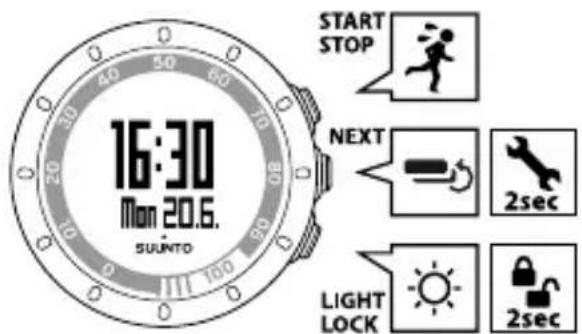
By pressing the following buttons, you can access various features:
START STOP:
- select custom mode 1 (training), custom mode 2 (running), custom mode 3 (cycling), recovery time, prev. Move, web connect
• start/stop a training session
• increase a value/move up
Read more about the custom modes in Section 11.2 Customizing displays in Movescount on page 35.
NEXT:
- switch views
- keep pressed to enter/exit settings
- accept/move to the next step
LIGHT LOCK:
• activate the backlight
- keep pressed to lock the START STOP button
• decrease a value/move down
en
5 GETTING STARTED
Start by adjusting your personal settings. Many of the calculations use these settings, so it is important that you are as accurate as possible when defining the values. Through the personal settings, you tune your Suunto Quest according to your physical traits and activity.
To set the initial settings:
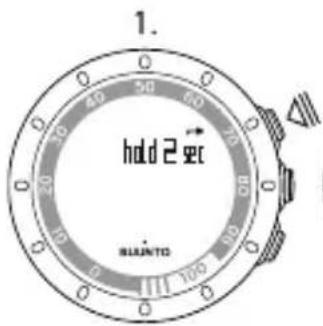
- Press any button to activate the device. Wait until the unit wakes up and says hold 2 sec. Keep START STOP pressed to enter the first setting.
- Press START STOP or LIGHT LOCK to change values.
- Press NEXT to accept a value and to move to the next setting. Press LIGHT LOCK to return to the previous setting.
- When you are ready, select yes (START STOP) to confirm all settings. If you want to modify the settings, select no (LIGHT LOCK).
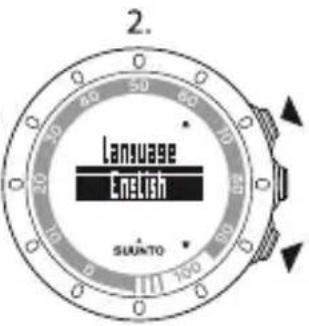
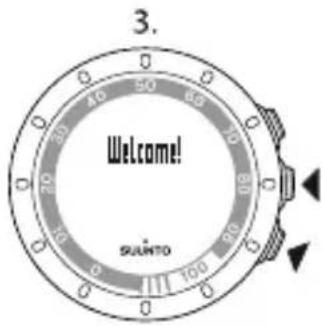
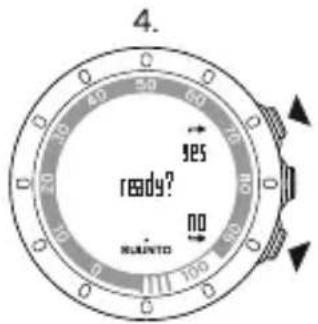
You can set the following initial settings:
-
language: English, Deutsch, français, español, português, italiano, Nederlands, svenska, suomi
• units: metric / imperial
• time: 12 / 24 h, hours and minutes -
date
• personal settings: year of birth, sex, weight

NOTE: Once you have entered your year of birth, your device automatically the maximum heart rate (max. HR) using the formula 207 – (0.7 x AGE) published by the American College of Sports Medicine. If you know your real max. you should adjust the automatically given value to the known value.
Remember to adjust additional personal values in personal settings before you start training with Suunto Quest, see Chapter 10 Adjusting settings on page 27.

TIP: In the time view, press the NEXT button to see the date, dual time, and bonds with the time. If you choose the seconds view, the display returns to show a date or dual time after 2 minutes to save battery life.
5.1 Using backlight and button lock
Press LIGHT LOCK to activate the backlight.
Keep LIGHT LOCK pressed to lock or unlock the START STOP button. When the START STOP button is locked, 🔔 is shown on the display.

NOTE: Lock the START STOP button to avoid accidentally starting or stopping r stopwatch. When the START STOP button is locked during a training session, can still change the views by pressing the NEXT button.
NOTE: During training, keep the NEXT button pressed to activate the button lock and deactivate the tapping feature.
NOTE: To save the battery life, the backlight blinks when activated during training.
5.2 Testing your rest HR
Rest HR is your heart rate at rest. Improving your fitness level usually lowers the rest HR.
To test your rest HR:
- Moisten the contact areas and put on the HR belt.
- Make sure your device receives the HR signal.
- Lie down and relax for three minutes.
- Check your heart rate from the device and adjust it accordingly in the personal settings.
TIP: The best time to perform the rest HR test is after a good night's sleep. If you just had coffee, feel tired or stressed, do the test later.
6 PUTTING ON HR BELT
en
NOTE: Suunto Quest is compatible only with Suunto Dual Comfort Belt.
Adjust the strap length so that the HR belt is tight but still comfortable. Moisten the contact areas with water or gel and put on the HR belt. Ensure the HR belt is centered on your chest and the red arrow is pointing up.
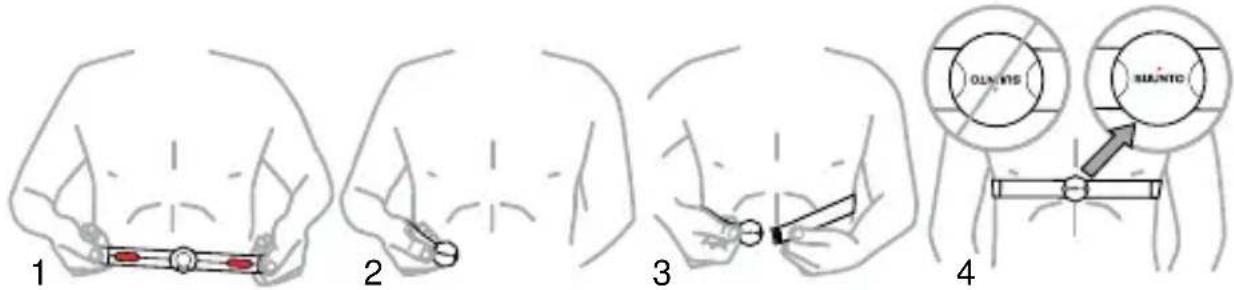
WARNING: People who have a pacemaker, defibrillator, or other implanted electronic device use the HR belt at their own risk. Before starting the initial use of the HR belt, we recommend an exercise test under a doctor's supervision. This ensures the safety and reliability of the pacemaker and HR belt when being used simultaneously. Exercise may include some risk, especially for those who have been inactive. We strongly advise you to consult your doctor prior to beginning a regular exercise program.
NOTE: HR belts with ANT icon (are compatible with ANT compatible Suunto wristop computers and with Suunto ANT Fitness Solution, while HR belts with IND icon (are compatible with most exercise equipment with inductive heart rate reception. Your Suunto Dual Comfort Belt is both IND and ANT compatible.

NOTE: Suunto Quest cannot receive the HR belt signal under water.

TIP: Machine-wash the heart rate belt regularly after use to avoid unpleasant or.
7 STARTING TRAINING SESSION
After the initial settings, you can start training. You can get full advantage of Suunto Quest by customizing it to best suit your needs. For information about settings, displays, and training customization options, see Chapter 10 Adjusting settings on page 27 and Section 11.2 Customizing displays in
Movescount on page 35. This section describes how to start a training session using Suunto Quest default settings.
To start training:
- Moisten the contact areas and put on the HR belt.
-
In the time view, press START STOP and select one of the following: training, running, or cycling.
-
Press NEXT to confirm.
If the training program is activated and a training session is scheduled for the current day, you will see a recommendation screen showing HR or speed range before the training session begins. In this case, press NEXT to move to the next screen.
- As soon as Suunto Quest finds the HR belt or POD, you will see a notification screen. Press START STOP to start recording your training session.
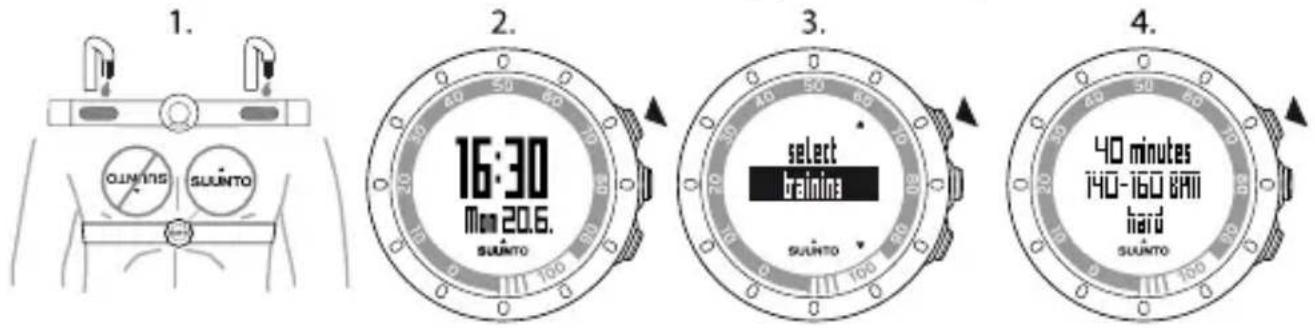

TIP: Warm up before and cool down after training.
7.1 Troubleshooting: No HR signal
If you lose the HR signal, try the following:
- Check that you are wearing the HR belt correctly.
- Check that the electrode areas of the HR belt are moist.
- Replace the battery of the HR belt and/or the device, if problems persist.

NOTE: Suunto Quest cannot receive the HR belt signal under water.
8 DURING TRAINING
Suunto Quest gives you additional information during training. You can define what information you want to see on the display. For information about settings, displays, and training customization options, see Chapter 10 Adjusting settings on page 27 and Section 11.2 Customizing displays in
Movescount on page 35. This section describes how to scroll through additional information during a training session using Suunto Quest default settings.
Here are some ideas on how to use the device during training:
- Press NEXT to see additional information in real time.
- Keep LIGHT LOCK pressed to lock the START STOP button to avoid accidentally stopping your stopwatch.
- Press START STOP to pause the training session.
The additional information varies depending on what information is available and also on your personal choice and preference. As a default, if both HR and POD are available, the following information is displayed:
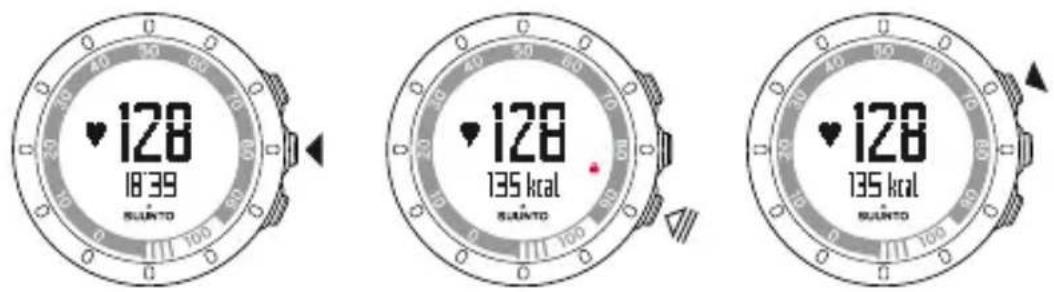
In the default training custom mode:
• view 1: heart rate and stopwatch
• view 2: heart rate and calories in real time
• view 3: heart rate percentage and heart rate zone
• view 4: stopwatch
• view 5: speed and distance in real time
In the default running custom mode:
• view 1: heart rate and stopwatch
• view 2: pace and distance
• view 3: pace and average running cadence
• view 4: distance and time
• view 5: stopwatch
In default cycling custom mode:
• view 1: heart rate and stopwatch
• view 2: heart rate and distance
• view 3: speed and distance
• view 4: speed and stopwatch
• view 5: distance and average speed
In addition, during training you will see arrows on the outer rim of the display.
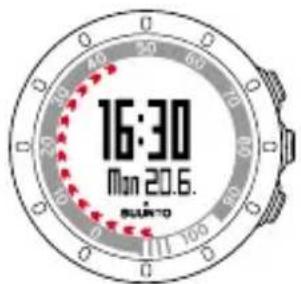
The arrows represent your current recovery time (in hours). The recovery time is the time you need to fully recover from the training to be ready for the next training session. The numbers on the rim show how many hours your recovery time is so far. Recovery time will also be visible in one of the summary views after training and as a separate item in the training menu.
NOTE: To save battery life, the backlight will blink when activated during training.
TIP: Switch the sounds on or off (✗) during exercise by keeping NEXT pressed. You cannot switch the sounds on, if you have set sounds to all off in the general settings, see Chapter 10 Adjusting settings on page 27.
8.1 During guided training
You can create your own training program at www.movescount.com and download the program to your Suunto Quest. When the training program is on, Suunto Quest guides you to reach your daily training target. When the arrow on the display is pointing up, you should increase the intensity or speed. When the arrow is pointing down, you should decrease the intensity or speed.
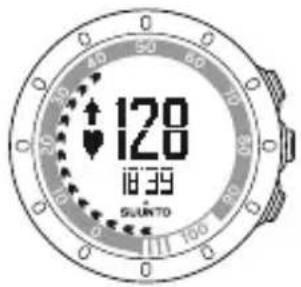
NOTE: When planning a training session in Movescount, you can define its duration, intensity, and distance. Unless distance is defined, Suunto Quest will give you intensity guidance.
NOTE: You can set the outer rim arrows to represent the percentage of training completion in Movescount. You can read the percentage value using the digits on the rim of the device.
NOTE: During training the guiding arrow is only visible in the displays showing speed or HR data.
When you have reached your target, 📋s shown. If you do not want to follow a training program, make sure to turn it off in the training settings. When the training program is disabled, you can still receive guidance related to personally set heart rate or speed limits. Remember to enable the heart rate or speed limits by selecting limits on in the training settings.
9 AFTER TRAINING
en
9.1 After training
- Press START STOP to pause or stop the training session.
- Select stop to confirm stopping and to view the summary, or select continue to continue training.
- Press NEXT to browse through the different views of the summary.
- Keep NEXT pressed to return to the time view.
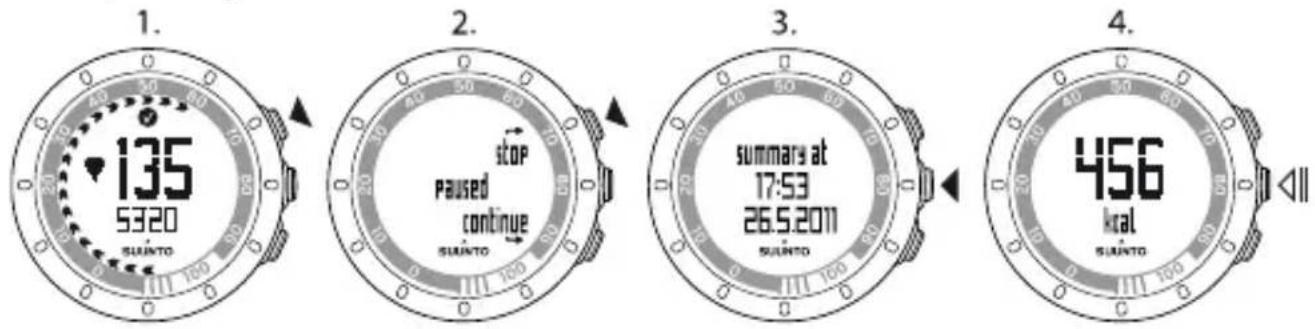
NOTE: If your peak HR during training has exceeded your maximum HR set in the device settings, the device automatically asks if you want to update your maximum HR.
TIP: You can skip the summary by keeping NEXT pressed in the first summary view. To view the previous training summary later, press START STOP in the time view and select prev. Move.
TIP: Machine-wash the heart rate belt regularly after use to avoid unpleasant odor.
9.2 Recovery time
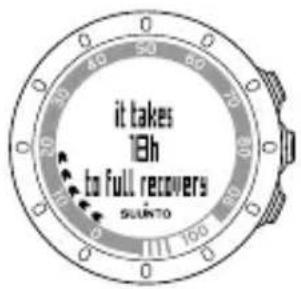
After each training session, Suunto Quest shows how long it takes for you to fully recover and when you are ready to train with full intensity within your personal activity class. Check your recovery time at any time in recovery time, see Section 9.3 Reviewing recovery time and previous Move on page 25. If the recovery time is more than 24 hours, we recommend you to have a rest day to avoid overtraining. Suunto Quest calculates up to 120 hours of recovery time.
NOTE: Consult a professional trainer to learn more about how to utilize recovery times (exercise and rest ratio) to reach your targets.
NOTE: The arrows appearing on the outer rim of the display during training represent your recovery time. The arrows are shown during and after training in the time view.
NOTE: The recovery time is calculated based on HR information and it is only available when you are training with an HR belt.
en
9.3 Reviewing recovery time and previous Move
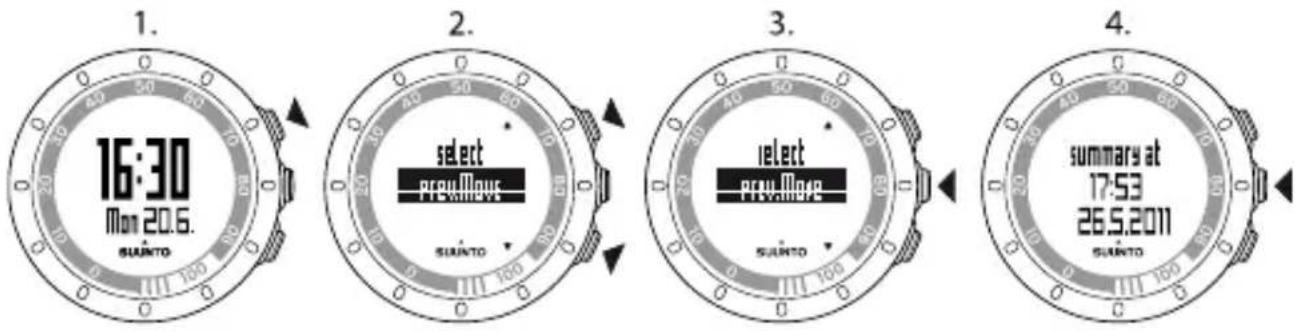
To review recovery time and previous Move:
- In the time view, press START STOP.
- Select recovery time or prev. Move with START STOP or LIGHT LOCK.
-
Confirm your selection with NEXT.
-
Press NEXT to browse through the views. After you have browsed through all the views, the device returns to the time view.
TIP: Keep NEXT pressed to return to the time view.
The arrows appearing on the outer rim of the display during training represent your recovery time. The arrows are shown during and after training in the time view. In the time view the arrows gradually disappear, as you recover.
9.4 Previous Move
In prev. Move you can view the information of your previous training session.
You can only view the details of your previous training session from the device. However, Suunto Quest stores training details from previous sessions, which you can view in more detail when you transfer the logs to Movescount.com.
NOTE: Remember to transfer your training logs to Movescount.com regularly to avoid overwriting log memory.
10 ADJUSTING SETTINGS
You can adjust the settings in the time view.
During training, you can:
- set the sounds on or off by keeping NEXT pressed.
- lock the START STOP button and the tapping feature by keeping the LIGHT LOCK button pressed.
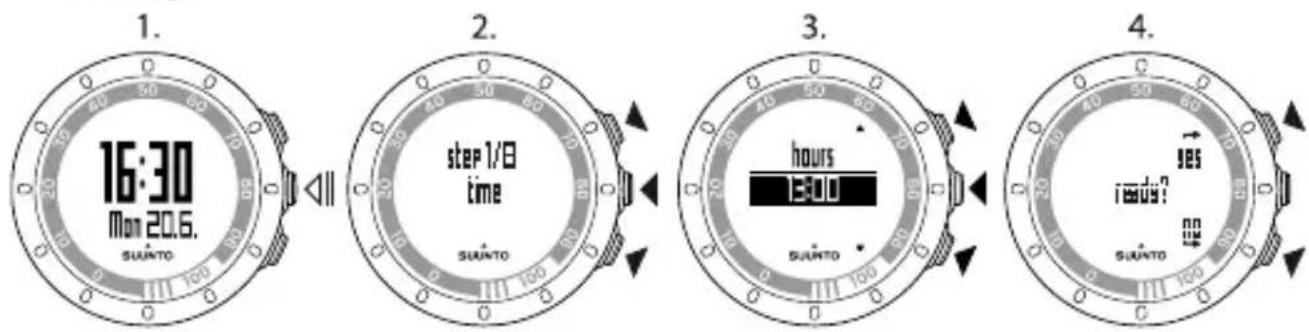
To adjust the settings:
- In the time view, keep NEXT pressed to enter the settings.
- Press NEXT to enter the first setting. You can browse through the setting steps with START STOP and LIGHT LOCK.
- Press START STOP or LIGHT LOCK to change the values. Press NEXT to confirm and to move to the next setting.
- When you are ready, select yes (START STOP) to confirm all settings. If you still want to modify the settings, select no (LIGHT LOCK) to return to the first setting.
You can adjust the following settings:
Time and personal settings
• time: hours and minutes
• alarm: on/off, hours, minutes
• dual time: hours and minutes
• date: year, month, weekday
- personal settings: weight, activity class, maximum HR (max. HR), rest HR
Training settings
- program: on/off - allows you to use a default Suunto Quest program or a personal training program downloaded from Movescount.com.
- limits: off, HR, speed - allows you to select heart rate limit or speed limit guidance, if you are not using a training program.
- autolap: on/off
- timer 1: off/on, minutes, seconds
- timer 2: off/on, minutes, seconds

TIP: You can adjust the personal values for the HR and speed limits in
Movescount. In Movescount you can also define limits per custom mode.

TIP: Autolap is triggered by distance. The default values per POD are 1 (km/mile)
for Foot POD Mini and 1 (km/mile) per Bike POD. You can adjust the values for each POD and custom mode you are using in Movescount.com.
General settings
sounds:
• all on: all sounds are on
- buttons off: you will hear all other sounds, except button presses
- all off: all sounds are off (when the sounds are off, is shown on the display during training)
- tap sensitivity: off, very low, low, medium, high, very high
- distance unit (with optional speed and distance POD): km/mi
Pairing
- skip: skip pairing
- belt: pair HR belt
- Foot POD: pair a Foot POD or Foot POD Mini
• Bike POD: pair a Bike POD - Speed POD: pair a POD - we recommend you pair Suunto GPS POD under this name.
10.1 Estimating your activity class
The activity class is a rating of your current activity level. Use the following classifications to help you determine your activity class.
Easy going
If you do not participate regularly in recreational sports or heavy physical activity, use 1.
Recreational
If you participate regularly in recreational sports or do physical work and your weekly exercise is:
• less than 1 hour, use 2.
- more than 1 hour, use 3.
Fitness
If you participate regularly in sports or other physical activity and you engage weekly in heavy exercise:
• under 30 minutes, use 4.
• 30-60 minutes, use 5.
• 1-3 hours, use 6.
• over 3 hours, use 7.
Endurance or professional
If you train on a regular basis or participate in competitive sports and your weekly exercise is:
- 5-7 hours, use 7.5.
- 7-9 hours, use 8.
• 9-11 hours, use 8.5.
• 11-13 hours, use 9.
• 13-15 hours, use 9.5.
• over 15 hours, use 10.
10.2 Sleep mode and initial settings

NOTE: It is recommended to change the initial settings in Movescount.com.
To change the initial settings without access to Movescount.com, you have to put the device into sleep mode.
To put the device into sleep mode:
- After the last step of general settings, when the device asks you to confirm that the setting changes are done, keep NEXT pressed until the device goes into sleep mode.
- Press any button to activate the device again.
- Set the initial settings, see Chapter 5 Getting started on page 12.
NOTE: When replacing the battery, only the time and date change. The device remembers your previous initial settings and recorded exercises.
Example: adjusting alarm settings
When the alarm is on, is shown on the display.
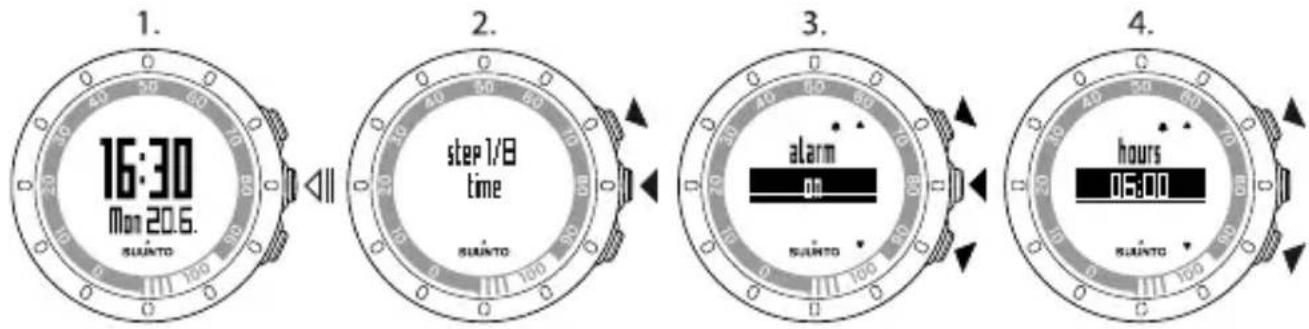
To set the alarm on/off:
- In the time view, keep NEXT pressed to enter the settings.
- Browse to alarm with START STOP and confirm with NEXT.
- Set the alarm on or off with START STOP and LIGHT LOCK. Confirm with NEXT.
- Set the alarm time with START STOP and LIGHT LOCK. Confirm with NEXT.
When the alarm sounds, press stop (LIGHT LOCK) to turn it off.
After you have stopped the alarm, it sounds the same time the following day.
10.3 Changing language
If you want to change the device's language or you have chosen the wrong language when setting up the device, the device needs to be put to sleep. For information on how to put the device to sleep, see Section 10.2 Sleep mode and initial settings on page 30.
Alternatively, you can adjust the language in Movescount.com

NOTE: The device remembers your previous initial settings and recorded timing sessions.
11 CUSTOMIZING SUUNTO QUEST
en
11.1 Connecting to web
Movescount.com is an online sports community that offers you a rich set of tools to manage your daily activities and create engaging stories about your experiences. It also allows you to customize your Suunto Quest to best meet your training needs.
Transfer your recorded logs with Suunto Movestick Mini to Movescount.com. Download settings and customized plans from Movescount.com to your Suunto Quest.

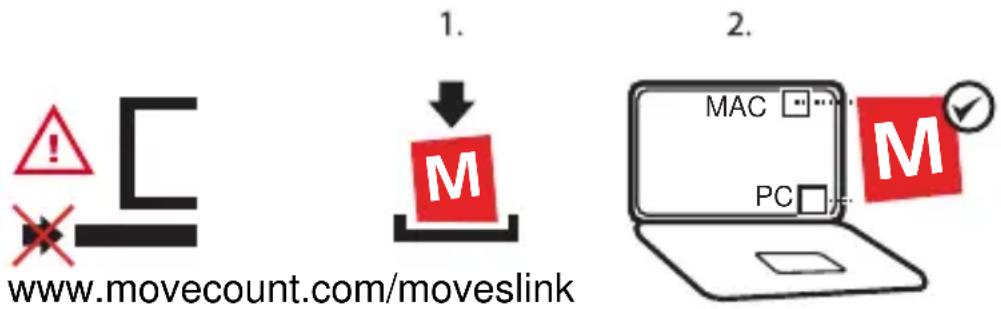
CAUTION: Do not plug in Movestick Mini before installing Moveslink!
To install Moveslink:
- Go to www.movescount.com/moveslink.
- Download, install, and activate Moveslink.
flowchart
graph TD
    A["Warning Symbol"] --> B["User Interface"]
    C["MoveCount Icon"] --> D["1."]
    D --> E["M"]
    F["Laptop with 'MAC' and 'PC' icons"] --> G["2."]

NOTE: A Moveslink icon is visible on your computer's display when Moveslink is active.
NOTE: Moveslink is compatible with PC (Windows XP, Windows Vista, Windows 7) and MAC (Intel-based, running OS X version 10.5 or later).
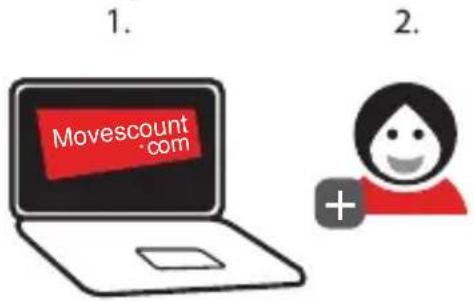
To register to Movescount:
- Go to www.movescount.com.
- Create your account.
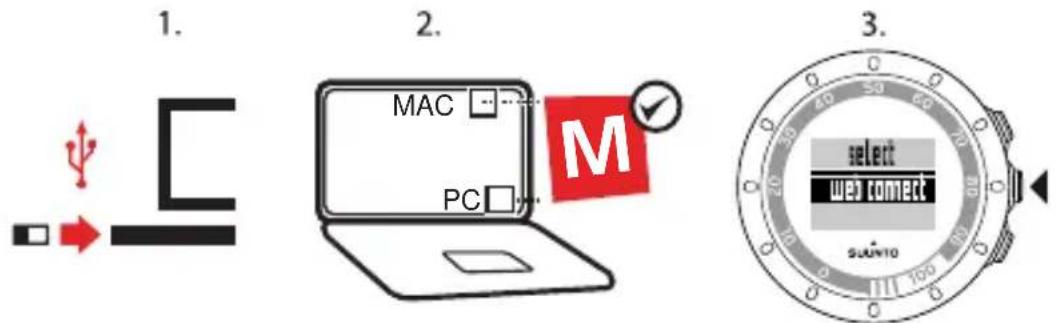
To transfer data:
- Plug Suunto Movestick Mini into your computer's USB port.
- Make sure that Moveslink is activated.
-
In Suunto Quest, press START STOP to enter the training menu, scroll to web connect, and confirm by pressing NEXT.
-
Follow the instructions shown on your computer to view your moves in Movescount.
TIP: Suunto Quest can store between 20 and 30 logs, depending on the data you want to record during training. After that it starts to overwrite the oldest log. To avoid losing training logs and to view the log details, transfer them to Movescount.com.
NOTE: The first time Suunto Quest is connected to Movescount.com, all information (including the device settings) is transferred from Suunto Quest to Movescount. The next time you connect Suunto Quest to Movescount.com, changes in settings, training programs, displays, and custom modes you made in Movescount.com and in the device will be synchronized.
11.2 Customizing displays in Movescount
Suunto Quest lets you choose the information you want to see on the display during training. Take full advantage of Suunto Quest by customizing the displays and creating your own training program in Movescount.com.
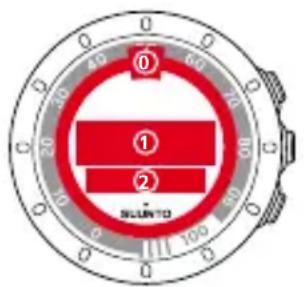
You can customize three different areas on the display:
- The outer rim arrows can be customized to show the recovery time in hours, heart rate percentage, or percentage of training completion. When showing the completion and recovery time, the outer rim arrows are visible during
training and after training in the time mode. When showing the heart rate percentage, the outer rim arrows are only visible during training. Use the digits on the rim of the device to interpret outer rim arrows. The digits represent hours (for recovery time) or percentage (for heart rate % and for training completion).
- Row 1 displays training information in the middle of the screen.
- Row 2 displays training information at the bottom of the screen.
NOTE: Remember to connect Suunto Quest to your Movescount.com account every time you transfer your training data, or would like to transfer changes made in Suunto Quest settings to the device.
NOTE: Recovery time and heart rate percentage will only be displayed when training with a heart rate belt. Training completion will only be shown if you take a training program into use.
NOTE: Some information, for example the interval timer, lap time, and heart rate zone can only be shown in row 2.
You can create up to 5 custom modes to your Suunto Quest, name them, and define up to 5 views for each mode. You can also define whether Suunto Quest should connect to a heart rate belt or POD, as well as the autolap distance per POD.
TIP: By selecting the stopwatch to row 2 and leaving row 1 empty, the stopwatch will be displayed in large digits on the display.
12 TRAINING WITH CUSTOM TRAINING PROGRAM
en
You can create your own training program in Movescount.com and download the program to your Suunto Quest. When the training program is on, Suunto Quest guides you to reach your daily training target.
This section describes how to take the default program into use. Remember that the default program is only an example and may not fully meet your training needs.
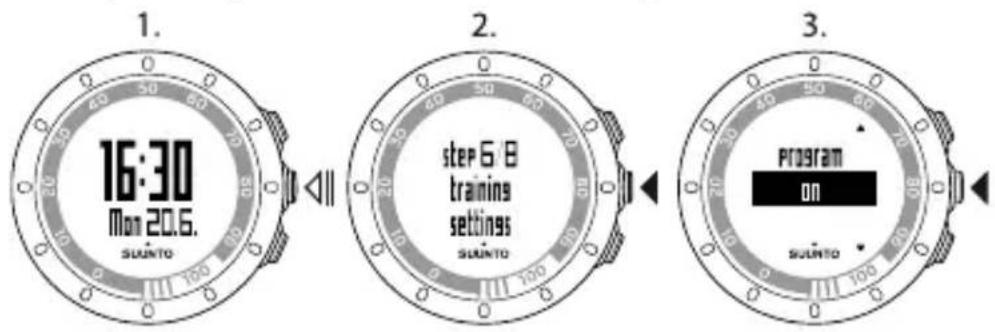
12.1 Activating training program
To activate the default training program:
- Keep NEXT pressed to enter the settings.
- Scroll to training settings with START STOP and confirm with NEXT.
- Select program on and confirm with NEXT.
- Keep NEXT pressed to exit the settings and return to the time view.
12.2 Taking program into use
Suunto Quest default training program lasts 15 weeks, with training sessions varying in duration and intensity. The program is designed for activity class 6 (1-3 hours of heavy exercise weekly).
Suunto Quest default program offers you intensity guidance during your training. To create your own training program, visit Movescount.com.
NOTE: Remember to connect Suunto Quest to your Movescount.com account every time you transfer your training data, or would like to transfer changes made in Suunto Quest settings to the device.
When the training program is on, Suunto Quest shows you a training day reminder in the time view for the day with the scheduled training session. Press NEXT to see the daily target recommendation. Press NEXT again to confirm and to return to the time view.
12.3 Training guidance
When the training program is on, Suunto Quest shows your progress and guides you to reach your daily training target. Depending on the type of training selected, Suunto Quest provides intensity (heart rate based) or speed (distance based) guidance. In the default program only intensity guidance is shown. When the arrow on the display close to heart rate or speed value is pointing up, you should increase the intensity or speed. When the arrow is pointing down, you should decrease the intensity or speed. When you have reached your target, 📋s shown.
NOTE: The guiding arrow during training is only visible in the displays showing speed or HR data.
NOTE: Unless distance is defined, Suunto Quest will give you intensity guidance. If you train without a heart rate belt, you will not receive intensity guidance during your training session.
NOTE: If you do not want to follow a training program, make sure to turn it off in the general settings and in Movescount.
TIP: If the training program is disabled, you can still receive guidance related to personally set heart rate or speed limits. Remember to turn the limits on in the device settings. You can adjust the limits in Movescount.
NOTE: Suunto Quest creates a daily target. If you plan several training sessions per day, their durations and intensities are combined into a daily target.
12.4 Making laps during training
You can set Suunto Quest to take autolaps when training. Autolaps are driven by distance. You can select different autolap distances for each POD and custom mode.
TIP: You can use three custom modes in Suunto Quest: running, walking, and cycling. In Movescount.com you can set your Suunto Quest to take autolaps
every 1 km (mile) for running, every 0.5 km (mile) for walking, and every 10 km (miles) for cycling.
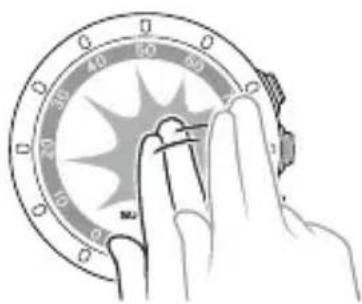
You can also take manual laps during training. When training, tap on the display to take a lap.
You can adjust the tapping sensitivity in the general settings:
- In the time mode, keep NEXT pressed to enter the settings.
-
Scroll to general settings with START STOP and confirm with NEXT.
-
Press NEXT to enter the tap sensitivity settings.
-
Press START STOP to adjust the tap sensitivity to the desired level – you can tap the display when scrolling through the levels to check the sensitivity level. When a tap is registered, tapped! message will be displayed.
-
Press NEXT to confirm the setting.
-
Keep NEXT pressed to exit the settings and return to the time mode.
natural_image
Hand holding a dial indicator with a starburst effect, no text or symbols visibleTIP: Laps will be automatically created when using interval timers and when a training session is paused or stopped.
13 PAIRING POD/HR BELT
Pair Suunto Quest with optional Suunto PODs (Suunto Foot POD Mini, GPS POD, or Bike POD) to receive additional speed and distance information during training. Suunto Quest is compatible with Suunto Dual Comfort Belt.
The HR belt and/or POD included in your Suunto Quest package are already paired. Pairing is required only if you want to use a new HR belt or a speed POD with the device.
You can pair up to three Suunto speed and distance PODs. If you pair more than three PODs, only the latest three will be paired.
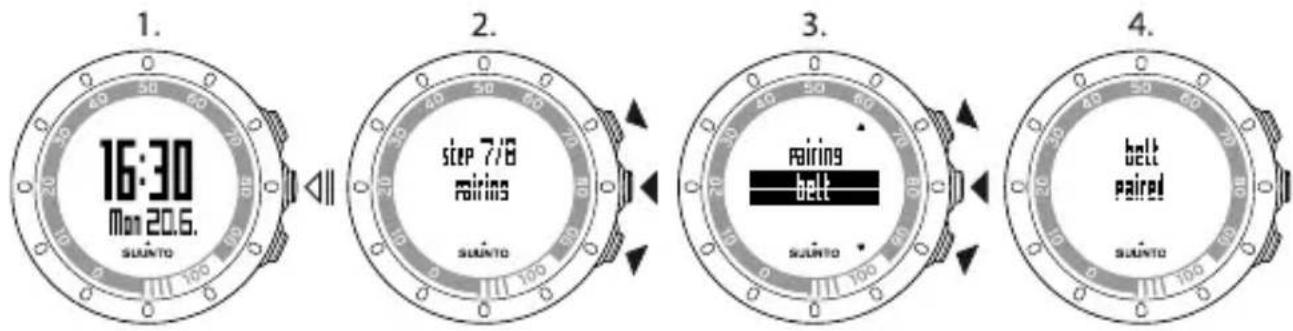
To pair a POD or an HR belt:
- In the time view, keep NEXT pressed to enter the settings.
- Scroll up by pressing START STOP to reach the pairing options and press NEXT to enter the pairing menu.
- Select POD or belt with START STOP and LIGHT LOCK. Confirm with NEXT.
- Turn on your POD or HR belt (see the instructions below). See the POD manual for more information. Wait for the message paired.
- If the pairing fails, press NEXT to return to the pairing setting.
Example: Pairing Suunto Dual Comfort Belt
- Remove the HR belt battery.
- Reset the HR belt by inserting the battery positive side down.
- In your Suunto Quest, follow the steps 1-3 from the instructions above.
- Re-insert the belt battery positive side up and close the belt cover. Wait for the message paired.
- If the pairing fails, press NEXT to return to the pairing setting.

NOTE: When turn on POD or turn on belt text is shown on the display, Suunto Quest waits for the pairing signal from the HR belt or POD for 15 seconds, during which the corresponding HR belt or POD should be turned on.
13.1 Troubleshooting
If HR belt pairing fails, try the following:
- Remove the battery from the belt.
- Re-insert the battery upside down to reset the HR belt and remove the battery again.
- Scroll to the device's pairing option.
- Insert the battery in the HR belt the right side up.
13.2 Calibrating PODs
You can calibrate Suunto Foot POD Mini or Suunto Bike POD with Suunto Quest for accurate speed and distance measurement. Perform the calibration on an accurately measured distance, for instance, on a 400 m running track.
To calibrate Suunto Foot POD Mini with Suunto Quest:
- Attach Suunto Foot POD Mini to your shoe. For more information, see Suunto Foot POD Mini Quick Guide.
- Choose a custom mode to connect Suunto Quest with Suunto Foot POD Mini.
- Start running at your usual pace. When you cross the starting line, press START STOP to start the recording.
- Run a distance of 800–1000 m (about 0.500–0.700 miles) at your usual pace (for example two laps on a 400 m track).
- Press START STOP when you reach the finish line.
- Scroll with NEXT through summary views, until you reach the distance summary. Adjust the distance shown on the display to the actual distance you ran with START STOP and LIGHT LOCK. Confirm with NEXT.
- Confirm the POD calibration by pressing START STOP. Your Foot POD Mini has now been calibrated. You can also calibrate your Suunto Bike POD in a similar way.
14 CARE AND MAINTENANCE
Handle the unit with care – do not knock or drop it.
Under normal circumstances the device will not require servicing. After use, rinse it with fresh water, mild soap, and carefully clean the housing with a moist soft cloth or chamois.
Do not try to repair the unit yourself. Contact an authorized Suunto service, distributor or retailer for any repair. Use only original Suunto accessories - damage caused by non-original accessories is not covered by warranty.

NOTE: Never push the buttons while swimming or in contact with water.
Pressing the buttons while the unit is submerged could cause the unit to malfunction.
14.1 Replacing battery
If is displayed, a battery replacement is recommended.
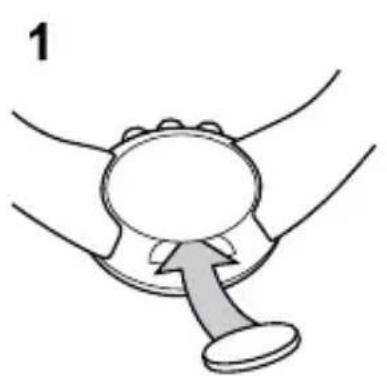
Replace the battery with extreme care to ensure your Suunto Quest remains water resistant. Careless replacement may void the warranty.
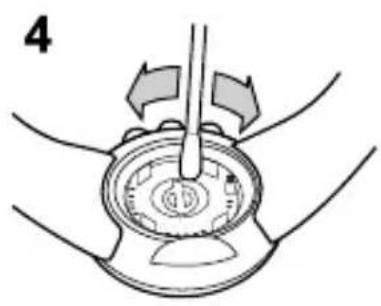
Replace the battery as illustrated here:
natural_image
Illustration of a hand holding a circular object with a handle, no text or symbols present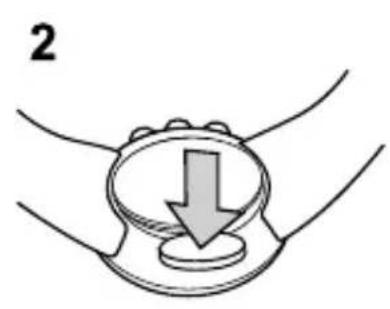
natural_image
Illustration of hands holding a circular object with a downward arrow, no text or symbols present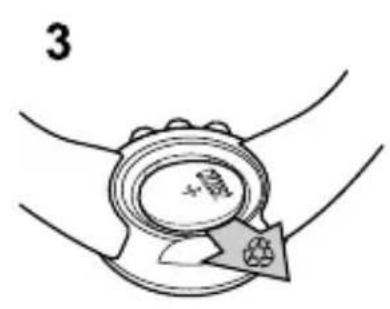
natural_image
Illustration of a hand holding a circular device with arrows indicating motion or force direction (no text or symbols)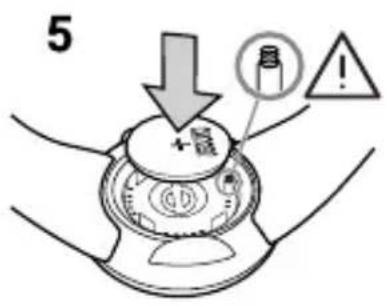
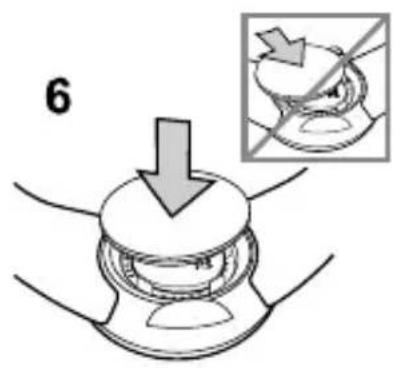
NOTE: Carefully ensure that the plastic O ring is properly placed so that the wristop computer remains water-resistant. Careless battery replacement may void the warranty.
NOTE: Be careful with the spring in the battery compartment (see illustration). If the spring is damaged, please send your device to an authorized Suunto representative for service.
NOTE: When replacing the battery, only the time and date change. Previous initial settings and recorded exercises are restored.
14.2 Replacing HR belt battery
Replace the battery as illustrated here:
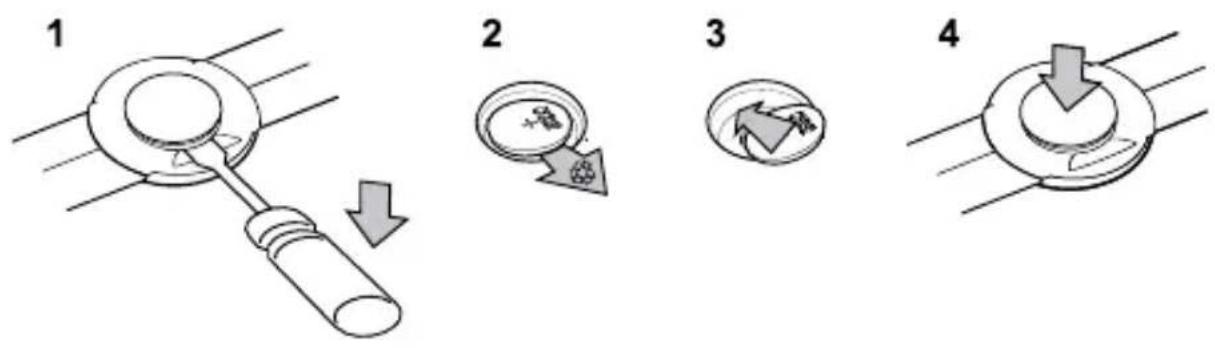
NOTE: Suunto recommends that the battery cover and the O ring are changed simultaneously with the battery to ensure that the HR belt remains clean and water resistant. Replacement covers are available with replacement batteries from your authorized Suunto dealer or web shop.
15 SPECIFICATIONS
15.1 Technical specifications
General
- Operating temperature: -10^ C to +50^ C / +14^ F to +122^ F
- Storage temperature: -30^ C to +60^ C / -22^ F to +140^ F
• Weight (device): 40 g / 1.41 oz
• Weight (HR belt): max. 55 g / 1.95 oz
● Water resistance (device): 30 m / 100 ft (ISO 2281)
• Water resistance (HR belt): 20 m / 66 ft (ISO 2281) - Transmission frequency (belt): 5.3 kHz inductive, gym equipment and 2.465 GHz Suunto-ANT compatible
- Transmission range: \~ 2 m / 6 ft
- User-replaceable battery (device / HR belt): 3V CR2032
- Battery life (device / HR belt): approximately 1 year in normal use (2.5 h / week exercise with HR and POD)
Log recorder/stopwatch
• Maximum log time: 20 hours
• Resolution: 0.1 second accuracy
Heart rate
- Display: 30 to 240
● Rest HR: estimated at 60 bpm, adjustable from 30 to 100 bpm
Personal settings
● Birth year: 1910 - 2009
• Weight: 30 - 200 kg or 66 - 400 lb
15.2 Trademark
Suunto Quest, its logos, and other Suunto brand trademarks and made names are registered or unregistered trademarks of Suunto Oy. All rights are reserved.
15.3 FCC compliance
This device complies with Part 15 of the FCC Rules. Operation is subject to the following two conditions: (1) this device may not cause harmful interference, and (2) this device must accept any interference received, including interference that may cause undesired operation. Repairs should be made by authorized Suunto service personnel. Unauthorized repairs will void warranty. This product has been tested to comply with FCC standards and is intended for home or office use.
15.4 CE
The CE mark is used to mark conformity with the European Union EMC directives 89/336/EEC and 99/5/EEC.
15.5 ICES
This Class [B] digital apparatus complies with Canadian ICES-003.
15.6 Copyright
Copyright © Suunto Oy 2011. All rights reserved. Suunto, Suunto product names, their logos and other Suunto brand trademarks and names are registered or unregistered trademarks of Suunto Oy. This document and its contents are proprietary to Suunto Oy and are intended solely for the use of clients to obtain knowledge and information regarding the operation of Suunto products. Its contents shall not be used or distributed for any other purpose and/or otherwise communicated, disclosed or reproduced without the prior written consent of Suunto Oy. While we have taken great care to ensure that information contained in this documentation is both comprehensive and accurate, no warranty of accuracy is expressed or implied. This document content is subject to change at any time without notice. The latest version of this documentation can be downloaded at www.suunto.com.
15.7 Patent notice
This product is protected by pending patent applications and their corresponding national rights: US 11/432,380, US 11/169,712, US 12/145,766, US 7,526,840, US 11/808,391, USD 603,521, USD 29/313,029. Additional patent applications have been filed.
16 WARRANTY
SUUNTO LIMITED WARRANTY
Suunto warrants that during the Warranty Period Suunto or a Suunto Authorized Service Center (hereinafter Service Center) will, at its sole discretion, remedy defects in materials or workmanship free of charge either by a) repairing, or b) replacing, or c) refunding, subject to the terms and conditions of this Limited Warranty. This Limited Warranty is only valid and enforceable in the country of purchase, unless local law stipulates otherwise.
Warranty Period
The Limited Warranty Period starts at the date of original retail purchase. The Warranty Period is two (2) years for display devices. The Warranty Period is one (1) year for accessories including but not limited to PODs and heart rate transmitters, as well as for all consumable parts.
Exclusions and Limitations
This Limited Warranty does not cover:
- a) normal wear and tear, b) defects caused by rough handling, or c) defects or damage caused by misuse contrary to intended or recommended use;
- user manuals or any third-party items;
- defects or alleged defects caused by the use with any product, accessory, software and/or service not manufactured or supplied by Suunto;
- replaceable batteries.
This Limited Warranty is not enforceable if item:
-
has been opened beyond intended use;
-
has been repaired using unauthorized spare parts; modified or repaired by unauthorized Service Center;
- serial number has been removed, altered or made illegible in any way, as determined at the sole discretion of Suunto;
- has been exposed to chemicals including but not limited to mosquito repellents.
Suunto does not warrant that the operation of the Product will be uninterrupted or error free, or that the Product will work with any hardware or software provided by a third party.
Access to Suunto warranty service
You must have proof of purchase to access Suunto warranty service. For instructions how to obtain warranty service, visit www.suunto.com/warranty, contact your local authorized Suunto retailer, or call Suunto Help Desk +358 2 2841160 (national or premium rates may apply).
Limitation of Liability
To the maximum extent permitted by applicable mandatory laws, this Limited Warranty is your sole and exclusive remedy and is in lieu of all other warranties, expressed or implied. Suunto shall not be liable for special, incidental, punitive or consequential damages, including but not limited to loss of anticipated benefits, loss of data, loss of use, cost of capital, cost of any substitute equipment or facilities, claims of third parties, damage to property resulting from the purchase or use of the item or arising from breach of the warranty, breach of contract, negligence, strict tort, or any legal or equitable theory, even if Suunto knew of the likelihood of such damages. Suunto shall not be liable for delay in rendering warranty service.

SUUNTO HELP DESK
Global +358 2 284 1160
USA (toll free) 1-800-543-9124
Canada (toll free) 1-800-267-7506
www.suunto.com
SUUNTO
© Suunto Oy 9/2011
Suunto is a registered trademark of Suunto Oy.
All Rights reserved.

- SAFETY
- Types of safety precautions:
- Safety precautions:
- WELCOME
- \_PLAN
- \_PLUG
- \_PLAY
- \_PROGRESS
- DISPLAY ICONS AND SEGMENTS
- USING BUTTONS
- START STOP:
- NEXT:
- LIGHT LOCK:
- GETTING STARTED
- Using backlight and button lock
- Testing your rest HR
- PUTTING ON HR BELT
- STARTING TRAINING SESSION
- Troubleshooting: No HR signal
- DURING TRAINING
- Here are some ideas on how to use the device during training:
- During guided training
- AFTER TRAINING
- After training
- Recovery time
- Reviewing recovery time and previous Move
- Previous Move
- ADJUSTING SETTINGS
- Time and personal settings
- Training settings
- General settings
- sounds:
- Pairing
- Estimating your activity class
- Easy going
- Recreational
- Fitness
- Endurance or professional
- Sleep mode and initial settings
- Example: adjusting alarm settings
- Changing language
- CUSTOMIZING SUUNTO QUEST
- Connecting to web
- Customizing displays in Movescount
- TRAINING WITH CUSTOM TRAINING PROGRAM
- Activating training program
- Taking program into use
- Training guidance
- Making laps during training
- PAIRING POD/HR BELT
- Example: Pairing Suunto Dual Comfort Belt
- Troubleshooting
- Calibrating PODs
- CARE AND MAINTENANCE
- Replacing battery
- Replacing HR belt battery
- SPECIFICATIONS
- Technical specifications
- General
- Log recorder/stopwatch
- Heart rate
- Personal settings
- Trademark
- FCC compliance
- CE
- ICES
- Copyright
- Patent notice
- WARRANTY
- SUUNTO LIMITED WARRANTY
- Warranty Period
- Exclusions and Limitations
- Access to Suunto warranty service
- Limitation of Liability
- SUUNTO HELP DESK
- SUUNTO
Brand : SUUNTO
Model : Quest Running Pack
Category : Sports Watch