
MIMI 530690000 - Produit pour enfants Eta - Free user manual and instructions
Find the device manual for free MIMI 530690000 Eta in PDF.


| Product Type | Video Baby Monitor |
| Brand | Eta |
| Model | MIMI 530690000 |
| Parent Unit Weight | Approx. 230 g |
| Baby Unit Weight | Approx. 210 g |
| Indoor Range | Up to 50 m |
| Outdoor Range | Up to 300 m |
| Video Resolution | 480 x 272 px |
| Frame Rate (Day) | 20 fps |
| Frame Rate (Night) | 15 fps |
| Camera Movement | Horizontal 330°, Vertical -30° to 90° |
| Field of View | 37.5° |
| Zoom | 2x digital zoom |
| Parent Unit Battery | Li-ion 3.7 V, 4000 mAh |
| Charging | USB-C, 5 V / 1000 mA |
| Charging Time | Approx. 10 hours |
| Battery Life (Parent Unit) | Up to 20 hours |
| Night Vision | Automatic IR LEDs |
| Temperature Monitoring | Range 0-40 °C, with alarm |
| Two-Way Communication | Yes, via push-to-talk |
| Lullabies | Built-in, multiple melodies |
| ECO Mode | Sound-activated display and transmission |
| Multi-Camera Support | Up to 4 baby units |
| Frequency Band | 2.4 GHz |
| Parent Unit Display | 2.4" LCD (estimated) |
| Cable Length | Keep at least 0.9 m from child |
| Maintenance | Clean with soft cloth; microfiber for lens |
| Storage | Dry, dust-free place |
| Included Accessories | Parent unit, baby unit, USB-C cable, wall fasteners, fixing rings |
| Optional Accessories | Flexible holder (ETA530690100) |
Frequently Asked Questions - MIMI 530690000 Eta
User questions about MIMI 530690000 Eta
0 question about this device. Answer the ones you know or ask your own.
Ask a new question about this device
Download the instructions for your Produit pour enfants in PDF format for free! Find your manual MIMI 530690000 - Eta and take your electronic device back in hand. On this page are published all the documents necessary for the use of your device. MIMI 530690000 by Eta.
USER MANUAL MIMI 530690000 Eta
natural_image
White and teal-colored self-camera device with camera lens (no visible text or symbols)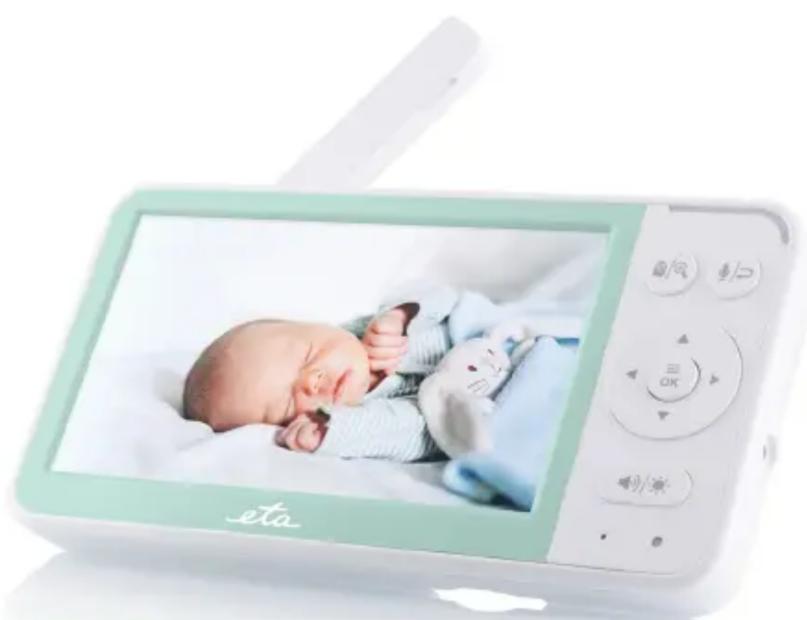
natural_image
Digital camera module displaying a sleeping baby on a white surface, no visible text or symbols on the device itself.1
natural_image
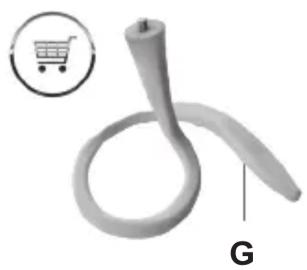
3D rendered illustration of a curved object with a shopping cart icon in the corner (no text or symbols on the object itself)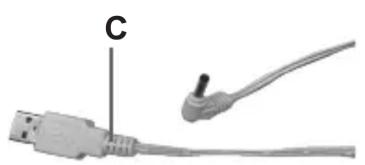
natural_image
Close-up of a USB cable with a terminal connector labeled 'C' (no text or symbols beyond label)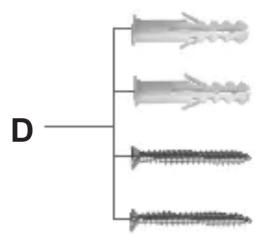
natural_image
Diagram showing three types of screw-like components with different head profiles, no text or labels present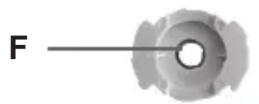
2
natural_image
White smart home camera with a toothbrush on a table, against a blurred outdoor background (no text or symbols visible)
natural_image
Close-up of a mechanical component with circular features and a central hub (no visible text or symbols)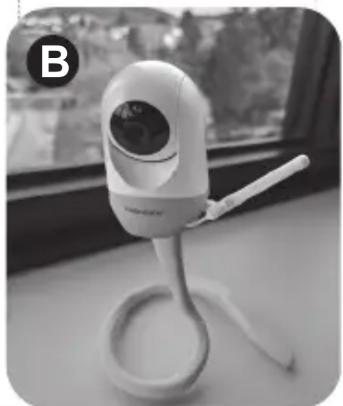
natural_image
White medical device with a coiled tube, displayed indoors near a window (no visible text or symbols)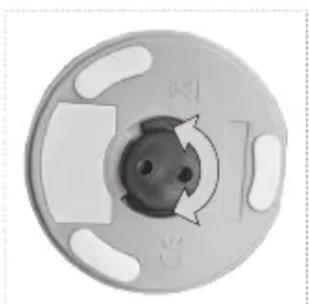
natural_image
Close-up of a circular mechanical component with internal features and directional arrows (no text or symbols)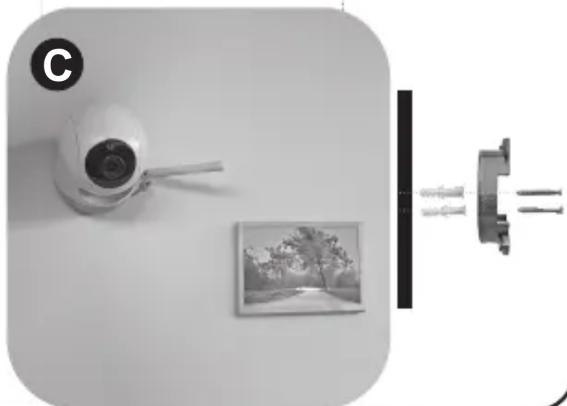
natural_image
Wall-mounted camera and wall-mounted electrical plug assembly with a framed picture (no text or symbols visible)CZ – DĚTSKÁ VIDEO CHŮVIČKA
I. BEZPEČNOSTNÍ UPOZORNĚNÍ 5
II. POPIS CHŮVIČKY A PŘÍSLUŠENSTVÍ 7
III. INSTALACE 8
IV. POUŽITÍ 8
V. ÚDRŽBA....12
VI. SKLADOVÁNÍ 13
VII. EKOLOGIE....13
VIII. TECHNICKÁ DATA 13
SK – DETSKÁ VIDEO OPATROVATEL'KA
I. BEZPEČNOSTNÉ UPOZORNENIA....15
II. POPIS PESTÚNKY A PRÍSLUŠENSTVA 17
III. INŠTALÁCIA....18
IV. POUŽITIE 18
V. ÚDRŽBA....22
VI. SKLADOVANIE 23
VII. EKOLÓGIA....23
VIII. TECHNICKÉ ÚDAJE 23
EN – VIDEO BABY MONITOR
I. SAFETY NOTICE 25
II. DESCRIPTION OF THE BABY MONITOR AND ACCESSORIES....26
III. INSTALLATION 27
IV. USE 28
V. MAINTENANCE 32
VI. STORAGE 32
VII. ENVIRONMENT 32
VIII. TECHNICAL DATA....33
HU – BÉBI VIDEO MONITOR
I. BIZTONSÁGI FIGYELMEZTETÉS 34
II. BÉBI MONITOR ÉS TARTOZÉKOK LEÍRÁSA 36
III. TELEPÍTÉS 37
IV. HASZNÁLAT....37
V. KARBANTARTÁS....41
VI. TÁROLÁS 42
VII. KÖRNYEZETVÉDELEM 42
VIII. MÜSZAKI ADATOK....42
PL – WIDEO NIANIA DLA NIEMOWLAT
I. UWAGI DOTYCZĄCE BEZPIECZEŃSTWA....44
II. OPIS NIANI ELEKTRONICZNEJ I AKCESORIÓW 46
III. INSTALACJA 47
IV. UŻYCIE....47
V. KONSERWACJA 52
VI. PRZECHOWYWANIE 52
VII. EKOLOGIA....52
VIII. DANE TECHNICZNE 53
DE – VIDEO-BABYPHONE
natural_image
Illustration of a baby with sun icons and sound waves, no text or symbols presentD) Noční režim
VI. SKLADOVÁNÍ
natural_image
Close-up of a baby's face with sound waves and sun icons, no text or symbols presentD) Nočný režim
VI. SKLADOVANIE
Dear customer, thank you for purchasing our product. Please read the operating instructions carefully before putting the appliance into operation and keep these instructions including the receipt and, if possible, the box with the internal packing.
I. SAFETY NOTICE

GENERAL PROVISIONS:
- Consider the instructions for use as a part of the appliance and pass them on to any other user of the appliance.
- The baby monitor is intended as an auxiliary tool. It is not a substitute for careful adult supervision and should not be used as such. It is essential that you never leave your child alone at home. It is always necessary to have a person present to supervise the child, look after his/her needs and respond to different situations that arise.
- This appliance may only be used by children aged 8 years or older, and persons with reduced physical, sensory or mental capabilities or lack of experience and knowledge if they have been given supervision or instruction concerning use of the appliance in a safe way and understand the hazards involved. Children shall not play with the appliance. Cleaning and user maintenance shall not be made by children without supervision. Children younger than 8 years must be kept out of reach of the appliance and its cable.
- Never use the appliance if its adaptor or plug is damaged, if it does not work properly, if it fell down and was damaged. In this case take the appliance to a special service to check its safety and proper function.
- The appliance and the connected adapter must not be used at places where it could fall into bath tub, wash basin or swimming pool. If the appliance fell into water anyway, do not take it out! First of all, unplug the adapter from the socket and only then take the appliance out. Then bring the appliance to a specialised service centre to check its safety and proper functionality.
- The appliance has no charging source of its own, it is only designed for charging via USB (an adapter with USB output with output voltage of 5.0 V, and output current of at least 1000 mA). Before making any connection, please pay attention to instructions of the manufacturer of the respective power source.
- Do not use the USB ports on other devices (e.g. computer, laptop, tablet, mobile phone, etc.) to power the appliance. These devices may not be rated for the current draw of the appliance and could be damaged.
- Never immerse used mains adapter and the device in water (even partially) and protect them from moisture! Do not place the device where water or other liquids may drip or splash on it. Never use the device in damp places or near water. Also, prevent them from getting wet.
-
Keep the packaging material supplied with the baby monitor (bags, cardboard reinforcements, etc.) out of the reach of children. These are not toys.
-
This appliance contains batteries that may only be replaced by trained personnel.
- In order to ensure safety and proper function of the appliance, use only original spare parts and accessories approved by the manufacturer. Use only the type of battery approved by the manufacturer in the appliance. Do not use batteries that must not be recharged.
- Only use this appliance for the purpose it was designed for, as specified in this manual. Never use the appliance for any other purpose.
- The manufacturer is not liable for any damage caused by improper use of the appliance. and accessories in the event of failure to observe the above safety instructions.
USE OF THE APPLIANCE:
- The product is intended for home use and similar (in shops, offices and similar workplaces, in hotels, motels and other residential environments, in facilities providing accommodation with breakfast). It is not intended for commercial use!
- The appliance may only be charged using a safe low voltage corresponding with the marking on the appliance.
- The appliance must not be used in damp or wet environments and in any environment with a risk of fire or explosion (areas where chemicals, fuels, oils, gases, paints and other flammable or volatile substances are stored).
- Install the baby monitor far enough away from heat sources (radiators, heaters, kitchen stoves, etc.).
- If you place the baby monitor firmly on the ceiling or wall using the supplied fasteners, be careful both with the installation itself and the method of attachment.
- Keep your hands dry when handling the adapter and cable.
- Never immerse the lead/adapter in water or other liquids (even partially) and do not wash under running water!
- The inlet is intended for this appliance only, do not use it for other purposes.
- Do not plug the cord/adapter into an electrical outlet and do not pull it out of the electrical outlet with wet hands.
- Check the condition of the USB connection cable regularly.
- It is important to position the baby monitor in such a way that the cord does not obstruct the passageway. When placing on a table or low furniture, make sure the power cord does not hang over the edge. You must also ensure that the cord does not rest on the floor where it could cause tripping.
- Keep the USB cable at a safe distance from children, there is a risk of strangulation.
Limitation of liability
- Please note that use of this baby monitor is at your own risk. ETA is not responsible for its operation or the manner in which it is used by you, and therefore accepts no liability for any damages arising from your use of this device.
- The ETA company cannot be liable in any way for any incidental, indirect or consequential damages, or for any loss of data or loss due to information leakage during wireless communication.
II. DESCRIPTION OF THE BABY MONITOR AND ACCESSORIES
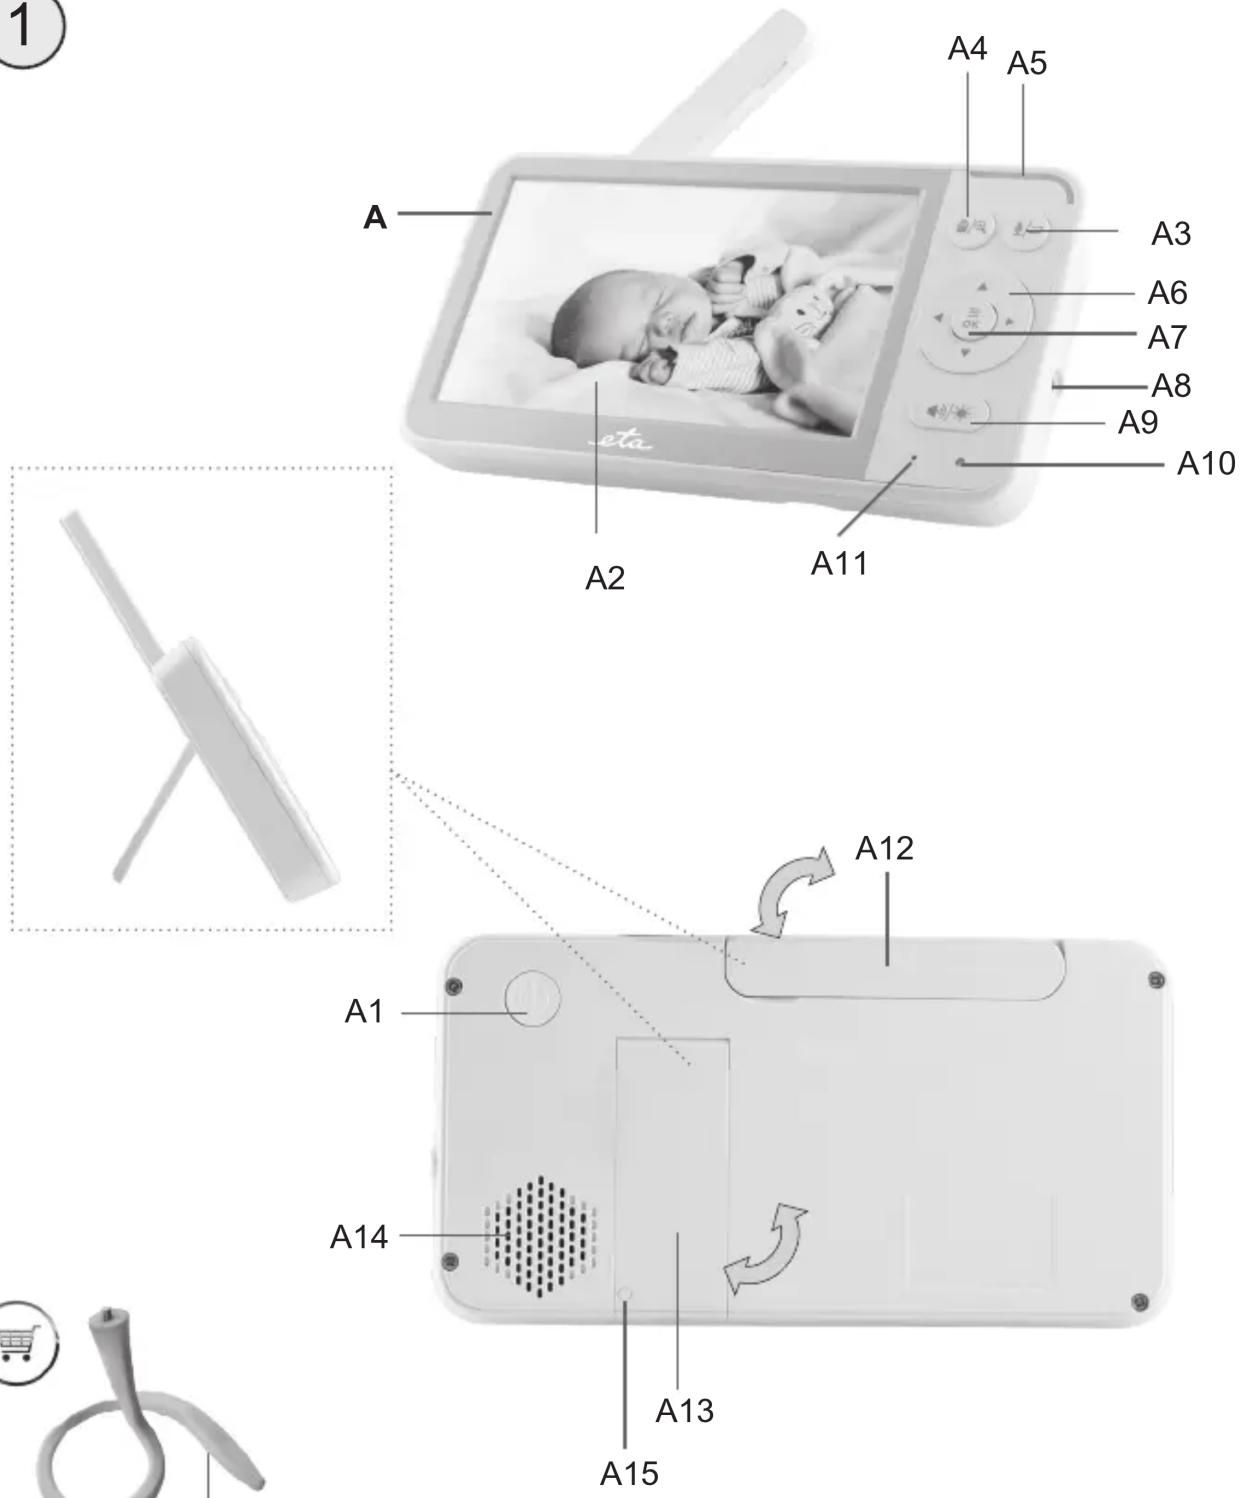
Description (Fig. 1, 2)
| A – Parent unit | A7 – Menu / OK |
| A1 – On/Off button | A8 – Power jack |
| A2 – LCD display | A9 – Volume / brightness |
| A3 – Back / two-way communication | A10 – Indicator light |
| A4 – Zoom / camera switching | A11 – Microphone |
| A5 – Sound level indication (crying) | A12 – Pull-out antenna |
| A6 – Directional buttons | A13 – Pull-out stand |
A14 – Speaker
A15 – Reset
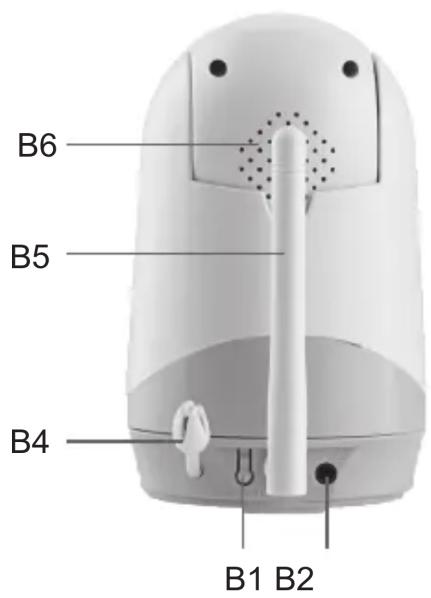
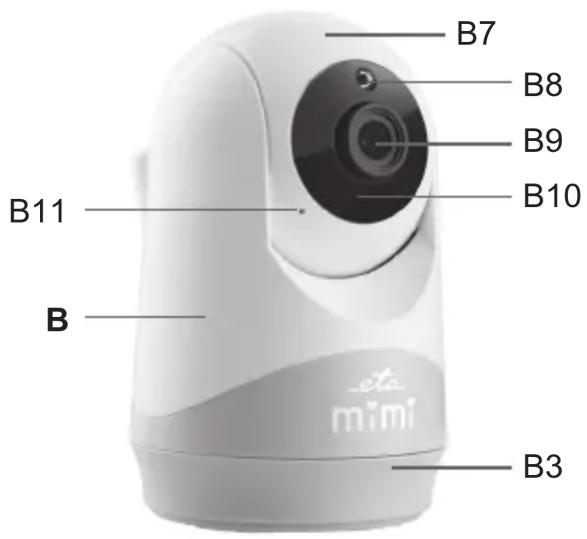
B – Baby swivel unit
B1 – Pairing button
B2 – Power socket
B3 – Base
B4 – Temperature sensor
B5 – Antenna
B6 – Speaker
B7 – External rotary head
B8 – Light sensor
B9 – Camera lens
B10 – IR diodes for night vision
B11 – Microphone
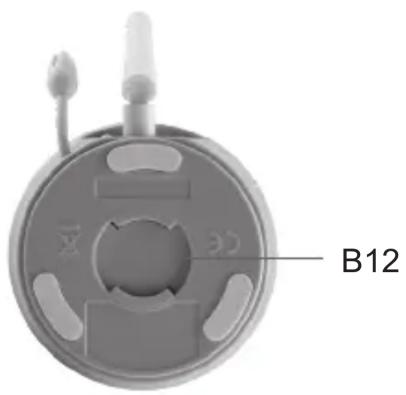
B12 – Mounting ring compartment
C - USB-C cable
D – Fasteners
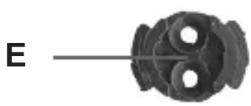
E - Fixing ring (fixed)
F – Fixing ring (bracket G)
G – Flexible holder (not included)
| A2 display icons overview | |||
 | Signal strength | Activated zoom | |
 | Activated timer | Audio transmission to camera | |
 | Lullaby | Battery status | |
 | Sound volume | ECO | High sound sensitivity |
 | Connected camera (x=position number) | ECO | Medium sound sensitivity |
 | Loop - switching cameras | ECO | Low sound sensitivity |
 | Night mode | °C | Temperature at the baby unit |
DESCRIPTION OF THE MAIN MENU
Control of baby camera units
Cry sensitivity setting when the display is off
Camera
Temperature

Lullaby

Energy Saving
Feeding Timer

Language
Alarm setting when limit temperatures are exceeded
Playing lullabies on baby unit
Change the language of operation
Setting a countdown time for breastfeeding reminders
III. INSTALLATION
First remove all packaging material, remove both units and all accessories. Then remove any adhesive films, stickers or paper from both units.
Thanks to its variability, the baby monitor can be used in several ways:
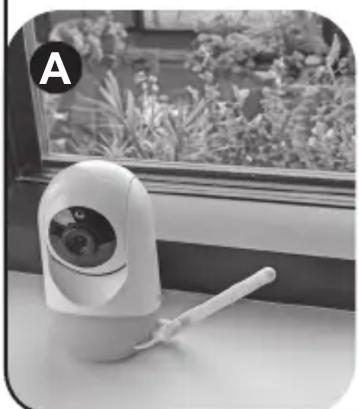
- freestanding on a storage surface (fig.2A) - just place the baby monitor on a flat and stable surface.
- mounted on the flexible bracket G (fig.2B) - this method allows a wide flexibility of use. Thanks to the high plasticity of the holder, its arm can be shaped into different forms thus allowing the baby monitor to be used in harder to reach places (uneven surfaces, possibility of hooking, etc.). You can purchase the G bracket under the designatio ETA530690100.
- fixed (Fig. 2C) - using the included fasteners (D + E) , the baby monitor can be attached to a wall or ceiling, for example, to take advantage of the baby monitor's improved field of view.
Attention
- For best field of view, install it on a perpendicular wall, do not install it on the ceiling (the image would be inverted).
- Before any fixed mounting, first test that the location corresponds to the expected field of view coverage of the room. In the case of placement on flexible bracket G, make sure the base is stable and the baby monitor does not tip over after placement.
- The installation itself (drilling of the dowel holes) using fastener D must be carried out professionally and in accordance with standard safety procedures. Make sure that there are no electrical, telephone, water, etc. installations under the plaster at the point of anchoring to the wall.
- Do not place the baby monitor on soft surfaces (e.g. blankets) or in the corners of cabinets, shelves, etc.
- The use of other 2.4GHz products such as wireless networks (Wi-Fi routers), Bluetooth or microwave ovens may cause interference to this product, so keep the baby monitor at least 1.5 m away from such products or switch them off if they cause interference.
IV. USE
The baby monitor works on the principle of transmitting and receiving data on its own frequency and is designed so that its signal can cover the vast majority of all common interiors of houses and apartments.
In order for the two units to work together, a radio link must be maintained between them. The two units are automatically paired from the factory. However, if you want to add another baby unit to the parent unit, or if the connection stops working, both units must be re-paired.
Notes
- The range of the signal itself depends on the environmental conditions, the most important factor being the solid obstacles and their composition, thickness and even their slope. Indoors, the quality of signal transmission will therefore be affected by the amount and type of obstacles (mainly walls and furniture). Any large metal object such as a refrigerator, mirror, filling cabinet, metal door, reinforced concrete, etc. between the baby and parent units can block the radio signal. If you observe poor signal quality, try moving the parent unit to another location.
- In case of longer distance between parent and baby unit, or weak signal, we recommend to extend the A12 antenna.
- If the image on the parent unit freezes, first try turning it off and on. If this does not work, press the A15 RESET button.
START-UP AND BASIC OPERATION
For both baby monitor units, the following procedure applies in principle - connect the C cable to the adapter and connect it to the power supply. Then connect the end of cable C to socket A8/B2.
Remarks
- For short-term use, you can also use a POWER BANK that matches the required parameters of the baby monitor. This option is particularly useful when you need to carry the baby monitor and there is no power outlet available.
- If you charge the parent unit, you can use it for some time without a power source connected and easily move it within the signal range.
To switch on the baby unit, connect it to a power source. Press the parent unit on/off by long pressing the A1 button. Short press the A1 button in camera monitoring mode to turn off the display - press any button to turn the display back on.
Movement in the MENU of the parent unit
Use the directional buttons A6 to navigate through the menu. To confirm the desired item press the A7 (OK) button, or to cancel (or go back one step) use the A3 button.
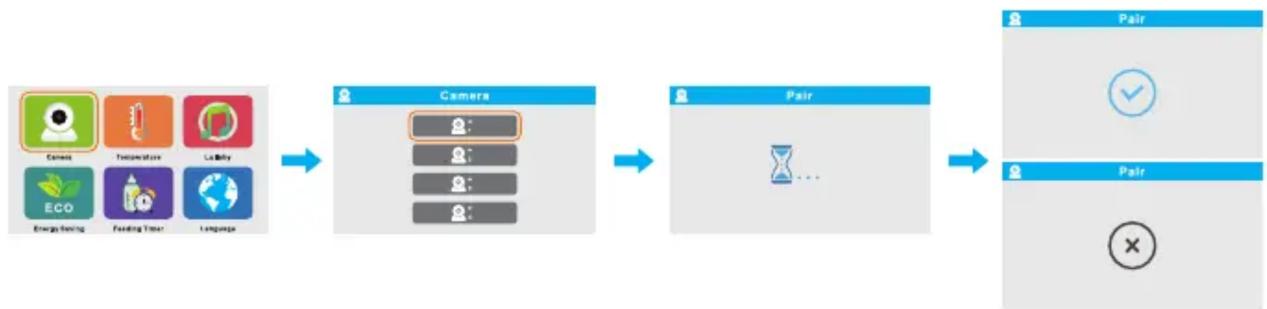
PAIRING OF PARENT AND BABY UNIT
To pair a baby unit or add another, do the following:
- Select
from the menu and confirm; - Select a position to store the camera and confirm;
- If you select an empty position, the countdown starts immediately. At the same time, you must press the pairing button B1 on the baby unit. Once the pairing is complete, the successful connection icon will be displayed. In the event of a failure, a failed connection icon will appear - repeat the procedure.
- Correctly paired baby units are indicated by the symbol.
Note
- You can also overwrite the already occupied positions or delete (unpair) existing occupied positions.
flowchart
graph LR
    A["Camera"] --> B["Camera"]
    B --> C["Pair"]
    C --> D["Pair"]
Using multiple cameras
One baby unit and one parent unit are included in the original package. The parent unit can receive signals from up to 4 different baby units at the same time. The pairing procedure is the same as above, just select a blank position for each unit.
Connected cameras can be switched on the parent unit by briefly pressing the A4 button. This selects a specific camera, symbolized by a number next to the camera icon, or switching in a loop.
Note
- Replacement baby unit B can be purchased under the designation ETA530600020.
Charging the parent unit
The parent unit includes a built-in battery for more convenient use and mobility. Connect the power cord to the A8 socket. Charging is indicated by the red LED signal A10 and the gradual increase of the battery icon on the display. Once the battery is charged, the A10 indication is green and the battery icon has 3 full fields.
- Before using the unit for the first time, or if you have not used it for a long time, charge it to the full.
- The standard charging time is approximately 10 hours and a fully charged new battery will provide up to 20 hours of operation. The run time will decrease depending on the use/load of the appliance and also as the battery ages and wears out.
OVERVIEW OF FUNCTIONS
A) Two-way communication
In video monitoring mode, press and hold the A3 button to activate two-way communication mode - speak towards the parent unit's microphone, the baby unit will transmit the sound. You can speak to your child in this way. The active mode is indicated by the microphone icon on the display.
Note
• After pressing the button, wait a moment before speaking.
- On the contrary, the sound transfer from the baby unit to the parent unit is automatic without the need for activation (unless the sound transfer is switched off,
B) Visual indication of crying level A5
This is a colour visual indication of the volume level transmitted from the baby unit.
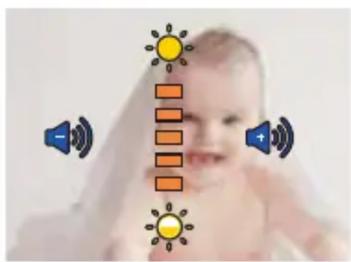
C) Display volume and brightness
In video monitoring mode, press the A9 button for a few moments to change the volume of the sounds around the baby unit and the brightness of the display. Use the directional buttons A6 to set the desired parameter to the desired level. Sound transmission can be switched off completely by muting to the leftmost position.
natural_image
Illustration of a baby with sound waves and sun icons, no text or symbols presentD) Night mode
When the B8 light sensor detects low light levels around the baby unit, it automatically activates night mode. Once the room is lit or natural light is set, the mode will automatically exit.
E) Temperature (MENU)
The units °C / °F can be set in the
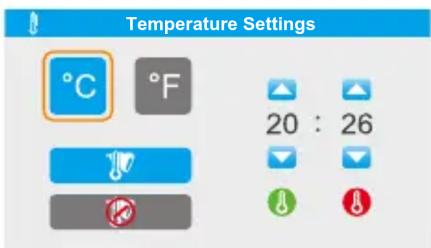
Notes
- The measured temperature of the baby unit is only indicative and may have some variation in measurement accuracy.
- The function covers situations where undesirable temperature changes may occur that could have a negative effect on persons around the baby unit.
- The temperature detection and adjustment range is 0 - 40 °C.
- The setting is valid for all paired baby units.
F) ECO mode (MENU)
The principle of ECO mode is that the display of the parent unit and the transmission of sounds from the baby unit are switched off after a while. These are only activated again when the baby unit detects the sound level (crying) you have chosen. There are 3 levels of sensitivity available within the menu (see A2 display icon overview) + the option to switch off the function ( ). For low sensitivity, an intense and loud cry is needed to activate the parent unit, whereas for high sensitivity, the parent unit will activate even if the cry is less loud.
Note
- The response to sound sensitivity also depends in part on the distance of the baby unit from the baby.
G) Timer (MENU)
This is basically a countdown timer, after which the baby monitor will start the sound and visual signalization (alarm). It is mainly intended to remind the baby to feed. To cancel the alarm, press any button. The mode is indicated by an icon on the display and a gradual countdown.
Note
- The volume of the alarm depends on the set volume of the parent unit.
- To deactivate during the countdown, select the option in the timer menu.
H) Lullabies (MENU)
Select a specific lullaby in the < Lullaby > menu, or select the option to alternate individual lullabies in a loop (♪).
Notes
- The volume of the lullaby cannot be changed.
- If you do not turn off the sound transmission (see point C), you will hear the lullaby also on the parent unit. You cannot interrupt the playback of the lullaby on this unit as they are picked up by the microphone on the baby unit itself.
- If you are using more than one baby unit, to switch on a particular unit, you must switch to that unit and start the lullaby on that unit. Then switch to another unit and set a different lullaby for that unit.
I) Change of language (MENU)
In the
J) Zoom
In the image tracking mode, press and hold the A4 button to activate the zoom mode and zoom in the image. Long press this button again to return the distance to the default position.
V. MAINTENANCE
Do not use harsh and aggressive cleaning agents for maintenance and cleaning! Use only a soft cloth on the body of the parent and baby unit. Clean the lens and display with a microfiber cloth. Do not allow water to get into any of the baby monitor units. To minimize the risk of damage, do not forcefully manipulate the moving head of the baby unit during maintenance.
More extensive maintenance or maintenance requiring intervention in the inner parts of the appliance must be carried out by professional service! Failure to comply with the instructions of the manufacturer will lead to expiration of the right to repair! The information regarding warranty and product repairs you can find on the website www.eta.cz/servis-eu.
VI. STORAGE
Store the properly cleaned appliance including all accessories and attachments at a dry, dustless and safe place, out of reach of children and incapacitated persons.
VII. ENVIRONMENT

If the dimensions allow, there are labels of materials used for production of packing, components and accessories as well as their recycling on all parts. The symbols specified on the product or in the accompanying documentation mean that the used electrical or electronic products must not be disposed of together with municipal waste. For proper disposal of the product, hand it over at special collection places where it will be received free of charge. Suitable disposal of the product can help to maintain valuable natural resources and to prevent possible negative impacts on the environment and human health, which could be the possible consequences of improper waste disposal. Fines can be imposed for improper disposal of this type of waste in agreement with the national regulations. The appliance is equipped with the Li-Ion battery with long life.
For environmental protection it is necessary to remove the battery from the appliance after its service life and the battery and the appliance must be disposed of safely using special collection networks. Ask for more details at the local authority or at the local waste collection site. Never dispose of batteries by burning!
Removing the battery
Unscrew the 4 screws of the battery compartment cover on the underside of the parent unit. Disconnect and then remove the battery.
VIII. TECHNICAL DATA
Weight (g) approx. 230 (A) / 210 (B)
Range indoors up to 50 m / outdoors up to 300 m
Video resolution 480 x 272 px
Battery (parent unit) Li-ion 3.7V 4000 mAh
Frame rate day 20 fps, night 15 fps
Camera movement horizontal 330°, vertical -30° - 90°
Field of view (FOV)
ZOOM
Focal length
37,5°
2x
3,6 mm
Hereby, ETA a.s. declares that the radio equipment type ETA5306 is in compliance with Directive 2014/53/EU. The full text of the EU declaration of conformity is available at the following internet address: http://eta.cz/declaration-of-conformity
The manufacturer reserves the right to change the technical specifications and accessories for the respective models. Product images are for illustrative purposes only.
The capacity of the product battery decreases over time. Decreasing of battery capacity occurs during normal use of the appliance and is considered usual wear and tear of the appliance. Decreasing battery capacity is not a defect of the appliance.
| HOUSEHOLD USE ONLY. DO NOT IMMERSE IN WATER OR OTHER LIQUIDS. | |
 | TO AVOID DANGER OF SUFFOCATION, KEEP THIS PLASTIC BAG AWAY FROM BABIES AND CHILDREN. DO NOT USE THIS BAG IN CRIBS, BEDS, ARRIAGES OR PLAYPENS. THIS BAG IS NOT A TOY. |
 | Removable power supply unit |
 | CAUTIONPlease read the instructions manual |
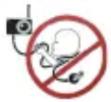 | Warning: Choking hazard! Children can strangle themselves with the cable. Keep this cable out of the reach of children (at least 0.9 m away). |
HU – Bébi videó monitor
eta 5306
MiMi
HASZNÁLATI UTASÍTÁS
natural_image
Baby with colorful sun icons and sound waves, no text or symbols presentD) Éjszakai mód
VI. TÁROLÁS
natural_image
Baby with colorful sound waves and orange vertical bars, no text or symbols presentD) Tryb nocny
VI. PRZECHOWYWANIE
natural_image
Close-up of a baby's face with sound wave indicators and speaker symbols (no text or labels)D) Nachtmodus
VII. UMWELTSCHUTZ

natural_image
Illustration of a baby with sound waves and orange bars, no text or symbols presentD) Нічний режим
VII. ЕКОЛОГІЯ



- CZ – DĚTSKÁ VIDEO CHŮVIČKA
- SK – DETSKÁ VIDEO OPATROVATEL'KA
- EN – VIDEO BABY MONITOR
- HU – BÉBI VIDEO MONITOR
- PL – WIDEO NIANIA DLA NIEMOWLAT
- DE – VIDEO-BABYPHONE
- D) Noční režim
- SKLADOVÁNÍ
- D) Nočný režim
- SKLADOVANIE
- SAFETY NOTICE
- GENERAL PROVISIONS:
- USE OF THE APPLIANCE:
- Limitation of liability
- DESCRIPTION OF THE BABY MONITOR AND ACCESSORIES
- B – Baby swivel unit
- DESCRIPTION OF THE MAIN MENU
- INSTALLATION
- Thanks to its variability, the baby monitor can be used in several ways:
- Attention
- USE
- Notes
- START-UP AND BASIC OPERATION
- Remarks
- Movement in the MENU of the parent unit
- PAIRING OF PARENT AND BABY UNIT
- Note
- Using multiple cameras
- Charging the parent unit
- OVERVIEW OF FUNCTIONS
- A) Two-way communication
- B) Visual indication of crying level A5
- C) Display volume and brightness
- D) Night mode
- E) Temperature (MENU)
- F) ECO mode (MENU)
- G) Timer (MENU)
- H) Lullabies (MENU)
- I) Change of language (MENU)
- J) Zoom
- MAINTENANCE
- STORAGE
- ENVIRONMENT
- Removing the battery
- TECHNICAL DATA
- eta 5306
- MiMi
- HASZNÁLATI UTASÍTÁS
- D) Éjszakai mód
- TÁROLÁS
- D) Tryb nocny
- PRZECHOWYWANIE
- D) Nachtmodus
- UMWELTSCHUTZ
- D) Нічний режим
- ЕКОЛОГІЯ
Brand : Eta
Model : MIMI 530690000
Category : Produit pour enfants