
B50-35 - Uncategorized LENOVO - Free user manual and instructions
Find the device manual for free B50-35 LENOVO in PDF.


| Product Type | All-in-One PC |
| Brand | Lenovo |
| Model | B50-35 |
| Machine Type | F0AV |
| Operating System | Windows 8.1 |
| Display | Touch screen (select models only) |
| Input Devices | Keyboard (wired/wireless select models), touch screen, mouse |
| Ports | USB 3.0 x2, USB 2.0 x3, Ethernet RJ-45, HDMI-in, HDMI-out, headphone/microphone combo, TV tuner (select models), memory card reader |
| Connectivity | Wired LAN, Wireless LAN (select models), NFC (select models) |
| Storage | Hard disk drive (replaceable) |
| Memory | DDR3L SO-DIMM (replaceable) |
| Power | AC power adapter (included) |
| Rescue System | OneKey Recovery, Driver and Application Installation |
| BIOS | Setup utility with UEFI/Legacy boot mode |
| Energy Star | Compliant, with power management features |
| Safety | Safety and Warranty Guide included; follow precautions |
| Maintenance | Clean with soft dry cloth; avoid liquids and solvents |
| Spare Parts | Memory module, hard disk drive, stand base, foot cover |
| Stand | Adjustable tilt (5° forward, 25° backward) |
Frequently Asked Questions - B50-35 LENOVO
User questions about B50-35 LENOVO
0 question about this device. Answer the ones you know or ask your own.
Ask a new question about this device
Download the instructions for your Uncategorized in PDF format for free! Find your manual B50-35 - LENOVO and take your electronic device back in hand. On this page are published all the documents necessary for the use of your device. B50-35 by LENOVO.
USER MANUAL B50-35 LENOVO
Machine type: F0AU [B50-30]
F0AV [B50-35]
FOAW [B40-30]
Lenovo
B40/B50 Series
User Guide
Version 1.0 2014.05
31506952
CE
lenovo
Important Safety Information
Before using this manual, it is important that you read and understand all of the related safety information for this product. Refer to the Safety and Warranty Guide that you received with this product for the latest safety information. Reading and understanding this safety information reduces the risk of personal injury or product damage.
The interface and functions shown in this User Guide are provided for reference only and may differ from actual product appearance. Product design and specifications may be changed without notice.

Danger: Be aware of extremely hazardous or potentially lethal situations.

Attention: Be aware of possible damage to programs, devices, or data.

Note: Pay attention to this important information.
Contents
Important Safety Information
Using the Computer Hardware .... 1
Front view of the computer ....2
Left and right views of the computer ....3
Rear view of the computer ....4
Installing the computer stand ....6
Computer stand ....7
Basic connector instructions ....7
Connecting your computer ....8
Important information about using the computer ....9
Connecting to the Internet 10
Wired keyboard (selected models only) 11
Using Windows 8.1 ...... 13
Switching between the main Windows 8.1 interfaces ....14
The Charms Bar 14
Shutting down the computer ....14
Switching between apps ....15
Closing an app ....15
Opening other system programs ....15
Windows Help and Support ....15
Touch screen instructions 17
Touch Screen Calibration ....18
User Gesture Instructions for the Touch screen 18
Precautions when using the Touch Screen 23
Using the Rescue System 25
OneKey Recovery ....26
Driver and Application Installation ....27
Using the Software 29
Lenovo Support ....30
Troubleshooting and Confirming Setup 31
Troubleshooting Display Problems ....32
Troubleshooting Touch screen 33
Troubleshooting Audio Problems ....33
Troubleshooting Software Problems ....34
Troubleshooting Problems with Optical Drives and Hard Disks .....35
Special considerations for troubleshooting Windows ....36
Windows Help and Support 36
BIOS setup utility 36
Performing Daily Maintenance Tasks ....37
Hardware Replacement Guide 39
Overview 40
Replacing hardware ....43
Appendix. 49
Declaration 49
Trademarks ....50
Energy Star Statement ....50
Enabling ErP compliance mode ....51
Electronic emissions notices 52
Mexico regulatory notice 53
Using the Computer Hardware
This chapter contains the following topics:
▶ Introduction to the computer hardware
Information on computer connections

Note: The descriptions in this chapter might be different from what you see on your computer, depending on the computer model and configuration.
Front view of the computer

1 Built-in microphone Camera LED indica?r
3 Built-in camera Built-in microphone 4
5 Built-in microphone 3D camera 6
7 Near Field Communication (NFC) (selected models only)
(selected models only)

Attention: If your computer is equipped with an infrared (IR) remote control, do not put the USB IR receiver on the same plane as the screen.
Left and right views of the computer

1 USB 3.0 connectors (2) Headphone 📊nnettor
3 Microphone connector Memory card reader
5 Optical drive eject button PC mode/H6 MI-in switch
(selected models only)
7 Power button
Rear view of the computer

Attention: Be sure not to block any air vents on the computer. Blocked air vents may cause thermal problems.
B50-30/B50-35

1 Security cable slot TV tuner connected 2 (selected models only)
3 Ethernet connector USB 2.0 connectors (3)
5 HDMI-out connector (selected models only)
6 HDMI-in connector (selected models only)
7 Air vents Power connector
8
B40-30

1 Security cable slot TV tuner connecto 2
(selected models only)
3 Power connector Ethernet connector 4
5 USB 2.0 connectors (3) HDMI-out co ector
(selected models only)
7 HDMI-in connector (selected models only)
8 Air vents
Installing the computer stand
Note: It may be helpful to place the computer face-down on a soft flat surface for this procedure. Lenovo recommends that you use a blanket, towel, or other soft cloth to protect the screen from scratches or other damage.
- Raise the stand holder. 1

-
Line up the stand base with the mounting holes in the stand holder, then push the stand base into position. 2
-
Pull the hand screw ring up, then secure the stand base to the stand holder with the hand screw. 3
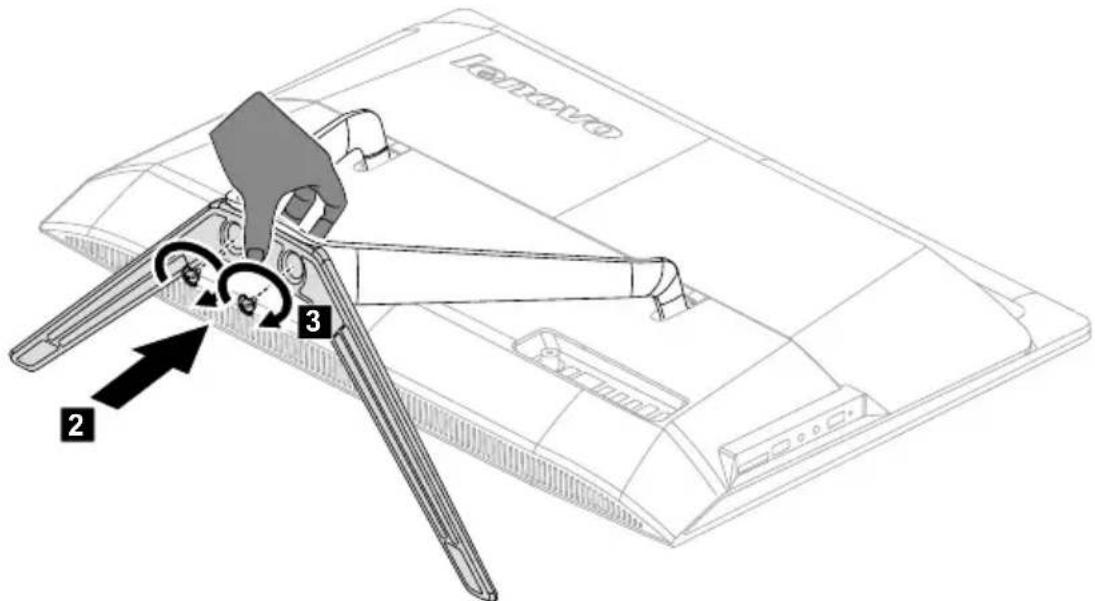
- Press down the hand screw ring.
Computer stand

Use the stand to position the display to your preference. It can be rotated 5^ forward and 25^ backward.
Basic connector instructions

Note: Your computer may not have all of the connectors described in this section.
| Connector Description | |
| Microphone Use this connector to attach a microphone to your computer when you want to record sound or if you use speech-recognition software. | |
| Headphone Use this connector to attach headphones to your computer when you want to listen to music or other sounds without disturbing anyone. | |
| USB connector Use this connector to attach a device that requires a USB connection. | |
| Ethernet connector Use this connector to attach the computer to an Ethernet-type local area network. | |
| HDMI connector (optional) | Connects to the HDMI connector on your display or TV. |
| TV-Tuner connector (optional) | Connects to an external antenna to view programs using the optional TV tuner card. |

Note: If your computer is equipped with a wireless keyboard or mouse, follow the installation instructions for those devices.
Connecting your computer
Connecting the power cord
Connect the power cord to an electrical outlet. We recommend using a grounded connection or a surge protector.
B50-30/B50-35

natural_image
Line drawing of a Lenovo monitor connected to a cable, showing cable routing and a close-up of the screen (no text or symbols on the device itself)
Important information about using the computer
Press the power button on the side of the computer to turn on the computer.
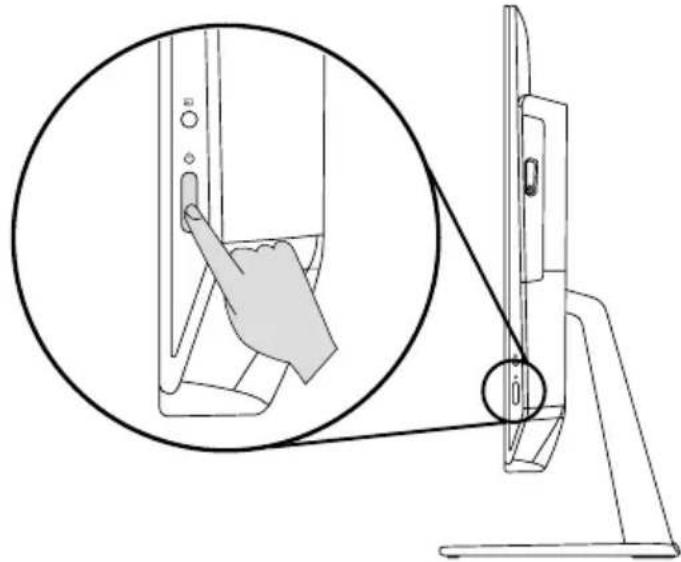
natural_image
Line drawing of a hand pressing down on a device panel, with an inset showing the insertion process (no text or symbols)Hold the computer tightly when you carry it.
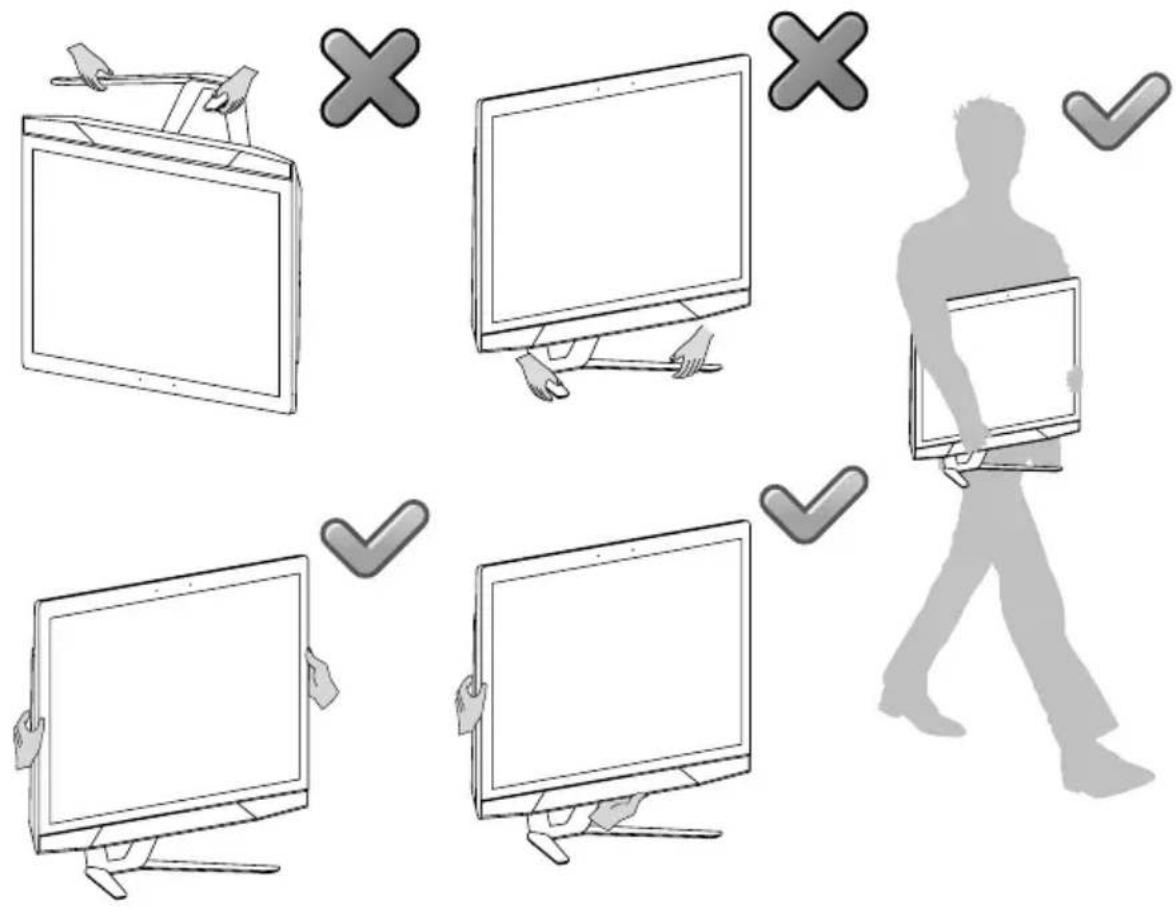
Connecting to the Internet
To connect to the Internet, you'll need a contract with an Internet Service Provider (ISP) and some hardware.
IPSs and ISP offerings vary by country. Contact your ISP for offerings available in your country.
Your computer is designed to support a wireless (selected models only) or wired network that connects your computer to other devices.
Wired network connection
For wired networks, connect one end of an Ethernet cable (purchased separately) to the Ethernet connector on your computer, and then connect the other end to the network router or broadband modem. Consult your ISP for detailed setup instructions.

Note: Broadband modem and router installation procedures vary depending on the manufacturer. Follow the manufacturer's instructions.
Wireless network connection
For wireless networks, you can use the built-in wireless LAN antenna to access your wireless home network.
To connect your computer to the wireless network:
-
Move the cursor to the top right or bottom right corner of the screen, then click Settings. (If your computer is equipped with touch screen, swipe in from the right edge of the screen, then tap Settings.)
-
Click or tap the network icon 📄, then select the name of your router. Click or tap Connect, then follow the steps on the screen.
Test the wireless network by opening your Web browser and accessing any Web site.
Wired keyboard (selected models only)
LVT —— After entering Windows, press this key to launch the LVT (Lenovo Vantage Technology) program, Lenovo's pre-loaded Home PC software. In addition to its own functions, the LVT program will allow you to start other Windows compatible software specially configured to run on this model of computer.

Notes:
• Some models are not equipped with the LVT program.
- The LVT key on the keyboard is disabled in the models without the LVT program.
F2 —— Your computer has the Lenovo Rescue System installed. To learn more about this program, repeatedly press and release the F2 key once turning on the computer until the Lenovo Rescue System open.
Using Windows 8.1
This chapter contains the following topics:
Switching between the main Windows 8.1 interfaces
The Charms Bar
Shutting down the computer
▶ Switching between apps
Closing an app
Opening other system programs
Windows Help and Support

Attention: The Windows 8.1 operating system is provided by Microsoft Corporation. Please use it in accordance with the END USER LICENSE AGREEMENT (EULA) between you and Microsoft. For any question related to the operating system, please contact Microsoft directly.
Switching between the main Windows 8.1 interfaces
Windows 8.1 comes with two main user interfaces: the Start Screen and the Windows desktop.
To switch from the Start Screen to the Windows desktop, do one of the following:
- Select the Windows desktop tile on the Start Screen.
- Press the Windows key + D.
To switch from the desktop to the Start Screen, do one of the following:
- Select Start from the Charms Bar.
- Move the cursor to the bottom left corner, then select the Start Screen thumbnail when it is displayed.
- Press the Windows key
The Charms Bar
Charms provide new and faster ways to perform many basic tasks.
To display the charms, do one of the following:
- Move the cursor to the top right or bottom right corner of the screen.
- If your computer is equipped with touch screen, swipe in from the right edge of the screen.
- Press the Windows key + C.
Shutting down the computer
To shut down the computer:
- Move the cursor to the top right or bottom right corner of the screen, then click Settings. (If your computer is equipped with touch screen, swipe in from the right edge of the screen, then tap Settings.)
- Select Power → Shutdown.
Switching between apps
Sometimes you want to get back to an app you were just using, or quickly switch through your recent apps.
To switch between apps:
Move the cursor to the top left corner, then click to bring in the next app. (If your computer is equipped with touch screen, swipe in from the left edge of the screen to bring in the next app.)
Closing an app
To close an app, do one of the following:
- Move the cursor to the top left corner of the screen. When the thumbnail appears, drag it to the bottom of the screen.
- Move the cursor to the top edge of the screen. When the cursor becomes a hand, drag the app page to the bottom of the screen.
- If your computer is equipped with touch screen, swipe in from the top edge of the screen. When the app page becomes smaller, drag it to the bottom of the screen.
Opening other system programs
There is a fast way to open other system programs.
To open the menu, do one of the following:
- Move the cursor to the bottom left corner of the screen. When the thumbnail appears, right-click with the mouse to open the menu.
- Press the Windows key + X.
Windows Help and Support
If you have a problem with the operating system, see the Windows Help and Support file. To open the Windows Help and Support file, do one of the following:
- Select the Settings charm, then select Help.
- Press the Windows key + F1.
You can read the Windows Help and Support file on your computer. You can also get online help and support by clicking on one of the two links listed under More to explore.
Touch screen instructions
This chapter contains the following topics:
▶ Touch Screen Calibration
➢ User Gesture Instructions for the Touch screen
➢ Attentions when using the Touch Screen

Attention: Only selected models are equipped with a touch screen.
The monitor is touch-sensitive thanks to its touch-sensitive screen. A touch screen is an input device just like a mouse or a keyboard, and the user's fingers transmit position information via the touch screen to the computer. With this technology, you only need to touch the pictures or words on the computer display lightly with your finger, and the computer will react.
Touch Screen Calibration
Prior to first use or whenever the touch screen reacts in a different place where you are touching it, start the calibration program. The procedure is as follows:
- In Control Panel, select "Hardware and Sound".
- In "Hardware and Sound" window, select "Tablet PC Settings".
- In "Tablet PC Settings" dialogue, click "Calibrate" button.
- To finish the calibration, use your finger or a more than 9 mm diameter touch pen to touch each of the calibration points shown in sequence.
User Gesture Instructions for the Touch screen
The Touch screen supports single touch and rotational movements, enlargement and reduction multi-touch operations, and the user can transmit position information to the computer via touch. The touch screen uses a very low pressure movement recognition method, which only needs the finger to move lightly on the computer display screen or make a simple hand gesture to be detected by the main computer processor.

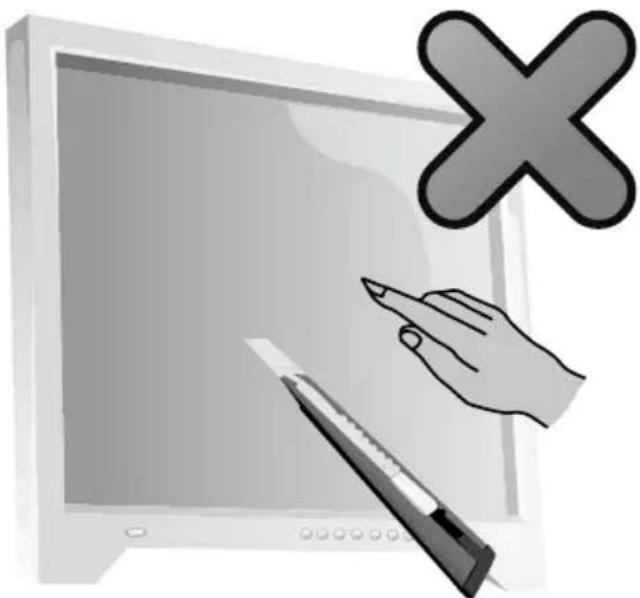
Note: Do not touch the screen with any hard objects, such as fingernails.
Basic Hand Gestures
1. Single Click / Double Click
For the item selected on the touch screen, with one finger touch it one or two times, to perform a single click or double click operation. This is similar to the action performed by clicking the mouse left button.

natural_image
Simple line drawing of a hand pointing upward (no text or symbols)2. Single Finger Right Click
For the item selected on the touch screen, press and hold your finger on the screen until a circle appears. After lifting your finger from the touch screen, a menu bar will pop up, completing the single finger right click operation. This is similar to the action performed by clicking the mouse right button.

natural_image
Hand pointing at a square button on a gray background (no text or symbols)
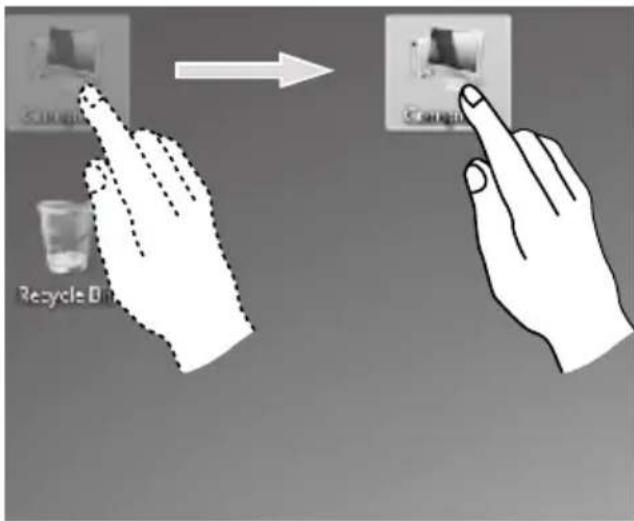
3. Dragging Movement
First touch your finger on the desired item on the screen and hold it there, then make a dragging movement. This is similar to the click and drag movement you can make with a mouse.
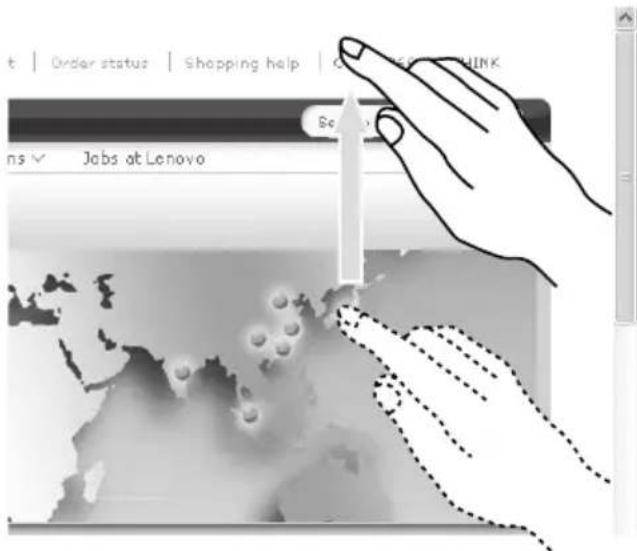
4. Rolling Movement
When you move your finger one time vertically (or horizontally) on the touch screen, this is called a Rolling Operation. For example: This operation is similar to moving the scroll wheel on the top of a mouse, and produces the same results as the scroll wheel interface does.
5. Zoom Operation
Touch two fingers lightly on the desired item on the touch screen, then keeping both fingers on the screen, change the distance between them. By increasing (or decreasing) the distance, you can perform a zoom in (or zoom out) operation. For example: you can enlarge or reduce the picture size in Windows Photo Viewer.

natural_image
Illustration of a hand pointing at a flower petal with an arrow indicating direction (no text or symbols)6. Rotation Operation
Use two figures to touch the desired item on the touch screen, then rotate them in the desired direction. For example: you can rotate the picture which is being displayed in Windows Photo Viewer.

natural_image
Illustration of hands interacting with a textured surface, showing motion direction and shading (no text or symbols)
Note: To learn more about how to use the touch screen, refer to Windows Help and Support by press Windows key F1 or Select Settings charm, then select Help.
Related Touch Screen Settings
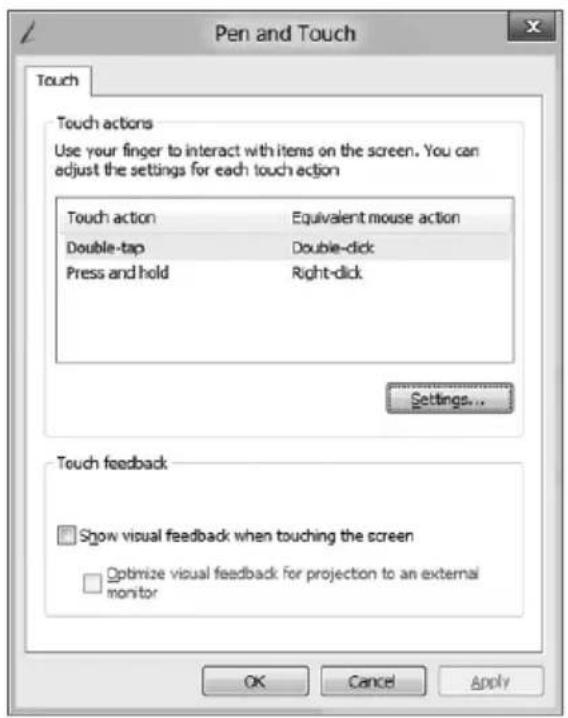
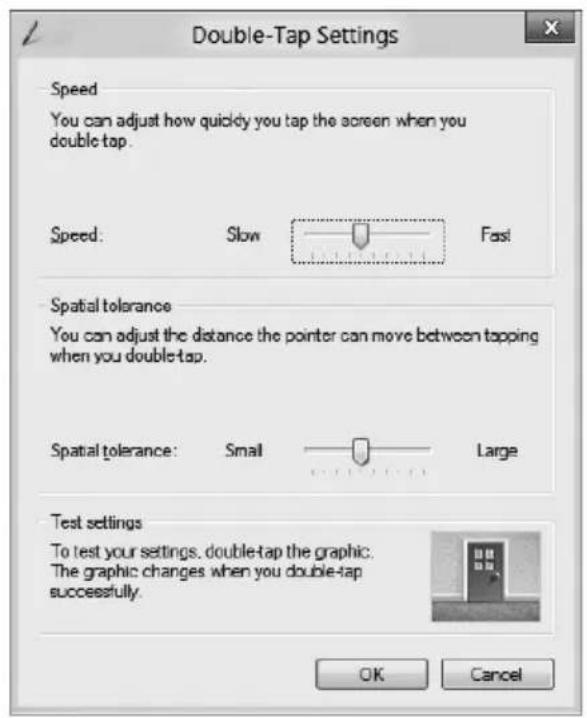
- Select Hardware and Sound→ Pen and Touch from the Settings charm.
- Select touch actions which you wish to adjust. By clicking on "Settings", you can adjust the "Speed" and "Spatial tolerance" parameters, to match the user's natural way of double-clicking. You can double-click on the lower right corner of the icon to test this.
Note: Users can access more help information from the Windows Help and Support menu.
Precautions when using the Touch Screen
- When using the touch screen, be careful not to tear the surface with any sharp objects.
natural_image
Illustration of a hand pointing at a computer monitor with a pencil and a large 'X' symbol (no text or symbols present)-
To ensure normal use of the touch screen, ensure that both the screen surface and your fingers are clean and dry.
-
To ensure precise positioning on the touch screen, avoid handling or touching the glass frame when you are touching the screen.
-
Turn the computer off for safety before cleaning the screen and frame with a soft cotton cloth. Do not wipe it with a wet cloth as this may leave a water mark and affect touch operation.
-
Do not place or drop anything which could obstruct it in the four corners of the screen or any part of its frame, because this could separate the screen from the frame and stop the screen from being able to sense position properly. Please avoid leaving water and dust in the gap between the casing and glass when you are cleaning the frame.
-
Avoid using the touch screen in dusty environments or hot or humid conditions. Any abrupt temperature change may cause condensation on the inside surface of the glass screen, which will disappear after a short time and does not affect normal use.
-
Do not spray any liquid or cleaner directly onto the touch screen.
-
Do not use a solvent or industrial alcohol-based cleaners.
-
Avoid using the computer in sunlight, which will affect the function of the touch screen.
Note: The touch screen will not affect other computer processes when used normally. -
Recognition of touch gestures can be influenced by the following:
-
Touching the correct place on the screen.
• The speed of movement.
• The time interval from when the screen was last touched.
Note: The user can consult this manual and also the related Windows help content to learn accurate hand gestures.
- The touch screen does not function in Rescue System mode.
- The touch screen also does not function during the startup process, in Hibernate mode and in Sleep mode or Safe mode.
- Do not touch the screen with your finger or any other objects during the computer startup or wake up process.
Using the Rescue System
This chapter contains the following topics:
OneKey Recovery
Driver and Application Installation

Attention: Using OneKey Recovery will result in loss of data.
- You can restore the C: drive of the computer to factory default settings or to the last system backup status using OneKey Recovery. If you do this, all of the existing data on drive C: will be lost, but the content and format of the other partitions of the hard disk drive will remain unchanged.
- If you want to install an operating system and back it up with OneKey Recovery, you must format the C: partition in NTFS format and install the operating system on the C: partition. Otherwise, the OneKey Recovery system cannot run.
Note about the service partition:
The files and relevant data used by the rescue system are saved in the service partition. Deleting this partition will make the rescue system unusable. For more detailed information, see the following instructions:
From the Search charm, select Apps → Control Panel → Administrative Tools → Computer Management → Disk Management, you can see the service partition, which must not be deleted.
Note: The recovery files and relevant data used by the rescue system are saved in the service partition. If the service partition is deleted or damaged by someone other than authorized Lenovo service personnel, Lenovo will not be liable for any losses arising therefrom in any way.
OneKey Recovery
OneKey Recovery is an easy-to-use application. You can use it to restore your computer to the system default or to a previously backed up state.
Detailed Operation Procedure
- Repeatedly press and release the F2 key once turning on the computer until the Lenovo Rescue System opens, then select OneKey Recovery.
Note: System Recovery will overwrite all of the data on the C: drive. To prevent loss of data, be sure to back up relevant data before performing system recovery. - Follow the on-screen instructions to select the backup task you want to restore from and the disk where you want to install the operating system, then press Next to start the restore.
- Please wait during the process of system recovery. Do not interrupt the operation during the recovery process.
- After the system is recovered successfully, the software will prompt you to restart the computer. Restart the computer and start the operating system.
Driver and Application Installation
The Driver and Application Installation function in the rescue system provides a way for the user to conveniently reinstall all of the Lenovo applications and drivers that were shipped with your Lenovo hardware.
Method 1: Automatic Installation
Repeatedly press and release the F2 key once turning on the computer until the Lenovo Rescue System opens, then select Driver and Application Installation.
Follow the on-screen prompts to install the Lenovo drivers and applications. Click OK to start installing the Lenovo Driver and Application Installation software.
The system will restart. After the system has restarted, the drivers and application installation process will continue until it has completed.
Method 2: Manual Installation
In the Windows system, Select Driver and Application Installation from the Search charm.
After starting the procedure, install the drivers and software manually by following the prompts.
Notes:
- Do not install software which is already installed on the computer.
- Make sure that the Driver and Application Installation software has been automatically installed before starting the operating system. The manual installation function can only be used after the software has been installed.
Using the Software
This chapter contains the following topic:
Software instructions
Note: The interface and functionality of these features will depend on which software was shipped with the computer model you purchased.
Lenovo Support
The Lenovo Support program enables you to register your computer with Lenovo, download and view user manuals for your computer, get the warranty information of your computer, and explore help and support information.
To open this program, do the following:
Click the Lenovo Support icon from the Start Screen or Search Screen.
The main functions of this program are listed below. (This program supports online upgrades. The functions shown below are for reference only, functionality will depend on the program icons currently displayed.)
Registration
Registration provides you with access to product support, upgrades and alerts on topics. Take advantage of award-winning Lenovo services.
User Guide
The User Guide provides more information about your computer.
Service and Warranty
You can extend the warranty of your computer through this option. Lenovo provides flexible options to meet your personal or business needs.
Troubleshooting and Confirming Setup
This chapter contains the following topic:
Troubleshooting and Problem Resolution
Note: The description of the TV tuner card in this manual is only applicable to machines which have the TV tuner card. It does not apply to machines that do not have a TV tuner card.
Solving Problems
Follow these tips when troubleshooting your computer:
- If you added or removed a part before the problem started, review the installation procedures to ensure that the part is correctly installed.
- If a peripheral device does not work, ensure that the device is properly connected.
- If an error message appears on the screen, write down the exact message. This message may help support personnel diagnose and fix the problem(s).
- If an error message occurs in a program, see the Help document of this program.
Troubleshooting Display Problems
Problem: Blank screen or no image is displayed on the monitor.
Troubleshooting and problem resolution:
- Make sure the power cord is plugged into your computer and a functioning power outlet.
- Unplug the power cord and plug the power cord back in securely and restart the computer.
- If the LCD screen has a LCD On/Off button, check that the LCD screen has been turned on.
If still cannot solve the problem, contact Lenovo Customer Service.
Problem: You need to change the display property settings.
Setting display background and icon properties:
- Right-click the desktop anywhere except over an icon, then select Personalize from the pop-up menu.
-
From here, select the appropriate options to:
-
Change the desktop background
- Select a screen saver
- Select Windows color options for borders and taskbar
-
Select a themes
-
Right-click the desktop anywhere except over an icon, then select Screen resolution from the pop-up menu to change the appearance.
Problem: Ripple on screen.
Troubleshooting and problem resolution:
- Check to see if any of the following devices are located less than one meter from the computer: refrigerators, electric fans, electric dryers, UPS systems, regulators, fluorescent lamps or other computers that may be generating magnetic interference.
- Move any interfering devices away from the computer.
- If the problem persists, contact Lenovo Service.
Troubleshooting Touch screen
Problem: The touch screen reacts, but not where you are touching it.
Troubleshooting and problem resolution:
Touch Screen Calibration:
- In Control Panel, select "Hardware and Sound".
- In "Hardware and Sound" window, select "Tablet PC Settings".
- In "Tablet PC Settings" dialogue, click "Calibrate" button.
Troubleshooting Audio Problems
Problem: No sound from the integrated speakers.
Troubleshooting and problem resolution:
- Adjust the Windows volume control — select the speaker icon from the Settings Charm or click the arrow on taskbar to show the hidden icons in Windows desktop mode, then click the speaker icon. Ensure that the volume is turned up and the sound is not muted. Adjust the volume, bass, or treble controls to eliminate distortion.
• Reinstall the audio driver. - Disconnect any headphones from the headphone connector — sound from the speakers is automatically disabled when headphones are connected to the computer's side-panel headphone connector.
Problem: No sound from headphones.
Troubleshooting and problem resolution:
- Check the headphone cable connection — ensure that the headphone cable is securely inserted into the headphone connector.
- Adjust the Windows volume control — select the speaker icon from the Settings Charm or click the arrow on taskbar to show the hidden icons in Windows desktop mode, then click the speaker icon. Ensure that the volume is turned up and the sound is not muted.
Troubleshooting Software Problems
Problem: You are unable to exit a running program normally.
Troubleshooting and problem resolution:
- Open the Task Manager window by pressing Ctrl, Alt and Delete at the same time.
- Select the problem program, then click the End Task button.
Problem: You need to install or uninstall a program.
Problem resolution:
During installation never abort the install process by powering the system off or through other drastic means. This can cause system program problems or even failure during system initialization.
During the uninstall process, never directly delete the files or folders. This is harmful to the operating system, and might cause a system-wide malfunction. Use the following procedure to properly uninstall programs:
- Back up all documents and system settings related to the program before removing it.
- If the program has its own uninstaller, run it directly to uninstall the program.
- If the program does not have its own uninstaller, then select Apps → Control Panel from the Search charm.
- From the Control Panel, choose Programs → Programs and Features.
- Find the applicable program from the Programs and Features dialog box and then select Uninstall/Change.
- Perform the instructions displayed to uninstall the software.
Troubleshooting Problems with Optical Drives and Hard Disks
Problem: The Optical drive is unable to read a CD/DVD.
Troubleshooting and problem resolution:
- Check to determine if there is an optical drive icon in the resource manager of the operating system. If not, restart your computer. If there is still no icon, contact Lenovo Service. Otherwise, continue with the next step of this procedure.
- Confirm that the CD/DVD has been properly placed in the drive. If not, reload the CD or DVD. Otherwise, continue with the next step of this procedure.
- Check the specifications that came with your computer to confirm that this optical drive is capable of reading this type of CD or DVD.
- If the CD/DVD cannot be read, replace it with a known good CD/DVD such as one that was shipped with the computer.
- If the known good CD cannot be read, visually check the operating side of the CD/DVD for defects.
Problem: The capacity of the hard disk, as indicated by the system, is less than the nominal capacity.
Troubleshooting and problem resolution: For computers equipped with the OneKey Recovery feature, the system recovery feature needs to occupy some hard disk space. This may account for the apparent hard disk capacity deficit.
Further Technical Explanation: The nominal capacity of the hard disk is expressed in the decimal system as 1000 bytes. But the actual hard disk capacity is expressed in the binary system as 1024 bytes (For example, the nominal capacity 1G is 1000M, while the actual capacity 1G is 1024M).
The capacity of the hard disk shown in Windows can be calculated according to the calculations in the following example:
The nominal capacity of the hard disk is 40G, while its actual capacity should be: 40 × 1000 × 1000 × 1000/(1024 × 1024 × 1024) = 37G .
If the Service partition of 3G - 3 x 1000 x 1000 x 1000/(1024 x 1024 x 1024) = 2.79G is subtracted, the capacity of the hard disk shown in the system can be obtained.
The capacity of the hard disk as calculated using this method may be slightly different from the actual capacity due to the rounding of totals.
Special considerations for troubleshooting Windows
Record the following information as it may be useful later when troubleshooting system problems:
The drivers for this computer model only support the Windows 8.1 system.
Windows Help and Support
If you have a problem with the operating system, see the Windows Help and Support file. To open the Windows Help and Support file, do one of the following:
- Select the Settings charm, then select Help.
- Press Windows key + F1.
You can read the Windows Help and Support file on your computer. You can also get online help and support by clicking on one of the two links listed under More to explore.
BIOS setup utility
What is the BIOS setup utility?
The BIOS setup utility is ROM-based software. It communicates basic computer information and provides options for setting boot devices, security, hardware mode, and other preferences.
How can I start the BIOS setup utility?
To start the BIOS setup utility:
- Shut down the computer.
- Repeatedly press and release the F1 key once turning on the computer to start the Setup Utility program.
How can I change the boot mode?
There are two boot modes: UEFI and Legacy. To change the boot mode, start the BIOS setup utility and select Startup → Boot Priority, then set boot mode to UEFI or Legacy support on the boot menu.
When do I need to change the boot mode?
The default boot mode for your computer is the UEFI mode. If you need to install a legacy Windows operating system (any operating system before Windows 8.1) on your computer, you must change the boot mode to Legacy support. The legacy Windows operating system cannot be installed if you don't change the boot mode.
Performing Daily Maintenance Tasks
Cleaning the computer components
Because many of the computer components consist of sophisticated integrated circuit boards, it is very important to periodically clean the computer to prevent dust buildup. The cleaning supplies you need to clean the components include: a vacuum cleaner, a soft cotton cloth, pure water (preferably purified or distilled water) and cotton swabs.

Attention: Before you clean your computer, disconnect the computer from the electrical outlet. Clean your computer with a soft cloth dampened with water. Do not use liquid or aerosol cleaners, which may contain flammable substances.

Note: To avoid damaging the computer or display, do not spray cleaning solution directly onto the display. Only use products specifically designed for cleaning displays, and follow the instructions included with the product.
The following are general methods for cleaning the components:
- You can use a soft cloth to remove dust on the surface of the computer, the monitor, the printer, the speakers and the mouse.
- You can use a vacuum cleaner to clean in otherwise inaccessible corners.
- To clean the keyboard thoroughly, shut down the computer and scrub it gently with a wet cloth. Do not use the keyboard until it is dry.
Do not do any of the following:
- Allow water to enter the computer.
• Use a heavily dampened cloth. - Spray water directly onto the surface of the monitor or inside the computer.
LCD monitor should be cleaned daily. Use a dry cloth to brush dust from the monitor and keyboard every day. Keep all surfaces clean and free of grease stains.
Hardware Replacement Guide
This chapter contains the following topics:
Removing the stand base
Removing the foot cover
▶ Replacing a memory module
▶ Replacing the hard disk drive
Overview
This guide is intended to be used by customers who are replacing Customer Replaceable Units (CRUs) as well as trained service personnel who are replacing Field Replaceable Units (FRUs). In this guide, CRUs and FRUs will often be referred to as parts.
Note: Trained service personnel should refer to the Hardware Maintenance Manual (HMM) for parts ordering information.
This guide does not include procedures for all parts. It is expected that cables, switches, and certain mechanical parts can be replaced by trained service personnel without the need for step-by-step procedures.
Note: Use only parts provided by Lenovo®.
The description of the TV-Tuner card in this manual applies only to those computer models that have a TV-Tuner card installed.
This guide contains procedures for replacing the following parts:
- Memory module
- Hard disk drive
Safety information for replacing CRUs
Do not open your computer or attempt any repairs before reading the “Important safety information” in the Safety and Warranty Guide that was included with your computer. If you no longer have this copy of the Safety and Warranty Guide, you can obtain one online from the Support Web site at http://support.lenovo.com.
Additional information resources
If you have Internet access, the most up-to-date information for your computer is available from the Internet.
You can find the following information:
• CRU removal and installation information
- Publications
- Troubleshooting information
- Parts information
- Links to other useful sources of information
To access this information, go to: http://support.lenovo.com
Tools required
To disassemble the computer, you need the following tools:
• Wrist grounding strap and conductive mat for preventing electrostatic discharge
- Flat head screwdriver
• Phillips head screwdriver
- Hex screwdriver
• Plastic flat head screwdriver
- Plastic tweezers

Note: The screws for the different components vary in size. During the disassembly procedure, group the screws with their corresponding components to avoid a mismatch when replacing the components.
Handling static-sensitive devices
Static electricity, although harmless to you, can seriously damage computer components.
When you are replacing a part, do not open the anti-static package containing the new part until the defective part has been removed from the computer and you are ready to install the new part.
When you handle parts and other computer components, take these precautions to avoid static electricity damage:
- Limit your movements, as this can cause static electricity to build up.
- Always handle parts and other computer components carefully. Handle adapters, memory modules, system boards, and microprocessors by the edges. Never touch any exposed circuitry.
- Prevent others from touching the parts and other computer components.
- Before you replace a new part, touch the anti-static package containing the part to a metal expansion slot cover or other unpainted metal surface on the computer for at least two seconds. This reduces static electricity in the package and your body.
- When possible, remove the new part from the anti-static packaging and install it directly in the computer without setting the part down. When this is not possible, place the anti-static package that the part came in on a smooth, level surface and place the part on it.
- Do not place the part on the computer cover or other metal surface.
Replacing hardware

Attention: Do not remove the computer cover or attempt any repairs before reading the “Important safety information” in the Safety and Warranty Guide that was included with your computer or in the Hardware Maintenance Manual (HMM) for the computer. To obtain copies of the Safety and Warranty Guide or HMM, go to the Support Web site at: http://support.lenovo.com

Note: Use only parts provided by Lenovo.
General information
Pre-disassembly instructions
Before proceeding with the disassembly procedure, make sure that you do the following:
- Turn off the power to the system and all peripherals.
- Unplug all power and signal cables from the computer.
- Place the system on a flat, stable surface.
Removing the stand base

Attention: Turn off the computer and wait 3 to 5 minutes to let it cool down before removing the cover.

Note: It may be helpful to place the computer face-down on a soft flat surface for this procedure. Lenovo recommends that you use a blanket, towel, or other soft cloth to protect the touch screen from scratches or other damage.
- Remove any media (disks, CDs, or memory cards) from the drives, shut down the operating system, and turn off the computer and all attached devices.
- Unplug all power cords from electrical outlets.
-
Disconnect all cables attached to the computer. This includes power cords, input/output (I/O) cables, and any other cables that are connected to the computer. Refer to “Left and right views” and “Rear view” for help with locating the various connectors.
-
To release the stand base from the stand holder, turn the hand screw rings counter-clockwise until the base comes loose. 1
-
Slide the stand base out from the holder then put it aside. 2

- Refer to "Installing the computer stand" to reinstall the stand base.
Removing the foot cover

Attention: Turn off the computer and wait 3 to 5 minutes to let it cool down before removing the cover.

Note: It may be helpful to place the computer face-down on a soft flat surface for this procedure. Lenovo recommends that you use a blanket, towel, or other soft cloth to protect the touch screen from scratches or other damage.
-
Remove any media (disks, CDs, or memory cards) from the drives, shut down the operating system, and turn off the computer and all attached devices.
-
Unplug all power cords from electrical outlets.
-
Disconnect all cables attached to the computer. This includes power cords, input/output (I/O) cables, and any other cables that are connected to the computer. Refer to "Left and right views" and "Rear view" for help with locating the various connectors.
-
Remove the foot base. Refer to "Removing the foot base".
-
Lift up the stand holder when slide out the foot cover as shown.


- To reattach the foot cover:
a. Lift up the stand holder.
b. Line up the foot cover with mounting holes on the back of the computer, then slide it back into position.
Replacing a memory module

Attention: Turn off the computer and wait 3 to 5 minutes to let it cool down before removing the cover.

Note: It may be helpful to place the computer face-down on a soft flat surface for this procedure. Lenovo recommends that you use a blanket, towel, or other soft cloth to protect the touch screen from scratches or other damage.
-
Remove any media (disks, CDs, or memory cards) from the drives, shut down the operating system, and turn off the computer and all attached devices.
-
Unplug all power cords from electrical outlets.
-
Disconnect all cables attached to the computer. This includes power cords, input/output (I/O) cables, and any other cables that are connected to the computer. Refer to "Left and right views" and "Rear view" for help with locating the various connectors.
-
Remove the stand base. Refer to "Removing the stand base".
-
Remove the foot cover. Refer to "Removing the foot cover".
-
Slide then remove the memory shielding as shown.

natural_image
Technical line drawing of a device chassis with internal components and a highlighted rectangular component (no text or symbols)- Push out the latches on both sides of the memory socket to release the memory module and gently pull the memory module upward to remove it from its socket. All of the memory modules can be removed using the same procedure.

- To install a memory module:
a. Align the new memory module with the memory socket, then insert it and push down on the top edge. Make sure the latches lock the memory module in place.
b. Reattach the memory shielding back.
- Reattach the foot cover and stand base.
Replacing the hard disk drive

Attention: Turn off the computer and wait 3 to 5 minutes to let it cool down before removing the cover.

Note: It may be helpful to place the computer face-down on a soft flat surface for this procedure. Lenovo recommends that you use a blanket, towel, or other soft cloth to protect the touch screen from scratches or other damage.
-
Remove any media (disks, CDs, or memory cards) from the drives, shut down the operating system, and turn off the computer and all attached devices.
-
Unplug all power cords from electrical outlets.
-
Disconnect all cables attached to the computer. This includes power cords, input/output (I/O) cables, and any other cables that are connected to the computer. Refer to "Left and right views" and "Rear view" for help with locating the various connectors.
-
Remove the stand base. Refer to "Removing the stand base".
-
Remove the foot cover. Refer to "Removing the foot cover".
-
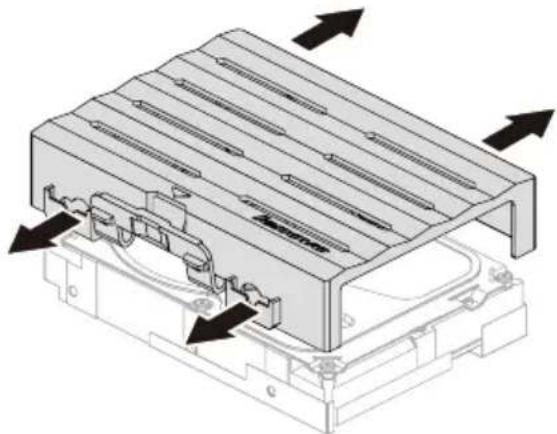
Lift out the hard disk drive and bracket as shown.

-
Disconnect the data and power cables from the hard disk drive.
-
Push the lock pins outward to release the hard disk drive from the bracket.
natural_image
Technical diagram of an electronic device housing with heat exchangers and internal components (no text or symbols)- To install the new hard disk drive:
a. Install the new hard disk drive to the bracket, and secure it with the mounting pins.
b. Connect the data and power cables to the new hard disk drive.
c. Slide the hard disk drive and bracket back into position.
- Reattach the foot cover and stand base.
Declaration
Thank you for using Lenovo products.
Carefully read all documents shipped with your computer before you install and use the product for the first time. Lenovo is not responsible for any loss except when caused by installation and operations performed by Lenovo professional service personnel. You are responsible if you fail to operate the product according to instructions and requirements in the manuals included with your computer, or operate the product inappropriately.
This manual could include technical inaccuracies or typographical errors. Changes are made periodically to the information herein; these changes will be incorporated in new editions of the publication. To provide better service, Lenovo reserves the right to improve and/or modify the products and software programs described in the manuals included with your computer, and the content of the manual, at any time without additional notice.
The manuals included with your computer are provided to help you use Lenovo's products appropriately. For the configuration of the product, refer to the related contract (if any) or product packing list, or consult the distributor for the product sales.
The content of the manuals included with your computer is protected by copyright laws and rules. None of the manuals included with your computer may be reproduced or transcribed by any means or translated into any language without prior written permission of Lenovo.
The software interface and function and hardware configuration described in the manuals included with your computer might not match exactly the actual configuration of the computer that you purchase. You are welcome to contact us about the manuals included with your computer. For the latest information or any questions or comments, contact or visit the Lenovo Web site:
Service Web site: http://support.lenovo.com
Trademarks
Lenovo and the Lenovo logo are trademarks of Lenovo in the United States, other countries, or both.
Microsoft, Windows, and Windows Vista are trademarks of the Microsoft group of companies.
Intel Inside is a trademark of Intel Corporation in the U.S. and/or other countries.
AMD, the AMD Arrow logo, ATI, AMD Athlon, AMD LIVE!, AMD Opteron, AMD Phenom, AMD Sempron, Catalyst, Cool 'n' Quiet, CrossFire, PowerPlay, Radeon, and The Ultimate Visual Experience are trademarks of Advanced Micro Devices, Inc.
Other company, product, or service names referred to herein or in other Lenovo publications may be trademarks or service marks of others.
All rights reserved.
Names or marks of certain companies mentioned in the manuals included with your computer or this document do not necessarily indicate that related software or hardware is included. The actual configuration of the product depends on the packing list description.
Energy Star Statement

ENERGY STAR® is a joint program of the U.S. Environmental Protection Agency and the U.S. Department of Energy aimed at saving money and protecting the environment through energy efficient products and practices.
Lenovo is proud to offer our customers products with an ENERGY STAR compliant designation. The following machine types have been designed and tested to conform to the ENERGY STAR program requirement for computers at the time of manufacture. For more information about ENERGY STAR ratings for Lenovo computers, go to http://www.lenovo.com.
FOAU
FOAV
FOAW
By using ENERGY STAR compliant products and taking advantage of the power-management features of your computer, you reduce the consumption of electricity. Reduced electrical consumption contributes to potential financial sayings, a cleaner environment, and the reduction of greenhouse gas emissions.
For more information about ENERGY STAR, go to: http://www.energystar.gov.
Lenovo encourages you to make efficient use of energy an integral part of your day-to-day operations. To help in this endeavor, Lenovo has preset the following power-management features to take effect when your computer has been inactive for a specified duration:
ENERGY STAR power-management features, by operating system.
Microsoft Windows Vista, Windows 7, Windows 8 and Windows 8.1
Power plan: Balanced
• Turn off the display: After 10 minutes
- Put the computer to sleep: After 25 minutes
• Advanced power settings:
- Turn off hard disk drives: After 20 minutes
- Hibernate: Never
To awaken your computer from a Sleep or System Standby mode, press any key on your keyboard. For more information about these settings, refer to your Windows Help and Support information system.
Enabling ErP compliance mode
You can enable the energy-related products directive (ErP) compliance mode through the Power menu in the Setup Utility program. This mode reduces electricity consumption when your computer is in standby mode or turned off.
To enable ErP compliance mode in the Setup Utility program, do the following:
- Repeatedly press and release the F1 key when turning on the computer to start the Setup Utility program.
- From the Setup Utility program main menu, select Power → ErP and press Enter.
- Select Enabled and press Enter.
- Press F10 to save changes and exit the Setup Utility program. Press Enter when prompted to confirm.
Note: When ErP compliance mode is enabled, you only can wake up your computer by pressing the power switch.
In Windows 8 or Windows 8.1 operating system, you also need to disable Fast Startup function to meet the off mode requirement of ErP compliance.
To disable the Fast Startup function, do the following:
- Select Apps → Control Panel from the Search charm.
- From the Control Panel, choose All Control Panel Items → Power Options.
- Select Choose what the power buttons do from the pop-up dialog box.
- Choose Change settings that are currently unavailable option, and uncheck the Turn on fast startup option from the Shutdown Settings list.
Additional information as required by EU Regulation 617/2013 implementing Directive 2009/125/EC with regard to ecodesign requirements for computers and computer servers can be found here: www.lenovo.com/ecodeclaration.
Electronic emissions notices
The following information refers to Lenovo machine type:
FOAU
FOAV
FOAW
Federal Communications Commission (FCC) Declaration of Conformity
This equipment has been tested and found to comply with the limits for a Class B digital device, pursuant to Part 15 of the FCC Rules. These limits are designed to provide reasonable protection against harmful interference in a residential installation. This equipment generates, used, and can radiate radio frequency energy and, if not installed and used in accordance with the instructions, may cause harmful interference to radio communications. However, there is no guarantee the interference will not occur in a particular installation. If this equipment does cause harmful interference to radio or television reception, which can be determined by turning the equipment off and on, the user is encouraged to try to correct the interference by one or more of the following measures:
• Reorient or relocate the receiving antenna.
- Increase the separation between the equipment and receiver.
- Connect the equipment into an outlet on a circuit different from that to which the receiver is connected.
- Consult an authorized dealer or service representative for help.
Lenovo is not responsible for any radio or television interference caused by using other than recommended cables or connectors or by unauthorized changes or modifications to this equipment. Unauthorized changes or modifications could void the user's authority to operate the equipment.
This device complies with Part 15 of the FCC Rules. Operation is subject to the following two conditions: (1) this device may not cause harmful interference, and (2) this device must accept any interference received, including interference that may cause undesired operation.
Responsible party:
Lenovo (United States) Incorporated
1009 Think Place - Building One
Morrisville, NC 27560
U.S.A.
Telephone: (919) 294-5900

Mexico regulatory notice
- Lenovo
- B40/B50 Series
- User Guide
- Important Safety Information
- Contents
- Using the Computer Hardware .... 1
- Using Windows 8.1 ...... 13
- Touch screen instructions 17
- Using the Rescue System 25
- Using the Software 29
- Troubleshooting and Confirming Setup 31
- Hardware Replacement Guide 39
- Appendix. 49
- Electronic emissions notices 52
- Mexico regulatory notice 53
- Using the Computer Hardware
- This chapter contains the following topics:
- Front view of the computer
- Left and right views of the computer
- Rear view of the computer
- Installing the computer stand
- Computer stand
- Basic connector instructions
- Connecting your computer
- Connecting the power cord
- Important information about using the computer
- Connecting to the Internet
- Wired network connection
- Wireless network connection
- Wired keyboard (selected models only)
- Notes:
- Using Windows 8.1
- Switching between the main Windows 8.1 interfaces
- The Charms Bar
- Shutting down the computer
- Switching between apps
- Closing an app
- Opening other system programs
- Windows Help and Support
- Touch screen instructions
- Touch Screen Calibration
- User Gesture Instructions for the Touch screen
- Basic Hand Gestures
- Single Click / Double Click
- Single Finger Right Click
- Dragging Movement
- Rolling Movement
- Zoom Operation
- Rotation Operation
- Related Touch Screen Settings
- Precautions when using the Touch Screen
- Using the Rescue System
- Note about the service partition:
- OneKey Recovery
- Detailed Operation Procedure
- Driver and Application Installation
- Method 1: Automatic Installation
- Method 2: Manual Installation
- Using the Software
- This chapter contains the following topic:
- Lenovo Support
- Registration
- Service and Warranty
- Troubleshooting and Confirming Setup
- Solving Problems
- Follow these tips when troubleshooting your computer:
- Troubleshooting Display Problems
- Troubleshooting and problem resolution:
- Setting display background and icon properties:
- Troubleshooting Touch screen
- Troubleshooting Audio Problems
- Troubleshooting Software Problems
- Problem resolution:
- Troubleshooting Problems with Optical Drives and Hard Disks
- Special considerations for troubleshooting Windows
- BIOS setup utility
- What is the BIOS setup utility?
- How can I start the BIOS setup utility?
- How can I change the boot mode?
- When do I need to change the boot mode?
- Performing Daily Maintenance Tasks
- Cleaning the computer components
- The following are general methods for cleaning the components:
- Do not do any of the following:
- Hardware Replacement Guide
- Overview
- Safety information for replacing CRUs
- Additional information resources
- Tools required
- Handling static-sensitive devices
- Replacing hardware
- General information
- Pre-disassembly instructions
- Removing the stand base
- Removing the foot cover
- Replacing a memory module
- Replacing the hard disk drive
- Declaration
- Trademarks
- Energy Star Statement
- Microsoft Windows Vista, Windows 7, Windows 8 and Windows 8.1
- Power plan: Balanced
- Enabling ErP compliance mode
- Electronic emissions notices
- Federal Communications Commission (FCC) Declaration of Conformity
- Mexico regulatory notice
Brand : LENOVO
Model : B50-35
Category : Uncategorized