Optima Ia - Uncategorized AGFA - Free user manual and instructions
Find the device manual for free Optima Ia AGFA in PDF.


| Product Type | Compact 35mm Film Camera |
| Brand | AGFA |
| Model | Optima Ia |
| Lens | AGFA Color 1:2.8/45 (45mm f/2.8) |
| Film Format | 35mm (135) cartridges |
| Exposure Control | Fully automatic with manual override for flash and time exposures |
| Shutter Speed Range | Automatic from 1/30 sec to 1/300 sec (estimated) |
| Film Speed Range | 11–25 DIN / 10–250 ASA |
| Focusing | Symbol-based zones (close-up, group, landscape) plus scale; minimum 3.5 ft (1 m) |
| Viewfinder | Bright frame with parallax correction lines for close-ups |
| Flash Connection | Accessory shoe with foot contact; electronic flash via adapter (type 6793) |
| Dimensions | Approx. 120 x 80 x 60 mm (4.7 x 3.1 x 2.4 in) |
| Weight | Approx. 350 g (12.3 oz) |
| Power Source | None (mechanical operation, no battery) |
| Film Transport | Rapid lever advance, manual rewind with crank |
| Filter Thread | 35.5 mm screw mount |
| Construction | Metal body with plastic components |
| Special Features | Built-in selenium exposure meter, pressure-point lock, automatic zone focusing |
| Care & Cleaning | Clean lens with soft brush or cloth; store in dry, dust-free place |
| Safety Notes | Do not force film transport; avoid direct sunlight when loading |
| Spare Parts & Repairability | Serviceable by authorized AGFA repair centers; some parts may still be available |
| General Information | Manufactured by AGFA-GEVAERT, Munich, Germany |
Frequently Asked Questions - Optima Ia AGFA
User questions about Optima Ia AGFA
0 question about this device. Answer the ones you know or ask your own.
Ask a new question about this device
Download the instructions for your Uncategorized in PDF format for free! Find your manual Optima Ia - AGFA and take your electronic device back in hand. On this page are published all the documents necessary for the use of your device. Optima Ia by AGFA.
USER MANUAL Optima Ia AGFA
All rights reserved.
AGFA-GEVAERT · CAMERA-WERK · MÜNCHEN
4795 engl. - 1167
Type 2635
Printed in Germany
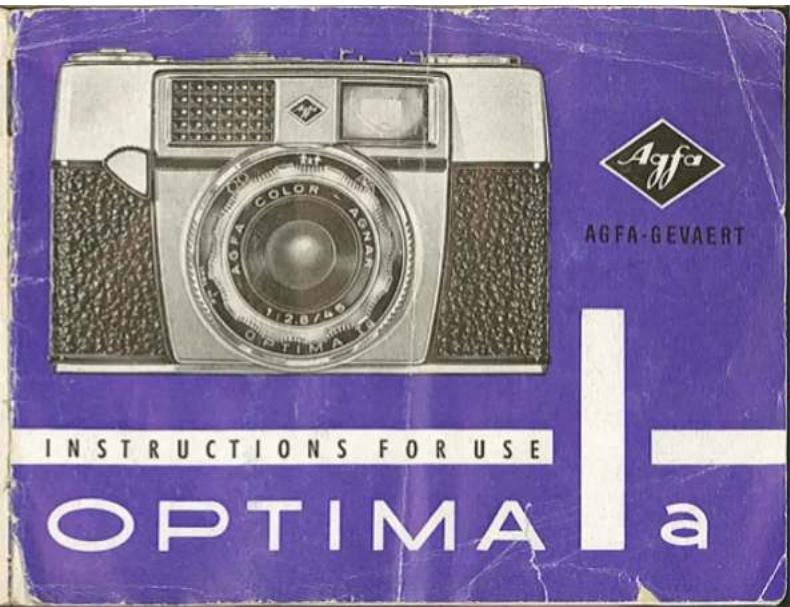
Good looking and handy, those are the outer characteristics of your
OPTIMAIα

m = 311
Press the button—
green signal—

a perfect picture
that is the operational sequence which provides proof of the efficiency of your new fully automatic Agfa camera.
Three quickly performed operations are sufficient to achieve wonderful photographs:
- Set the required focusing symbol.
- Line up the subject—press down release lever to pressure point.
- Green signal in viewfinder—press release lever right down.

natural_image
Close-up of a metallic electronic component with labeled section A, against a purple background (no readable text or symbols)
natural_image
Close-up of a white triangular object with a yellow arrow pointing downward, against a dark background (no text or symbols)
natural_image
Close-up of a metallic object with a yellow arrow pointing downward, against a dark textured background (no visible text or symbols)But you should know something more about your new camera and we therefore suggest that you read through the following pages carefully and then you will soon be an expert.
And so AGFA wishes you lots of fun with your Optima I a.

1
2
8

natural_image
Close-up of hands holding a smartphone with a black cover and a white arrow pointing to the screen (no visible text or symbols)A

natural_image
Illustration of hands installing or adjusting a computer motherboard with a clip (no text or symbols visible)B

natural_image
Close-up of hands holding a smartphone with a small inset showing a device (no visible text or symbols)C
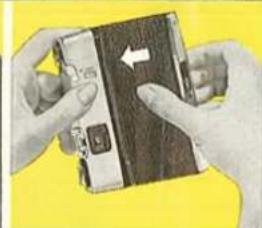
The camera can be loaded in day-light, however, not in direct sunlight but using body shadow.
A First open the camera back by pressing the catch to "open". Then slide off the back as illustrated.
B Insert the cassette so that its hole engages with the rewind crank. It is advisable to push the locking
2
key (R) in the direction of the small arrow, so that the transport wheel can be moved freely (see arrow in fig. C).
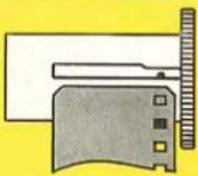
C Turn the spool by its milled disc until one of the two slits and its small lug are uppermost (see fig. F). Draw out film from the cassette to the winding spool, holding the cassette with the other hand.

natural_image
Close-up of hands holding a device with an arrow pointing to a component (no visible text or symbols)D
natural_image
Close-up of hands holding a smartphone with a white arrow pointing to the screen (no visible text or symbols)E
D/ Insert the leading end of the film in the slit of the winding spool so that the lug engages in the second film perforation (see fig. F). Now turn the winding spool until the film is taut and the teeth of the transport wheel engage cleanly in the film perforations.
E When about 13 rd inch (1 cm.) full width of the film projects from the cassette, close the camera by replacing the back (catch to "open") in the groove at an oblique angle, slide it close to the top part of the camera and then press down slightly. Continue pressure on the base plate, slide the back right home and set the catch to "lock".
. Inserting the film is so easy
F

3

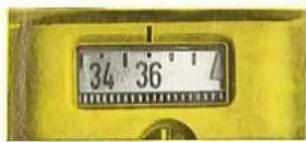
Film counter
On the top plate alongside the rapid transport lever there is the film counter. It counts backwards and shows you the number of exposures still left on the film. On its dial there are three triangular marks, one each before the numbers 36, 20 and 12. According to the length of the film loaded the appropriate triangle should be set against the fixed mark. This is done by turning the small milled wheel beneath the counter dial with your finger, but only in the direction of the arrow.

natural_image
Close-up of hands holding a vintage camera against a yellow background (no visible text or symbols)When loading the camera, the start of the film is wasted by exposure to light and so you must first make two blank exposures before starting to photograph.
Film transport
Operate the rapid transport lever with your thumb, swing it forward as far as it will go and let it return.

natural_image
Close-up of hands holding a vintage camera against a yellow background (no visible text or symbols)Then press down the magic release lever as far as possible. Repeat this
procedure—swivel the rapid transport lever round to the stop and operate release lever—until the number 36, 20 or 12 is opposite the fixed mark, according to the length of the film.
If the rapid transport lever will not move, the release lever will first have to be pressed. The release and film transport mechanism are fitted with a lock to avoid double and blank exposures.
Should you inadvertently release the rapid transport lever too soon, it returns to its starting position and must then be pushed forward again as far as possible.
Note! The disc of the rewind crank usually rotates as the film is transported. Care must therefore be taken to ensure free movement.
Your camera is now ready for use.
Wait
You must first set the speed of the film on your camera in order to be sure of correctly exposed photographs. The milled disc can be turned in both directions and should be set

by means of a coin until the triangle is in line with the appropriate DIN or ASA number.
Fully automatic photography is possible with the Agfa Optima I a using all types of film from 11 to 25 DIN or 10 to 250 ASA.
Focusing
Three symbols facilitate snapshot setting. Depending on the subject, you should set the black index mark to one of the three symbols.
If necessary, of course, you can set the triangular mark to any position between two symbols.

natural_image
Close-up of a mechanical gear or cam mechanism with no visible text or symbols
Average subject distance
Close-ups 6 ft. (1.80 m.)

There is no need to set the focusing symbols absolutely exactly because under reasonably good lighting conditions the automatic lens stop and shutter speed control increases the effective focusing range to a much greater extent than indicated by the figures given here.
If you wish to approach closer to your subject turn the lens mount until the 3½ ft. (1 m.) setting is in line with the black mark.

natural_image
Three-panel illustration of a person adjusting a camera, shown in different angles (no text or symbols)View your subject ...
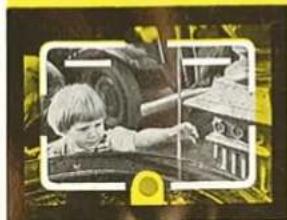
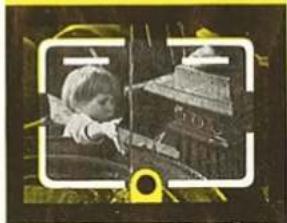
When photographing it is important to hold the camera steady. You should therefore take your Optima I a in both hands and brace your arms against your body. When you look through the viewfinder you will see a luminous frame which surrounds the subject and shows you the exact picture area. For close-ups (3½ ft./1 m), the two small lines in the upper third of the viewfinder form the upper or side limits of the picture area. The adjacent illustrations show you the correct position for taking vertical or horizontal photographs.
Note Make sure that the letter A is visible in the small upper window (see also first cover page). Otherwise turn the large milled ring until the letter A appears in the window, thus ensuring that the camera operates fully automatically.
To enable the built-in exposure meter to adapt itself to the prevailing lighting conditions, the Optima Ia should be held absolutely steady for about 1 second when lining up the subject.—Only then ...
natural_image
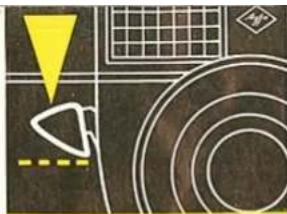
Abstract geometric pattern with concentric circles, diagonal lines, and a yellow triangle on black background (no text or symbols)- Press down magic release lever to pressure point.
- When green signal appears, "all clear" for the exposure.
- Then press down the magic release lever as far as pos-
natural_image
Black-and-white photo of a child interacting with a vehicle, surrounded by foliage (no visible text or symbols)
natural_image
Abstract geometric design with concentric circles, a yellow warning triangle, and grid pattern (no text or symbols)sible without changing the position of the camera.
- If the signal stays red, stop—there is not enough light, remove your finger from the release lever.
natural_image
Black-and-white photo of a child in a car, viewed through a window frame (no visible text or symbols)Without the automatic mechanism
If the signal stays red on reaching the pressure point this means that there is not enough light. In this case you can use a flashgun as follows:
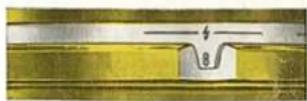
Disconnect the automatic mechanism. Turn the rear milled ring to the flash scale ( 12 ), the lens stop will then appear in the small window. The correct lens stop settings can be obtained from the instructions printed on the flash bulb package (note film speed).
With the Optima I a flashgun with a foot contact should be used (e.g. Agfa Isi M or Agfa Tully M). The contact with the camera shutter is made by simply sliding the flashgun into the accessory shoe (see main illustration 6).
When connecting an electronic flash-gun with cable, the use of the Agfa adapter, type 6793, will be necessary. The lens stop can be calculated from the guide number of the flashgun, e.g. guide number 96 divided by a distance of 12 feet = aperture f/8. When the automatic mechanism is disconnected the red or green signal, although visible in the viewfinder, should be disregarded.
Time exposures
By these are meant longer exposure times from 12 to several seconds which are used for motionless objects such as reproductions of pictures, documents, postage stamps or for night photography. Turn the automatic mechanism ring to B and set the window opposite the required lens stop (e.g. f/11 in the illustration).
The shutter will then stay open as long as the release lever is depressed. The use of a tripod and cable release is indispensable due to the risk of camera shake. The cable release socket is on the top of the camera.
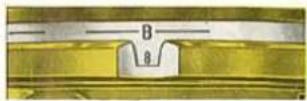
We repeat:
When the automatic mechanism is disconnected the red or green signal, although visible in the viewfinder, should be disregarded.
Do not forget that, in order to make subsequent exposures automatically, the letter A must be reset in the window.

natural_image
Close-up of hands holding a vintage camera with adjustment knobs and a scroll wheel (no visible text or symbols)Rewinding the film
After the last exposure, the counter will indicate one dash before zero and the rapid transport lever cannot usually be moved. The film now has to be rewound into its light-tight cassette by means of the rewind crank.
First slide the locking key on the rear of the top plate of the camera in the direction of the arrow. Then raise the crank with your fingernail and fold out.

natural_image
Close-up of hands holding a vintage-style radio device against a yellow background (no visible text or symbols)Now turn the crank in the direction of the arrow. When the rewind crank turns much more easily, rewinding is complete and you can then open the camera. This is done by moving the catch on the base of the camera to "open" and then removing the camera
back. Put the cassette in its light-tight packing and mark it as exposed.
When inserting a new film, the locking key automatically returns to its original position.
Film Tips
Before loading your camera with film as described on pages 2 and 3 here are a few suggestions to help you in choosing the right film.
First of all there are Agfa Isopan F or Perutz 17. They have fine grain and good contour sharpness.
For sports photography the high-speed Agfa Isopan ISS or Perutz 21 are the right films.
Agfacolor films open up the world of colour to you. For more than 30 years these films have been great favourites due to their natural reproduction of pastel tints and bright colours alike. Their high speed has also made colour snapshots a reality.
For sharp, brilliant, realistic colour transparencies in daylight:
Agfacolor Reversal Film CT 18, or Perutz C 18.
For colour prints:
Agfacolor Negative Film CN 17 Universal or CN 17 Special.
From your mounted transparencies you can now have CT colour prints made on paper.
Filters
There is a variety of filters for black and white film available for use with the Agfa Optima Ia in screw mounts S of 35.5 mm. diam. As soon as a filter is used on the camera you will have to reduce the setting on the film speed scale accordingly.
Filters for your Optima I a for black and white photography
Reduce DIN
scale setting by
light yellow
medium yellow
yellow-green
1)
2} DIN
UV filter (ultra-violet)
no change
for special photo-
graphs with colour reversol film
Agfa Color Filter R 1.5
no change
Exposure hints
Where clear detail is required in photographs taken against the light, it is advisable to set the automatic mechanism to a film speed of about 3 DIN or its ASA equivalent less than that marked on the film package.
When photographing with reversal film, such as Agfacolor CT18, with an overcast sky, the setting on the DIN/ASA disc should be reduced by 2 DIN, in dull weather even by 3-4 DIN, e.g. instead of 18 DIN/50 ASA, 16 DIN/32 ASA or 14 DIN/20 ASA should be set. Do not forget to re-set the original film speed after the exposure has been made.
When a subject with high contrast has to be photographed and it is wished to obtain the correct exposure for an object which is small in comparison with its surroundings, it is advisable to take a close-up reading. Unless this is done, a photograph of a person in a light dress in front of a dark wood, for instance, could easily be over-exposed.
In such cases closely approach the subject with the camera and press down the release lever gently to the first pressure point. Hold the lever in this position and return to your original position to take the photograph.
Close-ups
It is interesting and well worth while photographing the wonders of the miniature world at distances of 16 to 28 inches (40—70 cm.). All you require
natural_image
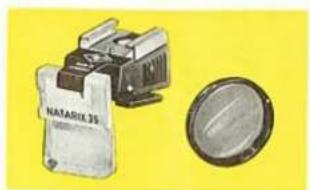
Illustration of a NATAK 35 camera module and a circular lens on a yellow background (no text or symbols)for this purpose is the Natarix close-up lens 35, Type 6713.
The fully automatic mechanism of your camera can still be used for close-ups of this kind if the green signal is visible in the viewfinder when the magic lever is pressed.
In such cases, however, it is not possible to regulate the depth of field which is dependent on the lens stop selected by the automatic control mechanism.
If you wish to photograph a subject sharply focused within a given range, you can select the depth of field yourself by choosing the appropriate lens aperture. Before doing this, the automatic mechanism should be disconnected and the shutter set to B or 12 symbol. At the B setting any length of exposure is possible (see page 11), at the 12 symbol setting you always photograph with a shutter speed of 1/30 sec. (see page 10).
At the B setting only completely motionless objects should be photographed with the camera on a tripod and using a cable release. At the 12 symbol setting, i.e. 130 sec., there is no need to use a tripod when the camera is held absolutely steady.
The correction wedge supplied with the Natarix close-up attachment ensures that the viewfinder image is free from parallax. When using a flashgun for close-ups the oblique setting of the shoe on top of the Natarix correction wedge makes certain that the object is properly illuminated.
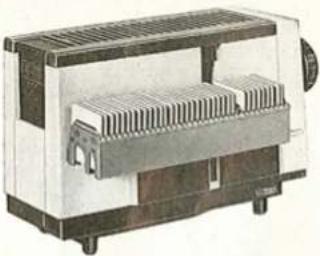
We recommend the Agfa Projector CP 150 or the attractively styled Agfa Diamator 100 magazine projector for showing your own colour slides. The fully automatic Agfa Diamator 150 projector incorporates genuine technical advances. During projection you can sit back in your easy chair and provide the necessary commentary whilst changing the slides and focusing the projector by remote-control.
natural_image
Cross-sectional illustration of a mechanical device with heat sinks and cooling fins (no text or symbols)Agfa Diamator 100
natural_image
Monochrome landscape photo of a calm lake with reeds and distant trees under a cloudy sky (no text or symbols)CONTENTS
Page
Loading the camera 2-3
Setting the film counter 4
Film transport 5-6
Setting the film speed 6
Focusing 7
View your subject/Holding the camera 8
Setting the automatic mechanism . . 8
Taking the pressure point green signal visible—release . . 8-9
Without the automatic mechanism (flash and time exposures) . . . 10-11
Rewinding the film 12
Film tips 13
Special exposure hints 14
Filters 14
Close-ups 15-16
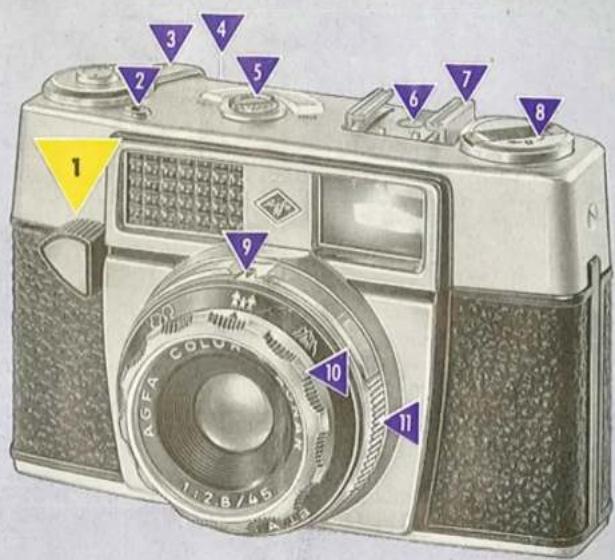
1 ▶ Magic release lever
2 ▶ Cable release socket
3 ▶ Rapid film transport lever
4 ▶ Locking key for film rewinding
5 ▶ Milled disc for setting film speed
6 ▶ Flash contact
7 ▶ Accessory shoe (for flashgun)
8 ▶ Rewind crank
9 Viewing window for automatic mechanism and lens stop
10 ▶ Focusing ring
11 ▶ Milled ring for selecting lens stop or automatic setting


Brand : AGFA
Model : Optima Ia
Category : Uncategorized