
RD-175 - Uncategorized MINOLTA - Free user manual and instructions
Find the device manual for free RD-175 MINOLTA in PDF.


| Product Type | Digital SLR Camera |
| Brand | Minolta |
| Model | RD-175 |
| Sensor Resolution | 1.75 megapixels (CCD) |
| Lens Mount | Minolta AF (A-type) |
| Viewfinder | Optical TTL |
| Flash | Built-in, pop-up |
| Storage Media | CompactFlash (CF) Type I/II |
| Image Format | JPEG |
| Connectivity | Serial (RS-232C), Video out (NTSC/PAL) |
| Power | 6x AA batteries (NiMH or Alkaline) |
| Battery Life | Approx. 50 shots per set |
| Dimensions | 170 x 100 x 70 mm (6.7 x 3.9 x 2.8 in) |
| Weight | 800 g (1.76 lbs) without batteries |
| Operating Temperature | 0–40 °C (32–104 °F) |
| Cleaning | Use dry soft cloth; avoid solvents |
| Safety | Do not disassemble; keep away from water |
| Spare Parts | Batteries, CF cards, cables (minimal availability) |
| Manual Language | English (original) |
Frequently Asked Questions - RD-175 MINOLTA
User questions about RD-175 MINOLTA
0 question about this device. Answer the ones you know or ask your own.
Ask a new question about this device
Download the instructions for your Uncategorized in PDF format for free! Find your manual RD-175 - MINOLTA and take your electronic device back in hand. On this page are published all the documents necessary for the use of your device. RD-175 by MINOLTA.
USER MANUAL RD-175 MINOLTA
This Manual describes neither the procedure for operating your PC nor the procedure for operating the image-editing software which you use. Working with the Twain module for the RD-175 Digital Camera does require a basic knowledge of how to use a PC and the image-editing software used. Please refer to your PC's User Manual or the User Manual supplied with your image-editing software.
MS, Microsoft, MS-DOS and Windows are registered trademarks of Microsoft Corporation.
Adobe Photoshop is a registered trademark of Adobe Systems Inc.
Other trade names and product names are also registered trademarks.
USER LICENCE AGREEMENTS
Please read through the terms below carefully before you use the enclosed product. By using the product, you will have agreed to be bound by the terms of this agreement. Should you not agree with the terms, please return the unopened package immediately.
This agreement is a licence agreement and not a purchase contract. MINOLTA owns the copyright to the microcode, the computer programs and coded fonts, including the bitmap font files and outline fonts, hereinafter referred to as a whole as "Software" contained in the product. Moreover, MINOLTA holds the licences to the corresponding copyrights of other copyright owners. The licensee shall not acquire rights of any nature to the software. MINOLTA or the aforesaid other copyright owners shall remain the owner(s) of the rights to the copy of the software contained in the package and any copy made thereof. You as licensee shall be solely responsible for selection for achieving the required results, installation, use and the results achieved with the software.
1. LICENCE
You as licensee shall be permitted:
- to install the software on a single computer and to use the software to reproduce and display the weight, font and style of letters, numbers, special characters and symbols;
- to make one regular and intentional copy of the software and use this solely for back-up or installation purposes. In this case, the licensee undertakes to attach the information on copyright and trademarks contained on the software to the copy accordingly;
-
to transfer ownership of copies of the software to third parties by transferring this agreement and the other, related written material and at least one full copy of the software if the following conditions are fulfilled:
3.1 if all other copies of the software of the initial licensee are transferred to the third party or these copies are destroyed at the same time;
3.2 if the licence agreement between the initial licensee and MINOLTA is announced on transfer of ownership and
3.3 if the third party acknowledges these licence terms on first use of the software and undertakes to comply with the corresponding contractual obligations; -
to use the trademarks present on the software and the corresponding note relating to the name of the trademark owner solely within the framework of the recognised practice for handling trademarks.
2. RESTRICTIONS
The licensee shall be permitted to do the following only with the written consent of MINOLTA:
- to use, create, or modify copies of the software, to integrate copies of the software with other software or to transmit copies of the software for purposes other than those expressly stated in this agreement,
- to disassemble or decompile the software, subject to a legal provision to the contrary or
- to rent, lease or transmit the software or a copy thereof or to grant a sublicence.
3. LIMITED LIABILITY
The individual liability terms and restrictions in respect of the hardware used to run the software are listed in the Warranty Terms. These Warranty Terms were supplied with the hardware or are available from MINOLTA or authorised dealers. MINOLTA grants 6 months warranty, as of the date of delivery to the initial licensee, on all software on hard disks or diskettes. No other liability shall be assumed for the software apart from this warranty on hardware and media. The software is delivered in the condition in which it was handed over.
These warranties apply in place of any other express or implied warranties, including - but not restricted to - the warranty implied in law in respect of use and suitability of the software for a specific purpose.
4. OTHER WARRANTIES EXCLUDED
On no account shall MINOLTA be liable for loss of prospective profits, loss of possible savings, consequential damage or loss incurred incidentally during use or other consequential damage or loss even if MINOLTA or the authorised dealers has or have been informed of such possible damage or loss. Neither shall MINOLTA be liable for licensee claims resulting from third-party claims.
5. STANDARD TERMS AND CONDITIONS
The licensee may terminate the licence agreement at any time by destroying all copies of the software or by following other, corresponding provisions of this agreement. MINOLTA may terminate the licence agreement with the licensee if the licensee does not comply with these terms. In such cases, the licensee undertakes to destroy all copies of the software.
Any attempt to rent, lease or transmit a copy of the software for purposes other than the purposes expressly specified herein or to grant a sublicence shall be null and void. The licensee hereby acknowledges that he shall be liable for any personal damage or loss incurred as the result of this agreement.
Notwithstanding the nature of the claims, rights resulting from this agreement may be asserted only within a period of two years subsequent to occurrence of the claim. A period of 4 years shall apply in the event of violations of the provisions in the section entitled “Licence”.
For the rest, the law of the Federal Republic of Germany shall apply to this agreement.
6. NATIONAL PROVISIONS
In certain countries, warranty and liability restrictions in respect of damage and loss incurred incidentally or consequential damage and loss constitute a violation of existing legislation. In this case, the aforesaid restrictions shall not apply to the licensee.
DESCRIPTION OF THE APPLICATION SOFTWARE FOR WINDOWS
2. SYSTEM REQUIREMENTS 9
3. PREPARING THE RD-175 DIGITAL CAMERA 10
3.1 SELECTING THE SCSI ID 10
3.2 SETTING THE POWER SUPPLY FOR THE TERMINATOR 11
3.3 INSERTING THE PC CARD 12
4. PREPARING THE PC 13
5. CONNECTING THE RD-175 DIGITAL CAMERA TO THE PC 15
6. USING THE SOFTWARE 16
6.1 SELECTING THE SOURCE 16
6.2 DISPLAYING THE IMAGES STORED ON THE PC CARD 17
6.3 SAVING DISPLAYED IMAGES ON YOUR PC'S HARD DISK 18
6.4 COPYING DISPLAYED IMAGES TO YOUR PC'S HARD DISK 19
6.5 OPENING AND SAVING IMAGES STORED IN MINOLTA FORMAT 21
6.6 DELETING IMAGES FROM YOUR PC'S HARD DISK 22
6.7 DELETING IMAGES FROM THE PC CARD 23
6.8 SETTING THE CAMERA FUNCTIONS WITH THE PC 24
6.8.1 Setting exposure compensation 24
6.8.2 Setting the system time of the RD-175 26
6.8.3 Initialising the PC card 27
6.9 Quitting the software 29
7. DISCONNECTING THE CAMERA FROM THE PC 30
8. ERROR MESSAGES 31
8.1 NO HOST ADAPTER 31
8.2 DEVICE NOT READY 31
8.3 FILE ERROR! CANNOT FIND WINASPI.DLL 32
8.4 HDD CARD NOT READY 32
8.5 IMAGE INFORMATION UNAVAILABLE 33
1. BRIEF OVERVIEW
The software for the RD-175 Digital Still Camera allows you to:
• View images stored on the PC card
- Copy these images to the hard disk, store them on the hard disk and also delete them again from the hard disk
- Delete images from the PC card
- Set digital camera functions via the computer:
- Selecting exposure compensation
- Resetting the clock in the RD-175
- Initialising the PC card
2. System requirements
The system requirements for running the software are as follows:
- A personal computer with 80486DX2 processor or higher
- 16 MB RAM
• 30 MB available hard disk space - Mouse for Windows 3.1
• Colour monitor for Windows 3.1
• MS-DOS for Windows 3.1 - TWAIN-compliant, digital image-editing software
THIS SOFTWARE IS NOT COMPATIBLE
WITH WINDOWS 95
3. Preparing the RD-175 Digital Camera
3.1 Selecting the SCSI ID
The RD-175 Digital Camera is set at the factory to SCSI ID 6 but may be set to another ID if necessary:
① Press the MODE key on the camera and keep it pressed.
② Slide the master switch to ON. If the master switch was already set to ON, slide it back to LOCK, wait 30 seconds and then slide it back to ON.
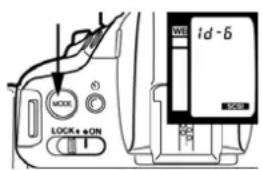
You will see "SCSI" at the bottom right on the display. The SCSI ID is shown at the top on the display. If SCSI ID 6 is not yet in use by another device, please skip the steps below.
③ Keeping the MODE key pressed, switch the SCSI ID to an ID setting not yet used with the function selector (thumbwheel beneath the shutter release).
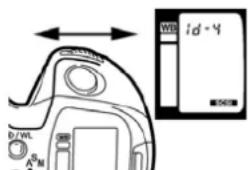
④ Release the MODE key. You have now set the SCSI ID.
3.2 Setting the power supply for the terminator
The RD-175 Digital Camera features only one SCSI port and is thus always the last device in the SCSI chain. The power supply for the terminator is provided by the computer if the computer is a desktop PC. If you use a laptop, please note the following information so that the power can be supplied to the terminator via the internal battery:
① Press the MODE key and keep it pressed.
② Slide the master switch to ON. If the master switch was already set to ON, slide it back to LOCK, wait 30 seconds and then slide it back to ON.
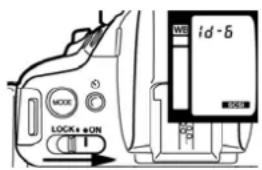
You will see "SCSI" at the bottom right on the display. The SCSI ID is shown at the top on the display.
③ Keeping the MODE key pressed, press the Program-Select key (P)
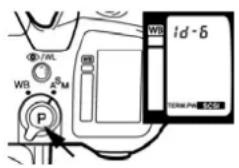
The terminator power supply is shown on the display
④ Release the MODE key. Power is now supplied to the terminator via the internal battery. Please follow precisely the same procedure in order to switch the power supply back to your PC.
3.3 Inserting the PC card
Slide the PC card into the card slot as specified in the instructions on Page 27 of the User Manual for the RD-175 Digital Camera.
4. Preparing the PC
① Install MS-DOS, Windows and the TWAIN-compliant image-editing software (e.g. Adobe Photoshop, Corel Photopaint etc.) on your computer.
② Install an ASPI-compatible SCSI board. We recommend Adaptec SCSI controllers of Series 1520/1522 or 1540/1542.
ISA-bus computers do not support more than 16 MB RAM. Should you be using an Adaptec ISA controller of Series 1540/1542 with the RD-175 Digital Camera, please ensure that the amount of RAM installed is not greater than 16 MB since your system would otherwise not work correctly.
Please make the following settings for the SCSI host adapter, depending on the SCSI ID which you have selected for connecting the camera, before you connect the RD-175 Digital Camera to your computer:
"Initial Sync Negotiation" - OFF
"Enable Disconnection" - OFF
Please consult the Manual for the SCSI controller if necessary in order to make these settings.
③ Check that your Windows directory contains file "TWAIN.DLL".
④ Check that your Windows "SYSTEM" subdirectory contains file "WINASPI.DLL".
⑤ Check that the correct pointer to the SCSI controller has been entered in line 1 of "config.sys": DEVICE=C:\SCSI\ASPI"x"DOS.SYS, where "x" will depend on the version of the DOS operating system and the controller which you are using, e.g. 2 or 4, i.e. DEVICE=C:\SCSI\ASPI4DOS.SYS. Normally, this pointer is entered automatically if you have installed the software for the controller with the Adaptec kit.
⑥ Copy file "RD-175.DS" from the supplied diskette to the TWAIN subdirectory which is a subdirectory of the Windows directory. Create a TWAIN directory if it does not already exist.
⑦ When you have made all necessary settings, switch off your computer before you connect the RD-175 Digital Camera.
5. Connecting the RD-175 Digital Camera to the PC
① Switch off the camera by sliding the master switch to LOCK.
② Switch off your PC and all connected devices.
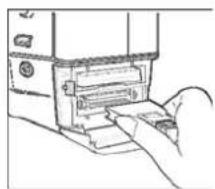
③ Open the cover on the RD-175's card slot. Plug the plug (half-size, 50-pin) onto the socket connector.
natural_image
Line drawing of a hand inserting a device into a device (no text or symbols visible)The plug is locked in position.
Connect the other end of the cable to your PC's SCSI port. If you have also connected other SCSI devices to your PC, connect the cable to the last device of the SCSI chain.
The RD-175 Digital Camera may be used only with the original interface cable. Using other cables may mean that your system no longer applies with applicable EMC regulations *.
④ Now switch the RD-175 to SCSI mode by setting the master switch to ON whilst keeping the MODE key pressed (see also Chapter 3).
⑤ First switch all other SCSI devices on - if any are present - so that they are detected when your PC is booted and so that the RD-175 is also detected as the last device in the SCSI chain.
⑥ Now switch on your computer and check that the RD-175 camera has been detected by your PC.
6. Using the software
6.1 Selecting the source
You will need TWAIN-compliant image-editing software (e.g. Adobe Photoshop, Corel Photopaint etc.) on your computer in order to be able to view and save the digitally stored images on the MINOLTA RD-175's PC card.
① Launch your software and choose the "Fetch Image" or "Import" command from the File menu and choose "Select Source".
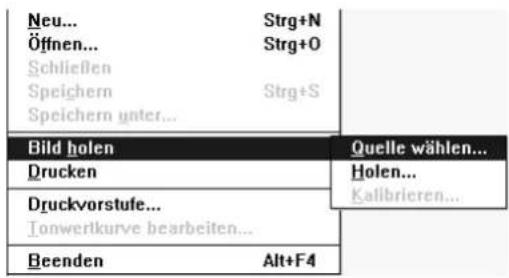
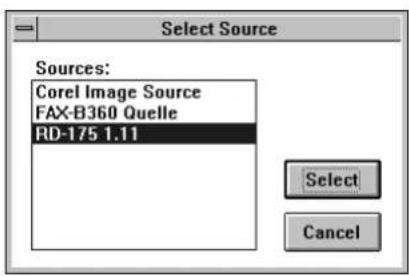
② Select the RD-175 driver.
6.2 Displaying the images stored on the PC card
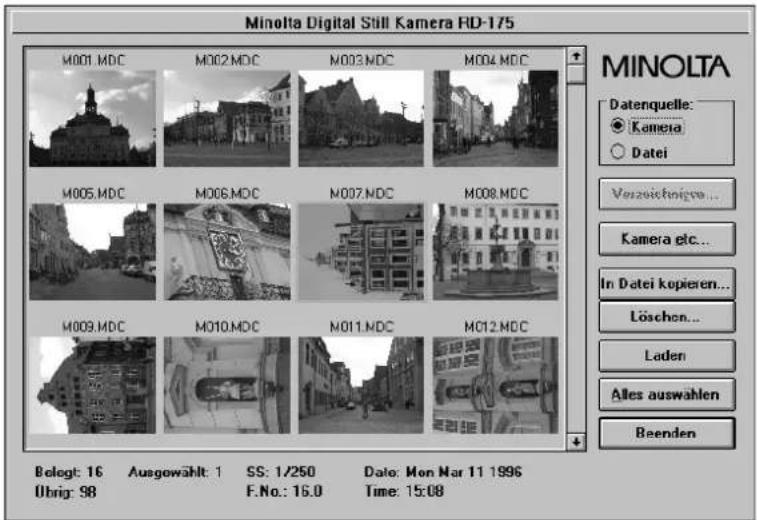
① Choose the "Fetch Image" or "Import" command from the File menu again and then choose "Fetch". You will now see the main menu window of the MINOLTA Digital Still Camera RD-175:
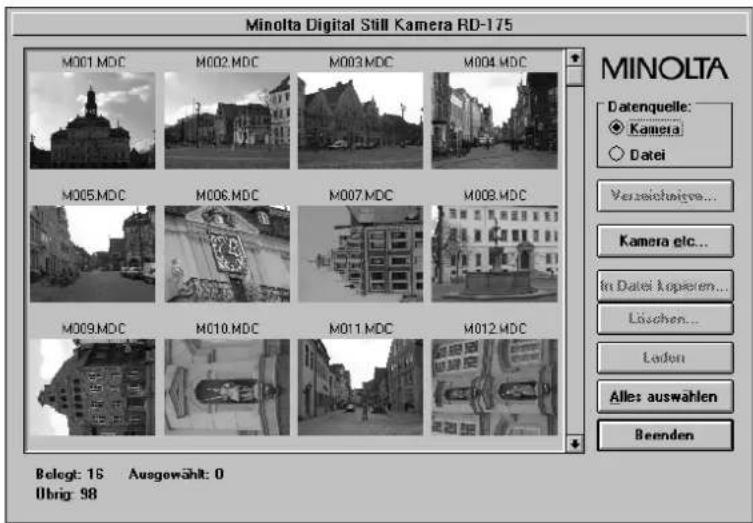
In the lower area of the main menu window, you will see the number of used images and free images on the PC card.
The number of images displayed will depend on the size of the connected monitor and the number of images recorded.
If there are more images stored on the PC card, you can scroll to them by clicking on the scroll arrows.
6.3 Saving displayed images on your PC's hard disk
① Click on the required image - it will then be displayed with a border. The related aperture setting (F No.) and shutter speed (SS) in addition to the date and time of the recording are displayed in the lower area of the window.
② Choose "Load". Loading progress is displayed during loading.
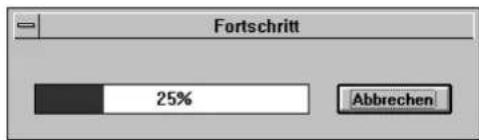
The image is then opened in your image-editing program and you can then save it and edit it further with the "Save As..." command.
6.4 Copying displayed images to your PC's hard disk
You can copy a single image, several images or all images on the PC card to your PC's hard disk.
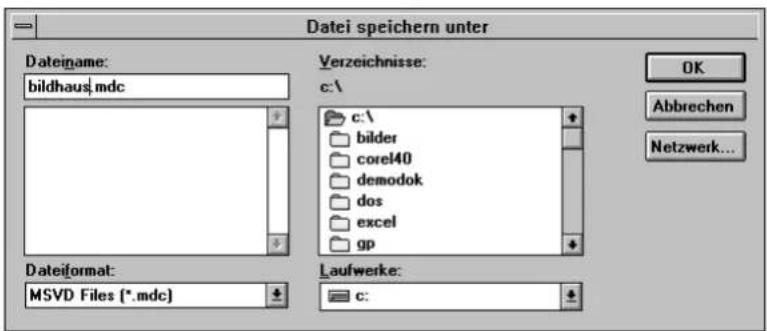
The copied image is saved in Minolta's own file format indicated by the file name extension ".mdc". The image can be neither displayed nor opened without the RD-175 TWAIN module. These files can only be renamed, moved, copied and deleted.
① Mark one or more images (by holding the Shift key) or click on "Select All" in order to select all images. Now click on the "Copy to File..." button.
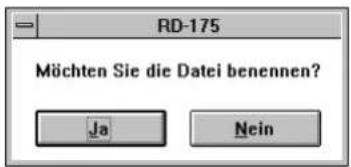
② By default, the images are numbered consecutively in the order of the recordings, starting with file "m001.mdc". If you choose "No", the images are saved with precisely this file name. You may choose only the destination directory.
③ You may also name the individual images in order to better distinguish between them. If you choose "Yes", you can select the file name and destination directory.
6.5 Opening and saving images stored in Minolta format
Please proceed as follows in order to open the images stored on your PC's hard disk in Minolta's own format (.mdc):
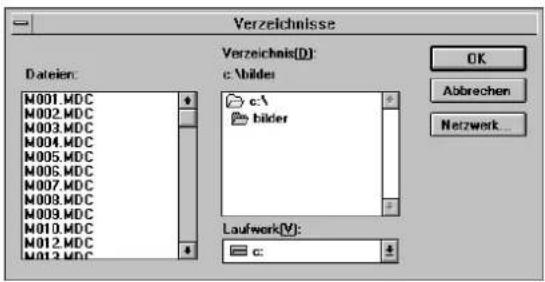
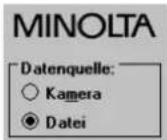
① Choose "File" under Input at the top right in the main menu window and then click on the "Directories..." button.
② In the dialogue window, choose the corresponding directory in which the images are located.
![Verzeichnisse Datein: M001.MDC M002.MDC M003.MDC M004.MDC M005.MDC M006.MDC M007.MDC M008.MDC M009.MDC M010.MDC M012.MDC M013.MDC Verzeichnis[0]: c:\Bilder c\ bilder Laufwerk[V]: c:](/content/2026/05/856285/images/fa8fc2793f5a4b71462b5cfa496d56561d4043ee126dc6b644f83891402b5c59.jpg)
All images located in this directory are displayed to you in the main window.
③ Please proceed as described in Point 6.3 (Page 18) when editing and saving the images.
6.6 Deleting images from your PC's hard disk
You may also delete individual images, several images or all images stored on your PC's hard disk in Minolta's own format (.mdc) with the aid of the TWAIN module.
① Choose "File" under Input at the top right in the main menu window and then click on the "Directories..." button.
② In the dialogue window, choose the corresponding directory in which the images to be deleted are located. You will then see an overview of the images.
③ Mark the image which you wish to delete by clicking on it. If you wish to delete several images, keep the Shift key pressed when marking. Click on the "Select All" button in order to delete all images. The selected images are then displayed with a border.
④ Click on the "Delete..." button. You will now see the following dialogue box.
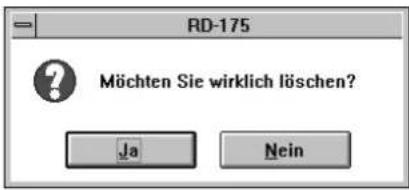
⑤ Choose "Yes" if you wish to delete the images. Choose "No" if you wish to abort the delete operation. If the operation is quit or aborted, you will see the main menu window again.
6.7 Deleting images from the PC card
You may delete individual images, several images or all images from the PC card with the aid of TWAIN module.
It is not possible to recover deleted images. You should thus proceed with great caution.
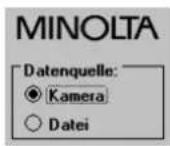
① Open the main menu window and choose "Camera" at the top right under Data Source.
② Mark the image which you wish to delete by clicking on it. If you wish to delete several images, keep the Shift key pressed when marking. Click on the "Select All" button in order to delete all images. The selected images are then displayed with a border.
③ Click on the "Delete" button. You will now see the following dialogue box.
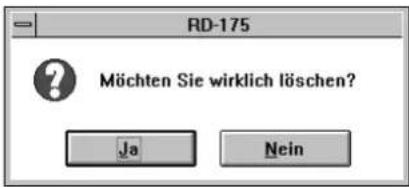
④ Choose "Yes" if you wish to delete the images. Choose "No" if you wish to abort the delete operation. If the operation is quit or aborted, you will see the main menu window again.
6.8 Setting the camera functions with the PC
6.8.1 Setting exposure compensation
You can set exposure compensation (from +3.0 to -3.0) for difficult lighting conditions either via the PC or on the camera itself. Please refer to the User Manual for the Minolta Digital Camera RD-175 (Chapter 8.5, Page 40) if you wish to set exposure compensation on the camera itself.
① Open the main menu window and choose "Camera" under Data Source at the top right.
② Click on the "Camera etc..." button. You will now see the "RD-175 Control" window:
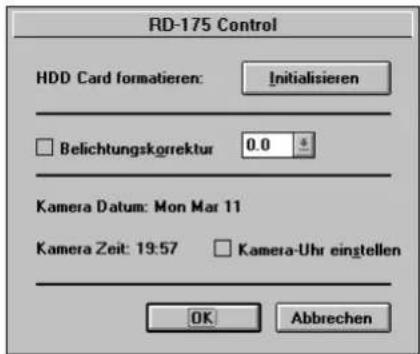
③ Check the box next to "Exposure Compensation" with an "X" and choose the required compensation setting for the exposure from the drop-down list box.
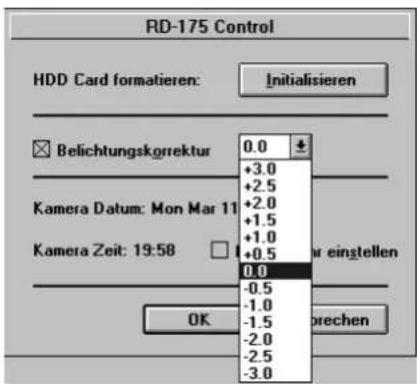
④ Click on "OK" - the exposure compensation value which you have selected is now stored in the camera.
6.8.2 Setting the system time of the RD-175
The system time can be transferred from PC to the RD-175 camera.
Before making the following settings, please ensure that "Date/Time" is correctly set on your PC in Control Panel.
① Open the main menu window and choose "Camera" under Input at the top right.
② Click on the "Camera etc...." button
③ In the bottom third of the "RD-175 Control" window, you will see the settings for the recording date (camera date) and the camera time currently stored in the camera.
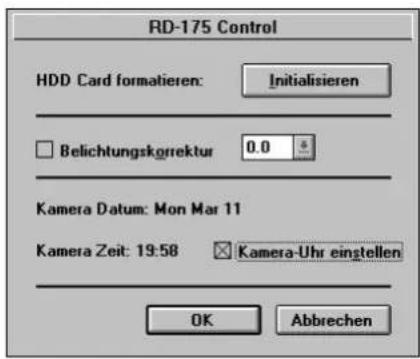
④ Check the box next to "Set Camera Clock" with an "X".
⑤ Choose "OK" - the PC's system time is now transferred to the RD-175.
If an incorrect creation date for the images is displayed in the main menu window, you must replace the battery block. Please refer to the User Manual for the MINOLTA Digital Camera RD-175 for the procedure.
After replacing the battery block, you must re-enter the camera's system time.
6.8.3 Initialising the PC card
PC cards which are not standard accessories must be initialised.
If you use PC cards which are not standard accessories, please ask your MINOLTA dealer for details.
① Remove the PC card and insert the PC card to be initialised (you will see "Er" for error on the camera display if the PC card is not yet formatted).
② Open the main menu window. You will see the following message if the PC card has not yet been initialised by the RD-175:
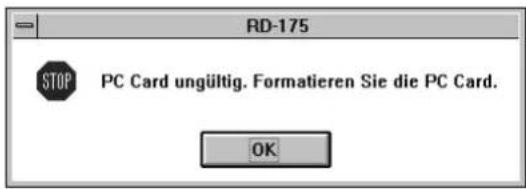
③ Click on "OK". The blank main menu window is now opened.
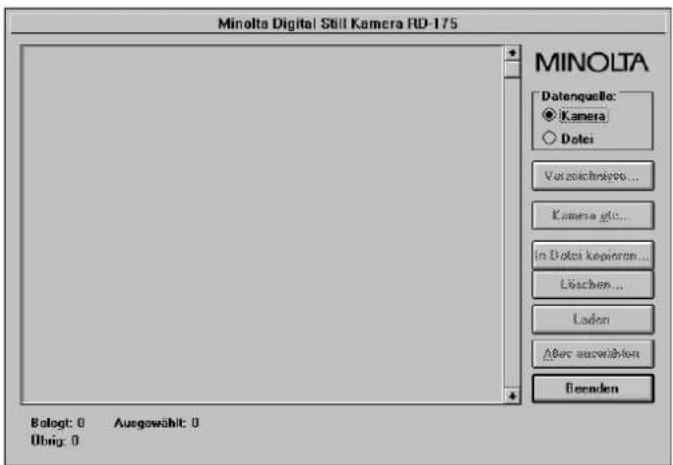
④ Click on the "Camera etc..." button
⑤ Click on the "Initialise" button next to "Format HDD Card" in the top third of the "RD-175 Control" window.
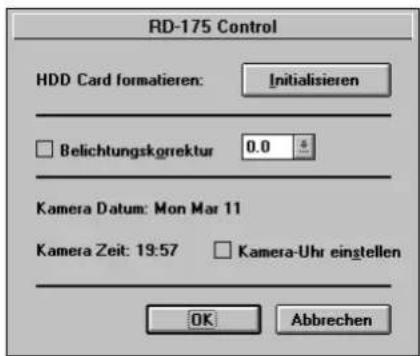
You will see the following warning before initialisation commences:
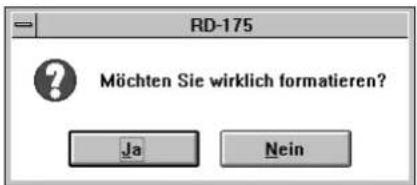
⑥ If you really do wish to initialise the PC card, please choose "Yes". Choose "No" if you wish to abort initialisation.
Click on "OK" if the operation has been quit or aborted. You will now see the main menu window again (the number of free images is displayed on the camera display).
6.9 Quitting the software
Click on the "Quit" button at the bottom right in order to quit the main menu window of the RD-175's TWAIN module. You will see the following warning before you quit the program:
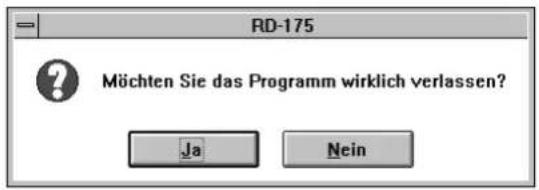
You can then quit your image-editing program as normal.
7. Disconnecting the camera from the PC
① As is the conventional procedure for all SCSI devices, you should switch off your PC first before disconnecting the cable which links the camera to the PC.
② After this, switch off the camera and then, not before, disconnect the SCSI cable from the camera's socket.
③ Connect the camera again only with the PC switched off (cf. Chapter 5, Page 12).
8. Error messages
You may see the following error messages when you are working with the program:
8.1 No host adapter
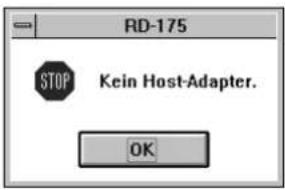
It is not possible to establish a link between the SCSI controller and the camera.
- Check that you have fully installed the software for your SCSI controller.
- Check that the driver is loaded when you boot your PC.
- Check that the correct pointer to the SCSI controller has been added to line 1 of "config.sys" (cf. Page 13, Chapter 4).
8.2 Device not ready
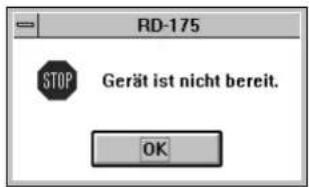
The camera is not being detected.
- Check the camera's power supply/battery voltage.
- Check that the camera is switched on and is in SCSI mode (cf. Chapter 3).
8.3 File error! Cannot find WINASPI.DLL
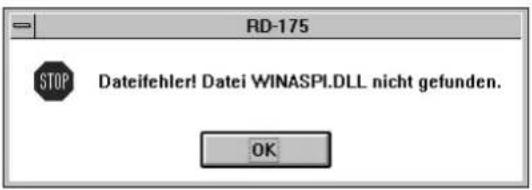
File WINASPI.DLL has not been found.
- Check that the driver is installed in the "TWAIN" subdirectory which is a subdirectory of the Windows directory (cf. Page 13, Chapter 4).
8.4 HDD card not ready
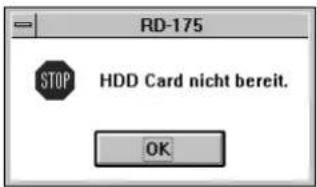
The PC card has not been detected.
- Check that the PC card has been inserted correctly in the slot of the RD-175 and is locked correctly in position (cf. Page 27 of the User Manual for the RD-175 Digital Camera).
8.5 Image information unavailable
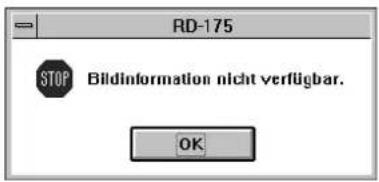
It has not been possible to read the image information.
- Check the cable connections (cf. Chapter 5).
- Check that the PC card has been inserted correctly in the slot of the RD-175 and is locked correctly in position (cf. Page 27 of the User Manual for the RD-175 Digital Camera).
Minolta GmbH, Business Equipment Operations, Minoltaring 11, D-30855
Langenhagen
- USER LICENCE AGREEMENTS
- LICENCE
- RESTRICTIONS
- LIMITED LIABILITY
- OTHER WARRANTIES EXCLUDED
- STANDARD TERMS AND CONDITIONS
- NATIONAL PROVISIONS
- DESCRIPTION OF THE APPLICATION SOFTWARE FOR WINDOWS
- SYSTEM REQUIREMENTS 9
- PREPARING THE RD-175 DIGITAL CAMERA 10
- PREPARING THE PC 13
- CONNECTING THE RD-175 DIGITAL CAMERA TO THE PC 15
- USING THE SOFTWARE 16
- DISCONNECTING THE CAMERA FROM THE PC 30
- ERROR MESSAGES 31
- BRIEF OVERVIEW
- System requirements
- Preparing the RD-175 Digital Camera
- Selecting the SCSI ID
- Setting the power supply for the terminator
- Inserting the PC card
- Preparing the PC
- Connecting the RD-175 Digital Camera to the PC
- Using the software
- Selecting the source
- Displaying the images stored on the PC card
- Saving displayed images on your PC's hard disk
- Copying displayed images to your PC's hard disk
- Opening and saving images stored in Minolta format
- Deleting images from your PC's hard disk
- Deleting images from the PC card
- Setting the camera functions with the PC
- Setting exposure compensation
- Setting the system time of the RD-175
- Initialising the PC card
- Quitting the software
- Disconnecting the camera from the PC
- Error messages
- No host adapter
- Device not ready
- File error! Cannot find WINASPI.DLL
- HDD card not ready
- Image information unavailable
Brand : MINOLTA
Model : RD-175
Category : Uncategorized