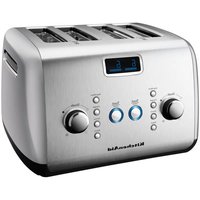
Artisan 5KMT423 - Toaster KITCHENAID - Free user manual and instructions
Find the device manual for free Artisan 5KMT423 KITCHENAID in PDF.


| Product Type | Toaster |
| Brand | KitchenAid |
| Model | Artisan 5KMT423 |
| Dimensions (approx.) | 29.5 x 19.0 x 21.5 cm (11.6 x 7.5 x 8.5 in) |
| Weight (approx.) | 2.9 kg (6.4 lb) |
| Power Supply | 220-240 V AC, 50 Hz (Brazil: 127 V AC, 60 Hz) |
| Number of Slots | 2 (extra-wide 3.8 cm) |
| Shade Settings | 7 levels (dial control) |
| Special Functions | Bagel, Defrost, Reheat, Keep Warm |
| Display | Digital LCD with progress bar |
| Self-Centering Racks | Yes |
| Interior Material | Steel |
| Exterior Material | Stainless steel and painted steel |
| Removable Crumb Tray | Yes, dishwasher-safe (top rack) |
| Cord Storage | Under-base cord wrap |
| Controls | Dial shade control, buttons for functions and cancel |
| Safety Features | Auto shut-off, grounded plug required, cool-touch exterior |
| Cleaning | Wipe exterior with damp cloth; do not immerse; crumb tray washable |
| Warranty | See KitchenAid warranty card (not specified) |
Frequently Asked Questions - Artisan 5KMT423 KITCHENAID
User questions about Artisan 5KMT423 KITCHENAID
0 question about this device. Answer the ones you know or ask your own.
Ask a new question about this device
Download the instructions for your Toaster in PDF format for free! Find your manual Artisan 5KMT423 - KITCHENAID and take your electronic device back in hand. On this page are published all the documents necessary for the use of your device. Artisan 5KMT423 by KITCHENAID.
USER MANUAL Artisan 5KMT423 KITCHENAID
natural_image
Black and white photo of a modern toaster with digital display and control knobs (no visible text or symbols)
natural_image
Exterior view of a modern kitchen toaster with digital display and control knobs (no visible text or symbols)
Your safety and the safety of others are very important.
We have provided many important safety messages in this manual and on your appliance. Always read and obey all safety messages.

This is the safety alert symbol.
This symbol alerts you to potential hazards that can kill or hurt you and others.
All safety messages will follow the safety alert symbol and either the word "DANGER" or "WARNING." These words mean:
! DANGER
You can be killed or seriously injured if you don't immediately follow instructions.
WARNING
You can be killed or seriously injured if you don't follow instructions.
All safety messages will tell you what the potential hazard is, tell you how to reduce the chance of injury, and tell you what can happen if the instructions are not followed.
ImpORTANT SAFEGUARDS
When using electrical appliances, basic safety precautions should always be followed, including the following:
- Read all instructions.
- Do not touch hot surfaces. Use handles or knobs.
- To protect against electrical shock, do not immerse cord, plugs, or toaster in water or other liquid.
- Close supervision is necessary when any appliance is used by or near children.
- Unplug toaster from outlet when not in use and before cleaning. Allow to cool before putting on or taking off parts.
- Do not operate any appliance with a damaged cord or plug or after the appliance malfunctions or has been damaged in any manner. Return appliance to the nearest Authorized Service Facility for examination, repair or adjustment.
- The use of accessory attachments not recommended by the appliance manufacturer may cause injuries.
- Do not use outdoors.
- Do not let cord hang over edge of table or counter, or touch hot surfaces.
- Do not place on or near a hot gas or electric burner, or in a heated oven.
- To disconnect, turn any control to "OFF," then remove plug from outlet.
- Do not use appliance for other than intended use.
- This appliance is not intended for use by persons (including children) with reduced physical sensory or mental capabilities, or lack of experience and knowledge, unless they have been given supervision or instruction concerning use of the appliance by a person responsible for their safety. Children should be supervised to ensure that they do not play with the appliance.
- Oversize foods, metal foil packages, or utensils must not be inserted in toaster as they may involve a risk of fire or electric shock.
- A fire may occur if toaster is covered with or touching flammable material, including curtains, draperies, walls and the like, when in operation.
- Do not attempt to dislodge food when toaster is plugged in.
- This product is designed for household use only.
SAvE THESE INSTRUCTIONS
Volts: 220-240 Volts AC only
Hertz: 50 Hz
(Brazil Only: 127 Volts AC / 60 Hz)
NOTE: To reduce the risk of electrical shock, this plug will fit in an outlet only one way. If the plug does not fit in the outlet, contact a qualified electrician. Do not modify the plug in any way.
Do not use an extension cord. If the power supply cord is too short, have a qualified electrician or serviceman install an outlet near the appliance.
A short power supply cord (or detachable power supply cord) should be used to reduce the risk resulting from becoming entangled in or tripping over a longer cord.
Longer detachable power supply cords or extension cords are available and may be used if care is exercised in their use.
If a longer detachable power supply cord or extension cord is used:
- The marked electrical rating of the cord set or extension cord should be at least as great as the electrical rating of the appliance.
- The cord should be arranged so that it will not drape over the countertop or tabletop where it can be pulled on by children or tripped over unintentionally.
If the appliance is of the grounded type, the extension cord should be a grounding-type 3-wire cord.
WARNING

Electrical Shock Hazard
Plug into a grounded outlet.
Do not use an adapter.
Do not use an extension cord.
Failure to follow these instructions can result in death, fire, or electrical shock.
Electrical Requirements for Brazil Only
WARNING

Electric Shock Hazard
Plug into a grounded 3-prong outlet.
Do not remove the ground prong.
Do not use with an adaptor or T.
Do not use with an extension cord.
Failure to follow these instructions could result in death, fire, or electric shock.
Residence mains:
The mains wires must be of copper with a minimum cross-section per ABNT (NBR-5410.)
To protect this appliance and the mains against over loading, this appliance must be connected to a circuit that is protected with a thermo-magnetic circuit breaker.
If the household circuit does not include a circuit breaker, contact an electrician to have one installed.
Electric outlet:
For your safety and to avoid damage to your product, it is very important that your product is earthed correctly.
Your appliance power cord features a 3-pin-shaped hexagon-shaped plug, 10A, per ABNT (NBR 14136).
Your residence electrical installation must have a suitable electric outlet for this type of plug. If not, it is your responsibility to have one installed by a qualified electrician.
Use appropriate outlet type for your appliance plug, as shown below:

Before operating this appliance, make sure the main voltage at the installation site is the same as indicated on product technical data label.

natural_image
Simple line drawing of an electrical outlet with a plug inserted (no text or symbols)This information is also included on the label attached to your appliance's cord near the plug.
IMPORTANT:
- If it is necessary to convert your 127V appliance to 220V, use a 1.0 KVA stabiliser.
- If it is necessary to convert your 220V appliance to 127V, use a 1.0 KVA stabiliser.
- Never plug your appliance into multi-plug adapters with another appliance in the same socket. Do not use an extension cord. This type

natural_image
Pure electrical circuit lines without any symbolsof connection may cause electrical overload in the mains, and can damage the appliance and could cause a fire. The appliance should be plugged into its own outlet.
- In case of oscillation in mains voltage, install an automatic voltage stabiliser with minimum rating of 1500 Watts between the appliance and the socket.
- If the cord of this appliance is damaged, it must be replaced. Contact your nearest authorized KitchenAid Customer Care Center.
KitchenAid™ Toaster Features

A. Dial shade control (7 settings)
B. Self-centering racks and steel interior
C. Extra-wide slots (3.8 cm)
D. Digital display
E. Toast/cancel button
F. Under base cord wrap
G. Special toasting functions
Feature not shown:
Removable crumb tray
Dual Independent Controls (4 Slot Model)

natural_image
Exterior view of a modern kitchen toaster with digital display and control knobs (no visible text or symbols)Same great features as 2 Slot Model with dual cavities for 2-slice or 4-slice toasting. One-Touch Buttons and Dial Knobs for each pair of slots work independently of each other, allowing toasting of a bagel or other item in one pair of slots while the second pair of slots could keep a pastry warm.
Heat System
Heavy gauge heating elements mounted on extra-thick boards are installed in the toaster to ensure even browning.
Extra-Wide Slots
Handles bagels, English muffins, and thick breads easily.
Self-Centering Bread Racks
Centers thick or thin breads perfectly for even toasting.
Removable Crumb Tray(s)
Durable, full-width, steel tray (two side-by side trays on 4 Slot Model) can be washed in the top rack of a dishwasher.
Under Base Cord Wrap
Keeps extra cord out of sight and out of the way.
Dial Shade Control
Rotating knobs for precision control. Turn the knob to the right for darker or to the left for lighter toasting.
Stylish Exterior
Stainless steel and painted steel surfaces are constructed for durability and style.
Steel Interior
Durable and deep toasting cavity helps to ensure even browning.
Special Toasting Functions

Digital Display
- Selected toasting shade and function are displayed.
- A toasting progress bar counts down the toasting time.
Keep Warm Button
Select to lower toasted foods to keep warm until you are ready, for up to a minute. The End-of-Cycle signal will beep and the toaster will shut off and raise the food.
Bagel Button
Toasts the cut-side of a bagel or English muffin while gently warming the outer surfaces.
Defrost Button
Defrosts and toasts frozen food.
Reheat Button
Quickly reheats previously toasted food in under a minute.
Toast/Cancel Button
Lowers the bread and starts or cancels the toasting cycle. A ring of light around the button illuminates when the heaters are actively toasting.
KitchenAid™ Toaster Use
Before using your toaster, check the Extra-Wide Slots and remove any packing or printed material that might have fallen inside during shipping or handling. Do not probe inside the toaster with a metal object.
You may see light smoke the first time you use the toaster. This is normal. The smoke is harmless and will soon disappear.
TO USE:
- Shorten cord, if necessary, by wrapping cord under the base. The toaster's feet are tall enough to allow the cord to exit from under any side of the toaster.

natural_image
Interior view of a device showing internal components and ventilation slots (no text or symbols visible)
natural_image
Interior view of a computer monitor case showing internal circuitry and ventilation slots (no text or labels)- Plug into a grounded outlet.
- Insert bread or other food to be toasted in slot.
NOTE: For even toasting on 2 Slot Models, toast only one bread type and thickness at a time. For 4-slot models, with Dual Independent Controls, if toasting of two different breads is desired, be sure to toast only one bread type in each pair of slots.

-
Press the TOAST/CANCEL button. The centering racks will adjust slot width automatically to hold food upright for even toasting. When toasting is completed, and End-of-Cycle signal will beep and the toaster will shut off and raise the toast.
-
Turn the Dial Shade Control to select the degree of darkness you want. Turn the Shade Control to the right for darker toasting or to the left for lighter. The LCD will display the shade level, from 1 (light) to 7 (dark).
NOTE: Different types of bread and their moisture levels may require different shade settings. For example, dry bread will brown more rapidly than moist bread and will require a lighter setting.
-
(Optional) Press desired special toasting function button. See the "Special Toasting Functions Use" section for more information.
-
To cancel toasting anytime, press TOAST/CANCEL. The toaster will shut off and raise the toast.
Special Toasting Functions Use
After you press TOAST/ CANCEL to begin toasting, you can select the special toasting functions by pressing the appropriate button. After a toasting cycle is complete, all functions will be cleared.
Bagel Toasting
Selecting the Bagel function will toast the thickest bagels and English muffins evenly, gently warming the bottoms while toasting the sides that are sliced. Bagel Toasting produces perfect results by shutting off power to the heating elements on one side of the toasting cavity.
- Insert the bagel so that the flat (sliced) side of the bagel faces the center of the toaster. See illustration.

natural_image
Simple illustration of a two-toned toaster with no text or symbols- Press the TOAST/CANCEL button.
- Set the Shade Control to the level you want. English muffins will generally take more time to toast than bagels.
- Press BAGEL.
To cancel, press TOAST/CANCEL. The toaster will shut off and raise the bagel.
To Defrost Frozen Items
The Defrost function will defrost and toast frozen items quickly.
- Insert the frozen item into bread slot. Use Defrost for frozen foods only.
- Press the TOAST/CANCEL button.
- Set the Shade Control to the level you want.
- Press DEFROST.
To cancel, press TOAST/CANCEL. The toaster will shut off and raise the food.
To Reheat Toasted Items
The Reheat function will reheat toast and other items quickly.
- Insert the previously toasted food into bread slot. Do not place food with butter or any other topping in the toaster. Use Reheat for dry foods only.
- Press the TOAST/CANCEL button.
- No Shade adjustment is necessary – the Reheat function overrides whatever Shade level you have set.
- Press REHEAT.
To cancel, press TOAST/CANCEL. The toaster will shut off and raise the food.
To Keep Toasted Items Warm
The Keep Warm function will keep toasted bread warm after toasting.
- Insert the previously toasted food into bread slot. Do not place food with butter or any other topping in the toaster. Use Keep Warm for dry foods only.
- Press the TOAST/CANCEL button.
- No Shade adjustment is necessary – the Keep Warm function overrides whatever Shade level you have set.
- Press KEEP WARM.
To cancel, press TOAST/CANCEL. The toaster will shut off and raise the food.
Toaster Care
- Unplug the toaster and let it cool before cleaning.
- Press and release the center of the crumb tray then slide it out. Shake the crumbs into a waste container. It is recommended that the crumb tray be emptied after each use. The crumb tray can be washed in the top rack of a dishwasher.
IMPORTANT: The tray will be hot immediately following a toasting cycle.

natural_image
3D rendering of a mechanical device with a labeled component (no visible text or symbols)- Wipe toaster with a soft, damp cotton cloth. Do not use paper towels, abrasive cleansers or liquid cleaning products. Do not immerse toaster in water.
NOTE: If grease or oil splatters on the toaster, wipe splatters away immediately using a clean, damp cotton cloth.
- Return crumb tray to toaster. Press it in firmly until it clicks into position. Do not use the toaster without the crumb tray in proper position.
NOTE: KitchenAid does not recommend the use of a toaster cover.
Troubleshooting
If your toaster should fail to operate, check the following:
- Check that the toaster is plugged into a proper electrical outlet. If it is, unplug the toaster.
- Plug in toaster.
- If the toaster still does not work, check the household fuse or circuit breaker.
If the problem cannot be corrected:
See the KitchenAid warranty and service sections. Do not return the toaster to the retailer; retailers do not provide service.
WARNING

Electrical Shock Hazard
Plug into a grounded outlet.
Do not use an adapter.
Do not use an extension cord.
Failure to follow these instructions can result in death, fire, or electrical shock.

- Your safety and the safety of others are very important.
- ! DANGER
- WARNING
- ImpORTANT SAFEGUARDS
- SAvE THESE INSTRUCTIONS
- Electrical Requirements for Brazil Only
- Electric Shock Hazard
- Residence mains:
- Electric outlet:
- IMPORTANT:
- KitchenAid™ Toaster Features
- Dual Independent Controls (4 Slot Model)
- Heat System
- Extra-Wide Slots
- Self-Centering Bread Racks
- Removable Crumb Tray(s)
- Under Base Cord Wrap
- Dial Shade Control
- Stylish Exterior
- Steel Interior
- Special Toasting Functions
- Digital Display
- Keep Warm Button
- Bagel Button
- Defrost Button
- Reheat Button
- Toast/Cancel Button
- KitchenAid™ Toaster Use
- TO USE:
- Special Toasting Functions Use
- Bagel Toasting
- To Defrost Frozen Items
- To Reheat Toasted Items
- To Keep Toasted Items Warm
- Toaster Care
- Troubleshooting
- If your toaster should fail to operate, check the following:
- If the problem cannot be corrected:
Brand : KITCHENAID
Model : Artisan 5KMT423
Category : Toaster