
First Spoon - Baby high chair Chipolino - Free user manual and instructions
Find the device manual for free First Spoon Chipolino in PDF.


| Type | Baby high chair |
| Brand | Chipolino |
| Model | First Spoon |
| Suitable for | Children from 6 months to 3 years (max 15 kg) |
| Safety harness | 5-point harness with adjustable straps |
| Backrest recline | 4 positions |
| Seat height adjustment | 7 positions |
| Leg rest adjustment | 2 positions |
| Feeding tray | Removable double tray, 4 positions forward/backward, upper part detachable |
| Toy bar | Included, attaches to base tray |
| Wheels | 4 swivel wheels with parking brakes |
| Storage basket | Included, attaches under seat |
| Foldable | Yes, for compact storage |
| Assembly | No tools required |
| Materials | Plastic, metal, fabric seat cover |
| Care instructions | Wipe clean with damp cloth and mild soap; do not use abrasive cleaners |
| Safety standards | EN 14988:2017+A2:2024, Directive 2001/95/EC |
| Weight capacity | 15 kg |
| Age range | 6 months to 3 years (child must sit unaided) |
Frequently Asked Questions - First Spoon Chipolino
User questions about First Spoon Chipolino
0 question about this device. Answer the ones you know or ask your own.
Ask a new question about this device
Download the instructions for your Baby high chair in PDF format for free! Find your manual First Spoon - Chipolino and take your electronic device back in hand. On this page are published all the documents necessary for the use of your device. First Spoon by Chipolino.
USER MANUAL First Spoon Chipolino
INSTRUCTION MANUAL FOR HIGH CHAIR „FIRST SPOON”
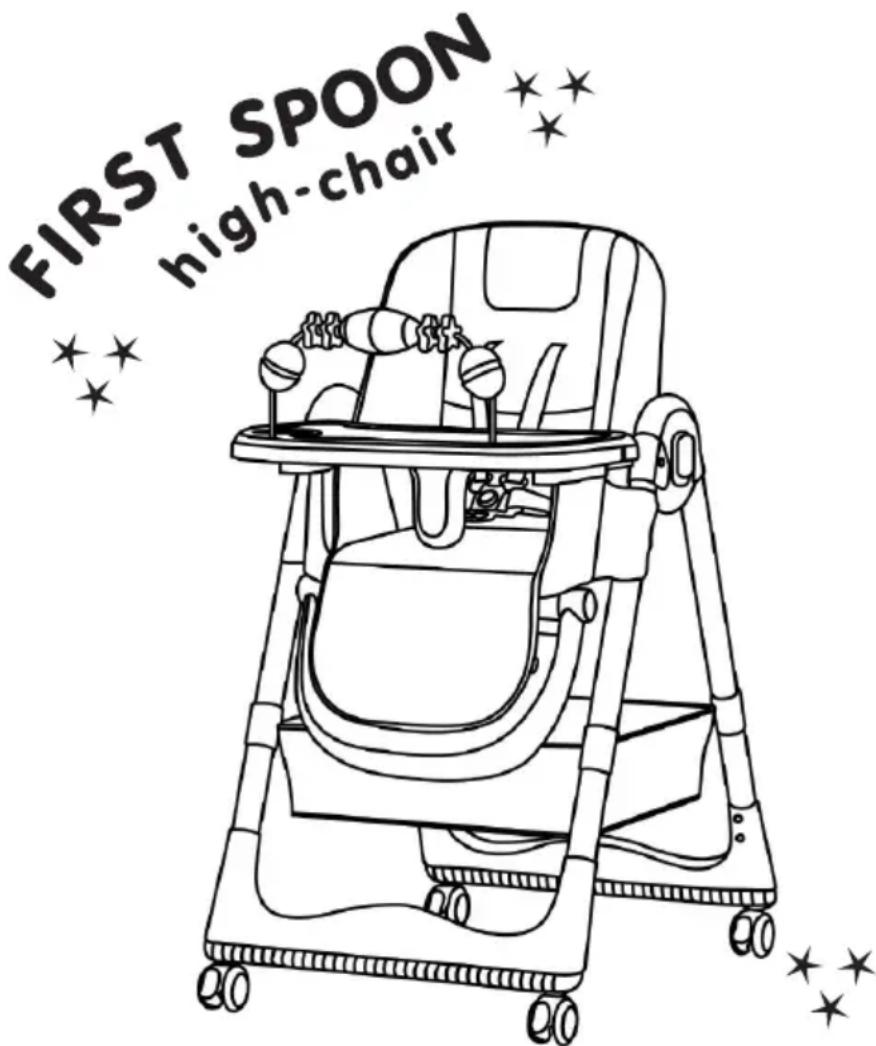
This high chair has been manufactured in accordance with the requirements of Directive 2001/95/EC of the European Parliament and of the Council and complies with European Standard EN 14988:2017+A2:2024 Children's high chairs. Safety requirements and regulations of the national legislation, as well as the Consumer Protection Law.
TO ENSURE THE SAFE USE OF THIS PRODUCT, FOLLOW THE WARNINGS, INSTRUCTIONS AND RECOMMENDATIONS IN THIS MANUAL:
CAUTION! NEVER LEAVE YOUR CHILD UNATTENDED!
✿ WARNING! THIS PRODUCT IS SUITABLE FOR CHILDREN, WHO CAN SIT ALONE UNAIDED, AGED UP TO 3 YEARS AND WEIGHING NO MORE THAN 15 KG.
✿ WARNING! ALWAYS USE THE SAFETY BELTS, WHEN THE CHILD IS IN THE CHAIR!
ALWAYS CHECK IF THEY ARE SECURELY FIXED TO THE HIGH CHAIR'S FRAME!
✿ WARNING! DANGER OF FALLING: DO NOT LET THE CHILD CLIMB ON THE PRODUCT!
✿ WARNING! DO NOT USE THE CHAIR UNTIL YOU MAKE SURE THAT ALL PARTS ARE IN GOOD ORDER AND ARE SET IN THE CORRECT POSITION!
✿ WARNING! KEEP THIS PRODUCT AWAY FROM FIRE! BE AWARE OF THE RISK OF OPEN FIRE AND OTHER HEAT SOURCES NEAR THE PRODUCT!
✿ WARNING! BE AWARE OF THE RISK OF THE PRODUCT TILTING, IF THE CHILD REACHES AND PRESSES WITH THE FEET OF A TABLE OR OTHER SOLID BASE.
- Assembly of the product to be done only by adult!
- Keep children away when unfolding and folding the product to avoid injury.
This high chair is not suitable and must not be used by children, who cannot sit unaided (minimum 6 months)!
This high chair must not be used for children weighing more than 15 kg!
Do not place more than one child in the product!
Do not lift the product by the food tray!
Discontinue using the product if you find any missing or damaged parts!
Do not let your child stand in the high chair!
❖ Always engage the wheel parking devices, when moving the high chair!
USE THE WHEELS ONLY TO MOVE THE HIGH CHAIR!
✿ Never lift, move, make any setting or repair to the high chair, while there is a child in it!
Do not place the high chair on elevated and/or uneven surfaces, while there is a child in it!
Do not place the high chair near stairs, pools or other hazardous areas!
◆ Use the high chair only by its purpose.
Do not use any spare parts or other components, which are not approved by the producer! The producer does not take any responsibility for the safety of the child when you have not used the proper and original spare parts, approved and provided by him!
Do not apply any changes or modifications to the high chair's construction! Contact the dealer or an authorized repair service for advice and/or repair instead!
Do not allow children younger than 3 years near the high chair during the assembly or disassembly, in order to prevent the risk of injury or swallowing of small parts!
The packaging of the product must be kept out of the reach of children to avoid the risk of strangulation!
◆ High chair is suitable for one child, who can sit alone unaided
❖ High chair is suitable for one child aged up to 3 years and weighing not more than 15 kg
◆ 5-point safety harness system
◆ Adjustable leg rest
◆ Adjustment of backrest recline
◆ Seat height adjustment
❖ Removable double feeding tray (front and back in 4 positions)
❖ Upper part of the tray can be removed
◆ Compact for storage when folded
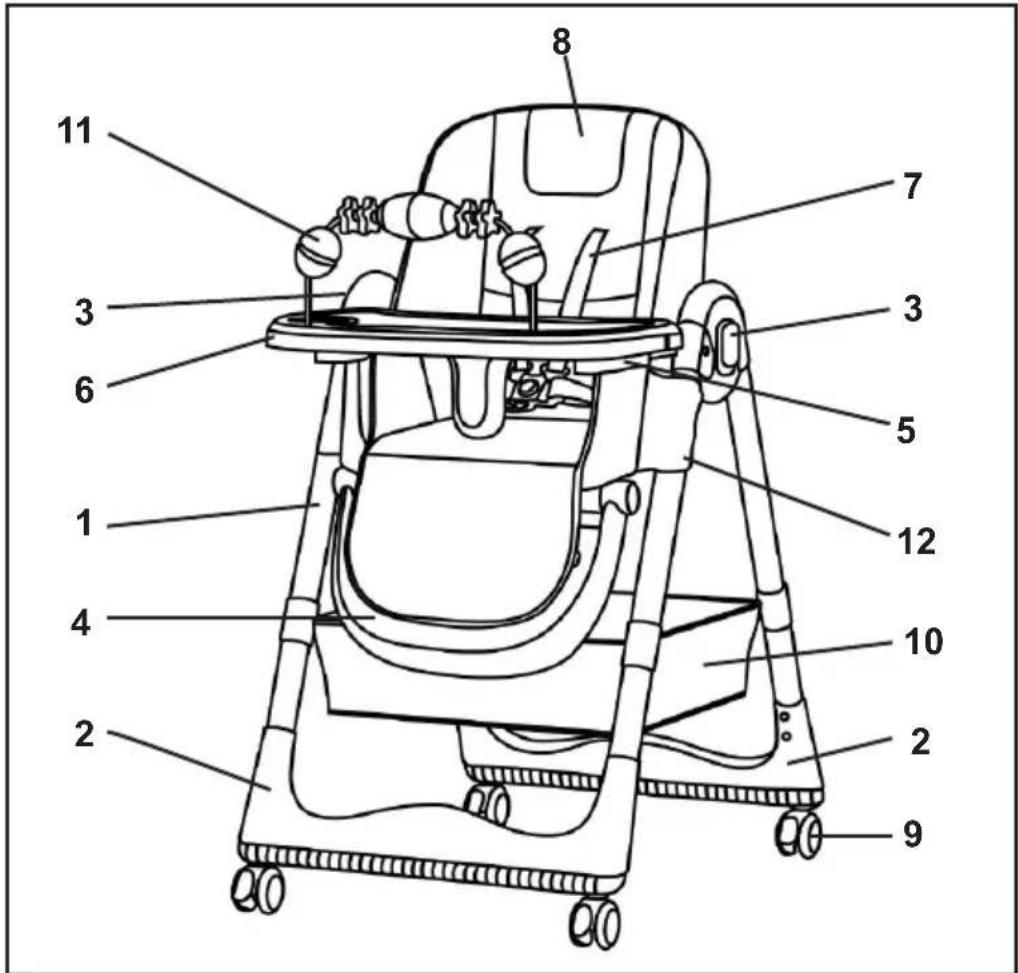
| 1. Upper tube 7. Safety harness | |
| 2. Front and rear bases 8. Seat cover | |
| 3. Folding/unfolding button 9. Wheels | |
| 4. Leg rest 10. Storage basket | |
| 5. Armrest 11. Toy bar | |
| 6. Food tray 12. Button for height adjustment |
ATTENTION! FOLLOW EXACTLY THE INSTRUCTIONS GIVEN AND THE ORDER ASSEMBLY AND USAGE, DESCRIBED IN TEXTS AND PICTURES. IN ORDER TO COMPLETE THE ASSEMBLY, YOU DO NOT NEED ANY TOOLS. ATTENTION! CHECK THE STABILITY OF FIXING AFTER EACH OPERATION!
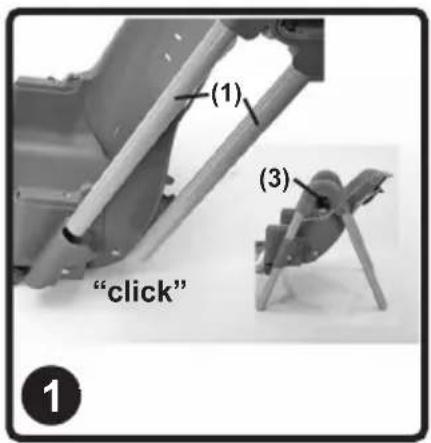
1 - ASSEMBLY OF UPPER TUBES (L/R)
Insert each upper tube of the high chair (1) in the corresponding opening of the seat, until the pins show and you hear a "click" sound.
Note: When mounting left and right upper tube (L/R), folding button (3) should be should be located outside, as shown in the figure.
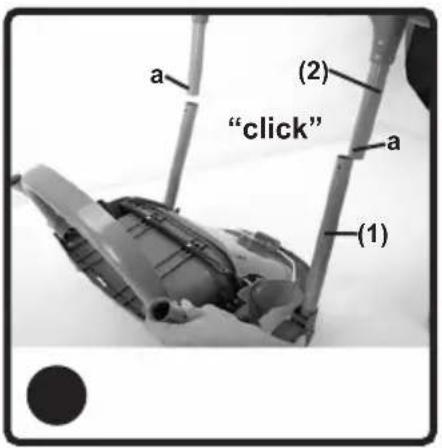
2 - ASSEMBLY OF FRONT AND REAR BASES
Insert each base (2) into the upper (1) tubes until the pins (a) show through the holes and a “click” sound is heard. Make sure all the pins are inserted into the holes and the bases are securely mounted in the correct places.
3 - UNFOLDING THE LEGS OF THE HIGH CHAIR
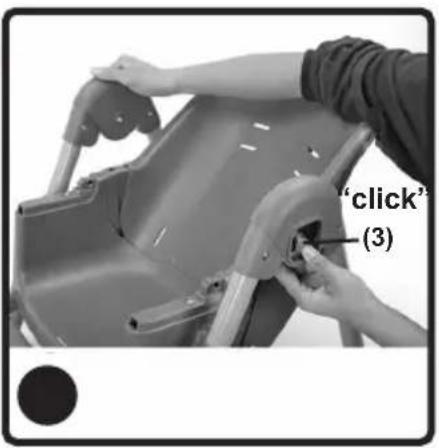
Press the unfolding buttons (3) both sides of the seat and unfold the seat. You will hear a "click" sound when locking.
4 - ASSEMBLY OF THE LEG REST
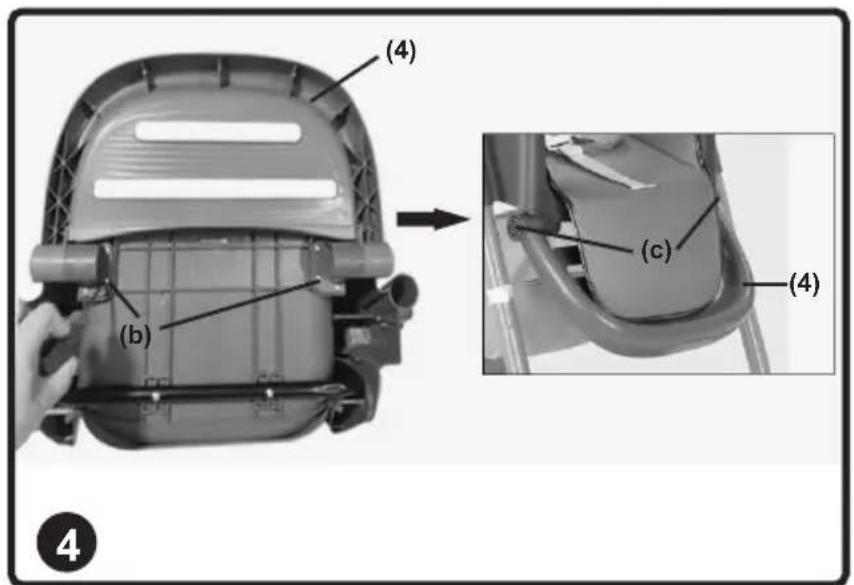
Place the leg rest under the seat, as shown in the figure and fix with the screw (b) both sides.
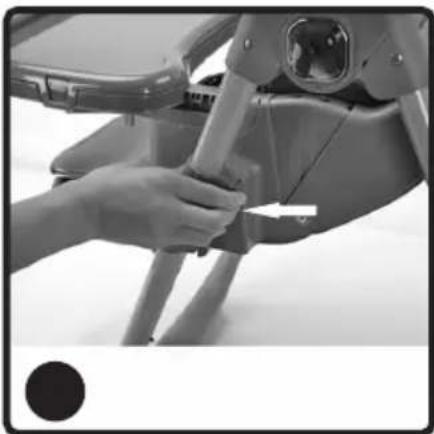
You can adjust the leg rest in 2 positions. Press the buttons simultaneously (c) both sides and move the leg rest downwards in lower position. Release, to get fixed.
Push upwards the leg rest by hand to move it from low to higher position. You will hear a "click" sound when you fix each position.
5 - ASSEMBLY OF THE ARMRESTS
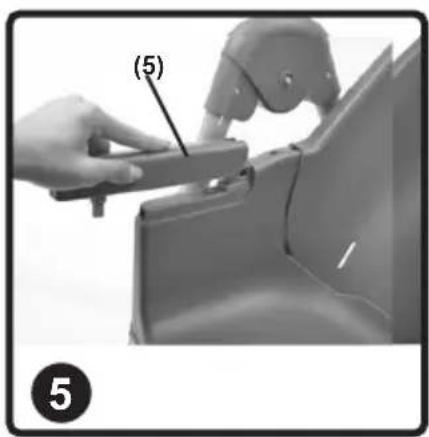
IMPORTANT! The armrests are left and right. Pay attention and mount in such a way, so the fixing channels of the tray to be on the outer side!
Place the armrests to the corresponding side of the seat and press down. At fixing you will hear a "click" sound.
6 - ASSEMBLY AND ADJUSTMENT OF FOOD TRAY. ASSEMBLY OF TOY BAR
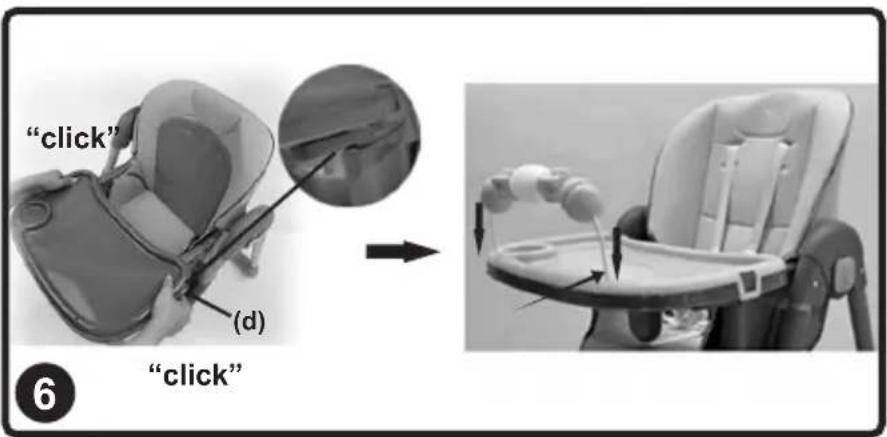
Slide the T-bar into the channel under the tray until it get fixed.
Pull out the two levers (d) on the side of the tray. Insert the tray into the seat armrests as far as it will go and release the levers to lock it into place.
Note: Try to pull the tray out to make sure it is secured to the seat.
The feeding tray can be placed in 4 positions (forward and backward). Pull the two levers, move to the desired position and release to lock. You will hear a "click" sound when you fix each position.
IMPORTANT! To place the toy bar, you have to remove the upper tray!
Insert the toy bar into the holes on the base tray.
7 - RESTRAINT SYSTEM
Thread the seat belt through the corresponding holes of the seat cover and the seat and turn the buckles as shown in the figure to secure.
Fastening: insert the ends of the belts into the buckle and push until you hear a "click" sound. Move the buckles (g) up/down to adjust the length of the belts.
IMPORTANT! Belts should not be twisted, they must fit the baby well and their length should not be adjusted while they are fastened!
Unfastening: Press the button in the middle of the buckle (f) and separate the belts.
8 - BACKREST ADJUSTMENT
The seat can be reclined in 4 positions.
Press the adjustment lever (k) and move the seat forward/backward to the desired position. You will hear a "click" sound when you fix each position.
9 – HEIGHT ADJUSTMENT OF THE SEAT
The height of the seat can be adjusted in 7 positions.
Press simultaneously with both hands the height adjustment buttons (12) and move the seat up or down to the desired position. Release the buttons to lock the seat. You will hear a "click" sound when fixed.
IMPORTANT! Make sure that after fixing the adjustment buttons (12) are at the same level!
10 - ASSEMBLY OF THE WHEELS
Insert the wheels (9) into the corresponding holes under the front and rear bases (2) and press to lock. Push down on the thumb (k) to engage the parking device.
Push up on the thumb (k) to release the parking device.
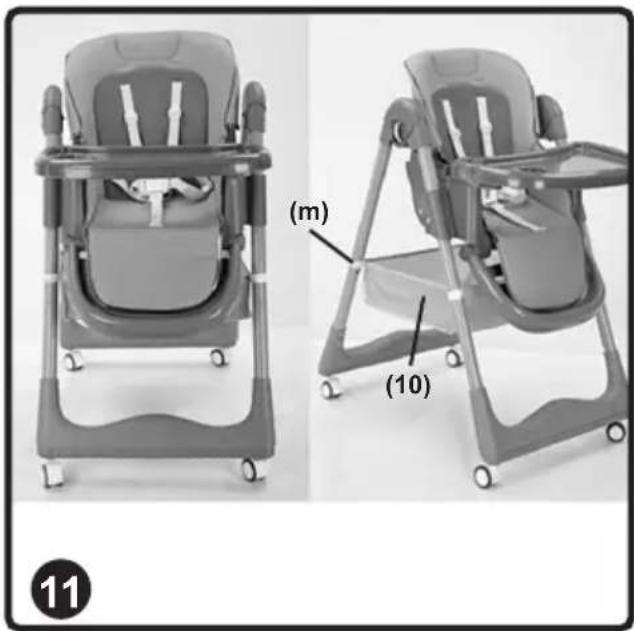
11 - ASSEMBLY OF STORAGE BASKET
Secure the storage basket (10) around the seat tubes with the straps, as shown in the figure.
12 – FOLDING THE HIGH CHAIR
Before folding the seat, engage the wheel parking devices and remove all objects from the basket.
Press the fold/unfold buttons (3) on both sides of the seat simultaneously and fold the seat.
For more compact storage, move the seat to its lowest position.
natural_image
Close-up of a hand adjusting a mechanical component with a white arrow pointing to a small hole (no text or symbols visible)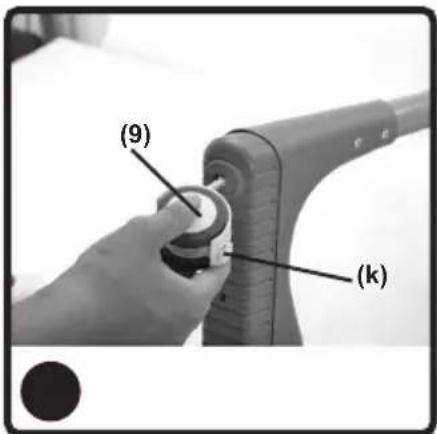
natural_image
Two views of a baby boom seat with labeled parts (m) and (10), shown from front and side angles (no text or symbols on the seats themselves)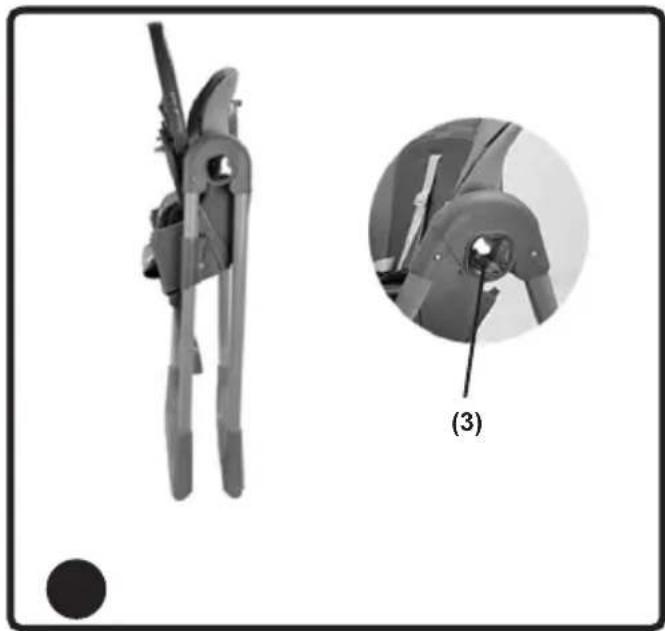
natural_image
Mechanical tool with two clamps shown in side and close-up view, labeled (3), no text or symbols present.CARE AND MAINTENANCE
- Clean the fabrics, plastic parts and metal parts with damp cotton cloth or sponge and mild soap.
Do not use abrasive, bleach or other aggressive detergents.
◆ Always after cleaning leave the high chair fully dry and after that store it.
Do not put any objects and things in high chair or on the top of it to avoid damages of the structure.
❖ Always store your high chair indoors. Do not expose to direct environment influence - sun, rain, moisture and high temperature intervals.
- INSTRUCTION MANUAL FOR HIGH CHAIR „FIRST SPOON”
- TO ENSURE THE SAFE USE OF THIS PRODUCT, FOLLOW THE WARNINGS, INSTRUCTIONS AND RECOMMENDATIONS IN THIS MANUAL:
- - ASSEMBLY OF UPPER TUBES (L/R)
- - ASSEMBLY OF FRONT AND REAR BASES
- - UNFOLDING THE LEGS OF THE HIGH CHAIR
- - ASSEMBLY OF THE LEG REST
- - ASSEMBLY OF THE ARMRESTS
- - ASSEMBLY AND ADJUSTMENT OF FOOD TRAY. ASSEMBLY OF TOY BAR
- - RESTRAINT SYSTEM
- - BACKREST ADJUSTMENT
- – HEIGHT ADJUSTMENT OF THE SEAT
- - ASSEMBLY OF THE WHEELS
- - ASSEMBLY OF STORAGE BASKET
- – FOLDING THE HIGH CHAIR
- CARE AND MAINTENANCE
Brand : Chipolino
Model : First Spoon
Category : Baby high chair