
Distortion DS-1X - Uncategorized BOSS - Free user manual and instructions
Find the device manual for free Distortion DS-1X BOSS in PDF.


| Product Type | Distortion effects pedal |
| Model | DS-1X |
| Brand | BOSS |
| Power Supply | 9V alkaline battery (6LR61) or AC adaptor (PSA series, sold separately) |
| Current Draw | 60 mA |
| Battery Life (Alkaline) | Approx. 6 hours continuous use |
| Input Impedance | 1 MΩ |
| Output Impedance | 1 kΩ |
| Nominal Input Level | -20 dBu |
| Nominal Output Level | -20 dBu |
| Recommended Load Impedance | 10 kΩ or greater |
| Controls | LEVEL, LOW, HIGH, DIST knobs; pedal switch |
| Indicators | CHECK indicator (effect on/off and battery check) |
| Connectors | INPUT jack, OUTPUT jack, AC adaptor jack |
| Dimensions (W x D x H) | 73 x 129 x 59 mm (2-7/8 x 5-1/8 x 2-3/8 inches) |
| Weight (including battery) | 440 g (1 lb) |
| Accessories | Leaflet (safety/important notes), alkaline battery (9V, 6LR61) |
| Options (sold separately) | AC adaptor (PSA series) |
| Key Feature | Cutting-edge distortion with adaptive frequency response |
| Power On/Off | Via INPUT jack (plug in to turn on, unplug to turn off) |
Frequently Asked Questions - Distortion DS-1X BOSS
User questions about Distortion DS-1X BOSS
0 question about this device. Answer the ones you know or ask your own.
Ask a new question about this device
Download the instructions for your Uncategorized in PDF format for free! Find your manual Distortion DS-1X - BOSS and take your electronic device back in hand. On this page are published all the documents necessary for the use of your device. Distortion DS-1X by BOSS.
USER MANUAL Distortion DS-1X BOSS
Before using this unit, carefully read the sections entitled: "USING THE UNIT SAFELY" and "IMPORTANT NOTES" (supplied on a separate sheet). After reading, keep the document(s) where it will be available for immediate reference.
Main Features
● This is a cutting-edge distortion effect that is distinctly different than previous types of distortion.
- The DS-1X adds the perfect amount of distortion for each frequency region without requiring you to adjust the settings, seamlessly providing the ideal distortionwhether you're riffing on low notes or playing a lead solo on high notes.
- You'll be able to adjust your tone easily and intuitively.
Panel Descriptions
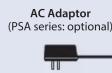
AC Adaptor Jack
Accepts connection of an AC Adaptor (PSA series; optional). By using an AC Adaptor, you can play without being concerned about how much battery power you have left.
* Use only the specified AC adaptor (PSA series; optional), and connect it to an AC outlet of the correct voltage. Do not use any other AC adaptor, since this may cause malfunction.
* If the AC adaptor is connected while power is on, the power supply is drawn from the AC adaptor.
* We recommend that you keep batteries installed in the unit even though you'll be powering it with the AC adaptor. That way, you'll be able to continue a performance even if the cord of the AC adaptor gets accidentally disconnected from the unit.
LEVEL Knob
Adjusts the volume when the effect is on.
LOW Knob
Adjusts the tone quality of the lower range when the effect is on.
OUTPUT Jack
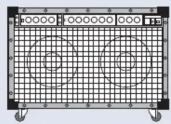
Connect this jack to your amp or to the input of another effect unit.
Guitar Amplifier
Pedal Switch
This switch turns the effect on/off.
Thumbscrew
When this screw is loosened, the pedal will open, allowing you to change the battery. * For instructions on changing the battery, refer to "Changing the Battery."
CHECK Indicator
Shows whether the effect is on or off, and also doubles as the battery check indicator. The indicator lights when the effect is on.
* If you're powering the unit with a battery and the CHECK indicator goes dim—or doesn't light at all—when you try to turn the effect on, the battery is near depletion and should be replaced. For instructions on changing the battery, refer to "Changing the Battery."
DIST Knob
Adjusts the amount of distortion applied to the sound. Turning the knob clockwise boosts the distortion effect.
HIGH Knob
Adjusts the tone quality of the upper range when the effect is on.
INPUT Jack
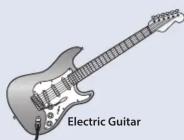
Accepts signals coming from a guitar or other musical instrument, or another effects unit.
* The INPUT jack doubles as the power switch. Power to the unit is turned on when you plug into the INPUT jack; the power is turned off when the cable is unplugged. To prevent unnecessary battery consumption, be sure to disconnect the plug from the INPUT jack when not using the effects unit.
Precautions When Connecting
- If you'll be using the DS-1X for an extended time, we recommend that you use an AC adaptor. If you prefer to use a battery, we recommend an alkaline battery.
- To prevent malfunction and equipment failure, always turn down the volume, and turn off all the units before making any connections.
- Once the connections have been completed, turn on power to your various devices in the order specified. By turning on devices in the wrong order, you risk causing malfunction and/or damage to speakers and other devices.
When powering up: Turn on the power to your guitar amp last. When powering down: Turn off the power to your guitar amp first. - Before turning the unit on/off, always be sure to turn the volume down. Even with the volume turned down, you might hear some sound when switching the unit on/off. However, this is normal and does not indicate a malfunction.
Use of Battery
- A battery was installed in the unit before it left the factory. The life of this battery may be limited, however, since its primary purpose was to enable testing.
- If you handle batteries improperly, you risk explosion and fluid leakage. Make sure that you carefully observe all of the items related to batteries that are listed in "USING THE UNIT SAFELY" and "IMPORTANT NOTES" (supplied on a separate sheet).
- When operating on battery power only, the unit's indicator will become dim when battery power gets too low. Replace the battery as soon as possible.
- Batteries should always be installed or replaced before connecting any other devices. This way, you can prevent malfunction and damage.
Changing the Battery
- Hold down the pedal and loosen the thumbscrew, then open the pedal upward.
* The pedal can be opened without detaching the thumbscrew completely.
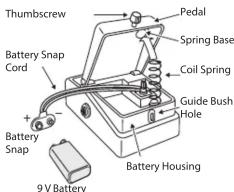
- Remove the old battery from the battery housing, and remove the snap cord connected to it.
- Connect the snap cord to the new battery, and place the battery inside the battery housing.
* Be sure to carefully observe the battery's polarity (+ versus -). - Slip the coil spring onto the spring base on the back of the pedal, and then close the pedal.
* Carefully avoid getting the snap cord caught in the pedal, coil spring, and battery housing. - Finally, insert the thumbscrew into the guide bush hole and fasten it securely.
Specifications
| Nominal Input Level -20 dBu | |
| Input Impedance 1 MΩ | |
| Nominal Output Level | -20 dBu |
| Output Impedance 1 kΩ | |
| Recommended Load Impedance | 10 kΩ or greater |
| Power Supply Alkaline | battery (9 V, 6LR61)AC adaptor (PSA series: sold separately) |
| Current Draw 60 mA | * Expected battery life under continuous use:Alkaline: 6 hoursThese figures will vary depending on the actual conditions of use. |
| Dimensions 73 (W) x 129 (D) x 59 (H) mm2-7/8 (W) x 5-1/8 (D) x 2-3/8 (H) inches | |
| Weight 440 g / 1 lb (including battery) | |
| Accessories | Leaflet ("USING THE UNIT SAFELY," "IMPORTANT NOTES," and "Information")Alkaline battery (9 V, 6LR61) |
| Options (sold separately) | AC adaptor (PSA-series) |
* 0 dBu = 0.775 Vrms
* This document explains the specifications of the product at the time that the document was issued. For the latest information, refer to the Roland website.
Brand : BOSS
Model : Distortion DS-1X
Category : Uncategorized