
Leisure 470 Neo - Projector Vankyo - Free user manual and instructions
Find the device manual for free Leisure 470 Neo Vankyo in PDF.


| Product Type | Video Projector |
| Model | Leisure 470 Neo |
| Brand | Vankyo |
| Display Technology | LCD |
| Light Source | LED |
| Native Resolution | 1280 x 720P |
| Aspect Ratio | 16:9 / 4:3 |
| Focus | Electric / Manual |
| Keystone Correction | Electric / Manual |
| Speaker | 5W / 4Ω |
| Power Supply | DC 21V 2.85A |
| Dimensions (WxHxD) | 7.7 x 5.8 x 3.03 inches (195 x 146 x 77 mm) |
| Net Weight | 3.31 lbs (1.5 kg) |
| Ports | HDMI In x1, USB x1, Audio Out x1, AV In x1, Power In x1 |
| Mounting Screw Size | 1/4 inch (not included) |
| WiFi Connectivity | Yes (2.4GHz) |
| Bluetooth | Yes (Receiver and Transmitter modes) |
| Screen Mirroring | iOS (Wireless & Wired), Android (Wireless) |
| Supported Image Formats | BMP, JPG, PNG, JPEG |
| Supported Audio Formats | AAC, MP2, MP3, PCM, FLAC, WMA |
| Supported Video Formats | AVI, MP4, MKV, FLV, MOV, RMVB, 3GP, MPEG1, MPEG2, XVID |
| Input Signal | 576i/576P/720i/720P/1080i/1080P |
| Installation Type | Front / Rear / Ceiling |
| Contrast Ratio | Not specified in manual; typical for LCD LED projectors |
| Brightness | Not specified in manual; typical for entry-level projectors |
Frequently Asked Questions - Leisure 470 Neo Vankyo
User questions about Leisure 470 Neo Vankyo
0 question about this device. Answer the ones you know or ask your own.
Ask a new question about this device
Download the instructions for your Projector in PDF format for free! Find your manual Leisure 470 Neo - Vankyo and take your electronic device back in hand. On this page are published all the documents necessary for the use of your device. Leisure 470 Neo by Vankyo.
USER MANUAL Leisure 470 Neo Vankyo
natural_image
Front view of a white electronic device with a yellow circular button and 'VANKYO' logo on the side (no text or symbols on body)LEISURE 470 NEO
Portable HD Projector
USER MANUAL
V1.02
CONTENTS
TROUBLESHOOTING GUIDE 01
IN THE BOX 02
PRODUCT OVERVIEW 02
QUICK START 04
- Projector Installation 04
- Power On/Off 04
- Image Adjustment 05
PROJECTOR CONNECTION AND INPUT SOURCE 06
- USB Connection 06
- HD Connection 07
- AV Connection 07
- Wired Speaker and Headphones Connection 08
WIFI CONNECTION 08
SCREEN MIRRORING 09
For iOS System 09
For Android System 11
BLUETOOTH CONNECTION 12
- Use as a Bluetooth Speaker 12
- Connect to An External Bluetooth Speaker 13
SETTINGS 15
PROJECTION DISTANCE AND SIZE 18
SPECIFICATION 18
EN
TROUBLESHOOTING GUIDE
- The copyrighted contents from Hulu, Netflix, and similar services can not be mirrored or cast.
* Due to the copyright restriction from Hulu, Netflix, and similar services, the contents MAY NOT be mirrored or cast. To play copyrighted content, please prepare a laptop, Fire TV Stick, Roku stick, or Chromecast™ and connect it to the projector.
- Blurry image
* Adjust the focus/keystone.
* The projector and screen/wall must be in the effective distance.
- Why doesn't the remote control work?
* Make sure the remote points at the IR receiver directly.
* Please make sure you have installed two AAA batteries in the remote control.
* Avoid mixing new batteries with old ones in the remote control as this can result in insufficient power supply and operational issues.
- Upside down images
* Go to Homepage > Settings > Option > Flip to flip the projection image.
- Factory reset
* Go to Homepage > Settings > Option > Factory Reset to restore the projector to default settings.
01
support@ivankyo.com
IN THE BOX
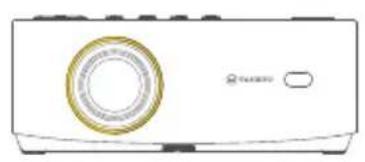
natural_image
Front view of a white projector with a gold circular button and control panel (no text or symbols visible)Projector

Remote
(Batteries Not Included)
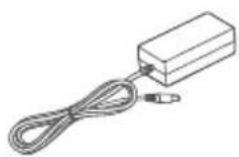
Power Adapter

HD Cable

User Manual
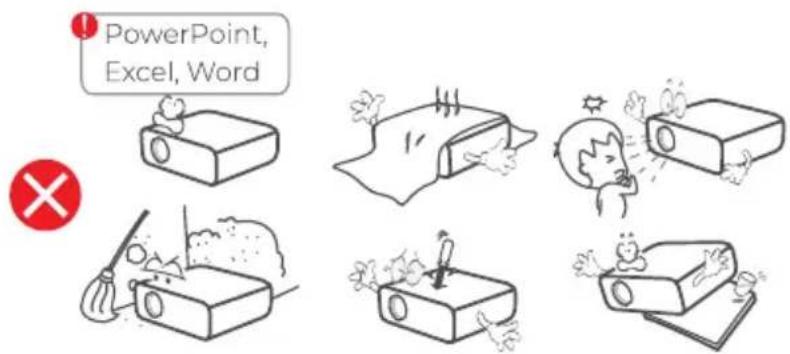
NOTICE
Recommended

NOT Recommended

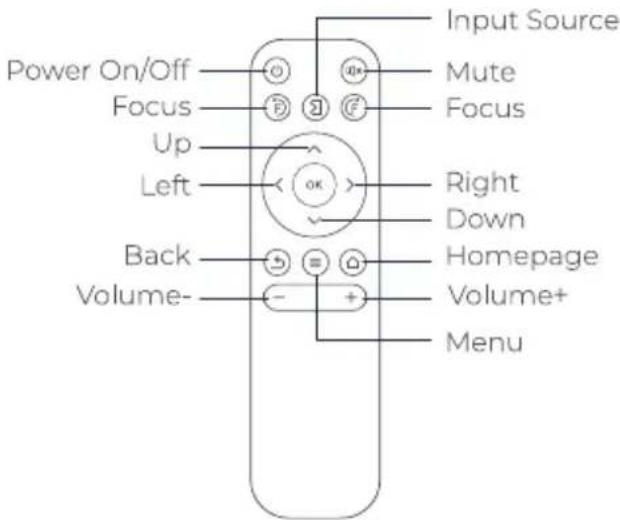
PRODUCT OVERVIEW




support@ivankyo.com
QUICK START
1. Projector Installation


EN
Note:
Whichever installation option you select, please make sure:
* To go to Homepage > Settings > Option > Flip to select the corresponding projection mode, so the images can be projected correctly.
* Mounting Screw: 1/4" (not included)
2. Power On/Off

natural_image
Diagram showing a circular component being inserted into a ring, with an arrow pointing to it (no text or symbols present)Take off the lens cover.
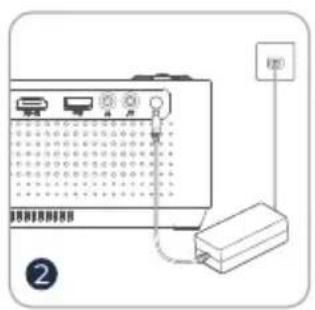
Connect the power adapter to an outlet.

Press the Power button once to turn on the projector.

Press the Power button twice to turn off the projector.
04

3. Image Adjustment
① Press the focus buttons on the remote or go to Homepage > Settings > Adjust > Focus to sharpen the image focus until the blurry image becomes clear.
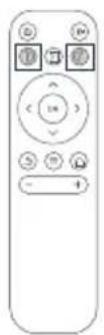

② Go to Homepage > Settings > Adjust > Keystone to manually correct the distortion.


support@ivankyo.com
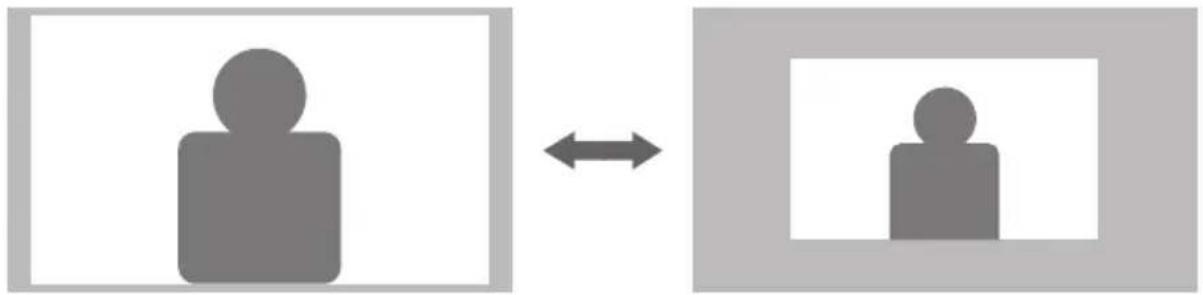
③ Go to Homepage > Settings > Option > Digital Zoom to reduce or enlarge the image size.
natural_image
Two gray silhouette icons inside rectangular frames, one with a human head and the other with a person, connected by an arrow (no text or symbols)PROJECTOR CONNECTION AND INPUT SOURCE
Connect your device to the projector correctly, then select the right input source.
1. USB Connection
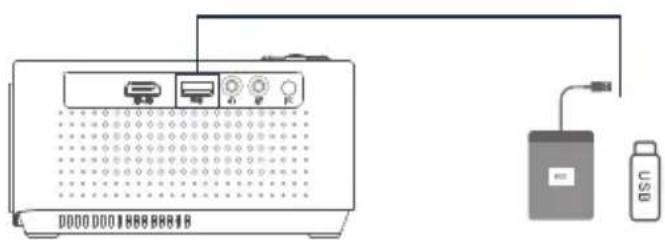


2. HD Connection

natural_image
Diagram of a device with ports and connectors, connected to a separate network interface (no text or symbols visible)
- AV Connection


support@ivankyo.com
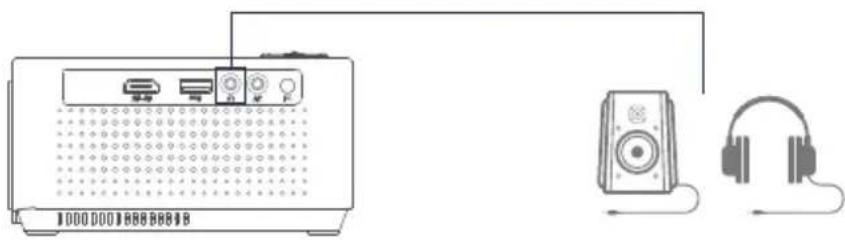
4. Wired Speaker and Headphones Connection
natural_image
Diagram showing a portable electronic device connected to a speaker and headphones, with no visible text or symbols.WIFI CONNECTION
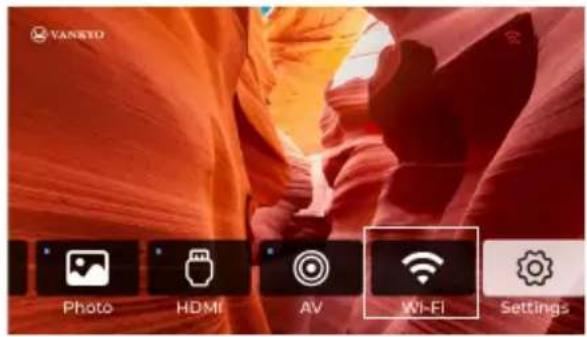
You can connect your projector to your router's WiFi by going to Homepage > Wi-Fi.


SCREEN MIRRORING
For iOS System
Screen Mirroring Wirelessly
Step 1:
Connect the projector and your mobile device to the same router's WiFi or directly connect your mobile device to the projector's AP hotspot.
Tip:
When you are using the projector's AP hotspot, the contents will be mirrored via the cellular data.
Step 2:
Go to Homepage > Wireless and select iOS Device to enter the interface below.

Step 3:
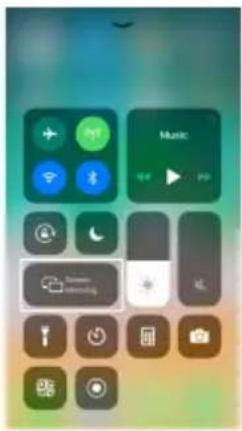
Go to the Control Center of your iOS device, then tap Screen Mirroring/Air Playing to search for the projector.

support@ivankyo.com

Step 4:
Choose Vankyo-XXXXXX from the list, and once the connection is successful, the contents on your iOS device will be mirrored onto the projection screen or wall.


Screen Mirroring via a Lightning Cable
Step 1:
Go to Homepage > Wired to enter the interface below.


EN
Step 2:
Connect your mobile device to the USB Port on the projector using the ORIGINAL lightning cable.
Step 3:
Select Trust in the pop-up window of Trust This Computer?
Trust This Computer?
Your settings and data will be accessible from this computer when connected wirelessly or using a cable.
Trust
Don't Trust
Step 4:
The contents on your iOS device will be mirrored on the projection screen/wall after a successful connection.
For Android System
To activate this function, please make sure your Android device supports Multi-screen/Smart View/Wireless Display. Names vary on different Android devices.
Step 1:
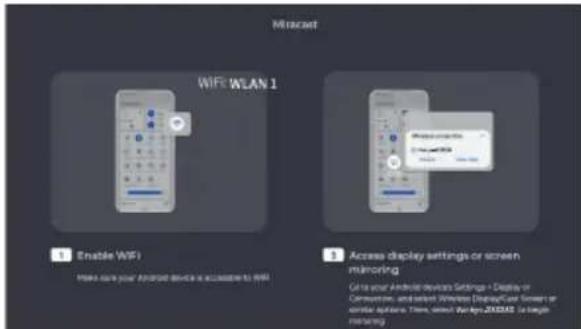
Go to the WiFi setting of your Android device to switch on the option of WiFi.
Note:
It is not necessary to have a successful WiFi connection, but it is important to ensure that the WiFi is turned on in your Android device.
11
support@ivankyo.com

Step 2:
Go to Homepage > Wireless and select Android Device to enter the interface below.
Step 3:
Activate the Multi-screen/Smart View/Wireless Display function on your Android device and search for the projector.
Step 4:
Choose Vankyo-XXXXXX from the list, and once the connection is successful, the contents on your Android device will be mirrored onto the projection screen or wall.
BLUETOOTH CONNECTION
1. Use as A Bluetooth Speaker
It is possible to use this projector as a Bluetooth speaker by connecting your mobile device to it through a Bluetooth connection.

Step 1:
Go to Homepage > Settings > BT Device and press the OK button to switch BT mode to Receiver.

Step 2:
Access your mobile device's Bluetooth settings and activate Bluetooth. Search for Vankyo in the available devices list to pair your mobile device with the projector.

2. Connect to An External Bluetooth Speaker
In addition to using the wired 3.5mm audio output port, you can also connect Bluetooth speakers or Bluetooth Headphones to this projector via a Bluetooth connection.

support@ivankyo.com
Step 1:
Turn on your Bluetooth device and make it ready for a Bluetooth connection.
Step 2:
Go to Homepage > Settings > BT Device and press the OK button to switch BT mode to On. Scan available Bluetooth devices, then select your Bluetooth device and pair it with the projector.

IMPORTANT:
① Compared with the wired connection to a speaker, BT wireless connection spends more time processing digital audio data, converting said data to an audio signal, and streaming the signal. There may be a delay or slight lag on audio due to signal interference.
As a result, the sound on the speaker may not be in sync with the image on the projector, especially when you are using wireless screen mirroring with WiFi and BT wireless connection at the same time.
If you are experiencing this situation, please check the following options to improve audio quality:
* Instead of using wireless screen mirroring with WiFi and BT wireless connection at the same time, we recommend using wired screen mirroring and BT connection or using HD connection via the provided HD cable and BT connection simultaneously. If you still want to use wireless screen mirroring, it is recommended to output the audio via a wired speaker.
EN
* Move your BT device closer to the projector.
* Keep the projector and your BT device away from other BT devices to avoid interference.
* You may be able to adjust the latency (Lip Sync) on your device which is playing the video. The way to adjust the latency varies with different devices; please consult it from the device manufacturer.
② Due to the compatibility issue between BT speakers/headphones and the projector, few BT devices may not be paired with the projector via BT wireless connection. Please contact us at support@ivankyo.com for further assistance.
SETTINGS
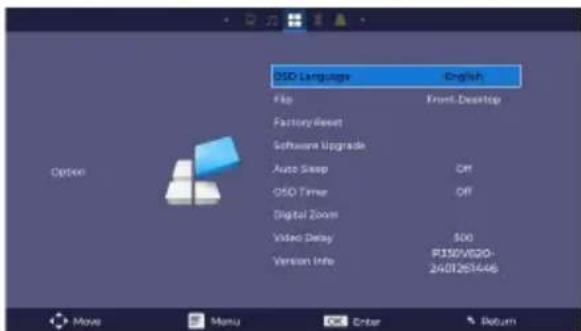
Option
- Set the projector's language.
- Select the appropriate projection mode to ensure accurate image projection.
- Restore the projector to the factory settings.
- Update the software as needed.
- Set the screen to automatically turn off after a specific period.
15
support@ivankyo.com
- Set the menu display time before it automatically returns to the homepage.
- Modify the image size and change the aspect ratio.
- Check version info.

Picture
Select your preferred image mode and color temperature. When selecting User in the Image Mode option, you can tweak Contrast, Brightness, Color, and Sharpness settings to optimize the image quality.

Sound
Select your preferred sound mode and adjust the balance settings. When selecting User in the Sound Mode option, you can tweak Treble and Bass to adjust the sound effect.

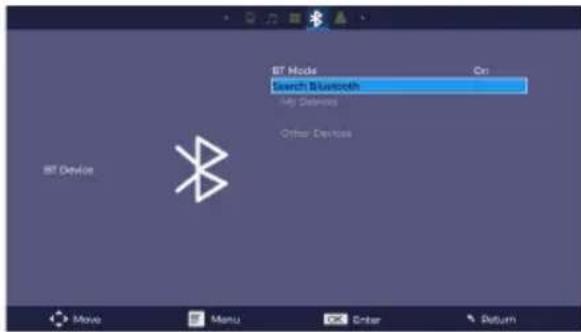
BT Device
- Connect the projector to an external Bluetooth speaker.
- Connect the mobile device to the projector to use the projector as a Bluetooth speaker.
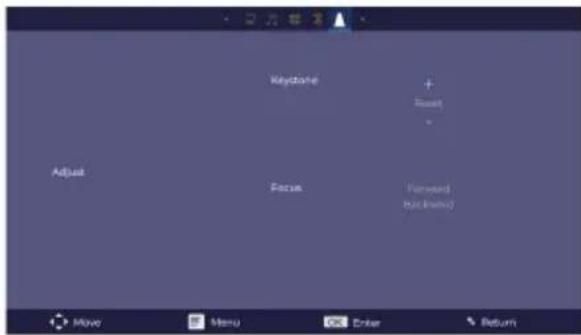
Adjust
- Correct the keystone manually.
- Adjust the focus manually.

support@ivankyo.com
PROJECTION DISTANCE AND SIZE
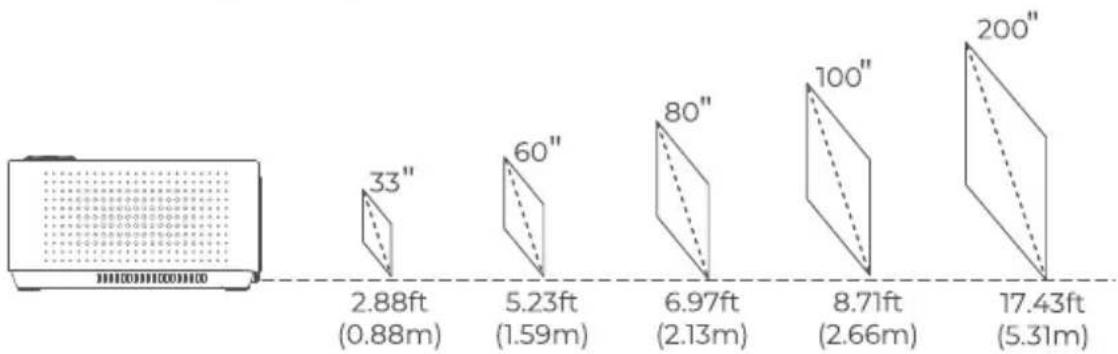
bar
| Dimension | Height (ft) | Height (m) | | :--- | :--- | :--- | | 1mm | 2.88 | 0.88 | | 2mm | 5.23 | 1.59 | | 3mm | 6.97 | 2.13 | | 4mm | 8.71 | 2.66 | | 5mm | 17.43 | 5.31 | The chart displays a single data point for the device. The height values are explicitly labeled: 33" for 2.88ft, 60" for 5.23ft, 80" for 6.97ft, and 100" for 8.71ft. The visual scale is indicated by dashed lines connecting the bars to the right.* The recommended projection distance varies with different projection contents. Please adjust the distance between the wall/screen and the projector as needed.
* Ambient darkness will improve the clarity of the projected images.
SPECIFICATIONS
| Display Technology | LCD | Light Source | LED |
| Resolution | Native 1280 x 720P | Input Signal | 576i/576P/720i/720P/1080i/1080P |
| Installation Type | Front/Rear/Ceiling | Aspect Ratio | 16:9/4:3 |
| Focus | Electric/Manual | Keystone | Electric/Manual |
| Speaker | 5W/4Ω | Power Supply | DC 21V == 2.85A |

| Unit Dimension | 7.7 x 5.8 x 3.03 inches (195 x 146 x 77 mm) | Unit Net Weight | 3.31lbs(1.5kg) |
| Photo Format Supported | BMP/JPG/PNG/JPEG | Audio Format Supported | AAC/MP2/MP3/PCM/FLAC/WMA |
| Video Format Supported | AVI/MP4/MKV/FLV/MOV/RMVB/3GP/MPEG1/MPEG2/XVID | Ports | HD In x 1/USB x 1/Audio Out x 1/AV In x 1/Power In x 1 |
| Mounting Screws | 1/4" | Screw Number | 1 (not included) |
FCC Caution:
Any Changes or modifications not expressly approved by the party responsible for compliance could void the user's authority to operate the equipment.
This device complies with part 15 of the FCC Rules. Operation is subject to the following two conditions: (1) This device may not cause harmful interference, and (2) this device must accept any interference received, including interference that may cause undesired operation.
Note: This equipment has been tested and found to comply with the limits for a Class B digital device, pursuant to part 15 of the FCC Rules. These limits are designed to provide reasonable protection against harmful interference in a residential installation. This equipment generates, uses and can radiate radio frequency energy and, if not installed and used in accordance with the instructions, may cause harmful interference to radio communications. However, there is no guarantee that interference will not occur in a particular installation. If this equipment does cause harmful interference to radio or television reception, which can be determined by turning the equipment off and on, the user is encouraged to try to correct the interference by one or more of the following measures:

support@ivankyo.com
EN
—Reorient or relocate the receiving antenna.
—Increase the separation between the equipment and receiver.
—Connect the equipment into an outlet on a circuit different from that to which the receiver is connected.
—Consult the dealer or an experienced radio/TV technician for help.
This equipment complies with FCC radiation exposure limits set forth for an uncontrolled environment. This equipment should be installed and operated with minimum distance 20cm between the radiator& your body.
This transmitter must not be co-located or operating in conjunction with any other antenna or transmitter.
ISEDC Warning:
This device complies with Industry Canada licence-exempt RSS standard(s). Operation is subject to the following two conditions:
(1) this device may not cause interference, and
(2) this device must accept any interference, including interference that may cause undesired operation of the device.
The device is compliance with RF exposure guidelines, users can obtain Canadian information on RF exposure and compliance. The minimum distance from body to use the device is 20cm.
This transmitter must not be co-located or operating in conjunction with any other antenna or transmitter.
Operation of 5150-5250 MHz is restricted to indoor use only.
To avoid replacement of a battery with an incorrect type.
Don't disposal of a battery into fire or a hot oven, or mechanically crush or cut of a Battery.
Don't leave a battery in an extremely high temperature surrounding environment.
To avoid battery subjected to extremely low air pressure.
The mains plug is used as the disconnect device, the disconnect device shall remain readily operable.

support@ivankyo.com
VANKYO SUPPORT
support@ivankyo.com

www.ivankyo.com

@VankyoOfficial

VANKYO

- LEISURE 470 NEO
- CONTENTS
- TROUBLESHOOTING GUIDE 01
- IN THE BOX 02
- PRODUCT OVERVIEW 02
- QUICK START 04
- PROJECTOR CONNECTION AND INPUT SOURCE 06
- WIFI CONNECTION 08
- SCREEN MIRRORING 09
- BLUETOOTH CONNECTION 12
- SETTINGS 15
- PROJECTION DISTANCE AND SIZE 18
- SPECIFICATION 18
- EN
- TROUBLESHOOTING GUIDE
- 01
- QUICK START
- Projector Installation
- Note:
- Power On/Off
- Image Adjustment
- PROJECTOR CONNECTION AND INPUT SOURCE
- USB Connection
- Wired Speaker and Headphones Connection
- WIFI CONNECTION
- SCREEN MIRRORING
- For iOS System
- Step 1:
- Tip:
- Step 2:
- Step 3:
- Step 4:
- Screen Mirroring via a Lightning Cable
- Trust This Computer?
- For Android System
- 11
- BLUETOOTH CONNECTION
- Use as A Bluetooth Speaker
- Connect to An External Bluetooth Speaker
- IMPORTANT:
- SETTINGS
- Option
- 15
- Picture
- Sound
- BT Device
- Adjust
- FCC Caution:
- ISEDC Warning:
- VANKYO SUPPORT
Brand : Vankyo
Model : Leisure 470 Neo
Category : Projector