
TM-5116 - Monitor Posiflex - Free user manual and instructions
Find the device manual for free TM-5116 Posiflex in PDF.


| Product Type | POS Monitor |
| Brand | Posiflex |
| Model | TM-5116 |
| Display Size | 15.6 inch TFT LCD |
| Resolution | 1920 x 1080 (Full HD) |
| Touch Technology | P-CAP (Projected Capacitive) |
| Touch Interface | USB |
| Brightness | 300 cd/m² |
| Contrast Ratio | 1000:1 |
| Viewing Angle | 89°/89°/89°/89° (U/D/L/R) |
| Power Supply | 12V DC from external adapter |
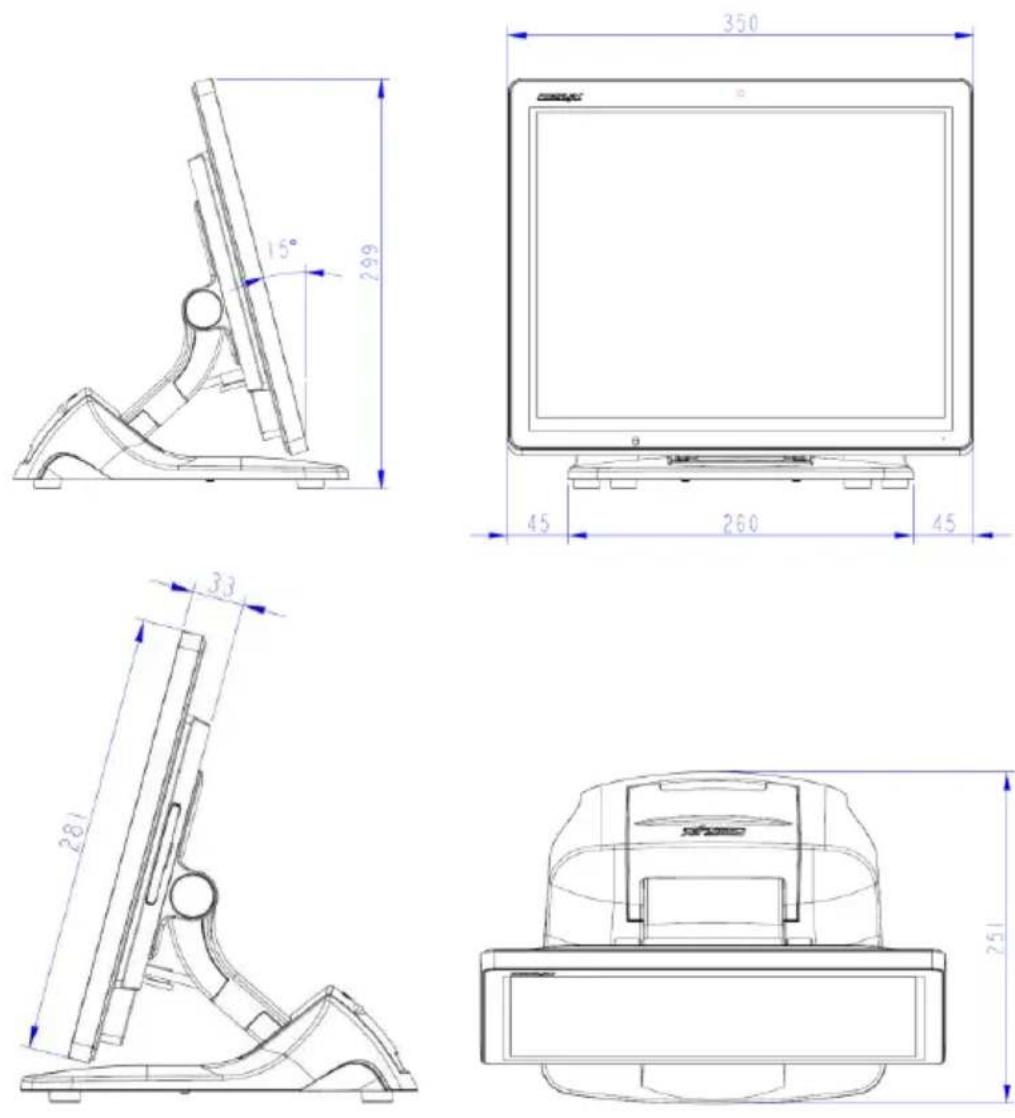
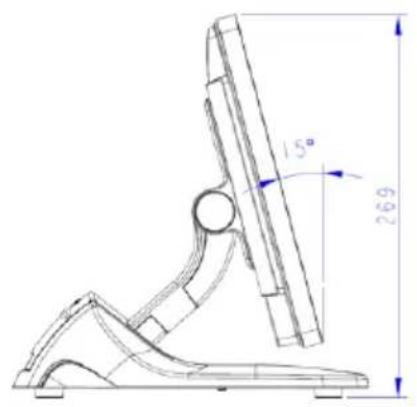
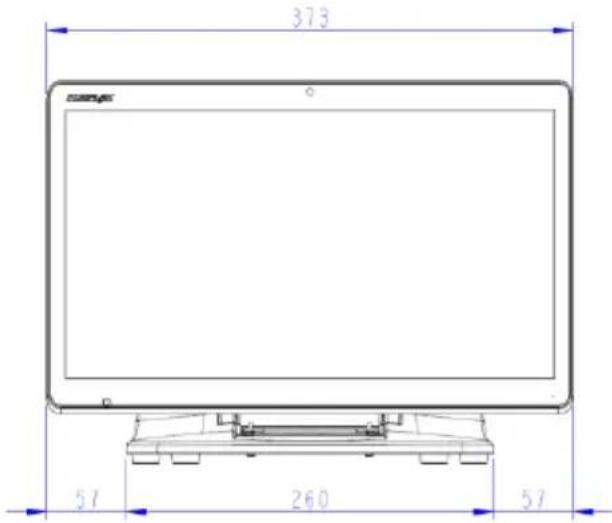
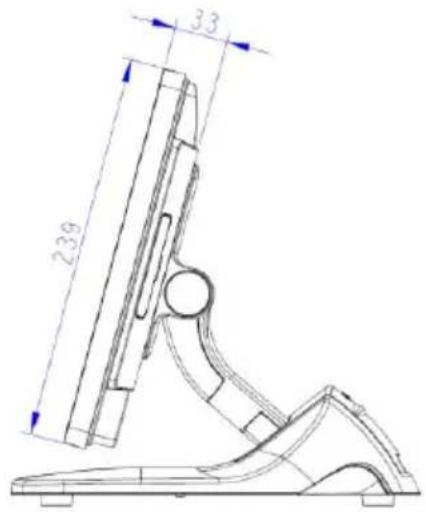
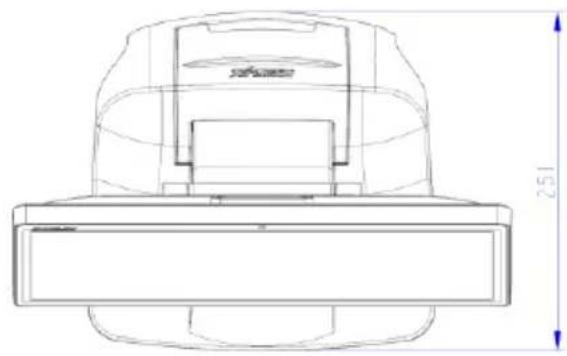
| Dimensions (W x H x D) | 373 x 251 x 269 mm (with 15° tilted base) |
| Net Weight | 3.6 kg |
| I/O Ports | DP, HDMI, VGA, USB Type-B (touch), USB Type-C (selected models), DC-IN |
| Camera | Optional (1MP wide angle) |
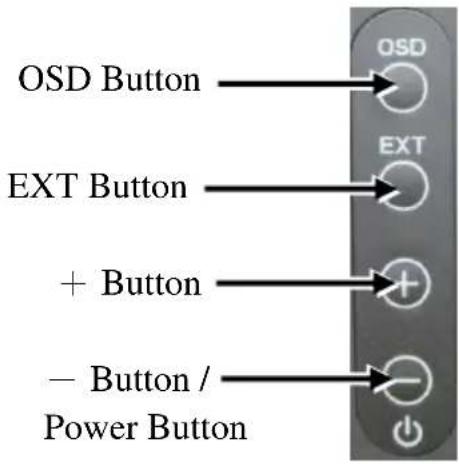
| OSD Keypad | Yes (Power, Menu, +, -, EXT) |
| Package Contents | Monitor, 12V DC power cable, display cable, USB touch cable |
| Stand Type | Gen7 base with tilt adjust |
| Compliance | FCC Part 15 Class A, CE Class A |
| Warranty Note | Warranty void if opened by unauthorized persons |
Frequently Asked Questions - TM-5116 Posiflex
User questions about TM-5116 Posiflex
0 question about this device. Answer the ones you know or ask your own.
Ask a new question about this device
Download the instructions for your Monitor in PDF format for free! Find your manual TM-5116 - Posiflex and take your electronic device back in hand. On this page are published all the documents necessary for the use of your device. TM-5116 by Posiflex.
USER MANUAL TM-5116 Posiflex
This system meets industry & government requirements and applicable standards. This equipment generates, uses, and can radiate radio frequency energy and, if not installed and used in accordance with the instructions manual, may cause interference to radio communications. It has been tested and found to comply with limits for a Class A digital device pursuant to subpart B of Part 15 of FCC Rules, which are designed to provide reasonable protection against interference when operated in a commercial environment. Operation of this equipment in a residential area is likely to cause interference in which case the user at his own expense will be required to take whatever measures to correct the interference.
This device complies with part 15 of the FCC Rules. Operation is subject to the following two conditions: (1) This device may not cause harmful interference, and (2) this device must accept any interference received, including interference that may cause undesired operation.
CE CLASS A WARNING
This equipment is compliant with Class A of CISPR 32. In a residential environment this equipment may cause radio interference.
AVERTISSEMENT CE CLASSE A
Warranty will terminate automatically when the machine is opened by any person other than the authorized technicians. The user should consult his/her dealer for the problem happening. Warranty voids if the user does not follow the instructions in application of this merchandise. The manufacturer is by no means responsible for any damage or hazard caused by improper application.
LIMITES DE GARANTIE
This equipment is not suitable for use in locations where children are likely to be present.
CONSIGNES DE SÉCURITÉ
Power cord shall be connected to a socket-outlet with earthing connection.
ATTENTION
| Date | Version | Description |
| 2024/01/22 | A0 | For Preliminary Release |
| 2024/12/27 | B0 | Add TM/LM-5115C/5116C/5116PC model |
Package Contents
√ 15" POS Monitor or 15.6" POS Monitor with Gen 7 base....(x 1)
√ 12V to 12V DC Power Cable....(x 1)
√ Display Cable (Different depends on POS terminal series)....(x 1)
√ USB Cable for Touch....(x 1)
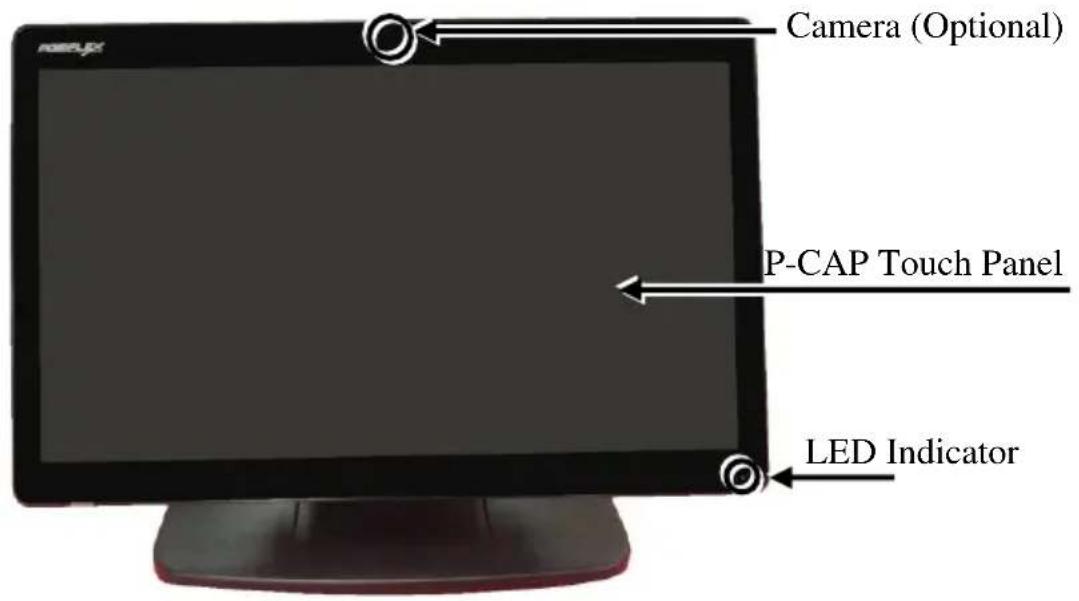
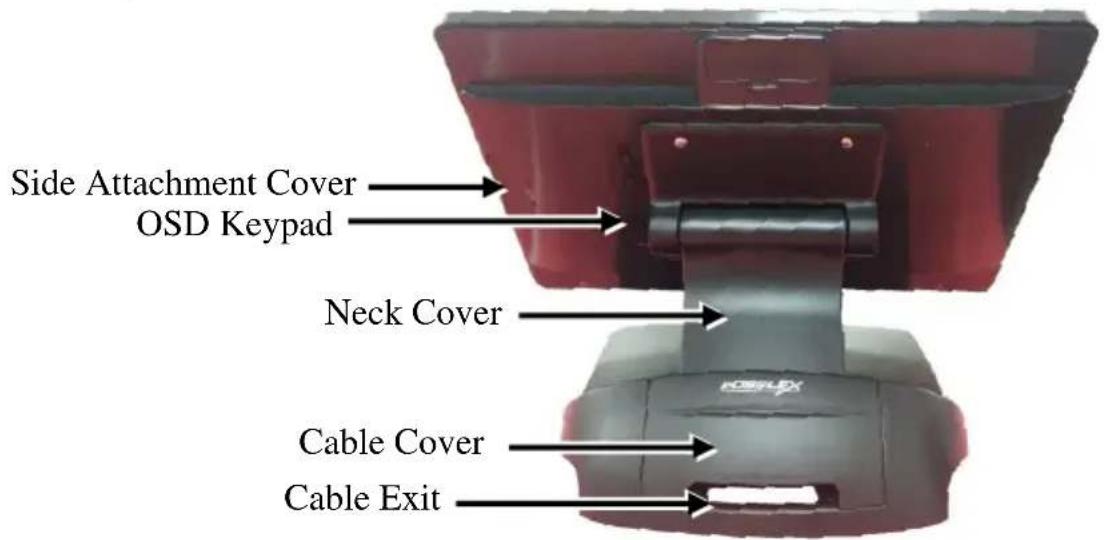
Views of TM/LM-5115/5115C & TM/LM-5116/5116C
Front View
Rear View
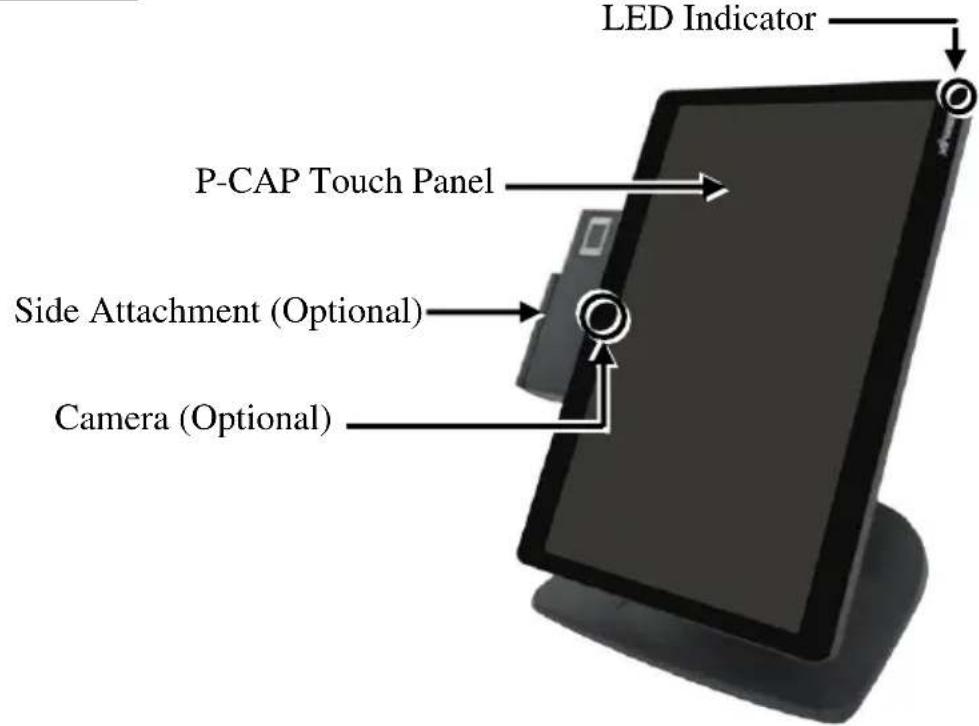
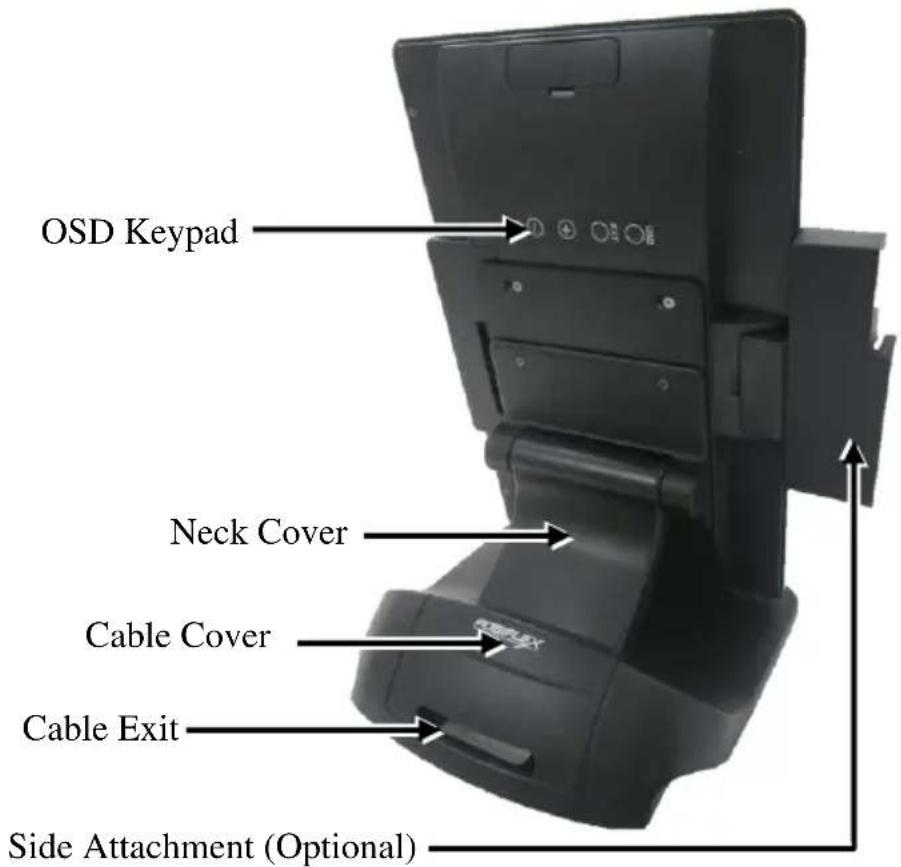
Views of TM/LM-5116P/5116PC
Front View
Rear View
OSD Keypad
Introduction to the I/O Ports
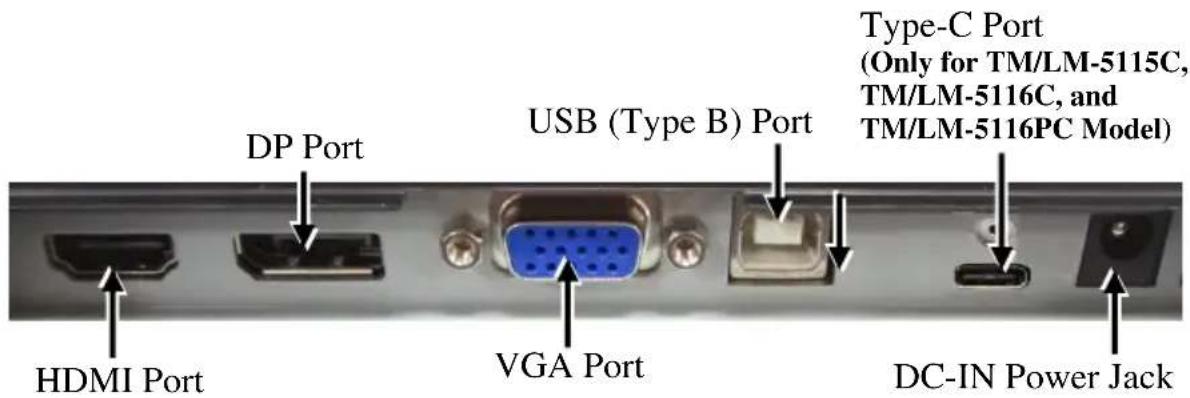
Note: The terms HDMI, HDMI High-Definition Multimedia Interface, HDMI trade dress and the HDMI Logos are trademarks of HDMI Licensing Administrator, Inc. Positioning your screen for a Perfect Viewing Angle
-
Tilt the screen in the direction shown by the arrow in the figure. Please do not press on the LCD panel while setting up the tilt angle.
-
Remove the cable cover from the base.
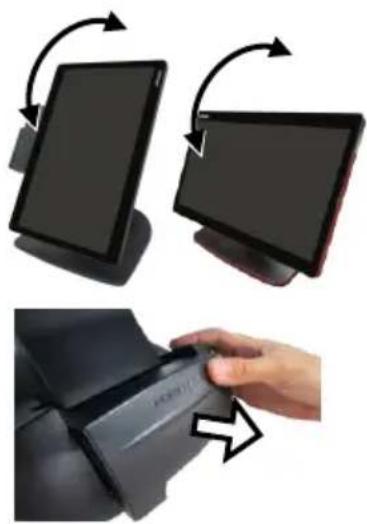
natural_image
Three-panel image showing a hand pressing a button on a device, with arrows indicating rotation and change (no text or symbols)- Fix the base with two #6/32 screws.
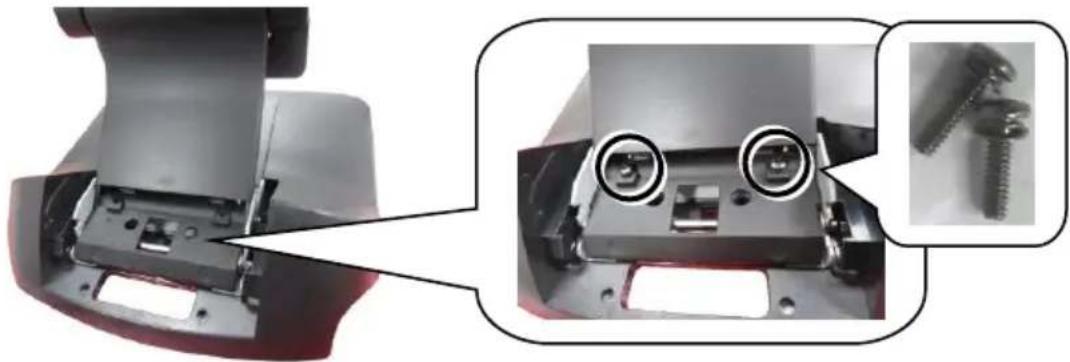
natural_image
Close-up of a mechanical assembly with two screws inserted, showing internal components and mounting features (no text or symbols visible)Connecting Power Adapter and I/O Cables
Before connecting power adapter and I/O cables to the I/O ports of the POS monitor, please route and arranging the cables. Refer to the following step-by-step instruction of cable routing and arrangement for the details.

Note:
Please use the type-C cable certified/provided by Posiflex. Please DO NOT use the cables from other unknown sources.
- Pull out the cable cover.
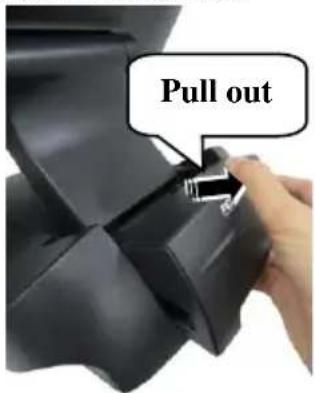
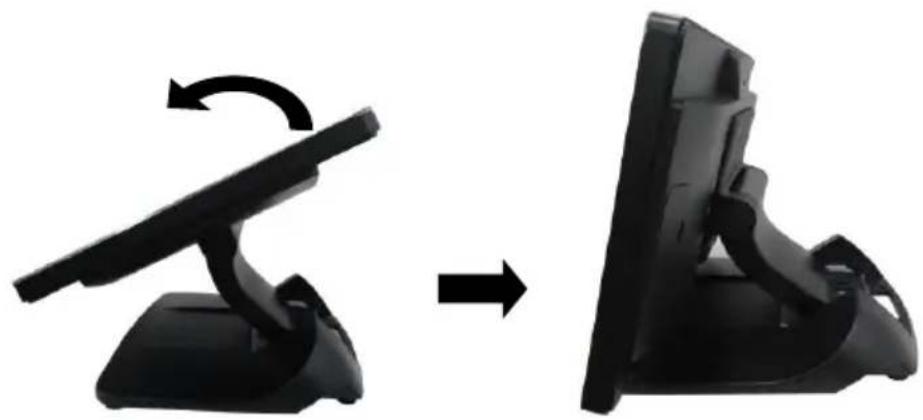
- Push and tilt the monitor to the end in the direction as shown by the arrow. Then determine that the monitor is tilted to the end, as shown in the below figure.
natural_image
Two black electronic devices with a curved arm, shown from left and right angles (no text or symbols visible)-
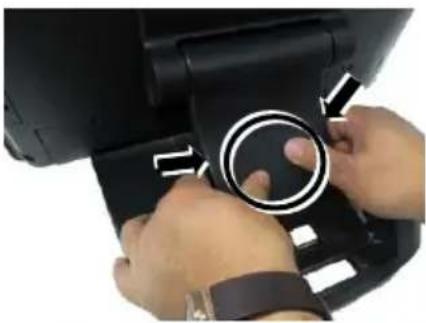
Press the circled section with two thumbs and pull by force the two sides of the locking hook with two forefingers as indicated by the arrow.
-
Remove the neck cover from the base stand.
natural_image
Close-up of hands adjusting a circular mechanical component with directional arrows (no visible text or symbols)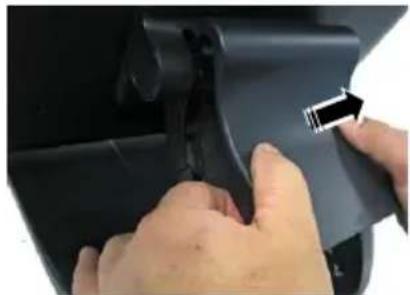
natural_image
Close-up of hands adjusting a black plastic component with a tool (no visible text or symbols)- Tilt the monitor slightly at a little angle in the direction as shown by the arrow, making cables easily pass through the cable passage.
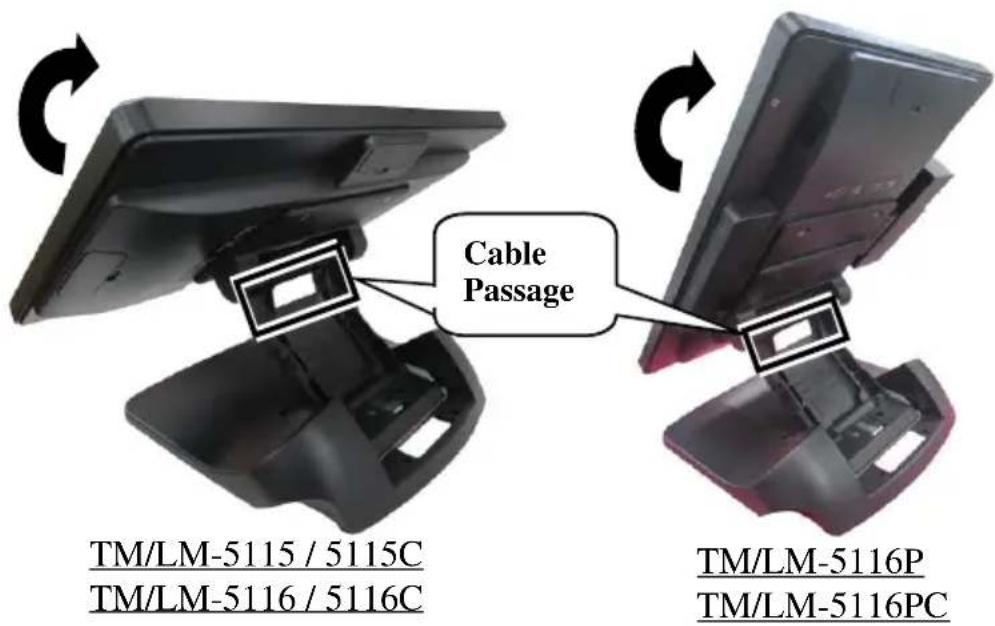
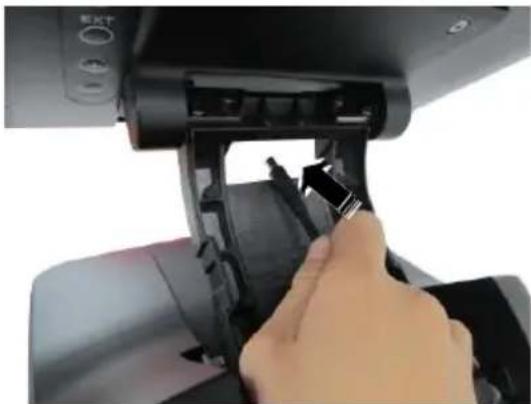
- Pass the power cable, display cable, and USB cable (for touch) through the cable passage of base stand.
Note: If you use Type-C cable (for TM/LM-5xxxC model) to connect the monitor and the POS terminal, there will be only one Type-C cable. No need power cable or another USB cable.
natural_image
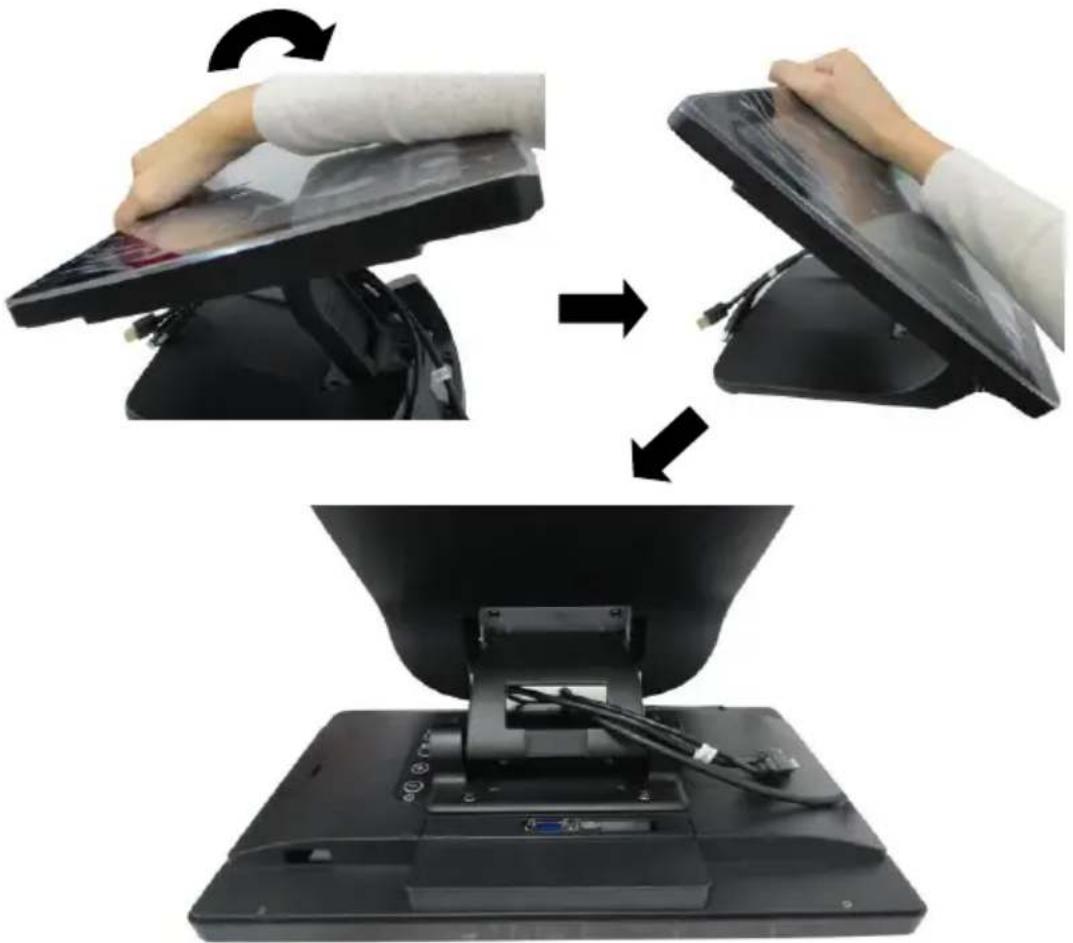
Close-up of a hand inserting a black plastic component into a device (no visible text or symbols)- For TM/LM-5115/5115C & TM/LM-5116/5116C: Push and tilt the monitor to the end in the direction as shown by the arrow. And then place the screen face down on a soft mat or PE foam.
For TM/LM-5116P: There is no need to place the screen face down.
natural_image
Three-step diagram showing a person holding a flat-screen device, then adjusting a black cover on a computer monitor (no text or symbols present)- Remove the bottom I/O cover.
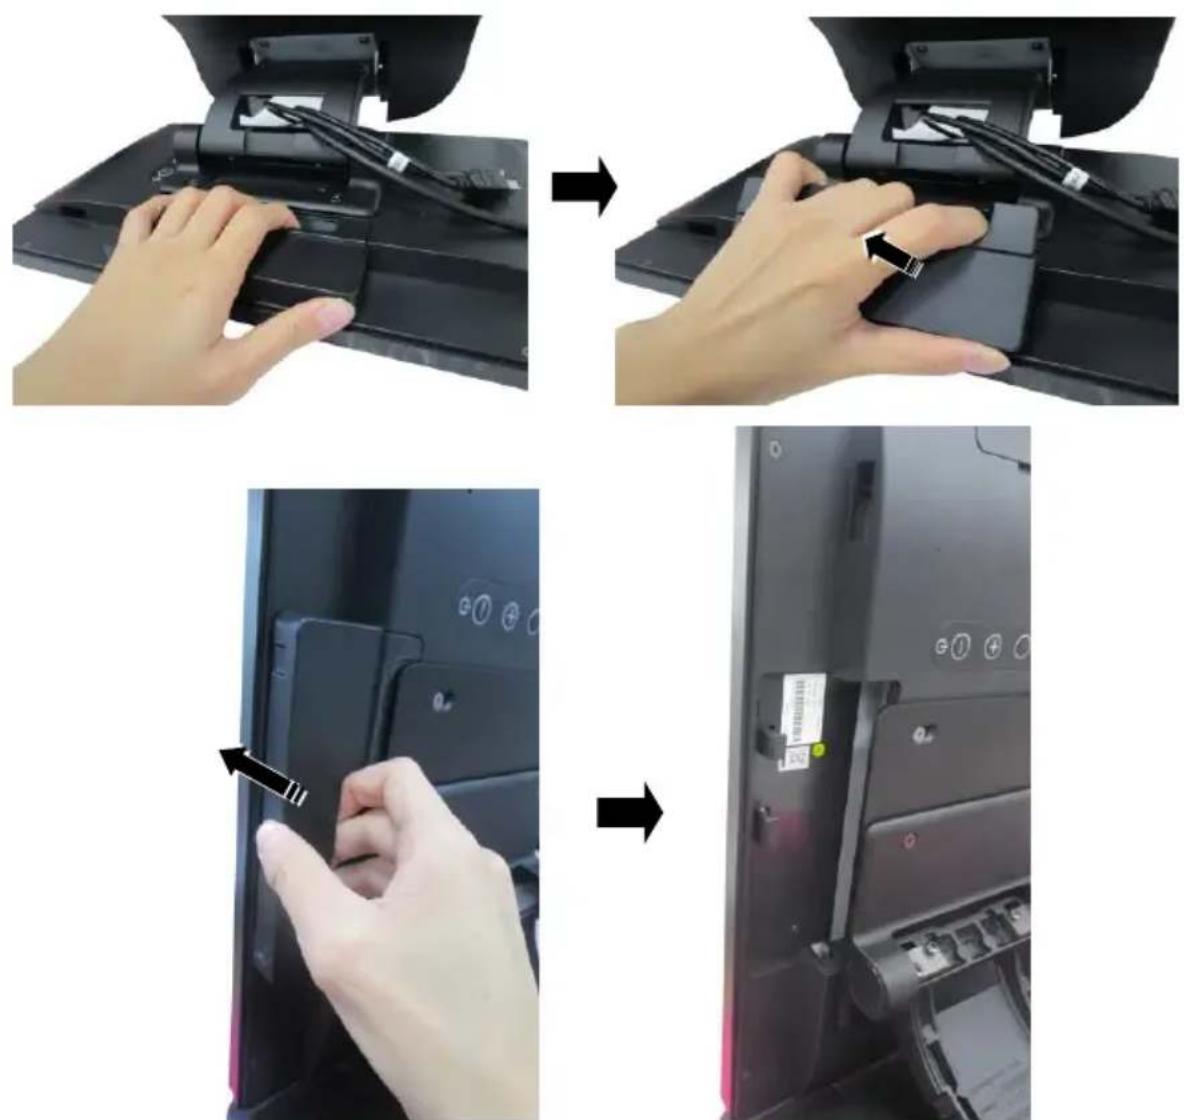
Portrait Model
- Connect the connector of the power adapter to the 12VDC-IN power jack, and connect the display cable and the USB cable (for TM model) to the relevant port.
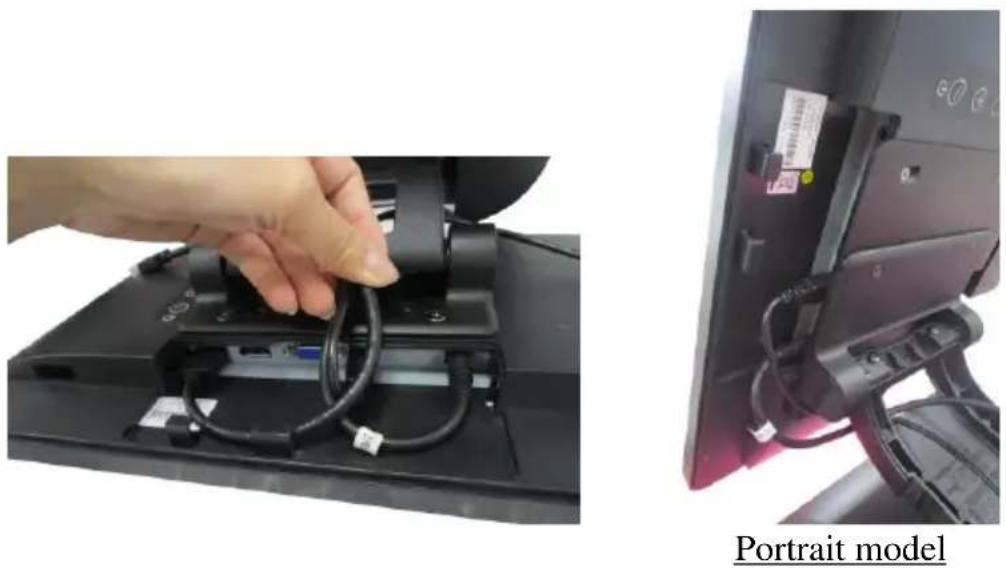
- Put the bottom I/O cover back to the monitor. Please note that it should be put in from the outside, and then press the cover downwards.
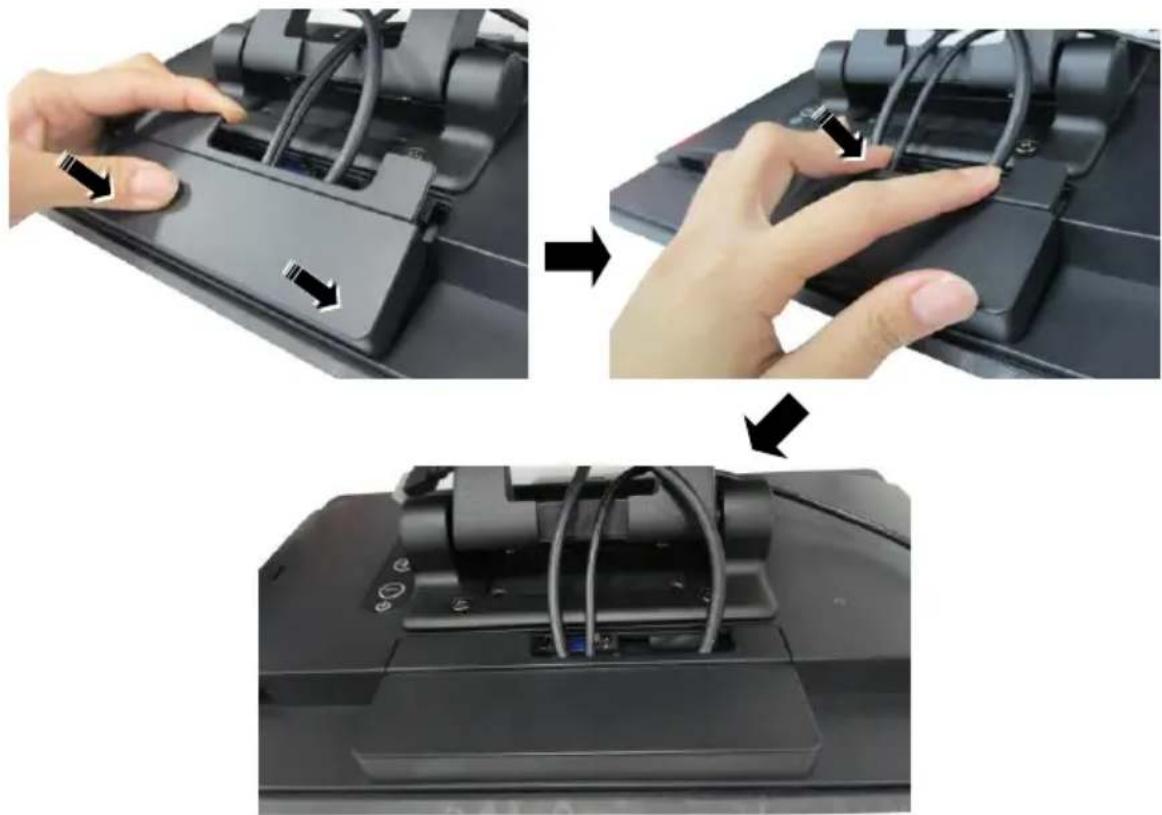
natural_image
Three-step diagram showing hand positioning of a printer's base panel, with arrows indicating the process (no text or symbols present)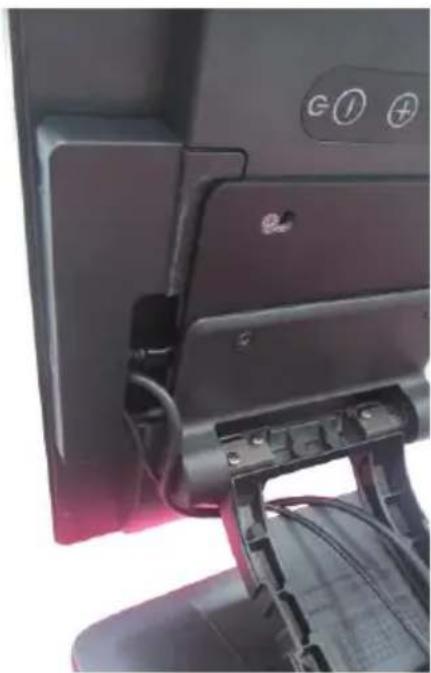
natural_image
Close-up of a computer monitor with visible ports and cable (no readable text or symbols)Portrait model
- Arrange the cables well and then shield the I/O cable arrangement area on the neck of the base stand with the neck cover.
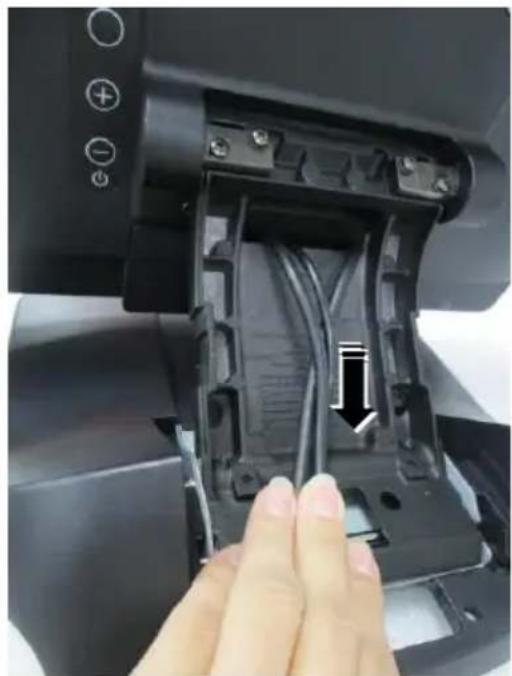
natural_image
Close-up of a hand inserting cable into a plastic housing component (no text or symbols visible)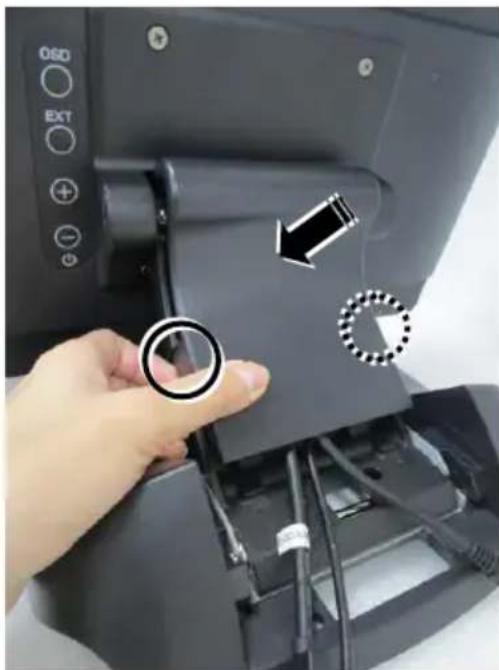
natural_image
Hand inserting a device into a computer monitor, showing left and right rotation arrows (no text or symbols on the device itself)- Shield the I/O cable exposure area with the cable cover.
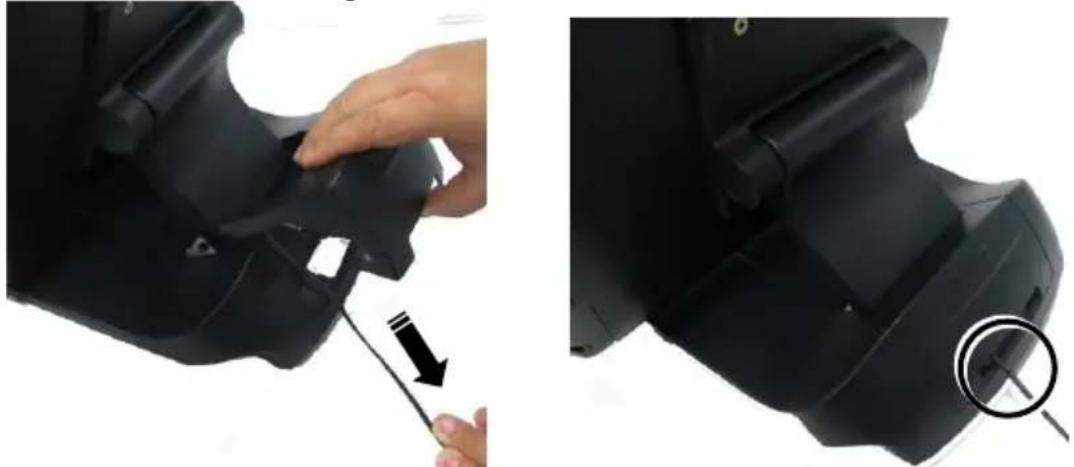
natural_image
Close-up of a hand using a tool to adjust or install a black mechanical component, showing a close-up with a magnified detail (no text or symbols visible)CAUTION: On doing insertion or extraction of a cable connector, please always hold the connector head itself instead of pulling the cable wire. Doing this could damage the cables and ports, which is considered as an artificial damage and is not covered by the warranty. The means of power cord should be connected to a socket-outlet with earthing connection.
Identifying your Monitor as Secondary Touchscreen Monitor in Extended Mode
In the following section the related descriptions will be offered to help you set up TM series as the extended monitor when you attempt to extend the desktop across multiple monitors
For TM-5115(C)/5116(C)/5116P(C) Models with P-CAP Touchscreen
If your monitors are TM-5115(C)/5116(C)/5116P(C) models, you may configure the display settings from Control Panel in Microsoft Windows to identify the monitor as the secondary touchscreen monitor. Please go through the below steps to complete configuration.
-
Make sure that the monitor is well connected to your POS terminal.
-
Go to Control Panel>Display Settings, change your display settings to extended mode.
-
Go to Control Panel, and then click on Tablet PC Settings item.
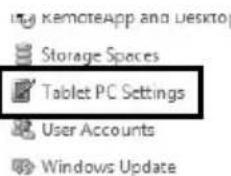
- In Tablet PC Settings dialogue box, click on Setup button.
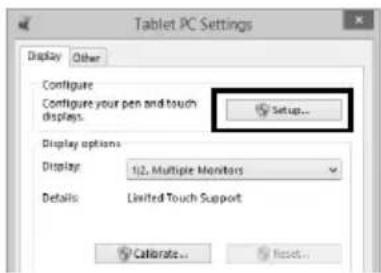
- Following the instruction shown on the screen, click on the screen that you want to identify as the primary touchscreen display.
Touch this screen to identify it as the touchscreen.
If this is not the Tablet PC screen, press Enter to move to the next screen. To close the tool press Esc
- Press Enter button to proceed the configuration.
Press Enter to proceed to the next step to complete your configuration
- Click on the screen you want to use as the secondary touchscreen display.
Touch this screen to identify it as the touchscreen.
If this is not the Tablet PC screen, press Enter to move to the next screen. To close the tool, press Esc
Powering ON/OFF your Monitor
To start up the monitor, please make sure that the monitor is well connected to POS terminals and electricity is supplied to the monitor through POS terminal.
Installing Drivers
Please visit Posiflex official website to download and install the related drivers. (https://download.posiflex.com/en-global/Download/index/driver/POS-Monitor/TM-5115)
Setting up Display Resolution for Your Monitor
The below chart defines the list of recommended display settings for TM/LM monitor. Improper display configuration will prevent the monitor from properly displaying the image and lead to a warning message of “out of range” prompted on the screen.
15" TM/LM-5115(C)
| Display Resolution | Horizontal Frequency (KHz) | Refresh Rate (Hz) |
| 640 x 480 | 31.5 | 60 |
| 800 x 600 | 37.9 | 60 |
| 1024 x 768 | 48.4 | 60 |
15.6" TM/LM-5116(C) & TM/LM-5116P(C)
| Display Resolution | Horizontal Frequency (KHz) | Refresh Rate (Hz) |
| 800 x 600 | 37.88 | 60.00 |
| 1024 x 768 | 48.36 | 60.00 |
| 1280 x 720 | 45.00 | 60.00 |
| 1366 x 768 | 47.71 | 60.00 |
| 1920 x 1080 | 67.50 | 60.00 |
Specification
| TM/LM-5115TM/LM-5115C | TM/LM-5116TM/LM-5116CTM/LM-5116PTM/LM-5116PC | |
| Display | ||
| LCD Panel | 15" TFT LCD | 15.6” TFT LCD |
| Resolution | 1024 (H) x 768 (V) | 1920 (H) x 1080 (V) |
| Viewing Angle | 88/88/88/88 degree(U/D/L/R) | 89/89/89/89 degree(U/D/L/R) |
| Contrast Ratio | 2500 : 1 | 1000: 1 |
| Brightness | 350 cd/m2 | 300 cd/m2 |
| Power Supply | 12V from power adapter | |
| Touch | ||
| Touch type | TM-5115/5115C:P-CAPLM-5115/5115C: N/A | TM-5116/5116C/5116P/5116PC: P-CAPLM-5116/5116C/5116P/5116PC: N/A |
| Interface | TM-5115/5115C: USBLM-5115/5115C: N/A | TM-5116/5116C/5116P/5116PC: USBLM-5116/5116C/5116P/5116PC: N/A |
| Integrated module | ||
| Camera | Optional, 1MP wide angle camera module | |
| Mechanical | ||
| Mechanical | Standalone display with Gen7 base | |
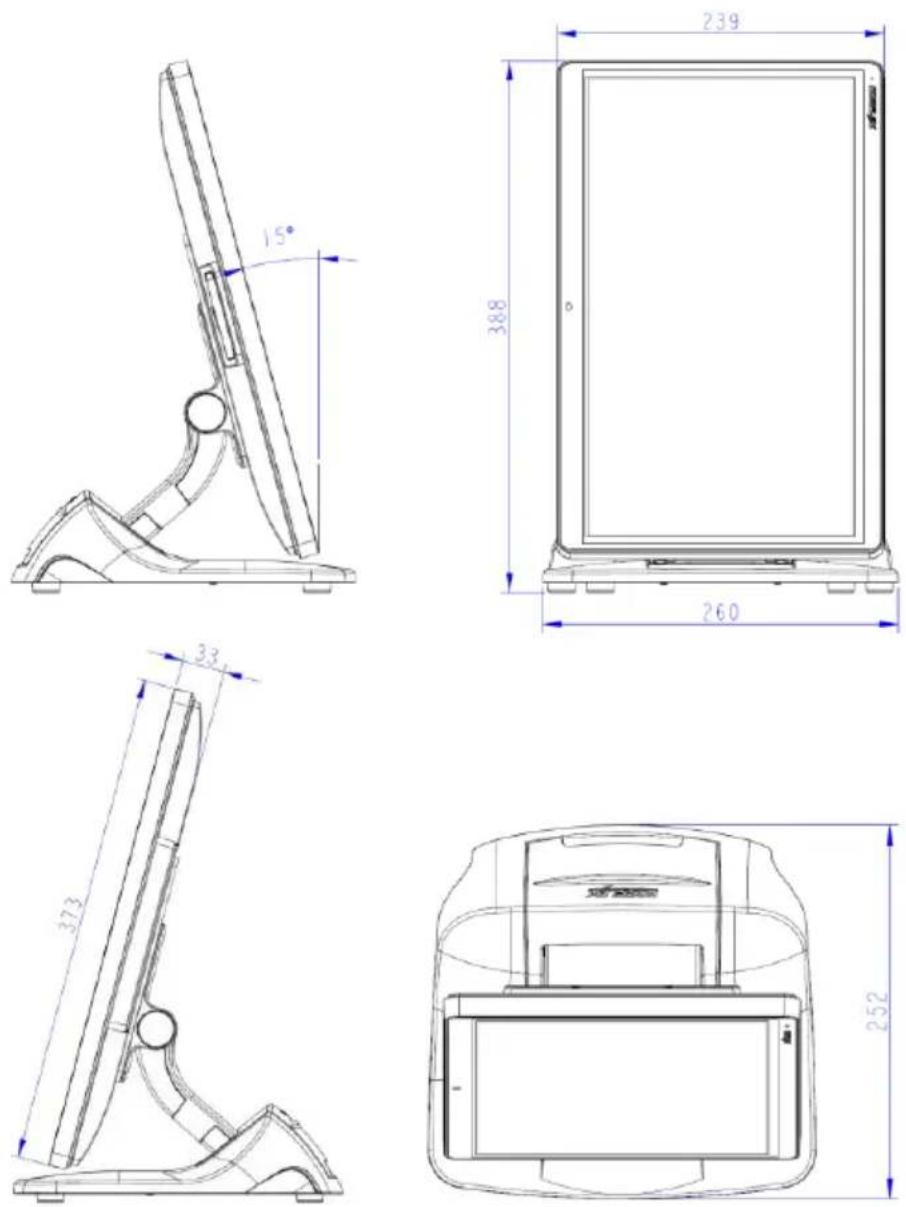
| Dimension(WxHxD in mm) | TM/LM-5115/5115C: 350 x 251 x 299 ^1 TM/LM-5116/5116C: 373 x 251 x 269 ^1 TM/LM-5116P/5116PC: 260 x 252 x 388 ^1 Note1: with 15° tilted base stand | |
| Net weight | TM/LM-5115/5115C: 4.0 kgTM/LM-5116/5116C: 3.6 kgTM/LM-5116P/5116PC: 4.1 kg | |
※ The product information and specifications are subject to change without prior notice.
TM/LM-5115/5115C
TM/LM-5116/5116C
natural_image
Technical line drawing of a mechanical component with dimension annotations (no readable text or symbols)TM/LM-5116P/5116PC
- CE CLASS A WARNING
- AVERTISSEMENT CE CLASSE A
- LIMITES DE GARANTIE
- CONSIGNES DE SÉCURITÉ
- ATTENTION
- Package Contents
- Views of TM/LM-5115/5115C & TM/LM-5116/5116C
- Front View
- Rear View
- Views of TM/LM-5116P/5116PC
- OSD Keypad
- Introduction to the I/O Ports
- Connecting Power Adapter and I/O Cables
- Identifying your Monitor as Secondary Touchscreen Monitor in Extended Mode
- For TM-5115(C)/5116(C)/5116P(C) Models with P-CAP Touchscreen
- Powering ON/OFF your Monitor
- Installing Drivers
- Setting up Display Resolution for Your Monitor
- TM/LM-5116/5116C
- TM/LM-5116P/5116PC
Brand : Posiflex
Model : TM-5116
Category : Monitor