
SleepSafe - Children's Products Caretero - Free user manual and instructions
Find the device manual for free SleepSafe Caretero in PDF.


| Product Type | Bed rail for children |
| Brand | Caretero |
| Model | SleepSafe |
| Age Range | 18 months to 5 years (when child can climb in/out unaided) |
| Mattress Size Compatibility | Minimum 60x150 cm, maximum 155x190 cm |
| Mattress Thickness | 10 cm to 20 cm |
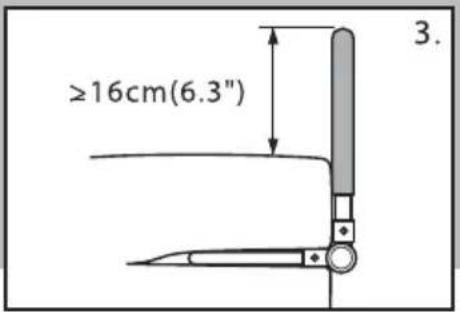
| Bed Rail Height Above Mattress | At least 16 cm (6.3 in) |
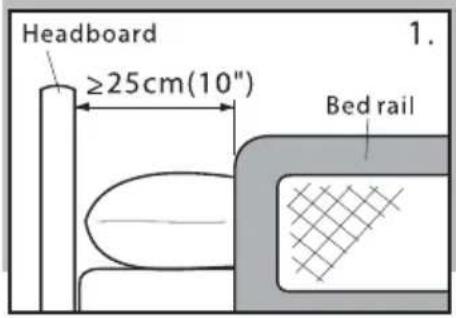
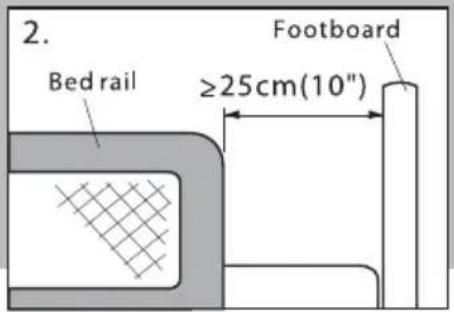
| Gap Requirements | Minimum 25 cm (10 in) between each end of bed and corresponding end of bed rail |
| Materials | Fabric upholstery, plastic frame, metal components |
| Color | White and black |
| Safety Standard | Conforms to BS 7972:2001+A1:2009 |
| Parts Included | Bed rail (A), bed rail frame (B), middle rail 1 (C), middle rail 2 (D), tensioning belt (E) |
| Assembly Required | Yes, manual installation recommended |
| Folding Mechanism | Press disk buttons on both sides to fold down or flat for storage |
| Adjustable Belt | Yes, tensioning belt with red belt for adjustment |
| Cleaning | Warm water and mild detergent, fabric removable |
| Distributor | IKS 2, 9 Rybnicka Street, 43-190 Mikolow, Poland |
Frequently Asked Questions - SleepSafe Caretero
User questions about SleepSafe Caretero
0 question about this device. Answer the ones you know or ask your own.
Ask a new question about this device
Download the instructions for your Children's Products in PDF format for free! Find your manual SleepSafe - Caretero and take your electronic device back in hand. On this page are published all the documents necessary for the use of your device. SleepSafe by Caretero.
USER MANUAL SleepSafe Caretero
IMPORTANT! Please read these instructions carefully before the first use of the product. This manual should be kept for future use.
natural_image
Technical line drawing of a mechanical frame or enclosure with mounting brackets (no text or symbols)SleepSafe
CARETERO
best for babies
SleepSafe
Thank you for choosing the Caretero SleepSafe bed rail.
You bought a modern, high quality product.
We are sure it will help your child in safe, harmonious growth.
We encourage you to learn about our full offer on our website: www.caretero.pl
Should you have any remarks about this product, feel free to share them with us.
Caretero Team.
Learn more about brand Caretero. Scan the code QR.
DISTRIBUTOR:
IKS 2 - Children's Goods Distribution Centre 9 Rybnicka Street, 43-190 Mikolow, Poland +48 32 226 06 06
IKS 2 - Children's Goods Distribution Centre
9 Rybnicka Str., 43-190 Mikolow, Polen
+48 32 226 06 06
e-mail: caretero@caretero.pl, www.caretero.pl
natural_image
Mechanical arm component with directional arrows indicating motion (no text or symbols)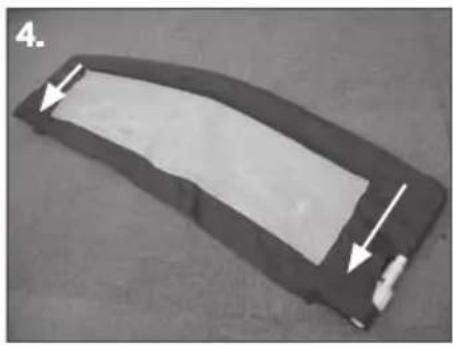
natural_image
Black rectangular object with a white inner section and two white arrows pointing downward (no text or symbols)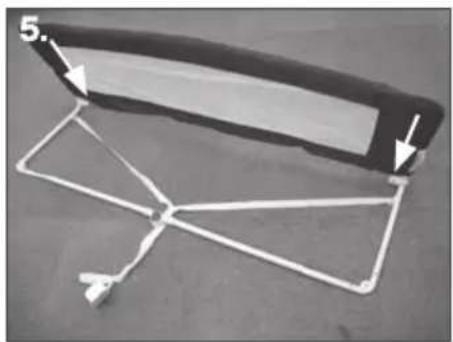
natural_image
Mechanical component with white frame and black top, no visible text or symbols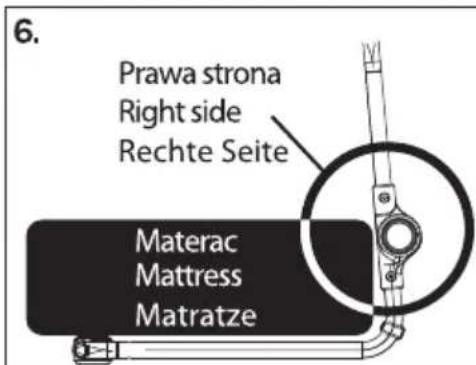
natural_image
Close-up of a mechanical component with a circular head and shaft, no visible text or symbolsnatural_image
Close-up of hands adjusting a black fabric with a white arrow pointing to the edge (no text or symbols visible)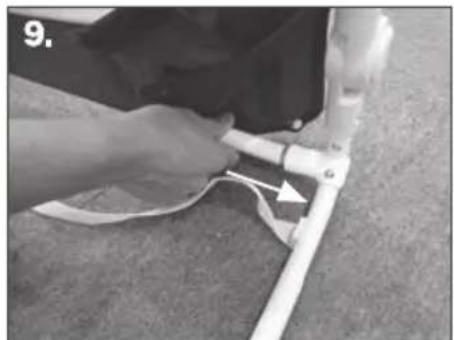
natural_image
Close-up of a hand adjusting a white cable or cable component on a carpet (no visible text or symbols)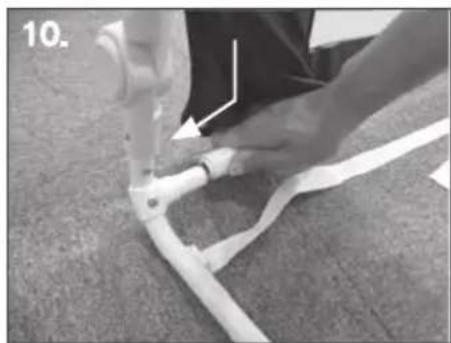
natural_image
Close-up of hands holding a white cable or pipe with a small hole, no visible text or symbols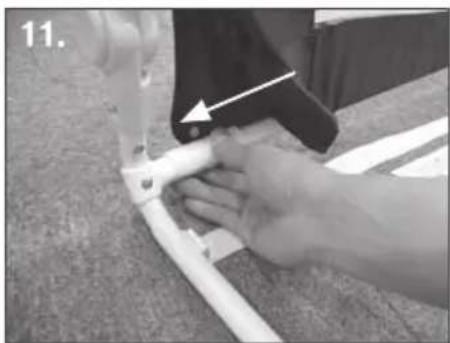
natural_image
Close-up of hands installing a white PVC pipe with a black clip, no visible text or symbols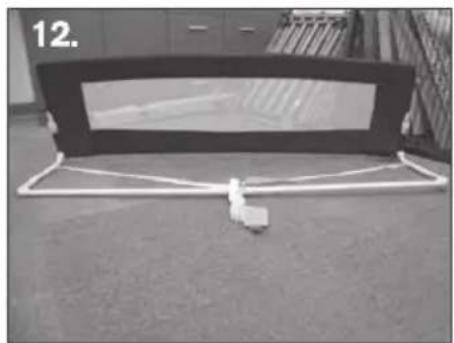
natural_image
Black and white photo of a large overhead board with a white frame, placed on a textured floor (no text or symbols visible)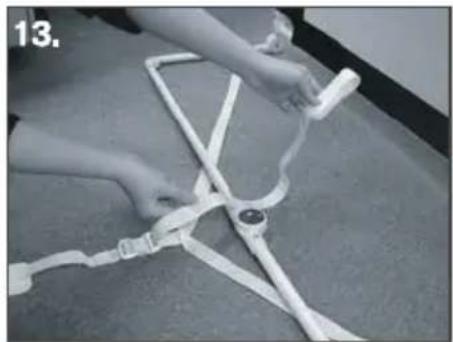
natural_image
Person assembling a white safety harness on a floor, no visible text or symbols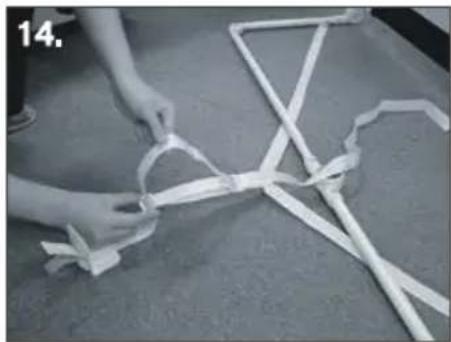
natural_image
Person tying a white ribbon on a gray surface, no text or symbols visible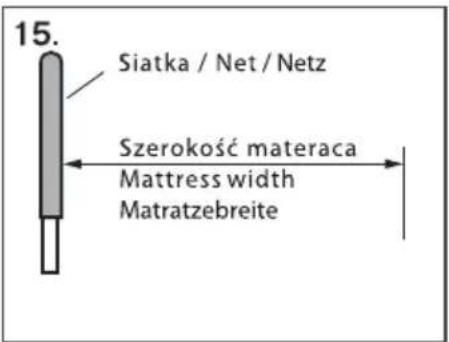
natural_image
Two white plastic frame structures on a dark surface, one rectangular and one triangular, with no visible text or symbols.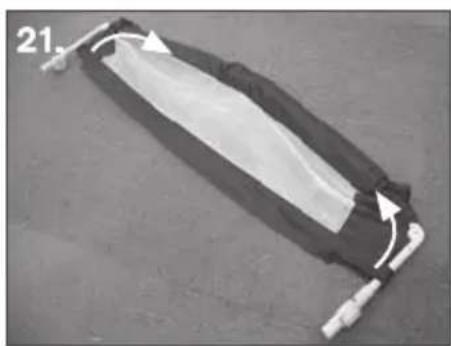
natural_image
Close-up of a black and white fabric bag with a white handle, placed on a gray surface (no text or symbols visible)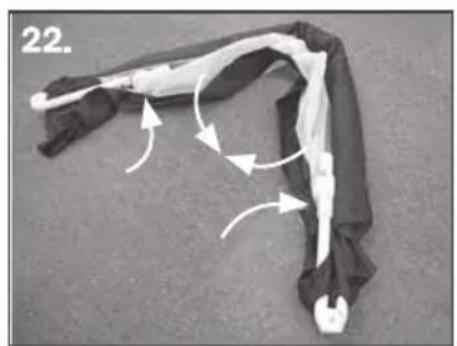
natural_image
Mechanical robotic arm with motion arrows indicating movement (no text or symbols)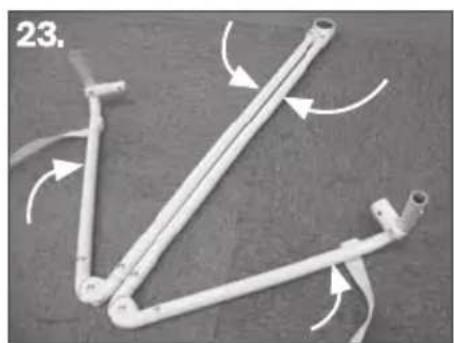
natural_image
Mechanical linkage diagram with curved arrows indicating motion (no text or symbols)WAŻNE! ZACHOWAĆ W CELU POWOŁANIA SIĘ W PRZYSZŁOŚCI! ZAPOZNAJ SIĘ DOKŁADNIE Z PONIŻSZYMI INSTRUKCJAMI, ABY ZAPOBIEC POTENCJALNYM OBRAŻENIOM TWOJEGO DZIECKA.
IMPORTANT - RETAIN FOR FUTURE REFERENCE - READ CAREFULLY. IMPROPER PRODUCT ASSEMBLY MAY CAUSE DANGER TO THE CHILD. PLEASE KEEP THIS MANUAL FOR FUTURE USE.
This bed rail conforms with the European norm BS 7972:2001+A1:2009.
WARNINGS
For use with children 18 months to 5 years of age. This bed rail is used only when the child is able to climb in and out of bed unaided.
This bed rail does not ensure the same level of safety as a child's bed or cot.
Only use mattresses with the following measurements:
Minimum size 60x150 cm, maximum size 155x190 cm and min. thickness 10 cm and max. 20 cm.
Do not use when the height of the bedding is greater than 60 cm. Never use on a bunk bed, a child's bed or any other bed that does not correspond to the present instructions.
To avoid risk of injury, carefully respect the present instructions when assembling, installing and using this bed rail.
Never leave child unattended and adult supervision is always required.
It should be checked periodically that the bed rail is always properly fitted and secure in place, and the locking mechanism on the bed rail are securely fixed.
Keep away from fire.
2 PARTS LIST
EN
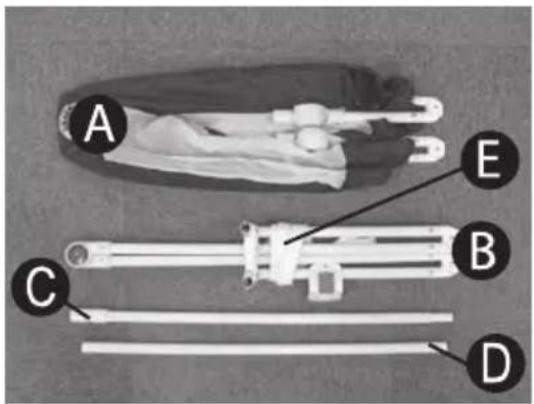
| SYM. | PART NAME | AMOUNT |
| A | Bed rail | 1 |
| B | Bed rail frame | 1 |
| C | Middle rail 1 | 1 |
| D | Middle rail 2 | 1 |
| E | Tensioning belt | 1 |
3 INSTALLING THE BED RAIL
EN
- Make sure no component is missing prior to assembly.
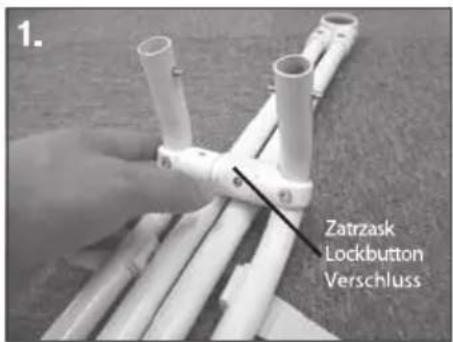
- Unfold the bed rail frame (1).
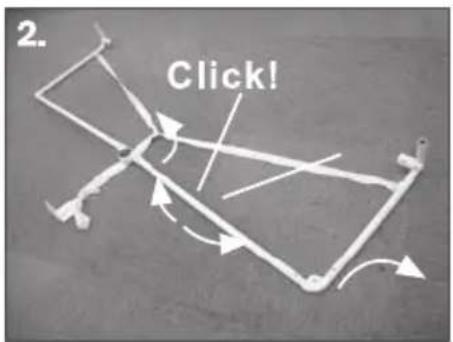
- Unfold the bottom joint until it clicks locked in place properly (2) and unfold the metal sides of the frame on both sides to a 90° angle.
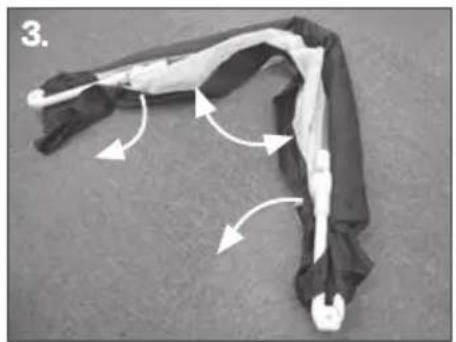
- Unfold the bed rail upholstery (3).
- Pull down both sides of the upholstery (4).
- Pull the bed rail to an upright position and place it on the frame (5).
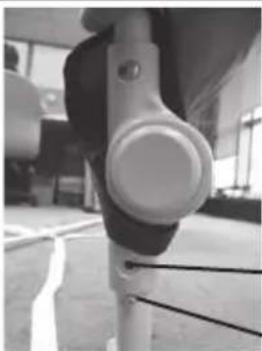
- Connect the bed rail with the frame by popping the lock buttons into lock button holes on both sides (6).
- Connect the middle rail 1 and middle rail 2 by popping the lock button into lock button hole (7).
- Slide the middle rail into the bottom of the upholstery (8).
-
Insert the middle rail into the plastic tube on the right bottom joint of the frame, make sure the lock button is securely locked (9).
-
Connect the middle rail with the plastic tube on the left bottom joint of the frame (10).
- Push the movable plastic tube buckle on the middle rail toward the left bottom joint of the frame until the lock button is securely locked (11). WARNING! Be sure to keep lock buttons securely in place.
- Fully assembled bed rail shown in picture (12).
4 INSTALLATION AND USE
EN
- Adjust length of safety belt:
[1] Measure the width of the mattress.
[2] Loosen the tensioning belt (13) and adjust its length (14) so that the distance between bed rail and L-shape plate is approximately equal to the width of the matress (15).
- To install on the bed:
[1] Keeping the bed rail upright, slide the bed rail feet beneath the mattress. Make sure the feet are placed on the boards of the bed floor.
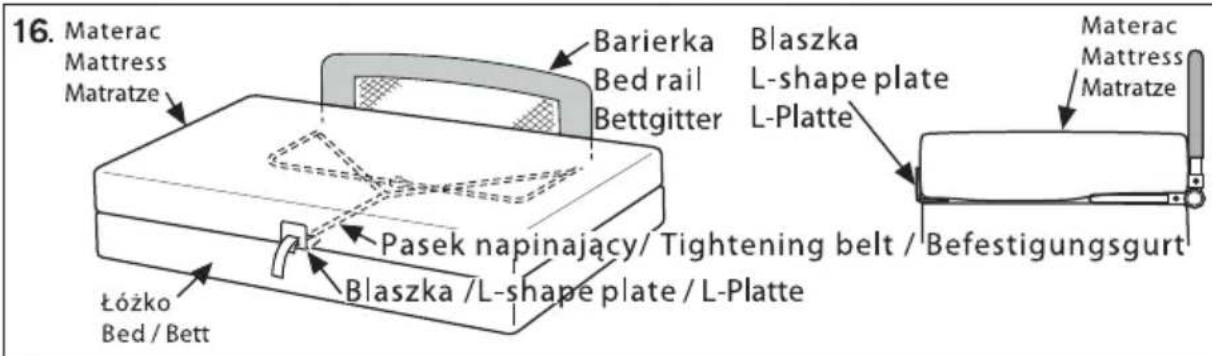
[2] Fix the L-shape plate to the edge on the other side of the mattress (16).
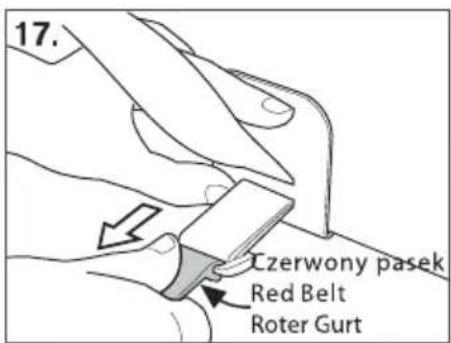
[3] Hold the L-shape plate and pull the red belt to adjust the tensioning belt length (17).
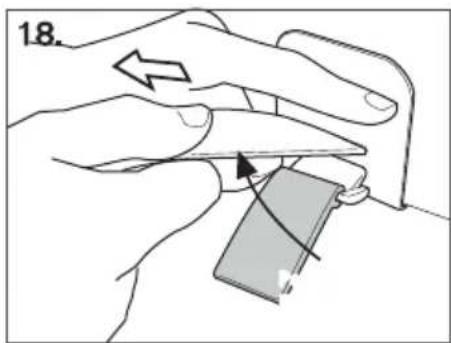
[4] Pull and fasten the tensioning belt (18).
- To fold the bed rail down:
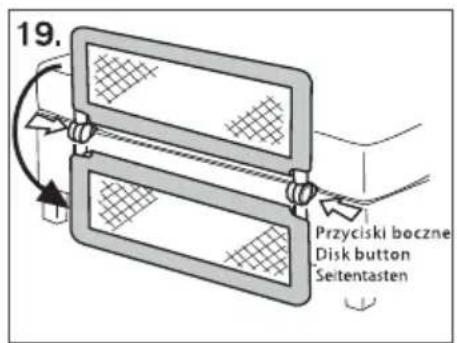
Press the disk buttons on both sides of bed rail joints to swing the bed rail down (19).
- To reposition the bed rail:
Swing the bed rail upwards so that the both joints click locked in place securely.
WARNING
- To prevent the risk of strangulation it is essential to ensure that when the bed rail is fitted into position, there is a gap of at least 250mm (10 in.), between each end of the bed and the corresponding end of the bed rail.
- The bed rail must tightly press against the side of the mattress and the fixings must be all in place.
- Once fitted in place, the bed rail should be checked to ensure that it is properly fitted and secure.
- The top edge of bed rail must be at least 16cm (6.3 in.) above top edge of the mattress.
5 FOLDING THE BED RAIL
EN
To fold for storage:
- Remove the bed rail from the bed.
- Press the disk buttons on both sides of the bed rail to fold it flat.
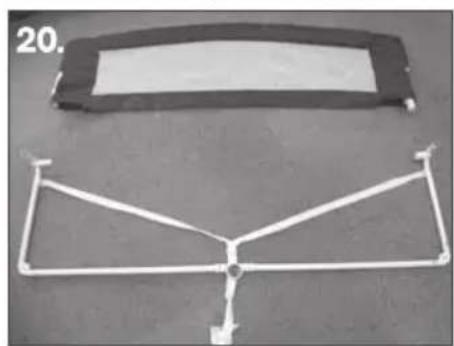
- To detach for storage, follow the installation instructions in reversed order (20-23).
(1) Detach middle rails C and D.
(2) Detach bed rail A from the frame B by popping both sides of the lock buttons out of lock button holes.
(3) Pull up the net before folding the bed rail.
(4) Fold the bed rail A on both sides.
(5) Fold the bed rail frame and connect the middle tubes B.
Remarks:
6 CLEANING AND MAINTENANCE
EN
Cleaning. Clean the safety gate using warm water and mild detergent. Use soft cloth or sponge to avoid scratches. Never use solvents or chemicals to clean teh safety gate. Fabric is removable.

- SleepSafe
- DISTRIBUTOR:
- WAŻNE! ZACHOWAĆ W CELU POWOŁANIA SIĘ W PRZYSZŁOŚCI! ZAPOZNAJ SIĘ DOKŁADNIE Z PONIŻSZYMI INSTRUKCJAMI, ABY ZAPOBIEC POTENCJALNYM OBRAŻENIOM TWOJEGO DZIECKA.
- WARNINGS
- INSTALLING THE BED RAIL
- INSTALLATION AND USE
- EN
- WARNING
- FOLDING THE BED RAIL
- To fold for storage:
- Remarks:
- CLEANING AND MAINTENANCE
Brand : Caretero
Model : SleepSafe
Category : Children's Products