
FH25S - Thermostat GENERAL Life - Free user manual and instructions
Find the device manual for free FH25S GENERAL Life in PDF.


| Product Type | Thermostat |
| Brand | GENERAL Life |
| Model | FH25S |
| Dimensions (H x W x D) | Approximately 80 x 80 x 25 mm |
| Weight | Approximately 100 g |
| Power Supply | 2 x AA batteries or 24 VAC |
| Display Type | LCD |
| Temperature Range | 5°C to 35°C |
| Accuracy | ±0.5°C |
| Programmable | Yes, 7-day programmable |
| Modes | Heat, Cool, Auto, Fan Only |
| Fan Control | On, Auto, Circulate |
| Compatibility | Most 24V gas, oil, electric, heat pump systems |
| Battery Low Indicator | Yes |
| Keypad Lock | Yes (child lock) |
| Maintenance | Wipe with a dry cloth; do not use harsh chemicals |
| Spare Parts | AA batteries (user-replaceable) |
| Repairability | Limited; refer to manual or contact support |
| Installation | Wall mount, requires wiring (see manual) |
| Warranty | Standard 1 year (check manual) |
Frequently Asked Questions - FH25S GENERAL Life
User questions about FH25S GENERAL Life
0 question about this device. Answer the ones you know or ask your own.
Ask a new question about this device
Download the instructions for your Thermostat in PDF format for free! Find your manual FH25S - GENERAL Life and take your electronic device back in hand. On this page are published all the documents necessary for the use of your device. FH25S by GENERAL Life.
USER MANUAL FH25S GENERAL Life
FH25/FH25S is a digital room thermostat designed for underfloor heating and cooling system. The user can get more comfortable and economic heating/cooling by adjusting the room thermostat with the required temperature.
- Sensitive Temperature Measurement
- Hysteresis Adjustment
- Temperature Calibration
- ON/OFF Control
• Temperature Calibration Wired connection - wired connection
• Floor sensor temperature setting
• Heating/Cooling Modes

FH25/FH25S AND EQUIPMENTS

TECHNICAL DATA
| Dimensions (H / L / W) | 85.7mm / 85.7mm / 33.5mm |
| Operating Current | 230V AC |
| Relay NO Switching Current | 7A (240VAC – Resistive load)10A (120VAC – Resistive load) |
| Temperature Measurement Accuracy | 0.1°C |
| Operating Sensitivity | (-2.0ircC) - (+2.0ircC) |
| Operating Temperature Range | (5ircC) - (30ircC) |
| Operating Temperature | (-10ircC) - (+50ircC) |
| Storage Temperature | (-20ircC) - (+60ircC) |
ROOM THERMOSTAT

| 1 | Room Temperature | |
| 2 | Underfloor Heating Temperature* | |
| 3 | Set Temperature | |
| 4 | Heating Indicator- If the Heating Indicator is blinking, the heating unit is working.- If the Heating Indicator lights up constantly, the heating unit is not working. | |
| 5 | Cooling Indicator- If the Cooling Indicator is blinking, the cooling unit is working.- If the Cooling Indicator is steady, the cooling unit is not working. |
* External floor sensor is only active when it is connected.
ENGLISH
ROOM THERMOSTAT PLACEMENT
Place your Room Thermostat in a room you use frequently in your living space. For example; like the hall or living room of your home. Avoid installing the Room Thermostat in places where there is a lot of air circulation, such as at the doorway or by the window. Also, do not place it close to heating units (heater core, fireplace, etc.) and in direct sunlight. We recommend that the room thermostat is placed at a height of 150 cm from the floor.

ROOM THERMOSTAT TEMPERATURE CALIBRATION
Temperature sensors used in Room Thermostats are very sensitive. Based on the temperature on the thermometers in your living space you need to calibrate your Room Thermostat. For this:
- While your device is off, press and hold the button for 3 seconds.
- Press the button until you see the calibration menu that says "CFL" press it. The temperature difference you want from the calibration menu, Adjust by turning the button to the right or left. This value can be adjusted between "-8°C" and "+8°C".
- Press the button until the device turns off to save the settings and
exit.
- Note: Recommended temperature calibration setting is "0.0°C".
ROOM THERMOSTAT HEATING / COOLING MODES
Your Room Thermostat has heating and cooling modes. In order to switch easily between heating and cooling modes:
- While your device is turned off, press and hold the button for 3 seconds.
- Press the button until the "PU" menu appears.
- You can switch between HE" (heating) and Eo" (cooling) modes by turning the button to right or left in the Fu" menu.
- To save the settings and exit, press the button until the device turns off.
- The settings you have made have been saved. Once you turned on your device, it will operate with the changed settings.
ROOM THERMOSTAT HYSTERESIS POSITIVE MENU
The hysteresis positive factory setting of your Room Thermostat is 0.5irc C. This value can be adjusted between "0.1irc C" and "2.0°C". While the hysteresis positive value is 0.5irc C, your Room Thermostat will send a command to your heating unit when the room temperature rises 0.5irc C above the set temperature. For example, when we set the Room Thermostat to 22.0irc C, your heating unit will stop when the room temperature rises to 22.5irc C. To change the hysteresis positive setting:
- While your device is off, press and hold the button for 3 seconds.
- "Press the button until the HSP" menu appears.
- In the hysteresis positive menu, you can adjust the operating sensitivity by turning the HSP " button to the right or left.
- Press the button until the device turns off to save the settings and exit.
- The settings you have made have been saved. When you turn on your device, it will work with the operating sensitivity you have set.
ROOM THERMOSTAT HYSTERESIS NEGATIVE MENU
The hysteresis negative factory setting of your Room Thermostat is -0.5ircC . This value can be adjusted between -0.1ircC and -2.0ircC . While the hysteresis negative value is -0.5ircC , your Room Thermostat will send a command to your heating unit when the room temperature drops 0.5ircC below the set temperature. For example, when we set the Room Thermostat to 22.0ircC , your heating unit will work when the room temperature drops to 21.5ircC . To change the hysteresis negative setting
- :While your device is off, press and hold the button for 3 seconds.
- Press the button until the HSn "menu appears.
- In the hysteresis negative menu, you can adjust the operating sensitivity by turning the H5n." button to the right or left.
- Press the button until the device turns off to save the settings and exit.
- The settings you have made have been saved. When you turn on your device, it will work with the operating sensitivity you have set.
FLOOR SENSOR TEMPERATURE SETTING MENU
If a floor sensor is installed with Room Thermostat, only GENERAL Life floor sensor should be installed. Otherwise, the product will be out of warranty.
*In case of floor sensor connected, the following settings apply. The factory temperature setting for floor sensor is 28°C. This value can be adjusted between 23°C and 34°C. The floor sensor operating sensitivity is 1°C. For example, when you set the floor sensor temperature to 28°C, your Room Thermostat will stop the heating unit from working when the floor temperature rises to 29°C. When the floor temperature drops to 27°C, it starts the heating unit of the Room Thermostat. To change the floor sensor temperature:
- Press and hold the button for 3 seconds while your device is off.
- Press the button until the " menu appears.
- Adjust the operating temperature by turning the " button to the right or left in the floor sensor temperature menu that appears.
- Press the button until the device turns off to save the settings and exit.
- The settings you have made have been saved. When you turn on your device, it will operate at the floor sensor temperature you have set.
FACTORY RESET
You can reset the Room Thermostat to its factory default settings.
This action resets the calibration setting and hysteresis settings to the factory setting. To factory reset your Room Thermostat:
- While your device is off, press and hold the button for 3 seconds.
- Press the button until the "S" menu appears.
- While in the "S t " menu, turn the button to the right or left, select the "YS" option and press the button.
- Your device will turn off and reset to factory settings.
ROOM THERMOSTAT WORKING PRINCIPLE
Heating Mode
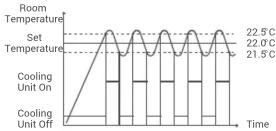
As soon as you energize your Room Thermostat, it will start working. Your room thermostat takes the average room temperature of last 40 seconds as basis. If the ambient temperature rises above the hysteresis positive temperature you set, your Room Thermostat turns off the heating unit, and if it drops below hysteresis negative temperature value, it turns on the heating unit. Thus, it is ensured that the ambient temperature remains within a certain range.
If the floor sensor measures temperature above 28irc C, it turns off the heating unit.*
*External floor sensor is only active when it is connected.

Cooling Mode
As soon as you energize your Room Thermostat, it will start working. Your room thermostat takes the average room temperature of last 40 seconds as basis. If the ambient temperature rises above the hysteresis positive temperature you set, your Room Thermostat will start the cooling unit and if it drops below hysteresis negative temperature value, will stop the cooling unit. Thus, it is ensured that the ambient temperature remains within a certain range.
*External floor sensor is deactivated in the cooling mode.
ROOM THERMOSTAT WIRING DIAGRAM
①

④

②

⑤

③
⑥WARNING!
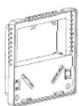
The assembly of product should be done according to the image above.
For electrical connection, please see diagram 5.
- Should not be used in case the usage of a wiring center
WIRING DIAGRAM FOR ACTUATORS

230V AC
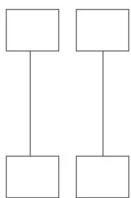
ACTUATOR
WIRING DIAGRAM FOR WIRING CENTER

flowchart
graph TD
    A["NLL1 N1"] --> B["230V AC"]
    C["WIRING CENTER"] --> D["230V AC"]
    E[" "] --> F[" "]
    G[" "] --> H[" "]
    I[" "] --> J[" "]
WARNING!
Operating related to the control panel, heating / cooling unit or electrical installation must be carried out by persons with professional qualifications.
DECLARATION OF CONFORMITY
ISIPARK İÇ VE DIŞ TİC. İNŞ. ISITMA SİSTEMLERİ OTO. SAN.A.Ş.which Head Office and production site is located on Fatih Mah. 1188 Sk.No:13/A Sarnıç - Gaziemir - İZMİR - TÜRKİYE confirms and declares that the product marked with CE and its specifications below is covered by the provisions of the mentioned directive.
Brand · GENERAL Life
Product Name : FH25/FH25S
Product Type : Floor Heating Room Thermostat
Compatible Directives:
Electromagnetic Compatibility Regulation 2014/30/EU
(EN 61000-6-1:2019, EN 61000-6-3:2021)
Low Voltage Directive 2014/35/EU (IEC 60730-2-9)
Additional Information: The mentioned product can be used with
boilers with on / off output and compliance with the directives only
covers the product. ISIPARK is not responsible for the entire system's
compliance with the directives. This statement is not valid if changes


ISIPARK IC VE DIŞ TİC,İS.İSIT.SİS.ÜTO.SAN.A.S.
Fatih Mah. 1188 Sokak No.3/A Sarniç/İZMİR
Tel: (0232) 457 99 656/67ax:(0232) 457 91 22
Mersis No:0466052137000016
Gaziem@V.D. 466 073 1206
WARRANTY CONDITIONS
1- The warranty period starts from the invoice date and warranted against manufacturing defects for 2 years.
2-Devices and apparatus are delivered to the customer in working condition in our company. On-site commissioning is subject to a service fee.
3-The repair of the devices and apparatus covered by the warranty is carried out in our company factory and should send by a contracted transportation company. In on-site services, the transportation and accommodation expenses of the service personnel belong to the customer. The shift fee during transportation is added to the service fee and collected in advance.
4-The maintenance of devices and apparatus is done in our company. For the maintenance of the devices and apparatus, the round travel fares belong to the customer.
5-In case of malfunctioning of the devices and apparatus whose warranty period continues, it is tested in our company whether the malfunction is caused by a customer or manufacturer fault, and it is reported with a report issued by our company.
6-In case of detection of manufacturer-induced errors of devices and apparatus whose warranty period continues, the customer can request a replacement or repair of the devices and apparatus at full expense by the manufacturer, unless it's higher than the product's price.
7-In the event that the faults of the devices and apparatus whose warranty period continues are determined as caused by the customer, all expenses would belong to the customer.
8-Customers should be aware of damages (if there are any) of product and warn manufacturer since the day warranty duration starts. If customer do not warn manufacturer with knowledge of damage, customer loses the rights of article 6.
9-Malfunctions resulting from the use of devices and apparatus contrary to the matters stated in the User Manual are not covered by the warranty.
10-Devices and their apparatus are out of warranty if they are beaten, broken or scratched by the customer.
11-Damages resulting from the use of devices and apparatus belonging to other brands and models without the approval of the manufacturer are not covered by the warranty.
12-Battery leakage and errors due to rust, oxidation, and liquid contact by working in acidic/humid environments are not covered by the warranty.
13-When the product is not used for a long period (more than 15 days), remove the batteries. Otherwise, malfunctions that will occur are out of warranty.
14-Damages that may occur during the transportation of devices and apparatus are not covered by the warranty. Customers can take transportation insurance.
15-Damages caused by mains voltage / faulty electrical installation are not covered by the warranty.
16-Devices and apparatuses are out of warranty for malfunctions caused by force majeure such as fire, flood, earthquake, etc.
17-All of the devices and apparatuses, including all their parts, are under the warranty of our company.
18-In case of malfunction of the devices and apparatuses within the warranty period, the time spent during repairment period is added to the warranty period. The repair period of the product cannot exceed 20 working days. This period starts from the date of notification to the service station of the malfunction related to the product or, in the absence of a service station, to the seller, dealer, agency, representative, importer or manufacturer of the product. Consumer can report the problem by, phone, fax, e-mail, registered and reply paid letter or a similar way. However, in case of a conflict, responsibility of prove is belong to the customer. If the malfunction of the product is not repaired within 20 working days, the manufacturer-producer or importer; has to allocate another product with similar features to the use of the consumer until the repair of the product is completed.
19-Although the consumer uses his/her repair rights,
-If the product breaks down for 4 times in a year or 6 times in warranty duration and these problems effects main purpose of the product.
(starting from delivery time during warranty.)
- Exceeding the maximum time required for repair, - In the event that the service station is not available, if it is determined that the repair of the defect is not possible with the report prepared (in order) by one of the seller, dealer, agency, representative, importer or manufacturer, a refund or a price discount at the rate of defect can be requested.
20-The customer can make complaints and appeals to consumer courts or consumer arbitration committees.
21-The warranty document must be kept by the customer during the warranty period. If the document is lost, a second document will not be issued. In case of loss, repair and replacement of devices and apparatus will be made for a fee.
WARRANTY CERTIFICATE
Manufacturer
Title: ISIPARK İÇ DIŞ TİC. A.Ş.
Address: Fatih Mah. 1188 Sk. No:13/A Sarniç
Gaziemir Izmir-TURKIYE
Tel: +90 (232) 457 99 50
Fax. +90 (232) 437-91-22 E-mail: generollife@generollife.com.tr
E-mail: generalme@g Authorized Signature:
Company Stamp:
Product
Type: Floor Heating Room Thermostat
Brand: GENERAL Life
Model: FH25/FH25S
Warranty Period: 2 Years
Max. Time to Repair. 20 Days
Bandori and Senar Number.
X
Vendor
Title:
Address:
Tel: Fax:
E-Mail:
Invoice Date and Number;
Delivery Time and Place:
Authorized Signature:
Company Stamp:
Product
Type: Floor Heating Room Thermostat
Brand: GENERAL Life
Model. FH25/FH25S
ISIPARK reserves the rights of changing product specifications and user manuals.
* For all changes, you may visit generallife.com.tr
⑤
⑥
⑦
⑧
- • Heating/Cooling Modes
- FH25/FH25S AND EQUIPMENTS
- ROOM THERMOSTAT
- ENGLISH
- ROOM THERMOSTAT PLACEMENT
- ROOM THERMOSTAT TEMPERATURE CALIBRATION
- ROOM THERMOSTAT HEATING / COOLING MODES
- ROOM THERMOSTAT HYSTERESIS POSITIVE MENU
- ROOM THERMOSTAT HYSTERESIS NEGATIVE MENU
- FLOOR SENSOR TEMPERATURE SETTING MENU
- FACTORY RESET
- ROOM THERMOSTAT WORKING PRINCIPLE
- Heating Mode
- Cooling Mode
- ROOM THERMOSTAT WIRING DIAGRAM
- WIRING DIAGRAM FOR ACTUATORS
- WIRING DIAGRAM FOR WIRING CENTER
- WARNING!
- DECLARATION OF CONFORMITY
- WARRANTY CONDITIONS
- WARRANTY CERTIFICATE
- Manufacturer
- Product
- Vendor
- Tel: Fax:
Brand : GENERAL Life
Model : FH25S
Category : Thermostat