
SLE 40F60TCS - Television SENCOR - Free user manual and instructions
Find the device manual for free SLE 40F60TCS SENCOR in PDF.


| Product Type | LED TV |
| Screen Size | 40" (100 cm) |
| Resolution | 1920 x 1080 (Full HD) |
| Aspect Ratio | 16:9 |
| Brightness | 220 cd/m² |
| Response Time | 10 ms |
| Viewing Angle | H: 170°, V: 170° |
| Power Consumption (On) | 75 W |
| Standby Consumption | < 0.5 W |
| Annual Energy Consumption | 76 kWh |
| Dimensions with Stand (W x H x D) | 899 x 555 x 234 mm |
| Dimensions without Stand (W x H x D) | 899 x 512 x 84 mm |
| Net Weight with Stand | 6.3 kg |
| Net Weight without Stand | 6.0 kg |
| VESA Wall Mount | 200 x 200 mm |
| RF Input | 2x (Antenna / Satellite) |
| HDMI Ports | 3x |
| USB Port | 1x (max 500 mA) |
| Component (YPbPr) Input | 1x |
| VGA Input | 1x |
| AV Input | 1x |
| Digital Audio Output | 1x (optical) |
| Supported USB Formats | MKV, AVI, MP4, WMV, MOV, XviD, MP3, JPEG, JPG, TXT |
| PVR Recording to USB | Yes |
| Timeshift | Yes |
| Electronic Program Guide (EPG) | Yes |
| Teletext | Yes (1000 pages) |
| Noise Reduction | Yes (Off/Low/Middle/High/Default) |
| Hotel Mode | Yes |
| Energy Efficiency Class | A |
Frequently Asked Questions - SLE 40F60TCS SENCOR
User questions about SLE 40F60TCS SENCOR
0 question about this device. Answer the ones you know or ask your own.
Ask a new question about this device
Download the instructions for your Television in PDF format for free! Find your manual SLE 40F60TCS - SENCOR and take your electronic device back in hand. On this page are published all the documents necessary for the use of your device. SLE 40F60TCS by SENCOR.
USER MANUAL SLE 40F60TCS SENCOR
- Important safety instructions....2
- Assembling the stand....8
- Device 9
3.1. Button functions of the control panel....9
3.2. Connecting the TV connectors....10
- Remote control....12
- Turn on first time 16
5.1. Language selection....16
5.2. Country selection....16
5.3. Automatic tuning....17
- Menu....19
6.1 Channel Menu - satellite 19
6.2. Channel menu - ATV/DTV 22
6.3. Picture Menu 26
6.4. Sound menu 28
6.5.Time menu 30
6.6. Lock menu 33
6.7. Hotel mode 35
6.8. Setup menu 36
6.9. ATV Channel menu....41
6.10. Component Input / HDMI / AV menu 42
6.11. Screen menu (only in computer mode) 42
- USB 44
7.1 Photo Menu 45
7.2. Music menu 46
7.3. Movie menu....47
7.4.Text Menu 48
-
Troubleshooting....49
-
Technical specifications....52
9.1. Information sheet 54
1. Important safety instructions
To be able to use this product properly, read this user's manual carefully and keep it for future reference. If you plan to give (sell) this device to a third person, include all documentation, including this manual, with the transaction.
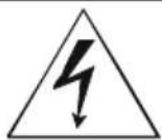
The lightning symbol inside a triangle indicates the device has dangerous voltage that may cause electric shock.
ATTENTION
RISK OF ELECTRIC SHOCK – DO NOT OPEN!
TO REDUCE THE RISK OF ELECTRIC SHOCK, DO NOT REMOVE THE COVER (OR BACK SIDE). THE INSIDE OF THE DEVICE DOES NOT CONTAIN PARTS THAT CAN BE REPAIRED BY THE USER. REFER TO AUTHORIZED REPAIR SHOPS FOR REPAIR WORK.

The exclamation point symbol inside an isosceles triangle indicates important operation and repair instructions in the included device documentation.
General safety instructions
- Please read this manual carefully before using the device. Follow this manual and the instructions inside.
• Heed all warnings.
• Follow all instructions.
• Use only the attachments and accessories specified by the manufacturer.
• OPEN FLAMES, FOR EXAMPLE A BURNING CANDLE, SHALL NOT BE PLACED ON THE DEVICE. DO NOT PLACE HOT OBJECTS OR OBJECTS WITH AN OPEN FIRE ON THE DEVICE, FOR EXAMPLE CANDLES OR NIGHT LAMPS. HIGH TEMPERATURES MAY MELT PLASTIC COMPONENTS AND CAUSE FIRE.
• Use the device in temperate climate. - The manufacturer and vendor of the device are in not in any way liable for any direct or indirect damages caused by not following the instructions for installation, setup, operation, maintenance and cleaning of the device mentioned in this manual.
- Protect the device against impacts, falls, blows, shocks, vibration, moisture and dust.
- Prior to granting children consent to use the device, they shall become familiar with the proper and safe use of the player, corresponding to their age. If the device has a headphone jack, do not use headphones set to maximum volume. Risk of hearing damage or loss.
Installation, control
• Install the device according to the instructions in the manual.
- Leave free space around the device, it is necessary for proper air circulation. It helps to dissipate the heat generated by the operation of the device. By covering the air vents of the cabinet, you risk overheating and damage of the device. You must ensure that the air circulation will not be prevented by covering the air vents with e.g. newspaper, tablecloth, curtain, etc. Follow the installation instructions in the manual.
- This device shall not be kept in a closed area, such as a library or shelf, provided sufficient ventilation cannot be provided or the manufacturer's instructions cannot be followed.
- Do not place any objects into the air vents or any other holes. Risk of touching components with dangerous voltage or shorting parts that could cause fire or electric shock. Do not pour any liquids into the device. Do not install the device in direct sunlight, or close to heat sources, like radiators, heat exchangers, stoves or other appliances (including amplifiers) producing heat. High temperatures shorten the life of the electronic components of the device significantly. Do not use and do not leave the device near an open fire.
- The device must not be exposed to dripping or running water and you must not place upon it objects filled with liquid, e.g. vases. Protect the device against becoming wet, sprayed on or poured on by any liquid, do not leave or install the device outdoors. Do not use the device outdoors. You risk electric shock or fire by not adhering to these instructions.
• Do not use the device close to water. - Handle the glass panels and cover of the device with care. The glass screen can break on impact and cause serious injury.
• Make sure the power cord is not stepped on or compressed, especially near the plug and point leading from the device or adapter. The power plug (adapter) is used to disconnect the system and must be easy to access. - Do not use a device with a damaged power cord or plug. If the power cord or plug is damaged, turn off the device, disconnect it from the power supply and contact your authorized repair shop. Only a professional can replace a damaged power cord or plug. Under no circumstances should you attempt to replace the power cord or plug yourself.
- Do not attempt to bypass the safety function of the polarized plug. If the plug cannot be plugged into your socket, refer to an electrician to replace your obsolete socket. Before plugging the device into the socket make sure the voltage in your socket corresponds with the voltage on the label of the device or power adapter. If you are not sure of the type of power source you have in your home, refer to your vendor or local power company.
- Before switching, make sure that all network connections are made properly and in accordance with the manufacturer's instructions. Switch the device off and unplug it from the socket before plugging in or changing the connection of the device.
- Remember to always unplug the plug (adapter) from the socket before unplugging the power cord.
- Plug the power cord into an independent socket. Do not overload wall sockets using extension cords or unified sockets. Risk of electric shock.
-
Hold the power cord by the plug and not by the cable when pulling out from the socket.
-
Disconnect the power cord from the power outlet during thunderstorms, or when not in use for a longer period of time. Avoid carrying the device from a cool environment into a warm environment or vice versa, or operating the device in a moist environment. Air moisture may condense in some areas within the device case and may cause the device to become temporarily inoperable.
- In this case, leave the device in a warm and well-ventilated area and leave for 1–2 hours until the moisture evaporates. The device can be normally used again. Be especially cautious when using the device for the first time during a cool season immediately after purchasing. Do not place the device on an unstable cart, stand, console or table. The device can fall and cause serious injury to children or adults or seriously damage the device and other objects. Only carts, stands or tables defined by the manufacturer or sold with the device shall be used. Any assembly work with the device shall be carried out according to the manufacturer's instructions and shall use assembly accessories recommended by the manufacturer.
- Do not lean against the device, do not lean over or use the device as a step. Avoid quick movements. Make sure children do not play with the machine.
- Be careful when moving the device when placed on a cart. Suddenly stopping, using excessive force and uneven surfaces may cause the cart holding the device to tip over.
• Under no circumstances are the manufacturer or vendor liable for any direct or indirect damage caused by the failure to observe the instructions for installation, configuration, operation, treatment and cleaning of this device included within this manual. - Protect the device against impacts, falls, blows, shocks, vibration, moisture and dust. Do not expose the device to extreme temperatures or humidity.

Note:
If the device is powered by an adapter, only use the AC adapter and power cord included with the device. Do not use defective sockets. Make sure the cord is properly plugged into the socket. If the cord is loose, an electric arc can cause fire. Refer to a qualified electrician to replace sockets.
Note:
Plug the device into a properly grounded sockets with protective grounding pin only.
Note:
If you plan to mount the device to a wall or ceiling, follow the instructions of the manufacturer and the user's manual for the given system.
Repairs and maintenance
- To avoid risks of electric shock or fire, do not remove the device from the case – the case does not contain components that the user could repair or adjust without the necessary equipment and qualification. Refer to a professional service centre if your device requires service.
• In the event of any unusual occurrences during the use of the device, e.g. smelling the characteristic smell of burning insulation or even seeing a smoke, turn the device off immediately, disconnect the power supply and wait with continuing use of the device until you learn the result of its inspection by the service personnel. - Leave all service to qualified service personnel. Service is necessary when the device is damaged in any way, for example in case of damage to the power cord, spilling liquid on the device, intrusion of foreign objects into the device, when the device is exposed to rain or moisture, if the device does not function in the usual manner or if it fell.
- When repairing or replacing a component of the device, make sure the repair technician used spare parts defined by the manufacturer to ensure the replaced components have the same features as the original. Unauthorized replacements can cause fire, electric shock or other risks.
- Prior to cleaning, moving or other maintenance work, unplug the cord (adapter) from the socket.
- Clean the device with a dry cloth only. Do not use gasoline, thinner or other solvents or abrasives, scouring pads, or sponges with scouring pads to clean the device.
Note: Do not throw the device into your common household waste. Respect laws and regulations when disposing of the machine.
Remote controller and battery
- Do not expose the remote controller or battery to direct sunlight, or close to heat sources, like radiators, heat exchangers, stoves or other appliances (including amplifiers) producing heat. Do not use and do not leave the device near an open fire. Make sure the sensor is not exposed to intense light (e.g. sunlight) or fluorescent tube light, which could lower the efficiency and reliability of the remote controller.
- The remote controller or battery must not be exposed to dripping or running water and objects filled with liquid, e.g. vases, shall not be placed on the device. Protect the remote controller against becoming wet, sprayed or poured on by any liquid. Do not use outdoors. Failure to respect these instructions can lead to the remote controller or battery becoming damaged.
• Do not use the device close to water.
• The impact the battery disposal has on the environment shall be monitored carefully.
• Using the batteries incorrectly can result in leakage and corrosion. Follow the following instructions to ensure proper remote control operation:
- Do not insert the batteries in the wrong direction.
- Do not charge, heat, open or short the batteries.
- Do not throw batteries into a fire.
- Do not leave dead batteries in the remote controller.
- Do not combine various types of batteries or old and new batteries.
- If you do not use the remote controller for a longer period of time, remove the batteries to prevent damaging the remote controller by the batteries leaking out.
- If the remote controller does not work correctly or its range decreases, replace all batteries with new ones.
- If there is an electrolyte leakage from the batteries, have the remote control serviced by an authorized technician.

WARNING:
To prevent risk of fire or electric shock, do not expose the device to rain or moisture.

WARNING:
The batteries must not be exposed to excessive heat, for example sunlight, fire, etc.

This symbol indicates the device has double insulation between dangerous voltage from the network and user-accessible parts. Replace parts with identical spare parts only.
- Do not leave a static image on the LCD panel for more than 2 hours. This may result in a damaged panel.
• LCD screens are made using precision technology to provide even the finest image details. Several defective pixels can appear on the screen from time to time, indicated as red, blue, green or black
natural_image
Close-up black-and-white photo of a sunflower with visible petals and center (no text or symbols)dots (up to 0.001% of the total pixel count of the screen). This does not affect the characteristics and the effectiveness of your TV set.
Notes on the USB connector:
• USB memory devices require being connected directly into the device. To prevent a failing or interrupting data transfer, do not use USB extension cable. Electrostatic discharge can cause the device to not function. In this case, the user must restart the device.
- Before using a USB memory device, test that it communicates with the device and its read and write speed.
- For maximum reading speed, we recommend to keep the disc space defragmented. Use file system FAT32, single partition, no protection.
- If the reading/writing of the memory device is not smooth, it can lead to undesirable effects, such as interruption of the image (blocky image) or failure of whole frames, audio malfunctions, and in extreme cases, stopping of the operation. Unexpected behaviour of the connected storage device, or the presence of viruses and other malicious software can cause the device to stop the functioning with the need to restart it.
- The USB connector is a standard type and cannot power a USB device with a high power consumption (e.g. hard drives). Use a device with its own power and power them with their own power supply.
- The device was designed with respect to maximum compatibility with memory devices. Considering the variety of devices on the market, we cannot guarantee compatibility with every USB device available. Should you run into any issues, try formatting the memory device directly in the device. Should problems persist, use another memory device.
Due to wide range of the USB devices on the market, it is not possible to ensure compatibility of the device with all types of USB devices.
Serial number
The device's serial number is a unique number that unambiguously identifies your device. Mark down the serial number of your device below along with additional information important for the unambiguous identification of your device.
Serial number:
Date of purchase: ____
Notes:
- The graphics in this manual is informative.
- The menu on your TV screen may be slightly different from the illustrations in this manual.
- The information in the document are subject to change without notice. The manufacturer accepts no liability for damages incurred directly or indirectly from errors, incompleteness or discrepancies between the instruction manual and the product described.
2. Assembling the stand
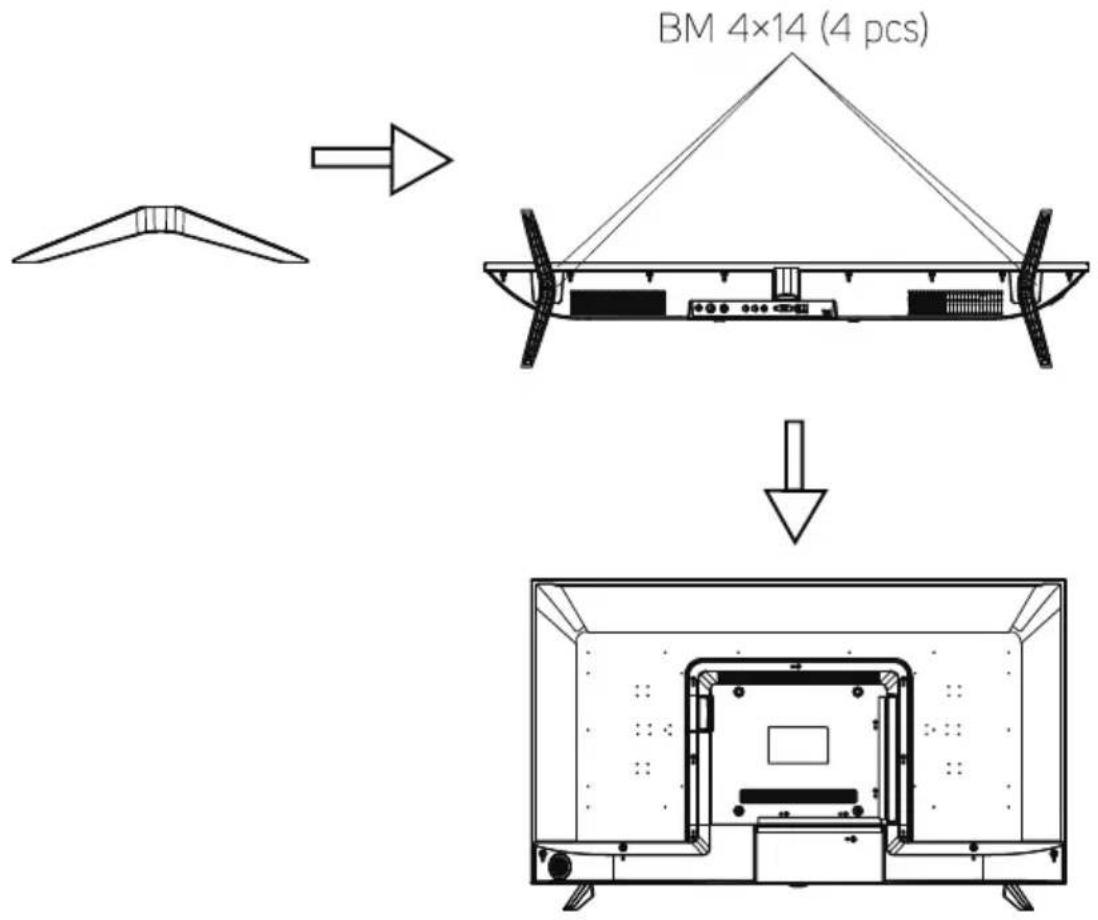
Before attaching /removing the stand, make sure the TV is turned off and plug is disconnected from the wall outlet.
Before performing the work, put underneath the LED TV set some soft material (e.g. blanket). This will prevent damage to it. Ensure a proper attachment of the supports so that the TV set is stable.
Place the assembled TV set on a firm and flat surface.
Instruction for assembling the stand
3. Device
3.1. Button functions of the control panel
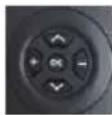
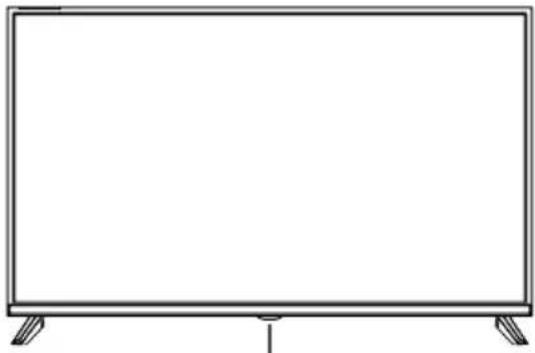
The buttons in the back on the bottom right control the main functions of the TV set, including the on-screen menu. If you want to use advanced functions, you have to use the remote controller.
Note:
The figures are only for orientation
natural_image
Line drawing of a flat-screen TV with two legs and a central screen (no text or symbols)Remote control sensor
• The red light on indicates that the TV is in standby mode.
- When the TV set is on, the indicator light is green.
| Keyboard Functions | ||
| Icon | Name | Functions |
| V ∧ | Up/Down | Change the TV reception channel to a higher/lower number. In the TV menu, move to a higher/lower item. |
| - + | Left/Right | Lowers/Increases the volume of TV sound. In the TV menu, selects left/right item. |
| Main menu | Entry into the main setup menu | |
| Source | Signal source selection. | |
| Standby | Turn the TV off to standby. | |
When you press OK the screen shows three basic icons. Press OK again to move to the next function. Holding the selected function starts it. The icons disappear after 5 sec. of inactivity.

Turning off the TV as POWER on the remote controller.

Opens TV menu (as MENU on RC). To get back, you need to reactivate the Menu from the list of icons.

TV source selection (as SOURCE on RC).
3.2. Connecting the TV connectors
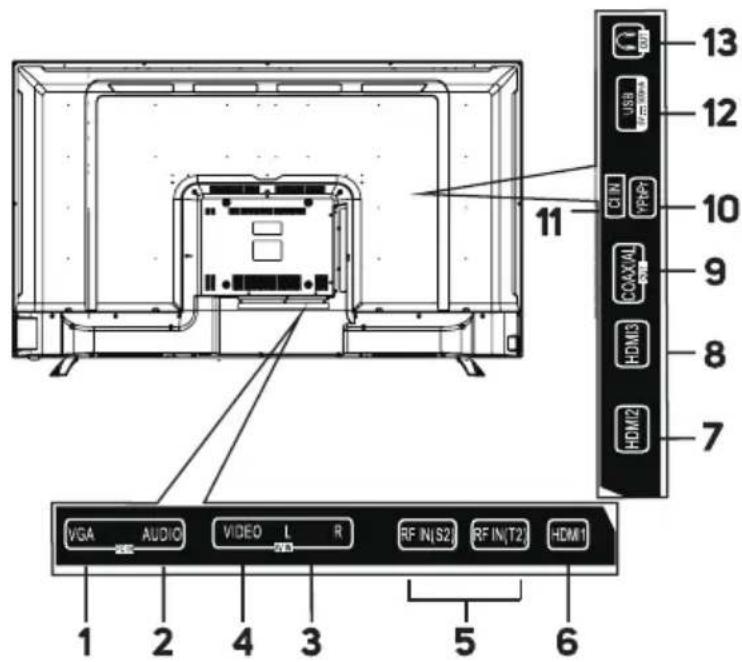
- PC: Connect one end of the VGA cable to the computer's VGA port, connect the other end of the VGA cable to the VGA port on the TV, and tighten the screws clockwise at both ends.
NOTE:
- Do not use excessive force when connecting the 15-pin connector to avoid damaging individual pins.
- AUDIO: connect the audio output connector on your computer
3.-4.AV IN: The AV output connector of DVD can be connected to AV input via the AV cable. - ANT (1, 2): This connector is used to connect to an antenna, cable TV, satellite, or a closed TV circuit.
6.-8. HDMI (1, 2, 3): To connect an AV device to an HDMI connector (such as a set-top box or DVD player). HDMI is an abbreviation for "high definition multimedia interface" and audio and video signals are simultaneously transmitted via one HDMI cable.
NOTE:
- When connecting the HDMI cable, ensure proper orientation and do not use excessive force to avoid damaging the connector pins.
- DIGITAL AUDIO OUT: Transmitting digital audio signal from TV to external device.
- COMPONENT (YPbPr): The output connector COMPONENT (YPbPr) DVD can be connected to the input COMPONENT (YPbPr) of the TV using the AV cable.
NOTE:
-
Audio signals of the AV and COMPONENT connectors are inputs of connectors "R - Audio - L".
• If the COMPONENT (YPbPr) and AV connectors act as miniterminals and share the same audio signal, use a triple audio/video cable. -
CI: Insert the CI (Common Interface) card into the PCMCIA slot according to the arrow on the CI card.
- USB: USB connector for connecting supported devices such as a USB flash drive.
- Ω: Connector for connecting headphones or other sound devices.
- Connect the power cable to a 100-240 V\~ power network.
NOTE:
- The allowed range of the power supply voltage of this TV is 100–240 V\~50/60 Hz. Do not connect the TV to power outside this range.
4. Remote control
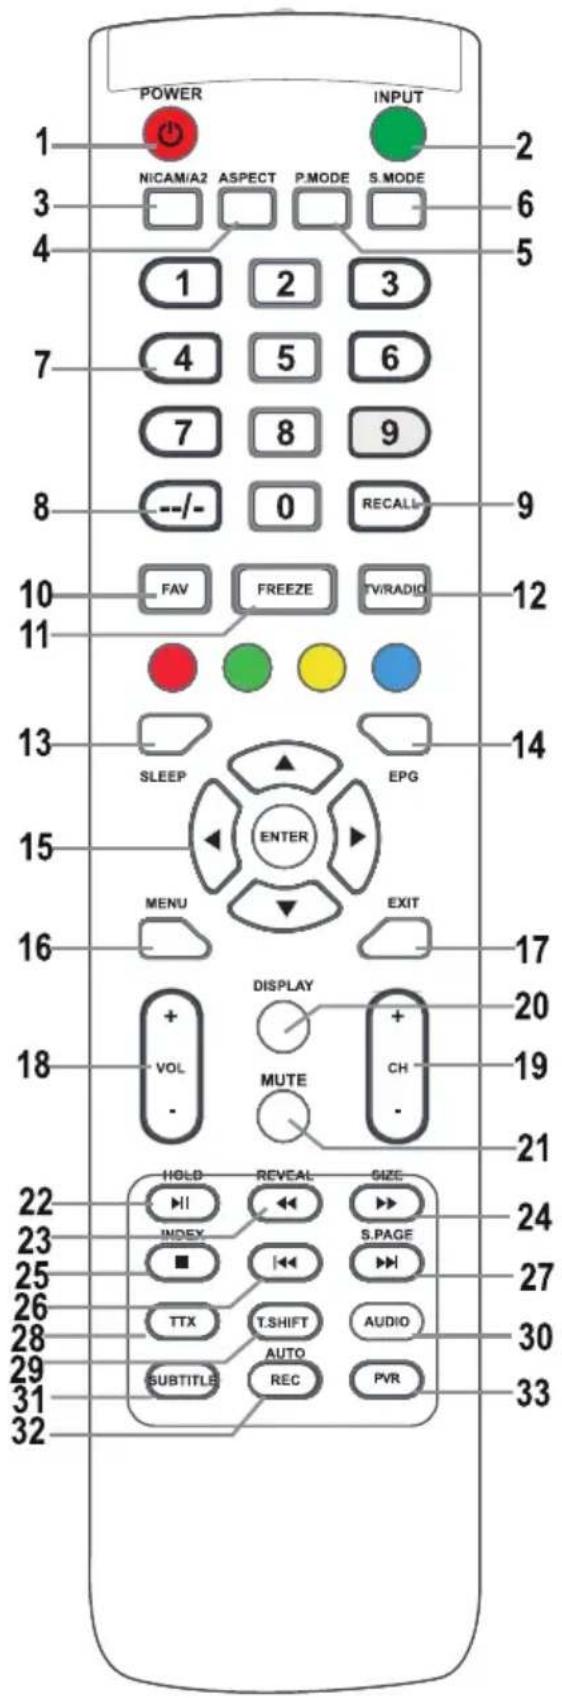
- POWER ⏻ button
Turns the television on/from the stand-by mode.
- INPUT button
Press to select the desired input.
- NICAM button
NICAM/A2 input or output.
- ASPECT button
Page aspect ratio selection, e.g. 16:9, Zoom, Auto, 4:3.
- PMODE button
Press repeatedly to select a picture mode.
- SMODE mode
Press repeatedly to select a sound mode.
- Numerical buttons 0-9
Press 0–9 buttons directly to select a TV channel while watching the TV. Enter the page number in the teletext mode, etc.
- --/- button
It is used to enter channel numbers with various digit counts, e.g. 1 - 11 - 111.
- RECALL button
Button to switch the previously watched channel.
- FAV button
Press to enter/exit the favourites menu in the TV mode.
- FREEZE button
Freeze picture
- TV/RADIO button
Switch between the television and radio modes
- SLEEP button
Set the automatic shut off time for the television.
- EPG button
Press to show/hide the electronic program guide.
- ▲/▼/◄/►/ENTER buttons
Used to navigate in a menu on the screen and to set up the TV according to your preferences.
ENTER button
Used to enter/exit the channel list menu (DTV/ATV only).
- MENU button
It displays TV main menu in TV mode.
- EXIT button
Exit the menu or a screen.
- VOL+/- buttons
Press to increase/decrease the volume.
- CH +/- buttons
Press to switch among channels.
- DISPLAY buttons
Press to show the source and information about channels.
- MUTE button
Press to mute the sound. Press is again to restore the sound or press VOL + button.
- HOLD/▶II button
HOLD button: hold the current display
▶II button: play/pause or start a time shift recording.
23. REVEAL/◄◄ button
REVEAL button: Press REVEAL button to display / hide hidden teletext information (depends on the broadcast).
◀ button: fast rewind
24. SIZE/▶ button
SIZE button: Press SIZE button to change the size of the screen in MEDIA mode.
▶▶ button: fast forward
25. INDEX/■ button
INDEX button: call up a teletext content page.
■ button: stop recording / playback
26. ◀◀ button
Skip to previous track.
27. S.PAGE/▶▶I button
S.PAGE button: Press S.PAGE button to enter a teletext subpage.
▶▶I button: skip to the next track
28. TTX button
Turn teletext on / off.
Note: The teletext function is optional and the availability of buttons depends on the model. Teletext information fully depends on the operator of the channel.
29. T.SHIFT button
It is used to start recording with a time shift (i.e. time shift). Function is only available in the DTV mode and connected USB flash memory.
30. AUDIO button
DTV/MEDIO mode: select a background sound if available.
ATV mode: select a sound mode: Stereo / Dual I/II / Mono.
Other sources: select left/right channel
31. SUBTITLE button
Press to show/hide subtitles in the bottom part of the screen, if they are available.
32. AUTO/REC button
AUTO button: used for automatic configuration in PC mode.
REC button: press to start recording (only DTV mode).
33. PVR button
It is used to enter/exit the PVR setting menu.
Note:
Remove batter during storage or when you are not using the device for a long time. To control the device using the remote control, point the remote control at the device and then press the button with the required function. The maximum range of the remote control is about 5 meters with a deviation of up to +/- 30° from the perpendicular direction to the reception sensor of the remote control on the front side of the device. The falling capacity of the batteries gradually reduces the remote control range. There must be no solid obstacles in the area between the remote control and the device when the remote control is being used. During standard use the lifetime of batteries in the remote control is about 1 year. When the effective range of the remote control is substantially reduced, or when there are problems with its use, change both the batteries in the remote control. If you are not using the remote control for a longer period of time, take out both batteries from it – in this way you will prevent potential damage caused by their leakage.
Avoid strong impact of light (e.g. sunlight or light from strong fluorescent/saving sources) which can reduce the effectiveness and reliability of IR remote control.
5. Turn on first time
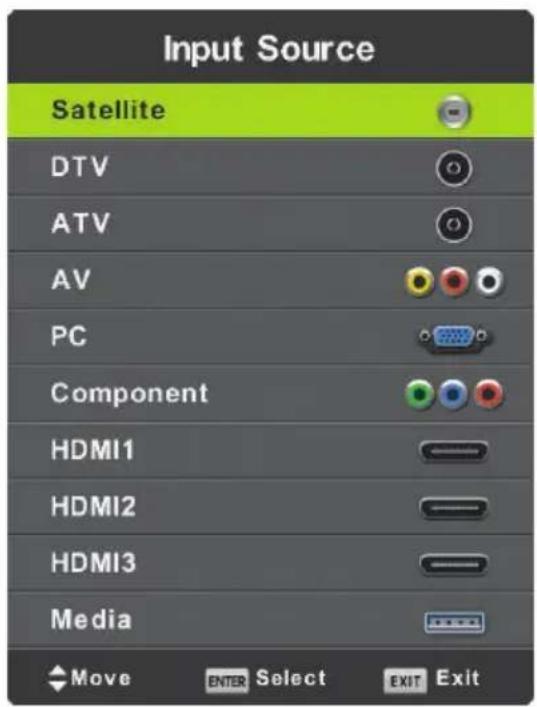
Press SOURCE to display the list of input sources.
Press ▼/▲ or SOURCE to select the required input source.
Press ENTER to switch to the appropriate input source.
Press EXIT to exit menu.
To watch television connect the antenna cable with functional reception (antenna, common antenna, cable...) to TV input marked as "RF-In".
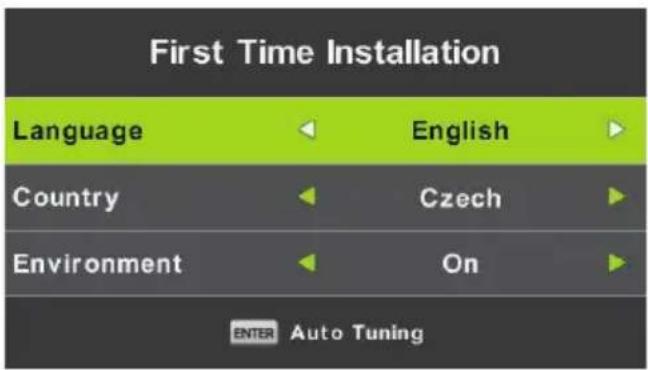
5.1. Language selection
Using buttons ◀/▶ select the language used in menus and news.
5.2. Country selection
Using buttons ▼/▲ select the country menu.
Using buttons ◀/▶ select the required country.
5.3. Automatic tuning
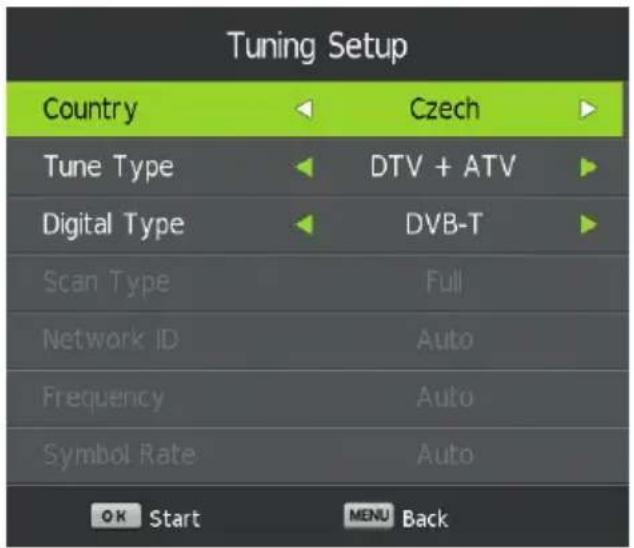
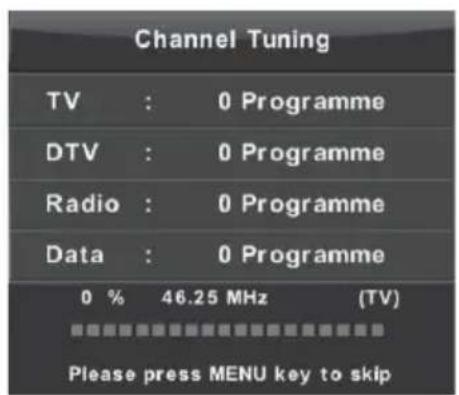
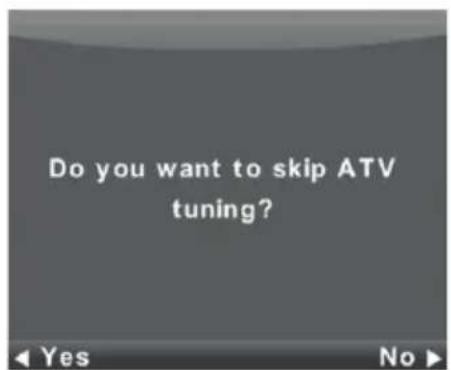
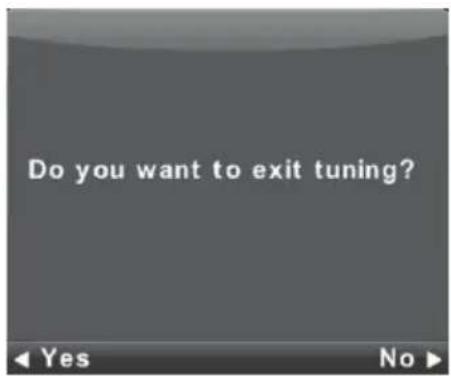
Select between the Analogue (ATV) or digital (DTV) reception or keep both receptions ATV+DTV. First will be processed the tuning of the analogue television channels (ATV). If you want to skip the ATV tuning, press the Menu button and the button with left arrow. Afterwards, the tuning of the digital television channels will be done (DTV). If you want to skip the DTV tuning, press the Menu button and the button with left arrow.
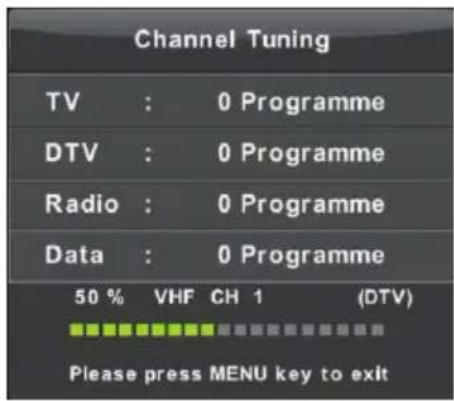
Note:
When the automatic tuning does not find any receivable channel (e.g. due to poor antenna) or you interrupted the tuning manually, you can still tune channels manually, one by one, in the device menu described below. For this you will need some technical information about the broadcast that you want to receive, e.g. the method of transmission, of the channels frequency, sound modes, the transmission speed etc.
A successful completion of the automatic tuning results in saving of the list of the available TV programs and radio stations, which you can receive immediately. In the case of multiple occurrences of the same or similar programs (e.g. due to local variations of the same central program or a remote reception with interference or local reception "clean" reception) verify, which station works best for you or modify the list.
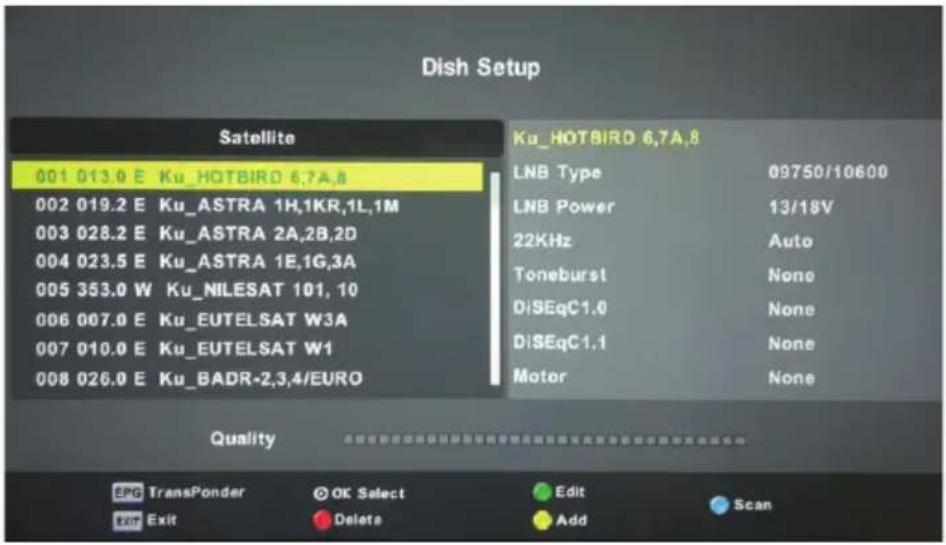
Automatic satellite tuning is adapted to tune one satellite antenna with a single LNB and corresponds to the setting DiSEqC = None / None. If your antenna is complicated, specify the antenna parameters (especially control LNB DiSEqC commands) by setting that the installer of your antenna system tells you. Enter these data in the Satellite setting/Dish Setup, described in the next section.
6. Menu
6.1. Channel Menu - satellite

WARNING:
We strongly recommend that the antenna system is installed by an expert. A good quality installation will reward you with a stable and trouble-free reception.
Press MENU to display the main menu.
Use the buttons ◀/▶ to select the item CHANNEL in the main menu.
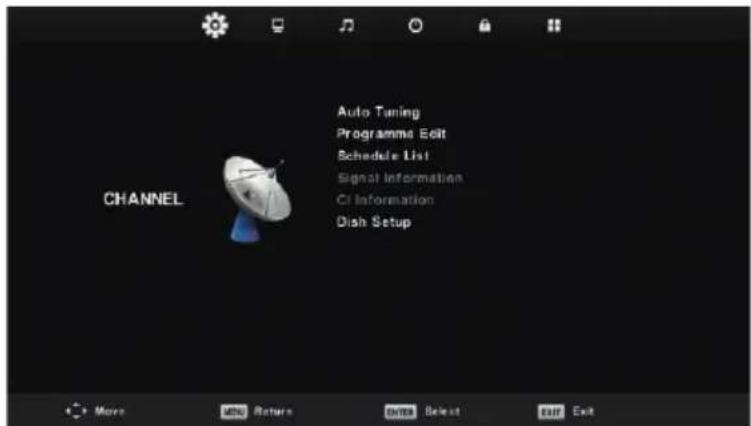
- Using the buttons ▼/▲ select the item, which you want to modify in the menu CHANNEL.
- Press ENTER and perform the modification.
- When you finish the modification, press MENU, save the changes and return to the previous menu.
Acting on the information from your installer of the antenna system, specify all parameters for each of the satellites for which your system is ready and which you intend to receive. If a parameter is wrong or your antenna system will not accept any values Auto or None / None, it will not be possible to receive the satellite or under the name of a particular satellite will be accepted another satellite.
When setting a satellite follow the description of the buttons for individual functions on the screen.
Select a satellite from the list, use the Right arrow to move in the parameter settings and set them correctly. Return to the list using the button EXIT. When the parameters are properly set and if it is active the first of the transponders on the list of the given satellite (still hidden) broadcasts the horizontal indicator Quality (bottom of the window) changes from empty to a nonzero value, e.g. it will be in the middle of the range. If you want to display the list of transponders of a given satellite, press the button EPG. Each
transponder is mainly characterized by a frequency (and also by H/V polarization and symbol rate, e.g. 27500 kSym/s) and carries several TV programs and if you want to receive them, when selected, the indicator Quality must again show non-zero value, e.g. the middle of the range.
6.1.1. Fast scan M7 FastScan
- Set correctly the DiSEqC switches for the Astra 23.5° east satellite.
• Set the scanning mode to Fast Scan
• Press ENTER and wait until the scanning is finished.
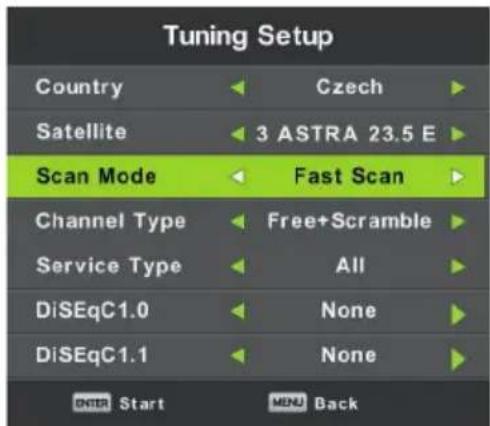
Note on FastScan:
FastScan finds the appropriate operator channel table and saves it in the device list. The list taken by FastScan function, the position and the numbers of the individual channels are determined by the broadcast operator and the user can not change them. The list is stored in the device regardless of the current reception options, antenna settings, subscriptions etc. The user is guaranteed to have in the device all the channels the operator is transmitting.
Note about updating the FastScan and consumption list:
The device will check the channel list of the operator FastScan for up to date channel list availability when switched into Standby mode. To do this, simply switch off the TV at the selected Satellite input. The device will not stop to power the satellite antenna during the update, the status LED may flash several times. Only after completion of the update (about 3 minutes) will its consumption fall below the prescribed value of 0.5 W.
6.1.2. Advanced/Special tuning
You can perform advanced and special tuning in the Dish Setup of the satellite.
You can scan one or more satellites, one or more transponders by selection from their list using the button ENTER. After selection press blue button and select from the following window three selections:
- Scanning mode between Default (is searched according to the list on TV), Blind scan (the slowest, searches many modes and parameters of broadcasting regardless if any broadcasting exists there), Network (first is scanned for the network table NIT and then are scanned the transponders found there).
- Channel type select – Free/FTA, for which reception is not necessary any card of conditional access (CA) and Scrambled (sometimes called "coded"), where you need an access card. The scrambled channels are displayed in the list by a symbol of a key.
- Service type - select DTV and Radio.
Example of advanced tuning process Skylink:
- Set correctly according to your antenna system the satellites' reception Astra 23,5° east (Astra 1E, 1G, 3A). (Or check the presence and setting of individual transponders according to the list of the operator.)
- Select (check by pressing ENTER) in the list of this satellite the transponder 12070 MHz, horizontal polarization, symbol rate 27500 kSym/s.
• After you press Scan select Network tuning. The television will first find the NIT table on TP12070 and then tunes in the programs, which are not listed there. (If you receive also the satellite Astra 19,2° east, tune programs from several transponders of this satellite, if you paid for these programs and want to receive them.)
• You can delete from the extensive list of programs those, which you do not require, e.g. because they belong to another operator, whose access card you do not own.
6.2. Channel menu - ATV/DTV
Press MENU to display the main menu.
Use the buttons ◀/▶ to select the item CHANNEL in the main menu.
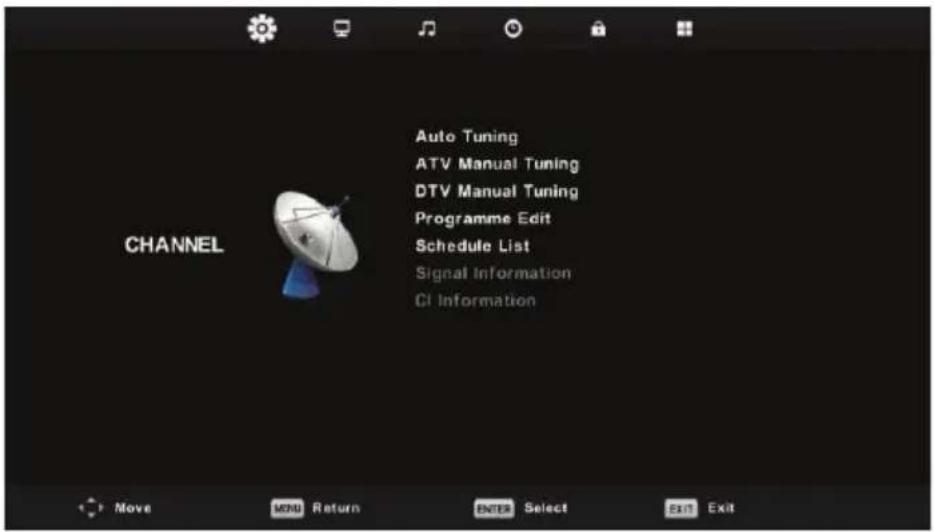
- Using the buttons ▼/▲ select the item, which you want to modify in the menu CHANNEL.
- Press ENTER and perform the modification.
- When you finish the modification, press MENU, save the changes and return to the previous menu.
6.2.1. Automatic tuning
Using the buttons ▼/▲ select the item Auto Tuning and enter it by pressing ENTER. The same action will happen like in the first tuning, all the previously tuned channels will be deleted.
6.2.2. Manual ATV tuning
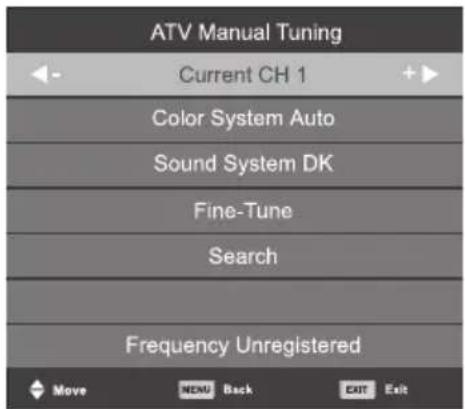
Current CH (Current channel)
Setting the channel number.
Color System
Select the color system.
Sound System
Select the sound system.
Fine-Tune
Fine tuning of channel frequency.
Search
Start channel search.
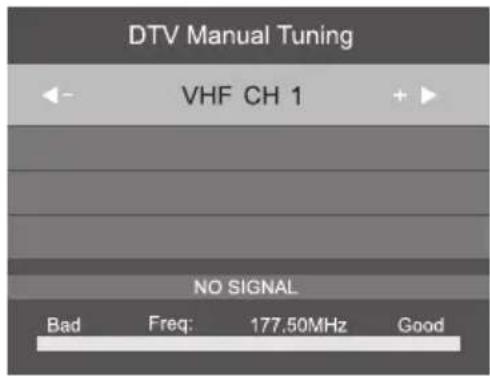
6.2.3. Manual DTV tuning
Using the buttons ▼/▲ select the item DTV Manual Tuning and press ENTER to enter the submenu.
Using the buttons ◀/▶ select the channel and press ENTER to perform program search.
6.2.4. Program edit
Using the buttons ▼/▲ select the item Program Edit and press ENTER to enter the submenu.
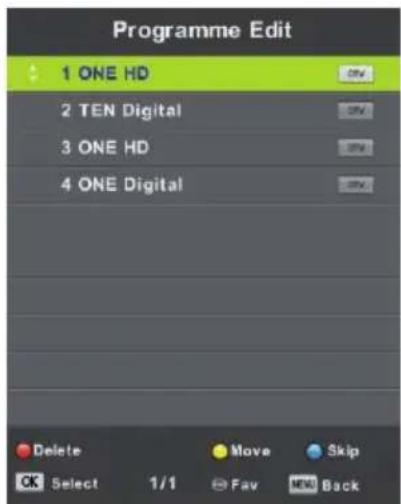
Use the three color buttons ● ● to program a channel.
First, press the buttons ▼/▲ to mark the channel, which you want to select. Then:
Use the red button to remove the program from the list.
Use the yellow button to move the program.
Use the blue button to skip the channel (the television will automatically skip the channel when you will use the buttons PR+/- for switching channels).
Press FAV to add or remove the channel from the list of the Favourite channels.
The position and numbers of each channel captured by FastScan are determined by the broadcast operator and the user can not change them. The color buttons are inoperative.
6.2.5. Schedule list
You can program in the digital broadcast system certain time dependent actions, which are called Events. These events scheduled by you (programmed) are saved in the list.
Using the buttons ▼/▲ select the item Schedule List and press ENTER to enter the submenu. It is available with some sources.
![Schedule List (0% Uses) 11:44 05 Nov 1/1 Programme Title Date 1 [DTV]Manual Timer Set 05/11/2010 T ONE HD Manual Timer Set 11:47-12:17 Move Add Edit Exit](/content/2026/05/854159/images/9adbfd81378766ae6ddfabbb5174cfd914471c277019303e3129c74c31eae0f9.jpg)
Enter the following interface using the yellow button.
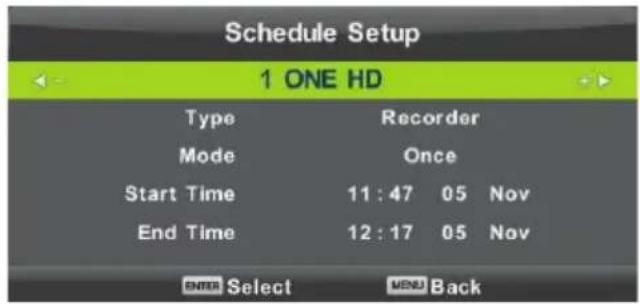
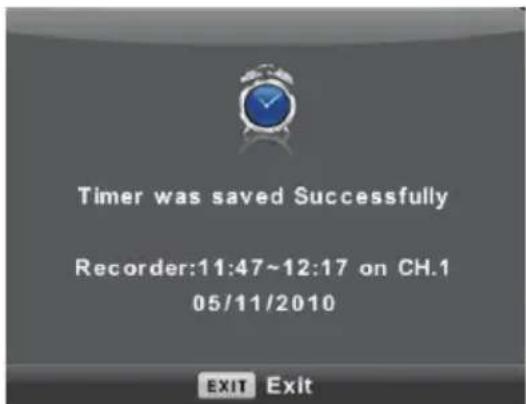
If there is a conflict in the set time a warning appears.
Note:
Scheduled tasks require precise time setting, otherwise their execution may be inaccurate or unreliable. Use accurate time from broadcast to schedule tasks, set correct time zone, daylight saving time, and perform tasks when the TV is on.
Note:
If your Conditional Access System (CAM) supports URI protection, you need to enter the PIN (CI CAM PIN) of your CA system for the first time. This is different from the TV lock password, it is assigned by the CAM operator.
6.2.6. Signal information
Use the buttons ▼/▲ to select the item Signal Information. Press ENTER to display detailed information about the signal, its strength and quality (interference level). Available only for the DTV signal. For satisfactory reception use only programs/channels with the highest values of both variables, max. is 100.
| Signal Information | |
| Channel: 5 (177.50MHz) | |
| Network ... | |
| Modulation Unknow | |
| Quality 100 | (Good) |
| Strength 0 | (Weak) |
6.3. Picture Menu
Press MENU to display the main menu.
Use the buttons ◀/▶ to select the item PICTURE in the main menu.
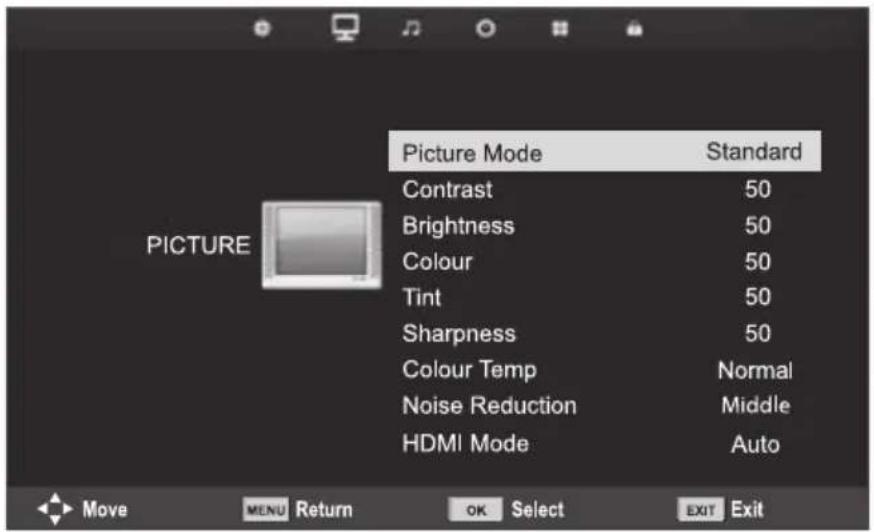
- Using the buttons ▼/▲ select the item, which you want to set in the menu PICTURE.
- Press ENTER and set.
- After you finish the setting, save it by pressing the button MENU and return to the previous menu.
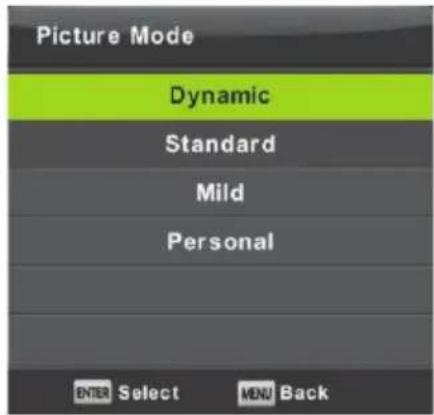
6.3.1. Picture mode
Using the buttons ▼/▲ select the item Picture Mode and press ENTER to enter the submenu.
If the picture is in the Personal mode, you can change the values of contrast, brightness, colors, sharpness and tint.
Tip:
For direct picture mode change you can use the button P.M.
Contrast / Brightness / Color / Tint / Sharpness
Using the buttons ▼/▲ select the item and then perform the modification using the buttons.
Contrast: The level of intensity of the light places in the picture. The dark places remain unchanged.
Brightness: Setting the overall brightness of the picture. It will affect the dark places in the picture.
Colour: Setting the color saturation according to your preferences.
Tint: Used for color compensation, only for NTSC.
Sharpness: Setting the highlighting of picture details.
Note:
The items are available only for Personal picture setting.
6.3.2. Color temperature
Change of the overall color presentation.
Using the buttons ▼/▲ select the item Color Temperature and then press ENTER to enter the submenu.
Using the buttons ◀/▶ select the mode (available picture modes: Cold, Normal, Warm).
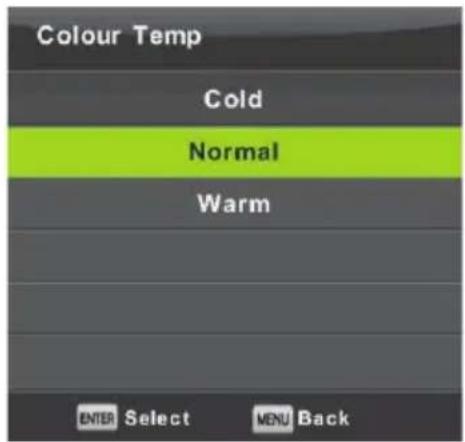
Cold Emphasizes blue tint of the white color.
Normal Keeps the white color neutral.
Warm Emphasizes reddish tint of the white color
6.3.3. Noise reduction
Used to filter and suppress noise in an image and improve image quality. Using the buttons ▼/▲ select the item Noise Reduction and them press ENTER to enter the submenu.
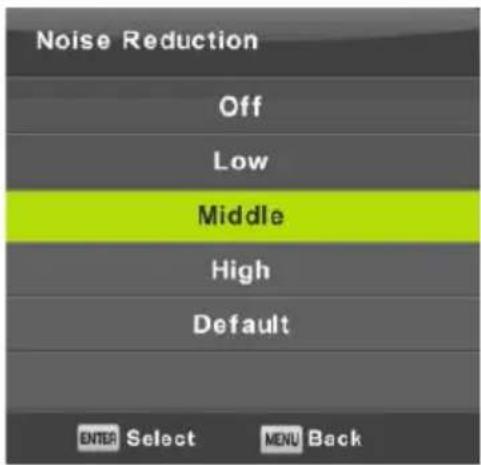
Off: Noise detection in the picture is off.
Low: Detection and reduction of a low picture noise.
Middle: Detection and reduction of a medium strong picture noise.
High: Detection and reduction of a strong picture noise.
Default: Set as default.
6.3.4. HDMI mode
Select for the currently connected source in the HDMI input either Video (e.g. satellite receiver) or PC (computer) or AUTO. This way you will adjust the picture processing and its size to the current source. When a source is not connected the HDMI is not active.
6.4. Sound menu
Press MENU to display the main menu.
Press ◀/▶ to select in the main menu the item SOUND.
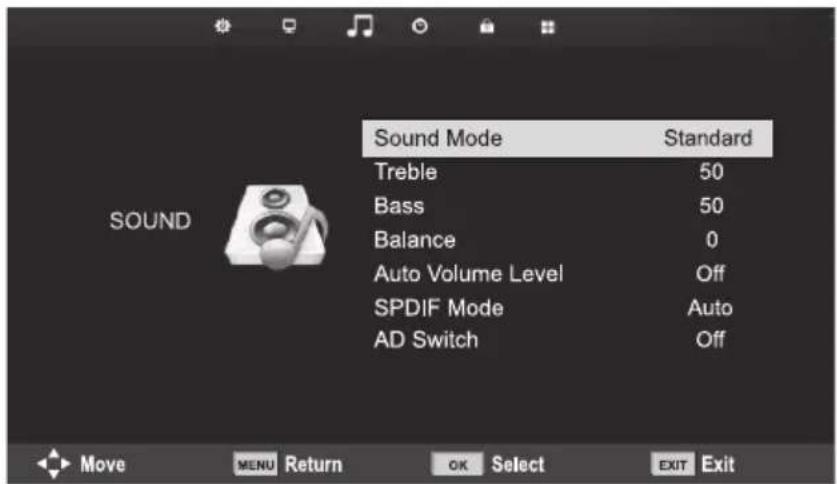
- Using the buttons ▼/▲ select the item, which you want to set in the menu SOUND.
- Press ENTER and set.
- After you finish the setting, save it by pressing the button MENU and return to the previous menu.
6.4.1. Sound mode
Use the buttons ▼/▲ to select the item Sound Mode and press ENTER to enter the submenu.
Use the buttons ▼/▲ to make selection.
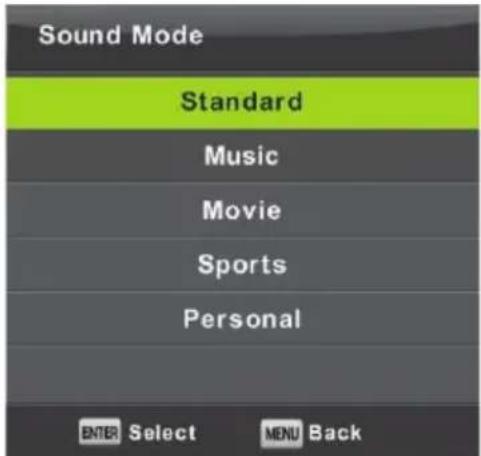
If the sound is in Personal mode(Personal), you can change the treble and bass values.
Tip:
To change the sound mode directly, use the button S.M. on the remote controller.
Standard: Provides balanced sound in all environments.
Music: Maintains the original sound. Suitable for music programs.
Movie: Emphasizes the treble and bass for an enhanced audio experience.
Sports: Emphasizes voice in sports programs.
Personal: It allows you to customize the sound settings.
Note:
Bass and treble are available only in the Personal mode, where you can set it as necessary.
6.4.2. Balance
Use the buttons ▼/▲ to select the item Balance. Use the buttons ◀/▶ to perform the adjustment.
6.4.3. Automatic volume levelling
Use the buttons ▼/▲ to select the item Auto Volume Level and then use the buttons ◀/▶ to select the option On or Off.
6.4.4. Digital output
Use the buttons ▼/▲ to select the item SPDIF Mode and then use the buttons ◀/▶ to select the option Off, PCM or Auto. Designed to process the external digital sound.
6.4.5. Switching the sound description
Use the buttons ▼/▲ to select the item AD Switch and then use the buttons ◀/▶ to select the option On or Off. Function for the visually impaired, at which an active audio track describes the current picture. It requires the support of the encoded data stream. When you turn the function on, it adds to the original sound of the program a commentary with a preset volume, with which are some programs equipped by the broadcaster.
Note:
Balance: this item allows to set the speaker output and to optimize listening from the place where you are.
Auto Volume Level: This item is used to automatically reduce the differences between the volumes of channels and programs.
6.5. Time menu
Press MENU to display the main menu.
Use the buttons ◀/▶ to select the item TIME in the main menu.
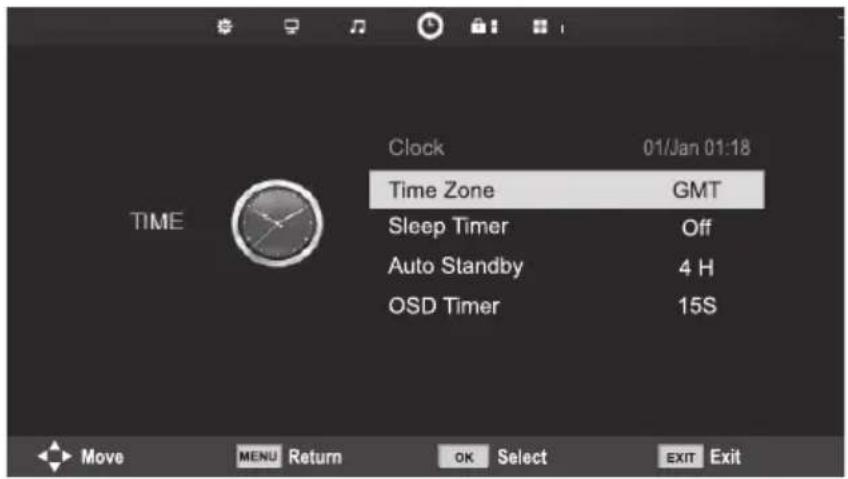
- Using the buttons ▼/▲ select the item, which you want to set in the menu TIME.
- Press ENTER and set.
- After you finish the setting, save it by pressing the button ENTER and return to the previous menu.
6.5.1. Time zone
Use the buttons ▼/▲ to select the item Time Zone and press ENTER to enter the submenu.
Use the buttons ▼/▲/◄/► to select the time zone.
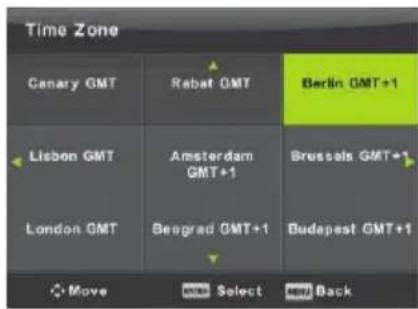
Note:
Correct time setting (incl. the switching to summer time) is needed for many functions of digital broadcasting, e.g. EPG. The accurate time is present in the broadcasting and the device synchronizes with it. It is necessary only for the user to set the correct time zone.
6.5.2. Sleep Timer
Use the buttons ▼/▲ to select the item Sleep Timer and press ENTER to enter the submenu.
Use the buttons ▼/▲ to select (available options: Off, 15 min, 30 min, 45 min, 60 min, 90 min, 120 min, 240 min).
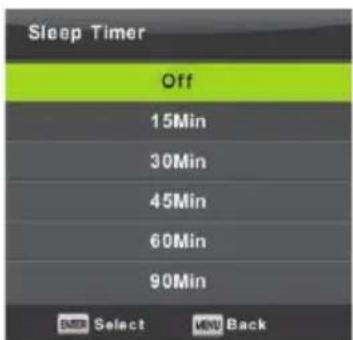
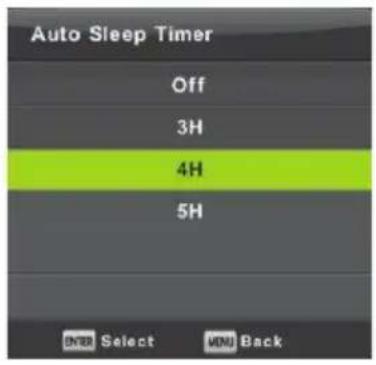
6.5.3. Automatic standby mode
Use the buttons ▼/▲ to select the item Auto Standby and press ENTER to enter the submenu.
Use the buttons ▼/▲ to make selection.
Tip:
If you do not use the remote control during the set time, the TV automatically switches to standby mode. If you use the controller, the timer resets. The length of time suffices for most users. You can deactivate the shutoff function entirely by selecting OFF.
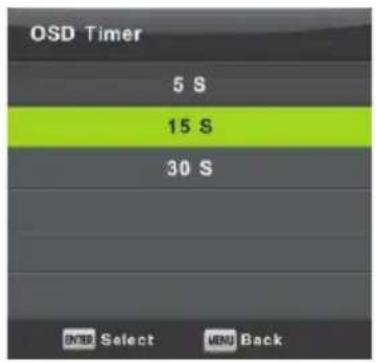
6.5.4. Menu display timer
Use the buttons ▼/▲ to select the item OSD Timer and press ENTER to enter the submenu.
Use the buttons ▼/▲ to select how long should be displayed the setting options on the screen before they disappear.
6.6. Lock menu
Press MENU to display the main menu.
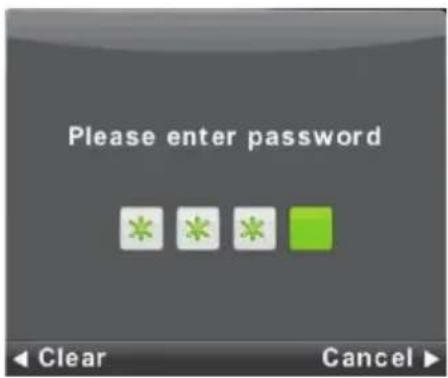
Use the buttons ◀/▶ to select in the main menu the item Lock. You have to enter a valid password.
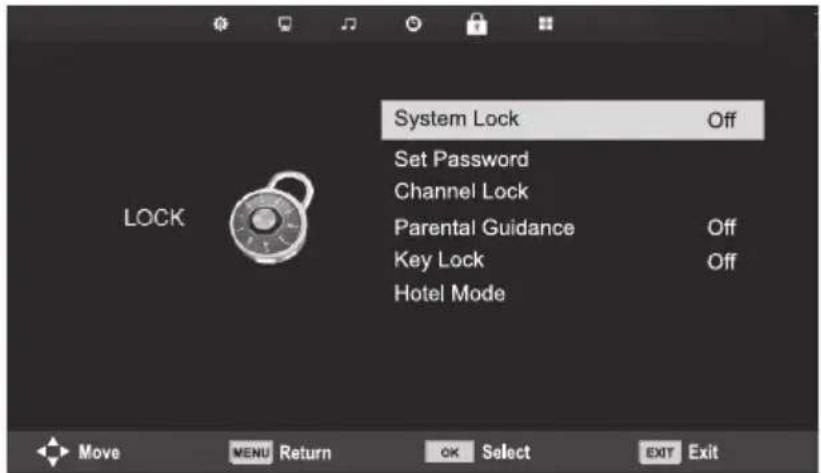
- Using the buttons ▼/▲ select the item, which you want to set in the menu LOCK.
- Press ◀/▶ and enter the setting.
- After you complete the setting, save it by pressing MENU and return to the previous menu.
The default factory password is 0000, and if you forget what you have set, contact a service centre.
6.6.1. Lock system
Use the buttons ▼/▲ to select the item Lock System, press ENTER and select one of the following three options.
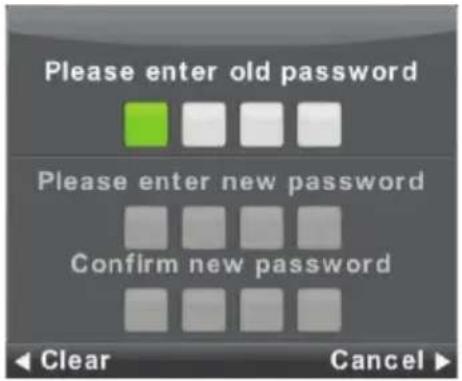
6.6.2. Setting the password
Use the buttons ▼/▲ to select the item Set Password and then press ENTER to enter the submenu and enter the new password.
6.6.3. Channel Lock
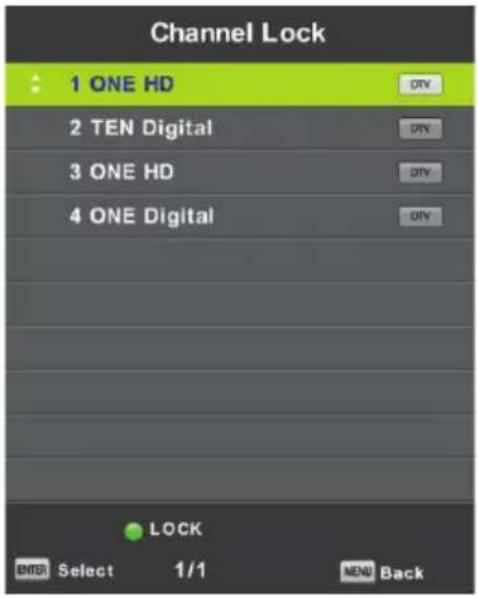
Use the buttons ▼/▲ to select the item Channel Lock and then press ENTER to enter the submenu and select.
Use the green button to lock or unlock the channel. You have to enter the a password to watch it.
6.6.4. Parental Guidance
Use the buttons ▼/▲ to select the item Parental Guidance and then press ENTER to enter the submenu where you select the age suitable for your children.
The broadcaster can provide information about a program about a recommended or minimum age for watching it. If a program is broadcast with hidden mark of minimum age, the device then compares it with what you entered, and possibly prompts for a password, so that you can watch the program for higher age.
6.6.5. Key Lock
Use the buttons ▼/▲ to select the item Key Lock and then use the buttons ◀/▶ to select the option Off or On.
If the key lock is active, you can not use the buttons on the control panel of the TV.
6.6.6. Hotel mode
Hotel Mode is used to restrict certain TV functions, to make it easy to operate in places where should be e.g. limited maximum volume or to prevent tuning TV.
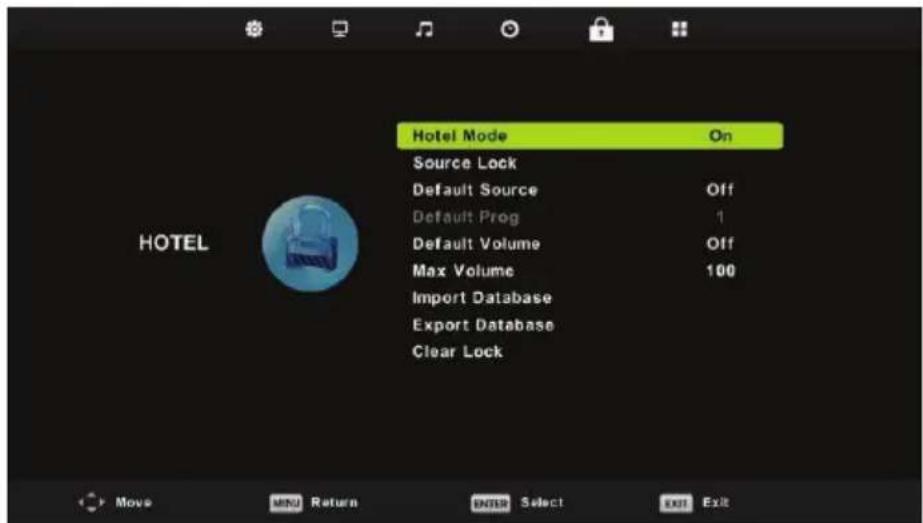
- Use the buttons ▼/▲ on the remote control to select the hotel mode in the menu Lock.
- Press ENTER on the remote controller to enter the submenu.
- After you finish the setting, save it by pressing the button MENU and return to the previous menu.
6.7. Hotel mode
Using the buttons ▼/▲ select the item Hotel Mode and then use the buttons ◀/▶ to select the option On or Off.
6.7.1. Source Lock
Use the buttons ▼/▲ to select the item Source Lock and then press ENTER to enter the submenu and to select.
6.7.2. Default Source
Use the buttons ▼/▲ to select the item Default Source and then press ENTER to enter the submenu and to select.
6.7.3. Default Program
Use the buttons ▼/▲ to select the item Default Prog and then use the buttons ◀/▶ to select.
6.7.4. Maximum Volume
Use the buttons ▼/▲ to select the item Max Volume and then use the buttons ◀/▶ to select.
6.7.5. Clear Lock
Use the buttons ▼/▲ to select the item Clear Lock and then press ENTER to delete the previous settings.
6.8. Setup menu
Press MENU to display the main menu.
Use the buttons ◀/▶ to select the item SETUP in the main menu.
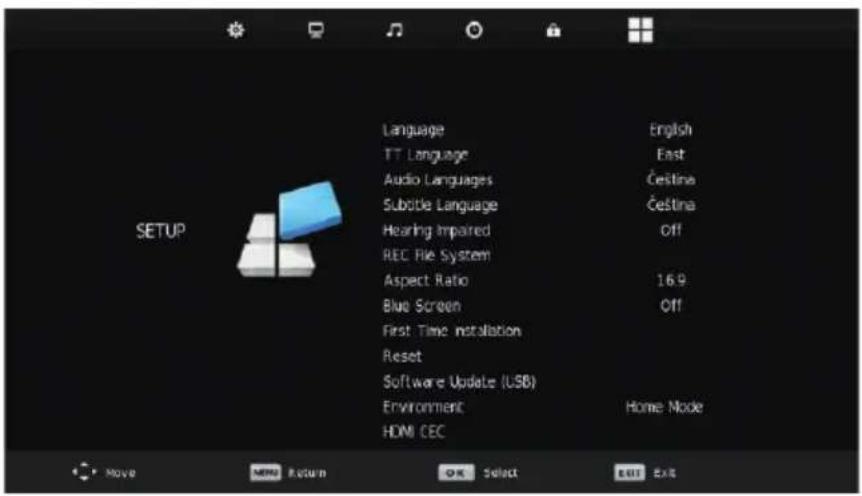
- Using the buttons ▼/▲ select the item, which you want to set in the menu SETUP.
- Press ◀/▶ and enter the setting.
- After you finish the setting, save it by pressing the button MENU and return to the previous menu.
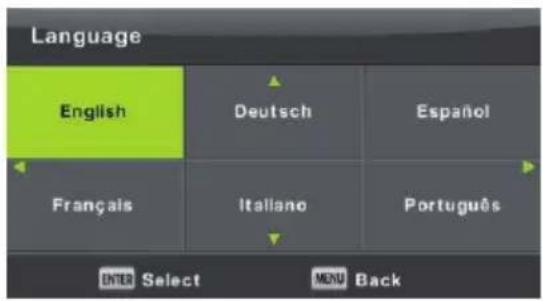
6.8.1. Menu language on the screen
Select the displayed language of the menu on the screen. English is the selected default menu language.
Use the buttons ▼/▲/◄/► to select the menu language.
6.8.2. TT Language
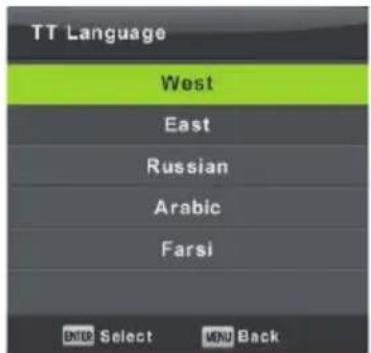
Use the buttons ▼/▲ to select the item TT Language and then press ENTER to enter the submenu.
Use the buttons ▼/▲/◄/► to select the teletext language if the national alphabet is not correctly displayed.
6.8.3. Audio Language
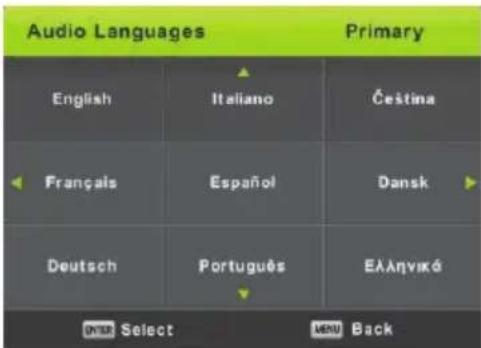
Press ▼/▲ to select the item Audio Languages and then press ENTER to enter the submenu. Automatically selects a specific language if it is present in the broadcast. You can use two languages in order of primary and secondary. If there is no language selected by you, the language of the broadcaster will be selected.
Use the buttons ◀/▶ to select the primary/secondary language.
Use the buttons ▼/▲/◄/► to select the audio languages.
6.8.4. Subtitle Language
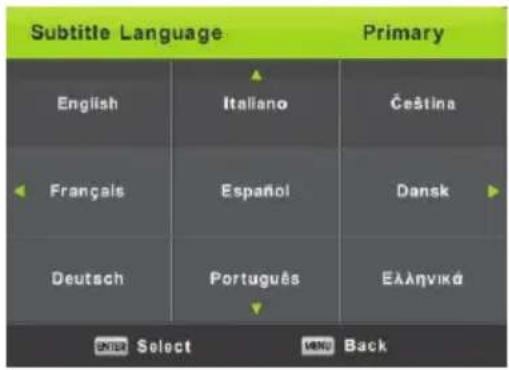
Press ▼/▲ to select the item Subtitle Language and then press ENTER to enter the submenu. Automatically selects a specific language if it is present in the broadcast. You can use two languages in order of primary and secondary. If there is no language selected by you, the language of the broadcaster will be used.
Use the buttons ◀/▶ to select the primary/secondary language of the subtitles. Use the buttons ▼/▲/◀/▶ to select the subtitle language.
6.8.5. Hearing Impaired, Impaired listening
Use the buttons ▼/▲ to select the item Hearing Impaired and then press ENTER to select the option On or Off. Depends on the program broadcasting.
6.8.6. PVR File System
It is an option to set recording (PVR) of digital broadcasts on your USB storage device. Due to the size of data of the incoming digital broadcasting the setting is more detailed. Use the buttons ▼/▲ to select the item REC File System and then press ENTER to enter the submenu.
Use the buttons ▼/▲ to select the item Check REC File System and then enter the settings by pressing ENTER. The speed of the USB device will be checked. The result determines what best broadcast is your USB device capable of holding. When the result is unsatisfactory, format the TV, which will attempt to adapt the USB device better to the digital broadcast recording. Due to the limit of the file size and recording choose lower values. Higher values rapidly increase the demands on your memory device, both on size and especially the speed.
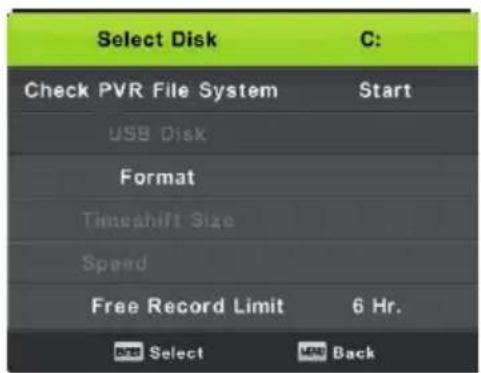

WARNING: Formatting permanently erases all contents of the memory device!
Note:
First try each USB device for speed and the reliability of recording.
When the result is unsatisfactory, replace it with another one, mainly faster. The speed of the USB memory is the basic parameter of the reliability of the recording and also of the time shift.
Note on recording and copyright protection:
PVR and time shift recordings can place higher demands on the speed of the connected memory and verification of the copyrights to the encrypted broadcast.
Changing the mode (e.g. start and end) or some operations may wait for these external stimuli and response to the user's instructions may slow down. If the broadcast rights only allow watching and not a recording, the device will notify you. The recording on your storage device is encrypted for protection of copyright against use on another device.
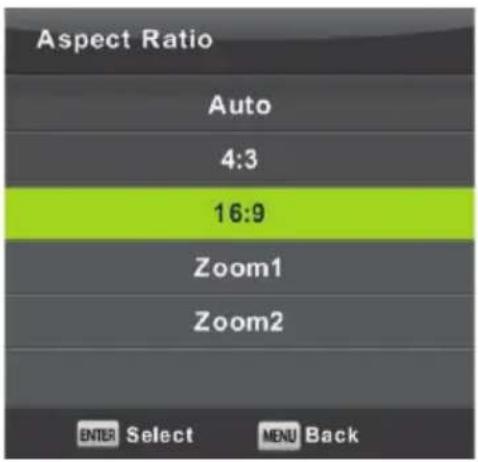
6.8.7. Aspect ratio
Use the buttons ▼/▲ to select the item Aspect Ratio and then press ENTER to enter the submenu.
Use the buttons ▼/▲ to select the aspect ratio (available options: Auto, 4:3, 16:9, Zoom1, Zoom2).
6.8.8. Blue screen
Use the buttons ▼/▲ to select the item Blue Screen and press ENTER to select the option On or Off. The function will apply if there is no useful picture signal to display.
6.8.9. First Time Installation
Use the buttons ▼/▲ to select the option First Time Installation and then press ENTER to enter the settings. You erase the previous settings and tuning and go through the whole process of putting the device into operation again.
6.8.10. Reset, Reset the default factory setting.
Use the buttons ▼/▲ to select the item Reset and then press ENTER to enter the submenu. The function performs return of TV settings to factory defaults, except for deletion of the list of tuned programs.
Use the buttons ▼/▲ to select the item Software Update (USB), insert the USB device in the USB slot and then press ENTER, to update the software.

WARNING:
Update the new TV software only in case when you have the original software producer for the given type including the description of the changes. Any attempt to update with non-genuine software, even with small differences may end up causing irreversible damage to the TV, which is not covered by warranty.
6.8.12. HDMI CEC
The feature performs settings of special items of digital communication between devices at the HDMI interface. Follow the instructions in your external HDMI CEC to set the items and verify the correct communication.
Press ▼/▲ to select the item HDMI CEC and then press ENTER to enter the submenu.
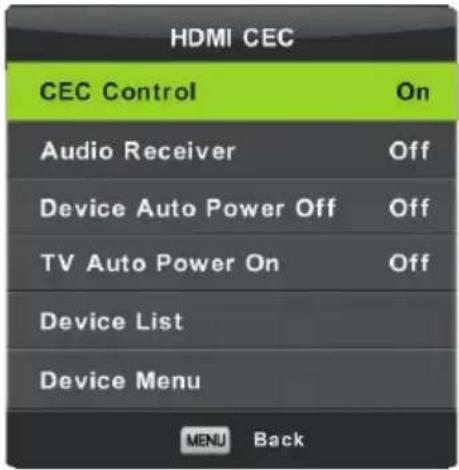
CEC Control
Audio Receiver
Press ◀/▶ to switch on or off the HDMI CEC function.
Press ◀/▶ to switch on or off the HDMI Audio receiver function.
Auto Standby, Device Auto Power Off, TV Auto Power On.
Press ◀/▶ to turn on or off the auto standby mode for this TV set as well as for a connected device.
Device List, Device Menu
Press the ENTER button to open the main menu of the device.
6.9. ATV Channel menu
Press the button MENU to display the main menu (in the ATV mode).
Use the buttons ◀/▶ to select the item CHANNEL in the main menu.
- Using the buttons ▼/▲ select the item, which you want to set in the menu
CHANNEL
-
Use the buttons ◀/▶ to set a value.
-
When you finish the setting save it by pressing the button MENU and return to the previous menu.
6.9.1. Automatic tuning
Use the buttons ▼/▲ to select the item Auto Tuning and press ENTER to start tuning.
6.9.2. Manual ATV tuning
Using the buttons ▼/▲ select the item ATV Manual Tuning and press ENTER to enter the submenu.
6.9.3. Manual DTV tuning
Using the buttons ▼/▲ select the item DTV Manual Tuning and press ENTER to enter the submenu.
6.9.4. Programme Edit
Use the button ▼/▲ to select the item Programme Edit and press ENTER to enter the submenu.
Notes:
- The menu Sound and its description are the same like in the DTV mode (however the item AD switch is not available).
- The menu Lock and its description are the same like in the DTV mode.
- In the menu TIME the items to set time and the time zone selection are not available.
- In the menu Setup are not available the items Hearing impaired and PVR recording.
6.10. Component Input / HDMI / AV menu
Notes:
- The menu Picture and its description are the same like in the DTV mode.
- The menu Sound and its description are the same like in the DTV mode (however the item AD switch is not available).
- The menu Lock and its description are the same like in the DTV mode.
- The menu Channel is not available in the AV / Component input / HDMI modes.
- In the menu Time the items to set time and the time zone selection are not available.
- AV does not support Hearing Impaired items and PVR recording; Component input or HDMI do not support teletext language and Hearing Impaired items.
6.11. Screen menu (only in computer mode)
Press MENU to display the main menu.
Use the buttons ◀/▶ to select the item SCREEN in the main menu.
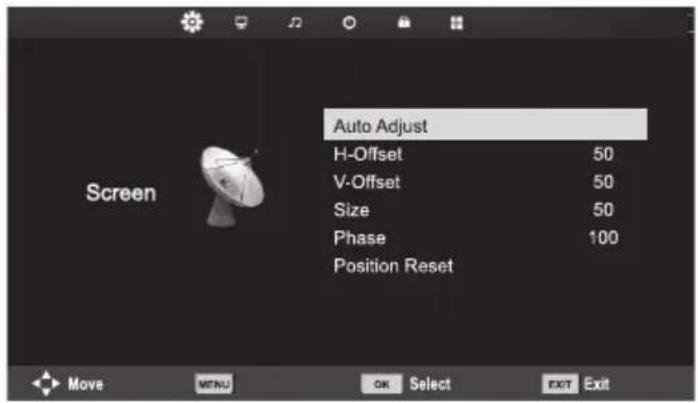
- Using the buttons ▼/▲ select the item, which you want to set in the menu SCREEN.
- Press Enter and set.
- When you finish the setting save it by pressing the button MENU and return to the previous menu.
6.11.1. Automatic adjustment
Press Enter to start automatic adjustment of the horizontal/vertical offset, size and phase.
6.11.2. Horizontal offset
Set the horizontal position of the picture.
Use the buttons ▼/▲ to select the item H-Offset and then press Enter to enter the submenu.
6.11.3. Vertical offset
Setting the vertical position of the image.
Use the buttons ▼/▲ to select the item V-Offset and then press Enter to enter the submenu.
6.11.4. Size
Set the size of the picture.
Use the buttons ▼/▲ to select the item Size and then press Enter to enter the menu.
6.11.5. Phase
Setting of obtrusive horizontal lines.
Use the buttons ▼/▲ to select the item Phase and then press Enter to enter the submenu.
Use the buttons ▼/▲ to select the item Position Reset and then press Enter to enter the settings.
Notes:
- Item Noise Reduction in the menu PICTURE is not valid.
- Menu SOUND and description are the same like in the antenna mode.
- Setting the clock in the TIME menu is not valid.
- Menu LOCK and description are the same like in the antenna mode.
- The items Hearing Impaired and PVR File System in the SETUP menu are not valid.
7. USB
Note:
Before you use the Media menu, connect the USB device and then press SOURCE and set the input source to Media. The TV set detects the majority of the USB devices and shortly offers you to switch to playback. When you will not respond, the offer disappears and the TV remains in the original mode.
Use the buttons ▼/▲ to select the item Media in the menu Source and press Enter to enter the settings.
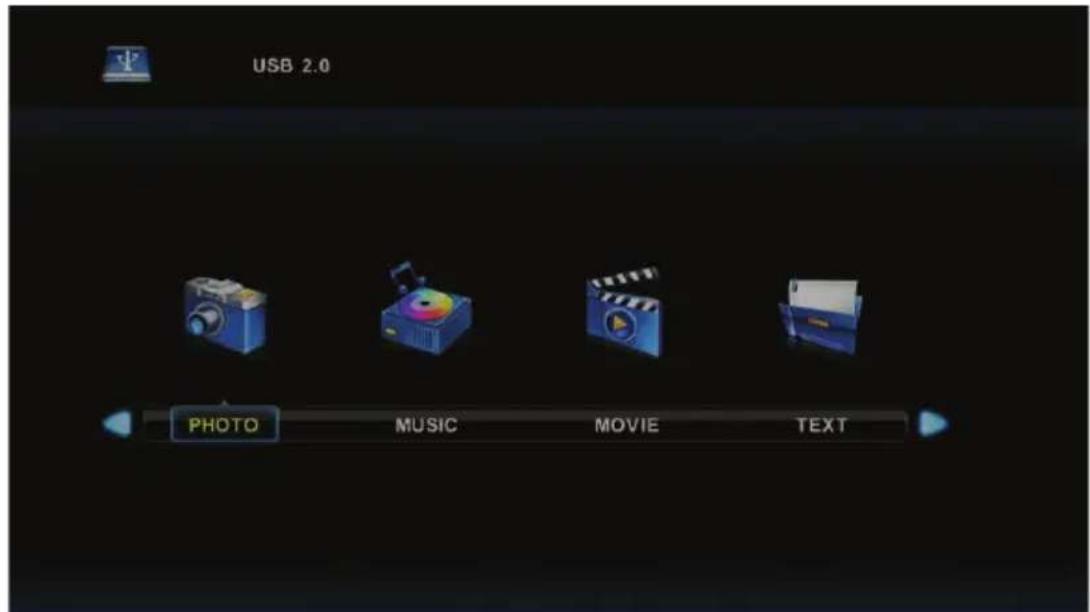
Use the buttons ◀/▶ to select in the main menu the item Media, which you want to set and press Enter to enter the settings.
7.1. Photo Menu
Use the buttons ◀/▶ to select in the main menu the item PHOTO and then enter the interface by pressing ENTER.
Press Exit to return to the previous menu and to exit menu.
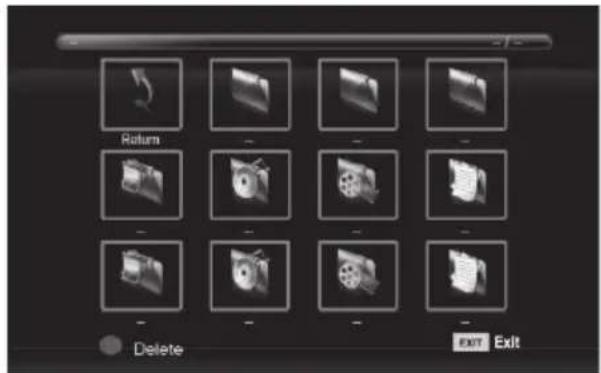
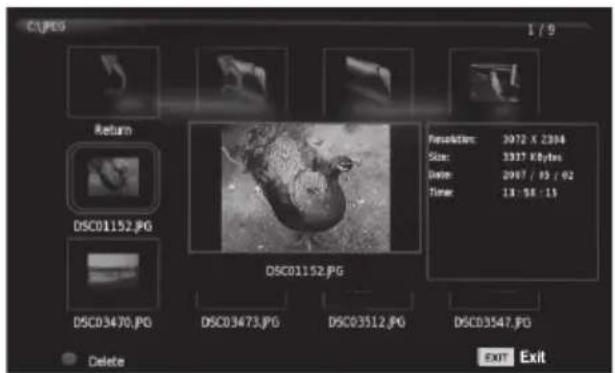
Press ◀/▶ to select in the file menu the file, which you want to view and press the ENTER button to display the picture. If you want to view only this image, press the button Pause, otherwise the slideshow of all the photos in the directory starts, beginning with the tagged picture. Press the down arrow to hide the information bar with slideshow controls. To resume the paused slideshow, press Play/Pause. Stop the slideshow by pressing EXIT, you will return to the directory list.
When you pause on an image in the directory list, after a while, the file information appears on the right, and a preview of the image is displayed in the middle.
Basic functions:
Repeat ALL
Use the buttons ◀/▶ to select the repeat mode, press ENTER and select Repeat None /
Repeat all / Repeat 1.
Music
Use the buttons ◀/▶ to select the item Music, press ENTER and select the music background.
Playlist
Use the buttons ◀/▶ to select the item Playlist, press ENTER to enter.
Info
Use the buttons ◀/▶ to select the item Information, press ENTER to enter. Detailed information about the picture is displayed.
Rotate
Use the buttons ◀/▶ to select the item Rotate. You can rotate the picture as needed.
Zoom in/Zoom Out
You can select zooming in or out of the picture.
Move View
If the picture is larger than the screen, use this function to move the picture.
7.2. Music menu
Use the buttons ◀/▶ to select in the main menu the item MUSIC and then enter the interface by pressing ENTER.
Press Exit to return to the previous menu and to exit menu.
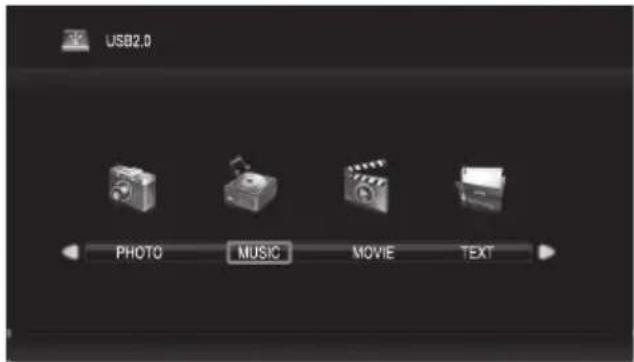
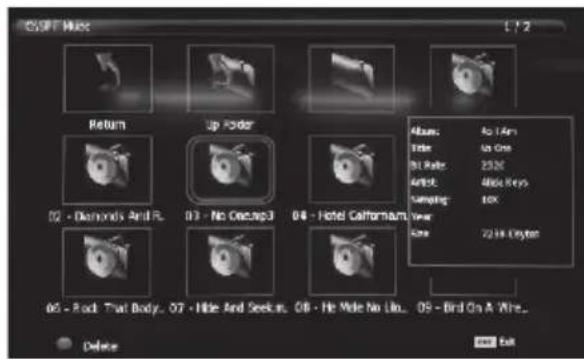
Use the buttons ◀/▶ to select the disk unit, which you want to play and press ENTER to enter the interface. You can hide the information bar by using the arrow button down, you can renew it by pressing ENTER. End playback by pressing EXIT, you will return to the directory. When you pause in the directory on a music file, after a while the information about the file is displayed on the right and a playback starts.
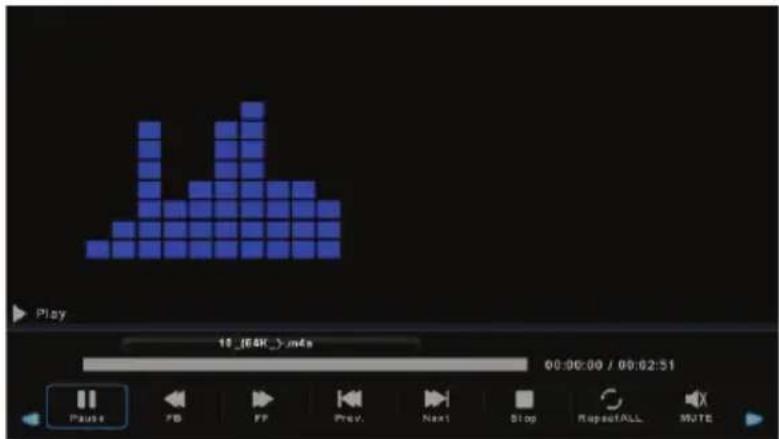
Use the buttons ◀/▶ to select the item to return to the previous menu.
7.3. Movie menu
Use the buttons ◀/▶ to select in the main menu the item MOVIE and then enter the interface by pressing ENTER.
Press Exit to return to the previous menu and to exit menu.
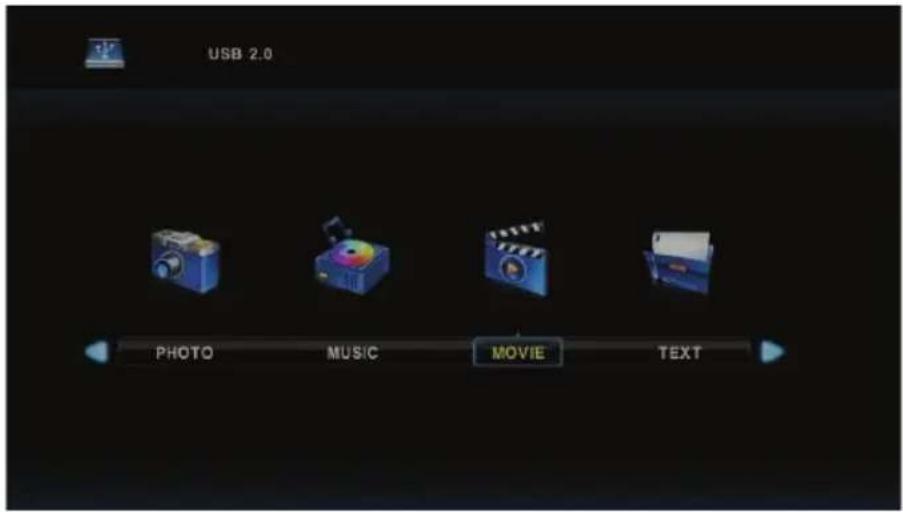
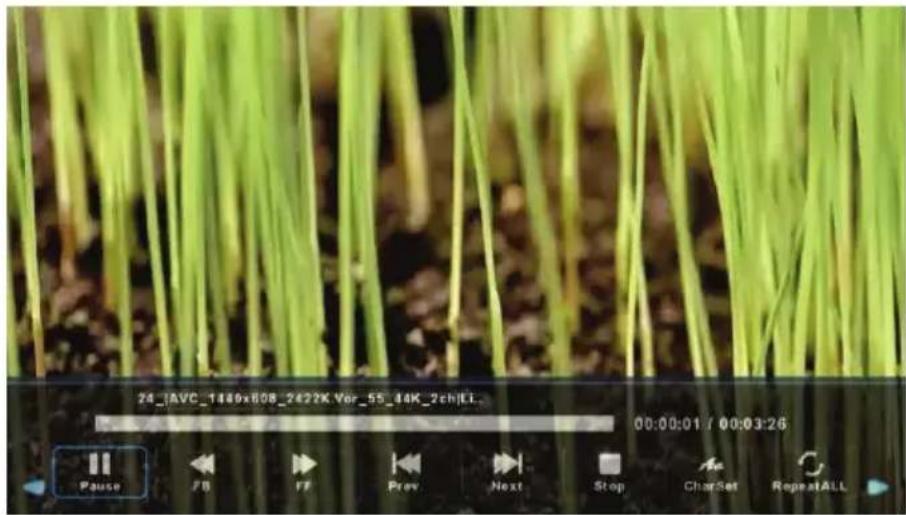
Use the buttons ◀/▶ to select the disk unit, which you want to play and press ENTER to enter the interface. Press the media button to play the selected movie if it is acceptable for playing, especially its codec.
Press Display to select information bar at the bottom, which you want to start and press ENTER to enter it.
If there is in the movie directory also a file with external subtitles with the same name as the movie, the device will play it (the button SUBTITLE). You can select among national alphabets by pressing CharSet in the information bar. When you pause in the directory on a movie file, after a while information about the file is displayed on the right and the file starts playing.
Press Exit to return to the previous menu and press again to exit the overall menu.
7.4. Text Menu
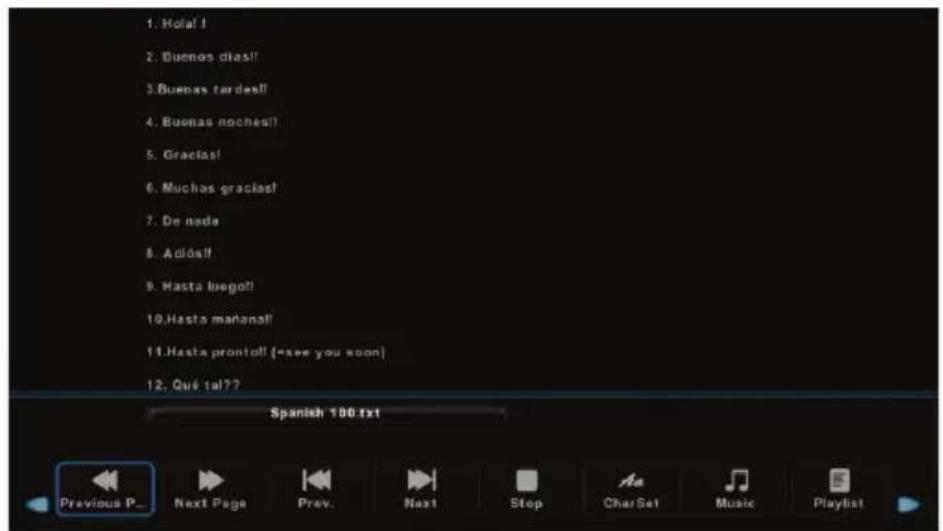
Use the buttons ◀/▶ to select in the main menu the item TEXT and then enter the interface by pressing ENTER.
Press Exit to return to the previous menu and to exit menu.
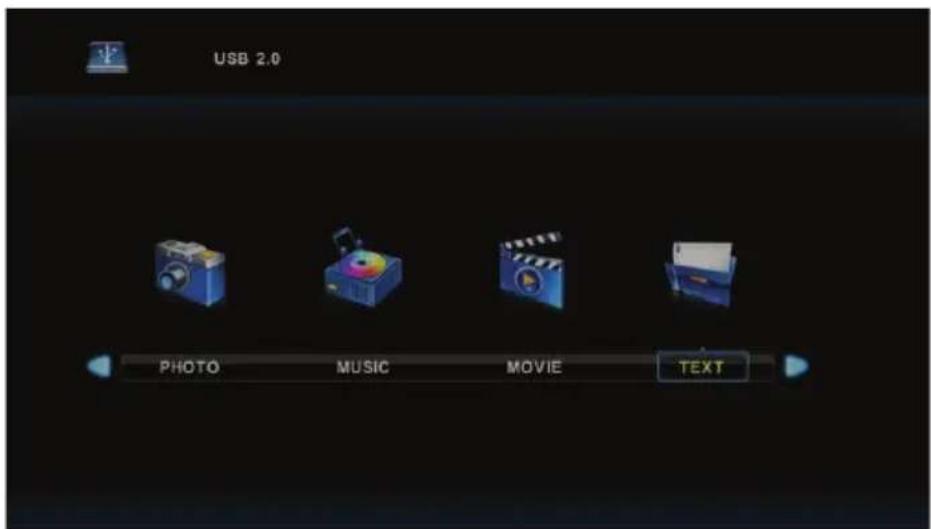
Use the buttons ◀/▶ to select the drive unit which you want to browse and press ENTER to enter the interface.
Use the buttons ◀/▶ to select the item to return to the previous menu.
8. Troubleshooting

WARNING:
Under no circumstances should you try to repair the appliance yourself, the device does not contain parts that could be repaired by the user. Always take the device to an authorized service center if a repair or adjustment are necessary other than regular maintenance. Unauthorized interference with the device is considered a breach and the loss of warranty claim. The importer, supplier, distributor or vendor shall not be liable for any losses caused by a violation of regulations listed in this manual. Do not open the device, there is the danger of electric shock. In the case of device failure, first check the following list of problems and their solutions. If you fail to remove the defect according to the following tips, contact your vendor.
| Problems | Possible solutions |
| The TV set has no power. | Check the attached power cord and the functioning of the electrical outlet.Unplug the power cord, plug it in after 60 seconds and turn the TV set on again. |
| No picture. | Check the antenna connection.There could have been problems at the broadcasting station, try another station.Adjust contrast and brightness. |
| Good picture, but no sound. | Raise volume.Check that the sound is not muted (Mute function).Press MUTE on the remote controller. Check audio settings.If you use an external device, make sure that its volume is not muted or the sound is not switched off.If you use the A/V or a component input, make sure that the cables are correctly connected and are not loose. If you use a cable with DVI reduction on HDMI, you need a separate audio cable.Make sure that the headphones jack is not occupied. |
| Good sound, but an unusually colored picture or no picture. | Check the connection and the state of the antenna.If you use a component input, check the connection.Incorrect or loose connection can cause problems with colors or empty screen. |
| The TV set does not respond to the remote controller. | The batteries in the remote controller might be empty.If it is necessary, replace them with new ones.Clean the lens of the remote controller. The distance between the LED TV set and the remote controller should be no more than 8 m, in the recommended operating angle and with no obstacles in the path of the beam. Prevent the impact of strong light (daylight, sunlight or fluorescent light lamps and fluorescent tubes) on the TV and remote controller. |
| There are color points on the screen. | Although the LED screen is made with high-precision technology and 99.99% or more of the pixels are operational, the screen can display permanently unlit or lit points of light (red, blue or green). This is a construction feature of the LED screen and is not a malfunction. |
| The picture falls apart. | Keep the TV set away from interfering sources of electricity, such as cars, hair-dryers, welders and any optional equipment.The disintegration of image may be caused by atmospheric phenomena, such as a local or distant thunderstorm.When installing optional equipment, leave a space between the optional equipment and the TV set.Check the antenna and the connection.Keep the antenna away from the power or input/output cables. |
| After automatic tuning only some channels are available. | Check if your area is covered by digital TV broadcasting. Try to retune or manually tune the missing channels.Check if you use the correct antenna type. |
| Cannot select a channel. | Check if the channel is not blocked in the main menu settings. |
| Cannot play from the USB device. | Check the connecting channel between the USB and power connection. The hard disc was not formatted.Make sure that the USB flash unit is compatible and contains supported formats of multimedia data. |
| The picture is distorted, contains macroblocks, microblocks, points, large pixels, etc. | Video compression can cause disruption, especially during rapid movement, e.g. In sports programs and action movies. |
| Speaker noise | Check the cable connections, make sure that the video cable is not connected to video input.Sound distortion can be caused by a low level of the signal. |
| The TV set turns off automatically. | Make sure that the sleep timer or power save mode timer are not on. |
| The TV set turns on automatically. | Make sure that the timer to turn on is not on in the settings menu (Settings). |
| The picture is not displayed on the whole screen. | First make sure that the problem is not caused by the input signal. Then try to adjust the item Zoom in the Functions menu. |
Picture defects and their causes
Snowy screen
Snowy screen is usually caused by a weak signal. Change the antenna setting or install an antenna booster.
Double images or ghosting
Double image is usually caused by reflection from tall buildings. Adjust the antenna orientation or place it higher.
Radio frequency interference
Waves are moving on the screen, which is usually caused by neighbouring radio transmitters or shortwave receiver.
Interference by electrothermal devices with high temperature
Inclined or arrow shaped patterns appear on the screen or a part of the picture is missing. This is probably caused by electrothermic devices with high temperatures in a nearby hospital.
- Technical specifications
| Model | SLE 40F60TCS |
| Panel size | 40" |
| Power consumption | 75 W |
| Standby consumption | <0.5 W |
| Rated voltage | 100-240 V AC, 50/60 Hz |
| Remote controller | Yes |
| VESA wall mount | 200 × 200 |
| Dimensions with stand (w × h × d) | 899 × 555 × 234 |
| Dimensions without stand (w × h × d) | 899 × 512 × 84 |
| Net weight with stand | 6.3 kg |
| Net weight without the stand | 6 kg |
| Connection | |
| RF IN | 2× |
| AV input | 1× |
| Component YPbPr | 1× |
| VGA | 1× |
| HDMI | 3× |
| USB | 1× (max. 500 mA) |
| Supported USB formats | MKV, AVI, MP4, WMV, MOV, XviD, MP3, JPEG, JPG, TXT |
| CI slot | Yes |
| Other functions | |
| WXGA resolution | 1920 × 1080 |
| Brightness (cd/m2) | 220 |
| Aspect ratio | 16:9 |
| Response time (ms) | 10 ms |
| Colours | 16.7 M |
| Setting the color warmth | Cool, standard, warm |
| Viewing angle | H: 170°, V: 170° |
| Video system | PAL, SECAM/MPEG-2, MP@ML, MPEG-2, MP@HL, H.264 |
| Audio system | BG/DK/I, MPEG-1 layer 1/2, DD, DD+, AAC, HE-AAC |
| Stereo sound | NICAM/A2 |
| PVR recording to USB | Yes |
| Correction of sound | No |
| Progressive scan | Yes |
| Timeshift | Yes |
| EPG | Yes |
| Teletext | Yes |
| Teletext pages | 1000 |
| Comb filter | 3D |
| OSD menu | Yes |
| Zoom | Yes |
| Noise reduction | Yes |
| Timer OFF / ON / SLEEP | Yes |
| Subtitles | Yes |
| Audio language | Yes |
| Channel list | Yes |
| Favourites list | Yes |
| Image freeze | Yes |
| Radio | Yes |
| Lock | Yes |
| Parent lock | Yes |
| Hotel mode | Yes |
Note:
Technical specifications may change without prior notice.
The original version is in Czech.
Manufacturer address: FAST ČR, a.s, Černokostelecká 1621, 251 01 Ríčany, Czech Republic
Information sheet
| Symbol | Fast | |
| Model | SLE 40F60TCS | |
| Energy efficiency class | A | |
| Screen diagonal in cm / inches | [cm/"] | 100/40 |
| Electric energy consumption when on | [W] | 52 |
| Annual electric energy consumption* | [kWh] | 76 |
| Electric energy consumption in standby mode | [W] | ≤0.5 W |
| Screen resolution | [pixels] | 1920 × 1080 |
* The electricity consumption of 76 kWh per year is based on the power consumption of the television operating 4 hours per day for 365 days. The actual electric energy consumption will depend on how the television is used.
INSTRUCTIONS AND INFORMATION REGARDING THE DISPOSAL OF USED PACKAGING MATERIALS
Dispose of packaging material at a public waste disposal site.
DISPOSAL OF USED ELECTRICAL AND ELECTRONIC APPLIANCES
The meaning of the symbol on the product, its accessory or packaging indicates that this product shall not be treated as household waste. Please, dispose of this product at your applicable collection point for the recycling of electrical & electronic equipment waste. Alternatively in some states of the European Union or other European states you may return your products to your local retailer when buying an equivalent new product.
The correct disposal of this product will help save valuable natural resources and help in preventing the potential negative impact on the environment and human health, which could be caused as a result of improper liquidation of waste. Please ask your local authorities or the nearest waste collection centre for further details. The improper disposal of this type of waste may fall subject to national regulations for fines.
For business entities in the European Union
If you wish to dispose of an electrical or electronic device, request the necessary information from your seller or supplier.
Disposal in other countries outside the European Union
If you wish to dispose of this product, request the necessary information about the correct disposal method from local government departments or from your seller.

Hereby, FAST ČR a.s. declares that the radio equipment type SLE 40F60TCS is in compliance with Directive 2014/53/EU.
The full text of the EU declaration of conformity is available at the following internet address: www.sencor.eu
Changes to the text, design and technical specifications may occur without prior notice and we reserve the right to make these changes.
SENCOR®
EN Warranty conditions
Warranty card is not a part of the device packaging.
This product is warranted for the period of 24 months from the date of purchase to the end-user. Warranty is limited to the following conditions. Warranty is referred only to the customer goods using for common domestic use. The claim for service can be applied either at dealer's shop where the product was bought, or at below mentioned authorized service shops. The end-user is obligated to set up a claim immediately when the defects appeared but only till the end of warranty period. The end user is obligated to cooperate to certify the claiming defects. Only completed and clean (according to hygienic standards) product will be accepted. In case of eligible warranty claim the warranty period will be prolonged by the period from the date of claim application till the date of taking over the product by end-user, or the date the end-user is obligated to take it over. To obtain the service under this warranty, end-user is obligated to certify his claim with duly completed following documents: receipt, certificate of warranty, certificate of installation.
This warranty is void especially if apply as follows:
• Defects which were put on sale.
• Wear-out or damage caused by common use.
- The product was damaged by unprofessional or wrong installation, used in contrary to the applicable instruction manual, used in contrary to legal enactment and common process of use or used for another purpose which has been designed for.
• The product was damaged by uncared-for or insufficient maintenance.
• The product was damaged by dirt, accident of force majeure (natural disaster, fire, and flood).
• Defects on functionality caused by low duality of signal, electromagnetic field interference etc.
• The product was mechanically damaged (e.g. broken button, fall).
- Damage caused by use of unsuitable media, fillings, expendable supplies (batteries) or by unsuitable working conditions (e.g. high temperatures, high humidity, quakes).
• Repair, modification or other failure action to the product by unauthorized person.
• End-user did not prove enough his right to claim (time and place of purchase).
• Data on presented documents differs from data on products.
- Cases when the claiming product cannot be identified according to the presented documents (e.g. the serial number or the warranty seal has been damaged).
Authorized service centers
Visit www.sencor.eu for detailed information about authorized service centers.
- Important safety instructions
- ATTENTION
- General safety instructions
- Installation, control
- Note:
- Repairs and maintenance
- Note: Do not throw the device into your common household waste. Respect laws and regulations when disposing of the machine.
- Remote controller and battery
- WARNING:
- Notes on the USB connector:
- Due to wide range of the USB devices on the market, it is not possible to ensure compatibility of the device with all types of USB devices.
- Serial number
- Notes:
- Assembling the stand
- Device
- Button functions of the control panel
- Remote control sensor
- Connecting the TV connectors
- Remote control
- REVEAL/◄◄ button
- SIZE/▶ button
- INDEX/■ button
- ◀◀ button
- S.PAGE/▶▶I button
- TTX button
- T.SHIFT button
- AUDIO button
- SUBTITLE button
- AUTO/REC button
- PVR button
- Turn on first time
- Language selection
- Country selection
- Automatic tuning
- Menu
- Channel Menu - satellite
- Fast scan M7 FastScan
- Note on FastScan:
- Note about updating the FastScan and consumption list:
- Advanced/Special tuning
- Example of advanced tuning process Skylink:
- Channel menu - ATV/DTV
- Automatic tuning
- Manual ATV tuning
- Current CH (Current channel)
- Color System
- Sound System
- Fine-Tune
- Search
- Manual DTV tuning
- Program edit
- Schedule list
- Signal information
- Picture Menu
- Picture mode
- Tip:
- Contrast / Brightness / Color / Tint / Sharpness
- Color temperature
- Noise reduction
- HDMI mode
- Sound menu
- Sound mode
- Balance
- Automatic volume levelling
- Digital output
- Switching the sound description
- Time menu
- Time zone
- Sleep Timer
- Automatic standby mode
- Menu display timer
- Lock menu
- Lock system
- Setting the password
- Channel Lock
- Parental Guidance
- Key Lock
- Hotel mode
- Hotel mode
- Source Lock
- Default Source
- Default Program
- Maximum Volume
- Clear Lock
- Setup menu
- Menu language on the screen
- TT Language
- Audio Language
- Subtitle Language
- Hearing Impaired, Impaired listening
- PVR File System
- Note on recording and copyright protection:
- Aspect ratio
- Blue screen
- First Time Installation
- Reset, Reset the default factory setting.
- HDMI CEC
- Auto Standby, Device Auto Power Off, TV Auto Power On.
- Device List, Device Menu
- ATV Channel menu
- CHANNEL
- Automatic tuning
- Manual ATV tuning
- Manual DTV tuning
- Programme Edit
- Component Input / HDMI / AV menu
- Screen menu (only in computer mode)
- Automatic adjustment
- Horizontal offset
- Vertical offset
- Size
- Phase
- USB
- Photo Menu
- Basic functions:
- Repeat ALL
- Repeat all / Repeat 1.
- Music
- Playlist
- Rotate
- Zoom in/Zoom Out
- Move View
- Music menu
- Movie menu
- Text Menu
- Troubleshooting
- Picture defects and their causes
- Snowy screen
- Double images or ghosting
- Radio frequency interference
- Interference by electrothermal devices with high temperature
- Information sheet
- INSTRUCTIONS AND INFORMATION REGARDING THE DISPOSAL OF USED PACKAGING MATERIALS
- DISPOSAL OF USED ELECTRICAL AND ELECTRONIC APPLIANCES
- For business entities in the European Union
- Disposal in other countries outside the European Union
- SENCOR®
- EN Warranty conditions
- This warranty is void especially if apply as follows:
- Authorized service centers
Brand : SENCOR
Model : SLE 40F60TCS
Category : Television