
OMNI-5 - Uncategorized BRESSER - Free user manual and instructions
Find the device manual for free OMNI-5 BRESSER in PDF.


| Brand | Bresser |
| Model | OMNI-5 |
| Product Type | Electronic device (uncategorized) |
| Dimensions | Approximately 20 x 15 x 10 cm (7.9 x 5.9 x 3.9 in) |
| Weight | Approximately 0.5 kg (1.1 lb) |
| Power Supply | Battery or USB power (specific type not specified) |
| Main Functions | Basic operation modes as per user manual |
| Display | LCD screen (likely) |
| Control Buttons | On/Off, Mode, Set, etc. |
| Connectivity | USB port (for data or charging) |
| Battery Life | Varies with usage; typical 10-20 hours |
| Maintenance | Clean with a soft, dry cloth. Do not use abrasive cleaners. |
| Cleaning | Wipe gently with a lint-free cloth. |
| Storage | Keep in a dry place away from direct sunlight. |
| Safety | Do not expose to water or extreme temperatures. Keep out of reach of children. |
| Spare Parts | Contact Bresser support for replacement parts. |
| Repairability | Repairs should be performed by qualified personnel only. Do not open the device. |
| Warranty | Standard manufacturer warranty (check documentation for details). |
| Included Accessories | USB cable, user manual (may vary) |
Frequently Asked Questions - OMNI-5 BRESSER
User questions about OMNI-5 BRESSER
0 question about this device. Answer the ones you know or ask your own.
Ask a new question about this device
Download the instructions for your Uncategorized in PDF format for free! Find your manual OMNI-5 - BRESSER and take your electronic device back in hand. On this page are published all the documents necessary for the use of your device. OMNI-5 by BRESSER.
USER MANUAL OMNI-5 BRESSER
The OMNI-5 red dot sight may be mounted in two configurations:
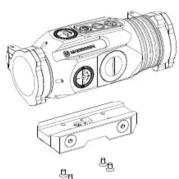
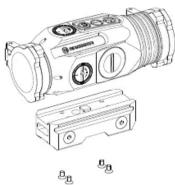
LOW PROFILE MOUNT HIGH CO-WITNESS MOUNT
OMNI-5
RED/GREEN LOW PROFILE SIGHT INSTRUCTIONS
4.25 IN
FOLD
PRODUCT SPECIFICATIONS
| Model | 23-20300 | Power Supply | CR2032 3V Lithium Battery |
| Description | Red/Green Low Profile Sight | Brightness | 1 - 11 |
| Magnification | 1x | Windage | 40 MOA |
| Length | 4.8" | Elevation | 40 MOA |
| Width | 2.4" | Click Value | 1 MOA |
| Height (low/high) | 2.3"/2.8" | Accessories | Picatinny Mount 4 Mounting Screws 2mm Hex Wrench 3mm Hex Wrench |
| Optical Height (low/high) | 1.1"/1.4" | ||
| Weight (low/high) | 0.7lbs/0.75lbs |
POWERING UP AND POWERING DOWN THE RED DOT
Depress and release the “♦” or “.”” button to power up the red dot; press “♦” and “.”” button to power down the red dot. Press “C” to change color between red and green. This red dot has a convenient auto-off feature that will switch off the device if it has been left on for more than 4 hours. If the unit shuts down automatically, moving or lifting the gun will turn the unit on again automatically. However, if the unit is turned off by pressing “♦” and “.”” simultaneously, the unit will not be turned on automatically by moving or lifting the gun.
Press the "+" or "-" button and select the lowest brightness setting that still provides good contrast against the target. The higher brightness settings should only be used in bright daylight (otherwise, the reticle may appear distorted).
BATTERY
Your sight includes a 3-volt lithium battery (CR2032). To replace the battery, rotate the battery cover counter-clockwise and remove. Insert the replacement battery with "+" side facing out. Replace the cover and hand-tighten.
INSTALLATION
CAUTION: BEFORE YOU BEGIN, ENSURE THAT THE FIREARM IS CLEAR. REMOVE MAGAZINE, LOCK ACTION OPEN AND VISUALLY INSPECT TO ENSURE THAT THE CHAMBER IS CLEAR.
To get the best performance from your red dot, it must be mounted properly. If you are not familiar with mounting a red dot, it is strongly recommended that you seek the assistance of a qualified professional.
FOLD

natural_image
Technical line drawing of a mechanical component with a separate 3D view showing internal parts (no text or symbols)MOUNT ONTO A PICATINNY OR WEAVER-STYLE RAIL
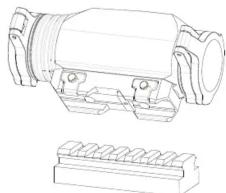
Your sight has integrated mounting rails that attach to a standard Weaver-style base on Picatinny rail.
Loosen both mounting screws and set the sight onto the mounting base of the firearm. Please note that one mounting screw is lower than the other mounting screw. Only the lower mounting screw should fit into one of the grooves in the top of the mounting base. Be sure the sight is fully seated on the mounting base before tightening the mounting screws. To ensure tightening, alternate between screws after each half turn
( DO NOT OVER TIGHTEN MOUNTING HARDWARE, MAX. TORQUE 20 INCH LBS.)
For additional security, a drop of thread-locker can be added to the mounting screws.
PARALLAX
Your sight has been carefully set to have a minimum parallax at 30 yards. At distances significantly greater or less than this distance, some parallax will be observed. To reduce the possibility of a Point if Impact (POI) shift caused by parallax, the reticle should be kept in the middle 2/3 of the field of view when aiming.
ZEROING
Initial Setup The dot position has been pre-set at the factory. Only minor windage and elevation adjustments should be required. If possible, a bore sighting device should be used for rough alignment of the sight to the firearm. If bore sighting is not possible, place the firearm on a sturdy rest and look through the barrel or along the rail at a small target about 25 yards away. Turn on the red dot and select a suitable brightness. Using a straight-slot screwdriver, adjust the windage and elevation until the dot position corresponds with the target. Note the following when making adjustments.

| Address |
| Addresses 2 |
| City |
| State/Zip Code |
| Phone |
| Date Purchased |
| Store Name |
Name
Please mail to: Explore Scientific 1010 South 48th Street Sprindale, AR 72762

Would you like to learn more about our Explore Care Alliance Program? □ YES INFO
Would you like to sign up for our newsletter?
FOLD FOLD FOLD FOLD4.25 IN
MAINTENANCE & CLEANING
Although your red dot is extremely durable, it is a precision instrument that should be treated with reasonable care.
LENSES
The optical coatings are hard and will last indefinitely with proper care. Should either protective windows become dirty, blow loose materials off before cleaning. Use lens cleaning fluid and a soft cloth to dab at the surface and remove any abrasive bits of dust and dirt before applying more pressure. Be patient and clean in steps so as to not grind abrasive dirt into the lens.
EXTERIOR
Should the exterior become dirty, it may be cleaned with a damp cloth. Do not use oil or solvents as they may be harmful if inadvertently rubbed onto the optical coatings.
STORAGE
This red dot has been constructed using adhesives and lubricants that enable a broad range of operational and storage environments. The grease used is temperature-stable from -50 to +175 degrees Fahrenheit. Do not store at temperatures outside this range (for example a car trunk on a very hot day).
TROUBLESHOOTING
Please use the following guide to test/correct operational issues with this red dot.
1. Red dot will not power up.
A. Check to see that the battery is properly installed with "+" side facing down.
B. Replace battery. C. Inspect battery terminals for corrosion or debris inhibiting contact and correct as necessary.
D. Should the above be ineffective in resolving the problem, contact Bresser (call 866.252.3811 or visit explorescientific.supportsync.com) for return procedures.
2. Red dot brightness will not adjust.
A. Move to where ambient light is low enough to clearly discern a change in brightness. B. Follow fault diagnosis #1A-C above and repeat 2A. If brightness will not adjust, contact Bresser (call 866.252.3811 or visit explorescientific.supportsync.com) for return procedures.
3. Red dot will not zero
Review sections of this manual regarding zeroing. (See ZEROING in this manual.) This red dot is pre-centered at the factory; if more than 10" of adjustment is required at a sight-in distance of 25 yards, mounting is at fault.
⊕
4. Red dot will not adjust for windage and/or elevation
This red dot has a maximum adjustment range of 30 MOA. Beyond this range of adjustment, rotating the W/E screws will not provide additional point of impact change. If you believe that your red dot is within the maximum range of adjustment and not providing W/E movement, contact Bresser ( call 866.252.3811 or visit explorescientific.supportsync.com ) for return procedures.
5. Red dot appearance and/or target is not clear.
A. Be sure to select the lowest brightness setting that still provides good contrast against the target; using too high a setting may make the reticle appear distorted.
B. Inspect both sides of the main lens for contamination and clean as necessary.
( See MAINTENANCE & CLEANING in this manual.)
C. Inspect the protective window in front of the diode and clean as necessary. ( See MAINTENANCE & CLEANING in this manual.) D. Should the above be ineffective in resolving the problem, contact Bresser ( call 866.252.3811 or visit explorescientific.supportsync.com ) for return procedures.

LIMITED FIVE YEAR WARRANTY
With a mission to make outdoor and scientific exploration accessible and
affordable, EXPLORE SCIENTIFIC has been putting people on a path to adventure since 2008. A huge part of ensuring that our customers have the
*REGISTERED WITHIN 60 DAYS OF PURCHASE experiences they seek is providing unwavering support and product protection.
Upon receipt of your product, we encourage you to thoroughly inspect it, promptly register it and familiarize yourself with the applicable warranty coverage as outlined below. If you have any questions or concerns about your product and its warranty or if you need advice on getting started, please contact us at 1-866-252-3811.
Registering Your Product:
To maximize the warranty coverage provided by EXPLORE SCIENTIFIC, it is important that you promptly register your product either by mailing in the enclosed card to 1010 South 48th Street, Springdale, AR 72762 or by visiting https://explorescientificusa.com/product-registration.
If registered within 60 days of purchase, your product will have additional warranty protection against manufacturer defects. When you purchase an EXPLORE SCIENTIFIC product, you will notice that there are serial numbers on most telescopes, microscopes, binoculars, riflescopes, eyepieces, and other major components or educational products. Please use this number to register your item. For products that do not include a serial number, use the product item number followed by the date of purchase expressed in a six-digit format. For example, a purchase date of January 1, 2018, would be entered as 010118.
Return Authorization: Making it Easy
We know that your time is precious, so we aim to eliminate the hassle of obtaining an authorization to send in your product for repairs or service. Once you have registered your product, you may visit our online customer service center (https://explorescientific.supportsync.com) and submit a request for warranty service. This will generate all the required RMA (Return Merchandise Authorization) information. Prior to the return of any product or part, you must be registered as the current owner, and your Return Merchandise Authorization (RMA) number must be on the
⊕
- POWERING UP AND POWERING DOWN THE RED DOT
- BATTERY
- INSTALLATION
- MOUNT ONTO A PICATINNY OR WEAVER-STYLE RAIL
- ( DO NOT OVER TIGHTEN MOUNTING HARDWARE, MAX. TORQUE 20 INCH LBS.)
- PARALLAX
- ZEROING
- FOLD FOLD FOLD FOLD4.25 IN
- MAINTENANCE & CLEANING
- LENSES
- EXTERIOR
- STORAGE
- TROUBLESHOOTING
- Red dot will not power up.
- Red dot brightness will not adjust.
- Red dot will not zero
- ⊕
- Red dot will not adjust for windage and/or elevation
- Red dot appearance and/or target is not clear.
- ( See MAINTENANCE & CLEANING in this manual.)
- LIMITED FIVE YEAR WARRANTY
- Registering Your Product:
- Return Authorization: Making it Easy
Brand : BRESSER
Model : OMNI-5
Category : Uncategorized