
BXAC40023GB - Air-conditioner BLACK & DECKER - Free user manual and instructions
Find the device manual for free BXAC40023GB BLACK & DECKER in PDF.


| Product Type | Portable 3-in-1 Air Conditioner (Cool, Dry, Fan) |
| Model | BXAC40023GB |
| Brand | Black & Decker |
| Weight | 18.5 kg |
| Power Supply | 220-240 V AC, 50 Hz, 560 W |
| Cooling Capacity | 1.470 kW (5,000 BTU) |
| Energy Efficiency Ratio (EER) | 2.63 |
| Refrigerant | R290 (Propane), GWP 3 |
| Sound Power Level | 65 dB(A) |
| Fan Speeds | 2 (High and Low) |
| Timer | 24-hour programmable timer |
| Operating Modes | Cool, Dry (Dehumidify), Fan, Sleep |
| Smart Control | WiFi via BLACK+DECKER Home app (iOS/Android) |
| Remote Control | Included with battery (2x AAA, not included) |
| Window Kits | Included for sash and casement windows |
| Drainage | Manual or continuous drainage via hose |
| Self-Diagnosis | Error codes E1, E2, E3, E5 displayed on panel |
| Safety Features | Child lock, overheat protection, earthing required |
| Filter Cleaning | Recommended every 2 weeks; rinse with water (max 40°C) |
| Guarantee | 2 years from original purchase (UK & Ireland) |
Frequently Asked Questions - BXAC40023GB BLACK & DECKER
User questions about BXAC40023GB BLACK & DECKER
0 question about this device. Answer the ones you know or ask your own.
Ask a new question about this device
Download the instructions for your Air-conditioner in PDF format for free! Find your manual BXAC40023GB - BLACK & DECKER and take your electronic device back in hand. On this page are published all the documents necessary for the use of your device. BXAC40023GB by BLACK & DECKER.
USER MANUAL BXAC40023GB BLACK & DECKER
natural_image
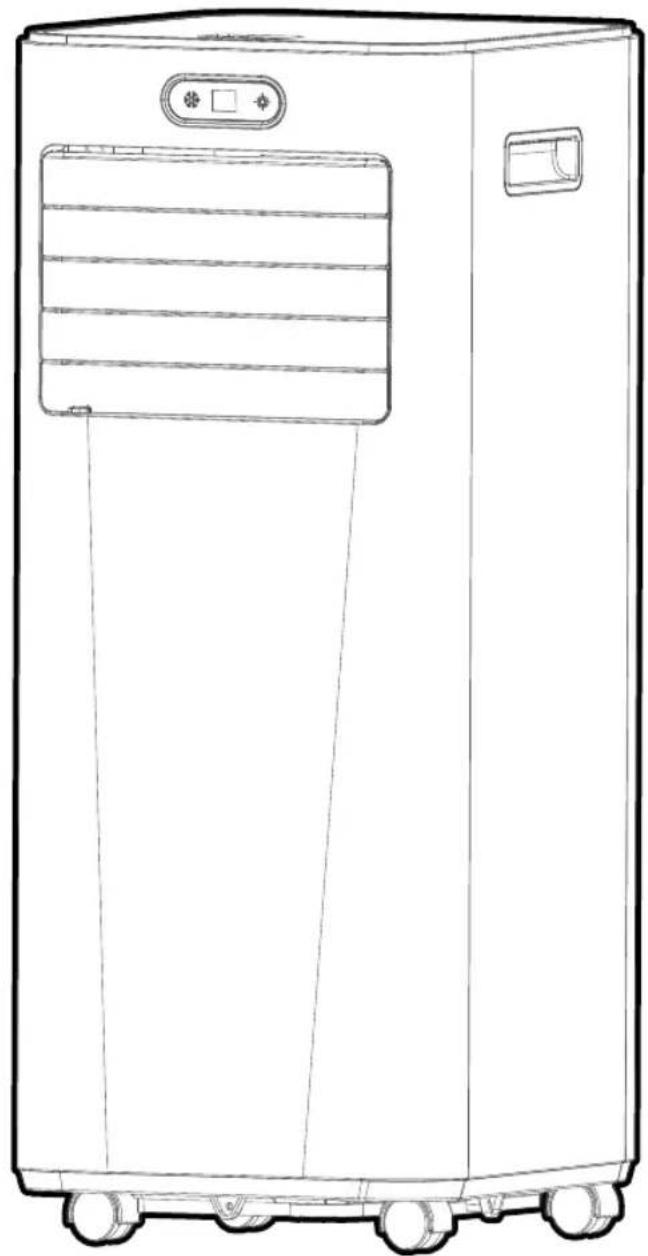
Line drawing of a portable air conditioner unit with control panel and wheels (no text or symbols)BXAC40023GBwww.blackan
EN
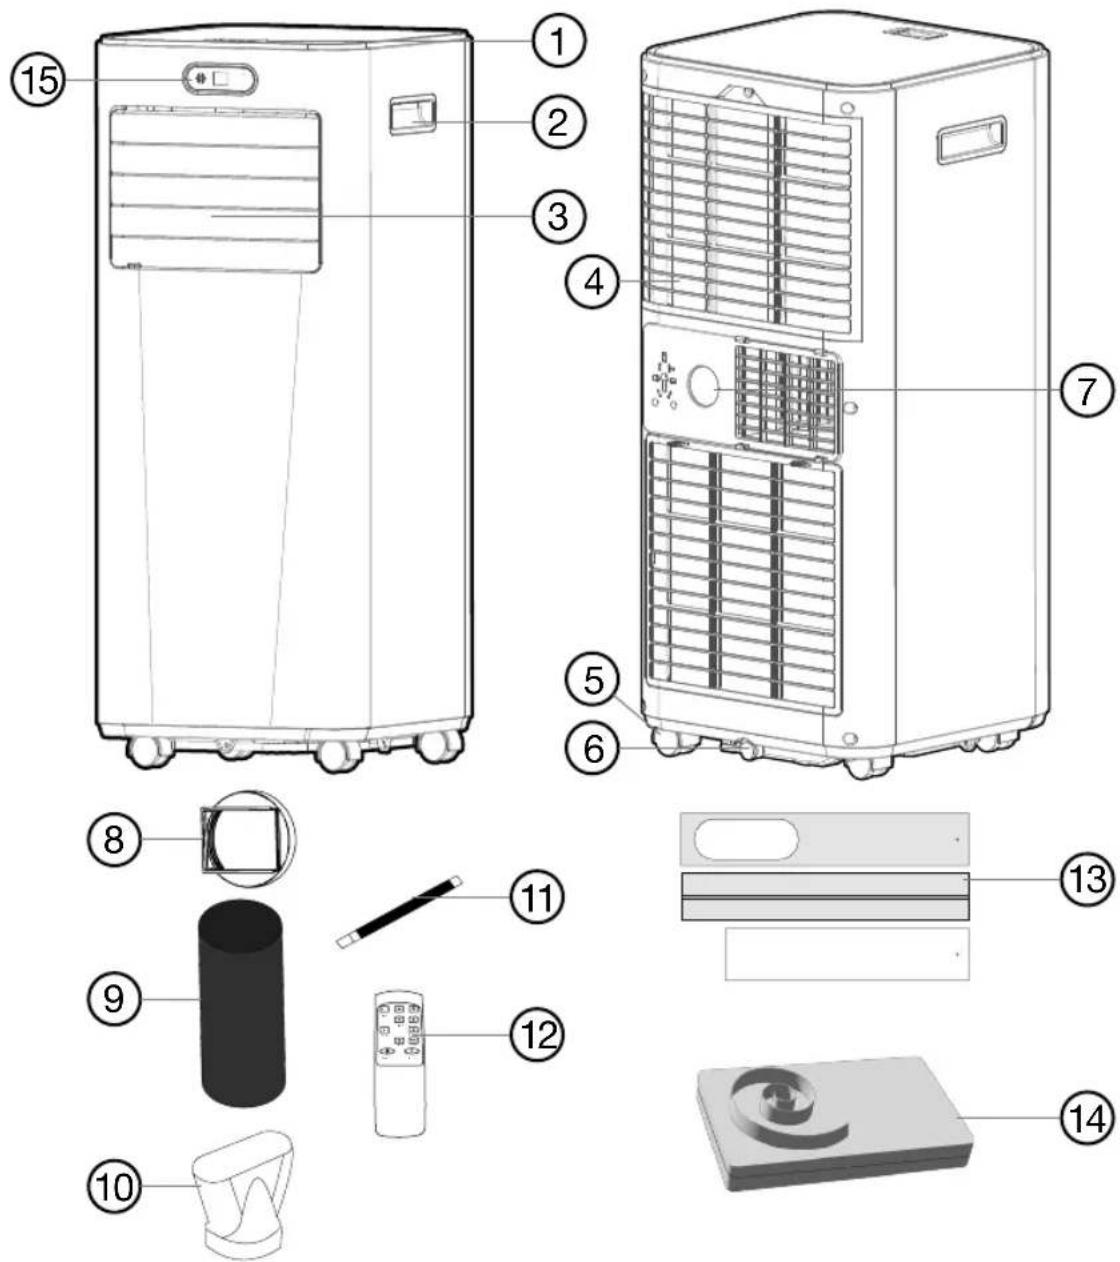
What's in the box
Instruction Manual
Portable 5,000 BTU 3-in-1 Air
Conditioner
Remote Control
Features
- Control Panel
- Carry Handle
- Air Outlet With Adjustable Louvers
- Air Inlet And Filter
- Castor Wheels
- Drainage Hole
- Water Stopper/Drainage Point
-
Hose Adaptor
-
Exhaust Hose
- Window Kit Adaptor
- Drain Tube
- Remote Control
- Sash Window Kit
- Casement Window Kit
- Front Panel With Cooling Mode Indicator
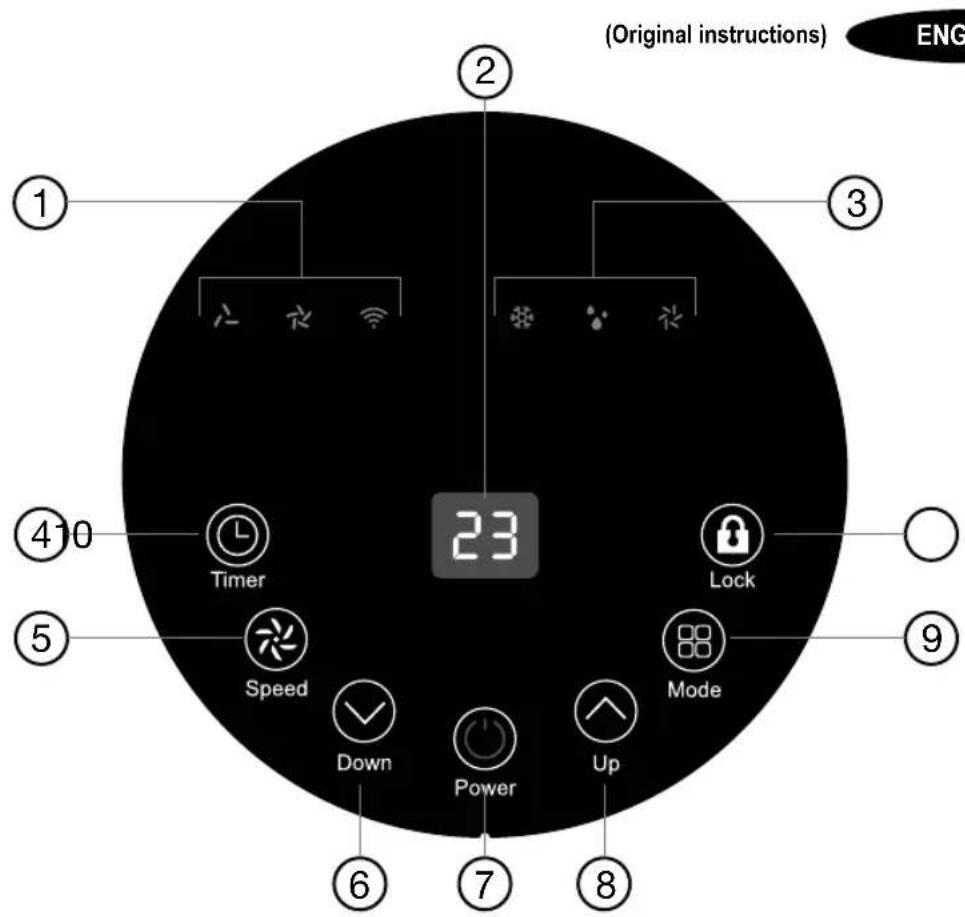
Control Panel
- Speed/WiFi Indicators
- Led Display Panel
- Mode Indicators
- Timer Button
-
Speed Selection Button
-
Time/Temperature Down Button
- Power ON/OFF Button
- Time/Temperature Up Button
- Mode Button
- Lock Button
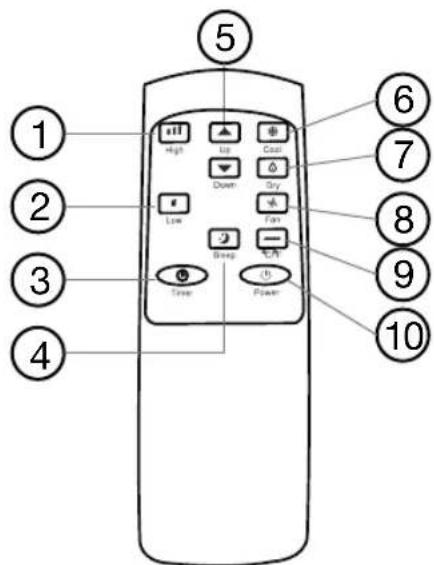
Remote Control
- High Temperature Button
- Low Temperature Button
- Timer Button
- Sleep Mode Button
- Time/Temperature Up & Down Buttons
- Cool Mode Button
- Dry Mode Button
- Fan Mode Button
- Celsius/Fahrenheit Selection Button
- Power ON/OFF Button
ENGLISH
(Original instructions)
Intended Use
Your BLACK+DECKER BXAC40023GB 5000 BTU Smart 3-in-1 Air Conditioner has been designed for cooling small and medium spaces.
This appliance is intended for indoor household use only.
Thank you for choosing BLACK+DECKER. We hope that you will enjoy using this product for many years.
Safety Instructions
⚠ WARNING: Read all safety warnings and all instructions. Failure to follow the warnings and instructions listed below may result in electric shock, fire and/or serious injury.
- Read this manual carefully before using the appliance.
◆ The intended use is described in this manual. - The use of any accessory or attachment or the performance of any operation with this appliance other than those recommended in this instruction manual may present a risk of personal injury.
◆ Retain this manual for future reference.
♦ WARNING: When using mains-powered appliances, basic safety precautions, including the following, should always be followed to reduce the risk of fire, electric shock, personal injury and material damage.
Using Your Appliance
Please read the operating instructions carefully before using your air conditioner for the first time.
◆ Check that the voltage of the main circuit corresponds with the rating of the appliance before operating.
◆ Children shall not play with the appliance.
♦ DO NOT let the cable hang over the edge of a table or counter or let it come into contact with any hot surfaces.
- The use of accessory attachments is not recommended by the appliance manufacturer, apart from those supplied with this product.
♦ DO NOT pull the plug out by the cable as this may damage the plug and/or the cable.
♦ DO NOT use this product for anything other than its intended use.
- This appliance is for household use only.
♦ DO NOT carry the appliance by the power cable.
♦ DO NOT use the appliance outdoors.
♦ DO NOT operate with wet hands.
◆ Use of an extension cable with this appliance is not recommended. However, if it is necessary to use an extension lead, ensure that the lead is suited to the power consumption of the appliance to avoid overheating of extension cable, appliance or plug point. DO
NOT place the extension cable in a position where it can be pulled on by children or animals or tripped over.
◆ Always unplug the unit when not in use or before cleaning.
- The manufacturer does not accept responsibility for any damage or injury caused by improper or incorrect use, or for repairs carried out by unauthorised personnel.
Safety Of Others
◆ Close supervision is necessary when any appliance is used by or near children.
◆ Children should not play with the appliance.
- This appliance can be used by children aged from 8 years and above and persons with reduced physical, sensory or mental capabilities or lack of experience and knowledge if they have been given supervision or instruction concerning use of the appliance in a safe way and understand the hazards involved.
◆ Cleaning and user maintenance should not be undertaken by children without supervision.
Take care when any appliance is used near pets.
♦ DO NOT allow the cord to become twisted.
After Use
- While cleaning, DO NOT use a wet cloth or use water on any part of the unit, as this may cause a short circuit or electrical shock.
- Keep this unit clean. DO NOT allow objects to enter the ventilation opening as this may cause electric shock, or damage to the unit. Switch off the unit and then remove the plug from the socket when not in use or before cleaning.
◆ Check all inlets and outlets regularly for accumulated dust
♦ Disconnect the unit from mains outlet when it is not in use, or before relocating or cleaning it.
◆ Switch off and remove the plug from the socket before leaving the appliance unattended and before changing, cleaning or inspecting any parts of the appliance. - When not in use, the appliance should be stored in a dry place. Children should not have access to stored appliances.
Inspections And Repairs
♦ DO NOT attempt to dismantle, repair or remould any part of the unit. This should only be done by a qualified service agent. Even the change of power cable should be done by a qualified person.
ENGLISH
(Original instructions)
In the unlikely event the appliance develops a fault, stop using it immediately and seek advice from the manufacturer.
In case of technical problems, switch off the product and DO NOT attempt to repair it yourself. Return the appliance to an authorised BLACK + DECKER service facility for examination, adjustment or repair. Always insist on the use of original spare parts. Failure to comply with the above mentioned precautions and instructions, could affect the safe operation of this product. Further information about authorised BLACK + DECKER service facilities can be found on www.2helpu.com
Additional safety instructions for Air conditioners and Fans
◆ Install the unit on flat and hard floor to diminish vibration or noise.
◆ Always operate the appliance on a smooth, even, stable surface. DO NOT place the unit on a hot surface.
◆ Ensure that the unit is switched off after use.
♦ DO NOT immerse cables, plugs or any part of the appliance in water or any other liquid.
◆ Operate the unit only at the voltage specified.
♦ DO NOT use the unit near open windows, as contact with rain and other natural elements could cause an electrical hazard.
♦ DO NOT put heavy objects on the appliance.
♦ DO NOT tip the unit on its side.
- Never insert any other object into the unit body to avoid any hazard or unit failure.
♦ DO NOT put the unit close to heat-generating devices or near flammable and dangerous materials.
If the supply cable is damaged, it must be replaced by the manufacturer or its service agent or a similarly qualified person in order to avoid a hazard
◆ The appliance must be positioned so that the plug is accessible.
⚠ WARNING: DO NOT place the unit on or near a hot gas or electric burner.
Safety relating to refrigerant R290:
◆ These symbols on your device mean:
- This appliance is filled with Propane gas R290. ALWAYS follow the manufacturer's instruction concerning use and repairs.
◆ Read the entire instruction manual carefully before attempting to use the appliance.
♦ DO NOT install, operate or store the device in a room smaller than 7m^2 . Observe a distance of 50cm from walls, ceiling and furniture when installing the unit.
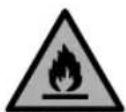
Warning: Risk of fire
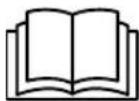
Please read operator's manual carefully!

Please read operating instructions carefully!
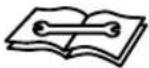
Please read technical manual carefully!
◆ Read these warnings carefully.
- This appliance contains the refrigerant R290. R290 is a refrigerant that complies with the relevant European Directives. Never perforate the refrigerant circuit.
CAUTION: R290 is flammable (GWP3)!
♦ DO NOT use any processes to clean the unit or accelerate the defrosting process, other than those recommended by the manufacturer.
♦ DO NOT store the appliance in a room containing other continuously operating ignition sources (for example: open flames, an operating gas appliance or an operating electric heater).
♦ DO NOT pierce or burn any of the components of the cooling circuit of the unit. DO NOT set the unit on fire.
Take care to store the appliance in such a way as to prevent mechanical faults or damage from occurring.
♦ DO NOT install, operate or store the appliance in a room with a floor area of less than 7m².
- Be aware that the refrigerant may be odourless, and that leaks may not be detectable by smell.
♦ ALWAYS take care to comply with national gas regulations.
- Keep ventilation openings clear of obstruction.
◆ An unventilated area where the appliance is used should be constructed so that, should the refrigerant leak, it should not stagnate as to create a fire or explosion hazard.
◆ Store the appliance in a well-ventilated area where the room size corresponds to the room area specified for operation.
◆ Any person who is involved with working on or breaking into a refrigerant circuit should hold a current valid certificate from an industry-accredited assessment authority, which authorises their competence to handle refrigerants safely in accordance with an industry recognised assessment specification.
◆ Servicing shall only be performed on the grounds recommended by the equipment manufacturer. Maintenance and repair requiring the assistance of other skilled personnel shall be carried out under the supervision of the person competent in the use of flammable refrigerants.
▲WARNING: DO NOT place the unit on or near a hot gas electric burner.
ENGLISH
(Original instructions)
Electrical safety
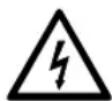
This product must be earthed. Always check that the mains voltage corresponds to the voltage on the rating plate.
◆ Appliance plugs must match the outlet. Never modify the plug in any way.
♦ DO NOT use any adaptor plugs with earthed (Class I) appliances. Unmodified plugs and matching outlets will reduce the risk of electric shock.
◆ To avoid the risk of electric shock, DO NOT immerse the cord, plug or appliance in water or other liquid.
Extension cables & class I product
◆ A 3 core cable must be used as your tool is earthed and of class I construction.
◆ Up to 30m (100 ft) can be used without loss of power.
If the supply cord is damaged, it must be replaced by the manufacturer or an authorised BLACK+DECKER Service Centre in order to avoid a hazard.
Warning! Before assembling, switch the appliance off and remove the plug from the socket.
Features (Refer to diagrams on page 2)
- Control Panel
- Carry Handle
- Air Outlet With Adjustable Louvers
- Air Inlet And Filter
- Castor Wheels
- Drainage Hole
- Water Stopper/Drainage Point
- Hose Adaptor
- Exhaust Hose
- Window Kit Adaptor
- Drain Tube
- Remote Control
-
Sash Window Kit
-
Casement Window Kit
- Front Panel With Cooling Mode Indicator
Use
About the Controls
◆ 2 speed settings
◆ 24 hour timer
◆ 3 Modes - Air Conditioning, Dehumidifying and Fan
◆ Sleep mode accessible through the remote control or BLACK+DECKER Home smartphone app
◆ Time/Temperature +/- adjustment buttons
◆ Access to smart functionality through the BLACK+DECKER Home smartphone app
Installing the Battery
⚠WARNING: Danger of explosion if battery is incorrectly replaced.
⚠ WARNING: DO NOT INGEST BATTERY.
◆ Keep new and used batteries away from children. If the battery compartment does not close securely, stop using the product and keep it away from children.
If you think batteries might have been swallowed or placed inside any part of the body, seek immediate medical attention.
Do not incinerate or dispose of appliance together with household waste material! Appliance that has reached the end of its life must be collected separately and returned to an environmentally compatible recycling facility.
To Begin Using Your Air Conditioner
◆ To install the battery, first detach the battery cover from the remote. To do this, simply slide the battery cover downwards until it detaches.
◆ Insert 2 x AAA batteries (not included) into the battery compartment, taking care to ensure the positive polarity is facing upwards.
Once the batteries are in place, slide the battery cover back into the remote until it clicks into place. Ensure the battery cover is firmly secured into place before attempting to use the unit.
Assembling Your 3-in-1 Air Conditioner
⚠ WARNING: Before performing any assembly or maintenance, switch the unit off and remove it from the power supply.
Using the Window Kits
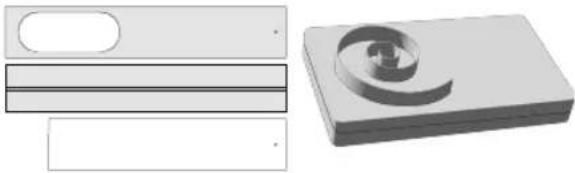
This unit comes equipped with two separate window kits, suitable for sash and casement windows, respectively.
natural_image
Three technical illustrations: a rectangular plate with an oval cutout, a three-layered rectangular block with a spiral-shaped cutout on top, and a separate flat panel (no text or symbols)Installing the Casement Window Kit
To install the casement window kit, carry out the following steps:
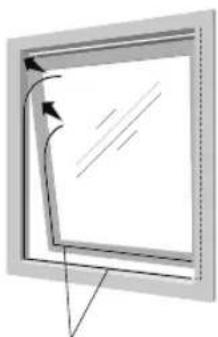
◆ Place the included adhesive tape all around the inner and outer perimeters of the window, as shown in the illustration below. Be careful to ensure the tape is applied to both sides.
Step One
natural_image
Simple line drawing of a square frame with an arrow indicating direction (no text or symbols)Adhesive Tape
Once the tape has been correctly installed, use the adhesive fasteners on the window kit to attach it to the adhesive, as shown in the illustration above. If necessary, tie up the remainder of the window kit so that it is not loose, taking care to ensure there are no gaps between the tape and the adhesive.
Step Two
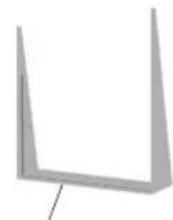
Window Casement Kit
Step Three
natural_image
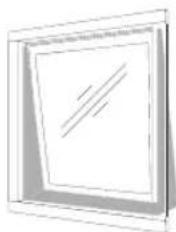
Simple line drawing of a square frame with a diagonal line inside, no text or symbols present.Once the window kit is in position, open the zipper in the middle and slot the air conditioner's hose through it.
Step Four
natural_image
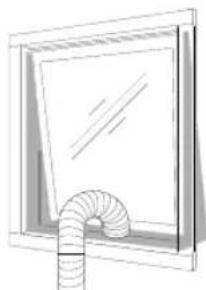
Simple line drawing of a window with a coiled pipe attached (no text or symbols)◆ Once the hose is correctly installed, close the zipper tightly around it to secure it into place.
Note! Ensure the hose is attached to the air conditioner before attempting to use the unit.
◆ The unit is now ready for normal use.
ENGLISH
(Original instructions)
Installing the Sash Window Kit
To install the sash window kit, carry out the following steps:
◆ Start by assembling the window kit, as shown in the illustration below.
Once the window kit is assembled, place it at the desired length and tighten the provided screw to fix it at that length.
When the window kit is at the desired length, slot the hose adaptor through it, as shown in the illustration below.
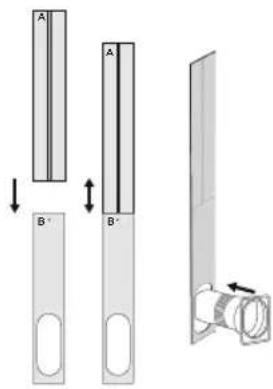
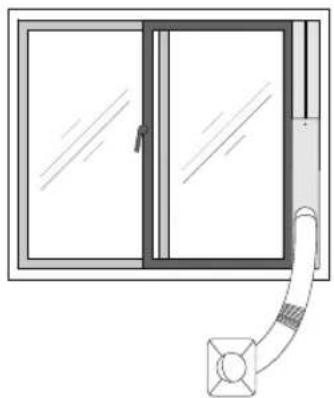
◆ Fit the sash window kit into the window recess
natural_image
Diagram of a window with a curved pipe extending from the side, showing no text or symbols.◆ Connect the hose adapter to the air conditioner.
◆ The unit is now ready for normal use.
Mounting the Window Hose
◆ To mount the window hose, begin by attaching the window adaptor to the end of the hose, as shown in the illustration below.
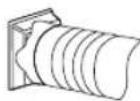
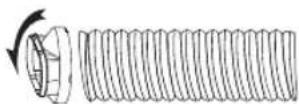
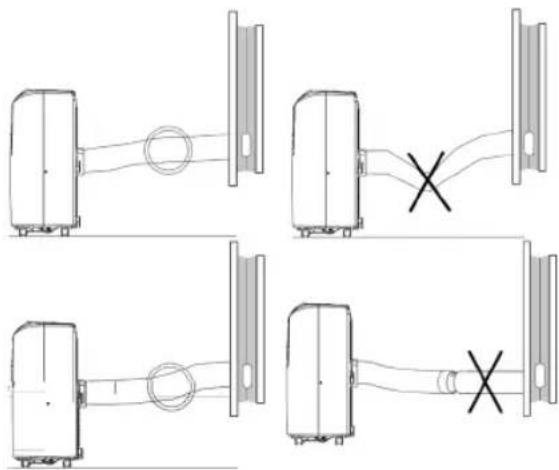
Once the adaptor has been connected to the hose, clip the hose adaptor to the back of the air cooling unit, then attach the hose to it. Take care to avoid any bends or kinks, as this could cause the pipe to clog, resulting in overheating and potential malfunction. Refer to the illustrations below for guidelines on how to correctly install the hose.
Note! Although the hose may be extended up to a total length of 30cm, we recommend its length be kept as short as possible to ensure optimal performance.
Note! Use ONLY the hose provided with your air cooling unit. Attempting to attach other hoses to it to extend the length could result in the unit malfunctioning.
natural_image
Four-panel diagram showing mechanical or electrical components connected by wires, with no visible text or symbols.Using the B&D Home App
This unit is equipped with a wireless functionality, and fully compatible with the B&D Home smartphone app, available for Android and iPhone.
To control this unit using the B&D Home app, carry out the steps detailed below.
Downloading The App
To start using the 'BLACK+DECKER Home' app, begin by downloading it from the Apple App store or the Google Play store. Scan the QR Codes shown below to download the app directly from either store.
◆ Follow the instructions in the app to create an account and connect the air cooler to a WiFi network.
Note! Other app and device instructions are also available in the app.


Using the App
Once the app is downloaded, carry out the following steps to control the unit remotely through the corresponding smart device.
Connecting the App to the Unit
◆ Install the "BLACK+DECKER Home" app and create a user account, as detailed above.
◆ Plug the appliance in. The WiFi indicator will illuminate and begin to flash to show the unit is in pairing mode.
◆ Place the appliance at a distance of about 5 meters to your router.
As long as the power is turned on, the WIFI indicator flashes. If there is no network configuration after 3 minutes, the status will be cancelled and the indicator light will go out. If you need to re-connect to WIFI, long press the Timer button for 5 seconds to start the network configuration. The WIFI indicator flashes again.
WIFI Connection
The unit can be connected to WiFi in two different ways.
Method 1
Bluetooth Connection
◆ Activate the Bluetooth function in the corresponding smart device.
When the WIFI indicator flashes, open the 'BLACK+DECKER Home' app. The unit will automatically connect to the device via Bluetooth.
Method 2
When the WIFI indicator flashes, select 'Add Device'-'Home Appliances'-Portable AC', and follow the instructions on the display.
◆ Check the status of the WIFI indicator and choose the correct status.
◆ If the WIFI indicator flashes rapidly, the unit can be connected to Bluetooth directly.
◆ If the WIFI indicator flashes slowly, press "Connect" to connect to the WIFI network named 'BLACK+DECKER Home'.
Turning Your Appliance On or Off
◆ To begin using the appliance, start by plugging it into the mains. The Power On/Off button and WiFi icon on the unit's control panel will light up to show the unit has been plugged in.
Once the unit has been plugged in, press the Power On/Off button on the remote control, the appliance's control panel or the 'BLACK+DECKER Home' app to turn it on. The front and top LED displays on the unit's control panel will come on and air will start emitting from the vents to show the unit has been turned on.
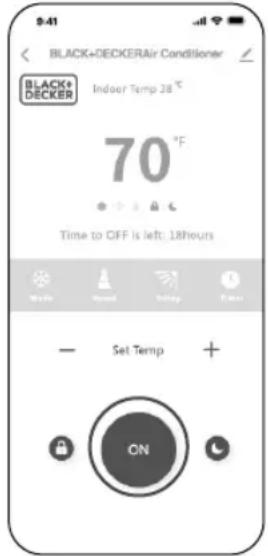
◆ Press the button again to put the appliance on Standby. Both LED displays and all indicators on the unit's control panel aside from the Power On/Off button and WiFi indicator will go out and air will stop emitting from the vents to show the unit has been put on Standby.
ENGLISH
(Original instructions)
Speed Selection
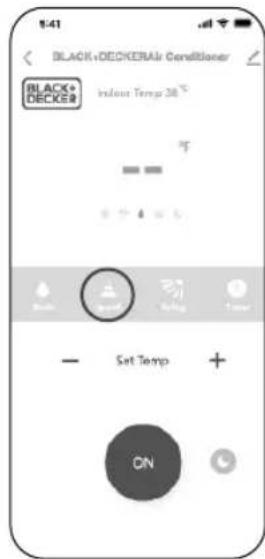
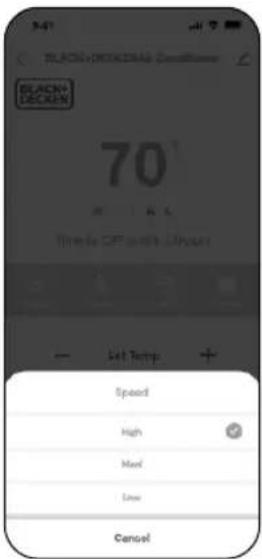
◆ Press the Speed button on the appliance's control panel or the 'BLACK+DECKER Home' app (as shown in the image below), or press either of the High and Low buttons on the remote control to choose between High and Low speed settings. The corresponding indicator will light up on the unit's control panel to show which speed has been selected.
Note! The speed selection option is not available in Dry mode. In this mode, the unit will automatically operate on the Low speed setting.
Note! The image presented is generic and applicable to all BLACK+DECKER air conditioners. Functionality may vary depending on model. For instance, this model is only equipped with 2 speed settings, rather than 3 as shown in the illustration, and does not feature a Swing function.
Temperature Selection
While the unit automatically adjusts its selected mode to reflect room temperature, temperature outputs can also be manually controlled if required.
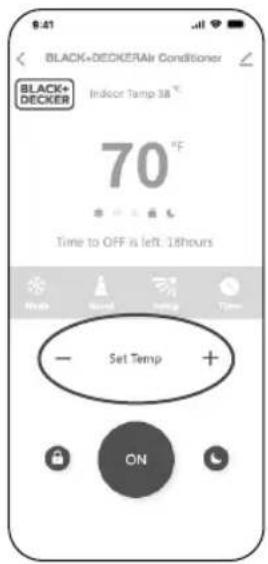
- Press the Up and Down buttons on the remote control or the appliance's control panel or the + and - buttons on the 'BLACK+DECKER Home' app to manually adjust temperature levels. Press the Up or + buttons to increase the temperature, or press the Down or - buttons to decrease it.
◆ Long-press the 'Mode' key on the unit's control panel for about 5 seconds, press the °C / °F button on the unit's remote control or long-press the digit display on the 'BLACK+DECKER Home' app to switch between degrees Celsius and degrees Fahrenheit (refer to the image below). The figures on the unit's LED displays and the remote control's LED display will adjust accordingly, and the '°C' or '°F' indicators will be displayed to show Celsius or Fahrenheit has been selected.
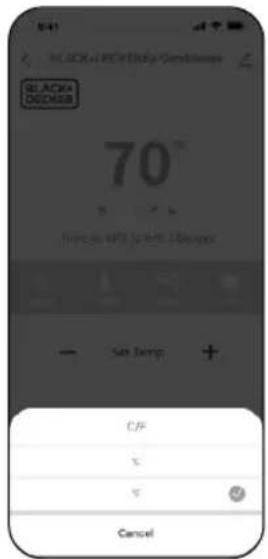
Note! Once the digit display has been pressed on the 'BLACK+DECKER Home' app, a drop-down menu will appear, where the selection can be made. Refer to the image above for guidance on how to select between Celsius and Fahrenheit when using the app.
Note! The unit's temperature will increase or decrease by increments of 1 degree, from 16 to 32^ , or from 61 to 90^ .
Note! The temperature selection function is only available in Cool or Sleep modes.
Selecting Functions
◆ Press the Mode button on the appliance's control panel, either of the three mode buttons on the remote control or the Mode button on the 'BLACK+DECKER Home' app to switch between the Cooling, Dehumidifying (Dry) and Fan modes.
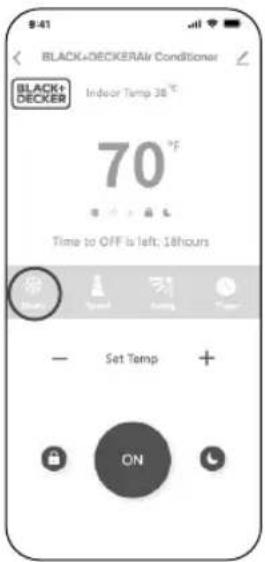
To select a different function, press the Mode button on the control panel again as many times as required until you have reached your preferred function, press the corresponding button on the appliance's control panel, or select the required function from the drop-down menu on the 'BLACK+DECKER Home' app, as shown in the image to the right.
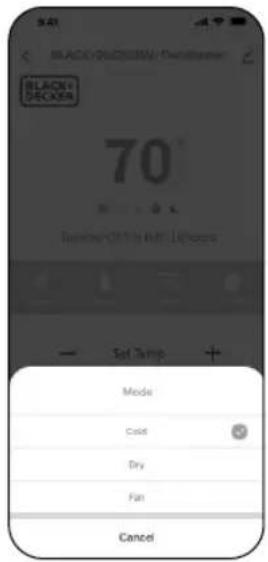
◆ The corresponding indicators will light up to show which mode the unit is operating in. When Fan mode is selected, a further indicator will light up on the left side of the unit's front LED display.
◆ The four modes operate as follows:
Cooling Mode (Cool) - In Cooling mode, the unit will blow out cold air to decrease the ambient temperature. To select Cooling mode, press the 'Mode' button repeatedly until the corresponding indicator lights up. To access this mode on the 'BLACK+DECKER Home' app press the Mode button as detailed above, then choose the Cool option from the drop-down menu shown above.. Fan Mode - In fan mode, the unit will blow out natural air to cool the ambient temperature. To select fan mode, press the 'Mode' button repeatedly until the corresponding indicator lights up. To access this mode on the 'BLACK+DECKER Home' app press the Mode button as detailed above, then choose the Fan option from the drop-down menu shown above.
Dehumidifying Mode (Dry) - This unit is equipped with a dehumidifying function, which removes moisture from the air. To select dehumidifying mode, press the 'Mode' button repeatedly until the corresponding indicator lights up. To access this mode on the 'BLACK+DECKER Home' app press the Mode button as detailed above, then choose the Dry option from the drop-down menu shown above.
ENGLISH
(Original instructions)
Sleep Mode
In Sleep mode, unit will operate at a low speed in Cooling Mode and the temperature display will increase by 1 degree per hour from the selected temperature. The unit will continue until the ambient room temperature is reached. At this point the unit will change to Fan mode only.
To select Sleep mode, press the corresponding button on the unit's remote control or the 'BLACK+DECKER Home' app.
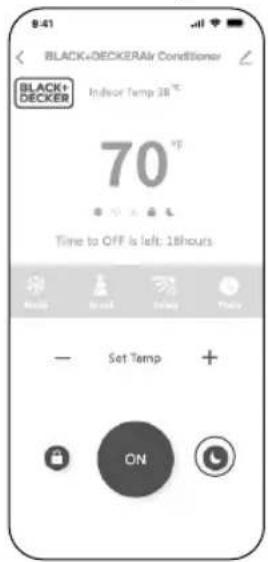
◆ Press the Sleep button again white the unit is in Sleep mode to turn this function off. The unit will resume operation and default to the latest pre-set mode and speed settings.
Note! Sleep mode is only available when the unit is operating in Cooling mode.
The Timer Function
This unit is equipped with a 24-hour programmable timer.
Setting the Timer
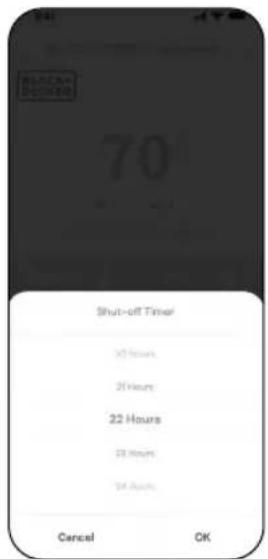
◆ Press the Timer button on the remote control, the appliance's control panel or the 'BLACK+DECKER Home' app to activate the timer. The number '00' will appear on the unit's LED display to indicate the timer function has been selected.
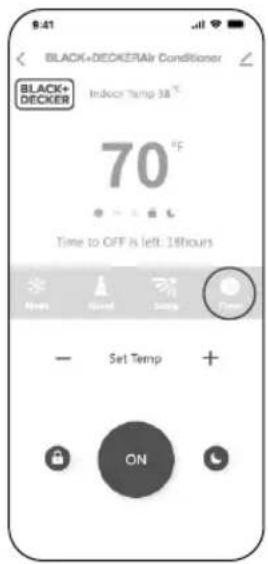
Once this function has been activated, press the Up or Down buttons on the remote control or the appliance's control panel or tap the required operation time in the drop-down menu on the 'BLACK+DECKER Home' app to select your desired operation time in increments of 1 hour, from 1 to 24 hours.
Pre-Setting the Timer
The unit's timer can also be pre-set and used as a delay timer, so that the unit will begin operation after a set period of time.
To pre-set a delay time, press the Timer button while the unit is plugged into the mains, but not in operation. The number '00' will appear on the unit's LED display to indicate the pre-set delay timer function has been selected.
Once this function has been activated, press the Up or Down buttons on the remote control, the appliance's control panel or the 'BLACK+DECKER Home' app select your desired operation time in increments of 1 hour, from 1 to 24 hours.
Note! To cancel a pre-set delay timer, press the Power On/Off button to turn the unit on, then press the button again to turn it off. This will cancel any previously set delay timers. Alternatively, simply press the Down button until the unit's LED display shows '00'.
Locking the Unit
◆ Press the Lock button on the unit's control panel or the 'BLACK+DECKER Home' app to lock the unit. When the unit is locked, no functionalities will be available until the Lock button is pressed again
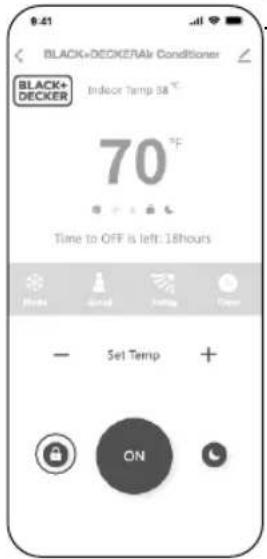
◆ Press the Lock button again while the unit is locked to unlock it and resume normal control panel functionality and usage.
Draining the Unit
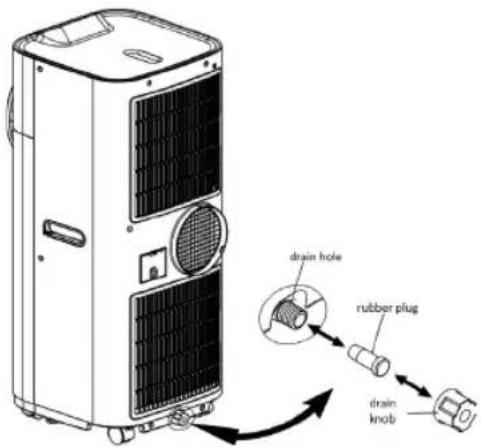
The unit can be drained in two ways: manually, or through continuous drainage.
Manual drainage
To empty the water tank manually, follow the steps below:
◆ Turn off the unit and avoid moving it.
◆ Place a container, such as a water tray, underneath the drain hole.
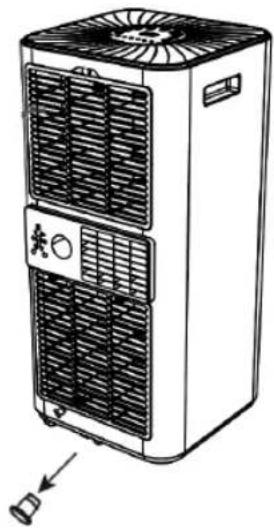
◆ Remove the drain plug and plug cap, to allow the water to drain out, as shown in the illustration below.
natural_image
Line drawing of a high-pressure air conditioner unit with cooling fan and ventilation slots (no text or symbols)When the container is almost full, place the drain plug back into the plug hole and empty the water tray.
ENGLISH
(Original instructions)
◆ Repeat this procedure until the unit is empty.
Once you have emptied the unit, put the rubber plug and plug cap back into place and tighten the cap firmly.
When you have completed the drainage process, turn the unit back on, to prevent condensation from the machine from spilling onto the floor.
Note! Always wait at least 3 minutes after switching off the unit before turning it back on. This will help prolong the life of the compressor.
Continuous Drainage
If the unit is set to operate on Dehumidifying (Dry) mode for a long period of time, especially if unattended, continuous drainage should be enabled.
To allow continuous drainage of the unit, carry out the following steps:
♦ Turn the unit off.
◆ Remove the plug cap at the back of the unit, taking care to keep it within reach.
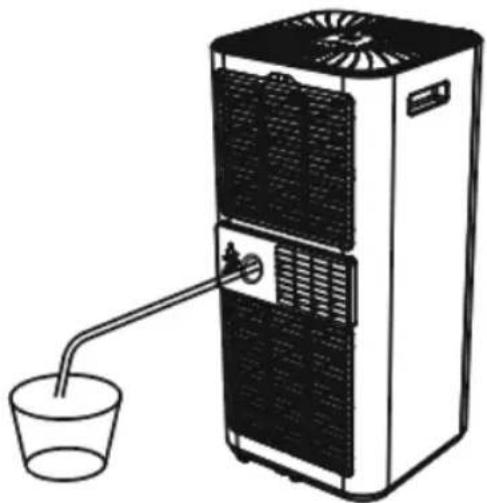
◆ Attach the drainage hose to the drainage hole, as shown in the illustration below, and tilt it down at about a 20-degree angle from the floor to prevent spillages. Make sure the hose is unobstructed, and free of kinks and bends.
◆ Place a suitable container under the hose, as shown in the illustration above, ensuring water can flow freely into it.
CAUTION! Do not submerge the end of the drainage hose in water, as this could cause an air lock in the hose.
natural_image
Diagram of a water heater with a cup and a vertical tube inserted into the unit (no text or symbols)The unit will now be able to continuously drain the water tank for as long as the Dehumidifying (Dry) option is selected.
Self-Diagnosis
This unit is equipped with a self-diagnose feature, which warns you of any errors or malfunctions it finds in the course of its normal operation.
Any errors the unit finds when running its self-diagnose will be represented by the words E1, E2, E3 or E5, which reflects different conditions, appearing on the display panel.
◆ Should any malfunction occur, please contact our customer support team.
♦ Cleaning and maintenance
⚠WARNING: Before cleaning and maintenance, switch the appliance off and remove the plug from the socket, to prevent electric shock.
Note! Always unplug the unit from the mains before cleaning.
Note! Clean the unit regularly to ensure optimal performance.
Cleaning the Housing
◆ To clean the unit's housing, wipe it down with a soft, damp cloth.
◆ Never use aggressive chemicals, gasoline, detergents, chemically treated cloths or other cleaning solutions to clean the unit, as this may cause damage to its components.
♦ Cleaning the Filter
◆ To clean the filter, tap it lightly or use a vacuum cleaner to remove loose dust and dirt from its surface.
◆ Once it is dust and dirt-free, rinse the filter thoroughly under running water, at a temperature of no more than 40 degrees centigrade.
◆ Dry the filter thoroughly before placing it back into the unit
Note! NEVER attempt to operate the unit without the filters.
Note! It is recommended the filters be cleaned every two weeks.
Before storing the unit:
◆ Drain any water inside the tank.
◆ Operate the unit in Cooling mode for a few hours to thoroughly dry the interior.
◆ Clean or change the filter.
◆ Unplug and store the power cord.
◆ Place the unit back into its original box.
◆ You can now safely store the unit.
WARNING:
The following information is for qualified technicians ONLY to tend any problems with the BXAC40023GB
◆ Please DO NOT attempt to fix, repair or alter this product in any way unless you are fully qualified
◆ If you are concerned or want any further advice please call 0333 220 6089
Instruction, Repairing Appliances Containing R290
- Checks to the area - prior to beginning work on systems containing flammable refrigerants, safety checks are necessary to ensure that the risk of ignition is minimised. For repair to the refrigerating system, the following precaution shall be completed prior to conducting work on the system.
- Work procedure shall be undertaken under a controlled procedure so as to minimise the risk of a flammable gas or vapour being present while the work is being performed.
- General work area - All maintenance staff and others working in the local area shall be instructed on the nature of work being carried out. Work in confined spaces shall be avoided.
- Checking for presence of refrigerant - The area shall be checked with an appropriate refrigerant detector prior to and during work, to ensure the technician is aware of potentially toxic or flammable atmospheres. Ensure that the leak detection equipment being used is suitable for use with all applicable refrigerants, i.e. nonsparking, adequately sealed or intrinsically safe.
- Presence of fire extinguisher - If any hot work is to be conducted on the refrigerating
equipment or any associated parts, appropriate fire extinguishing equipment shall be available to hand. Have a dry powder or CO2 fire extinguisher adjacent to the charging area.
-
No ignition sources - No person carrying out work in relation to a refrigerating system which involves exposing any pipe work shall use any sources of ignition in such a manner that it may lead to the risk of fire or explosion. All possible ignition sources, including cigarette smoking, should be kept sufficiently far away from the site of installation, repairing, removing and disposal, during which refrigerant can possibly be released to the surrounding space. Prior to work taking place, the area around the equipment is to be surveyed to make sure that there are no flammable hazards or ignition risks. "No Smoking" signs shall be displayed.
-
Ventilated area - Ensure that the area is in the open or that it is adequately ventilated before breaking into the system or conducting any hot work. A degree of ventilation shall continue during the period that the work is carried out. The ventilation should safely disperse any released refrigerant and preferably expel it externally into the atmosphere.
-
Checks to the refrigerating equipment - Where electrical components are being changed, they shall be fit for the purpose and to the correct specification. At all times the manufacturer's maintenance and service guidelines shall be followed. If in doubt, consult the manufacturer's technical department for assistance. The following checks shall be applied to installations using flammable refrigerants:
The actual refrigerant charge is in accordance with the room size within which the refrigerant containing parts are installed;
◆ The ventilation machinery and outlets are operating adequately and are not obstructed;
If an indirect refrigerating circuit is being used, the secondary circuit shall be checked for the presence of refrigerant;
Marking to the equipment continues to be visible and legible. Markings and signs that are illegible shall be corrected;
ENGLISH
(Original instructions)
♦ Refrigerating pipe or components are installed in a position where they are unlikely to be exposed to any substance which may corrode refrigerant containing components, unless the components are constructed of materials which are inherently resistant to being corroded or are suitably protected against being so corroded.
9. Checks to electrical devices
◆ Repair and maintenance to electrical components shall include initial safety checks and component inspection procedures. If a fault exists that could compromise safety, then no electrical supply shall be connected to the circuit until it is satisfactorily dealt with. If the fault cannot be corrected immediately but it is necessary to continue operation, an adequate temporary solution shall be used. This shall be reported to the owner of the equipment so all parties are advised. Initial safety checks shall include:
◆ That capacitors are discharged: this shall be done in a safe manner to avoid possibility of sparking;
◆ That no live electrical components and wiring are exposed while charging, recovering or purging the system;
◆ That there is continuity of earth bonding.
10. Repairs to sealed components.
During repairs to sealed components, all electrical supplies shall be disconnected from the equipment being worked upon prior to any removal of sealed covers, etc. If it is absolutely necessary to have an electrical supply to equipment during servicing, then a permanently operating form of leak detection shall be located at the most critical point to warn of a potentially hazardous situation.
◆ Particular attention shall be paid to the following to ensure that by working on electrical components, the casing is not altered in such a way that the level of protection is affected. This shall include damage to cables, excessive number of connections, terminals not made to original specification, damage to seals, incorrect fitting of glands, etc.
◆ Ensure that the apparatus is mounted securely.
Ensure that seals or sealing materials have not degraded to the point that they no longer serve the purpose of preventing the ingress of flammable atmospheres.
◆ Replacement parts shall be in accordance with the manufacturer's specifications.
11. Repair to intrinsically safe components
DO NOT apply any permanent inductive or capacitance loads to the circuit without ensuring that this will not exceed the permissible voltage and current permitted for the equipment in use.
Intrinsically safe components are the only types that can be worked on while live in the presence of a flammable atmosphere. The test apparatus shall be at the correct rating.
◆ Replace components only with parts specified by the manufacturer. Other parts may result in the ignition of refrigerant in the atmosphere from a leak.
12. Cabling
◆ Check that cabling will not be subject to wear, corrosion, excessive pressure, vibration, sharp edges or any other adverse environmental effects. The check shall also take into account the effects of aging or continual vibration from sources such as compressors or fans.
13. Detection of flammable refrigerants
Under no circumstances shall potential sources of ignition be used in the searching for or detection of refrigerant leaks. A halide torch (or any other detector using a naked flame) shall not be used.
◆ Removal and evacuation
When breaking into the refrigerant circuit to make repairs – or for any other purpose – conventional procedures shall be used. However, for flammable refrigerants it is important that best practice is followed since flammability is a consideration. The following procedure shall be adhered to:
◆ Remove refrigerant;
◆ Purge the circuit with inert gas;
◆ Evacuate;
◆ Purge with inert gas;
◆ Open the circuit by cutting or brazing.
The refrigerant charge shall be recovered into the correct recovery cylinders. For appliances containing flammable refrigerants the system shall be purged with oxygen-free nitrogen to render the appliance safe for flammable refrigerants. This process may need to be repeated several times.
◆ Compressed air or oxygen shall not be used for purging refrigerant systems.
For appliances containing flammable refrigerants, refrigerants purging shall be achieved by breaking the vacuum in the system with oxygen-free nitrogen and continuing to fill until the working pressure is achieved, then venting to atmosphere, and finally pulling down to a vacuum. This process shall be repeated until no refrigerant is within the system. When the final oxygen-free nitrogen charge is used, the system shall be vented down to atmospheric pressure to enable work to take place. This operation is absolutely vital if brazing operations on the pipe-work are to take place.
◆ Ensure that the outlet for the vacuum pump is not close to any potential ignition sources and that ventilation is available.
◆ Charging procedures In addition to conventional charging procedures, the following requirements shall be followed.
◆ Ensure that contamination of different refrigerants does not occur when using charging equipment.
◆ Hoses or lines shall be as short as possible to minimise the amount of refrigerant contained in them.
◆ Cylinders shall be kept in an appropriate position according to the instructions.
◆ Ensure that the refrigerating system is earthed prior to charging the system with refrigerant.
◆ Label the system when charging is complete (if not already).
◆ Extreme care shall be taken not to overfill the refrigerating system.
- Prior to recharging the system, it shall be pressure-tested with the appropriate purging gas. The system shall be leak-tested on completion of charging but prior to commissioning. A follow up leak test shall be carried out prior to leaving the site.
14. Decommissioning
Before carrying out this procedure, it is essential that the technician is completely familiar with the equipment and all its detail. It is recommended good practice that all refrigerants are recovered safely.
- Prior to the task being carried out, an oil and refrigerant sample shall be taken in case analysis is required prior to re-use of recovered refrigerant. It is essential that electrical power is available before the task is commenced.
a. Become familiar with the equipment and its operation.
b. Isolate system electrically.
c. Before attempting the procedure, ensure that:
◆ Mechanical handling equipment is available, if required, for handling refrigerant cylinders;
◆ All personal protective equipment is available and being used correctly;
◆ The recovery process is supervised at all times by a competent person;
◆ Recovery equipment and cylinders conform to the appropriate standards.
d. Pump down refrigerant system, if possible.
e. If a vacuum is not possible, make a manifold so that refrigerant can be removed from various parts of the system.
f. Make sure that cylinder is situated on the scales before recovery takes place.
g. Start the recovery machine and operate in accordance with instructions.
h. DO NOT overfill cylinders (no more than 80% volume liquid charge).
i. DO NOT exceed the maximum working pressure of the cylinder, even temporarily.
ENGLISH
(Original instructions)
j. When the cylinders have been filled correctly and the process completed, make sure that the cylinders and the equipment are removed from site promptly and all isolation valves on the equipment are closed off.
k. Recovered refrigerant shall not be charged into another refrigerating system unless it has been cleaned and checked.
- Labelling
◆ Equipment shall be labelled stating that it has been de-commissioned and emptied of refrigerant. The label shall be dated and signed. For appliances containing flammable refrigerants, ensure that there are labels on the equipment stating the equipment contains flammable refrigerant.
- Recovery
When removing refrigerant from a system, either for servicing or decommissioning, it is recommended good practice that all refrigerants are removed safely.
When transferring refrigerant into cylinders, ensure that only appropriate refrigerant recovery cylinders are employed. Ensure that the correct number of cylinders for holding the total system charge is available. All cylinders to be used are designated for the recovered refrigerant and labelled for that refrigerant (i.e. special cylinders for the recovery of refrigerant). Cylinders shall be complete with pressure-relief valve and associated shut-off valves in good working order. Empty recovery cylinders are evacuated and, if possible, cooled before recovery occurs.
The recovery equipment shall be in good working order with a set of instructions concerning the equipment that is at hand and shall be suitable for the recovery of all appropriate refrigerants including, when applicable, flammable refrigerants. In addition, a set of calibrated weighing scales shall be available and in good working order. Hoses shall be complete with leak-free disconnect couplings and in good condition. Before using the recovery machine, check that it is in satisfactory working order, has been properly maintained and that any associated electrical components are sealed to prevent ignition in the event of a refrigerant release. Consult manufacturer if in doubt.
The recovered refrigerant shall be returned to the refrigerant supplier in the correct recovery cylinder, and the relevant waste transfer note arranged. DO NOT mix refrigerants in recovery units and especially not in cylinders.
If compressors or compressor oils are to be removed, ensure that they have been evacuated to an acceptable level to make certain that flammable refrigerant does not remain within the lubricant. The evacuation process shall be carried out prior to returning the compressor to the suppliers. Only electric heating to the compressor body shall be employed to accelerate this process. When oil is drained from a system, it shall be carried out safely
Protecting the environment
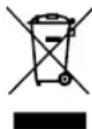
Separate collection. Products and batteries marked with this symbol must not be disposed of with normal household waste.
Products and batteries contain materials that can be recovered or recycled, reducing demand for raw materials. Please recycle electrical products and batteries according to local provisions. Further information is available at www.2helpU.com.
Technical data
| BXAC40023GB | ||
| Input voltage V AC | 220-240 | |
| Frequency Hz 50 | ||
| Power input W 560 | ||
| Weight KG 18.5 |
Product Guarantee
This product comes with a 2 Year guarantee from the original date of purchase. If any defect arises due to faulty materials or workmanship, the faulty products must be returned to the place of purchase. Refund or replacement is at the discretion of the retailer. This guarantee is in addition to and in no way prejudices your statutory rights.
The Following Conditions Apply:
The product must be returned to the retailer with proof of purchase or a receipt within the 1st year of purchase. For any product related issues after 12 months please contact our customer services team.
◆ The product must be installed and used in accordance with the instructions contained in this instruction guide.
- It must be used only for domestic purposes.
- It does not cover wear and tear, damage, misuse or consumable parts.
- This guarantee is valid in the UK and Republic of Ireland.
For all customer service enquires please contact us below;
RKW,
Sutton House,
Berry Hill Road,
Stoke-on-Trent,
ST4 2NL
Email blackanddecker@rkwltd.com
Tel 0333 220 6089
Black & Decker® and BLACK+DECKER™ and the Black & Decker® and BLACK+DECKER™ logos are registered trademarks of The Black & Decker® Corporation and are used under licence. All rights reserved. Imported and Distributed by RKW LTD, Sutton House, Berry Hill Industrial Estate, Berry Hill Road, Stoke-on-Trent, ST4 2NL
ENGLISH
(Original instructions)
| Model Identifier(s): BXAC40023GB | ||||
| Description | Symbol | Rated Value | Measured Rated Value | Unit |
| Capacity for cooling | P for cooling | 1.470 1.472 kW | ||
| Capacity for heating | P for heating | -- kW | ||
| Power input for cooling | PEER 0.560 0.558 kW | |||
| Power input for heating | PCOP - kW | |||
| Energy efficiency ratio | EERd | 2.63 | 2.638 | - |
| Coefficient of performance | COPd | -- | - | |
| Information to identify the model(s) to which the information relates to [fill in as necessary]: | ||||
| Description | Symbol | Rated Value | Measured Rated Value | Unit |
| Power consumption in off mode | POFF | - | W | |
| Power consumption in standby mode | PSB | 0.50 | 0.43 | W |
| Electricity consumption of single/double duct appliances (indicate for cooling and heating separately) | DD: QDD SD: QSD | SD: 0.558 for cooling | DD: kWh/a SD: kWh/h | |
| Sound power level | LWA | 65 | 63.2 | dB(A) |
| Global warming potential | GWP | 3 | kgCO 2 eq. | |
| Contact Details: | RKW LTD, Sutton House, Berry Hill Industrial Estate, Berry Hill Road, Stoke-on-Trent, ST4 2NL | |||
(Original instructions)


01/2023

- What's in the box
- Features
- Control Panel
- Remote Control
- ENGLISH
- (Original instructions)
- Intended Use
- Safety Instructions
- Using Your Appliance
- Safety Of Others
- After Use
- Inspections And Repairs
- Additional safety instructions for Air conditioners and Fans
- Safety relating to refrigerant R290:
- CAUTION: R290 is flammable (GWP3)!
- Electrical safety
- Extension cables & class I product
- Features (Refer to diagrams on page 2)
- Use
- Installing the Battery
- To Begin Using Your Air Conditioner
- Assembling Your 3-in-1 Air Conditioner
- Using the Window Kits
- Installing the Casement Window Kit
- Installing the Sash Window Kit
- Mounting the Window Hose
- Using the B&D Home App
- Downloading The App
- Using the App
- Connecting the App to the Unit
- WIFI Connection
- Method 1
- Method 2
- Turning Your Appliance On or Off
- Speed Selection
- Temperature Selection
- Selecting Functions
- Sleep Mode
- The Timer Function
- Setting the Timer
- Pre-Setting the Timer
- Locking the Unit
- Draining the Unit
- Manual drainage
- Continuous Drainage
- Self-Diagnosis
- ♦ Cleaning and maintenance
- Cleaning the Housing
- ♦ Cleaning the Filter
- Before storing the unit:
- WARNING:
- The following information is for qualified technicians ONLY to tend any problems with the BXAC40023GB
- Instruction, Repairing Appliances Containing R290
- Checks to electrical devices
- Repairs to sealed components.
- Repair to intrinsically safe components
- Cabling
- Detection of flammable refrigerants
- ◆ Removal and evacuation
- Decommissioning
- Protecting the environment
- Product Guarantee
- The Following Conditions Apply:
- For all customer service enquires please contact us below;
Brand : BLACK & DECKER
Model : BXAC40023GB
Category : Air-conditioner