
Evolution CS 3.3 - Audio Receiver AVM - Free user manual and instructions
Find the device manual for free Evolution CS 3.3 AVM in PDF.


| Product Type | Audio Receiver (Integrated Amplifier with CD, Streaming, and Preamp) |
| Dimensions (W x H x D) | 430 x 122 x 350 mm |
| Weight | 11 kg (CS/AS models) |
| Power Supply | 100-240 V, 50/60 Hz |
| Power Consumption (Standby) | < 0.5 W (Network Standby < 2 W) |
| Maximum Power Consumption | 1000 W (CS/AS), 25 W (PAS) |
| Amplifier Output Power | 2 x 350 W (4 Ω) / 2 x 180 W (8 Ω) |
| Frequency Response | < 5 Hz to > 100 kHz (PAS), < 0 Hz to > 100 kHz (3.3) |
| Total Harmonic Distortion (THD) | < 0.005% (Amplifier), < 0.001% (Preamp 3.3) |
| Signal-to-Noise Ratio | > 100 dB (Preamp), > 95 dB (Amplifier) |
| Supported Streaming Services | AirPlay, Qobuz, Roon, Spotify, TIDAL, HighResAudio |
| Bluetooth Standard | 5.0 LE |
| Wi-Fi Standards | 2.4/5 GHz, 802.11a/b/g/n/ac |
| Digital Inputs | 1 x Coaxial (192 kHz/24-bit), 1 x Optical (96 kHz/24-bit), 1 x HDMI ARC (192 kHz/24-bit) |
| Analog Inputs | 3 x RCA, 1 x XLR, 1 x Phono (MM/MC) |
| Speaker Outputs | A/B circuit, minimum 8 Ω each (4 Ω when both used) |
| Headphone Output | 6.35 mm front jack, 24 Ω output impedance |
| CD Player | Slot-in, CD Audio, CDR (Red Book) |
| Control Methods | Front panel, RC 3/8/9 remote, RC X app (iOS/Android) |
| Housing Care | Mild soapy water or glass cleaner, soft cloth; avoid liquid ingress |
| Spare Parts | Contact specialist dealer or AVM; fuse T10A for CS/AS |
Frequently Asked Questions - Evolution CS 3.3 AVM
User questions about Evolution CS 3.3 AVM
0 question about this device. Answer the ones you know or ask your own.
Ask a new question about this device
Download the instructions for your Audio Receiver in PDF format for free! Find your manual Evolution CS 3.3 - AVM and take your electronic device back in hand. On this page are published all the documents necessary for the use of your device. Evolution CS 3.3 by AVM.
USER MANUAL Evolution CS 3.3 AVM
Handcrafted in Germany
Welcome!
We are delighted that you have chosen an audiophile masterpiece from AVM and thank you for your trust. With the EVOLUTION CS/AS/PAS 3.3/5.3 you have acquired an outstanding and versatile high-end component with a wide range of functions. In the following, we would like to explain the use of your EVOLUTION CS/AS/PAS 3.3/5.3 in a comprehensive way and therefore ask you to take a little time to study this guide in detail.
Please note: Since the range of functions of your EVOLTION CS/AS/PAS 3.3/5.3 can be expanded in no time at all by future software updates, it is in the nature of things that this manual must also be supplemented. The current version of this instruction manual is therefore available for free download on our website at www.avm.audio.
And the most important thing at the end: We at AVM and our specialist dealers are always happy to be there for you. If you have any questions, requests or suggestions, please do not hesitate to contact us. And if you are satisfied with us, please feel free to recommend us.

Udo Besser – AVM Owner & Managing Director
Meaning of Warning Symbols

The general hazard symbol, in conjunction with the warning words CAUTION, WARNING and DANGER, warns of the risk of serious injury. Follow all the instructions below to avoid injury or death.

The lightning symbol, in conjunction with the warning word DANGER, warns of a life-threatening electrical voltage.
Safety
Opening the device

CAUTION: Please do not open the housing or other covers at any time. All maintenance work must be carried out by qualified customer service personnel.
Proper disconnection from the grid

DANGER: To completely disconnect your appliance from the mains, use the power button on the back and then disconnect the appliance from the mains by unplugging the appliance from the socket
Operation during thunderstorms

DANGER: Lightning surges - Power surges caused by lightning can damage or even destroy the device. In the event of an approaching thunderstorm, unplug from the power outlet. Switching it off with the power switch is not enough, because the
overvoltages "jump" even over the contacts that are not closed.
The right APP for your AVM device: RC-X

1.1 Scope of delivery 6
1.2 Overview 6
1.3 Installation and cooling....7
1.4 Mains connection....7
1.5 Connection of analogue sound sources....8
1.6 Connection of digital sound sources....8
1.7 Connection of analogue recording devices....9
1.8 Digital Output: Connection of digital recording devices....9
1.9 Operation with subwoofer....9
1.10 Connecting the speakers 9
1.11 RC 9 Remote Control....9
1.12 RC X App for iOS and Android.... 10
1.13 Network installation (LAN, WLAN).... 10
1.14 Software & Firmware Updates 17
2 Operation of the basic functions....18
2.1 First switch-on and self-test.... 18
2.2 Turn the device on and off 18
2.3 Source selection....18
2.4 Volume Setting & Volume Limit 19
2.5 CD-Player 20
2.6 Bluetooth 21
2.7 Selection of the appropriate termination for the phono input.... 22
3 Advanced Settings (MENU) 23
3.1 Global Settings 24
3.2 Analog Inputs 25
3.3 Digital Inputs (COAX, OPTO, ARC) 25
3.4 Streaming inputs, CD player and USB 25
3.5 Phono input 26
3.6 Bluetooth input, internet radio, AirPlay, podcast 26
3.7 Setup....27
3.8 Settings via the RC X app 32
3.9 Factory Reset 34
4 Appendix....35
4.1 Caring for the housing....35
4.2 Troubleshooting 35
4.3 Guarantor Bestimmunen 37
5 Specifications....38
1 Start-Up
1.1 Scope of delivery
1.1.1 EVOLUTION CS/AS/PAS 3.3/5.3 Compact Streaming CD-Receiver / Pre-Amplifier
1.1.2 2 WLAN/Bluetooth antenna(s)
1.1.3 Power cord
1.1.4 Gloves
1.1.5 RC 3 Remote
NOTE: Please check the device and accessories for completeness and transport damage after unpacking. If the original packaging has already been opened, please contact your specialist dealer. Often, a specialist dealer will prepare your new device for use in your network before delivery, in which a number of settings are already preconfigured for you. In addition, we ship all of our network-enabled devices with a current version of the X-STREAM software, which may need to be updated again as part of the initial installation (see Section 1.14 for details on updating the streaming software).
1.2 Overview
In this manual, there are numbers behind the names of the individual elements, which refer to the drawings below.
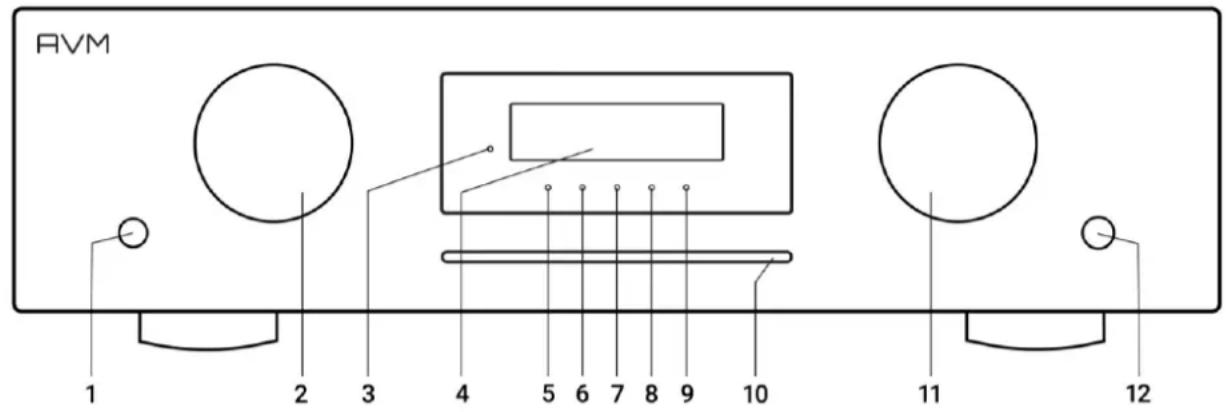
1 on/off switch
2 Source Selector
3 Status-LED
4 OLED Display
5 Menu 1 with LED
6 Menu 2 with LED
7 Menu 3 with LED
8 Menu 4 with LED
9 Menu 5 with LED
10 CD-Slot (Just CS)
11 Volume Control
12 Headphone Output
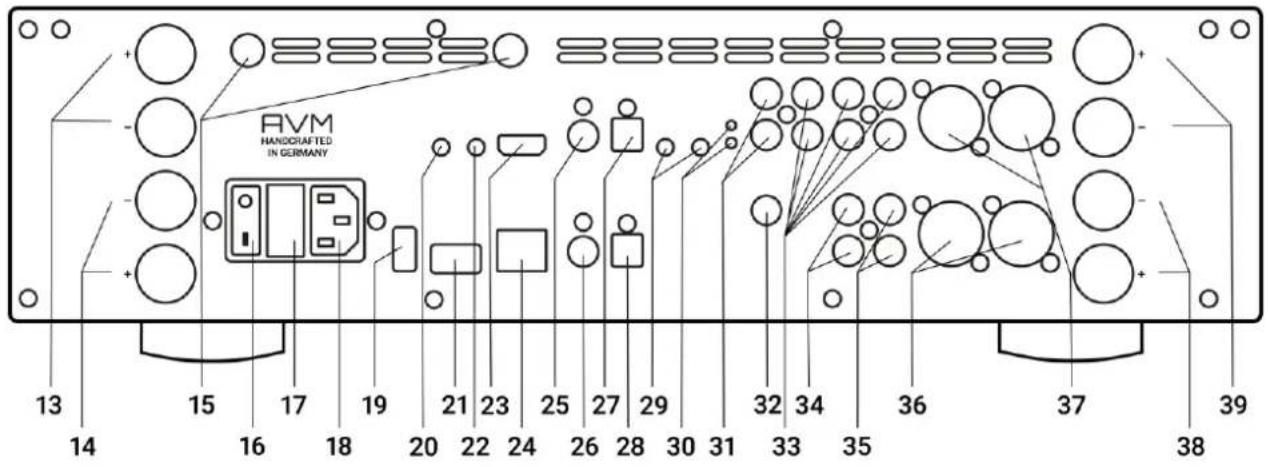
13 Speaker connector A Re (CS/AS only)
14 Speaker connector B Re (CS/AS only)
15 Wi-Fi/Bluetooth Antennas 1
16 Main switch on/off
17 Fuse holder
18 Electrical appliance connection
19 USB input for data carrier 2
20 Trigger Input (3,5mm)
21 USB input for RC dongle
22 External IR input
23 HDMI-ARC input
24 Network connection (LAN)
25 COAX digital input
26 COAX digital output
27 Optical Input
28 Optical Output
29 Trigger Output (2x) (3,5mm)
30 RESET button (with LED)
31 Phono Input
32 Ground connection for turntable
33 Analog Inputs (RCA)
34 Recording Output (LINE-OUT)
35 Pre-Amp Output (PRE-OUT)
36 XLR Preamp Output (PRE)
37 XLR Analog Input
38 Speaker connector B Li (CS/AS only)
39 Speaker connector A Li (CS/AS only)
1.3 Installation & Cooling (CS/AS Only)
The power amplifiers of your CS/AS 3.3/5.3 require cooling. Therefore, it is very important that the air supply from below as well as the outflow of the heated air upwards is possible without hindrance. Make sure that the CS/AS 3.3/5.3 is installed as freely as possible on a solid surface. The ventilation slots on the underside of the device must not be closed. In addition, the installation site should be protected from direct sunlight.
1.4 Mains connection
Connect the power supply connection (18) of the appliance to a Schuko socket using the supplied power cable.
NOTE: Please leave the device switched off for the time being (power switch (16) in zero position) until you have made all cable connections to the rest of the system. In addition, pay attention to the phase labeled on the device.
NOTE: Both antennas are identical and can be installed on both antenna connectors (15).
2IMPORTANT: The USB interface is only intended for USB sticks/flash drives or hard drives.
1.5 Connection of analogue sound sources
Analog signal sources can be connected to the analog inputs via suitable cables (31, 33, 37). In the case of RCA inputs, the left channel is connected to the top row, and the right channel is connected to the bottom row.
1.5.1 High-level sources (RCA, XLR)
Connect the respective inputs with appropriate RCA or .XLR cables. You can purchase the corresponding cables directly from your specialist dealer.
1.5.2 Phono-Input
The turntable is connected to the phono input (31). Connect its grounding cable to the ground connection (32). The phono input is suitable for MM systems and loud to medium-loud MC systems. After selecting the phono input, the different scanning systems MM and MC can be selected in the MENU (menu button (7)) under the option "Phono Pickup". Depending on the design principle of the pickup system used, you can choose either MM for electromagnetic transducers (MM = Moving Magnet) or MC for electrodynamic transducers (MC = Moving Coil). If your pickup system works according to the MM or MC principle, please refer to the corresponding documentation of your turntable or cartridge. Please note that if you have a 'noisy' MC system, you can also use the MM setting. For more information, please refer to the operating instructions for your turntable or cartridge.
For detailed adjustments to the cartridge system, please use the options for setting the termination impedance or termination capacitance in the device menu (see section 2.7 for more details).
1.6 Connection of digital sound sources
Digital signal sources can be connected to the digital inputs via suitable cables (23, 25, 27).
1.6.1 Coaxial or optical digital input
Connect your CS/AS/PAS 3.3/5.3 with a suitable Toslink or COAX cable.
1.6.2 HDMI ARC (Audio Return Channel)
If you're using an ARC-compatible TV, all you need is a suitable HDMI cable to input audio signals from the TV and transmit HDMI control signals. Simply connect your ARC-enabled TV to the ARC input (23) on your CS/AS/PAS 3.3/5.3.
NOTE: The HDMI port is an audio input only and is not suitable for image playback.
ATTENTION: Only stereo audio signals can be processed via the HDMI-ARC. This means that you need to change your source device (e.g. your TV) will have to switch to the PCM audio track. (Not: Dolby or DTS).
1.7 Connection of analogue recording devices
To operate an analog recorder, connect its inputs to the CINCH LINE analog output (34). The analogue outputs of the recorder connect you to one of the high-level inputs (33).
1.8 Output: Connection of digital recording devices
To operate a digital recording device, connect it to the optical or coaxial digital outputs (26, 28). Depending on the selected sound source, the digital output transmits the corresponding signal (e.g. CD player, DIG OPT, DIG COAX etc.).
The digital outputs can be easily switched to "volume controlled" and used as "digital PRE OUT".
1.9 Operation with subwoofer
You can connect a subwoofer to the regulated RCA or XLR outputs (PRE-OUT) using an appropriate cable (35, 36).
1.10 Speaker Connection (CS and AS Only)
The speaker outputs of the CS/AS 3.3/5.3 are equipped with gold-plated banana jacks. To connect the speakers, you will therefore need cables with the appropriate plugs (but you can also use fork shoes or free cable ends). These are connected to the speaker outputs (13, 14, 38, 39) of the CS/AS 3.3/5.3. To connect the speakers, use only speaker cables of good quality and sufficient cross-section. If in doubt, ask your specialist dealer to recommend the cable that is best for the sound of your loudspeaker. The A/B output circuit allows you to connect a total of two pairs of speakers. The minimum impedance of each loudspeaker must not be less than 8 ohms.
Pay attention to the marking of the A/B circuit on the speakers and only connect a pair of speakers to A or B at a time.
When connecting the speakers, also pay attention to the correct color polarity. The output jacks of the CS/AS 3.3/5.3 marked in red must be connected to the speaker terminals marked in red. The right and left channels must have the same polarity of the speakers.
1.11 RC 9 Remote Control (No longer available)
The RC 9 remote control, which was previously available as an option, allows you to control your AVM device conveniently and comprehensively. Before both components can be used together, they must first be coupled with each other. This one-time process is called pairing and establishes a wireless connection between the RC 9 remote control and your device (see section 1.11.1). To use the RC 9 you need a dongle. Please contact your dealer or our service. A detailed description of the full range of functions of the RC 9 remote control can be found in a separate user manual at www.avm.audio.
1.11.1 Pairing
Pairing is a process of creating a wireless connection between an RC 9 remote control and your device to pair both components together. There are two ways to start the pairing process:
a) You can start pairing via AVM's RC X app. You can find the Start pairing option in the settings under RC 9 remote control. Once you have started the pairing process via the app, you will need to start the pairing process in the RC 9 remote control using the navigation buttons shortly afterwards.
b) To start the pairing process without the RC X app, turn off the device completely using the power button on the back of the device (16). Then navigate to the Start Pairing menu item in the main menu of the RC 9 remote control with the top or bottom navigation button, but without selecting it by pressing the Enter key. First, turn the device back on using the power button on the back (16) and immediately press the Enter key on the RC 9 remote control to start the pairing process. After a short search, the name of a successfully detected device is displayed on the display of the remote control and can be further adjusted using the input buttons. In addition, it is possible to assign one of four hotkeys to the device (details on how to use the hotkeys can be found in a separate RC 9 user manual on the AVM website at www.avm.audio.
By pressing the Enter key on the RC 9 remote control again, the pairing process is complete.
ATTENTION: To use the RC 9 remote control, an additional USB dongle must be purchased (at an additional cost).
1.12 RC X App for iOS and Android
The RC X app for iOS and Android turns your smartphone or tablet into a convenient remote control and offers a variety of intuitive features for using all AVM streaming-enabled models with the built-in AVM X-STREAM engine®. The RC X app is available for free download from the Apple App Store and Google Play Store.
1.13 Network Installation (LAN, WLAN)
To use the extensive streaming and networking functions such as ROON, Spotify Connect®, Apple AirPlay, TIDAL, QOBUZ, HIGHRESAUDIO, web radio, podcasts or music servers, your device must be connected to your home network or to the Internet via a router. For this purpose, you can choose between a wired LAN connection via the network port (26) or a wireless WLAN connection (WiFi) via the supplied WLAN antenna. When screwing the supplied Wi-Fi antenna to the corresponding Wi-Fi antenna connector (15), please make sure that the antenna is aligned. Only then angle the antenna to the desired position.
LAN VS. WLAN:
If you have the choice between a wired LAN or wireless Wi-Fi connection, we generally recommend using a wired LAN connection, as this usually allows for higher bandwidth and is also less susceptible to interference and less dependent on the traffic of your entire network.
NOTE: All AVM devices with a built-in AVM X-STREAM engine® generally prefer a wired network connection (LAN) and automatically access it as soon as a network cable is installed on the device. To ensure smooth continuous operation via a wireless Wi-Fi connection, remove any connected network cable (LAN) from the network port (24).
Even during operation, the device re-establishes a wired network connection, as this is preferred by the device to Wi-Fi.
Follow these steps to start installing a wired or wireless network connection.
All AVM devices with an integrated AVM X-STREAM engine® are hot-pluggable. This means that there is no need to restart or turn the AVM device off and on again to set up a wired network connection, but a network cable (LAN cable) can be connected during operation and a network connection is established immediately.
a) Connect the device to a router on your home network using a network cable (LAN cable) by connecting the LAN cable to the network port of the AVM device (24) on one side and to a free port on your router (LAN) or network switch on the other.
b) The device automatically connects to your home network via the connected LAN cable and is ready to use.
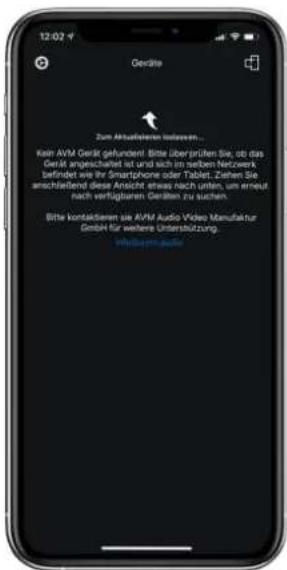
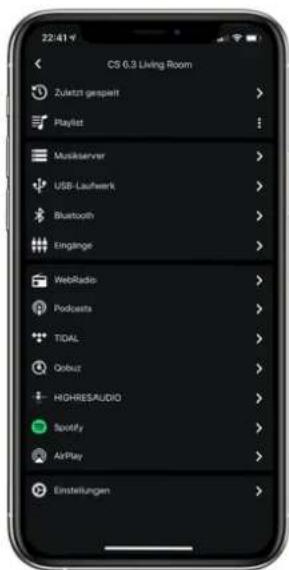
c) Make sure your smartphone or tablet is connected to the same network/Wi-Fi as your AVM device and launch the RC X app. After a short start-up process, the RC X app automatically searches for available AVM devices on your network and lists them with their respective device name and IP address. You can recognize an IP address by a sequence of numbers separated by several dots. For example, an IP address often starts with "192.168.xxx.x".
d) Select an available device from the list by tapping and wait a short moment for your smartphone or tablet to connect to the device.
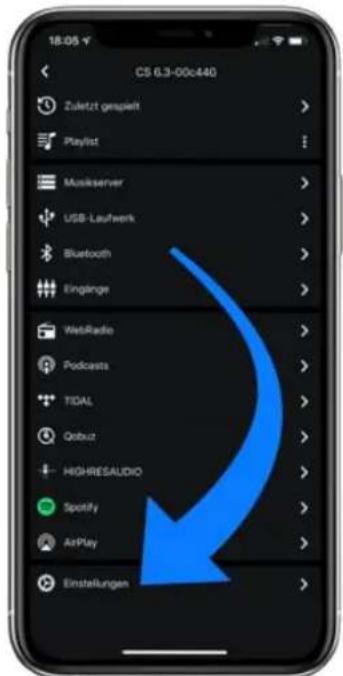
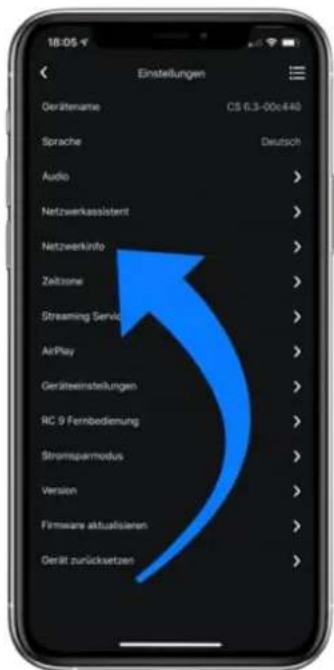
NOTE: If you don't see an available device, check that the network cable is installed correctly and that the AVM device is on the same network/Wi-Fi network as your smartphone or tablet. Next, drag the view down a bit in the RC X app to search for available devices again. Please also note that the RC X app is only compatible with AVM models with integrated AVM X-STREAM engine®. An up-to-date model overview can be found at: www.avm.audio/rc-x-app.
e) To check the network status, launch the RC X app and select the AVM device.
f) In the settings, go to the Network Info menu item. In the Wired section, you can view details about the network connection that has been made.
1.13.2 Setting up a wireless network connection (WLAN / WiFi)
There are several options for setting up a wireless network connection (WLAN/WiFi):
√ WPS
√ AirPlay-Configuration for iOS
√ RC X App for Android & iOS via WiFi Access Point
√ RC 9 Remote control
1.13.2 Setup via WPS
WPS (Wi-Fi Protected Setup) is a standard for easily and securely establishing a wireless network connection with encryption. All you need to set it up is a Wi-Fi router with WPS functionality. If your Wi-Fi router is equipped with WPS, please refer to the corresponding documentation of your router. Setting up a WPS connection is done from the Personal Setup menu of your AVM device. For details on the full functionality of the Personal Setup menu, see Section 3.7. Personal Setup.
a) To access the Personal Setup menu, press and hold the button under "MENU" (7) until "SETUP" appears instead of "MENU" and then release the button again.
b) In the Personal Setup menu, individual menu items can be selected with the menu buttons (5) and (6) and activated accordingly with the SELECT menu button.
c) Now use the menu keys (5) and (6) and the SELECT key to select the WPS menu item.
d) Activate the WPS function by pressing the START menu button. In the display, the WPS in progress indicator appears.
e) Now, within two minutes, activate the WPS feature on your Wi-Fi router.
f) Once your AVM device has successfully established a Wi-Fi connection via WPS, the name of the connected Wi-Fi will be displayed on the display, e.g.: Joined Wi-Fi: Wi-Fi Name (SSID).
g) To complete the process, press the BACK menu button and then exit the Personal Setup menu by pressing the EXIT menu button. Now your device is back to normal operating.
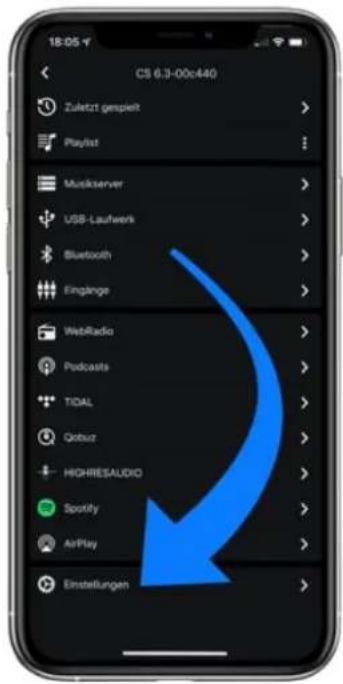
h) Your AVM device is now connected to your local wireless network (WLAN/WiFi) and ready to use.
i) To check the network status, launch the RC X app and select the AVM device.
j) In the settings, go to the Network Info menu item. In the Wireless section, you can view details of the Wi-Fi configuration that has been completed.
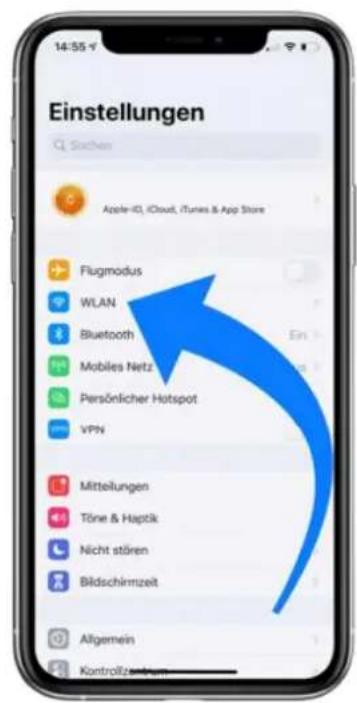
a) First, switch off the AVM device completely using the power button on the back (16) and wait a short moment before turning it back on using the power button.
b) Once your AVM device has completed the startup process and is in its general operating state, go to the Wi-Fi menu in your iPhone or iPad's settings. Make sure that the Wi-Fi feature is turned on and that your iPhone or iPad is connected to the Wi-Fi network you want.
c) In the Wi-Fi menu, under the NEW AirPlay speaker ON-SETUP menu item, select the AVM device you want to connect to your Wi-Fi network. In the example below, AVM device is listed as CS 6.3-00c440. Wait a moment if the device does not appear immediately. Your iPhone or iPad is constantly searching for new devices and refreshing the view of available Wi-Fi networks at short intervals. If necessary, repeat the power-on process of the AVM device as described above if the AVM device does not appear even after a short waiting period.
d) In the AirPlay Configuration menu that opens, verify that the desired Wi-Fi network is selected under NETWORK, and if necessary, change the device name for your AVM device under Speaker Name. Optionally, set a password. Then start the connection process via Continue. The Wi-Fi access data, including the password, is now automatically transferred from your iPhone or iPad to your AVM device.
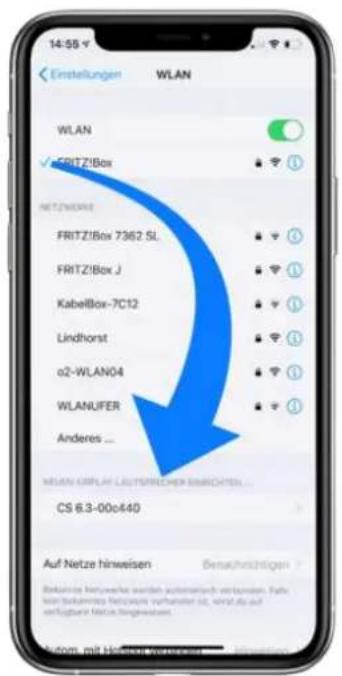
As soon as the configuration is finished, you will receive a corresponding feedback, which you acknowledge with Done. Your AVM device is now connected to your Wi-Fi network and ready to use.
e) To check network status, download the RC X app for iOS from the Apple App Store and install it on your iPhone or iPad. Launch the RC X app and select the AVM device from the Start menu.
f) In the settings, go to the Network Info menu item. In the Wireless section, you can see details about the Wi-Fi configuration that has been completed.
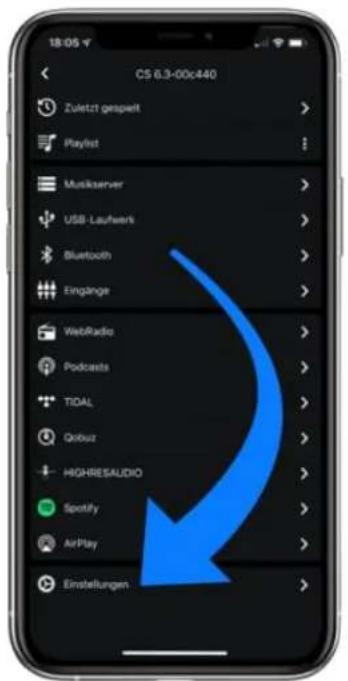
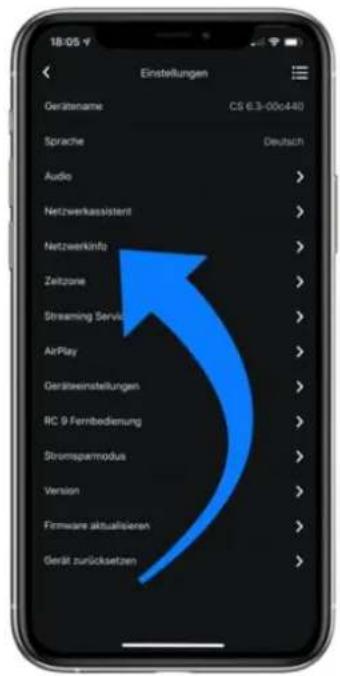
g) Use Scan to search for available Wi-Fi networks and select the desired Wi-Fi network as soon as it appears in the search results. In the example below, the Wi-Fi network has the name FRITZ! Box. A Wi-Fi network name is also known as an SSID.
h) Enter the network key (Wi-Fi password) for the Wi-Fi network and complete the setup via Connect.
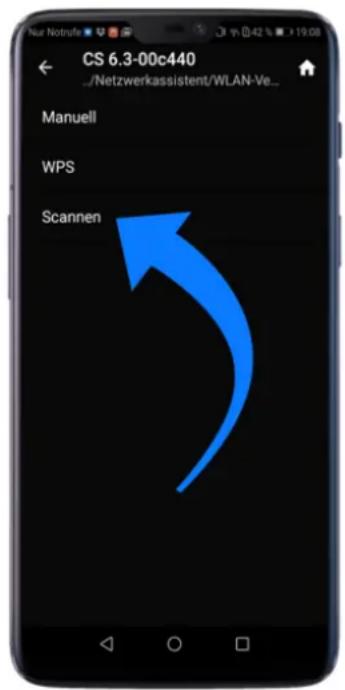
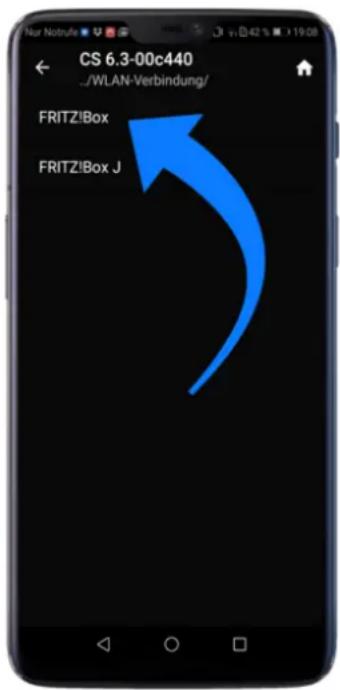
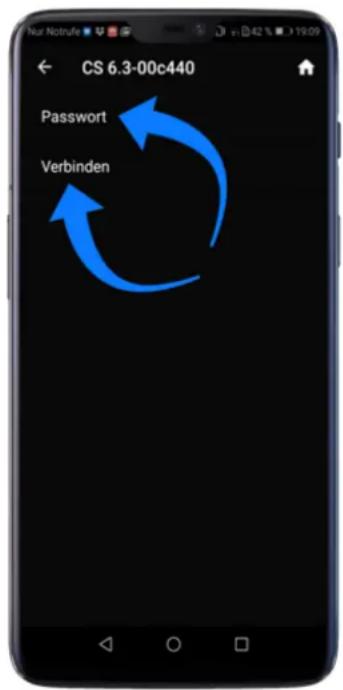
i) In the settings, go to the Network Info menu item. In the Wireless section, you can see details about the Wi-Fi configuration that has been completed.
1.13.4 Setup via optional RC 9 remote control
Before you can set up a wireless Wi-Fi connection via the RC 9, both components must first be connected to each other. This one-time operation is called pairing and is described in Section 1.11.1. A detailed description of the full range of functions of the RC 9 remote control can be found in a separate user manual at www.avm.audio.
a) First, perform the pairing process as described in Section 1.11.1 and then select the newly set up AVM device on the RC 9 via the Select Device menu item. This menu item can be accessed via the System Menu, which you can access by pressing the Settings button (tool icon) of the RC 9.
b) On the RC 9, select the Settings menu item in the main menu by pressing the top or bottom navigation button several times.
c) By pressing the Enter key, select the Network Assistant menu item and then Wi-Fi connection.
d) By then selecting the Scan menu item, your AVM device searches for available Wi-Fi networks and lists them in an overview.
e) Select the desired Wi-Fi network and, after pressing the password, enter the network key (Wi-Fi password) using the input keys of the RC 9.
f) Confirm the network key (Wi-Fi password) you entered by pressing the Enter key and select Connect.
g) In the following overview, Network Info, the Wireless section shows you details about the Wi-Fi configuration that has been completed.
1.14 Software & Firmware Updates
For maximum ease of use and to get the most out of your device, it is necessary to keep both the firmware of the integrated AVM X-STREAM engine® and the RC X app up to date. The latest version of the RC X app is available for download from the Apple App Store or Google Play Store. To check the installed AVM X-STREAM Engine® firmware version, use the RC X app or the optionally available RC remote control. Also, make sure that your device has an active internet connection before doing either of the following (see section 1.14).
1.14.1 AVM X-STREAM Engine® Update over RC X App
a) In the settings, go to the menu item "Firmware update" and select "Check for Online Update".
b) If you have a new version available under SW Update or Host Update, install it via "Update Firmware".
c) The device will restart to install the update. Do not turn off the device under any circumstances and wait for the update to be fully installed. The update process may appear on the device's display.
d) Once the update process is complete, the device will restart and be ready to use again.
e) Go to the RC X app settings. In the Version section, you can view details of the currently installed firmware version.
To install a software update via a USB stick, please consult your reseller, who will be happy to assist you with the update.
1.14.2 AVM X-STREAM Engine® Update over RC 9
a) Select the desired AVM device on the RC 9 using the Select Device menu item. This menu item can be accessed via the System Menu, which you can access by pressing the Settings button (tool icon) of the RC 9.
b) On the RC 9, select the Settings menu item in the main menu by pressing the top or bottom navigation button several times.
c) Go to the Update Firmware menu item and select "Check for Online Update". You can update this via "Update Firmware".
d) If you have a new version available under SW Update or Host Update, install it via "Update Firmware".
e) The device will restart to install the update. Do not turn off the device under any circumstances and wait for the update to be fully installed. The update process may appear on the device's display.
f) Once the update process is complete, the device will restart and be ready to use again.
g) In the main menu, select the menu item Settings by pressing the top or bottom navigation button several times. In the Version section, you can view details of the currently installed firmware version.
To install a software update via a USB stick, please consult your reseller, who will be happy to assist you with the update. If the device does not restart again, turn the device off and on again using the power button. Please note, however, that an update can take up to 15 minutes.
2 Operation of the basic functions
2.1 First switch-on and self-test
When the device is switched on for the first time (power switch to ON), a so-called self-test is carried out if the device has previously been completely disconnected from the mains or switched off via the power switch (17). The device checks the configuration and functionality of the built-in components. This process is indicated by a flashing standby LED (1) and may take some time.
2.2 Turn the device on and off
To turn on the device, set the power button on the back to ON, after which the device will start by default as described in the section above. To turn off the device, press the power button (1). Before the device is switched off, the text "Switching to Standby" appears on the display.
To turn the device on from standby, press the "power button" (1)
ATTENTION: The device is not completely disconnected from the mains in stand-by mode. To completely disconnect from the mains, press the power switch (17) on the back of the appliance or unplug the power cable from the power connector (19).
2.3 Choice of source
The selection of a local sound source is done by turning the source selector switches (2), the RC 3/RC 8/RC 9 remote control or through the RC-X app. At your disposal are the CD drive (10), three
high-level analog inputs (33), one XLR input (37), one coaxial digital input (25), one optical digital input (27), one HDMI-ARC input (23), one PHONO MM/MC input (31+32). The selected sound source is displayed in capital letters on the left side of the display.
The selection of other sound sources such as Spotify Connect®, Apple AirPlay, TIDAL, QOBUZ, HIGHRESAUDIO, web radio, podcasts, music server or USB drive (19) is normally done exclusively via the optionally available RC 9 remote control or the free RC X app for iOS and Android.
Spotify Connect®
Use your smartphone, tablet, or computer as a remote control for Spotify. Find out more on spotify.com/connect. In addition, after playing songs once via the Spotify APP, the source dial (2) can be used to restart Spotify locally on the device.
AirPlay
AirPlay is a technology from Apple that can be used to control home audio systems and speakers in any room - with a tap or simply by asking Siri - directly from the iPhone, iPad, HomePod or Apple TV.
Here's how to use AirPlay on your CS/AS/PAS 3.3/5.3:
- Make sure your device is connected to the network
- Open the app from which you want to use AirPlay on your iPhone or iPad
- Tap on
- Select your CS/AS/PAS 3.3/5.3 as your AirPlay device.
NOTE: If a digital input is selected and there is no compatible digital signal, the message NO DIG SIGNAL or NO ARC SIGNAL will appear on the display instead of the volume indicator. In this state, the volume setting is not adjustable due to the selected digital input.
2.4 Volume adjustment and volume Limit
To adjust the volume, use the rotary control (14). The increment of the volume change depends on the rotational speed. Slow turning causes a level change in 0.5 dB increments, fast turning changes the volume in 2 dB increments. The current setting is displayed numerically (0 to 99.5).
NOTE: If the volume falls below 0, Mute will appear on the display and the device will be muted. If a volume limit is set in the settings (default 70%), the 99.5 light will appear on the display if it is exceeded. If the volume limit is reached via the app, you will also see the message volume limit reached.
Please also note that the volume change via the optionally available RC 9 remote control is always done in steps of 1 dB.
2.5 CD-Player (Just CS)
When the built-in CD player is selected, you can operate its basic functions using the five menu buttons under the display. Advanced settings (Repeat Mode, Shuffle, etc.) are also possible via the extended CD player menu by briefly pressing the MENU menu button.
2.5.1 Inserting / ejecting the CD
Inserting the CD:
Instead of the usual drawer, the device has a slot mechanism through which the CD is inserted. Slide the CD (with the silver reflective layer facing down until the CD has disappeared to within about 3 mm of the slot) into the slot (8). It will now be automatically withdrawn. After that, the player reads the table of contents of the CD and displays it. On the left, the current title is displayed, next to it the total number of titles on the CD (e.g.: "1/17"). In the middle of the display, the playing time is displayed.
NOTE: If there is already a CD in the drive, the slot is blocked. If the CD is unreadable, or if you have accidentally inserted a data CD or DVD, the message "no audio disc" appears.
Eject:
The STOP menu button stops the playback process. This menu button then changes its function to EJECT and causes the ejection of an inserted CD.
AUTO PLAY
If the CD player is not selected as a source, it automatically switches to CD mode when a CD is inserted.
2.5.2 PLAY, PAUSE, STOP
Use one of the menu buttons |<< or >>|, you can select a specific title before playing. Short tap switches to the next higher/next lower track. A longer press will automatically switch through the track numbers. The number of the currently selected track is shown above the option keys on the display (TRACK). Pressing the PLAY menu button will start the playback process. The button then changes its function to PAUSE. When the key is pressed again, the playback process is stopped (PAUSE), pressing again continues the playback (PLAY). During playback, the track number and current playing time are shown on the display. The STOP menu button stops the playback process.
2.5.3 SKIP, SEARCH (Choice of title, search)
Use one of the menu buttons |<< or >>| you can select a specific track while playing, or search for a specific location within the current track. A short tap switches to the next or previous track. If more than 5 seconds of gameplay have passed, the first press on the left menu button will jump to the start of the track. Pressing the button again will then jump to the previous track.
Longer press activates the fast forward and rewind. This is only possible within a title. At the end of the title or At the beginning, the CD player automatically goes into PAUSE.
2.5.4 Repeat Mode
To select one of the available repeat functions, press the MENU button and select the REPEAT menu item using the menu buttons (5) and (6) with the SELECT menu button. Then use the menu keys (5) and (6) to select the desired repeat mode: REPEAT repeats only the currently selected tracks. REPEAT ALL repeats the entire CD. A corresponding symbol will show you the current mode in the upper left corner.
2.5.5 Shuffle
To activate the shuffle mode, press the MENU button and select Shuffle via the menu buttons (5) and (6) and confirm it with SELECT. You can then use the menu buttons (5) and (6) to enable (On) or deactivate (Off) shuffle. Confirm your selection by clicking APPLY. You can then use the PLAY menu button to start shuffle playback as soon as you have left the menu. A corresponding icon will show you in the upper left corner when Random mode is switched on.
2.6 Bluetooth
The integrated Bluetooth function enables the wireless transmission of high-quality music signals from a Bluetooth player such as a smartphone, tablet or PC to your AVM device. In order to activate and use the Bluetooth function, a compatible Bluetooth player must first be paired with your AVM device (see section 2.6.1 below). Please also make sure that the Bluetooth antenna is attached to the antenna connector (15).
NOTE: When screwing on the included antennas, make sure they are straight. Only then angle the antennas to the desired position.
2.6.1 Pairing
To activate the Bluetooth input (BT), use the source selector switch on the front (2), the RC 9 remote control or the RC X app.
By accessing the Bluetooth menu on the RC 9 remote control or in the RC X app, you can connect and locate your CS/PAS 3.3/5.3 in the Bluetooth menu of your player. In addition, you can use the Bluetooth menu in the app to manage the devices that have already been paired.
To connect to the CS/PAS 3.3/5.3, navigate to your player's Bluetooth menu, make sure that the Bluetooth function is enabled, and start searching for available Bluetooth devices in your area. For details on how to use your player's Bluetooth function, please refer to the relevant user manual.
Once the AVM device appears in the drop-down menu of available Bluetooth devices on your Bluetooth player (identified as AVM-x-xxxx*), select the AVM device as the audio playback device and wait a short moment for the connection to be established. When the pairing process is complete, the CONNECTED indicator will appear in the lower left area of the display and you will be able to transfer music from your Bluetooth player to your AVM device.
2.6.2 Pairing weiterer Bluetooth-Player
Your AVM device can only be paired with one Bluetooth player at a time. To switch to a different Bluetooth player, an existing connection must first be disconnected. You can do this in the RC X app for iOS and Android under Bluetooth.
2.7 Detailed adaptation to the pickup
For optimal playback quality, each cartridge should be operated with an appropriate termination impedance/capacitance. The CS/PAS3.3/5.3 offers extensive possibilities for this
2.7.1 Choosing the right pickup system (MM or MC)
As already explained in chapter 1.5.2, it is of great importance to choose the right type of pickup system. The menu items described in the following two chapters are adapted to the pickup depending on the setting in this point.
2.7.2 Termination Impedance Setting/-Capacity
For optimal playback quality, each cartridge should be operated with the appropriate termination impedance or termination capacity. This is particularly important for MM systems, as the termination capacitance generates a treble resonance that extends the frequency response upwards. If the capacitance is too low, the cartridge may not sound brilliant – if the capacitance is too high, the resonance will shift too far down and cause strong exaggeration in the high-frequency range. The sound is often garish and unpleasant.
We recommend that you take a look at the operating instructions of your pickup system before setting the impedance or capacitance. This usually indicates the optimal termination impedance. Otherwise, the rule of thumb is: For MM systems approx. 200 pF capacitance, for MC systems 100 ohms terminating resistance.
Depending on the selected system (MM or MC), capacitance or resistance can be adjusted in seven stages, with MM always ending at 47kΩ and MC always at 1nF. The following capacitance values can be set for MM: 47pF; 100pF; 150pF; 200pF; 270pF; 310pF; 410pFBhe following resistance values can be set: 100Ω; 180Ω; 220Ω; 330Ω; 660Ω; 1kΩ; 2kΩ
The setting of the terminator or capacitance can be set (best while a record is being played) with the app or on the device.
NOTE: Please note that the termination capacity of MM cartridges is increased by approximately 100 pF due to the capacitance of the cable. Therefore, on the CS/PAS 3.3/5.3, select a setting that is about 100 pF below the manufacturer's recommended capacitance.
It's worth experimenting to find out the setting for the optimal sound. Incorrect settings will not harm the pickup or the CS/PAS 3.3/5.3.
2.7.3 Adjustment of the gain
The output voltage of pickups is not standardized. There are therefore very "loud" and very "quiet" models. However, this has nothing to do with their sound quality. To suit each pickup, the gain of the CS/PS 3.3/5.3 can be adjusted.
With MM you have the +40dB and +50dB gain settings available, with MC +60dB and +70dB
NOTE: If the gain is too high, there may be input clipping and consequent distortion.
3 Advanced Settings (MENU)
In addition to the basic functions, the device has a variety of options for individual adaptation to your personal requirements. These functions are accessible via a menu that can be operated via the menu buttons below the display. During normal operation, the middle menu button is labeled MENU. Pressing this menu button will take you to the 'Advanced Settings' menu. The key label of the same menu button now changes to EXIT. With another press of a button, you leave the "Advanced Settings" menu and return to the general operating state. In the "Advanced Settings" menu, the individual menu items can be selected with the buttons (5) and (6) and selected with SELECT – the selected item is shown on the display. Use the keys (5) and (6) to change the value of the selected menu item. Click APPLY to confirm your selection.
NOTE: Please note that in the Advanced Settings menu, the available parameters depend on the currently selected input.
Please also note that when the Advanced Settings menu is activated, it is not possible to switch a sound source using the source dial (2), change the volume using the volume control (11) or turn off the device. To do this, first exit the Advanced Settings menu using the menu button marked with EXIT.
3.1 Global Settings
The following settings are available for each input group, whether digital, analogue, stream, CD, etc.
3.1.1 Balance
The Balance function allows you to move the right-left balance to the left or right in the range of ±6 dB to compensate for asymmetries.
3.1.2 Set Tone Control
The tone control of the device can be activated via the menu item Tone Control, which allows the adjustment of bass and treble components in the sound image as well as a loudness setting. In the LINEAR position, the tone control is disabled (but settings are still saved). In the TONE ON position, the tone control is ready to function and is activated as soon as you set it to Bass, Treble or Loudness. However, if a neutral setting (BASS = 0, TREBLE = 0, Loudness = 0) is selected, the tone control will remain disabled in the ACTIVE position until one of these parameters is changed. Unless a neutral setting is set, the active tone control is displayed at the top of the display.
Bass and treble can either be raised or lowered together for all inputs (GLOBAL) or specifically for the currently selected input (INDIVIDUAL). If an individual setting is desired, the inputs must be parameterized beforehand via the setup (see section 3.8.5). This is useful, for example, to compensate for a bass weakness of the turntable without boosting the bass at another input source.
NOTE: The setting of the loudness function (loudness) is dependent on the speaker and room and therefore applies globally to all inputs. As soon as the tone control under Tone Control is set to LINEAR, the menu items Bass, Treble and Loudness are not displayed.
3.1.3 Bass
The bass menu item allows you to adjust the low-frequency response from -6 to +6 dB. If you have a global setting for all sound sources, you will see GLOBAL in the upper right corner of the display, and if you have an individual setting, you will see INDIVIDUAL.
3.1.4 Treble
The Treble menu item can be used to adjust the treble reproduction from -6 to +6 dB. If you have a global setting for all sound sources, you will see GLOBAL in the upper right corner of the display, and if you have an individual setting, you will see INDIVIDUAL.
3.1.5 Loudness
Listening to music quietly often gives the impression of a flat, unbrilliant sound. This is due to a characteristic of the human ear: with quiet sounds, bass and treble are no longer perceived as well. The "Loudness Adjustment" is intended to correct this effect by raising the bass and treble during quiet music playback and gradually transitioning to the linear frequency response as the volume increases. In order for this compensation to achieve its full effect, careful adjustment is necessary. Therefore, proceed as follows:
Select a sound source and set it to a moderate listening volume. Next, switch to the Loudness menu. Now select menu buttons (4) and (5) one of a total of 9 available loudness values until the sound image seems balanced and pleasant to you. As soon as you leave the menu (APPLY menu button), the selected setting is saved. Every change in the volume setting now results in a physiologically correct adjustment of the bass and treble levels.
NOTE: When the Loudness menu is called up again, the displayed value may differ from the original setting. This is not an error, but is caused by the fact that the tone control selects an adjusted value depending on the currently set volume. The current value is then displayed accordingly when the Loudness menu is selected.
3.2 Analog Inputs
For the analog inputs, only the settings from the Global Settings are available.
3.3 Digital Inputs (COAX, OPTO, ARC)
After selecting a digital input, you will be shown another setting option in the menu.
If you choose the CD player or the USB input, you will also have separate settings available.
3.4.1 Repeat Mode
In this menu, you can set different repetition modes: REPEAT repeats only the currently selected tracks. REPEAT ALL repeats the entire CD/folder contents.
3.4.2 Shuffle
From this point you can enable or disable shuffle.
3.4.3 Filter
By pressing the menu button (5) you can access the Filter setting. You can choose between available filter settings for the selected digital input.
You can choose the STEEP and SMOOTH filter settings according to your tonal preferences. Depending on the signal being played, different filter settings can produce optimal sonic results. Technically, STEEP means steep filtering at the end of the band with a flat amplitude frequency response but strong phase rotation. SMOOTH, on the other hand, filters less steeply and already has a small amplitude drop before the end of the belt, but a smaller phase rotation. The selected filter setting is only valid for the current input and remains stored even after the device has been switched off.
3.4.4 Metadata usage
In this menu item you can choose whether metadata (if any) is displayed on the display (2). You can choose between On (default) and Off.
3.5 Phonoeingang
After selecting the phono input (31), you can set which sampling system (phono pickup) your pickup uses (MM or MC), set the termination capacitance or resistance, and adjust the gain in the MENU. For more information, see section 1.5.2.
3.6 Bluetooth input, internet radio, AirPlay, Podcast
After selecting these inputs, further setting options are also available here.
3.7 Setup
The setup menu offers you a number of other settings to customize the device to your personal needs. To access the Setup menu, press and hold the menu button (5) until it is replaced by MENU SETUP.
In the "Setup" menu, the individual menu items can be selected with the menu buttons (4) and (5) and activated accordingly with the SELECT (8) button. You can then use the menu keys (4) and (5) to change the value of the selected function. Once you have made the desired settings, press the menu button marked APPLY. Afterwards, further menu items can be edited. Press the EXIT menu button to exit the "Setup" menu.
NOTE: The settings described in the following section can be easily and conveniently adjusted via the RC X app for iOS and Android
3.7.1 Display
In this menu you will find the different settings for the display (3).
3.7.1.1 Display Brightness
Adjusts the brightness of the display from 25% (dark) to 50% (normal) to 100% (bright).
NOTE: The brightness setting of 100% may cause uneven brightness of individual segments of the display due to "burn-in" effects during long periods of operation. Therefore, do not leave the device on for an unnecessarily long time with this setting. Switch it to stand-by mode when not in use (e.g. overnight).
3.7.1.2 Proximity Sensor
Adjusts the sensitivity of the proximity sensor from None (off) via Close, Normal, and Far.
3.7.1.3 Tube light color (Only CS/PAS 5.3)
Sets the color of your tube. You can choose between blue and red.
3.7.1.4 Display Mode
Sets whether the display is always ON during operation.
Settings: Always On, Always Off, On Use
3.7.1.5 Permanent Volume Display
In this menu you can set whether you want to see the current volume all the time or only temporarily.
3.7.1.6 Scroll Text
For example, sets whether the text "scrolls" to display the entire text for long track names, or whether you don't want your device to display it.
3.7.1.7 Play Time
In this menu you can adjust whether the display shows only the time, only one timeline or both at the same time when playing songs (e.g. via the CD player). By default, the time and timeline are displayed.
3.7.1.8 Remaining Time Display
Here you can customize whether a song that is playing shows the total time (total) or the remaining time of the current song.
3.7.2 Volume Control
In this menu, you can make personal adjustments to the volume.
3.7.2.1 Power On Volume
Sets the volume of the device after startup.
You have the choice between LAST LEVEL (standard), 50%, 60% and 70%.
3.7.2.2 Volume Limit On Activate
This sets the volume to which it will be limited when switching inputs, if it is exceeded.
3.7.2.3 Volume Limit
This menu item allows you to limit the maximum output volume to up to 50% of the maximum volume. This feature can be useful to avoid rapid volume jumps, such as those caused by accidental misuse of the volume control in the RC X app for iOS and Android. The default setting is 70% and is intended as a protective mechanism to protect other components in your system (e.g. speakers) and last but not least your ears from drastic volume jumps, such as those that could be triggered by accidentally operating the volume control of the RC X app for iOS and Android.
3.7.2.4 Source Gain (Home Theater)
In the case of a surround system, the leveling of all channels, as well as the bass management, is carried out on a corresponding surround decoder (e.g. by an AV receiver). This signal should not be changed, otherwise the balance of the channels between them is no longer given.
The CS/AS/PAS 3.3/5.3 offers a so-called source-fix function for this case. This allows you to operate the RCA 1, RCA 2 and RCA 3 (33) analog inputs with a fixed gain. If the source-fix function is activated, the signal will be played back with a fixed gain when this input is selected. In addition, all sound settings (e.g. BASS, Treble, see 3.1) are disabled, regardless of whether you change the volume of the other inputs or their sound setting or balance setting. In addition, the CS/AS/PAS 3.3/5.3 trigger input can be used to power on using your AV processor (see section 3.7.3.4).
For the digital inputs COAX (25) and OPTO (27), the source-fix function is also available. In contrast to the analog inputs, however, the sound settings (e.g. bass, treble) and the balance setting are active here. This function is useful, for example, if a sound source with its own volume adjustment is connected to a corresponding digital input.
3.7.2.5 Input Gain
Often, the signal sources present in a hi-fi system have different levels. When switching, this creates a volume jump, which can be prevented by individually adjusting the input sensitivity of the inputs.
Use the source selector switch (2) to select a local digital or analog input (23, 25, 27, 31, 33, 37) and use the volume control (11) to set the monitoring volume to a comfortable level. By switching to other inputs, check if the levels are approximately identical. If you notice a deviation, you can adjust it via this function Use the menu buttons (5) and (6) to select the INPUT Gain menu and the corresponding source. You can then use the menu buttons to adjust the level of the selected sound source in a range of -9.5 and +9.5 dB. Use the APPLY menu button to exit the menu. The set input level is now saved and the device enters the general operating state.
By switching back and forth between each source using the source selector switch (2), you can compare the levels set and adjust the sensitivity of all analog and digital inputs, including CD and USB.
NOTE: Please note that during level adjustment, all remote controls are out of order. While you are making menu settings on the main unit, the optionally available RC 9 remote control cannot be used to avoid operating conflicts.
3.7.3 Inputs
Personal settings regarding the inputs can be made here.
3.7.3.1 Skip Unused Inputs
If you do not need all analog and digital inputs, the unused inputs can be deactivated (SKIPPED). When selecting sources with the source selector switch (12), all inputs defined as SKIPPED are automatically skipped and cannot be selected via the UP/DOWN function of the remote control. The settings can be undone at any time by calling up the menu item again (Input ACTIVE).
Skipping unused inputs makes it easier for you to operate via the source selection button (12) and the UP/DOWN function of the remote control. However, hidden inputs can still be selected via the RC 9 remote control or the RC X app.
3.7.3.2 Input Names
Using the menu item "Input Names" you can change the input designations of sound sources on the display (4) as desired. A name has a maximum of 8 characters. The name can be changed conveniently via AVM's RC-X APP or via the separately available RC9 remote control.
NOTE: To rename the input in the APP, after selecting your CS/AS/PAS 3.3/5.3, go to Inputs in the overview and press the 3-dot icon on the right side of the input to be renamed. You can then rename the input using the keyboard after pressing "Rename Input"
3.7.3.3 AUTO-ON
This menu allows you to set which inputs of the device can wake up from stand-by when a signal arrives. You can choose from all digital inputs as well as RCA 1-3 and XLR inputs.
Here you can choose which source should be started when a signal is applied to the trigger input (20). You can choose between the last source, XLR and RCA 1-3.
With the help of this function, you can, for example: Simply turn on your CS/PAS 3.3/5.3 reliably to fully integrate the device into a home cinema.
3.7.4 Outputs
In this menu item you can make various settings for the outputs.
3.7.4.1 Speaker (CS and AS only)
The CS/AS 3.3/5.3 has an A/B circuit for the speakers, which allows you to connect a second pair of speakers to your device. In this menu item you can set the configuration you are using. A, B and A+B are at your disposal.
ATTENTION: If you use both speaker outputs (A+B), the impedance of each speaker must not be less than 8.
3.7.4.2 Internal Poweramp (CS only)
This function can be used to activate or deactivate the speaker outputs (13, 14, 39, 40). The selected setting is saved permanently and can be changed again by calling up the menu again.
3.7.4.3 Headphone Muting
In this menu, you can set which outputs, including the power amplifier, are muted or switched off when using headphones on the front.
3.7.4.4 Digital Output Volume
In this setting point, you can specify whether the signal for the digital outputs (optical and COAX) is fixed or output is volume-controlled.
3.7.4.5 Trigger External AMP by audio
When using AVM power amplifiers, you can turn them on and off using the connected audio cable. This will make it easier for you to operate your system.
3.7.5 Tone Control (INDIVIDUAL)
You can use the Tone Control menu item to determine whether you want to adjust bass and treble components via the sound control electronics (see Section 3.1: Bass, Treble, Loudness) only for a single sound source (INDIVIDUAL) or for all sound sources together (GLOBAL). You can make this setting for all inputs individually.
3.7.6 Desired Standby Mode
To ensure that your AVM device can be switched on at any time via the RC X app for iOS and Android, the integrated AVM X-STREAM engine® remains in constant operational readiness in Network Standby mode, even in standby mode. Please note that this will increase the power consumption. If you want to save this energy, select Standby mode from this menu.
To turn it back on from standby, you can simply approach the device. Thanks to the built-in proximity sensor, the device is automatically activated. Your AVM device cannot be detected by the RC X app for iOS and Android in standby mode and can be woken up from standby mode.
3.7.7 Auto Standby
For reasons of energy saving, the device is equipped with a circuit that automatically puts the device into standby mode if there is no music signal for more than 20 minutes on the currently active input. This function is activated at the factory (ACTIVE) and can be permanently deactivated via this menu item (NOT ACTIVE).
3.7.8 IR Control
In addition to the possibility of controlling the CS/PAS3.3/5.3 via the optional RC 9 remote control or the free RC X app for iOS and Android, elementary basic functions of the device can also be operated via the classic RC 3 and RC 8 remote controls from AVM, which are available as optional accessories. In order to receive the infrared signal from these remote controls, the IR Control function must be activated (ON).
3.7.9 INFO
Here you can view information about the device, such as the device name or label, serial number, and firmware version.
3.7.10 NETWORK
Here you will find information about the network connections. (e.g.: WLAN/ LAN; IP address; MAC address; SSID)
3.7.11 WPS
3.8 Settings via the RC X App
Most of the settings you make via the device menu can also be easily changed with the new RC X app for iOS and Android.
For step-by-step instructions on how to connect to the network, see section 1.13.
3.8.1 Device Name
Here you can customize the name of the device in the network or name a listening area individually, e.g. living room, kitchen, etc.
3.8.2 Language
The settings of the APP language can be adjusted here (German/ English).
3.8.3 Audio
In this menu, the Tone Control settings can be set directly in the app. This means that you can switch the Tone Control function ON (Tone On) or OFF (LINEAR) and adjust the bass, treble, loudness and balance settings as described in section 3.1. Furthermore, depending on the selected input, further settings can be displayed and changed here. For example, if the phono input is selected, the phono pickup can also be set or the filter can be adjusted for the digital inputs.
3.8.4 Network Assistant
Here you will find the wizard for connecting the CS/AS/PAS 3.3/5.3 to the network. Step-by-step instructions on how to do this can be found in section 1.13.
3.8.5 Network info
In this tab, you can view the current network status of your device.
3.8.6 Timezone
Here you can set the time zone you are in.
3.8.7 Streaming Services
Here you will find different settings for your streaming services. For example, the data rates can be adjusted.
3.8.8 Devicesettings
In this menu, you can adjust most of the settings from the Personal Setup directly in the free RC-X app.
3.8.8.1 Display
Here, as described in section 3.7.1, you can make various settings for the display. These include the brightness, the proximity sensor, the display mode, among others.
3.8.8.2 Volume Control
Also in the app, you can make the extensive settings from the chapter Volume Control (see section 3.7.2). To do this, you can simply click on the corresponding menu items and display the available settings.
3.8.8.3 Inputs
Here, as in the Personal Setup, you can skip unused inputs. To do this, you can simply decide which ones are displayed or skipped by selecting or deselecting the required inputs. (See also section 3.7.3.1).
3.8.8.4 Outputs
In this menu item you will find the various settings for the outputs as well as in the Personal Setup (see section 3.7.4).
3.8.8.5 Tone Control
In this menu item, you can also set in the APP whether you want to adjust bass and treble components via the tone control (see section 3.1: Bass, Treble, Loudness) only for a single sound source (INDIVIDUAL) or for all sound sources together (GLOBAL). You can configure each input individually.
3.8.8.6 IR-control
In order to receive the infrared signal of the additionally available IR remote controls (RC3/ RC8), the IR Control function must be activated (ON). As described in section 3.7.8, you can easily make this setting directly in the app.
3.8.9 RC 9 Remote
Here you can set various functions for the optionally available RC 9 remote control. Among other things, you can start the pairing process, delete connected remote controls, or display the current version of RF mode.
3.8.10 STANDBY / NETWORK-STANDBY
In this sub-item, you can also set the sleep mode in which you want to operate the device (sleep mode with or without network access) and at what time the device automatically switches to sleep mode. For more information, see also sections 3.7.6 and 3.7.7.
3.8.11 Version
Here you can view various information about the installed version.
You can use this menu to perform firmware updates as soon as they are available. The first step is to check whether there is an update online or on a USB stick.
3.8.13 Factory-reset
Here you can trigger a factory reset by the APP. For more information about the factory reset, see Section 3.9.
3.9 Factory Reset
Hold down the menu button (7) to go to the SETUP menu. Find and select the point "Factory Reset". Select your desired RESET here.
The device will now perform the factory reset and then reboot to the general operating state.
Alternatively, a factory reset can be easily performed via the RC X app for iOS and Android, the SETUP menu or the RC 9 remote control. To do this, go to the settings of the RC X app or the RC 9 remote control and select the Reset device menu item and confirm the reset. The device will now perform the factory reset and then reboot to the general operating state.
ATTENTION: If you perform a factory reset, all your settings will be lost! Therefore, please make a note of your settings in advance (e.g. values for GAIN, etc.), this will make it easier for you to make the settings again after the reset.
4 Appendix
4.1 Caring for the housing
The surface and print of the case as well as the display screen are largely scratch-resistant. This can be cleaned with mild soapy water or a glass cleaner and a soft duster.
WARNING: Under no circumstances should liquid get into the inside of the case during cleaning. In addition, the power cord should be unplugged for safety reasons before wiping with a damp cloth. Do not use solvents or abrasives that could damage the surface or prints of the enclosure
4.2 Troubleshooting
Often, supposed defects can be traced back to operating errors, sometimes other components connected to the device are also responsible for a malfunction. Before you contact your specialist dealer or us about a defect, we ask you to check the following list to see if you can fix the malfunction yourself.
1. No music playback
a) The MUTE feature is active. Disable it.
b) Accidentally switching to stand-by mode via the remote control. Press the power button.
c) If the display is dark and the STATUS LED (3) is not lit, the mains fuse may be defective. Since this is usually caused by a defect in the power supply or the amplifier electronics (e.g. as a result of a lightning strike), please contact your specialist dealer.
2. Remote control without function:
a) The battery of the remote control is empty. Please charge the remote control / replace the battery.
b) There is no direct connection between the remote control and the device, or the distance is too great.
3. A CD has been inserted, but "no disc" appears in the display.
- Either a dirty CD was inserted, a defective CD was inserted, no CD was inserted or the CD was inserted the wrong way around (label side down instead of up).
- Eject the inserted CD and insert it correctly.
- Insert the incorrectly inserted CD the right way round.
- Clean and reinsert the dirty CD.
4. Lipsync out of sync on digital inputs
If, despite supported low-latency technology, the lip-sync is not correct, your TV often offers its own setting option to compensate for this. Your CS/AS/PAS 3.3/5.3 does not currently have its own setting for this.
5. HDMI ARC without function
If the HDMI ARC function does not work right away, please note the following points:
- Has the HDMI INPUT with ARC labeling been used to connect the CS/AS/PAS 3.3/5.3 to the TV?
• Is the HDMI cable ARC-enabled? - Is HDMI ARC selected as the output source on the TV? (Sometimes a "connection" has to be set up manually)
- Have all settings been made on the TV that may prioritize the sound settings (e.g. that Opto-OUT is prioritized)?
- Has PCM been selected as the sound format?
- In addition, you can try to re-establish the ARC connection. This time, however, first turn off the TV and disconnect it completely. Also turn off the CS/AS/PAS 3.3/5.3 completely. Now connect the HDMI cable to the ARC input of the CS/AS/PAS 3.3/5.3 and turn the CS/AS/PAS 3.3/5.3 and the TV back on.
If it still doesn't work, the display information on CS/PAS 3.3/5.3 can help you find an error
- No Signal -ARC Error: There is no signal coming from the TV. Please check the input and settings again.
- No PCM: Please change the audio format on the TV to PCM.
NOTE: Please note that device control can also be done if you have selected a "normal" HDMI input on the TV to connect the CS/AS/PAS 3.3/5.3 and not the HDMI ARC INPUT.
4.3 Warranty
If, contrary to expectations, an error occurs that you or your specialist dealer cannot remedy, we will repair your device free of charge for up to two years after the date of purchase. The warranty covers materials and labour, transport costs incurred are borne by the owner from six months after the date of purchase.
Regardless of the country in which the device was purchased, German law is generally applicable to warranty claims and warranty processing. If one of the following provisions is legally invalid, it must be replaced by a provision in conformity with the law.
Prerequisites for your warranty claim are:
The device must have been purchased from an AVM-authorized reseller. Devices that come from other sources will not be repaired (not even for a fee).
Warranty registration is done through our website: www.avm.audio.
The fault must not have been caused by improper handling or interference with the device.
In case of repair, the device must be sent to us in its original packaging. If this is not the case, we are entitled to refuse to accept it. In any case, we do not assume any responsibility for transport damage.
If you no longer have the original packaging at hand, please contact your specialist dealer. On request, we can also provide you with packaging directly. For this, however, we have to charge a contribution to expenses of 70 EURO.
The device sent in must be accompanied by a brief description of the fault. Please print out our SERVICE FORM. This can be found at www.avm.audio under SERVICE.
In case of doubt, we reserve the right to request a copy of the purchase invoice. In the event of an unauthorised submission or if there is no damage to the device, we reserve the right to charge a processing fee.
NOTE: If you do not ship your device from Germany, please make sure that you have proper export documents. Unfortunately, we cannot cover costs incurred due to improper export, omission of declaration or customs clearance.
5 Technical Data
5.1.1 Amplifire (CS/AS only)
Amplification factor 30
Factor .... < 0.005%
Signal-to-noise ratio....>95dB
Input Sensitivity (2x350W, 4Ω)....1.2V
Output power....2x 350W (4Ω) / 2x 180W (8Ω)
5.1.2 Preamp (analogue)
Input Resistance (RCA) 50 kΩ
Input Resistance (XLR) 40 kΩ
Output Resistance (RCA: PRE, LINE) 47 Ω
Output Resistor (XLR) 94 Ω
Amplification Factor 1
Distortion factor (3.3) < 0.001%
Distortion factor (5.3) < 0.025%
Signal-to-noise ratio....>100dB
Crosstalk attenuation (channels)....>94dB
Crosstalk attenuation (inputs).....> 85dB
Input Output (1% THD) 8.6 V
Output control PRE OUT (1% THD) 8.5 V
Ausgangasuccessful gel LINE OUT 2,5 V
Frequency response at -3dB (3.3) < 0Hz to > 100kHz
Frequency response at -3dB (5.3)....< 5Hz to >100kHz
5.1.3 Headphoneamplifire
Output resistance....24 Ω
Amplification factor 2.0
Distortion factor .... < 0.001%
Signal-to-noise ratio....>100dB
Output Output (1% THD) 7 V
5.1.4 Pre-Amp (Phono)
Entzerrung RIAA (20Hz-20kHz)....+/- 0,3dB
Gain MM....40dB/50dB
Signal-to-noise ratio MM....>84dB(A)
Gain MC....60dB/70dB
Signal-to-noise ratio MC....>75dB(A)
Input Output MM (1% THD, 40dB)....76 mV
Input Output MC (1% THD, 60dB)....7.4 mV
Frequenzgang (Line-Out)....11Hz - 100kHz
Adjustable resistance values MC (in Ω)....100; 180; 220; 330; 660; 1k; 2k
Adjustable capacitance values MM (in pF)....47; 100; 150; 200; 270; 310; 410
5.1.5 CD-Player (Only CS)
Playable formats CD Audio, CDR (according to Red Book standard)
Frequenzgang CD....< 20 - 20 kHz
5.1.6 Network
LAN port (hot pluggable)....100 Mbit/s
Supported WLAN/ Wifi standards....2.4/ 5GHz/ 802.11a/b/g/n/ac
Number of antennas....2
WPS ....yes
5.1.7 Streaming
Max. sample rates.....DSD256, 32 bit/384 kHz PCM
Streaming Services....AirPlay, Qobuz, Roon, Spotify, TIDAL, HighResAudio
Supported file formats:......WAV, MP3, WM, AAC, FLAC, ALAC, DSD, Ogg, AIFF
5.1.8 Bluetooth
Bluetooth Standard 5.0 LE
Supported Bluetooth profiles....AVRCP 1.5, AD2P
5.1.9 USB-Input (back))
USB Standard USB 2.0
Max. Strom....500 mA
Supported formatting.... FAT16, FAT32, NTFS
ATTENTION: The USB input is only intended for hard drives and USB sticks!
5.1.10 Digital inputs (S/P-DIF/ coaxial)
Max. Abtast-/ Bitrate (OPTO)....96 kHz / 24 Bit
Max. Abtast-/ Bitrate (COAX)....192 kHz / 24 Bit
Min. signal level [Vpp] at 192kHz (COAX).....> 150 mVpp
Input Impedance (COAX) 75 Ω
Deemphasis (OPTO, COAX)......Yes, automatic
Max. Abtast-/ Bitrate (ARC) 192 kHz / 24 Bit
Input Impedance 75 Ω
NOTE: When using the digital inputs, the cable length of the digital cables should not exceed three meters.
5.1.11 Digital outputs (S/P-DIF / coaxial)
Max. Abtast-/ Bitrate (OPTO)....96 kHz / 24 Bit
Max. Abtast-/ Bitrate (COAX)....192 kHz / 24 Bit
Output Impedance (COAX)....75 Ω
NOTE: When using the digital outputs, the cable length of the digital cables should not exceed three meters.
5.1.12 Control
Trigger input 5 - 20V
Trigger output (2x) 12V (sequentially switched)
NOTE: The second trigger-out is delayed to the first trigger-out to protect against excessive current spikes. Please use a standard 3.5mm mono jack cable for the trigger connectors.
5.1.13 Distortion factor (CS/AS 3.3/5.3)
Power supply 100V-240V / 50Hz-60Hz
Power consumption standby.... < 0.5 Watt
Idle power consumption....< 16 watts
Power consumption, maximum 1000 watts
Fuse used....: T 10A
5.1.14 Distortion factor (PAS 3.3/5.3)
Power supply 100V-240V / 50Hz-60Hz
Power consumption standby.... < 0.5 Watt
Power consumption network standby .... < 2 Watt
Idle power consumption....< 16 watts
Power consumption, maximum....25 watts
Fuse used....: T 1A
5.1.15 Generell
Weight (CS/AS 3.3/5.3) 11 kg
Weight (PAS 3.3/5.3) 8 kg
Dimensions (WxHxD) 430 x 122 x 350
Warranty.... 2 years + 2 years if you register online
* Warranty periods may vary from country to country.
5.1.16 Regulatroy Notes
Used transmission frequency range....WLAN 2.4 G: ....2.412 - 2.472 GHz
Wi-Fi 5: 5.150 - 5.350 GHz
5.470 - 5.725 GHz
Bluetooth: 2,400 - 2,4835 GHz
Maximum transmitting power....Wi-Fi 2.4 G: .... 20 dBm
Wi-Fi 5 15 dBm
Bluetooth: 6 dBm
The device is intended for non-commercial users.
The Ethernet / LAN port may only be connected to the house network (in-house LAN network).
NOTE on power consumption in standby mode:
To ensure that your AVM device can be switched on at any time via the RC X app for iOS and Android, the integrated AVM X-STREAM engine® remains in constant operational readiness in stand-by mode. Please note that the current consumption is not below 0.5 watts as usual, but increases to about 2 watts. To reduce energy consumption to less than 0.5W, switch the appliance to stand-by mode or turn it off completely using the rear power button (34). However, it can happen that various settings (e.g. the last source) are not saved permanently.
Declaration
AVM Audio Video Manufaktur GmbH confirms that CS 3.3/5.3, AS 3.3/5.3 and PAS 3.3/5.3, to which these operating instructions belong, comply with the EU Directives 2014/35/EU, 2014/30/EU, 2014/53/EU, 2009/125/EC and 2015/863/EU in force at the time of writing.

labelling. The necessary tests were carried out with positive results.
The full text of each EU declaration of conformity is available at the following web address:
AVM Evolution CS3.3:
https://avm.audio/wp-content/uploads/Declaration-of-Conformity_CS3-3.pdf
AVM Evolution CS5.3:
https://avm.audio/wp-content/uploads/Declaration-of-Conformity_CS5-3.pdf
AVM Evolution AS3.3:
https://avm.audio/wp-content/uploads/Declaration-of-Conformity_AS3-3.pdf
AVM Evolution AS5.3:
https://avm.audio/wp-content/uploads/Declaration-of-Conformity_AS5-3.pdf
AVM Evolution PAS3.3:
https://avm.audio/wp-content/uploads/Declaration-of-Conformity_PAS3-3.pdf
AVM Evolution PAS5.3:
https://avm.audio/wp-content/uploads/Declaration-of-Conformity_PAS5-3.pdf

Works with
Apple AirPlay
The Spotify Software is subject to third party licenses found here:
https://www.spotify.com/connect/third-party-licenses
ROON READY
We reserve the right to make changes to technical data and equipment.
Stand: 11. November 2023
- Welcome!
- Meaning of Warning Symbols
- Safety
- Proper disconnection from the grid
- Operation during thunderstorms
- The right APP for your AVM device: RC-X
- Operation of the basic functions....18
- Advanced Settings (MENU) 23
- Appendix....35
- Specifications....38
- Start-Up
- Scope of delivery
- Overview
- Installation & Cooling (CS/AS Only)
- Mains connection
- Connection of analogue sound sources
- High-level sources (RCA, XLR)
- Phono-Input
- Connection of digital sound sources
- Coaxial or optical digital input
- HDMI ARC (Audio Return Channel)
- Connection of analogue recording devices
- Output: Connection of digital recording devices
- Operation with subwoofer
- Speaker Connection (CS and AS Only)
- RC 9 Remote Control (No longer available)
- Pairing
- RC X App for iOS and Android
- Network Installation (LAN, WLAN)
- LAN VS. WLAN:
- Setting up a wireless network connection (WLAN / WiFi)
- Setup via WPS
- Setup via optional RC 9 remote control
- Software & Firmware Updates
- AVM X-STREAM Engine® Update over RC X App
- AVM X-STREAM Engine® Update over RC 9
- Operation of the basic functions
- First switch-on and self-test
- Turn the device on and off
- Choice of source
- Spotify Connect®
- AirPlay
- Volume adjustment and volume Limit
- CD-Player (Just CS)
- Inserting / ejecting the CD
- Inserting the CD:
- Eject:
- AUTO PLAY
- PLAY, PAUSE, STOP
- SKIP, SEARCH (Choice of title, search)
- Repeat Mode
- Shuffle
- Bluetooth
- Pairing
- Pairing weiterer Bluetooth-Player
- Detailed adaptation to the pickup
- Choosing the right pickup system (MM or MC)
- Termination Impedance Setting/-Capacity
- Adjustment of the gain
- Advanced Settings (MENU)
- Global Settings
- Balance
- Set Tone Control
- Bass
- Treble
- Loudness
- Analog Inputs
- Digital Inputs (COAX, OPTO, ARC)
- Repeat Mode
- Shuffle
- Filter
- Metadata usage
- Phonoeingang
- Bluetooth input, internet radio, AirPlay, Podcast
- Setup
- Display
- Display Brightness
- Proximity Sensor
- Tube light color (Only CS/PAS 5.3)
- Display Mode
- Permanent Volume Display
- Scroll Text
- Play Time
- Remaining Time Display
- Volume Control
- Power On Volume
- Volume Limit On Activate
- Volume Limit
- Source Gain (Home Theater)
- Input Gain
- Inputs
- Skip Unused Inputs
- Input Names
- AUTO-ON
- Outputs
- Speaker (CS and AS only)
- Internal Poweramp (CS only)
- Headphone Muting
- Digital Output Volume
- Trigger External AMP by audio
- Tone Control (INDIVIDUAL)
- Desired Standby Mode
- Auto Standby
- IR Control
- INFO
- NETWORK
- WPS
- Settings via the RC X App
- Device Name
- Language
- Audio
- Network Assistant
- Network info
- Timezone
- Streaming Services
- Devicesettings
- Display
- Volume Control
- Inputs
- Outputs
- Tone Control
- IR-control
- RC 9 Remote
- STANDBY / NETWORK-STANDBY
- Version
- Factory-reset
- Factory Reset
- Appendix
- Caring for the housing
- Troubleshooting
- No music playback
- Remote control without function:
- A CD has been inserted, but "no disc" appears in the display.
- Lipsync out of sync on digital inputs
- HDMI ARC without function
- Warranty
- Technical Data
- Amplifire (CS/AS only)
- Preamp (analogue)
- Headphoneamplifire
- Pre-Amp (Phono)
- CD-Player (Only CS)
- Network
- Streaming
- Bluetooth
- USB-Input (back))
- Digital inputs (S/P-DIF/ coaxial)
- Digital outputs (S/P-DIF / coaxial)
- Control
- Distortion factor (CS/AS 3.3/5.3)
- Distortion factor (PAS 3.3/5.3)
- Generell
- Regulatroy Notes
- Declaration
Brand : AVM
Model : Evolution CS 3.3
Category : Audio Receiver