
ED-EUROGE60SS - Cooker Eurotech - Free user manual and instructions
Find the device manual for free ED-EUROGE60SS Eurotech in PDF.


| Product Type | Freestanding Gas Cooker |
| Brand | Eurotech |
| Model | ED-EUROGE60SS |
| Dimensions (H x W x D) | 900 x 600 x 600 mm |
| Weight (approx.) | 55 kg |
| Gas Connection | Natural Gas (NG) 1.0 kPa or Universal LPG 2.75 kPa |
| Total Gas Consumption | 35.1 MJ/h (both NG and LPG) |
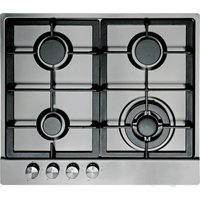
| Burner Configuration | 4 burners: Auxiliary, Semi-rapid, Rapid, Wok |
| Oven Functions | Conventional, Fan Forced, Static Grill, Fan Grill, Defrost, Bottom Heater + Fan, Oven Light |
| Oven Capacity | Approximately 60 liters (standard for 600mm width) |
| Temperature Range | Up to 250°C (max thermostat setting) |
| Ignition | Automatic electric ignition via knob; manual ignition with match possible |
| Timer/Programmer | Electronic programmer with timer, semi-automatic and automatic cooking functions |
| Safety Features | Flame failure safety device on each burner, anti-tilt chains, child safety warnings |
| Oven Light Bulb | 25W, 220-240V, 50Hz, G9 fitting (high temperature up to 300°C) |
| Electrical Requirements | 240V ~ 50Hz, 3G1.5mm power cord (recommended H05VV-F) |
| Cleaning | Enamel surfaces: mild detergent; burner components: warm soapy water; oven: warm water with mild detergent |
| Accessories Included | Oven grid, baking tray, wok support, anti-tilt chains, gas regulator (NG) or test point adaptor (LPG) |
| Warranty | Refer to warranty card for service and parts contact information |
Frequently Asked Questions - ED-EUROGE60SS Eurotech
User questions about ED-EUROGE60SS Eurotech
0 question about this device. Answer the ones you know or ask your own.
Ask a new question about this device
Download the instructions for your Cooker in PDF format for free! Find your manual ED-EUROGE60SS - Eurotech and take your electronic device back in hand. On this page are published all the documents necessary for the use of your device. ED-EUROGE60SS by Eurotech.
USER MANUAL ED-EUROGE60SS Eurotech
INSTRUCTION MANUAL
Do not use the oven until you have read this instruction manual
DEAR CUSTOMER
This appliance has been designed to be efficient and easy to use. The following instructions will show you how to best operate your appliance to enjoy years of hassle-free use.
it is important to keep this instruction manual and store it in a safe place so that it can be referenced at any time.
For your peace of mind, this appliance has been thoroughly tested with regard to safety and functionality before leaving the factory.
Caution!
Do not use this appliance until you have read this instruction manual.
This appliance is intended for household use only.
TABLE OF CONTENTS
Safety instructions....4
How to save energy....7
Unpacking....7
Disposal of the appliance....7
Description of the appliance....8
Installation....9
Operation....14
Prior first use....14
How to use gas burners....15
Oven 16
Baking in the oven 25
Cleaning and maintenance....26
Technical information....31
SAFETY INSTRUCTIONS
- To avoid any possible hazard, the appliance must be installed by qualified/authorised personnel only. Installation should be carried out in accordance with the legal regulations and technical requirements of the local gas supplier. Important instructions in this regard may be found in the section "Installation".
● The appliance becomes hot during operation. Take care not to touch the hot parts inside the oven. - Please pay attention to children in the vicinity of the appliance. In particular, hot surface burners, the oven chamber, grates, the door pane, and pans containing hot liquids standing on the hob may cause burns to children.
● Mind that electrical connection leads from other home appliances (e.g. of a food mixer) do not touch hot parts of the cooker.
● Do not place flammable material into the utility drawer - Do not leave the cooker unattended when frying. Oils and fats may catch fire due to overheating.
● At the point of boiling, mind to avoid spills on the burner. - If the cooker is damaged, it may be used again only after the fault has been fixed by an authorised person.
- Do not open the tap on the gas connection or cylinder valve before checking that all burner knobs are closed.
- Do not allow the burners to be soiled or liquids to spill on the burners. If soiled, clean and dry burners immediately after they have cooled down.
- Do not put pans directly onto burners.
● Never use the burners or the oven for heating of the room. Never place empty dishes upon the cooking zones. - Do not place pans with a weight greater than 10kg onto the grate over one burner, or pans with a total weight of over 40 kg on the whole grate.
- Do not open the cooker knobs before already having a lighted match or a gas lighter in your hand.
● Do not put out a burner flame by blowing.
SAFETY INSTRUCTIONS
- Do not make your own alterations to the cooker in order to adapt it to a different type of gas, move the cooker to another place or make changes to the power supply. These operations may only be carried out by an authorised electrician or gas fitter.
- Do not use harsh cleaning agents or sharp metal objects to clean the door as they can scratch the surface, which could then result in the glass cracking.
- IN CASE OF ANY SUSPICION OF GAS LEAKAGE YOU MUST NOT: Light matches, smoke cigarettes, swith electrical switches(eg door bell or light switch) on and off, or use other electric or mechanical devices that create electrical or percussive sparks. In such a case, immediately close the cylinder valve or tap cutting off gas supply, air the room, and then call a person authorized to repair the source of the leakage.
- In the event of any incident caused by a technical fault, disconnect the power (applying the above rule) and report the fault to the service centre to be repaired.
- Do not attach any antenna cords (e.g. radio) to the gas supply.
- In a case of gas escaping form leaky piping and catching frie, close gas supply immediately using a cutting-off valve.
- In a case of gas escaping from a leaky cylinder and catching fire: throw a wet blanket over the cylinder to cool it down and turn off the cylinder valve. Do not use the damaged cylinder.
- When the cooker is not to be used for several days, close the main valve on the gas .gnipip
● The cooker should not be cleaned using steam equipment. - Do not subject the knobs and burners to sharp forces.
● Alterations and repairs carried out by an unqualified person are not allowed. - Do not put pans weighing over 15kg on the opened door of the oven.
SAFETY INSTRUCTIONS
- During the operation of gas burners the room may be filled with extra heat and humidity, so it is necessary to assure adequate ventilation. Occasional opening of the window or door should provide enough exchange of air. During the prolonged use of the appliance, or during a very intense use, more ventilation will be required, and it will probably be necessary to engage the extractor hood.
- Do not use the cooker in the event of a technical fault. Any faults must be fixed by an appropriately qualified and authorized person.
- The rules and provisions contained in this instruction manual should be strictly observed. Do not allow anybody who is not familiar with the contents of this instruction manual to operate the cooker.
● Never put aluminum foil on the bottom of the oven, and do not place any crockery upon the bottom of the oven.
Must not be installed in a marine craft, caravan or mobile home, unless each burner is fitted with a flame safeguard.
DO NOT USE OR STORE FLAMMABLE MATERIALS IN THE APPLIANCE STORAGE DRAWER OR NEAR THIS APPLIANCE
DO NOT SPRAY AEROSOLS IN THE VICINITY OF THIS APPLIANCE WHILE IT IS IN OPERATION.
WHERE THIS APPLIANCE IS INSTALLED IN MARINE CRAFT OR IN CARAVANS, IT SHALL NOT BE USED AS A SPACE HEATER
DO NOT MODIFY THIS APPLIANCE
DO NOT PLACE ARTICLES ON OR AGAINST THIS APPLIANCE
Not suitable for use with aftermarket lids or covers.
- This appliance is not intended for use by persons (including children) with reduced physical, sensory or mental capabilities, or lack of experience and knowledge, unless they have been given supervision or instruction concerning use of the appliance by a person responsible for their safety.
- Children should be supervised to ensure that they do not play with the appliance.
- Unless the instructions state to the contrary, the instructions for cooking ranges and ovens shall state that the appliance must not be installed behind a decorative door in order to avoid overheating.
HOW TO SAVE ENERGY

Using energy in a responsible way not only saves money but also helps the environment. So let's save energy!
- Use proper pans for cooking. A saucepan should never be smaller than a burner crown.
- Ensure that the burners, the grate, and the hob are clean.
Soiling can prevent heat transfer and, when left alone, can often only be removed by cleaning products which are harmful to the environment.
In particular, pay careful attention to the flame opening in the rings under burner caps, and the burner nozzles. - Do not uncover pans or open the oven door more than necessary during cooking.
- Only use the oven when cooking larger dishes.
Meat of up to 1 kg can be prepared more economically in a pan on the cooker burner.
● Make use of residual heat from the oven. if the cooking time is greater than 40 minutes, it is recommended to switch off the oven 10 minutes before the end time.
● Make sure the oven door is properly closed.
Heat can leak through spillages on the door seals. Clean up any spillages immediately. - Do not install the cooker in the direct vicinity of refrigerators/freezers. Otherwise household energy consumption increases unnecessarily.
UNPACKING

During transportation, protective packaging was used to protect the appliance against any damage.
After unpacking, please dispose of all elements of packaging in a way that will not cause damage to the environment. All materials used for packaging the appliance are environmentally friendly; they are 100% recyclable and are marked with the appropriate symbol.
Caution!
During unpacking, the packaging materials (polythene bags, polystyrene pieces, etc.) should be kept out of reach of children.
DISPOSAL OF THE APPLIANCE

Old appliances should not simply be disposed of with normal household waste, but should be delivered to a collection and recycling centre for electric and electronic equipment.
A symbol shown on the product, the instruction manual or the packaging shows that it is suitable for recycling.
Materials used inside the appliance are recyclable and are labeled with information concerning this. By recycling materials or other parts from used devices you are making a significant contribution to the protection of our environment.
Information on appropriate disposal centers for used devices can be provided by your local authority.
DESCRIPTION OF THE APPLIANCE

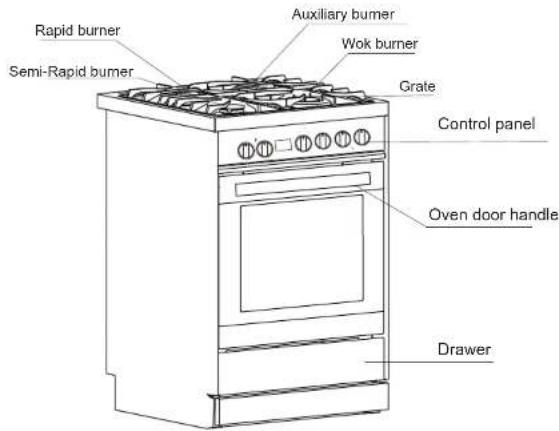
Because we contiunally strive to improve our products. We may change our specifications and designs without prior notice.
INSTALLATION
This appliance must be installed by an authorised person in accordance with this instruction manual, AS/NZS 5601.1-Gas installations (installation and pipe sizing), local gas fitting regulations, local electrical regulations, Building Code of Australia and any other government authority.

Overhead clearances-(Measurement A) Range hoods and exhaust fans shall be installed in accordance with the manufacturer's relevant instructions. However, in no case shall the clearance between the highest part of the hob of the gas cooking appliance and a range hood be less than 600 or an overhead exhaust fan, 750mm
Side clearances-(Measurements B,&C) Where B measured from the periphery of the nearest burner to any vertical combustible surface, or vertical combustible surface. covered with toughened glass or sheet metal, is less than 200mm, the surface shall be protected to a height C of not less than 150 mm above the hob for the full dimension (width or depth) of the cooking surface area. Where the gas cooking appliance is fitted with a splashback, protection of the rear wall is not required. Additional requirements for freestanding and elevated gas cooking appliances-(Measurements D &E). Where D, the distance from the periphery of the nearest burner to a horizontal combustible surface is than 200mm, then E shall be 10 mm or more, or less horizontal surface shall be above the trivet.the
- If the appliance is used for extended periods, it may be necessary to open a window in order to boost ventilation
● The kitchen where the appliance is to be installed must be dry and well ventilated. - The room should be equipped with a ventilation system that pipes away exhaust fumes created during combustion. This system should consist of a ventilation grid or hood. Hoods should be installed according to the manufacturer's instructions. The cooker should be placed so as to ensure free access to all control elements.
●oker should stand on a hard, en floor (do not put it on a base).
Before you start using the cooker, it should be leveled, which is particularly important for fat distribution in a frying pan. To this purpose, adjustable feet can be found upon removing the utility drawer. The adjustment range is +/-5mm.
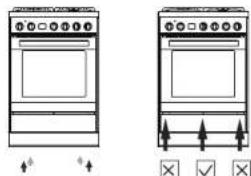
- Be sure to press the middle of the drawer, when opening a drawer.
INSTALLATION
- Install the cooktop Remove the crown caps and burner crowns from the oven, and arrange them on the cooktop as per the earlier diagram entitled. Description of the appliance! These components will fit together neatly when correctly installed.

Caution!
The crown cap and burner cap must be tightly installed to ensure that the gas flame burns as intended. if the flame fails to ignite, it may be because these components have been incorrectly installed.
● To fit the rear panel/splashback, slide the lugs on the bottom of the panel into the matching slots on rear of stove and fix with screws provided.

Gas connection Caution!
The cooker should only be connected to a gas supply of the particular type that the appliance is manufactured to function with. Information about the type of gas that the cooker has been adapted to by the factory is shown on the rear panel.
This appliance is suitable for connection with rigid pipe or flexible hose. The isolating manual shut-off valve connection point must be accessible when the appliance is installed.
Natural Gas: the supplied regulator must be fitted to the appliance inlet connection. Gas pressure must be adjusted to 1.0 kPa when approximately 50% of the burners are on high flame, the appliance test point is located on the regulator.
LPG: the supplied test point adaptor must be fitted to the appliance inlet connection. Gas pressure must be adjusted to 2.75 kPa, the appliance test point is located on the test point adaptor.
Suitable for connection with a flexible hose assembly. The flexible hose assembly must be certified to AS/NZS 1869 class B or D, be of appropriate internal diameter for the total gas consumption, be kept as short as possible (not exceeding 1200mm), must not be in contact with the floor or any hot or sharp surfaces. The hose assembly must not be subject to strain, abrasion, kinking or deformation.
Gas leakage and operation of the appliance must be tested by the installer before leaving. Check all burner flames are blue in colour, stable and completely ignite at both high low flame settings with no appreciable yellow tipping, carbon deposition, lifting, floating, lighting back or objectionable odour. Test burners individually and in combination.
For minor adjustment and fault finding refer to page 25 If this appliance cannot be adjusted to perform correctly. Refer to the warranty card for service & parts contact information. Where the data plate is obscured by cabinetry when the cooker is in the installed position, place the supplied duplicate data plate to a suitable adjacent surface or within the instruction manual for future reference.
INSTALLATION
Caution!
On completion of the cooker installation, the tightness of all connections should be checked, e.g. applying water with soap. Do not use fire to check tightness.
Fix the cooker to the back wall with 2 chains
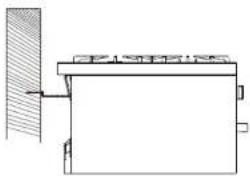
Anti tilt chains are located at the rear of the appliance and must be secured to the wall behind the appliance to prevent accidental tipping/tilting. The chain length must be as short as practicable to avoid appliance tilting forward and also diagonal to avoid appliance moving sideways.
Flexible hose connection
In case the appliance is connected by means of a flexible hose, the position A of the hose is not permissible.
In case the connection hose is made of metal, position A is permissible.

Beginning of operation
Start using the appliance in accordance with the instructions for use.
Lit up all burners and check the stability of the flame with high and low setting. Adjust air intake if necessary. After that, take time and explain the operation and control of the appliance to the user and read with him the instructions for use.
Liquefied gas connection
9 Connection R 1/2
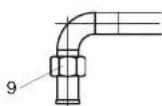

Adapting the cooker to another type of gas
This operation may only be carried out by an appropriately authorised fitter.
The cooker is supplied with natural gas (NG 1.0kpa). If the cooker is to be supplied with differs from the gas provided for the cooker by the manufacturer, burner nozzles must be exchanged and the flame needs to be adjusted.
In order to adapt the cooker to burn a different type of gas, you should:
● Exchange nozzles (see tables below),
- Adjust the "economical" flame.
- If you need to replace the natural gas (NG 1.0kpa), please contact the service center.
according to NG install instruction: se M7 sleeve to replace LPG nozzle to be NG nozzle djust NG pressure, ignite to check burner minimum ame status, adjusting damping hole till flame is stable.
INSTALLATION

Adapting the cooker another type of gas
This operation may only be carried out by
.nosrep desirontura Vialalpobapa na Adjust the flame intensity.
Caution!
To adapt the cooker to be
When leaving the factory, burners are selzzon renrub ent sang to exit renfona. Adapted to use the gas specified on their data plates and guarantee cards.
must be exchanged and the flame adjusted.
Injector Table
| Upright | Burner | Gas type | Injector Size(mm) | TPP (kPa) | NGC (MJ/h) |
| 600mm | Auxiliary | Natural gas | 0.88 | 1.0 | 3.6 |
| Semi-rapid | 1.17 | 6.3 | |||
| Rapid | 1.57 | 10.8 | |||
| Wok | 1.30 | 14.4 | |||
| Auxiliary | Universal I.PG | 0.52 | 2.75 | 3.6 | |
| Semi-rapid | 0.68 | 6.3 | |||
| Rapid | 0.88 | 10.8 | |||
| Wok | 0.73 | 14.4 |
Total Gas Consumption 600mm
Natural gas 35.1MJ/h - Universal LPG 35.1MJ/h
Burner turndown flame must also be adjusted to 25% of the high flame, refer to page 13 for adjustment screw location.
In order to perform the turndown adjustment, remove the gas burner control knobs.
A correct flame has distinct internal cones of blue colour. A short, humming flame or long, yellow and smoking one, without clearly outlined cones, shows improper quality of gas in the household piping or a damaged or soiled burner. In order to cheak a flame, heat a burner for around 10 minutes with a full flame, and next turn the valve knob to the turndown flame position. The flame should not go out or jump onto the nozzles. Hotplate burners do not require adjustment of primary air.
When converting to a different gas type refer to page 10; gas connection.
INSTALLATION

Replacement of a burner nozzle: Unscrew the nozzle with special socket spanner No 7 and replace with a new one according to the type of gas (see tables)
In cookers with a safety device, a knob with a surface burner safety valve is used, (Fig. B). Knobs should be adjusted with the burner switched on and set to the economical flame position, using an adjustment screwdriver of the 2.5mm size.
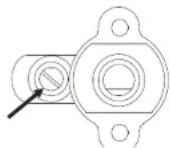
Fig. B
A knob with a surface burner safety valve
Caution!
● Adapting the appliance to a different type of gas than that indicated by the manufacturer of the cooker on the data plate, or purchasing a cooker for a different type of gas than supplied to the house, is exclusively the responsibility of the user and the fitter.
● After adjustment is completed, affix a label to the cooker indicating the type of gas to which the cooker is now adapted.
Electrical connections
Electric connection may be carried out by qualified service personnel only!
Wrong connection may permanently damage parts of the appliance and render your warranty void! Mains voltage of the user(240V) must be verified with the measuring device! Three separating switches should be placed in accordance with the mains connection.
● Mains lead behind the cooker must be placed in such manner to avoid touching the back panel of the cooker because of the heat it develops during operation.
● The mains lead extension may be made by qualified personnel only
● Repairs of electrical parts may be carried out only by qualified electrician. In case of malfunction call the service center
OPERATION


Before first use
- Remove packaging elements,
● Gently (slowly) remove labels from the over door, trying not to break the glue tape. If any visible trace is left on the glass, warm up the oven chamber(see below), spray the warmed-up glass with a glass cleaner, and wipe off with a soft cloth.
● Empty the utility drawer, and clean off factory preservatives from the oven chamber with warm soapy water
● Take out and wash the oven fittings with warm water and a little washing-up liquid. - Switch on the ventilation in the room or open a window.
- Heat the oven(to a temperature of 250 °C, for approximately 30 min.), remove any stains and wash carefully.
- When handing the cooker, follow the safety instructions carefully.
- When heating the oven for the first time, it is normal for it to give off smoke and a peculiar smell. This will disappear about 30 minutes later.
The oven chamber should only be washed with water and a small amount of washing-up liquid.
Connection (by authorised electrician)
● Using the screwdriver open the connector cover at the rear of the appliance. Release two locks located at either side of the connector bottom.
● Mains lead must be led through the relief safety device, protecting the mains lead cable from disconnection.
● Tighten the relief device securely and close the connector cover.


Colour code L = exterior live wires, usually coloured black, brown.
N=neutral
The colour is usually blue, white.
Beware of the correct N-connection!

E = earth wire, the colour is
green/yellow or green.
Recommended use H05VV-F 3G1.5mm power cord connection.
OPERATION

How to use gas burners
Choice of cookware
Mind that the diameter of a pan base is always larger than the burner flame crown, and that the pan itself is covered. The recommended pan diameter is around 2.5 to 3 times larger than the burner diameter, that is, for:
● An auxiliary burner- a pan with a diameter of 90 to 150 mm,
● An medium burner- a pan with a diameter of 160 to 220 mm,
● A large burner - a pan with a diameter of 200 to 240 mm, and the pan height should not be greater than its diameter.

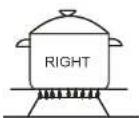
Gas burner control knobs
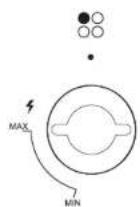
Ignition without an ignitor
• Light a match.
- Press in the knob to the end and turn it left to the MAX,
- Ignite gas with a match.,
- Set MIN)required flame size(e.g.
- Switch off the burner after finishing cooking, turning the knob right (to the off position●).
Knob ignition
- Press in the knob to the end and turn it left to the MAX.
- Hold until gas is lit.
● After the flame is lighted release the pressure on the knob and set a required flame size.
Caution!
In cooker models equipped with a surface burner safety valve, hold the knob pressed down to the end when igniting for 10 seconds at the "large flame" position to activate the safety device.
If the ignition device is out of order, either due to power failure or humid ignition device, use a match or a lighter to ignite the gas.
- Keep the button pressed for approximately 10 second after ignition to stabilize the flame.
- If you failed to ignite the burner after 15 seconds. Shut the burner off and wait for at least one minute before the next attempt.
Do not place anything, e.g. flame tamer or griddle plate between pan and pan support. Do not remove the pan support and enclose the burner with a work stand, only use the wok support supplied. Do not use large pots or heavy weights which can bend the pan support or deflect flame onto the hotplate. Locate pan centrally over the burner so that it is stable and does not overhang the appliance.
OPERATION
Selection of the appropriate flame A correctly adjusted burner has a light blue flame with a clearly visible internal cone. Flame size depends on the position of the burner knob which has been set.
Depending on requirements, flame size can be set in a continuous manner.

Oven
Oven is controlled by the function knob and the temperature control knob.
Caution!
When selecting any oven function, the oven will only be switched on after the temperature has been set by the temperature selection knob.
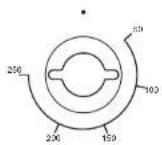
Temperature control knob
Caution!
- Button positions between and MAX are not recommended. In these positions, the flame is not stabilized and may be extinguished.
- If the flame goes out repeat the procedure.
- If the burner flame extinguishes, shut the burner off and wait for at least one minute before next attempt.
● Before igniting the burners cover them with appropriate cookware.
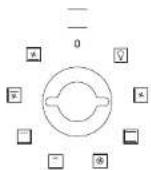
The Function knob
Operation of the burner protection valve
Some models are equipped with an automatic system that cuts off gas supply to a burner when the flame has disappeared.
This system protects the cooker against gas leakage when the flame on a burner goes out e.g. in case of spillage. The user's intervention is needed to re-ignite the burner.
Caution!
When selecting any heating function (switching a heater on etc.) the oven will only be switched on after the temperature has been set by the temperature regulator knob.
OPERATION

Electronic programmer

A - Display field
B-Seconds Icon
C-Buttons
D - Timer
E -Current time
F - Cooking time
G - End of cooking time
M - Function
- To decrease the numbers on the digital display
+ - To increase the numbers on the digital display
OPERATION
Setting the time
- At power on, "dispoayed and Ⓤ flashes.
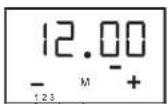
- The current time can be set with button 1 and 3, 5 seconds after the time has been set, the new data will be saved.
Timer
The timer can be activated at any time and any function. The timer can be set from 1 minute to 23 hours and 59 minutes.
To set the timer you should:
- Press button 2, flashing △. Enter the timer setting.

- Set the timer using buttons 1 and 3

- 5 seconds after the time is set, or directly press the button 2, the signal function Δ is on. your setting is saved.

- When the set time is up the alarm signal will be activated and the signal function △ starts flashing again.

- Press any button, the signal function Δ and alarm signal will go off. Or the alarm signal will be turned off automatically after 2 minutes.
OPERATION
Caution!
Besides timer alarm, any other alarms can be turned off by pressing any button, If the alarm signal is not turned off manually, it will be turned off automatically after 2 minutes.
Semi-automatic operation
If the oven is to be switched off at a given time, or after defined period, you should:
-
Set the oven function knob and the temperature regulator knob to the setting at which you want the oven to operate.
-
Press the function button, the oven will begin to work and the function signal → I flashing.
-
Press button 1 or 3 to adjust the cooking time, within a range from 1 minute to 10 hours.
-
Or press button "M" twice, then the display will show flashing →|. Set the end time by buttons 1 and 3.
-
The set time is introduced to the memory after 5 seconds.
-
When the set time passed, the oven is switched off automatically, the alarm is activated.
-
Press any button, the alarm signal and the I→I icon will go off, Or the alarm signal will be turned off automatically after 2 minutes.
Caution!
- The cooking time and end of cooking time range: Cooking time range: 0 < t ≤ 10 hours End of cooking time range: current time < end of cooking time < current time + 24 hours End of cooking time = current time + cooking time
- When using the semi-automatic operation, set either the cooking time or the end of cooking time.
- If you set the cooking time to 0 or set the end of cooking time to the current time, the auto function will be off.
● After the auto function be off, the cooking time to 0, end of cooking time and current time remains the same.
For example:
The current time is 2:00, want to oven work of 3 hours, end of cooking time is set to be 5:00 (2:00+3:00 = 5:00).

There are two methods to achieve this setting:
First method:
- Set the cooking time using buttons 1 and 3.
OPERATION

- End of cooking time automatically change to 5:00.
Second method:
- Set the end of cooking time using buttons 1 and 3.

- Cooking time automatically change to 3:00. 5 seconds after the setting, the auto function is on. 3 hours later, the current time shows "5.00" The alarm signal is activated.
Automatic operation
If the oven is to be switched on for a specified period of time and switched off at a fixed hour then you should set the cooking time and the end of cooking time:
-
Set the oven function knob and the temperature regulator knob to the setting at which you want the oven to operate.
-
2 not even with Begin to work and the function signal → 1 flashing.
-
Press button 1 or 3 to adjust the cook time, within a range from 1 minute to 10 hours.
-
And press button 2. then the display will show flashing → | . Set the cooking time using buttons 1 and 3 .
-
The set time is introduced to the memory after 5 seconds, the |→| and →| always on.
-
When the set time passed, the oven is switched off automatically, the alarm is activated. and the → will go off.
-
Press any button, the alarm signal and the → icon will go off. Or the alarm signal will be turned off automatically after 2 minutes.
OPERATION
Caution!
● Work time = end of cooking time-cooking time
For example:
If the current time is 2:00; cooking time set to be 3 hours; end of cooking time set to be 10:00, the work time will be 7:00 (7:00=10:00-3:00).
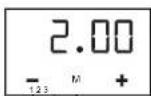
- Set the cooking time to be "3.00" with buttons 1 and 3.

- Set the end of cooking time, time to be "10.00" with buttons 1 and 3.

- 5 seconds after setting, the auto function is on.

- When it up to 7:00, the oven will begin to work.
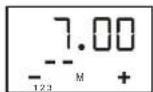
- When it up to 10:00, the alarm signal is activated. The oven is switched off automatically.

Caution!
● End of cooking time > current time + cooking time <= 10 hours
- At least more than one minute cooking time, cooking time and end of cooking time must be set.
- If the cooking time set to be 0 or the end of cooking time set to be the current time, the auto function will be off.
● After the auto function be off, the cooking time to 0, end of cooking time and current time remains the same.
Oven
Oven is controlled by the function knob and the temperature control knob.
Caution!
When selecting any heating function the oven will be switched on only after the temperature has been set by the temperature control knob.
Possible settings of the oven function knob
OPERATION
Possible settings of the oven function knob
Caution!
At this oven function knob position. The oven is not being warmed up.

Classic Convection
Setting the knob to this position allows the oven to be heated conventionally.

Static Grill
When the "combined grill" is active it enables grilling with the grill and with the top heater switched on at the same time.
This function allows a higher temperature at the top of the cooking area, which cause more intense browning of the dish and permits larger portions to be grilled.
Warning!
When using function grill it is recommended that the oven door is closed.
When the grill is in use accessible parts can become hot. it is best to keep children away from the oven.

Separate oven lighting
By setting the knob to this position the lighting inside the oven is switched on

Defrost
This function for defrosting

Fan Forced
At this function, allows the oven to be heating up in a forced way with the thermofan, which is in the central part of the oven heating method is: Reduction of oven heating-up time and of the initial heating stage. Possibility to bake at two cooking levels simultaneously.

Fan and bottom heater on
At this oven function, the oven activates the bottom heater and fan function. The mode is useful for baking low pastry and preparation of preserved fruit and vegetables.
OPERATION

Fan grill element
When the knob is turned to this position, the oven activates the grill and fan function. In practice, this function allows the grilling process to be speeded up and an improvement in the taste of the dish, you should only use the gill with the oven door shut.

Grill heater on
Setting the knob to this position allows dishes to be grilled on the grate.
Warning!
When using function grill it is recommended that the oven door is closed.
When the grill is in use accessible parts can become hot.
It is best to keep children away from the oven.
OPERATION
Oven guide levels
Baking pans and accessories (oven grid, baking tray, etc) may be inserted into the oven in 5 guiding levels.
Appropriate levels are indicated in the tables that follow.
Always count levels from the bottom upwards!
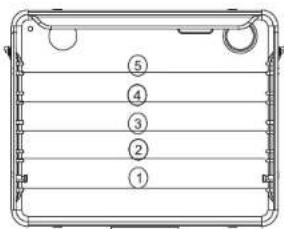
- Caution: accessible appliance components might be extremely hot after the use of grill. Prevent little children from approaching the appliance.
● Grill heater is especially suitable or the preparation of low-fat sausages, meat and fish fillets and steaks, and for browning and crisping the roast skin.
BAKING IN THE OVEN

Baking
- We recommend using the baking trays which were provided with your cooker which should be put on the drying rack;

- Before the cake is taken out of the oven, check if it is ready using a wooden stick(if the cake is ready the stick should come out dry and clean after being inserted into the cake);
● After switching off the oven it is advisable to leave the cake inside for about 5 min.; - The baking parameters given in tables are approximate and can be corrected based on your own experience and cooking preferences;
- If information given in recipe books is significantly different from the values included in this instruction manual, please apply the instructions from the manual.
| CAKE TYPE | TEMPERATURE (°C) WARMED UP | TEMPERATURE (°C) | BAKING TIME IN MINUTES | LEVEL FROM THE BOTTOM |
| Fruit cake | 170 | 160 | 60-70 | 2 |
| Victoria sponge | 170 | 150-160 | 20-40 | 2-3 |
| Sponge layer cake | 170 | 150-160 | 20-30 | 2-3 |
| Buns | 180 | 170 | 30-50 | 3 |
| Teacake | 180 | 180 | 40-50 | 3 |
| Cake(crispy base) | 200 | 180 | 40-60 | 3 |
| Puff pastry | 230-250 | 200-220 | 15-20 | 3 |
BAKING IN THE OVEN
Roasting meat
- Cooking meat weighing over 1 kg in the oven, but smaller pieces should be cooked on the gas burners.
- Use heat proof ovenware for roasting, with handles that also resistant to high temperature.
- When roasting on the drying rack or the grate we recommend that you place a baking tray with a small amount of water on the lowest level of the oven;
- It is advisable to turn the meat over at least once during the roasting time and during roasting you should also baste the meat with its juices or with hot salty water- do not pour cold water over the meat.
| TYPE OF MEAT | LEVEL FROM THE BOTTOM | TEMPERATURE (°C) | TIME* IN MINUTES |
| BEEF Roast beef or fillet rare | 3 | 250 | Per 1 cm 12-15 |
| Oven warmed up juicy * )'mulidem( | 3 | 250 | 15-25 |
| Oven warmed up 'well done' | 3 | 210-230 | 25-30 |
| Oven warmed up roast joint | 2 | 200-220 | 120-140 |
| PORK Roast joint | 2 | 200-210 | 90-140 |
| Ham Fillet | 2 | 200-210 | 60-90 |
| 3 | 210-230 | 25-30 | |
| VEAL | 2 | 200-210 | 90-120 |
| LAMB | 2 | 200-220 | 100-120 |
| VENISON | 2 | 200-220 | 100-120 |
| POULTRY Chicken | 2 | 220-250 | 50-80 |
| Goose(approx.2 kg) | 2 | 190-200 | 150-180 |
| FISH | 2 | 210-220 | 40-55 |
- The figures presented in the table refer to a portion of 1kg, if the portion is larger is larger than that an additional 30-40 minutes should be added for each additional kilogram.
CLEANING AND MAINTENANCE
By ensuring proper cleaning and maintenance of your cooker you can have a significant influence on the continuing fault-free operation of your appliance.
Before you start cleaning, the cooker must be switched off and you should ensure that all knobs are set to the “●” position. Do not start cleaning until the cooker has completely cooled.
Front side of the casting
For cleaning of frontal part of the cooker use the usual cleaning agents and follow the manufacture's instructions.
Never use any aggressive cleaning agents or dish cleaning accessories which might cause scratches.
Enamel coated and plastic surface
Clean the knob and handles with soft cloth and liquid cleaners, intended for use of smooth enamel surfaces.
▷ Cooktop
Gas grid, cooking area and burner components should be cleaned with warm water and mild detergent for manual washing of dishes.
Thermal element and ignition device should be cleaned with soft brush. To ensure perfect operation, these elements must always be thoroughly clean.
Clean the crown and the crown cap. Always keep the gas outless nozzles on the burner crown free of dirt.
Upon completion of cleaning wipe all components dry and replace them carefully to their respective slots. Oblique position of components may cause troubled ignition of burners.

Caution!
Crow caps are coated with black enamel. Discoloration of caps, due to high temperatures, is inevitable, but is has no adversary effect on normal operation of burners.
▷ Oven
- The oven should be cleaned after every use. When cleaning the oven the lighting should be switched on to enable you to see the surface better.
● The oven chamber should only be washed with warm water and a small amount of washing-up liquid.
● After cleaning the oven champer wipe it dry.
Caution!
Do not use cleaning products containing abrasive materials for the cleaning and maintenance of the glass front panel.
Service by an authorised person is recommend, or if any of the following conditions are noticed; incomplete ignition, appreciable yellow tipping, carbon deposition, lifting, floating, lighting back or objectionable odour. Refer to the warranty card for service & parts contact information.
CLEANING AND MAINTENANCE
Replacement of the oven light bulb
Before any maintenance is started involving electrical parts, the appliance must be disconnected from the power supply. If the oven has been in use, let the oven cavity and the heating elements cool down before attempting any maintenance.
Changing the bulb
● Unscrew the protective cover. We recommend that you wash and dry the glass cover at this point.
● Carefully remove the old bulb and insert the new bulb suitable for high temperatures (300°C) having the following specifications: 220-240V, 50Hz, 25W, G9 fitting.
● Refit the protective cover
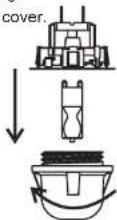
IMPORTANT
Never use screwdrivers or other utensils to remove the light cover. This could damage the enamel of the oven or the lampholder. Remove only by hand.
IMPORTANT
Never replace the bulb with bare hands as contamination from your fingers can cause premature failure. Always use a clean cloth or gloves.
Please note:
The bulb replacement is not covered by your guarantee
Door removal
In order to obtain easier access to the oven chamber for cleaning, it is possible to remove the door.
To do this, tilt the safety catch part of the hinge upwards. Close the door lightly, lift and pull it out towards you. In order to fit the door back on to the cooker, do the reverse. When fitting, ensure that the notch of the hinge is correctly placed on the protrusion of the hinge holder. After the door is fitted to the oven, the safety catch should be carefully lowered down again. If the safety catch is not set it may cause damage to the hinge when closing the door.

Tiling the hinge safety catches

Door removal
CLEANING AND MAINTENANCE
Removal of the internal glass panel
Unscrew and unfasten the plastic latch that is in the corner at the top of the door. Next take out the glass from the second blocking mechanism and remove. After cleaning, sert and block the glass panel, and screw in the blocking mechanism.

Removal of the internal glass panel
▷ Regular inspections
Besides keeping the cooker clean, you should:
- Carry out periodic inspections of the control elements and cooking units of the cooker. After the guarantee has expired you should have a technical inspection of the cooker carried out at a service centre at least once every two years.
● Fix any operational faults.
● Carry out periodical maintenance of the cooking units of the cooker.
Caution!!
All repairs and regulatory activities should be carried out by the appropriate service centre or by an appropriately authorized fitter.
▷ Install door

CLEANING AND MAINTENANCE
In the event of an emergency, you should:
- Switch off all working units of the cooker
- Disconnect the mains plug
- Call the service centre
- Some minor faults can be fixed by referring to the instructions given in the table below. Before calling the customer support centre or the service centre check the following points that are presented in the table.
| PROBLEM | REASON ACTION | |
| Bumer flame suddenly changes or not stable | Incorrect assembly of burner components. | Assemble the burner components correctly! |
| The flame goes off after ignition. | Early release of control button. Control button is not pushed in firmly. | Keep the button pressed longer. Before releasing the button, give it one final solid push. |
| The color of the cooking zone gas grid has changed. | Normal situation, caused by the high temperature. | Clean the grid with metal cleaning agents. |
| Electric operations are generally disturbed. | Fuse is burned. Check the fuse in the fuse box, and replace if required. | |
| Electric ignition of burners does not function. | Food residues or detergent block the contact between the ignition device and the burner. | Open and clean carefully the opening between the ignition device and the burner. |
| Burner crown caps look ugly. Usual staining. Clean the crown cap with metal cleaning agents. | ||
| Dew forms at oven door glass during heating up. | Normal situation, caused by the temperature difference. | No remedy; it does not impede normal operation. |
| roasting? | Roasting temperature too high Reduce roasting temperature, ...if you detect thermostat failure. Experts should replace the thermostat. | |
| Thermostat failure. Experts should replace the thermostat. | ||
| Oven is excessively stained during roasting. | Roasting temperature is too high. Grid rack and grease tray are incorrectly placed. | Reduce the roasting temperature, Place the grid above the grease tray and insert them both in the guide. |
| Liquid or pastry dough is lifted to on side. | The appliance is not leveled. Level the appliance into horizontal position by setting the adjustable legs. | |
| Baking results are disappointing. | Wrong oven setting. Select correct oven setting according to the instructions from the baking tables. | |
| Flat cake is too light from below. | Baking pan was placed in top of roasting pan. | Place the baking tray upon the grid rack. |
| Pastry is too dry. | Temperature is too low. Baking time too long. | Set higher oven temperature duce baking time. |
| Pastry is slippery, smeary and mellow. Meat is rare in the middle. | Baking temperature is too high. Roasting time is too short. Excessive quantity of liquid in dough. | Reduce the temperature - baking time may not be reduce d by setting higher temperature (roasted from the outside, raw from the inside) select longer baking time, let the dough rise longer. Add less liquid to the dough. |
| The appliance does not work. | Break in power supply. | Check the household fuse box; if there is a blown fuse replace it with a new one |
| The programmer display is flashing"0.00". | The appliance was disconnected from the mains or there was a temporary power cut. | Set the current time (see 'Use of the programmer') |
| The oven lighting does not work. | The bulb is loose or damaged. | Tighten up or replace the blown bulb (see 'Cleaning and Maintenance') |
smoke during
TECHNICAL INFORMATION
| Type | ED-EUROGE60SSED-EUROGE60BK |
| Dimensions:height/width/depth(mm)Gas inlet, right rear 150mm from top | 900/600/600 |
Injector Table
| Upright | Burner | Gas type | Injector Size(mm) | TPP (kPa) | NGC (MJ/h) |
| 600mm | Auxiliary | Natural gas | 0.88 | 1.0 | 3.6 |
| Semi-rapid | 1.17 | 6.3 | |||
| Rapid | 1.57 | 10.8 | |||
| Wok | 1.30 | 14.4 | |||
| Auxiliary | Universal LPG | 0.52 | 2.75 | 3.6 | |
| Semi-rapid | 0.68 | 6.3 | |||
| Rapid | 0.88 | 10.8 | |||
| Wok | 0.73 | 14.4 |
Total Gas Consumption
600mm
Natural gas 35.1MJ/h - Universal LPG 35.1MJ/h
Cod:0040306335-03

- INSTRUCTION MANUAL
- DEAR CUSTOMER
- CAUTION
- TABLE OF CONTENTS
- SAFETY INSTRUCTIONS
- HOW TO SAVE ENERGY
- UNPACKING
- DISPOSAL OF THE APPLIANCE
- DESCRIPTION OF THE APPLIANCE
- INSTALLATION
- GAS CONNECTION CAUTION
- FLEXIBLE HOSE CONNECTION
- BEGINNING OF OPERATION
- ADAPTING THE COOKER ANOTHER TYPE OF GAS
- TOTAL GAS CONSUMPTION 600MM
- ELECTRICAL CONNECTIONS
- OPERATION
- BEFORE FIRST USE
- CONNECTION (BY AUTHORISED ELECTRICIAN)
- HOW TO USE GAS BURNERS
- IGNITION WITHOUT AN IGNITOR
- KNOB IGNITION
- OVEN
- SETTING THE TIME
- TIMER
- SEMI-AUTOMATIC OPERATION
- FOR EXAMPLE
- AUTOMATIC OPERATION
- OVEN GUIDE LEVELS
- BAKING IN THE OVEN
- ROASTING MEAT
- CLEANING AND MAINTENANCE
- FRONT SIDE OF THE CASTING
- ENAMEL COATED AND PLASTIC SURFACE
- ▷ COOKTOP
- ▷ OVEN
- REPLACEMENT OF THE OVEN LIGHT BULB
- CHANGING THE BULB
- IMPORTANT
- PLEASE NOTE
- DOOR REMOVAL
- REMOVAL OF THE INTERNAL GLASS PANEL
- ▷ REGULAR INSPECTIONS
- ▷ INSTALL DOOR
- TECHNICAL INFORMATION
- TOTAL GAS CONSUMPTION
Brand : Eurotech
Model : ED-EUROGE60SS
Category : Cooker