
Connect Vero W6m - Wi-Fi Antenna ACER - Free user manual and instructions
Find the device manual for free Connect Vero W6m ACER in PDF.


| Product Type | Wi-Fi 6E Router (Tri-band) |
| Dimensions | 200.7 x 200.7 x 55.9 mm |
| Weight | 810 g |
| Power Supply | AC 100-240V, 50-60Hz, 1.6A; DC 12V/3A 36W adapter |
| Processor | MediaTek MT7986 + MT7916, Quad-core A53 2.0 GHz |
| Memory | 1 GB LPDDR, 4 GB Storage |
| Wireless Standard | 802.11 a/b/g/n/ac/ax (Wi-Fi 6E) |
| Wireless Speed | AXE7800: 2.4 GHz 574 Mbps, 5 GHz 4804 Mbps, 6 GHz 2402 Mbps |
| MIMO | 2x2 (2.4 GHz), 4x4 (5 GHz), 2x2 (6 GHz) |
| Ethernet Ports | 1 x 1 Gbps WAN, 3 x 1 Gbps LAN (one game port) |
| Buttons | Power ON/OFF, WPS, Reset |
| Mesh Support | Yes, up to 1 controller + 3 agents; star, daisy-chain, tree topologies |
| Security Features | Trend Micro Home Network Security: malicious site blocking, network attack blocking, IoT protection |
| QoS | Hybrid QoS with application and device priority, bandwidth limitation |
| VPN Support | OpenVPN and IPsec VPN server |
| Parental Control | Web & App controller with category-based blocking (adult, streaming, etc.) |
| Operating Modes | Router, Mesh Controller, Mesh Agent, Bridge |
| WPS | Push button or PIN method on 2.4/5/6 GHz |
| Firmware Update | Via web GUI, manual check and update |
| LED Indicators | Multi-color LED on top panel: breathing blue (good), green (normal), orange (poor), red (disconnected) |
| Compatibility | Wi-Fi 6E clients, Killer-enabled PCs, game consoles (PS, Xbox, Switch) |
| Management | Web GUI (http://acer-connect.com) and Predator Connect mobile app |
Frequently Asked Questions - Connect Vero W6m ACER
User questions about Connect Vero W6m ACER
0 question about this device. Answer the ones you know or ask your own.
Ask a new question about this device
Download the instructions for your Wi-Fi Antenna in PDF format for free! Find your manual Connect Vero W6m - ACER and take your electronic device back in hand. On this page are published all the documents necessary for the use of your device. Connect Vero W6m by ACER.
USER MANUAL Connect Vero W6m ACER
natural_image
Exterior view of a gray rectangular electronic device with horizontal ribbed top and control panel (no text or symbols visible)Acer Connect Vero W6m Wi-Fi Router
User Manual
V1.0
All Rights Reserved. © 2023.
Important: This manual contains proprietary information that is protected by copyright laws. The information contained in this manual is subject to change without notice. Some features described in this manual may not be supported depending on the Operating System version. Images provided herein are for reference only and may contain information or features that do not apply to your device. Acer Group shall not be liable for technical or editorial errors or omissions contained in this manual.
Revision Aug, 2023
© 2023. All Rights Reserved.
This revision: Aug, 2023
Important: This manual contains proprietary information that is protected by copyright laws. The information contained in this manual is subject to change without notice. Some features described in this manual may not be supported depending on the Operating System version. Images provided herein are for reference only and may contain information or features that do not apply to your device. Acer Group shall not be liable for technical or editorial errors or omissions contained in this manual.
Contents
-
Overview....3
-
Installation and Setup....3
-
Initial Configuration 6
-
Dashboard 7
-
Hybrid QoS....9
-
Quick Setup....11
6.1 How to create a mesh network.... 11
6.1.1 Mesh Topologies.... 12
- WAN 17
7.1 WAN status.... 17
7.2 WAN setting 17
7.3 DMZ 18
7.4 WAN ping 18
7.5 Firewall 18
7.6 NAT pass-through 19
7.7 Port forwarding 19
7.8 VPN server 19
7.9 DDNS 20
- WiFi 21
7.1 WiFi Status....21
7.2 Mesh WiFi 21
7.3 Basic Settings (router mode) 21
7.4 Advanced Settings 22
7.5 WiFi MAC filter 23
7.6 WPS 23
7.7 Smart home WiFi 24
7.8 Guest WiFi 24
7.9 ACS 24
-
LAN 25
-
IPv6 25
-
Power Saving 26
-
Home Network Security 26
12.1 Network Security Setting... 26
12.2 Parental Control 28
- System 29
13.1 Operation mode 29
13.2 Login password 29
13.3 System time 29
13.4 Languages 30
13.5 Backup and restore 30
13.6 System Information 30
13.7 Restart and Reset default 31
13.8 Firmware update 31
13.9 System logs 31
13.10 Main LED 32
- Troubleshooting.... 33
14.1 Quick Tips 33
14.2 FAQs (Frequently Asked Questions) 33
-
Appendix factory default settings 34
-
Router Basic Specification 35
1. Overview
Acer Connect series W6, a whole new Wi-Fi 6 wireless router, is enriched with intensive features and simple setup steps via a 1-2-3 wizard. A new stylish desktop wireless router for your household. Network Security protection is embedded. Live updates ensure your network is immune from malware and vulnerability threats 24-7. Smart home (IoT) devices can be set up on their WiFi network. ACS (Automatic Channel Selection) dynamically chooses the most suitable channel for the W6m when you experience interference from nearby 5GHz SSIDs. Port forwarding profiles for most game consoles (PS5, XBOX, etc.) are readily available inside for gameplay. Hybrid QoS is the best fit for your router, ensuring prioritization of your gaming traffic and bandwidth utilization. The VPN feature provides a secure connection for your device when surfing the website.
2. Installation and Setup
2.1. Plug in the AC adapter.
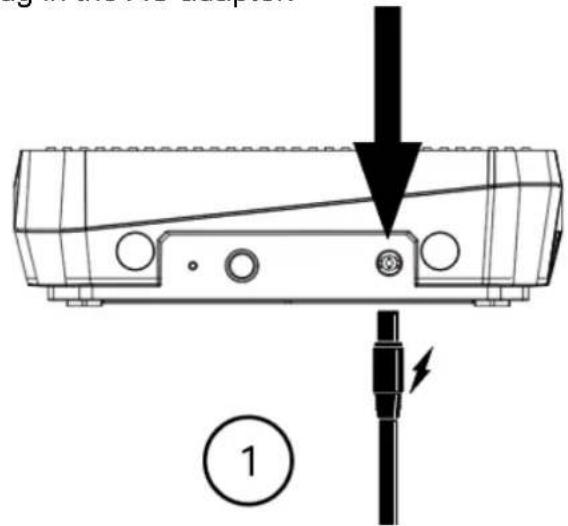
2.2. Plug into an outlet.
2.3 Plug-in Internet cable.


2.4 Power on the device.
2.5 Connect to W6m Vero WiFi.
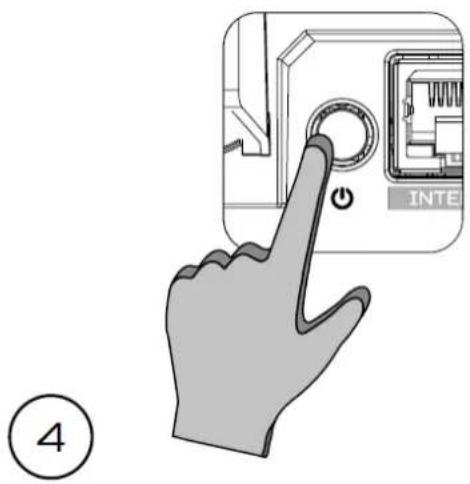

2.6 Important information is at the bottom of the device.

2.7 The device can be either setup via Predator Connect mobile App or the browser web admin.
How to setup the router via Predator Connect Mobile App:
- Use a mobile device camera to scan the QR code below. Download the Predator Connect mobile App via Play Store or App Store.

Available on the
App Store
GET IT ON
Google Play
- Open the Predator Connect Mobile App and follow the steps for registering an account. Go to your email inbox, review the registration email, and input the 4-digit registration code onto the mobile App. When the whole process is completed, you will be automatically signed in.
- Enable the mobile WiFi function and scan the device QR-code printed on the bottom label. The default admin and WiFi password will be automatically exported into the mobile app. (SSID: PredatorW6m-YYYY)
• Device setup completed.
Setup the router via browser:
- Please make sure that the wireless function on your laptop is already enabled.
- Check the device bottom label, and find the router's default SSID (PredatorW6m-YYYY) and password and then connect.
- Open the browser on your laptop/desktop, and input the device web admin URL: http://acer-connect.com or IP: http://192.168.76.1
- The device will automatically redirect to a quick setup wizard. Follow the easy 1-2-3 steps and get ready to access the internet.
Note: The admin login password requires modification within the setup wizard for first-time use. Please create a strong password and keep it in a safe place. (The new password cannot be the same as the prior one.)
Note: The router web admin portal will automatically lock after five consecutive incorrect attempts. You have to power cycle the router to unlock the web admin.
Note: The SSID WiFi password can't be the same as the admin login password.
Both the App & browser can help the router to do a quick setup. Web UI can execute all functions and settings of the router. Mobile App allows the user to remotely control some functions of the router and receive notifications.
3. Initial Configuration
Please log in to the Acer Connect Vero W6m Web Portal (http://acer-connect.com or IP: http://192.168.76.1) by using the current valid Admin password. You can select the language of Web UI by clicking on the drop-down arrow.

Enter the login password to see the dashboard and other settings of your Acer Connect Vero W6m. The router will automatically guide you step by step on how to set up and configure internet access and basic network settings.
You can scan the QR code (on the login screen using your Android mobile or iPhone) to download the mobile app and manage your router remotely.
4. Dashboard
Once you have successfully logged in, the following key information will be displayed on the Acer Connect Vero W6m dashboard.

Connection Status: shows the current connection status of Internet.
WAN Status: shows WAN connectivity and Download/Upload speed and WAN IP.
System Uptime: shows a system uptime since the last reboot.

WiFi Status: shows the number of wireless client devices connected with 2.4GHz, 5GHz & 6GHz bands.
LAN Status: quickly indicates the status of LAN ports. Predator Connect W6m has one WAN port and three LAN ports i.e. LAN 1, LAN 2, LAN 3.
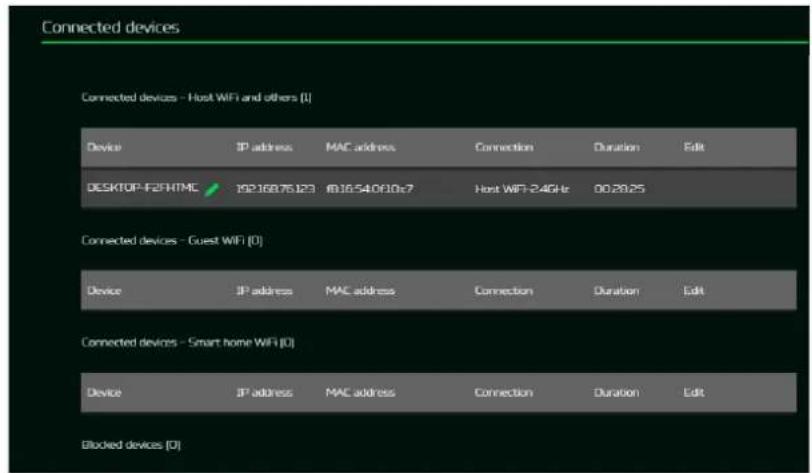
The "icon" (at the far right) represents the number of devices connected to the W6m router. Clicking on the icon will display the table shown below.

Connected Devices: shows how many client devices are connected with your Predator Connect W6m through WiFi or LAN.
You can also modify the device name by clicking on the pencil icon.
This tab displays the client's device name, the IP address allocated by the router, MAC address of the device, mode of connection (whether the device is connected to the router through Ethernet or WiFi), and duration of device connectivity with the router. You can even block the device from accessing the Internet by clicking on the "block" button.
Network Traffic: helps indicate real time status of the Download (DL) and Upload (UL) speeds across the WAN.
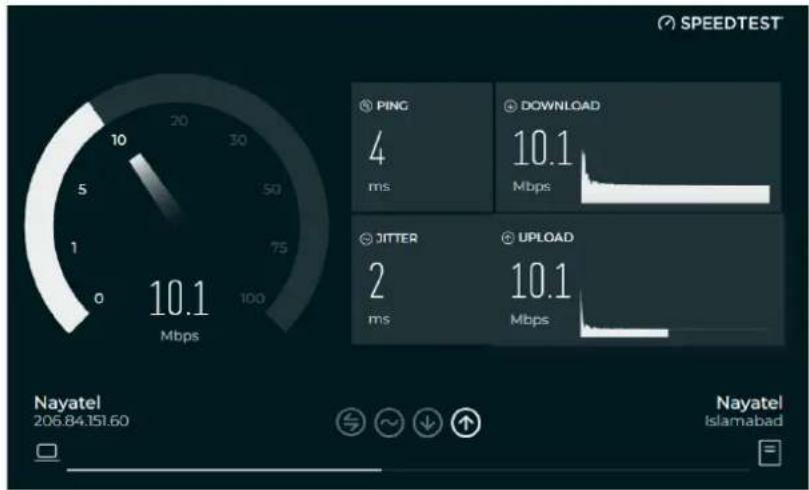
Network Speed Test:
1) Powered by Ookla. A single push of the "GO" button tests the speed of the WAN connectivity.
2) You can even manually select the server option. Click on the dropdown arrow and it will display the available servers.
3) Clicking the "Go" Button will test the network speed and display the results as shown in the image below.

line
| Time | WAN (Kbps) | | ---------- | ---------- | | 16:35:38 | ~0 | | 16:35:47 | ~2,200 | | 16:35:55 | ~200 | | 16:36:14 | ~2,200 | | 16:36:23 | ~0 | | 16:36:37 | ~0 |It will test and clearly show the network download and upload speed in Mbps, ping rate, and jitter in milliseconds.
After getting the speed test results, you have the option to run the speed test again.
gauge
| Metric | Value | | :--- | :--- | | PING (ms) | 4 | | DOWNLOAD (Mbps) | 10.1 | | JITTER (ms) | 2 | | UPLOAD (Mbps) | 10.1 | Nayatel 206.84.151.60 Islamabad5. Hybrid QoS
Hybrid QoS combines application priority and device priority with bandwidth limitation. The Killer-Enabled PC can set applications priority and send packets with DSCP values to the Acer Connect Vero W6m router, then the router will classify packets and set priority for all different applications based on the below definition.
For non-Killer-Enabled devices, Acer Connect Vero W6m can identify game consoles, streaming devices, computers, smartphones, and IoT devices in the network and allocate them to a priority group according to the default settings, or the user can manually set priority for devices connected to the router.
*Note: Device identification requires the network security engine option enabled. Application-based QoS* priority: (Enabled by default)
*Note: Application Priority will use the DSCP value in the IP header for packet classification. Laptop/desktop with Killer™ embedded traffic priorities in four grades by application. I.e. Extreme (Games), High (Streaming), Normal (Browsing), Low (Download).
| Priority | Extreme (Games) | High (Streaming) | Normal (Browsing) | Low (Download) |
| Applications (DSCP)Intel KillerTeams/Zoom, GT-Booster | · Killer Priority 1 (Games)· Killer Priority 2 (Real Time) | · Killer Priority 3 (Streaming) | · Killer Priority 4 (Browsing) | · Killer Priority 5 & 6(Cloud Download) |
| · Teams/Zoom Voice | · Teams/Zoom Video | · Teams Shared Screen | ||
| Devices | · Game Console: PS, Xbox, Switch | · Chromecast, FireTV, Roku· SmartTV | · Computers, Smartphones· Other Devices | · IoT Devices, Wearable |
Device priority:
Note 1: Killer-Enabled PC is set to default extreme priority whether connected by wired Ethernet or by wireless.
Note 2: You may drag and drop connected clients into the desired priority level. The change is effective immediately.
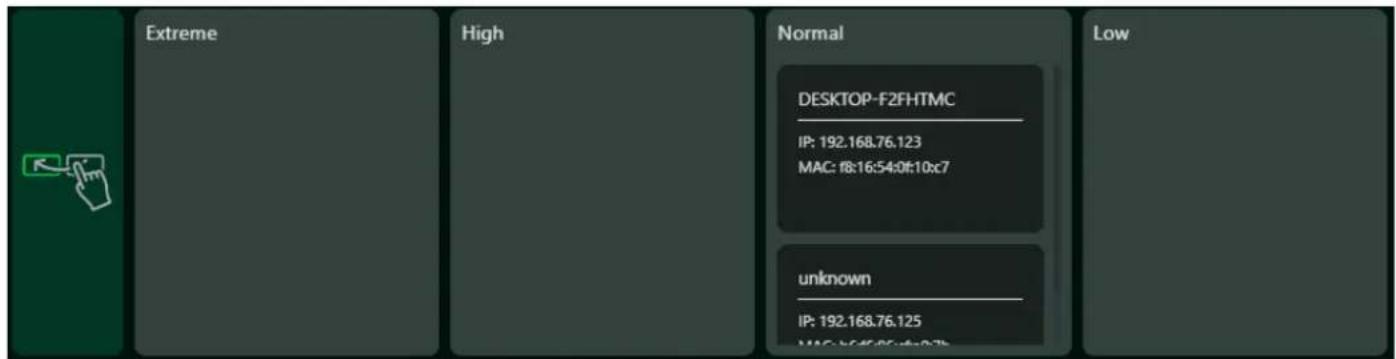
For the upload and download bandwidth configuration, please contact your ISP to get the exact value of the upload and download bandwidth. Once the bandwidth is configured, QoS will reserve the bandwidth according to the weighting percentage of each priority queue.

You may select "use default configuration" and click on "Apply bandwidth". Otherwise, you can select "setting manually" and enter the required upload and download bandwidth with priority weighting.
6. Quick Setup
The Acer Connect Vero W6m can operate as a standalone WiFi router, Bridge, or establish a Mesh network. Please select a mode which this device will operate in:
1) Router Mode
2) Mesh Controller
3) Mesh Agent
4) Bridge mode
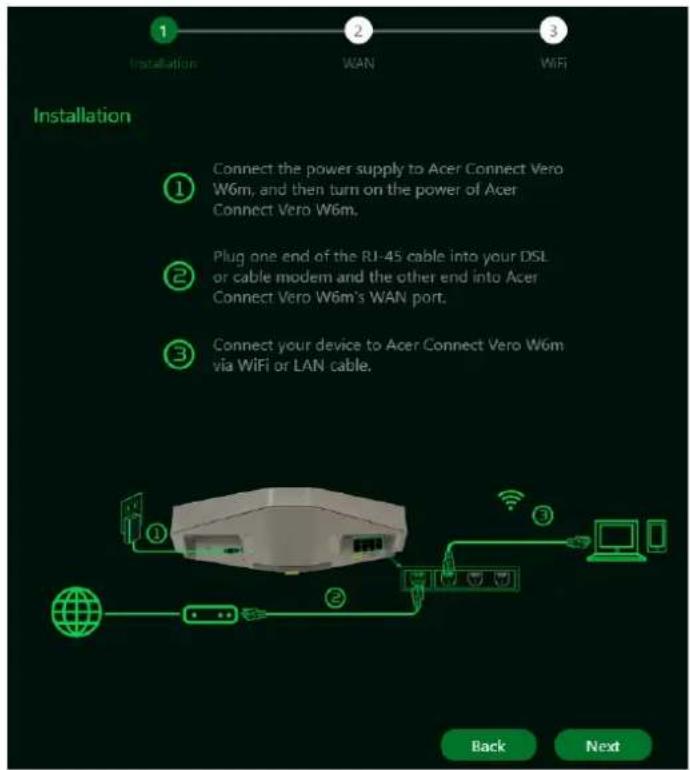
In Router mode, plug one end of the RJ-45 cable into your DSL or cable modem and the other end into Acer Connect Vero W6m's WAN port.
Connect your device to Predator Connect W6m via WiFi or LAN cable.

6.1 How to create a Mesh network
To create a mesh network, set one router as a Mesh controller (A) and set another router as a Mesh agent (B)
Note: To keep a better performance, please be aware that a controller could only have 3 agents under its network. For the fourth agent, it will be performed factory reset after connecting to the mesh network and switched back to router mode automatically.

flowchart
graph TD
    A["1 Set one router as Mesh controller."] --> B["2 Set another router as Mesh agent."]
    B --> C["3 Network with two routers"]
    C --> D["4 Network with one router"]
    style A fill:#f9f,stroke:#333
    style B fill:#f9f,stroke:#333
    style C fill:#ccf,stroke:#333
    style D fill:#ccf,stroke:#333
Following are the steps to create a Mesh network;
- Go to quick setup and set the main router as Mesh controller.
- Power on the other Predator router and set it as Mesh Agent.
- Place both routers close to each other.
There are two ways to onboard an agent to a Mesh network.
I. Press the WPS button on both devices for 2 seconds at the same time.
II. Connect the agent to the controller via LAN cable.
If the agent onboard to the controller successfully, the LED will be breathing blue, otherwise, the LED will become solid red color.
Power off the agent device, move it to some other place and then power it ON. Then observe the agent's LED color. (Agent's LED color shows RSSI indication between controller and agent.
The Blue color means RSSI is good, Green color means RSSI is normal, Orange color means RSSI is poor, Red color means disconnected.

flowchart
graph TD
    A["Press the WPS button on both devices for 2 seconds at the same time."] --> B["Connect agent to controller via LAN cable."]

6.1.1 Mesh Topologies
Following are the mesh topologies:
• Topology – One agent
- Start topology – 3 agents
- Daisy chain topology – 2 agents
- Daisy chain topology – 3 agents
- Tree topology – 3 agents
Topology – One Agent
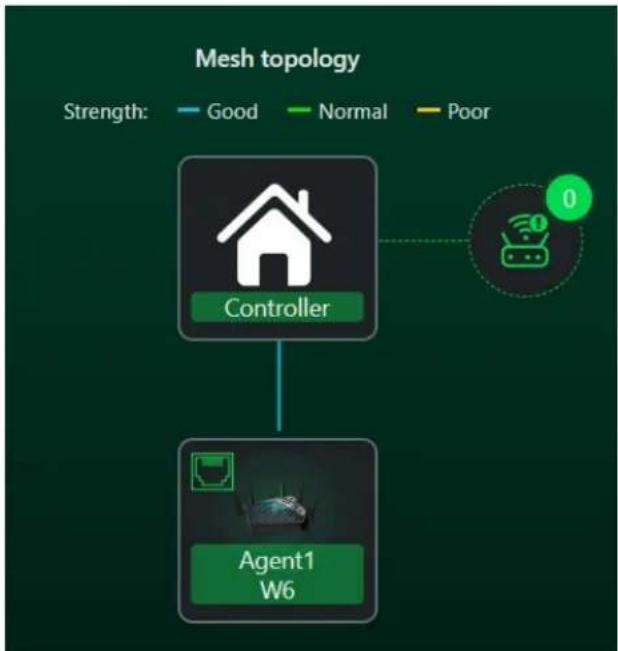
In one agent topology, a controller is connected with one agent, and the medium between a controller and the agent can be wireless or wired connectivity.
flowchart
graph TD
    A["Controller"] --> B["Agent1 W6"]
    style A fill:#000,stroke:#fff,color:#fff
    style B fill:#000,stroke:#fff,color:#fff
    note1["Strength: Good"] --> A
    note2["Normal"] --> A
    note3["Poor"] --> A
    note4["0"] -.-> A
Star topology - 3 agents
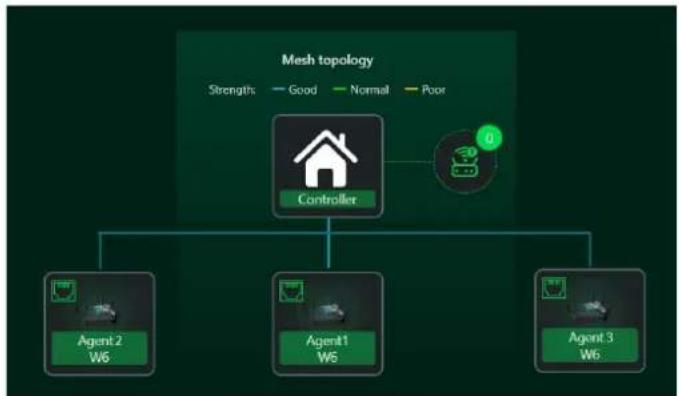
In star topology of 3 agents, the controller is simultaneously connected with three agents, and the medium between a controller and the agents can be wireless or wired connectivity.
Daisy Chain topology – 2 agents
In the daisy chain topology of 2 agents, the controller is connected with agent 1, and agent 1 is connected with the agent 2, making a chain topology.
Medium between the agents and the controller can be wireless or wired connectivity.
The blue color line indicates a good signal strength.
Daisy Chain topology – 3 agents
In a daisy chain topology of 3 agents, the controller is connected with agent 1, agent 2 is connected with agent 1, and last agent 3 is connected with agent 2, making a chain topology of 3 agents.
Medium between a controller and the agents can be wireless or wired connectivity.
The blue color line indicates a good signal strength.
flowchart
graph TD
    A["Controller"] --> B["Agent 2 W6"]
    A --> C["Agent1 W5"]
    A --> D["Agent 3 W6"]
    style A fill:#f9f9f9,stroke:#333
    style B fill:#e6f7ff,stroke:#333
    style C fill:#e6f7ff,stroke:#333
    style D fill:#e6f7ff,stroke:#333

flowchart
graph TD
    A["Controller"] --> B["Agent1 W6"]
    A --> C["Agent2 W6"]
    style A fill:#f9f,stroke:#333
    style B fill:#ccf,stroke:#333
    style C fill:#cfc,stroke:#333

flowchart
graph TD
    A["Controller"] --> B["Agent1 W6"]
    B --> C["Agent2 W6"]
    C --> D["Agent3 W6"]
    style A fill:#f9f,stroke:#333
    style B fill:#ccf,stroke:#333
    style C fill:#cfc,stroke:#333
    style D fill:#fcc,stroke:#333
Tree topology - 3 agents
In the tree topology of 3 agents, the controller is directly connected with two agents; whereas a third agent (Agent 3) is connected with agent 2, making a tree topology.
Medium between a controller and the agents can be wireless or wired connectivity.
Agent connected via WiFi
In this topology, a controller is wirelessly connected with the agent1
The blue color line indicates a good signal strength.

flowchart
graph TD
    A["Controller"] --> B["Agent 1 W6"]
    A --> C["Agent 2 W6"]
    A --> D["Agent 3 W5"]
    style A fill:#999,stroke:#333
    style B fill:#ccc,stroke:#333
    style C fill:#ccc,stroke:#333
    style D fill:#ccc,stroke:#333

flowchart
graph TD
    A["Controller"] -->|Strength: Good| B["1"]
    C["Agent1 W6"] -->|Strength: Good| B["1"]
    B --> D["Network icon with Wi-Fi symbol"]
Agent information
From this tab, you can see the agent's information including:
1) Location
2) Model number
3) IP address
4) Serial number
5) Firmware version
6) Devices connected with the agent
7) Agent backhaul connectivity.

There are some limitations in our mesh which are listed below:
I. Due to the adoption of front-haul and backhaul sharing bandwidth to connect various nodes in the Mesh network, if the Mesh agent is in a daisy-chain configuration, each layer of connected nodes needs to simultaneously handle communication with both upper-layer nodes and lower-level devices. As a result, the available bandwidth speed will be halved and evenly distributed. Based on this limitation, we recommend that users assemble the Mesh network using Ethernet cables to connect the nodes. This will avoid rate loss due to shared bandwidth (achieving lossless conditions). If users must connect the nodes wirelessly, we suggest forming a star topology network to prevent significant rate reduction caused by multi-tiered connections.
II. All client devices connect to the Mesh network through the front-haul interface of each node, while the connection between nodes relies on the backhaul bandwidth to reach the controller and then access the Internet. In other words, the speed at which clients connect to the Internet cannot exceed the backhaul bandwidth. Users can configure their preferred band for the backhaul using the GUI. Here are the maximum rates achievable when using each band as backhaul:
- 6GHz with 160MHz bandwidth: DL1201Mbps/UL1201Mbps (default using the maximum available 6GHz bandwidth).
- 5GHz with 80MHz bandwidth: DL1201Mbps/UL1201Mbps (default using 5GHz bandwidth to avoid DFS radar interference or CAC connection wait).
- 2.4GHz with 20MHz bandwidth: DL286Mbps/UL286Mbps (default using 2.4GHz bandwidth to avoid interference from neighboring 40MHz bandwidth signals)
III. Limitations of the W6 series Mesh: A maximum of one controller + three agents are allowed. Products that can act as controllers: Predator Connect X5/W6/W6m, Acer Connect Vero W6m. Products that can act as agents: Predator Connect W6/W6m, Acer Connect Vero W6m. Users will be reminded to avoid adding a fourth agent. When a user attempts to add a fourth agent, the fourth agent will be forcibly factory reset to the router state. The more agent nodes are connected; the more devices share the bandwidth. Particularly in daisy-chain topology networks, we recommend keeping the number of agents connected to three or fewer.
IV. All devices are factory-defaulted as routers. Users can change the device role (e.g., Mesh controller, Mesh agent, or bridge) through Quick Setup.
V. Once a device has been set as a Mesh controller, Mesh agent, or bridge, changing the device role requires restoring the device to its factory settings before the role change can be made. Note: When the current device is a router, it can be changed to other roles such as Mesh controller, agent, or bridge (using GUI operation mode or Quick Setup).
VI. Currently, only the controller supports Guest & smart Home WiFi, while it cannot be used in agent nodes. Agent nodes will not have any Guest & smart Home WiFi options.
VII. Mesh supports WPS Onboarding, but in cases where connection is hindered due to environmental interference, it's recommended to move the agent closer to the controller, or restore the device to its factory default settings and follow the Quick Setup process to reconfigure the agent. Alternatively, you can perform the setup steps via an Ethernet connection.
VIII. If the Mesh WiFi SSID or password is changed in an existing Mesh network, agents will apply the new configuration after the synchronization process is done. If the agent does not apply the new configuration successfully or the agent is in the offline status, it must go through the onboarding process with the controller again. This is necessary for the updated SSID or password to be applied to these agents.
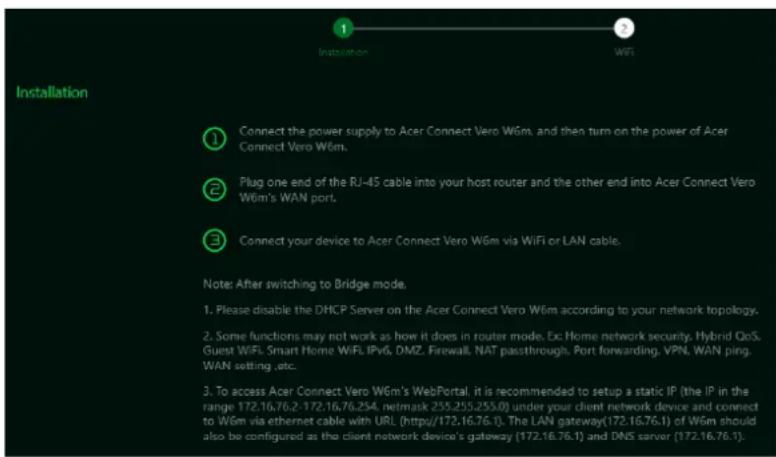
In bridge mode, plug one end of the RJ-45 cable into your host router and the other end into Predator Connect W6m's WAN port.
Connect your device to Predator Connect W6m via WiFi or LAN cable.
Please note that after switching to bridge mode, disable the DHCP server. Some functions like Home network priority, Hybrid QoS, Guest WiFi, Smart Home WiFi, IPv6, DMZ, Firewall, NAT, pass-through, port forwarding, VPN, WAN ping, WAN setting etc. may not work.
To access Acer Connect Vero W6m's web portal in a bridge mode, it is recommended using a static IP.

flowchart
graph TD
    A["Global Network"] --> B["Routers"]
    B --> C["Mobile Device"]
    C --> D["Internet"]
    style A fill:#f9f,stroke:#333
    style B fill:#ccf,stroke:#333
    style C fill:#cfc,stroke:#333
    style D fill:#fcc,stroke:#333
7. WAN
7.1 WAN Status
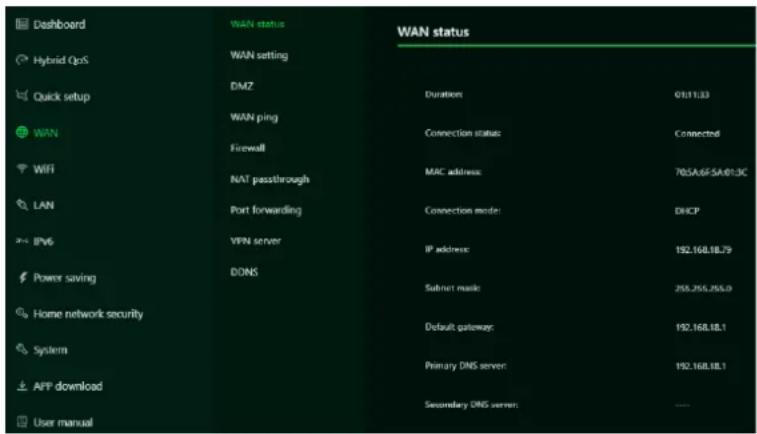
This tab provides information about WAN connectivity status and the following key information:
• Time duration (format HH:MM:SS)
- MAC address
- Connection Mode: DHCP, static IP, PPPoE, switch WAN port to LAN (switch/bridge).
- IP address
- Subnet mask
- Default gateway
• Primary & secondary DNS server
7.2 WAN Setting:
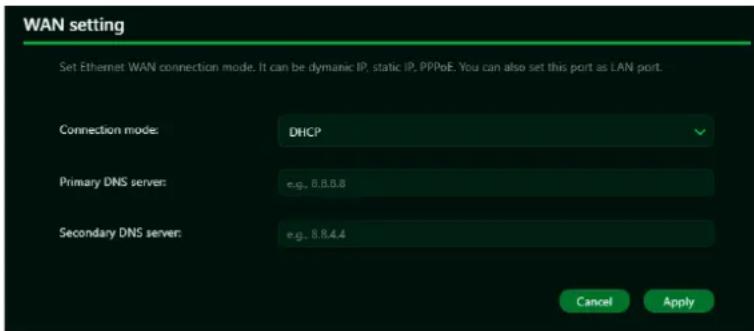
On this page, you can set up Ethernet WAN connection mode to DHCP, Static IP, PPPoE or switch WAN port to LAN, depending on your connection usage.
Click on the down arrow to reveal the drop-down menu to select your preferred WAN settings.
Note: After switching to Bridge mode,
1) Please disable the DHCP Server on the Acer Connect Vero W6m according to your network topology.
2) Some functions may not work as it does in router mode. E.g. Home network security, Hybrid QoS, Guest WiFi, Smart Home WiFi, IPv6, DMZ, Firewall, NAT pass-through, Port forwarding, VPN, WAN ping and WAN setting.
3) To access the Acer Connect Vero W6m's web portal, it is recommended to set up an IP under your client network device and connect to W6m via Ethernet cable. The LAN gateway of W6m should also be configured as the client network device's gateway and DNS server.
7.3 DMZ
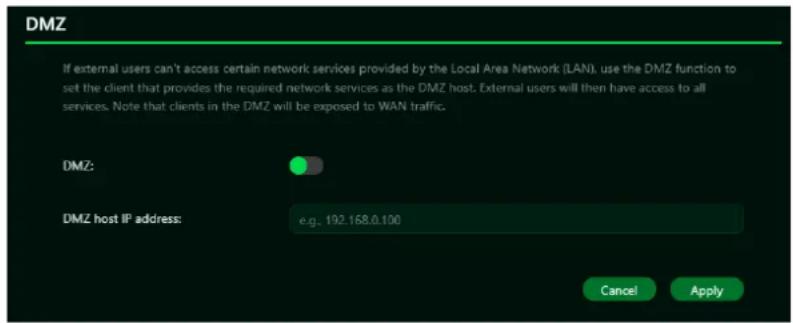
DMZ is physical or logical subnetwork that contains and exposes the firm's facing services to an untrusted, usually larger, network such as the Internet.
If external users can't access certain network services provided by the Local Area Network (LAN), use the DMZ function to set the client that provides the required network services as the DMZ host.
7.4 WAN Ping
By enabling this feature, WAN port of Acer Connect Vero W6m will respond to ping requests that are sent to the WAN IP address from the Internet.
For better security, keep the feature turned OFF, and the device will not respond to a WAN ping.

7.5 Firewall
Setup firewall rule to accept or drop network requests from Internet.
To set up a firewall, click on (+) icon and enter the name, source and destination port and IP address, protocol, target and status info.

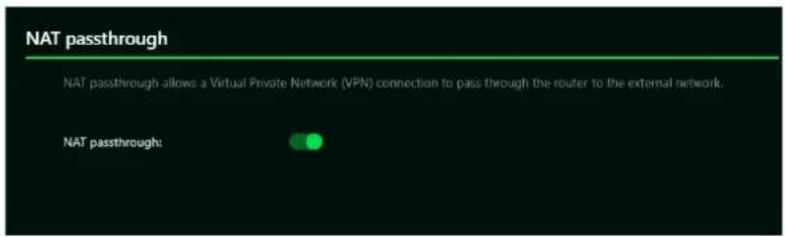
7.6 NAT pass-through
NAT pass-through allows a Virtual Private Network (VPN) connection to pass through the router to the external network.
7.7 Port Forwarding
This feature allows external users to connect to Local Area Network (LAN) services using Hypertext Transfer Protocol (HTTP), File transfer protocols (FTP), and other protocols. To add any application, click on (+) icon and select a required service.
You can select any service profile from common services tab and it will then automatically show its name, LAN & WAN port number and its protocol. Enter the LAN IP address and select the status ON/OFF and click on the "Apply" button to activate the service.
We have added a new game console profile including:
- Xbox network
- Play Station 5
- Play Station 4
- Nintendo SWITCH
• Nvidia GeForce Now - Steam
7.8 VPN Server
Setup VPN server on Predator Connect W6m for remote VPN connection over the Internet. This router offers two VPN services:
7.1.1. OpenVPN
7.1.2. IPsec VPN
The User needs to generate a certificate before enabling the VPN server. Once you create a VPN server, the VPN connection


link is established, and the status with be shown. It will display the connection type, remote & local IP address and duration.
Open VPN is a SSL VPN and uses a chosen UDP or TCP port, allowing for flexible configuration choices.
User access comes with two different options; Home network, Internet and home network.
The user can also export OpenVPN configuration file (client.ovpn). Enter the following information to configure Open VPN services.
1) WAN IP address
2) Service port
3) VPN subnet
4) VPN netmask
IPsec VPN uses predefined communication channels, UDP 500 and UDP 4500, to establish the encrypted tunnel and ESP for the transmission of encrypted data.
Enter the following information to configure IPsec VPN services.
1) WAN IP address
2) Client IP address
3) Primary DNS server
4) Secondary DNS server
5) Pre-shared key
7.9 DDNS
A DDNS service provides a fixed domain name for your router's dynamic IP address. You will need to register with a DDNS service among the following ones.
- Dyn.com
- No IP
- Google domain
- Cloudflare.com


Once you select the DDNS service, enter the hostname, username and password, and click on the 'Apply' button to activate DDNS. DDNS and WAN status will be shown once the DDNS information is entered.
8. WiFi
8.1 WiFi Status
Displays key information such as:
- WiFi SSID
- SSID Broadcast
- Security
- Channel
- Connected devices
- Gateway address
• Mac address of 2.4GHz, 5GHz & 6GHz bands
| Dashboard | WiFi status | WiFi status | |
| Hybrid QoS | Mesh WiFi | 2.4GHz | |
| Quick setup | WiFi MAC filter | ||
| WAN | Smart home WiFi | WiFi SSID: | Wien-Mosh |
| SSID broadcast: | Enabled | ||
| WiFi LAN | Guest WiFi ACS | Security: | WPA2 |
| IPV6 | Channel: | Auto(Channel 3) | |
| Power saving | Connected devices: | 1 | |
| Home network security | Gateway address: | 192.168.76.1 | |
| System | MAC address: | 70.5a5d5a9f3a | |
| APP download | 5GHz | ||
| User manual | WiFi SSID: | Wien-Mush | |
| SSID broadcast: | Enabled | ||
| Security: | WPA2 | ||
8.2 Mesh WiFi (In Mesh mode)
This tab provides information about Mesh WiFi SSID, security settings, encryption and WiFi password.
Band steering is ON by default, it automatically connects your devices to the best available WiFi frequency in your surroundings.

8.3 Basic Settings (Router mode)
This tab shows only when the W6m is configured in router mode. It allows the user to set the basic settings of 2.4/5/6GHz WiFi parameters such as WiFi SSID, security, encryption, PMF (Protected Management Frames) and password.
The WiFi band steering must be ON

in the mesh mode; whereas, in the router mode, user can switch ON/OFF for band steering in the host WiFi.
8.4 Advanced Settings
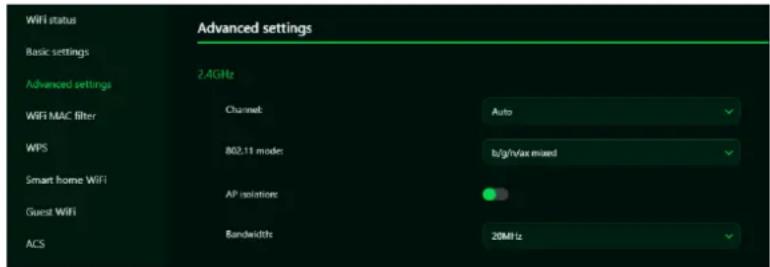
This tab will help you to set advanced WiFi parameters for 2.4GHz, 5GHz & 6GHz bands such as channel, 802.11 mode and bandwidth selection.
2.4GHz channel ranges from 1 to 11, and it is set to "Auto" by default. Bandwidth can be selected to 20MHz, 40MHz or auto in 2.4GHz band.
In 5GHz band, available channels are 36, 40, 44, 48, 149, 153, 157, 161 and 165. It is set to "Auto" by default. AP isolation is a feature that enables you to create a separate virtual network preventing client communicating with each other and preventing unwanted hacking. This feature is disabled by default.
DFS (Dynamic Frequency Selection) is a function of using 5GHz Wi-Fi frequencies that are generally reserved for radar, such as satellite communication, weather radar, etc.

Advantages of opening DFS
- If DFS is turned ON, the router can use more channels which can make it easier to avoid mutual interference with other APs.
- It can also use continuous channels at 5GHz to achieve 160MHz bandwidth.
Disadvantages of opening DFS
- It takes extra time to scan for radar signals every time it is restarted, which may take 1 minute to 10 minutes. This will cause delay in 5GHz SSID appearing.
- If you encounter radar signals during the use of DFS channels, the router must avoid this channel, switch to other available channels, and this will take additional scan time.
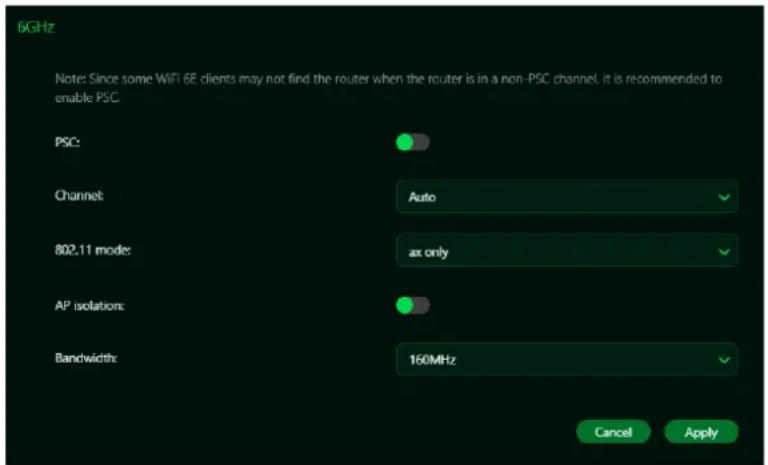
In 6GHz band, you can view the number of available channels by clicking on the drop down. It is set to "Auto" by default. Available bandwidth options in 6GHz are 20/40/80/160MHz. It is set to 160MHz by default.
Note: Since some WiFi 6E clients may not find the router when the router is in a non-PSC channel, it is recommended to enable PSC.
8.5 WiFi MAC filter
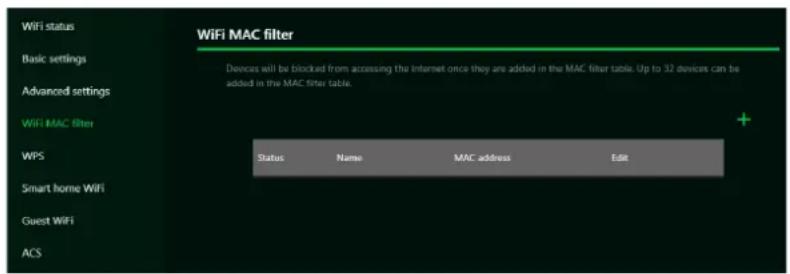
Devices that are added to the WiFi MAC filter will be blocked from accessing the Internet.
Click on the (+) icon to add the device in the filter table by entering its name & MAC address. Up to 32 devices can be added to the MAC filter.
8.6 WPS
WPS (WiFi Protected Setup) provides an easy way to connect your device to the network by pushing the WPS button (next to the USB port) or entering a PIN code.
On this page, you can configure the WPS settings of 2.4GHz, 5GHz & 6GHz bands. There are two methods to configure WPS i.e. using a PIN (client's PIN or Router's PIN) or you can choose a second method, in which you need to click on "Start WPS", then enable WPS on your wireless device within two minutes. WPS will be disabled, if the WiFi is set to WPA3, WPA or TKIP mode, or if the SSID broadcast is turned off.

8.7 Smart Home WiFi
This tab provides Internet connection for smart home WiFi, but blocks access to devices on your local network.
With the band steering feature enabled, it automatically connects your devices to the best available WiFi frequency in your surroundings.
Smart home WiFi password is set by default, so it is suggested to change the passwords for security reasons.

8.8 Guest WiFi
This tab provides information about the Internet connection for guests and their devices accessing your network.
Guest WiFi and Smart home WiFi only works in controller mode. It means that the client can't connect to guest/smart home WiFi via mesh agents. Guest WiFi password is set by the default for all bands, so it is suggested changing the passwords for security reasons.

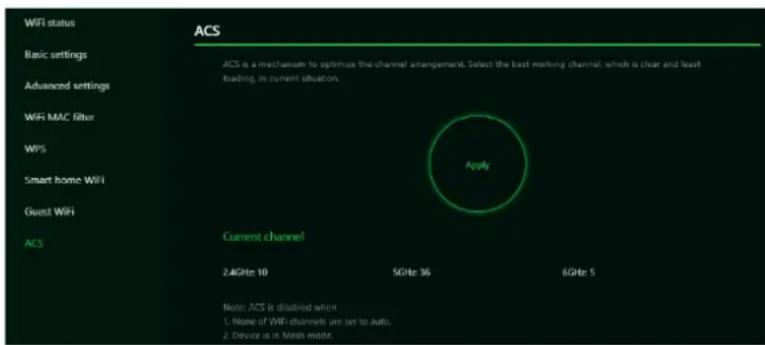
8.9 ACS (Automatic Channel Selection)
ACS is a mechanism to optimize the channel assignment. It selects the best working channel dynamically. One that is clear and has the least traffic.
Note 1: There will be a small delay, rescanning, and then cycling OFF and ON if the client is associated with the ACS enablement band. Please check your device's wireless connection and select the best WiFi W6 router SSID after the ACS process is completed.
Note 2: The ACS is not applicable if all bands (2.4GHz, 5GHz & 6GHz) are configured as fixed channels. ACS also works in a Mesh mode and when the device is in mesh mode, this will trigger channel planning.
9. LAN
LAN status
On this page, you can view each LAN port status including its associated IP address, MAC address and DHCP server. The Acer Connect Vero W6m has one Game port and three LAN ports.
LAN Setting
This tab allows you to set up LAN IP gateway address with an option to enable or disable the DHCP server feature.
You can enter/edit the gateway address and subnet mask. DHCP server provides and assigns IP addresses, default gateways, and other network parameters to the client devices. DHCP server can be enabled or disabled as per the network requirement.
The following subnets are reserved for default services. Please do not use it as a gateway address. 1. 192.168.7.x (IPsec VPN) 2. 192.168.8.x (Open VPN) 3. 192.168.10.x (Guest WiFi) 4. 192.168.20.x (Smart Home WiFi)
| LAN status | |
| LAN setting | WAN/LAN port |
| Connect status: WAN | |
| LAN1 | |
| Connect status: Disconnected | |
| IP address: -- | |
| MAC address: -- | |
| DHCP server: -- | |

10. IPv6
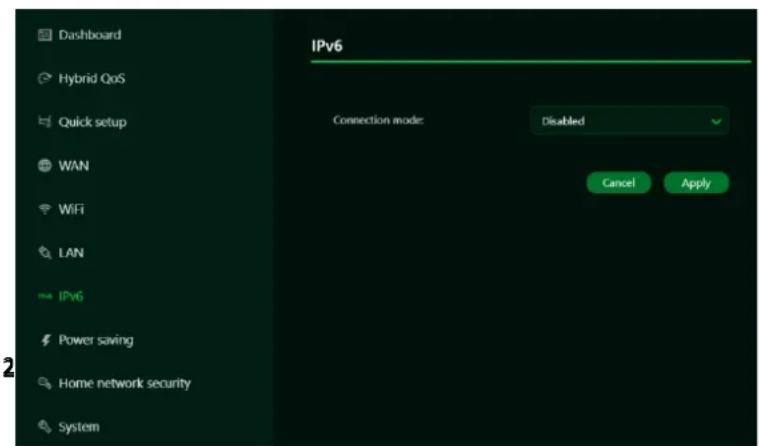
You can set IPv6 settings from this tab. The Acer Connect Vero W6m supports IPv6 mode below: DHCPv6, static IPv6, PPPoE, 464xlat, 6rd, DS-Lite. Connection mode will be disabled by default. Please consult local ISP before enabling and configuring the option.
11. POWER SAVING
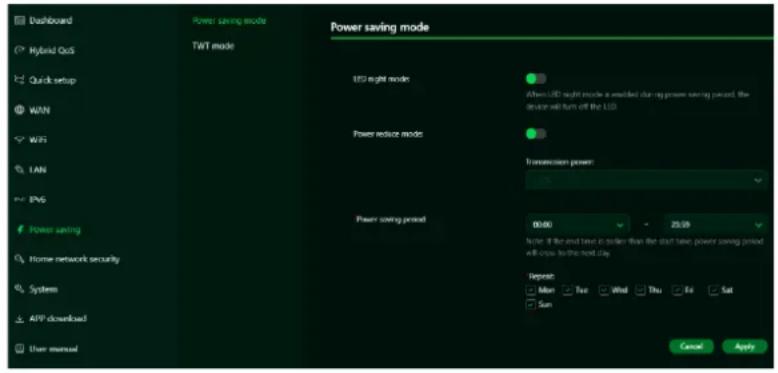
In power saving mode, you have the option to enable/disable LED night mode and Power reduce mode.
When LED night mode is enabled during power saving period, the device will turn off the LED.
By enabling power reduce mode, you can set the transmission power and power saving period as per your requirement.
TWT (Target Wake Time) mode is also available in power saving. You can enable or disable TWT mode as per the requirement. End devices will be disconnected once you enable/disable TWT.
TWT ensures that end devices spend more time in standby while sending and receiving data more economically.

12. Home Network Security
The home network security tab includes network security settings and web and app controller within the parental control feature. These two features must accept the Trend Micro license agreement before enablement.
12.1 Network Security Setting
This tab contains the network security-related information, powered by Trend Micro, where you can turn on/off the security engine and enable protection against malicious sites, network attacks and harmful connections coming from IoT devices.

Malicious site blocking
prevents unwanted sites to open and hence protecting your computer from being infected with Trojans. There is a feature called “Trend Micro’s Web Reputation Service (WRS) that identifies malicious URLs and allow you to take action against infected URLs.
Malicious site blocking
Malicious website blocking can prevent you from visiting malicious websites thereby protecting your computers from being infected with Trojans or being exploited unknowingly. Trend Micor's Web Reputation Services (WRS) can helps you identify malicious URLs.
Enable protection:


flowchart
graph LR
    A["Global"] --> B["Shield"]
    B --> C["Router"]
    C --> D["Laptop"]
    C --> E["Light Bulb"]
    style A fill:#99ccff,stroke:#333
    style B fill:#ffcccc,stroke:#333
    style C fill:#ffffff,stroke:#333
    style D fill:#ffffff,stroke:#333
    style E fill:#ffffff,stroke:#333
By enabling Network attack blocking feature, the router detects the infected devices and block its network behavior to prevent infection in other devices.
Network attack blocking
Network attack blocking can help prevent the exploitation of a known vulnerability even when the vulnerable systems/devices have not yet been installed with security patches. It can also detect the infected device and block it's network behavior to prevent infection to other devices.
Enable protection:

0
Protection
Since 25-08-2023 16:23:34


flowchart
graph TD
    A["Router"] --> B["Shield"]
    A --> C["Laptop"]
    A --> D["Phone"]
    A --> E["Lightbulb"]
Enabling IoT security
protection feature detects and blocks harmful connections from compromised IoT devices by using Trend Micro's smart protection network.
It's a continuously updated IoT device reputation database that prevents the network from false connections.
IoT security protection
IoT security protection can detect and block harmful connections from compromised IoT devices by using Trend Micro's Smart Protection Network, a continuously updated IoT device reputation database.
Enable protection:


flowchart
graph TD
    A["Router"] --> B["Shield"]
    A --> C["Lightbulb Icon"]
    A --> D["Computer Icon"]
    style A fill:#f9f,stroke:#333
    style B fill:#ccf,stroke:#333
    style C fill:#cfc,stroke:#333
    style D fill:#fcc,stroke:#333
① Protection
Since 25-08-2023 16:23:34
12.2 Parental Control
This feature allows you to control and block unwanted sites on specific devices. You can enable/disable Web & App controller.
Once you click on (+) icon, the following window will appear and here you can enter the device list, device name, its MAC address, status and select the following categories for blocking websites.

- Adult
Block websites and Apps which include Adult, Mature, Illegal, Prohibited, Alcohol, Tobacco, Gambling, Violence, Hate, Racism, Weapons, Illegal Drugs related content.
- Instant Messaging and Communication
Block websites and Apps related to Social Networking and Instant Messaging like Facebook, Instagram, Twitter etc.
• P2P and File Transfer
Block websites and Apps which include P2P or File transfer.
- Streaming
Block websites and Apps which include Audio and Video streaming.

13. SYSTEM
13.1 Operation Mode
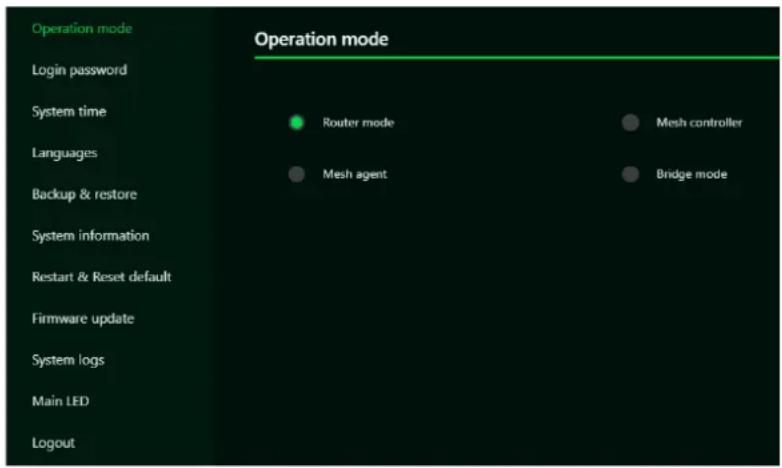
In this tab, you can view the different operation modes of the router.
Currently, the Predator Connect W6m is operating as Router mode.
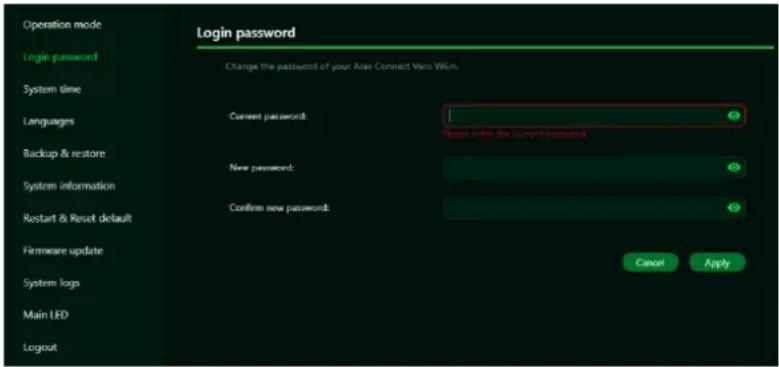
13.2 Login Password
You can change the login password of your Predator Connect W6m from this page.
To make a new password, you need to enter the current password first. Please use a strong password to keep it secure.
13.3 System Time
This tab allows you to synchronize the device time with the system time by enabling "Automatically set time zone".
By enabling “daylight savings time”, the device will automatically adjust the time according to the time zone.

13.4 languages
You can select the language of your Acer Connect Vero W6m from this tab.

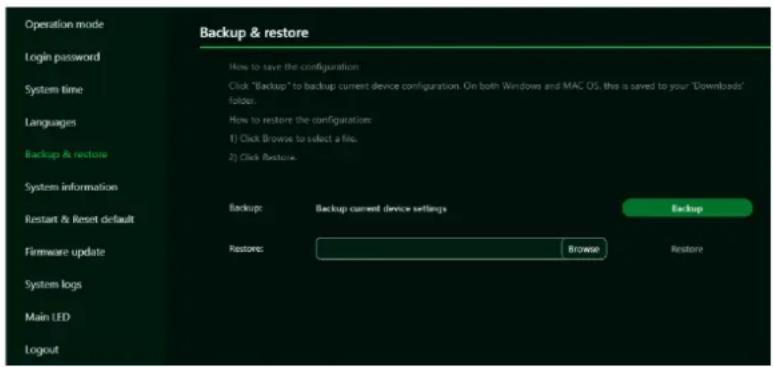
13.5 Backup and Restore
In this tab, you can check how to save the configuration: Click on "Backup" to backup current device configuration. On both Windows and MAC OS, this is saved to your 'Downloads' folder.
How to restore the configuration:
1) Click Browse to select a file
2) Click Restore
13.6 System Information
It shows key device information of Acer Connect Vero W6m, such as:
- Device name
- Serial number
- Firmware version
| Operation mode | System information | |
| Login password | ||
| System time | Device name: | Acer Connect Vero W6m |
| Languages | ||
| Backup & restore | Serial number: | FFG2FTA002319000362PE1 |
| System information | Firmware version: | W6m_0.09.327512D |
| Restart & Reset default | ||
| Firmware update | ||
| System logs | ||
| Main LED | ||
| Logout | ||
13.7 Restart and Reset Default From this tab, you can click on "Restart device" to reboot the router and click on "Factory data reset" to restore the factory default settings.
Please check if you have bind your device with Predator Connect Mobile App.
After the factory reset, please don't forget to unbind the device from mobile App.

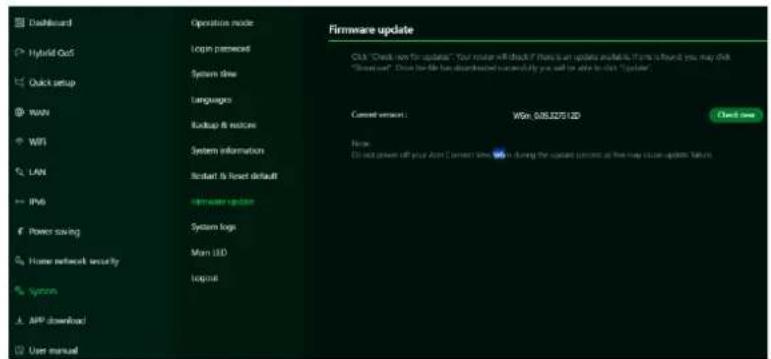
13.8 Firmware Update
In this tab, you can check the existing firmware version and also, click on "check new", to see if there is an update available.
13.9 System Log
The System logs consist of general logs and WiFi logs. It will display here all the recent 100 activities you have done with the router.
You can save the system logs by clicking the "Save log" button at the bottom of the page.

Click on WiFi logs to see all the WiFi-related logs.
You can save the WiFi logs by clicking the "Save log" button at the bottom of the page.
![[2023-08-28 01:01:00]----[YX5MS][LOG][WiFi] Start to Collect Logs---- Dump rail0: ==================== rail0 IEEE 802.11ax ESSID:"PredatorW6m-3PR4-2.4GHz" Mode:Master Channel:10 Access Point: 70:5A:6F:5A:01:3A Bit Rate:286 Mb/s Link Quality:10 Signal levels:0 Noise levels:172 Rx invalid nwcid:0 invalid crypt:0 invalid misc:0 rail0 stat CurrentTemperature = 51 Tx success = 33614 Tx fail count = 20933, PER=38.3% Current BW Tx count = 54547 Other BW Tx count = 0 Rx success = 31267 Rx with CRC = 4929, PER=13.6% Rx drop due to out of resource = 0 Rsa: -82 -87 -109 -109 CN Info: = 0 Last TX Rate = MCS18, BW20, 0.8us GL, HT_MM, LDPC Last RX Rate = MCS4, BW20, SGI, HT_MM, BCC hotspot enable = 0 daemon ready = 0 hotspot DGA/Disable = 0 hotspot L2Filter = 0 hotspot ICMPvldeny = 0 Hotspot C/Dia/Ba/Bc = 0 Save log](/content/2026/05/852774/images/0d11c99b4fa502ce0b796f68ce72e424f84aef334ee077275996f3e958676333.jpg)
13.10 Main LED
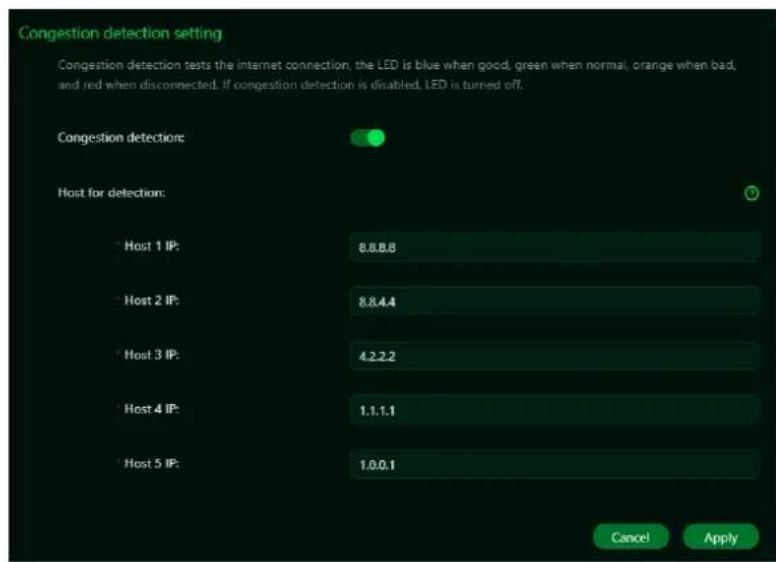
This tab displays information about LED colors and its indication. These LED indicators will help you to know and understand router behavior.
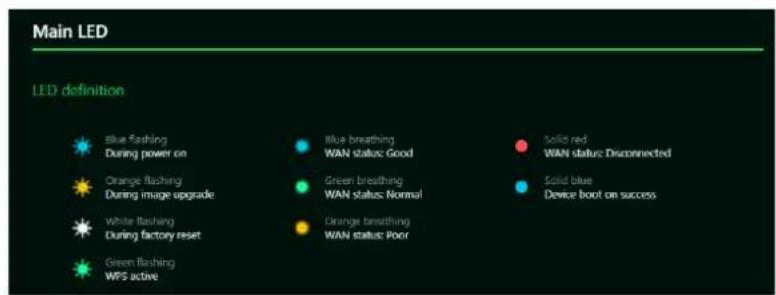
Congestion Detection tests helps you to identify the Internet connection status; whether it is good, normal, or poor. Different LED lights will indicate differently statuses.
LED is OFF if congestion detection is disabled.
Enter the host IP addresses for detection.
14. Troubleshooting
14.1 Quick Tips
This section describes common issues that you can encounter.
Sequence to restart the device and network:
- Turn off and unplug the modem power plug.
- Turn off the W6m router.
- Plug in the modem power plug and then turn it on. Wait for two minutes till the modem LED is steady as before.
- Turn on the W6m router and wait for the device's upper deck main LED to steady breathing.
14. 2 Frequently Asked Questions (FAQs)
14.2.1 What can I do if I forget my wireless password?
- Connect to the W6m router via Ethernet cable LAN.
- Visit device portal http://acer-connect.com and login admin.
- Go to WiFi -> Basic settings/Retrieve or reset the WiFi passwords.
14.2.2 What can I do if I forget the router's web portal admin password?
Reset the device by pressing and holding the reset key until the LED starts blinking white. After the device restores to factory default, please login web admin portal with admin PWD, label printed on the bottom of the device.
Note 1: The device web admin will be locked after 5 wrong password attempts. The user is required to reboot the device to disable the web admin.
Note 2: Remember to set up the device's internet connection after reset. Remember to also change the admin password.
Note 3: If you ever bind the device via the Predator Connect mobile app; remember to unbind it after the factory data reset.
14.2.3 What can I do if I can't log into the router's web admin portal?
Please follow the steps below to check on your client's device.
- Check whether the client-allocated IP and DNS server IPs both are with the same subnet and gateway.
- Clean the browser cookies or use private/Incognito mode to access the router admin.
14.2.4 What can I do if I can't surf the internet even though the configuration is finished?
Please follow the steps below to check on your W6m router:
- Login to the web admin portal dashboard to check Internet status.
- Continuingly, if the Internet status is up and connected. Go to the WAN setting, manually configure the DNS server using the below IP, and apply:
Primary DNS server: 8.8.8.8
Secondary DNS server: 8.8.4.4
- If the issue is still there, please restart the modem and router accordingly.
15. Appendix Factory Default Setting
| Router web admin | |
| URL | http://acer-connect.com or http://192.168.76.1 |
| Login Password (case-sensitive) | AcerXXXX(XXXX is randomized variables. Please check the device's bottom label) |
| Local Network (LAN) | |
| Gateway address | 192.168.76.1 |
| Subnet mask | 255.255.255.0 |
| DHCP server | 192.168.76.1 |
| DHCP range | 192.168.76.100 to 192.168.76.254 |
| Time zone | Depends on the country or region you bought the router. |
| DHCP starting IP address | 192.168.76.100 |
| DHCP ending IP address | 192.168.76.254 |
| Time adjusted for daylight save time | Enabled. |
| Wireless LAN (WLAN) | |
| WiFi SSID (case-sensitive) | 2.4GHz: PredatorW6m-YYYY-2.4GHz5GHz: PredatorW6m-YYYY-5GHz6GHz: PredatorW6m-YYYY-6GHz(YYYY is randomized variables. Please check the device's bottom label) |
| Security | 2.4GHz : WPA2/WPA35GHz : WPA2/WPA36GHz : WPA2/WPA3 |
| SSID Broadcast | Enabled. |
| Country / Region | United States in the US; otherwise, varies by region. |
| RF channel | 2.4 GHz : Auto5 GHz : Auto6 GHz : Auto |
| Default operation mode(with AX enabled) | 2.4 GHz: Up to 600 Mbps5 GHz: Up to 4804 Mbps6 GHz: Up to 2402 Mbps |
| Guest WiFi | Disabled. |
| Smart Home WiFi | Disabled. |
| Home Network Security | Disabled. |
16. Router Basic Specification
| Processor | System | MT7986 + MT7916 |
| CPU | Quad A53 2.0GHz | |
| Memory | LPDDR | 1GB |
| Storage | 4GB | |
| Wireless LAN | IEEE standard | 802.11 a/b/g/n/ac |
| MU-MIMO | 2+4+2 streams2.4GHz: 2x2 MIMO streams, 1024/256 QAM,20/40MHz, 574MBps5GHz: 4x4 MIMO streams, 1024/256 QAM, 20/40/80/160MHz, 4804Mbps6GHz: 2x2 MIMO streams, 1024/256 QAM, 20/40/80/160MHz, 2402Mbps | |
| Band | Tri-band, 2.4/5/6GHz | |
| Throughput | AXE7800 | |
| Ethernet | WAN | 1 x 1Gbps |
| LAN | 3 x 1Gbps | |
| Button | Power | Power-ON/OFF |
| WPS | Yes | |
| Form factor | Dimension | 200.7 x 200.7 x 55.9 mm |
| Weight | 810g | |
| DC Power Jack | Input Voltage | AC 100-240V, 50-60Hz, 1.6A |
| Power Adapter | 12V/3A 36W |
- Acer Connect Vero W6m Wi-Fi Router
- Contents
- Overview
- Installation and Setup
- Power on the device.
- Connect to W6m Vero WiFi.
- Important information is at the bottom of the device.
- The device can be either setup via Predator Connect mobile App or the browser web admin.
- Setup the router via browser:
- Initial Configuration
- Dashboard
- Network Speed Test:
- Hybrid QoS
- Device priority:
- Quick Setup
- How to create a Mesh network
- Mesh Topologies
- Topology – One Agent
- Star topology - 3 agents
- Daisy Chain topology – 2 agents
- Daisy Chain topology – 3 agents
- Tree topology - 3 agents
- Agent connected via WiFi
- Agent information
- WAN
- WAN Status
- WAN Setting:
- DMZ
- WAN Ping
- Firewall
- NAT pass-through
- Port Forwarding
- VPN Server
- DDNS
- WiFi
- WiFi Status
- Mesh WiFi (In Mesh mode)
- Basic Settings (Router mode)
- Advanced Settings
- Advantages of opening DFS
- Disadvantages of opening DFS
- WiFi MAC filter
- WPS
- Smart Home WiFi
- Guest WiFi
- ACS (Automatic Channel Selection)
- LAN
- LAN status
- LAN Setting
- IPv6
- POWER SAVING
- Home Network Security
- Network Security Setting
- Malicious site blocking
- Enabling IoT security
- Parental Control
- - Adult
- - Instant Messaging and Communication
- • P2P and File Transfer
- - Streaming
- SYSTEM
- Operation Mode
- Login Password
- System Time
- languages
- Backup and Restore
- System Information
- Firmware Update
- System Log
- Main LED
- Troubleshooting
- Quick Tips
- 2 Frequently Asked Questions (FAQs)
- What can I do if I forget my wireless password?
- What can I do if I forget the router's web portal admin password?
- What can I do if I can't log into the router's web admin portal?
- What can I do if I can't surf the internet even though the configuration is finished?
- Appendix Factory Default Setting
- Router Basic Specification
Brand : ACER
Model : Connect Vero W6m
Category : Wi-Fi Antenna