
AFD728 - Tumble dryer Airflo - Free user manual and instructions
Find the device manual for free AFD728 Airflo in PDF.


| Product Type | Front-loading tumble dryer |
| Brand | Airflo |
| Model | AFD728 |
| Dimensions (H x W x D) | 840 x 595 x 525 mm |
| Weight | 31 kg |
| Rated Power Input | 1700 W |
| Rated Voltage | 220–240 V~ |
| Rated Frequency | 50–60 Hz |
| Rated Capacity (Dry Clothes) | 7.0 kg |
| Drying Programs | Extra Dry, Standard Dry, Mix Dry, Airing, Iron Dry, Quilt, Towels, Shake The Quilt, Sportswear, Jeans, Fiber, Timed programs (30 min, 1h, 1.5h, 2h, 2.5h) |
| Key Functions | Crease Guard, Preset Timer (1–12 h), Temperature Display, Control Panel Lock, Auto Power-Off, Buzzer |
| Lint Filter | Located at door opening; clean after every use |
| Installation Requirements | Level surface, min. 10 cm from wall, well-ventilated area, dedicated power socket with grounding |
| Safety Features | Overheat thermostat reset button, child safety (supervision required for children under 3), auto power-off, cool-down cycle |
| Maintenance | Clean lint filter after each use; wipe cabinet and inner drum with damp cloth; do not use abrasive cleaners, gasoline, or alcohol |
| Door Opening Angle | 180 degrees |
| Control Panel | Program knob, Power, Start/Pause, Crease Guard, Heat, Preset, Temperature Display, Filter indicator |
Frequently Asked Questions - AFD728 Airflo
User questions about AFD728 Airflo
0 question about this device. Answer the ones you know or ask your own.
Ask a new question about this device
Download the instructions for your Tumble dryer in PDF format for free! Find your manual AFD728 - Airflo and take your electronic device back in hand. On this page are published all the documents necessary for the use of your device. AFD728 by Airflo.
USER MANUAL AFD728 Airflo
Airflo INSTRUCTION MANUAL

natural_image
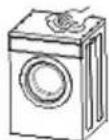
Line drawing of a front-loading washing machine with control panel and door (no text or symbols)Auto Tumble Dryer Model no. AFD728


Read this manual carefully and keep for future reference
Important Safety Reminders

Safety Information
1) This Tumble Dryer is a front loading machine.
2) This Dryer has a simple and convenient operation with the help of a PCB board.
3) Its big-sized window enables a clear view of the drying operation.
4) The Tumble Dryer's door opens at a 180 degree angle, making it convenient to transfer clothes.
5) Anti-dust, anti-humidity, anti-shake, long life and low noise design.
6) The Tumble Dryer is not to be used with industrial chemicals.
7) The Lint Filter should be cleaned frequently.
8) Lint must not be allowed to accumulate around the Tumble Dryer.
9) There should be adequate ventilation where you place the Tumble Dryer to avoid the back flow of air/gas in the room, to prevent any accidents.
10) Do not dry unwashed items.
11) Items that have been soiled with substances such as cooking oil, acetone, alcohol, petrol, kerosene, spot removers, turpentine, and wax or wax removers should be washed in hot water with an extra amount of detergent before before being dried in the Tumble Dryer.
12) Items such as foam rubber (latex), shower caps, waterproof textiles, rubber backed articles and clothes or pillows fitted with foam and rubber pads should not be dried in the Tumble Dryer.

Warning: Risk of fire / Flammable materials
Safety Information

13) Fabric softeners, or similar products, should be used as specified by the fabric softener's instructions.
14) The final part of the Tumble Dryer's cycle (the cool down cycle) occurs without heat to ensure that the items are left at a temperature that will not damage clothes.
15) Warning: To prevent burns or accidents, never stop the Dryer before the end of the drying cycle unless all items are quickly removed and spread out for the heat to dissipate.
16) Discharged exhaust air from the Tumble Dryer should not be anywhere near any other appliance, gas or other fuel.
17) Place the Dryer where its door can easily and fully open.
18) Oil-affected items can ignite spontaneously, especially when exposed to heat sources such as in a Tumble Dryer. Always have this in mind when placing items in the Dryer and make sure no oil/fuel gets in the Dryer to prevent any fire hazard.
Tip: Any item with oil and its other by-products should first be washed in hot water with extra detergent.
19) The appliance should not be overturned during normal use or maintenance.
20) Remove all objects from pockets such as lighters and matches.
Safety Information

21) This appliance is not intended to be used by persons (including children) with reduced physical, sensory or mental capabilities or lack of experience and knowledge unless they have been given supervision or instruction concerning use of the appliance in a safe way and understand the hazards involved. Children should not play with the appliance. Cleaning and user maintenance should not be made by children without supervision.
Children of less than 3 years should be kept away unless supervised.
22) Never obstruct the Dryer's ventilation openings.
23) If the power cable is damaged, it must be replaced by the manufacturer, its service agent or similarly qualified persons in order to avoid any hazard.
24) This appliance is for indoor use only.
Parts \* Installation


- Topboard
- Control panel
- Door
-
Cabinet
-
Filter
- Power lead
- Door lock
-
Tumbling drum
-
Reset button
- Program knob
- Display screen
Installation before use
Step1: Power source and grounding
The dryer employs alternative current with the rated voltage and frequency. A special power socket for the dryer should be set aside for safety and convenience. The socket's method of connection is as the figure below:


Notices:
The socket and grounding wire must be installed by an electrician to prevent incorrect installation and to guarantee the safety and correct use of the appliance. The power wire of the dryer employs a Y connection. If the supply cord is damaged, it must be replaced by the manufacturer, its service agent or similarly qualified persons in order to avoid any hazard. There should be no connection between the grounding wire and the neutral wire, otherwise the cabinet will be charged which may likely cause electric shock.
Installation

Step2: Precautions
Do not store or install the dryer where it will be exposed to water or the weather. If unavoidable, please dry the dryer before each use. | Position the Dryer in a well ventilated area for better air circulation and to prevent any hazards. |
It is advisable to wring or squeeze out excess water from clothes before placing them inside the Dryer. | Do not spray combustible aerosols near the Dryer during use. If accidental spray occurs, do not touch the plug or the Start/Pause button.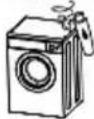 |
Do not dry any clothes that are contaminated with combustible (gas, methylated spirits) materials | Do not operate the Dryer if damaged, malfunctioning, partially disassembled or has missing or broken parts.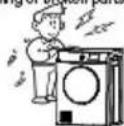 |
Note that the Dryer will be warm to touch, especially its back side. Keep children away. | Make sure that your hands and feet are not wet when handling or using the machine. |
Installation
◆ Do not place any heavy or hot items on top of the Dryer to avoid deforming or ruining its body | ◆ Avoid placing raincoats or items containing rubber or elastic materials. |
◆ To avoid scalding, do not open the dryer door until the program has completed. | |
| Items with the following markings should not be dried in this Dryer: | |
     Nlused for dry isolate Hang for dry Drip dry Flat dry Dry automatically Nlused for dry isolate Hang for dry Drip dry Flat dry Dry automatically | |
Items with the following markings should not be dried in this Dryer:
Notused for ayer in the U.
Hang for dry
Drip dry
Flat dry
Dry automatically
Installation

Installation
Step 1:
Your Tumble Dryer should be placed in a well ventilated area with no less than 10 cm distance from the wall. If placed in a room such as a bathroom, it is suggested that there are no obstacles of 1.5m in front and is kept ventilated.

Step 2: The horizontal adjustment
Make sure that your Tumble Dryer is level. Use a spirit level.

Notice:
If the Dryer is not level, the Dryer will not operate correctly and will likely end up damaged.
Notice when installing:
- Do not install the Dryer outdoors or where it can easily be damaged by water.
- Do not place the Dryer (especially the back of the Dryer) near any curtains or other obstacles.
- Do not place the dryer near gas or flammable materials.
Operation

Operation

Operation
1. Prepare clothes for Drying
- Wash clothes and wring out excess water before putting it in the Dryer
- Sort out clothes from heavy to light and place in Dryer in different loads. (Heavier clothes take longer to dry and light-weight, shorter.)
- Make sure buttons and the like are safe in high temperature, otherwise it may damage the Dryer's inner tube. Make sure the clothes are protected from damage as well.
- It is advisable to turn clothes inside out.
- Check clothes after washing. If there is dirt on clothes, the drying process cannot be relied on to remove said dirt.
- Ensure that the power plug is properly connected and the supply cord is in good condition.
2. Check filter
· Make sure the filter is well cleaned and in the right position.
- Filter must be cleaned regularly.
3. Place clothes in the Dryer
- For faster results, it is better to fill the Dryer only by a half or two-thirds capacity. Note that clothes need space to circulate evenly.
- When drying big clothes, it is better to include several small items to help balance the load.
- When drying delicate or small clothes (less than 1.5 kg), it is better to add several towels with fibers that do not fray. This will help dry the clothes more evenly.
- To avoid creases on clothes (or static electricity), do not over dry.
The reference weight of dry clothing
| Mixed-fabric clothes (about 800g) | Jacket (about 800g cotton) | Jeans (about 800g) | Towel quilt (about 900g cotton) | ||||
 | Single bedsheet (about 600g cotton) |  | Work clothes (about 1120g) |  | Sleepwear (about 200g) | ||
 | Short sleeve shirt (about 180g cotton) |  | Short pants (about 70g cotton) |  | Socks (about 50g mixed-weave) |
4. Close the Dryer door and review control panel
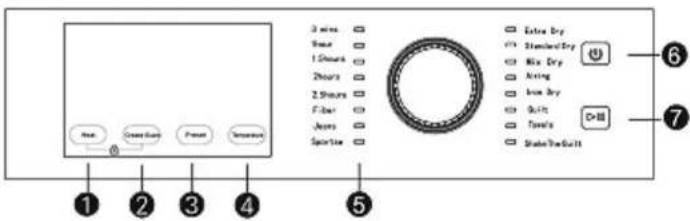
-
Heat (Full、Half、Airing)
-
Crease guard
3.Preset
-
Temperature
-
PROGRAM
6.Power
- Start/Pause
Operation

1) Switch on by pressing the Power button.
2) If the Filter button flashes, it means to clean the Lint Filter.
After you clean the Lint Filter, close the Dryer door and press Start / Pause button. The light should turn off.
3) Decide on a program (see diagram below) according to the texture and capacity of the clothes.
| Program | Max volume of dry clothings | Max dry time | Clothing type |
| Extra Dry | 6.0kg | 150min | Wool |
| Standard Dry | 5.0kg | 90min | Wool |
| Mix Dry | 5.0kg | 90min | Wool / Synthetic |
| Airing | 5.0kg | 80min | Unheated / To freshen up |
| Iron Dry | 5.0kg | 90min | Unheated / To freshen up |
| Quilt | 5.0kg | 120min | Semi dry clothes |
| Towels | 4.0kg | 90min | Dry towels |
| Shake The Quilt | 4.0kg | 120min | Dry (Shake the quilt) |
| Sportswear | 4.0kg | 90min | Dry (Sportswear) |
| Jeans | 5.0kg | 120min | Dry (Jeans) |
| Fiber | 5.0kg | 120min | Chemical fiber |
| 2.5hours | 6.0kg | 150min | Wool |
| 2 hours | 5.0kg | 120min | Wool |
| 1.5hours | 4.0kg | 90min | Small clothes |
| 1 hour | 2.0kg | 60min | Not dry clothes |
| 30 mins | 1.0kg | 30min | Fiber wool |
** Select the "Extra Dry" program with full heat for clothes under 2.0 kg.
4) Press the Crease Guard button if you are drying delicate or light clothes.
** Crease Guard adds an extra 30 seconds run to shake clothes in order to protect from creasing.
5) Push Start / Pause button to start desired program. If you wish to pause the cycle to add more clothes, put the Start / Pause button again. Be careful with hot steam when opening the Dryer door. To continue program, make sure the door is closed then push the Start / Pause button once again. When the Dryer is in Pause Mode, it is possible to change or restart programs.
6) Control panel lock feature is initialized by pushing both Crease Guard and Heat buttons at the same time. When the lock feature is enabled, it is indicated by a light. Pushing both buttons again will disable this feature.
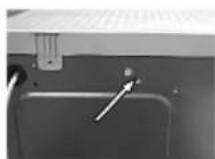
7) If the unit does not heat up, push the Reset button located at the back of the unit.
Operation

8) During the operation of the Dryer, you can click the the Temperature Display button to view the current temperature of the Dryer. This function will exit automatically after 5 seconds.
** Check label attached on clothes to choose the right temperature and time.
9) You can preset between 1 hour to 12 hours. Just press the Preset button and add desired time.
10) A buzzer will signify that the program has ended and clothes are ready to be taken out of the Dryer.
11) To be safe, unplug the unit after each use.
12) Clean Lint Filter, the cabinet and the inner tube. (Accumulated dust and fiber will affect air circulation which will cause longer drying time.)
* Make sure the power is off before cleaning.
Cleaning the Lint Filter
1) Remove Lint Filter
* The Lint Filter is located at the door's opening.
2) Clean the filter by wiping it down with a damp cloth.
3) Once the filter is dry, return the filter to its original position.
4) Remember to clean the filter after every use.

Cleaning Cabinet and Inner Tube
Use a damp cloth to wipe the cabinet and inner tube.
● do not rinse by water directly
• do not use scour wipes
● do not use gasoline and alcohol wipes
Make sure to open the Dryer's door for aeration after cleaning the inner tube.

Other functions description

- Warning function
| Fault | Cause | Solution |
| Buzzer sounds every 15 minutes | The Dryer door is open or has opened during the program. | Make sure to firmly and properly close the door. |
• Auto power-off function
* The Dryer will automatically switch off after 10 minutes of not setting any program.
* The Dryer will automatically switch off after the buzzer goes off six times.
Troubleshooting

| Trouble | Cause | Solution |
| Dryer won't start | Power cutPower plug not correctly connectedClothes exceed maximum volume | Wait for power to restoreCheck the power socket and make sure plug is connected lightRemove clothes and check dampness, Max volume of the dryer is 9 kg |
| Dryer releasing extensive heat | Lint fiber needs cleaningIntake or exhaust passage is obstructed | Clean Int filterClean air intake and exhaust and check for obstructions. (eg. Curtain) |
| Wet clothes | Dryer too fullClothes left in dryer too long after the end of the programClothes not sorted out propertyWrong temperature for clothes | Make sure the dryer is not too fullImmediately remove clothes once program finishesSee page 7Observe the maintenance label on clothes |
| Clothes have shrunk | Clothes are overly dried | Observe the maintenance label on clothing. Remove clothes from dryer while still damp finish drying process by hang drying |
| Lint balls on clothing | Synthetic fiber rubbing with each other causes lint which attaches to clothes | Use fabric softener |
- If there is no heat from the Dryer, press the plastic push button at the back of the Dryer to activate the thermostat which will reheat the element. (see illustration)
• The Dryer may produce excessive noise from the vibration of heavy clothes turning and spinning.
- When in cycle, the Dryer may generate steam which will come out of the exhaust pipe. This may also cause certain movements at the bottom of the inner tube.
Notice

- If the drying process can operate while the door is open it should be sent to maintenance.
- If the drying process can operate without pushing the "START/PAUSE" button, it should be sent to maintenance.
- This dryer is not intended to be placed on top of a washing machine.
Specifications
| Dimension | 595 x 525 x 840(mm) | Weight of product | 31 kg |
| Rated input power | 1700W | Rated volume of dryer | 7.0 kg (Dry clothes) |
| Rated voltage | 220-240V~ | Rated frequency | 50-60 Hz |
This appliance must not be plugged in to an external switching device, such as a timer, or connected to a circuit that is regularly switched on and off.
- Airflo INSTRUCTION MANUAL
- Important Safety Reminders
- Safety Information
- Parts \* Installation
- Installation before use
- Step1: Power source and grounding
- Notices:
- Installation
- Step2: Precautions
- Step 1:
- Notice:
- Notice when installing:
- Operation
- Prepare clothes for Drying
- Check filter
- Place clothes in the Dryer
- Close the Dryer door and review control panel
- Cleaning the Lint Filter
- Cleaning Cabinet and Inner Tube
- Other functions description
- • Auto power-off function
- Troubleshooting
- Notice
Brand : Airflo
Model : AFD728
Category : Tumble dryer