
RF-TTLP4-01 - Label printer Renkforce - Free user manual and instructions
Find the device manual for free RF-TTLP4-01 Renkforce in PDF.


| Product Type | Thermal Transfer Label Printer |
| Model | RF-TTLP4-01 (HT300) |
| Dimensions (L x W x H) | 285 x 226 x 171 mm |
| Weight | 2.26 kg |
| Power Supply | AC/DC adapter; input 100-240 V AC, 50/60 Hz, 2.0 A; output 24 V DC, 2.5 A |
| Printing Method | Thermal transfer / Direct thermal |
| Resolution | 203 dpi (8 dots/mm) |
| Max Printing Speed | 127 mm/s |
| Max Printing Width | 108 mm |
| Printing Length Range | 15 – 1200 mm |
| Interfaces | USB (USB-B), RS-232C serial, RJ45 Ethernet |
| Supported Media Types | Roll-fed or fan-fed, die-cut labels, continuous paper, tag stock |
| Media Width | 20 – 118 mm |
| Media Thickness | 80 – 180 μm |
| Ribbon Types | Wax, Wax/Resin, Resin |
| Ribbon Width | 33.8 – 110 mm |
| Ribbon Length | 300 m |
| Sensors | Adjustable reflective sensor, fixed transmissive sensor (center aligned), head-up sensor, ribbon end sensor |
| Programming Languages | TSPL, ZPL, EPL |
| Software | HPRT BarTender Ultralite label editor, Seagull Windows driver |
| Operating Environment | +5 to +40 °C, 30 – 85% RH (non-condensing) |
| Storage Environment | -20 to +50 °C, 10 – 90% RH |
| Cleaning | Clean print head with isopropyl alcohol; clean paper sensor with alcohol; clean roller/paper path with alcohol |
| Safety Features | Print head overheat protection; ribbon out detection; head-up detection; paper out detection; cutter blade warning |
| Spare Parts & Repairs | Only use original spare parts; repairs by authorized technicians only |
Frequently Asked Questions - RF-TTLP4-01 Renkforce
User questions about RF-TTLP4-01 Renkforce
0 question about this device. Answer the ones you know or ask your own.
Ask a new question about this device
Download the instructions for your Label printer in PDF format for free! Find your manual RF-TTLP4-01 - Renkforce and take your electronic device back in hand. On this page are published all the documents necessary for the use of your device. RF-TTLP4-01 by Renkforce.
USER MANUAL RF-TTLP4-01 Renkforce
GB Operating Instructions
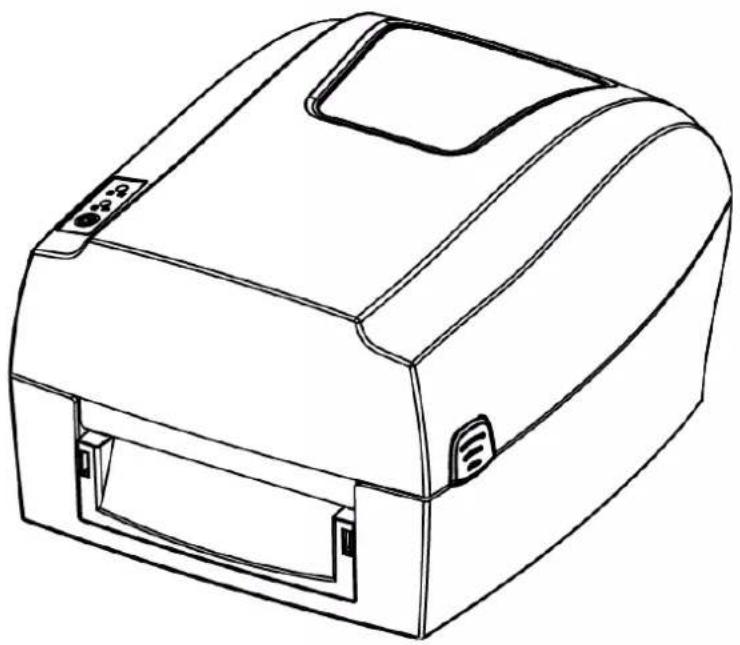
Thermal Transfer Label Printer
Item No.: 2734626 (RF-TTLP4-01 / HT300)
natural_image
Line drawing of a barcode scanner (no text or symbols)CE
Contents
Contents 2
- Introduction......4
- Intended use......4
- Delivery contents......4
- Latest product information .... 4
- Developer documentation....4
- Spare parts....5
6.1. Thermal paper and thermal labels 5
7. Description of symbols 5
8. Safety instructions .... 6
8.1. General 6
8.2. Handling 6
8.3. Installation 6
8.4. Operation....6
8.5. Connected devices....7
8.6. Power adapter 7
8.7. Repairs 7
- Product overview......8
9.1. Components 8
9.2. Indicators 9
- Specification 10
- Setting up.... 12
11.1. Connect peripherals.... 12
11.2. Connect to power.... 12
- Basic operation.... 12
12.1.1. Powering on and off.... 12
- Installing paper and configuring paper type 13
13.1. Installing the paper roll.... 13
13.1.1. Loading paper rolls externally.... 15
13.2. Aligning label sensor with paper/label type.... 16
13.2.1. Aligning for continuous paper 16
13.2.2. Aligning for labels.... 16
13.2.3. Aligning for punched hole label.... 17
13.2.4. Aligning for blackmark paper 17
13.3. Calibrating the printer for paper/label types 18
- Printing 18
14.1.1. Printing a blank label 18
14.1.2. Printing a self-test page.... 18
14.1.3. Pausing and restarting print jobs.... 18
- Interfaces.... 19
15.1. USB Interface 19
15.2.Serial port 19
15.3. Ethernet Port.... 19
- Configuring printer with Windows® Label Printer Utility Software 20
16.1. Getting started 20
16.2. Adding new printers.... 21
16.3.Configuring printers 21
16.4. Calibrating printer for label/paper type.... 22
- Installing Windows® label editor BarTender® Ultralite.... 22
17.1. Installing Seagull Windows® driver.... 22
17.2. Installing BarTender® Ultralite 22
- Cleaning and care.... 23
18.1. Cleaning housing 23
18.2. Cleaning paper sensor.... 23
18.3. Cleaning thermal print head 23
18.4. Cleaning roller and/or paper path.... 24
- Disposal....24
1. Introduction
Dear customer,
Thank you for purchasing this product.
If there are any technical questions, please contact: www.conrad.com/contact
2. Intended use
The product is a thermal transfer label printer.
The product is intended for indoor use only. Do not use it outdoors. Contact with moisture must be avoided under all circumstances.
If you use the product for purposes other than those described, the product may be damaged.
Improper use can result in short circuits, fires, electric shocks or other hazards.
The product complies with the statutory national and European requirements. For safety and approval purposes, you must not rebuild and/or modify the product.
Read the operating instructions carefully and store them in a safe place. Make this product available to third parties only together with the operating instructions.
All company names and product names are trademarks of their respective owners. All rights reserved.
3. Delivery contents
Printer
■ Power adaptor
■ Mains cable
■ USB cable (USB-A to USB-B)
■ USB memory stick
■ Ribbon core
■ Ribbon
■ Paper roll
■ Quick start guide
4. Latest product information

Download the latest product information at www.conrad.com/downloads or scan the QR code shown. Follow the instructions on the website.
5. Developer documentation
Download developer documentation from www.conrad.com/downloads.
6. Spare parts
6.1. Thermal paper and thermal labels
The printer can print on any commercially available thermal paper and thermal labels.
7. Description of symbols
The following symbols are on the product/appliance or are used in the text:

Read the operating instructions carefully.

The symbol warns of hazards that can lead to personal injury.

The symbol warns of dangerous voltage that can lead to personal injury by electric shock.

This product must only be used in dry, enclosed indoor areas. It must not become damp or wet.

The symbol warns of hot surfaces that can result in severe burns when touched. Read the information carefully.
8. Safety instructions
Read the assembly instructions carefully and especially observe the safety information. If you do not follow the safety instructions and information on proper handling, we assume no liability for any resulting personal injury or damage to property. Such cases will invalidate the warranty/guarantee.
8.1. General
■ The product is not a toy. Keep it out of the reach of children and pets.
■ Do not leave packaging material lying around carelessly. This may become dangerous playing material for children.
If you have questions which remain unanswered by this information product, contact our technical support service or other technical personnel.
■ Maintenance, modifications and repairs must only be completed by a technician or an authorised repair centre.
8.2. Handling
■ Handle the product carefully. Jolts, impacts or a fall even from a low height can damage the product.
8.3. Installation
■ Do not place the product under any mechanical stress.
■ Protect the appliance from extreme temperatures, flammable gases, steam and solvents.
■ Protect the product from high humidity and moisture.
■ Protect the product from direct sunlight.
■ Dust can damage the printer. Do not install the printer in dusty locations.
■ Vibrations, shock and impacts can damage the printer to move and fall down. Install the printer on a solid, stable and non-slip surface.
■ Liquids can damage the printer and cause short-circuits. Keep liquids away.
8.4. Operation

The hot printer head can cause burns. Do not touch the printer head.
■ Static discharge can damage the printer head. Do not touch the printer head.
■ The cutter blade is sharp and can cause cuts. Do not touch the blade.
■ Only use recommended label paper to prevent damage to the printer.
■ Switch off the printer before you make and disconnect connections.
- Blocking moving parts can cause damage. Do not touch, block or pull moving parts during operation. Do not stick objects into openings.
■ Only use approved accessories to prevent damage.
- Consult an expert when in doubt about the operation, safety or connection of the product.
If it is no longer possible to operate the product safely, take it out of operation and protect it from any accidental use. DO NOT attempt to repair the product yourself. Safe
operation can no longer be guaranteed if the product:
is visibly damaged,
is no longer working properly,
has been stored for extended periods in poor ambient conditions or
has been subjected to any serious transport-related stresses.
8.5. Connected devices
■ Also observe the safety and operating instructions of any other devices which are connected to the product.
8.6. Power adapter

Do not modify or repair mains supply components including mains plugs, mains cables, and power supplies. Do not use damaged components. Risk of death by electric shock!
■ Connect the appliance to a wall socket that can be accessed easily.
■ As power supply, only use the supplied mains adaptor.
■ Only connect the power adaptor to a normal mains socket connected to the public supply. Before plugging in the power adaptor, check whether the voltage stated on the power adaptor complies with the voltage of your electricity supplier.
■ Never connect or disconnect power adaptors if your hands are wet.
■ Never unplug the power adaptor from the mains socket by pulling on the cable; always use the grips on the plug.
■ For safety reasons, disconnect the power adaptor from the mains socket during storms.
■ Do not touch the power adapter if there are any signs of damage, as this may cause a fatal electric shock! Take the following steps:
Switch off the mains voltage to the socket containing the power adapter (switch off the corresponding circuit breaker or remove the safety fuse, and then switch off the corresponding RCD protective switch).
Unplug the power adapter from the mains socket.
Use a new power adapter of the same design. Do not use the damaged adapter again.
■ Ensure that cables are not pinched, kinked or damaged by sharp edges.
■ Always lay cables so that nobody can trip over or become entangled in them. This poses a risk of injury.
8.7. Repairs
■ Repairs require specialist knowledge. Contact a professional to have the printer repaired.
■ Only use original spare parts to repair the printer.
9. Product overview
9.1. Components
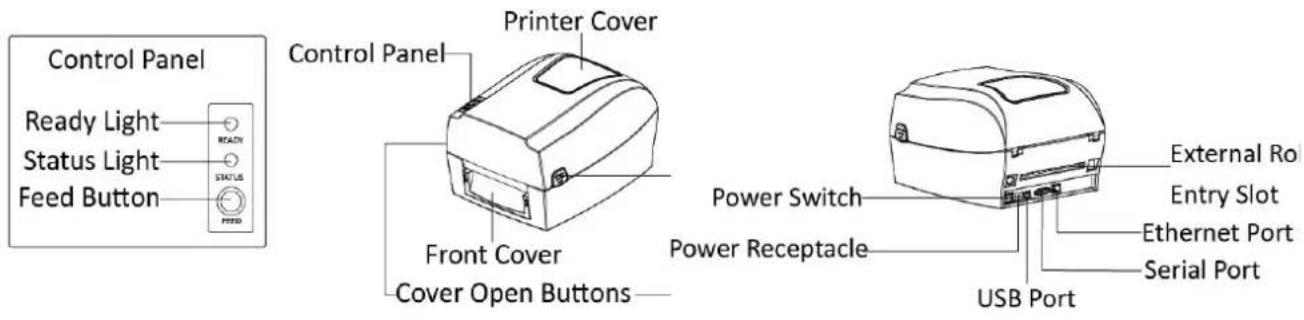
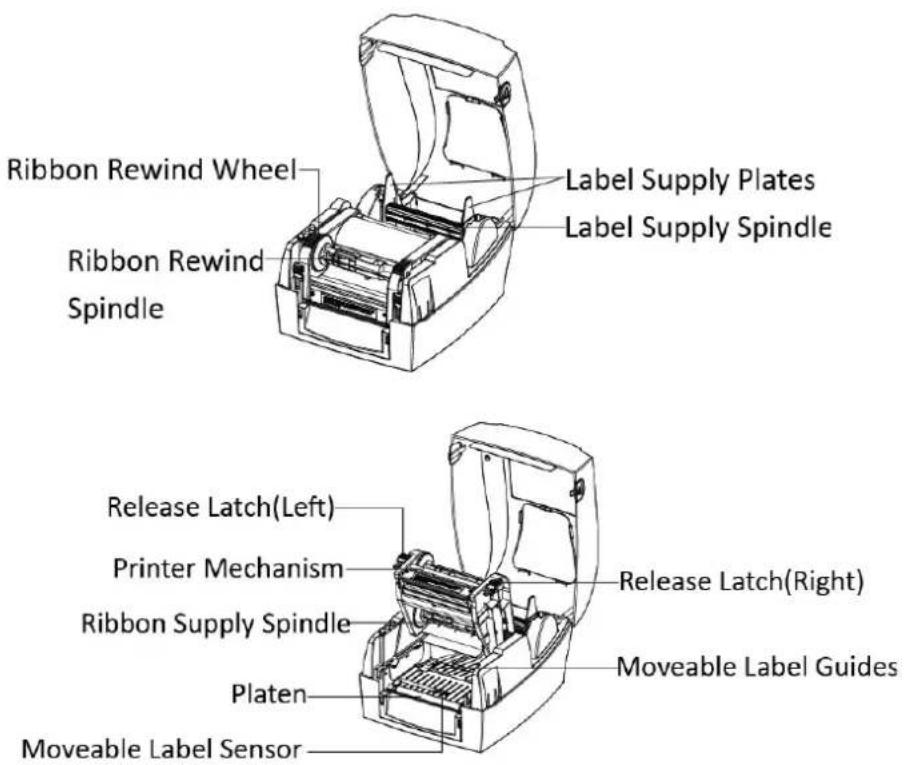
9.2. Indicators
| READY STATUS | Color | Action | Indicator Status | |
| Color | Action | |||
| Green | Solid on | Ready | ||
| Green | Slow flash | Dump mode | ||
| Red | Solid on | Overheat of printhead | ||
| Red | Slow flash | Ribbon out | ||
| Red | Solid on | Head up | ||
| Red | Slow flash | Out of paper | ||
| Red | Quick flash | Abnormal label calibration | ||
| Orange | Solid on | Out of ready | ||
| Orange | Quick flash | Data is written on flash | ||
| Orange | Slow flash | Paper jam or paper's positioning is abnormal | ||
| Green | Solid on | Printing | ||
| Green | Slow flash | Pause of printing | ||
| Green | Quick flash | Receiving data | ||
Quick flashing: 0.1 s on/off cycle
Slow flashing: 0.5 s light/off cycle
10. Specification
| Items Parameter | |||
| Type HT300 | |||
| Printing | Printing method | Thermal transfer/ Direct thermal | |
| Resolution | 203 dpi (8 dots/mm) | ||
| Printing speed | Max. 127 mm/s | ||
| Printing width | Max. 108 mm | ||
| Printing length | 15 - 1200 mm | ||
| Processor | NUC976 | ||
| Memory | RAM | 32 MB | |
| Flash | 16 MB | ||
| Detection | Sensors | Adjustable reflective sensor, Fixed transmissive sensor (Central aligned), Head-up sensor, Ribbon end sensor | |
| Media | Types | Roll-fed or Fan-fed, Die-cut or Continuous label, Tag stock, Continuous receipt paper | |
| Width | 20 mm (0.79") – 118 mm (4.65") | ||
| Thickness | 80 μm (0.003") – 180 μm (0.007") | ||
| Label roll diameter | 127mm (5") | ||
| Core diameter | 25.4 mm (1"), 38 mm (1.5"), 76.2mm (3") | ||
| Ribbon | Types | Wax, Wax/Resin, Resin | |
| Width | 33.8 mm (1.33") – 110 mm (4.33") | ||
| Length 300 m | |||
| Core diameter | 25.4 mm (1") | ||
| Programming language | TSPL, ZPL, EPL | ||
| Software | Label design | HPRT BarTender Ultralite | |
| Seagull Driver | Windows 2000, XP, Vista, Server, 7, 8, 10, 11 | ||
| Resident fonts | Bitmap fonts | Fonts 0-8 / Fonts A-H,0,GS,P-V 90°, 180°, 270° rotatable. 10 times maximun expandable in horizontal and vertical directions. | |
| TTF fonts | Monotype CG TriumvirateTM scalable true type font | ||
| Download Fonts | Bitmap fonts | 90°, 180°, 270° rotatable, single characters 90°, 180°, 270° rotatable | |
| Asian fonts | 16x16, 24x24. Traditional Chinese, Simplified Chinese, Japanese, Korean | ||
| Code pages | DOS437,720,737,755,775,850,852,855,856,857,858,860,862,863,864,865,866, Windows 1250, 1251, 1252, 1253, 1254, 1255, 1256, 1257, 1258 ISO8859-1,-2,-3,-4,-5,-6,-8,-9,-15 DBCS 932 (JIS), 936(GBK), 949 (Koran), 950(BIG5) | ||
| Barcode | 1D | Code 39, Code 93, Code 128UCC, Code 128 subset A, B, C, Codabar, Interleave 2 of 5, EAN-8, EAN-13, EAN-128, UPC-A, UPC-E, EAN and UPC 2 (5) digits add-on, MSI, PLESSEY, POSTNET, RSS-Stacked, GS1 DataBar, Code 11 | |
| 2D | PDF417, Maxicode, DataMatrix, QR Code, Aztec | ||
| Interfaces | Standard | USB, RS232, Ethernet | |
| Control Panel | Two bi-color status LEDs: Ready, Status Control key: Feed | ||
| Power | AC/DC switching power adapter Input: 100-240 V/AC, 50/60 Hz, 2.0 A Output: 24 V/DC, 2.5 A | ||
| Environment | Operation | +5 to +40 °C, 30 – 85 % RH non-condensing | |
| Storage | -20 to +50°C, 10 – 90 % RH non-condensing | ||
| Physical Characteristics | Dimension (L x W x H) | 285 x 226 x 171 mm | |
| Weight | 2.26 kg | ||
11. Setting up
11.1. Connect peripherals
The printer has the following peripheral ports:
USB-B port
■ RS-232C serial port
■ RJ45 Ethernet port
To make connections:
- Move the power switch at the rear to position 0.
- Connect the communication cable to the respective peripheral port.
11.2. Connect to power
- Move the power switch at the rear to position 0.
- Connect the power adaptor cable to the power input socket at the rear of the printer.
- Connect mains cable and power adaptor.
- Connect the power adaptor to a suitable mains socket.
12. Basic operation
12.1.1. Powering on and off
- To power on, move the power switch at the rear to position 1.
The indicator READY is green to indicate the ready state.
If an error is detected, the indicator READY is red.
- To power off, move the power switch at the rear to position 0.
13. Installing paper and configuring paper type
Perform the following steps to install the paper and configure the printer for the installed paper/label type:
- Install the paper roll. For large paper rolls, follow the instructions for external paper roll installation.
- Align the label sensor for the installed paper/label type. Only align for the paper/label type that you installed.
- Calibrate the printer for the paper/label type you installed. Use the "Windows® Label Printer Utility" software to calibrate the paper/label type.
13.1. Installing the paper roll
Step 1
- Move the power switch at the rear to position 0.
- Press the cover release tab on either side to unlock the cover. Lift the cover.

natural_image
Technical line drawing of a mechanical device with internal components and directional arrows indicating motion (no text or symbols)Step 2
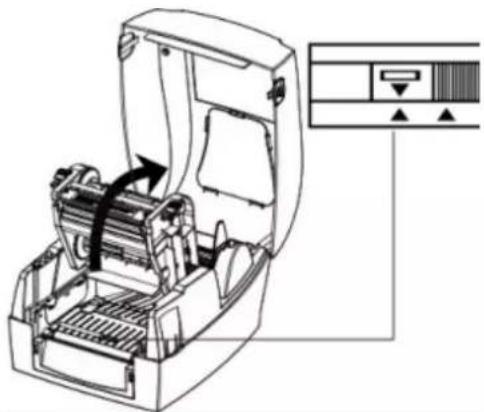
Release and then lift the printing head. If you print multiple labels, align the arrows as indicated in the right graphic below.
natural_image
Technical line drawing of a mechanical device with internal components and directional control panel (no text or symbols)Step 3
Install the paper roll.

natural_image
Technical line drawing of a mechanical device with no visible text or symbols- Lift out the spindle.
- Adjust the label supply plates on the spindle until the CORE size printed on the spindle matches that of your paper roll.
- Slide the paper roll onto the spindle.
- Install the spindle in the printer.
Step 5
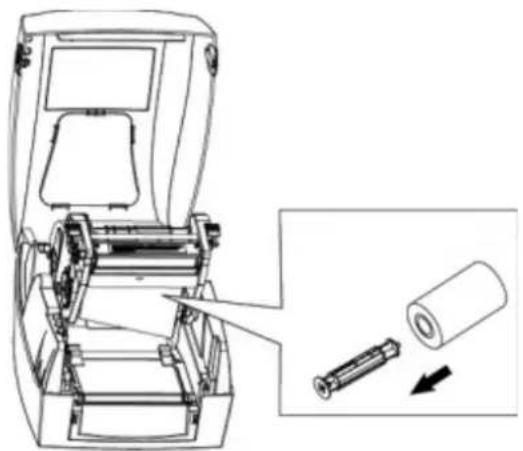
Install the ribbon.
natural_image
Technical line drawing of a mechanical device with an inset showing a cylindrical component being inserted (no text or symbols present)- Push the spring-loaded ribbon spindle in to release it. Remove the spindle.
- Slide the ribbon onto the spindle so that the labels are fed at the front. Observe the diagram printed on the inside of the printer cover.
- Install the spindle into the printer.
Step 4
Guide the label paper and set the label guides.

natural_image
Technical line drawing of a mechanical device with open lid and internal compartments (no text or symbols)- Release and lift the printing head.
- Below the printing head, pass the labels through the label guides.
- Adjust the label guides to the label width.
Step 6
Install the rewind spindle.

natural_image
Technical line drawing of a vehicle interior showing internal components and a close-up of a cylindrical component (no text or symbols)- Push the spring-loaded rewind spindle in to release it. Remove the spindle.
- Slide the empty rewind roll onto the spindle.
- Install the spindle into the printer.
Step 7
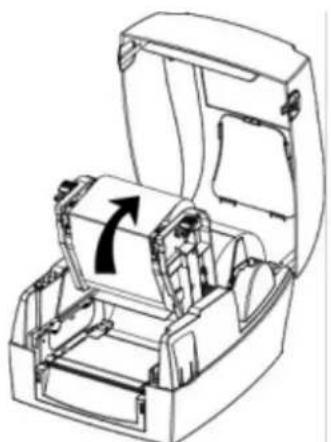
Link the ribbon to the rewind spindle.
natural_image
Technical line drawing of a mechanical device with an open lid and internal components, showing a rotational arrow (no text or symbols)-
Lift the sticky end of the ribbon and pull the ribbon out just enough to reach the rewind spindle.
-
Affix the sticky end on the rewind spindle. Observe the diagram printed on the inside of the printer cover.
-
Wind 3 layers of ribbon onto the empty rewind spindle by rotating the notched wheel.
Step 8
Lock the printing mechanism.

natural_image
Technical line drawing of a mechanical device with an open lid and internal compartments, showing no text or symbols.-
Push down the printing head until it locks.
-
Close the printer cover and lock it.
Next step: Align the label sensor with the paper/label type.
13.1.1. Loading paper rolls externally
For large paper rolls the printer cannot hold, load the paper roll externally. Pass the paper through the external feed slot and then through the paper guides.

natural_image
Line drawing of a cylindrical mechanical device with a base mount (no text or symbols)13.2. Aligning label sensor with paper/label type
The label sensor detects the paper type that is installed. Align the sensor with the paper type you are using.
13.2.1. Aligning for continuous paper
For continuous paper (Fig. 1), align the sensor with the left of the photoelectric hole (Fig. 2).

natural_image
Simple line drawing of a rolled-up sheet or document (no text or symbols)Fig. 1

natural_image
Technical line drawing of a mechanical assembly with no visible text or symbolsFig. 2
Next step: Calibrate the printer for the paper/label type.
13.2.2. Aligning for labels
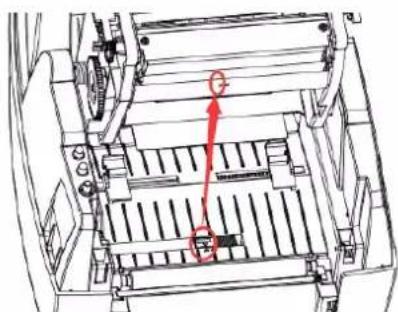
For labels (Fig. 3) or double-row labels (Fig. 4), align the sensor with the left of the photoelectric hole (Fig. 5).

natural_image
Simple line drawing of a rolled-up sheet of paper (no text or symbols)Fig. 3

natural_image
Diagram of a rolled-up sheet of paper with no text or symbolsFig. 4
natural_image
Technical line drawing of a mechanical component with internal channels and a red arrow indicating direction (no text or symbols)Fig. 5
Next step: Calibrate the printer for the paper/label type.
13.2.3. Aligning for punched hole label
For punched hole labels (Fig. 6), align the sensor with the right of the photoelectric hole (Fig. 7).

natural_image
Pure technical line drawing of a mechanical part with no text or symbolsFig. 6

natural_image
Technical line drawing of a mechanical device with internal components and mounting brackets (no text or symbols)Fig. 7
Next step: Calibrate the printer for the paper/label type.
13.2.4. Aligning for blackmark paper
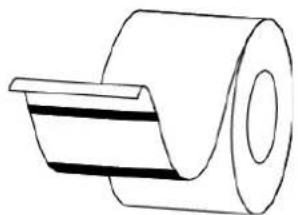
For blackmark paper (Fig. 8), align the sensor with the blackmark position (Fig. 9).
natural_image
Illustration of a rolled-up sheet of paper with a band (no text or symbols)Fig. 8

natural_image
Technical illustration of a mechanical assembly with a magnified inset showing a component detail (no text or symbols present)Fig. 9
Next step: Calibrate the printer for the paper/label type.
13.3. Calibrating the printer for paper/label types
Calibrate the printer to adjust the printing components to the label/paper type you have installed.
Calibrate the printer via the Windows® Label Printer Utility software.
When to calibrate:
Calibrate if one of the conditions applies:
■ Before printing for the first time
■ After cleaning the sensor
■ Reusing after long term storage
■ After changing label/paper types
■ Printer does not print properly
Calibrating:
- Install the Windows® Label Printer Utility on a Windows® computer. Follow the instructions in "Configuring printer with Windows® Label Printer Utility Software".
- Calibrate the printer for the paper/label type you have installed. Follow the instructions in "Calibrating printer for label/paper type".
You have calibrated the printer for the label/paper type that is currently installed in the printer. When printing, the printer will apply print settings suitable for the installed paper/label type.
14. Printing
14.1.1. Printing a blank label
■ Press the button FEED.
The printer prints a blank label.
14.1.2. Printing a self-test page
The self-test checks and prints the current settings.
■ Press and hold the button FEED for approx. 1.5 seconds and release it.
The printer will print a self-test page.
Note: You can print self-test pages via the Windows® print driver menu and the HPRT BarTender software.
14.1.3. Pausing and restarting print jobs
- With printing in progress, press the button FEED to pause the printing job.
The indicator STATUS flashes slowly.
- Press the button FEED to restart the printing job.
15. Interfaces
15.1. USB Interface

| PIN | SIGNAL NAME |
| 1 VBUS | |
| 2 | D- |
| 3 | D+ |
| 4 | GND |
15.2. Serial port

| PIN | SIGNAL NAME |
| 1 | +5VDC |
| 2 | TXD |
| 3 | RXD |
| 4 | - |
| 5 | GND |
| 6 | RTS |
| 7 | CTS |
| 8 | RTS |
| 9 | - |
15.3. Ethernet Port

| PIN | SIGNAL NAME |
| 1 | TX+ |
| 2 | TX- |
| 3 | RX+ |
| 4 | - |
| 5 | - |
| 6 | RX- |
| 7 | - |
| 8 | - |
16. Configuring printer with Windows® Label Printer Utility Software
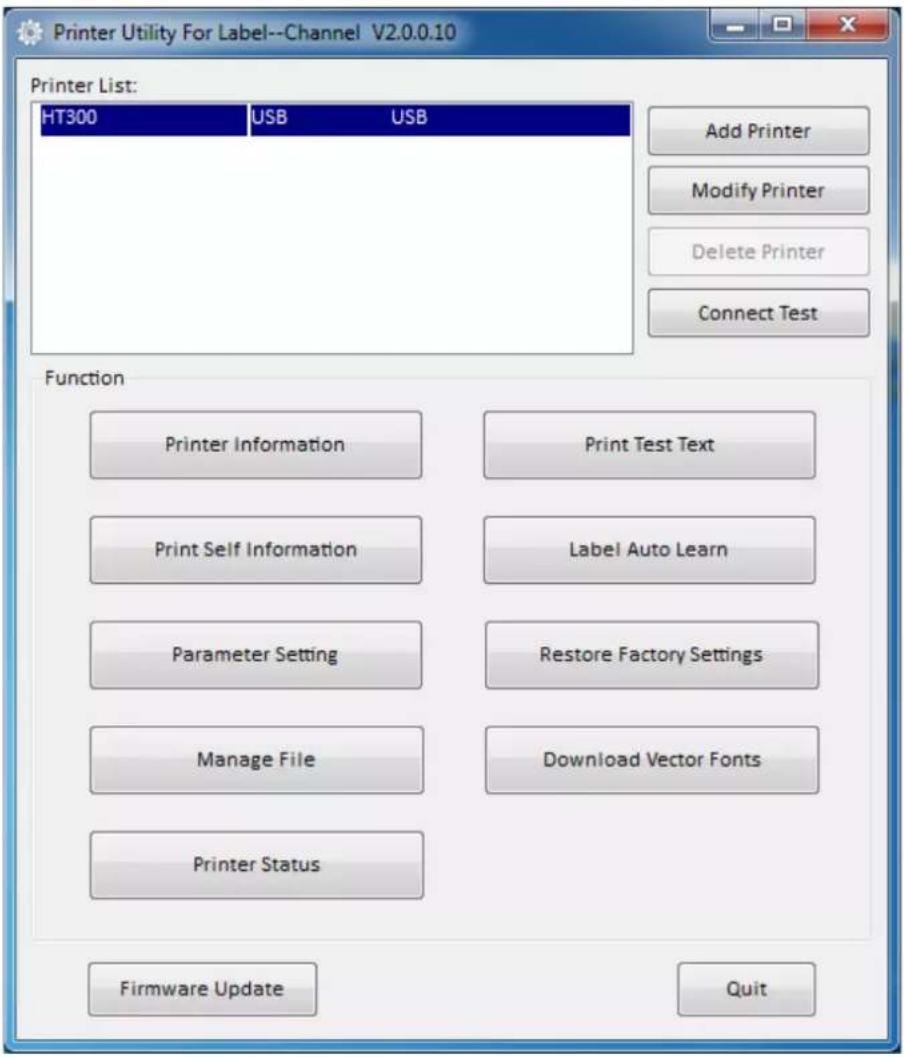
With the Windows® "Label Printer Utility" you can configure parameters of new and existing printers.
16.1. Getting started
- Download the application HPRTUtilityForLabel from www.conrad.com/downloads to your computer.
- Open the application HPRTUtilityForLabel.
16.2. Adding new printers
- Connect the printer to the computer/POS system.
- Switch the printer on.
- Open the application HPRTUtilityForLabel.
- Click Add Printer.
- Select the printer model and connection type.
- Click Connect Test to test the printer connection.
→ A pop-up will inform the connection status.
- On the main page, click Print Test Text to print a test label. Follow the on-screen instructions.
16.3. Configuring printers
Prerequisites:
Printer is connected to computer/POS system.
- Open the application HPRTUtilityForLabel.
- On the main page, select the printer you want to configure from the printer list.
- Click Parameter Setting to open the printer settings.
- Adjust the parameters and click Set to save the changes.

16.4. Calibrating printer for label/paper type
Prerequisites:
Printer is connected to computer/POS system.
- Open the application HPRTUtilityForLabel.
- On the main page, select the printer you want to configure from the printer list.
- Click Label Auto Learn (or Label Auto Calibration) to calibrate the printer to paper/label type that is installed.
The printer prints several labels during the calibration process.
17. Installing Windows® label editor BarTender® Ultralite
With BarTender® Ultralite you can create and edit labels. To use BarTender® Ultralite, you must install on your computer the required Seagull (www.seagullscientific.com) print driver and the BarTender® Ultralite application.
17.1. Installing Seagull Windows® driver
Seagull drivers are available for the following operating systems:
■ Microsoft Windows® 11 (32 bit/64 bit)
■ Microsoft Windows® 10 (32 bit/64 bit)
■ Microsoft Windows® 8 (32 bit/64 bit) Microsoft
■ Windows® 7 SPI (32 bit/64 bit)
■ Microsoft Windows® Vista SP2 (32 bit/64 bit)
■ Microsoft Windows® XP Professional SP3 (32 bit)
■ Microsoft Windows® Server 2012(64 bit) Microsoft Windows® Server 2008 R2
■ Microsoft Windows® Server 2008 SP2(32 bit/64 bit) \
■ Microsoft Windows® Server 2003 R2 SP2(32 bit/64 bit)
■ Microsoft Windows® 2000 (32 bit/64bit)
-
Download the required Seagull print driver from www.conrad.com/downloads.
-
Connect the printer to the computer/POS system.
-
Switch the printer on.
-
Install the Seagull print driver.
→ The printer will be added to the Windows® start menu.
17.2. Installing BarTender® Ultralite
-
Download the BarTender® Ultralite application from www.conrad.com/downloads.
-
Install the BarTender® Ultralite application.
18. Cleaning and care
Adhesives and coatings of the media can transfer onto the printer parts, which can lead to accumulation of dust and debris. Regular cleaning helps to maintain print quality and prevents breakdowns.
18.1. Cleaning housing
Important:
■ Do not use aggressive cleaning agents, rubbing alcohol or other chemical solutions. They damage the housing and can cause the product to malfunction.
■ Do not immerse the product in water.
-
Disconnect the printer from the power supply.
-
Clean the product with a dry, fibre-free cloth.
18.2. Cleaning paper sensor
Debris or dirt on the paper sensor can cause misreadings or unstable detection of the label gap.
- Disconnect the printer from the power supply.
- Open the printer cover.
- Clean the paper sensor with a cotton bud dampened with alcohol.
18.3. Cleaning thermal print head
Clean the print head with methanol or isopropyl alcohol and a cotton bud.
Important: Perform the cleaning process each time the paper roll is replaced to prevent print quality deterioration.

CAUTION
Hot print head can cause burns.
Let printer cool down before opening.
- Disconnect the printer from the power supply.
- Let the printer cool down for about 3 minutes. The printer head can be very hot.
- Open the printer cover.
- Dampen a cotton bud with methanol or isopropyl alcohol.
- Clean the head with the cotton bud. Start at the center and move to the outside.
- Wait for the alcohol to completely evaporate.
18.4. Cleaning roller and/or paper path
Clean the roller and paper path if you notice reduced print quality or problems with paper detection.
- Disconnect the printer from the power supply.
- Open the printer cover.
-
Remove the installed paper roll.
-
Remove lose dust or foreign substance using dry cloth or cotton swabs.
-
Remove persistent adhesive foreign substances with a clean cloth or cotton swab dampened with methanol or isopropyl alcohol.
-
Wait for the alcohol to completely evaporate before you use the printer again.
19. Disposal

This symbol must appear on any electrical and electronic equipment placed on the EU market. This symbol indicates that this device should not be disposed of as unsorted municipal waste at the end of its service life.
Owners of WEEE (Waste from Electrical and Electronic Equipment) shall dispose of it separately from unsorted municipal waste. Spent batteries and accumulators, which are not enclosed by the WEEE, as well as lamps that can be removed from the WEEE in a non-destructive manner, must be removed by end users from the WEEE in a non-destructive manner before it is handed over to a collection point.
Distributors of electrical and electronic equipment are legally obliged to provide free take-back of waste. Conrad provides the following return options free of charge (more details on our website):
■ in our Conrad offices
■ at the Conrad collection points
■ at the collection points of public waste management authorities or the collection points set up by manufacturers or distributors within the meaning of the ElektroG
End users are responsible for deleting personal data from the WEEE to be disposed of. It should be noted that different obligations about the return or recycling of WEEE may apply in countries outside of Germany.
This is a publication by Conrad Electronic SE, Klaus-Conrad-Str. 1, D-92240 Hirschau (www.conrad.com). All rights in- cluding translation reserved. Reproduction by any method, e.g. photocopy, microfilming, or the capture in electronic data processing systems require the prior written approval by the editor. Reprinting, also in part, is prohibited. This publication represents the technical status at the time of printing. Copyright 2023 by Conrad Electronic SE.
V1_(1)



- Thermal Transfer Label Printer
- Contents
- Contents 2
- Introduction
- Intended use
- Delivery contents
- Latest product information
- Developer documentation
- Spare parts
- Thermal paper and thermal labels
- Description of symbols
- Safety instructions
- General
- Handling
- Installation
- Operation
- Connected devices
- Power adapter
- Repairs
- Product overview
- Components
- Indicators
- Specification
- Setting up
- Connect peripherals
- Connect to power
- Basic operation
- Powering on and off
- Installing paper and configuring paper type
- Installing the paper roll
- Step 1
- Step 2
- Step 3
- Step 5
- Step 4
- Step 6
- Step 7
- Step 8
- Loading paper rolls externally
- Aligning label sensor with paper/label type
- Aligning for continuous paper
- Aligning for labels
- Aligning for punched hole label
- Aligning for blackmark paper
- Calibrating the printer for paper/label types
- When to calibrate:
- Calibrating:
- Printing
- Printing a blank label
- Printing a self-test page
- Pausing and restarting print jobs
- Interfaces
- USB Interface
- Serial port
- Ethernet Port
- Configuring printer with Windows® Label Printer Utility Software
- Getting started
- Adding new printers
- Configuring printers
- Prerequisites:
- Calibrating printer for label/paper type
- Installing Windows® label editor BarTender® Ultralite
- Installing Seagull Windows® driver
- Installing BarTender® Ultralite
- Cleaning and care
- Cleaning housing
- Important:
- Cleaning paper sensor
- Cleaning thermal print head
- Cleaning roller and/or paper path
- Disposal
Brand : Renkforce
Model : RF-TTLP4-01
Category : Label printer