
Forge - Uncategorized FLIR - Free user manual and instructions
Find the device manual for free Forge FLIR in PDF.


| Product Type | Thermal Imaging Camera |
| Brand | FLIR |
| Model | Forge |
| IR Resolution | 160 x 120 pixels |
| Temperature Range | -20°C to 400°C |
| Accuracy | ±2°C or ±2% of reading |
| Thermal Sensitivity | < 50 mK |
| Image Frequency | 9 Hz |
| Field of View | 50° x 38° |
| Focus | Fixed focus |
| Display | 2.4-inch LCD color display |
| Storage | Internal memory for 500+ images (JPEG) |
| Connectivity | USB-C for data transfer and charging |
| Battery | Rechargeable Li-Ion, 4 hours continuous use |
| Dimensions (HxWxD) | 10.5 x 6.0 x 3.5 cm |
| Weight | 300 g (including battery) |
| Operating Temperature | -10°C to 50°C |
| Warranty | 2 years |
| Cleaning | Use soft, dry cloth; avoid liquids |
| Safety | Do not point at intense heat sources; avoid impacts |
| Spare Parts Available | Battery pack, USB cable, lens cap |
| Manual | Free download on manufacturer's website |
Frequently Asked Questions - Forge FLIR
User questions about Forge FLIR
0 question about this device. Answer the ones you know or ask your own.
Ask a new question about this device
Download the instructions for your Uncategorized in PDF format for free! Find your manual Forge - FLIR and take your electronic device back in hand. On this page are published all the documents necessary for the use of your device. Forge by FLIR.
USER MANUAL Forge FLIR
Will your system support the camera?
Recommended System Configuration:
■ OS—Windows or Linux (32- or 64-bit)
■ CPU— Intel i7 or greater
■ RAM—8 GB dual channel
■ Ports—GigE network adapter with 5G Full Duplex support
■ Software—Microsoft Visual Studio 2015 (to run and compile example
Do you have a downloads account?
A downloads account is required to download software and firmware.
- Go to www.flir.com/account.
- Enter your email address and click Continue.
- Complete the Create an account form and click Continue.
- You will receive an email with a link to activate your account.
- Once activated, you can login using the credentials you've created.
The Forge resources page has many links to help you operate your effectively, including:
■ Spinnaker® SDK software, including drivers (login required)
■ Firmware updates and release notes (login required)
■ Dimensional drawings and CAD models
■ Documentation
Do you have all the parts you need?
To install your camera you need the following components:
- Ethernet cable
■ Powered Ethernet switch or Ethernet power injector (if using PoE)
■ GPIO cable
Lens
■ Tripod adapter (optional)
■ Interface card
Teledyne FLIR sells a number of the additional parts required for install purchase, visit the Accessories page.
Camera Care
To clean the imaging surface of your camera, follow the steps outlined the imaging surface of your camera.
Extended exposure to bright sunlight, rain, dusty environments, etc. may problems with the electronics and optics of the system.
Avoid excessive shaking, dropping, or mishandling of the device.
Warning! Avoid electrostatic charging.
Installing your Interface Card and Software
- Install your Interface Card
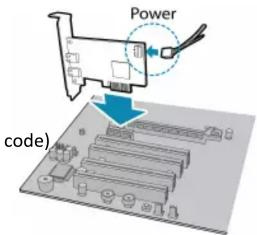
Ensure the card is installed per the manufacturer's instructions.
Connect the internal IDE or SATA power connector on the card to the computer supply.
Alternatively, use your PC's built-in host controller, if equipped.
Open the Windows Device Manager. Ensure the card is properly installed cards appear under Network Adapters. An exclamation point (!) next to indicates the driver has not yet been installed.
Configure the network adapter to use 5G Full Duplex.
a. Update the driver to the latest to access the 5G Full Duplex option
b. In Windows go to Control Panel\Network and Internet\Network Conn meraright-click on your network adapter and select Properties.
c. Click Configure.
d. On the Advanced tab, from the Property box select Speed & Duplex the Value drop-down select 5Gbps Full Duplex.
e. Click OK.
On the Advanced tab, if not already enabled, set the Jumbo Packet
- Install the Spinnaker® SDK Software
Note: For existing users who already have Spinnaker installed, we ensuring you have the latest version for optimal performance of you do not need to install Spinnaker, use SpinView to install an for your card. Forge requires Spinnaker version 3.1 or later.
a. Go to the Spinnaker SDK page.
b. Click the Download button. You are prompted to login, if not alr
c. Select your operating system. Depending on your selection there may versions to select.
ation. After download is complete, open the file to start the Spinnaker
e. Follow the steps in each setup dialog.
- Optimize the settings of your Ethernet card
a. In Start->All Programs-> Spinnaker SDK->SpinView, right click on the in Adapter and select Adapter Configuration. The Adapter Config Utility network adapters and allows you to access the following:
cause ■ Adapter IP address ■ Receive buffers ■ RSS
■ Subnet mask ■ Transmit buffers ■ Media optimization
■ Default gateway ■ Jumbo packets ■ CPU affinity
Note: See How to Optimize GigE Network Adapter Settings for more on configuring for best performance.
Using the Spinnaker SDK
Camera Interface
You can monitor or control features of the camera through Spinnaker examples provided in the Spinnaker SDK, or through the SpinView can evaluation application. A Programmer's Guide and API Reference is included in the installation.
APL Ethernet Connector
edThein 8-pin RJ-45 Ethernet jack is equipped with two (2) M2 screwhole connection. Pin assignments conform to the Ethernet standard.
Installing your Forge 5GigE
1. Attach a Lens
Unscrew the dust cap from the lens holder to install a lens.
2. Connect the interface Card and Cable to the Camera
Plug the interface cable into the host controller card and the camera. cable jack screws can be used for a secure connection. If using PoE, powered Ethernet switch or Ethernet power injector in between the card the camera.
When the camera is first connected, the operating system automatically the camera driver. Camera drivers are available with the Spinnaker SDK installation.
3. Plug in the GPIO connector
GPIO is used for power, trigger, serial input output, and strobe.
4. Confirm Successful Installation
Run the SpinView application: Start->All Programs-> Spinnaker->SpinView
The SpinView application can be used to test the camera's image acquisition capabilities and make changes to the camera's installation configuration.
5. Configure IP Settings if necessary
By default, a dynamic IP address is assigned to the camera according DHCP protocol. If DHCP addressing fails, a link-local address is assigned necessary, in SpinView change the IP address of the camera to be on subnet as the NIC.
Status Indicator LED
LED 5GigE
| No Light | No poweror LED is in inactive stateor LED is in error status state with no error |
| Blinking Green (1 blink) | Link-Local Address (LLA) |
| Blinking Green (2 blinks) | DHCP IP Address |
| Blinking Green (3 blinks) | Persistent IP Address |
| Solid Green | Acquisition Started |
| Rapid Flashing Green | Firmware update in progress |
| Flashing Green and Red | General Error |
General Purpose I/O Connector
The camera is equipped with a 6-pin GPIO connector on the back of
Diagram Color
| Green | 1^2 | 3 | V_EXT | External Input Voltage (DC) | |
| GPI | Non-isolated Input | ||||
| Black | 2 | 0 | OPTOIN | Opto-isolated Input | |
| Red | 3^2 | 2 | V_AUX OUT | Auxiliary Power Output | |
| GPIO^3 | Non-isolated Input/Output | ||||
| White | 4 | 1 | OPTOOUT^3 | Opto-isolated Output | |
| Blue | 5 | N/A | Opto GND | Opto-isolated Ground | |
| Brown | 6 | N/A | GND | Camera Power Ground |
1—GPIO cable assembly wire colors
2—Dual function pin
3—Open drain output, requires pullup resistor
For More Information
Teledyne FLIR endeavors to provide the highest level of technical support to the possible to you.
Support resources can be accessed through the Forge resources page.
| Your camera's settings and capabilities—Technical Reference or Camera Reference |
| Spinnaker® SDK—API Reference / Programmer's Guide |
| Selecting a lens for your camera |
| Setting Up Multiple GigE Cameras |
| How to Optimize GigE Network Adapter Settings |
| Using the Spinnaker Multicore GigE Optimizer |
| Using third-party applications from our software partners |
Contacting Us
For any questions, concerns or comments please contact us via the f methods:
| General questions | ||
| Support Ticket | Technical support | |
| Website | Find specifications, support articles, downloads on the product page at Teledyne FLIR machine vision |

- Will your system support the camera?
- Do you have a downloads account?
- Do you have all the parts you need?
- Camera Care
- Installing your Interface Card and Software
- Using the Spinnaker SDK
- Camera Interface
- APL Ethernet Connector
- Installing your Forge 5GigE
- Attach a Lens
- Connect the interface Card and Cable to the Camera
- Plug in the GPIO connector
- Confirm Successful Installation
- Configure IP Settings if necessary
- Status Indicator LED
- General Purpose I/O Connector
- For More Information
- Contacting Us
Brand : FLIR
Model : Forge
Category : Uncategorized