
GoPro4U - Action Camera BLOW - Free user manual and instructions
Find the device manual for free GoPro4U BLOW in PDF.


| Brand | BLOW |
| Model | GoPro4U |
| Product Type | Action Camera |
| Video Resolution | Up to 5K 30fps (5120x2880), 4K 60fps, 1080P 120fps, 720P 240fps |
| Photo Resolution | Up to 20MP (with 20M/14M/10M/8M options) |
| Image Stabilization | Electronic Image Stabilization (EIS) with 6-axis gyroscope |
| Display | Front screen and main touchscreen |
| Connectivity | Wi-Fi (2.4GHz), Bluetooth (for remote), HDMI output, USB Type-C |
| Memory Card | microSD/microSDHC/microSDXC up to 128GB (FAT32), UHS-III recommended for 4K |
| Battery | Built-in rechargeable lithium-ion, charging time approx. 4 hours (5V/1A) |
| Waterproof | Not specified; housing heat warning, not submersible |
| Dimensions | Approx. 6 x 4 x 2 cm (estimated from typical action cameras) |
| Weight | Approx. 100 g (estimated with battery) |
| External Microphone | Compatible with 2.5mm wired omnidirectional mono microphone |
| Remote Control | 2.4GHz wireless remote (optional), splash-proof, range 5m |
| Mobile App | iSmart DV app (iOS and Android) for remote control and file transfer |
| Loop Recording | Yes, overwrites old files when card is full |
| Slow Motion | Up to 720P 240fps (requires EIS off) |
| Time-Lapse | Video and photo time-lapse with adjustable intervals |
| Driving Mode | Auto start/stop with car charger (5V/1A) |
| Date Stamp | On/Off, Date or Date & Time for photos and videos |
| Storage Temperature | Do not store above 60°C (140°F) |
| Cleaning | Wipe with soft dry cloth; avoid liquids |
| Warranty | Standard warranty, see manufacturer website |
Frequently Asked Questions - GoPro4U BLOW
User questions about GoPro4U BLOW
0 question about this device. Answer the ones you know or ask your own.
Ask a new question about this device
Download the instructions for your Action Camera in PDF format for free! Find your manual GoPro4U - BLOW and take your electronic device back in hand. On this page are published all the documents necessary for the use of your device. GoPro4U by BLOW.
USER MANUAL GoPro4U BLOW
natural_image
Exterior view of a modern BLOW 5K camera with a digital display showing a skier in action (no text or symbols on the device body)BLOW
Multifunction sports camera
natural_image
Illustration of a person on waves with red arrows and icons, no readable text or symbolsVideo Preview Mode

natural_image
Four white icons on dark background: Wi-Fi, microphone, power button, and lock (no text or symbols)Shortcut Mode

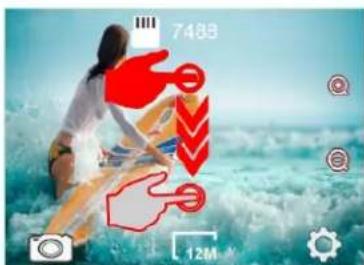
Photo Preview Mode
natural_image
Illustration of a person fishing on waves with a red upward arrow graphic overlay (no text or symbols)Video Preview Mode

Mode-Selection Menu

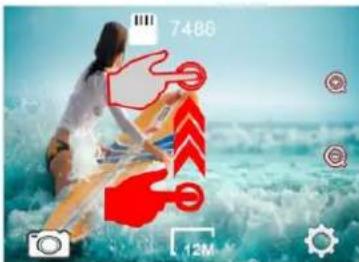
Photo Preview Mode
natural_image
Two hands holding a surfboard on waves, one with red arrows and the other with a red icon (no text or symbols)Video Preview Mode

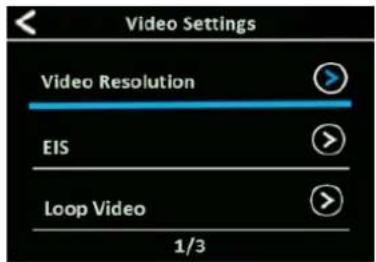
Video Serttings
natural_image
Woman surfing on waves with a camera interface, no visible text or symbols in the sceneVideo Preview Mode
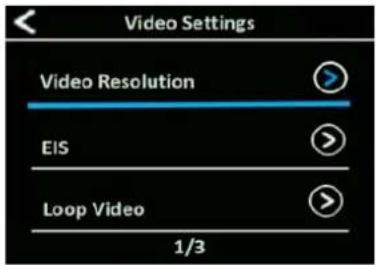
Video Serttings
natural_image
Person on waves holding a surfboard with red arrows and icons, no readable text or symbolsVideo Preview Mode

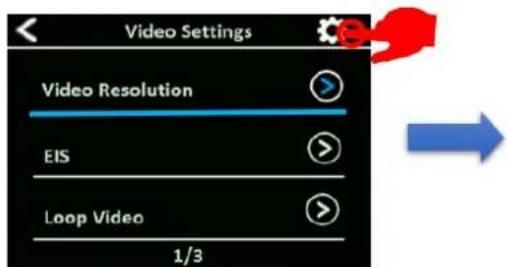
Video Serttings
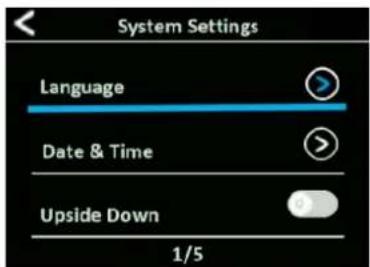
System Serttings
USTAWIENIA WIDEO
natural_image
Mobile phone screenshot showing a cyclist on a mountain peak with sky and clouds in the background (no readable text or symbols)POBIERANIE I UDOSTĘPNIANIE TREŚCI
natural_image
Mobile app screenshot showing a person riding a mountain bike against a cloudy sky (no text or symbols visible)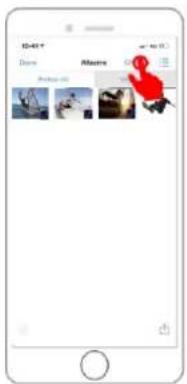
MIKROF ZEWNETRZNY
This is a action camera. It is normal for the housing to exert heat under use.
Don't expose the product directly to high temperatures over 40^ C.
Please peel off Transparent protective films on lens and screen of camera before using.
Please properly protect well the lens and screen of camera after using.
Keep it safe from falling and dropping.
Keep it distance from any strong magnetic interference objects like electrical machine to avoid strong radio waves that might be damaging the product and affect the sound or image quality.
In case of overheating, unwanted smoke from the device, unplug it immediately from the power outlet to prevent hazardous fire.
Keep it safety from children while on charging.
Stored the device in a cool, dry and dust free location.
Meet the Go Pro4U 5K camera
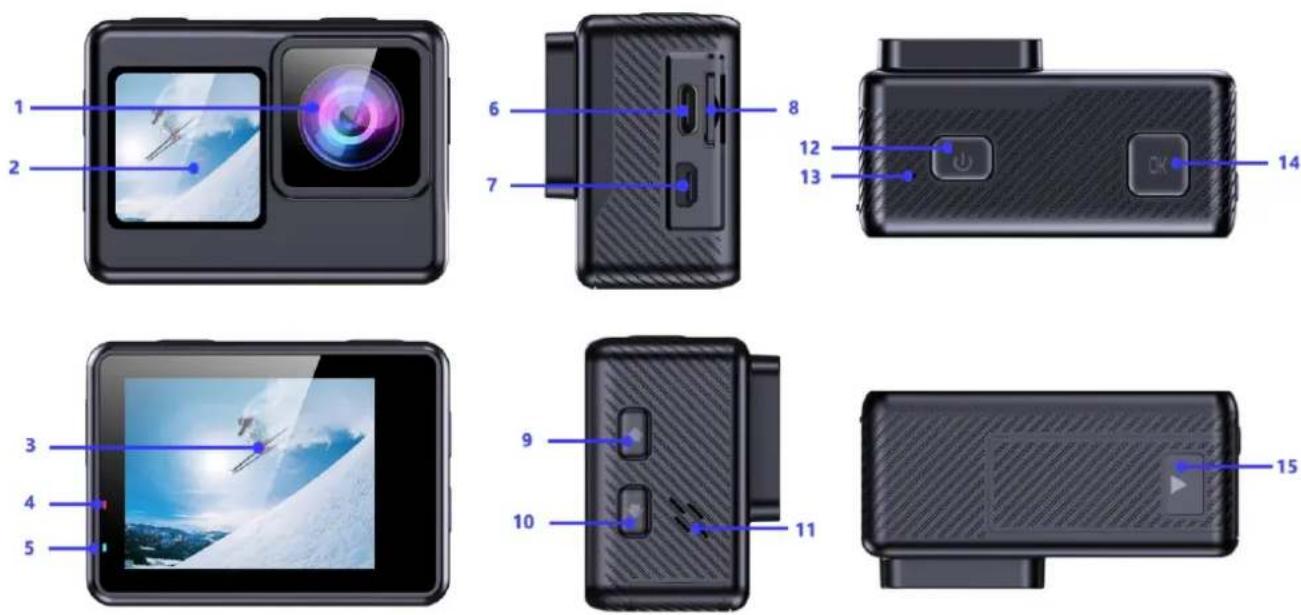
1 - Lens
2 - Front Screen
3 - Main Screen
4 - Charging Indicator
5 - Working Indicator
6 - Type-C USB Port
7 - HD Output Port
8 - Micro SD Card Slot
9 - UP / Wi-Fi / Zoom in Button
10 - Down / Remote / Zoom out / Beauty Button
11 - Speaker
12 - Mode / Power Button
13 - Built-in Mic
14 - Shutter / Select Button
15 - Battery Door
Tips :
- Verify the camera is in Video Preview Mode, Long Press and hold the Up Button to turn on Wi-Fi and press quickly Up Button to turn off Wi-Fi.
- Verify the camera is in Video Preview Mode, Short press Down Button to switch to front screen, press Down Button again to back the main screen.
- Verify the camera is in Photo Preview Mode, long Press and hold the Up or Down Button to Zoom in/out photo.
- Verify the camera is in Photo Preview Mode, Short press Down Button to switch to front screen,press Down Button again to back the main screen.
GETTING STARTED
To capture video and photos, you need a micro SD card (sold separately).
We strongly recommend to use the branded memory cards purchased from regular channels for maximum reliability and stability during recording and in high vibration activities.
STORAGE/MICRO CARDS
Use brand name memory cards that meet following requirements, We strongly recommend to use the branded memory cards purchased from regular channels for maximum reliability and stability during recording and in high vibration activities.
- micro SD, micro SDHC, or micro SDXC
• UHS-III rating at least for 4K Video resolution
• Capacity up to 128GB (FAT32)
NOTES:
- Please format the micro SD, micro SDHC and micro SDXC memory card on the camera before using.
- Please insert the memory card in correct way. if not, the card slot maybe damage by the wrong way.
• To keep your micro SD card in good condition, reformat it on a regular basis.
- Micro SD card stops recording when the storage of each file is over 4GB and starts to record again on a new file.
- Reformatting erases all of your content, so be sure to offload your photos and videos first.
- Don't place your Micro SD card near strong magnetic objects to avoid data error or loss.
POWERING ON + OFF
To Power On:
Press and hold the Mode button for seconds. The camera beeps while the camera status light is on. When information appears on the LCD display your camera is on.
To Power Off:
Press and hold the Mode button for seconds. The camera beeps while the camera status light is off.
OVERVIEW OF MODES
Button Operation:
Turn on the camera, press the Mode Button to cycle through camera modes and settings.
Touch Operation:
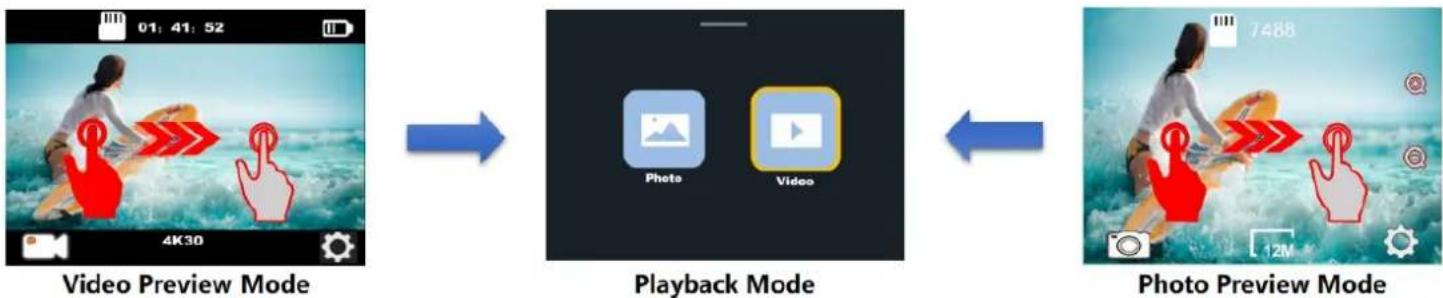
1) Turn on the camera and verify the camera is in Video Preview Mode or Photo Preview Mode, quickly Swipe from left to right on the touch screen to enter Playback Mode, as shown below:
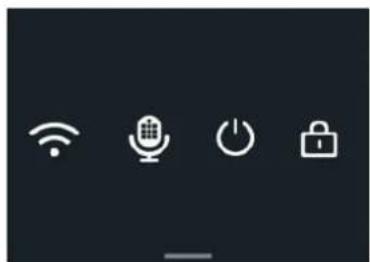
2) Turn on the camera and verify the camera is in Video Preview Mode or Photo Preview Mode, quickly swipe from Up to Down on the touch screen to switch to the Shortcut Mode, as shown below:
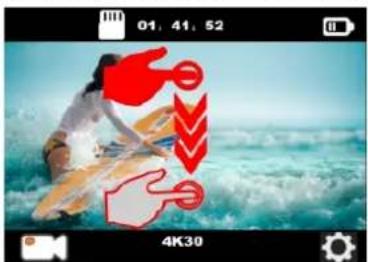
natural_image
Illustration of a person surfing on waves with red arrows and lock icons, no readable text or symbolsVideo Preview Mode

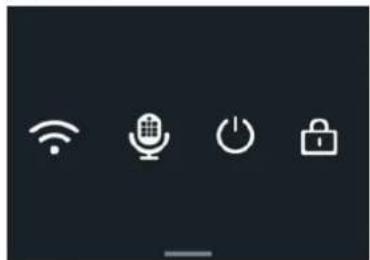
natural_image
Four white icons on dark background: Wi-Fi, microphone, power button, and lock (no text or symbols)Shortcut Mode

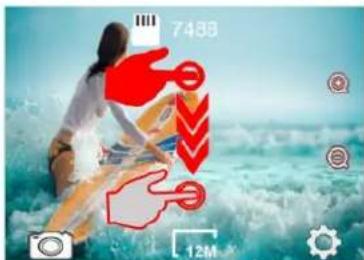
Photo Preview Mode
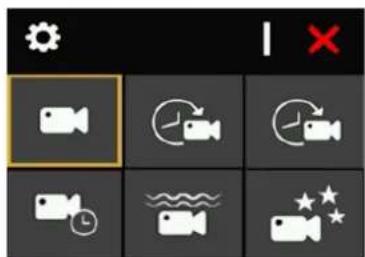
3) Turn on the camera and verify the camera is in Video Preview Mode or Photo Preview Mode, Quickly swipe from down to up on the screen to switch to the Mode-Selection Menu, as shown below:
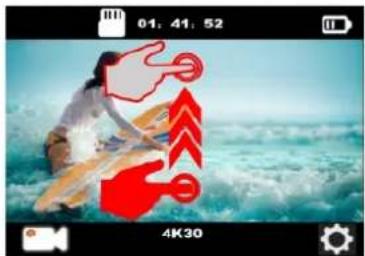
natural_image
Illustration of a person fishing in the ocean with red arrows and a camera interface (no readable text or symbols)Video Preview Mode

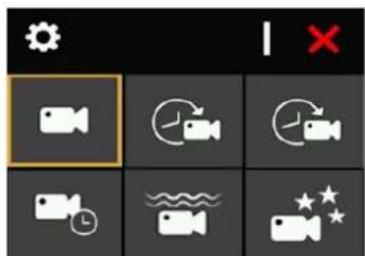
Mode-Selection Menu

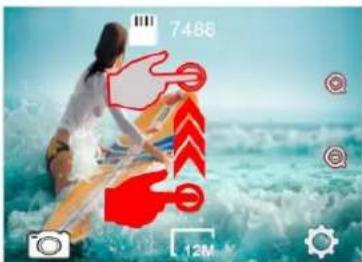
Photo Preview Mode
PHOTO SETTING
Verify the camera is in Photo Setting Mode, press the Shutter button to enter the Photo Settings menu. Then press the UP or Down button repeatedly to cycle through the options, and press the Shutter button to select the desired option. To exit, press the Mode button again.
Photo Resolution: 20M/14M/10M/8M
Default setting is 12M
ISO: Auto / 100 / 200 / 400 / 800 / 1600 / 3200
Default setting is Auto.
ISO determines the camera's sensitivity to light, and creates a trade-off between brightness and resulting image noise. Image noise refers to the degree of graininess in the image. In low light, higher ISO values result in brighter images, but with greater image noise. Lower values result in lower image noise, but darker images. When you change this setting, the display immediately shows you the effect on your image.
EV(Exposure Value): -3 \~ +3
By default, your camera uses the entire image to determine the appropriate exposure level. However, EV lets you select an area that you want the camera to prioritize when determining exposure. This setting is particularly useful in shots where an important region might otherwise be over- or underexposed.
When you change this setting, the LCD display immediately shows you the effect on your image. If you change modes, the camera returns to using the entire scene to determine the correct level of exposure.
Time Lapse Photo: Off / 3Sec / 5Sec / 10Sec / 30Sec / 1min
Time Lapse Photo captures a series of photos at specified intervals. Use this mode to capture photos of any activity, then choose the best ones later.
Note: If use Time Lapse Photo function, Burst Photo, Delay Timer and Long Exposure will not be available automatically.
TL Duration: Unlimited /5Mins / 10Mins /15Mins / 20Mins/ 30Mins / 60Mins
Default setting is Unlimited.
Note: If you want to use TL Duration, please turn on Time Lapse Photo interval first.
Burst Photo: Off / 3photos / 5photos / 15Photos / 30Photos
Default setting is off.
Continuous shooting can take up to 30 photos in a certain amount of time, making it ideal for fast-moving events.
- If use Burst Photo function, Time Lapse Photo, TL Duration and Long Exposure will not be available automatically.
Delay Timer: 2sec / 10sec
A Delay Timer gives a delay between pressing the shutter release and the shutter's firing. It is most commonly used to let photographers to take a photo of themselves (often with family).
Note:
- If use Delay Timer function, Time Lapse Photo, TL Duration and Long Exposure will not be available automatically.
Long Exposure: Off / 1sec / 2sec / 5sec / 8sec / 30sec / 60sec
Default setting is off.
Long Exposure is an exposure method that selects a slow shutter speed. Long exposures can make dark scenes clearer and get fantastic effects. Especially in night vision scenes such as starry sky or city night traffic, the camera can also take fantastic photos at night. Note:
• If use Long Exposure function, Time Lapse Photo, TL Duration, Burst Photo and Delay Timer will not be available automatically.
Date Stamp: Off / Date / Date & Time
If you turn on Stamp, this camera adds stamp to the photos you take.
If you turn off Stamp, this camera will not add stamp to the photos you take.
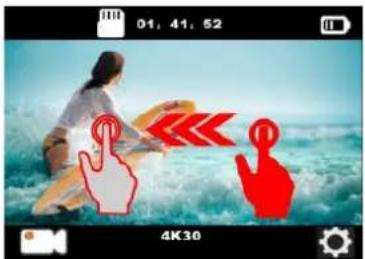
4) Turn on the camera and verify the camera is in Video Preview Mode or Photo Preview Mode:
- Swipe from right to left quickly on the touch screen to switch fast to the Video Settings or Photo Settings, as shown below:
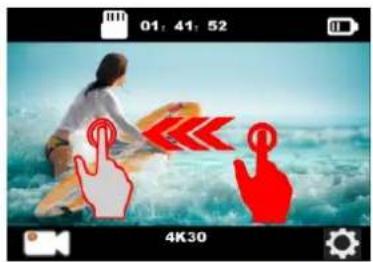
natural_image
Two hands reaching toward a person on waves, one pointing at the water with red arrows, the other holding a small object (no text or symbols)Video Preview Mode

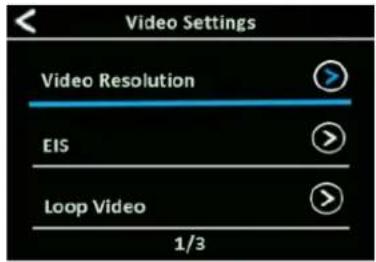
Video Serttings
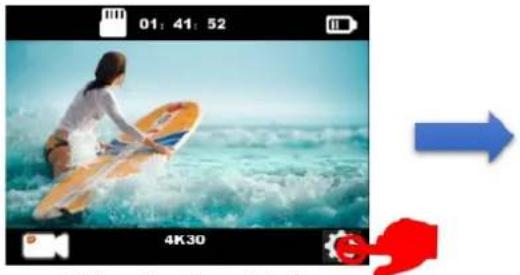
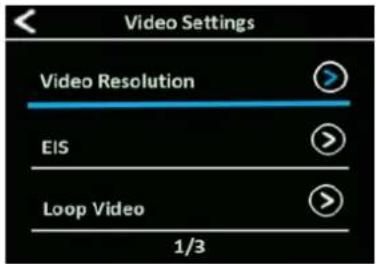
- Tap the settings icon in the bottom right corner of the screen to switch fast to the Video Settings or Photo Settings, as shown below:
natural_image
Person surfing on turquoise waves with blue arrow and red arrow overlay (no text or symbols)Video Preview Mode
Video Serttings
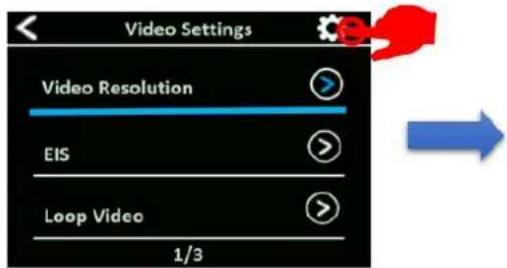
5) Turn on the camera and verify the camera is in Video Preview Mode or Photo Preview Mode, Swipe from right to left quickly on the touch screen to switch fast to the Video Settings or Photo Settings, then tap the settings icon in the upper right corner of the screen to enter into the system settings.
natural_image
Person on waves holding a guitar, with red arrows and icons pointing at the right (no readable text or symbols)Video Preview Mode

Video Serttings
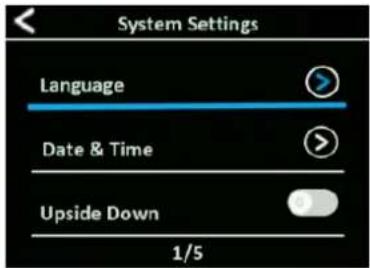
System Serttings
SYSTEM SETTING
Verify the camera is in System Setting Mode, press the Shutter button to enter the System Settings menu. Then press the UP or Down button repeatedly to cycle through the options, and press the Shutter button to select the desired option. To exit, press the Mode button again.
Frequency: 50Hz/60Hz
Default setting is 50 Hz.
Sound: Shutter / Boot / Beep / Volume
Shutter: On / Off
Sets the camera's shutter sound.
Boot : On / Off
Sets the your camera's power on sound.
Beep: On/Off
Sets the camera's operation sound.
Volume: 0 / 1 / 2 / 3
Sets the volume of your camera's record sound.
AE Meter: Center / Multi / Spot
Default setting is Multi
In photography, the metering mode refers to the way in which a camera determines exposure. Cameras generally allow the user to select between center, average or spot metering modes. The different metering modes allow the user to select the most appropriate one for use in a variety of lighting conditions
AWB: Auto / daylight / cloudy / Incandescent / Fluorescent / Snorkeling / Snow Mode
AWB (Auto White Balance) lets you adjust the color temperature of videos and photos to optimize for cool or warm lighting conditions. When you change this setting, the LCD display immediately shows you the effect on your image.
Note:
- Snorkeling mode provides color correction while capturing footage in blue water or clear freshwater at depths of 5 to 33ft (1.5 to 10m)
- Snow mode can suppress overexposure in high-brightness environments such as snow field or beach.
Effect: Standard / Black & White / Natural / Negative / Retro / Brightness Contrast
Default setting is Normal.
LDC (Lens Distortion Correction) : On / Off
Default setting is off.
Turn on Distortion Correction, it can correct the image distortion.
Date & Time: YYMMDD 00:00:00
The date and time are automatically updated when you connect your camera to the iSmart DV app. However, you can manually change these settings, if needed.
Note:
- If the battery is removed from the camera for an extended period of time, the date and time will be reset automatically.
Turns off the LCD display after a period of inactivity to save battery life. To turn on the LCD display again, press any button on the camera.
Upside Down: On/Off
This setting determines the orientation of setting menu.
Powers off your camera after a period of inactivity to save battery life.
Wi-Fi: On/Off
Default setting is off.
RF Remote: On/Off
Default setting is off.
Driving Mode: Off/On
If you turn on car mode and connect camera with car charger, the camera will turn on automatically and start recording if you start your car's engine. and the camera will turn off and stop recording if you Turn off the car's engine.
Note:
- Must use 5V 1A output car charger.
• Using as a dash cam, we suggest to turn on the Loop Video, Driving Mode and Screen Saver at same time.
Reset Wi-Fi : Yes / No
This option can erase the camera's WiFi data.
Language: English/简体中文/繁体中文/日本語/Italiano/Espanol/Portugues /Deutsch/Français/Polski/Pусский/한국어
Sets the language that appears on the camera.
Format: Yes/No
To keep your micro SD card in good condition, reformat it on a regular basis. Reformatting erases all of your content, so be sure to offload your photos and videos first. To reformat your card, press the mode button to enter system setting, then press down button several times to enter Format > Format Card? > YES.
Reset: Yes/No
This option resets all settings to their default values.
Version : Model / Version / Number / Dated
You can check the model, software version and updated time of your camera.
Note:
- Software version is the main information of firmware upgrade, troubleshooting and after-sales. If necessary, please provide the software version information to our after-sales team so that we can serve you in time.
Memory Card: Capacity / Free Space
Card Info option let you check the capacity and free space of your micro SD card.
Note:
If the camera's battery is removed, all settings will be restored to the factory default settings.
VIDEO SETTING
Verify the camera is in Video Setting Mode, press the OK button to enter the Video Settings menu. Then press the UP or Down button repeatedly to cycle through the options, and press the OK button to select the desired option.
To exit, press the Mode button again.
Video Resolution: 5K 30fps (5120X2880) / 4K 60fps (3840*2160) / 4K 30fps (3840*2160) / 1080P 120fps (1920*1080)
1080P 60fps (1920*1080) / 1080P 30fps (1920*1080) / 720P 240fps (1080*720)
Default setting is 4K 30fps.
Note:
- When capturing video at high resolution or high frame rates such as 4K 60/30fps, the camera may become hot and consume more power, which is normal.
• FAT32 format Micro SD card stops recording when the storage of each file is over 4GB and starts to record again on a new file - Since the exposure time of 4K60 will be shorter than 4K30 in low light scenes, 4K60 video will be darker than 4K30 in low light environment. In order to get better low-light video effects, it is recommended to turn on low-light mode in low-light scenes such as indoor/night/tunnel/underground parking. In order to avoid overexposure, it is recommended to turn off the low light mode in highlights such as beaches and snow.
EV(Exposure Value): -3 \~ +3
By default, your camera uses the entire image to determine the appropriate exposure level. However, EV lets you select an area that you want the camera to prioritize when determining exposure. This setting is particularly useful in shots where an important region might otherwise be over- or underexposed.
When you change this setting, the LCD display immediately shows you the effect on your image. If you change modes, the camera returns to using the entire scene to determine the correct level of exposure.
EIS (Electronic Image Stabilization) : On/Off
This camera is equipped EIS function with 6-axis gyroscope to detect motion changes. When the camera tilts, moves, shakes, the sensor use image cross-border compensation algorithm to compensate the change and produce stable videos, especially in activities with relatively small angle (about 6 degrees) but fast motion including cycling, motorcycling, and hand-held uses.
Note:
• EIS does not support 1080P 120fps / 720P 240fps video resolution.
- If you turn on EIS, Slow Motion, Auto Low Light and LDC will not be available automatically.
When the micro SD card is full, the new files will cover the old one if loop recording is on.
Note:
- FAT32 format Micro SD card stops recording when the storage of each file is over 4GB and starts to record again on a new file. You cannot set 5min video file length when camera is at 4K 60fps, 5min 4K 60fps video file is over 4GB.
- If you turn on Loop Video, Time-Lapse Video, TL Duration and Slow Motion will not be available automatically.
Time-Lapse Video: Off / 1Sec / 3Secs / 5Secs / 10Secs /30Secs /1min
Default setting is off.
Time Lapse Video creates video from frames captured at specific intervals. This option lets you capture a time lapse event and immediately view or share it as a video.
Select 3 seconds means recording 3 seconds to get one frame per second.
For example: If you select 4K/30FPS and 3 secs, you need to record 90secs, then you can get 1 sec video for 4K/30FPS.
Note:
• Time Lapse Video is captured without audio.
- If you use Time-Lapse Video function, the camera can not recorded the video over 30fps.
- If you use Time-Lapse Video function, Loop Video, Slow Motion and Fast Motion will not be available automatically.
TL Duration: Unlimited/5Mins / 10Mins /15Mins / 20Mins / 30Mins / 60Mins
Continuously creates Time Lapse Video at specific duration.
Note: If you want to set Time Lapse Duration, please turn on Time Lapse Interval first.
Slow Motion: On / Off
Slow motion is an effect in film-making whereby time appears to be slowed down.
Note:
- If you want to select Slow Motion, please turn off Image Stabilization first, then choose 1080P120fps/720P240fps under Video Resolution.
- If you use Slow Motion function, EIS, Time-Lapse Video and Fast Motion will not be available automatically.
Fast Motion: Off / 2x / 4x / 6x / 10x / 15x
Action that appears to move faster than normal on the screen, accomplished by filming the action at less than normal speed in the camera and then projecting it at normal speed.
Note: If you use Fast Motion function, Time-Lapse Video and Slow Motion will not be available automatically.
Wind Noise Reduction: On / Off
Turn on Wind Noise reduction function, it can lower the noise to an acceptable level.
Auto Low Light: On / Off
Default setting is Off.
Auto Low Light mode will automatically adjust the brightness in low light conditions to achieve the best low light performance.
Date Stamp: Off / Date / Date & Time
If you turn on Date Stamp, this camera adds date/time stamp to the videos you record.
If you turn off Date Stamp, this camera will not add date/time stamp to the videos you record.
VIDEO MODE
VIDEO
To record video, verify the camera is in desired Video Setting option and set the desired video resolution, if the Video icon in your camera's LCD is not showing, press the Mode Button repeatedly to the Video Setting menu and select the desired option , such as Loop Video/Time-lapse Video/Slow Motion/Fast Motion etc.
To Start Recording:
To press the Shutter Button. The camera's blue Working Indicator will flash and a Red Dot will show on the screen while recording.
To Stop Recording:
To press the Shutter Button. The camera Working Indicator stop flashing and the Red Dot disappear on the screen to indicate recording has stopped
Notes
• FAT32 format Micro SD card stops recording when the storage of each file is over 4 GB and starts to record again on a new file
- This camera automatically stops recording when the battery is out of power. Your video will save before the camera powers off. The video will not be saved, and even the video will be damaged, if the batter is took out or loss power during recording.
- Due to the battery's characteristics and environmental temperature requirements, such as high temperatures can cause the battery to expand. In high temperature environments, especially in the summer, when you use this camera as a dash camera, we strongly recommend that you remove the battery and use the car power directly, but when the car's engine is turned off, the camera will immediately turn off, the date&time set and last video recorded will not be saved
- This camera automatically stops recording when the SD card is full, if the looping record function is turn off.
PHOTO MODE
PHOTO
To capture photo, verify the camera is in desired Photo Setting option and set the desired photo resolution, if the photo icon in your camera's LCD is not showing, press the Mode Button repeatedly to the Photo Setting menu and select the desired option such as Time-lapse Photo/Burst Photo/Delay Timer/Long Exposure etc.
To capture a photo:
In the Photo mode, Press the Shutter Button. The camera will emit the camera shutter sound.
To capture Time-Lapse Photo series
Verify the camera is selected desired Time Lapse Photo mode, Press the Shutter Button, The camera will trigger continuous shooting at the set interval and TL dration, the camera will emit shutter sound each time a photo is taken. To stop Time Lapse Photo, Press the Shutter Button again.
To capture a Burst Photo series:
Verify the camera is selected desired Burst Photo option, Press the Shutter Button, the camera will emit shutter sound each time a photo is taken.
To capture a Delay Timer Photo:
Verify the camera is selected desired Delay Timer option, Press the Shutter Button, the camera initiates countdown and emit shutter sound each time a photo is taken.
To capture a Long Exposure Photo:
Verify the camera is selected desired Long Exposure option, Press the Shutter Button, the camera initiates BEEP and emit a shutter sound as soon as the photo is taken.
NOTE:
- If use Time Lapse Photo function, Burst Photo, Delay Timer and Long Exposure will not be available automatically.
- If the Time Lapse photo function is not turned on, the TL Duration function is invalid even if the TL Duration's related option is set.
• If use Burst Photo or Delay Timer function, Time Lapse Photo, TL Duration and Long Exposure will not be available automatically.
• If use Long Exposure function, Time Lapse Photo, TL Duration, Burst Photo and Delay Timer will not be available automatically.
PLAYBACK
PLAYING BACK ON CAMERA
- Enter Video or Photo playback mode. If the SD card contains a lot of content, it might take a minute for it to load.
- Press the Up / Down Button to scroll through the video or photo files.
- Press Shutter Button to open video or photo in full-screen view.
- To return to the file list, press Mode Button.
- To exit the Playback mode, press Mode Button again.
PLAYING BACK ON TV
- Turn on the TV
- Connect the Mini HDMI end to the port on camera and HDMI end to HDMI port on the TV
- Select the right input source on the TV
- Turn on the camera after a while, you can preview the camera from TV
- Setting your camera into the video/photo playback mode
- Select the desired content to playback
Note:
- If the camera is connected TV with HDMI cable, the camera do not support to take videos or photo, only for Playback.
• HDMI cable is not included in the standard package, you will need buy an extra HDMI cable.
To play back your video and photos on a computer, you must first transfer these files to a computer. Transferring also frees up space on your micro SD card for new content. To offload files to a computer using a card reader (sold separately) and your computer's file explorer, connect the card reader to the computer, then insert the micro SD card. You can then transfer files to your computer or delete selected files on your card. Note that you must use a card reader to offload photos or audio files. With this method, playback resolution depends on the resolution of the device and its ability to play back that resolution.
NOTE:
- 4K60 requires a high data transmission stream. If you playback 4K60 video file through a card reader, you may not be able to obtain sound playback. In order to get better playback results, it is strongly recommended to copy the 4K60 video directly to the computer to playback.
• This camera might not be compatible with the files from different solution camera or other device. - The quick time player is a good compatibility with MOV format video files. We strongly recommend using the Quick Time Player to play back video files on your computer.
DELETE FILE ON CAMERA
- Verify the camera is in Video or Photo Playback menu, If your micro SD card contains a lot of content, it might take a minute for it to load.
- Press the Up or Down Button to locate the file you want to delete.
- Press and hold the Up Button for seconds. The screen shows "Delete File".
- Press the Up or Down Button to locate the desired option: "Single File" or "All Files", then Press Shutter Button to select the desired option.
- Press the Up or Down Button to locate the desired option: "Yes / No"
- If you select "Yes", then Press Shutter Button to deleted the file you want.
If you select "No", then Press Shutter Button to back the playback mode.
BATTERY
The camera contains sensitive components, including the battery.
BATTERY STORAGE AND HANDLING
- Do not store in temperature above 140^ / 60^ .
- Avoid exposing your camera to very cold or very hot temperatures. Low or high temperature conditions may temporarily shorten the battery life or cause the camera to temporarily stop working properly. Avoid dramatic changes in temperature or humidity when using the camera, as condensation may form on or within the camera.
- Do not dry the camera or battery with an external heat source such as a microwave oven or hair dryer.
• Damage to the camera or battery caused by contact with liquid inside the camera is not covered under the warranty. - Do not store your battery with metal objects, such as coins, keys or necklaces. If the battery terminals come in contact with metal objects, this may cause a fire.
- Do not make any unauthorized alterations to the camera. Doing so may compromise safety, regulatory compliance, performance, and may void the warranty.
- Please do no throw the camera or its battery to the garbage, find a specific recycling point for it.
WARNING:
- Do not drop, disassemble, open, crush, bend, deform, puncture, shred, microwave, incinerate or paint the camera or battery.
- Do not insert foreign objects into the battery opening on the camera.
- Do not use the camera or the battery if it has been damaged - for example, if cracked, punctured or harmed by water. Disassembling or puncturing the battery can cause an explosion or fire.
CHARGING THE BATTERY
- Connect the camera to USB power supply (5V/1A commended).
- The charging status light remains ON while the battery is charging.
- The charging status light will turn OFF when the battery is fully charged.
Notes:
•Charging time: 4-hours for 5V 1A power supply
- Please make sure the camera is shuttled down while charging.
- Remove the battery before using as a dash camera and use 5V/1A brand-name car charger.
MAXIMIZING BATTERY LIFE
If the battery reaches 0% while recording, the camera saves the file and powers off.
To maximize battery life, follow these guidelines when possible:
• Turn off Wireless Connections
• Capture video at lower frame rates and resolutions
- Use Screen Saver setting.
Wi-Fi APP
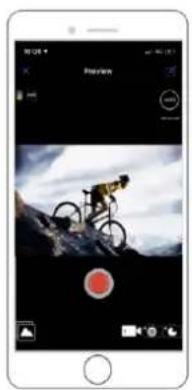
The Wi-Fi App lets you control your camera remotely using a smart phone or tablet. Features include full camera control, live preview, playback and sharing of selected content and more.
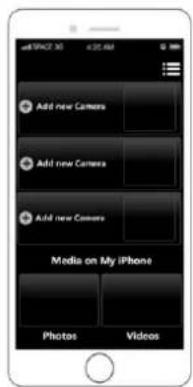
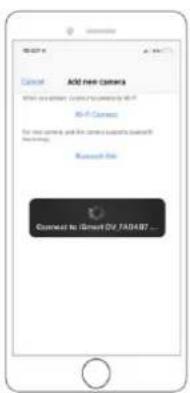
CONNECT TO THE iSmart DV APP
- Download iSmart DV app to your mobile device from the Apple App Store or Google Play;
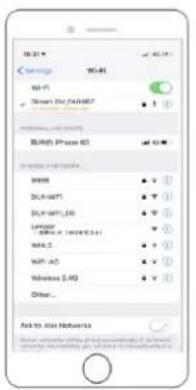
- Turn on the camera, then press Up Button for seconds to turn on Wi-Fi;
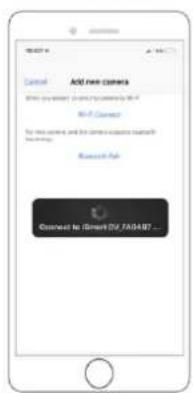
- Turn on Wi-Fi Setting of your mobile device, connect to the Wi-Fi SSID "iSmart DV";
- Enter the password: "1234567890";
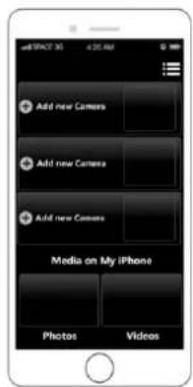
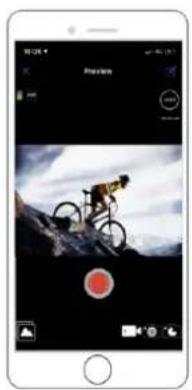
- Open the app "iSmart DV" on your smart phone or tablet.
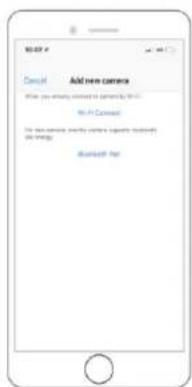
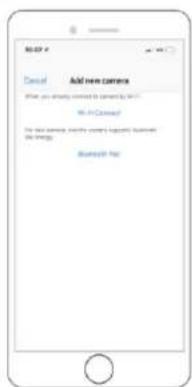
- Tap "Add new camera";
- Tap "Wi-Fi Connect";
Note: Press Up Button for seconds again if you want to turn off Wi-Fi.
natural_image
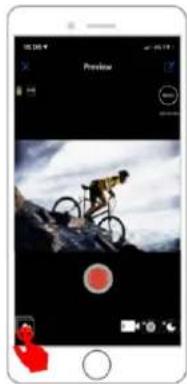
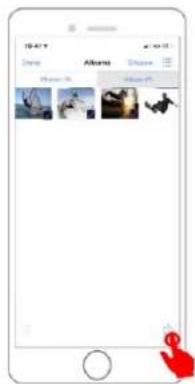
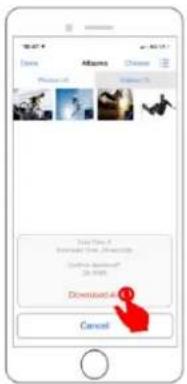
Mobile phone screenshot showing a cyclist on a mountain peak with a red circular overlay (no readable text or symbols)DOWNLOADING AND SHARE YOUR CONTENT
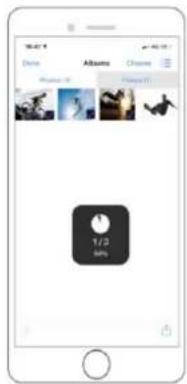
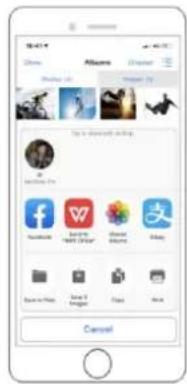
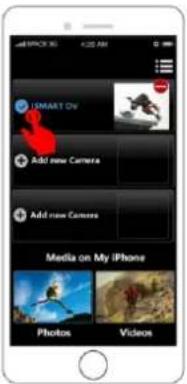
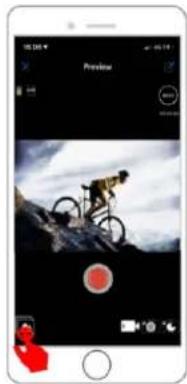
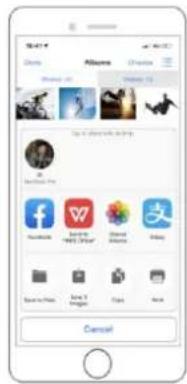
- Open the "iSmart Dv" app.
- Tap "Albums icon" at the left corner of the bottom screen.
- Select files in "Photos" or "Videos" at the top of the screen.
- Tap "Download icon" at the right corner of the bottom screen to download
- Save or Share your content.
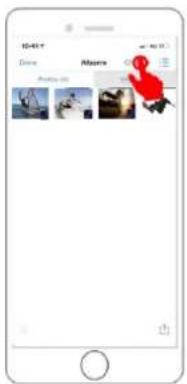
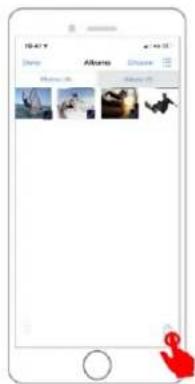
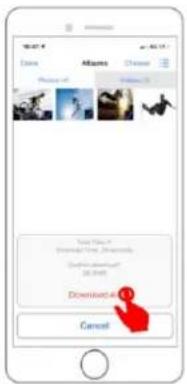
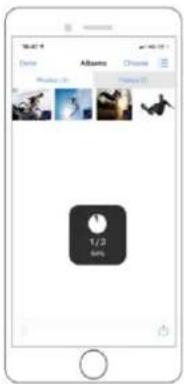
The iSmart DV App is compatible with smart phone and tablet listed below:
ForApple IOS
*iPhone6(plus),6s(plus),7 (above IOS12)
*iPhone Air & Mini (above IOS12)
For Android
*Android 4x Quad-Core devices (above Android 7.0)
App available on:

EXTERNAL MIC
This camera can be compatible with the external Wired Omani-directional Mono Microphone 2.5mm.
Insert the external MIC to DC2.5 MIC port, the camera will automatically switch to record the sound from the external MIC. This will help to reduce the noise and get better video sound.
Specifications:
Style: Collar Clip Mono Microphone
Polar Patterns: Omnidirectional
Frequency Range: 30Hz\~15000Hz
Output Impedance: 2.2K Ohm
Sensitivity: 34dB±2dB
Plugging: 2.5mm
SNR: >60dB
Wire Length: approx. 1M/3.28 ft
Communication:Wired
Operation temperature range(°C):-10\~+55
2.4G REMOTE
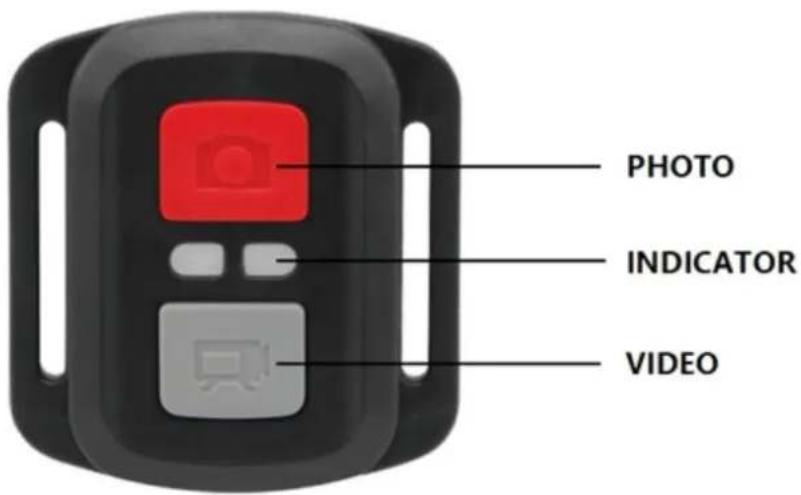
The remote controller is only applicable to cameras with remote control functions. If the camera you purchased is not equipped with remote control module, the following functions will not be available, and the remote control and its accessories will not included in the package. Place the Remote Control On Your Wrist and Acquiesce Ultra-convenient Control for Hiking, Biking, Skiing, Bungee and more while installing the camera on your Helmet or other place.
2.4G Wireless Remote: Splash-proof / Range 5M
HOW TO TURN ON/OFF THE REMOTE:
Way 1: Select ON/OFF in the Setting Menu to turn on/off the 2.4G remote controller.
Way 2: In the Video mode, press the Down Button to turn on/off the 2.4G remote controller quickly.
Video
To start recording: Press the Video Button.
To stop recording: Press the Video Button again.
Photo
To take a photo: Press the Photo Button.
DEKLARACJA ZGODNOSCI / DECLARATION OF CONFORMITY
Producent: PROLECH SP. Z O.O., STARY PUZNÓW 58 B, 08-400 GARWOLIN, POLSKA
The product meets the requirements of the directives:
2014/30/EU, 2014/53/EU, 2011/65/EU, (UE) 2015/863, (UE) 2017/2102.
The declaration of conformity is available for download from the website www.prolech.com.pl

- BLOW
- Multifunction sports camera
- USTAWIENIA WIDEO
- POBIERANIE I UDOSTĘPNIANIE TREŚCI
- MIKROF ZEWNETRZNY
- Meet the Go Pro4U 5K camera
- Tips :
- GETTING STARTED
- STORAGE/MICRO CARDS
- POWERING ON + OFF
- OVERVIEW OF MODES
- Button Operation:
- Touch Operation:
- PHOTO SETTING
- SYSTEM SETTING
- VIDEO SETTING
- VIDEO MODE
- VIDEO
- To Start Recording:
- To Stop Recording:
- Notes
- PHOTO MODE
- PHOTO
- To capture a photo:
- To capture Time-Lapse Photo series
- To capture a Burst Photo series:
- To capture a Delay Timer Photo:
- To capture a Long Exposure Photo:
- NOTE:
- PLAYBACK
- PLAYING BACK ON CAMERA
- PLAYING BACK ON TV
- DELETE FILE ON CAMERA
- BATTERY
- BATTERY STORAGE AND HANDLING
- WARNING:
- CHARGING THE BATTERY
- Notes:
- MAXIMIZING BATTERY LIFE
- Wi-Fi APP
- CONNECT TO THE iSmart DV APP
- DOWNLOADING AND SHARE YOUR CONTENT
- EXTERNAL MIC
- 2.4G REMOTE
- 2.4G Wireless Remote: Splash-proof / Range 5M
- HOW TO TURN ON/OFF THE REMOTE:
Brand : BLOW
Model : GoPro4U
Category : Action Camera