
column PT - Microphone the t.bone - Free user manual and instructions
Find the device manual for free column PT the t.bone in PDF.


| Product Type | Pencil Condenser Microphone |
| Model | column PT |
| Brand | the t.bone |
| Dimensions | Approx. 22 mm x 130 mm |
| Weight | Approx. 120 g |
| Power Supply | 48 V Phantom Power |
| Polar Pattern | Cardioid |
| Frequency Response | 40 Hz – 18 kHz |
| Impedance | 200 Ω |
| Connector | 3-pin XLR |
| Max SPL | 130 dB |
| Signal-to-Noise Ratio | 74 dB |
| Self-Noise | 16 dB-A |
| Sensitivity | -40 dB (10 mV/Pa) |
| Main Features | High-quality studio recording, low noise, cardioid pickup, rugged metal body |
| Maintenance & Cleaning | Wipe with a dry cloth; use a soft brush for the grille; avoid moisture |
| Safety | Use only with phantom power; do not expose to extreme temperatures or humidity |
| Spare Parts & Repairability | Replaceable grille and capsule; contact the t.bone for service |
| General Information | Ideal for vocals, acoustic instruments, and overhead miking |
Frequently Asked Questions - column PT the t.bone
User questions about column PT the t.bone
0 question about this device. Answer the ones you know or ask your own.
Ask a new question about this device
Download the instructions for your Microphone in PDF format for free! Find your manual column PT - the t.bone and take your electronic device back in hand. On this page are published all the documents necessary for the use of your device. column PT by the t.bone.
USER MANUAL column PT the t.bone
natural_image
Two black cylindrical earwatches with attached earphones and a microphone, connected by a cord (no visible text or symbols on devices)the t.bone
column PT
UHF wireless system
Musikhaus Thomann
Thomann GmbH
1.1 Further information.... 6
1.2 Notational conventions.... 7
1.3 Symbols and signal words.... 8
2 Safety instructions....9
3 Features.... 13
4 Installation and starting up.... 14
4.1 General Information.... 14
4.2 Bodypack receiver.... 16
4.3 Bodypack transmitter and receiver.... 17
5 Connections and controls.... 18
5.1 Bodypack receiver.... 18
5.2 Bodypack transmitter.... 22
6 Operating.... 26
6.1 Bodypack receiver.... 26
column PT
th·mann MUSIC IS OUR PASSION
Table of contents
6.2 Bodypack transmitter.... 39
7 Technical specifications.... 49
7.1 Bodypack receiver.... 49
7.2 Bodypack transmitter.... 50
8 Plug and connection assignment.... 52
9 Troubleshooting.... 54
10 Protecting the environment.... 57
th·mann MUSIC IS OUR PASSION
UHF wireless system
1 General information
This manual contains important instructions for the safe operation of the unit. Read and follow the safety instructions and all other instructions. Keep the manual for future reference. Make sure that it is available to all those using the device. If you sell the unit please make sure that the buyer also receives this manual.
Our products are subject to a process of continuous development. Thus, they are subject to change.
column PT
th·mann MUSIC IS OUR PASSION
1.1 Further information
On our website (www.thomann.de) you will find lots of further information and details on the following points:
| Download This manual is also available as PDF file for you to download. | |
| Keyword search | Use the search function in the electronic version to find the topics of interest for you quickly. |
| Online guides | Our online guides provide detailed information on technical basics and terms. |
| Personal consultation For personal consultation please contact our technical hotline. | |
| Service | If you have any problems with the device the customer service will gladly assist you. |
1.2 Notational conventions
This manual uses the following notational conventions:
Letterings
The letterings for connectors and controls are marked by square brackets and italics.
Examples: [VOLUME] control, [Mono] button.
Instructions
The individual steps of an instruction are numbered consecutively. The result of a step is indented and highlighted by an arrow.
Example:
- Switch on the device.
- Press [Auto].
⇒ Automatic operation is started.
- Switch off the device.
column PT

1.3 Symbols and signal words
In this section you will find an overview of the meaning of symbols and signal words that are used in this manual.
Signal word Meaning
DANGER! This combination of symbol and signal word indicates an immediate dangerous situation that will result in death or serious injury if it is not avoided.
NOTICE! This combination of symbol and signal word indicates a possible dangerous situation that can result in material and environmental damage if it is not avoided.
Warning signs Type of danger

Warning – danger zone.
2 Safety instructions
Intended use
This unit is used for the wireless transmission of audio signals between microphones or instruments on the one hand and video or photo cameras on the other. Use the device only as described in this user manual. Any other use or use under other operating conditions is considered to be improper and may result in personal injury or property damage. No liability will be assumed for damages resulting from improper use.
This device may be used only by persons with sufficient physical, sensorial, and intellectual abilities and having corresponding knowledge and experience. Other persons may use this device only if they are supervised or instructed by a person who is responsible for their safety.
column PT
th·mann MUSIC IS OUR PASSION
Safety

DANGER!
Danger for children
Ensure that plastic bags, packaging, etc. are disposed of properly and are not within reach of babies and young children. Choking hazard!
Ensure that children do not detach any small parts (e.g. knobs or the like) from the unit. They could swallow the pieces and choke!
Never let children unattended use electrical devices.

NOTICE!
Operating conditions
This device has been designed for indoor use only. To prevent damage, never expose the device to any liquid or moisture. Avoid direct sunlight, heavy dirt, and strong vibrations.

NOTICE!
External power supply
The device is powered by an external power supply. Before connecting the external power supply, ensure that the input voltage (AC outlet) matches the voltage rating of the device and that the AC outlet is protected by a residual current circuit breaker. Failure to do so could result in damage to the device and possibly the user.
Unplug the external power supply before electrical storms occur and when the device is unused for long periods of time to reduce the risk of electric shock or fire.

NOTICE!
Risk of fire due to incorrect polarity
Incorrectly inserted batteries may destroy the device or the batteries.
Ensure that proper polarity is observed when inserting batteries.
column PT


NOTICE!
Possible damage by leaking batteries
Leaking batteries can cause permanent damage to the device.
Take batteries out of the device if it is not going to be used for a longer period.
3 Features
The UHF wireless camera system is particularly suitable for professional sound transmission to video and photo cameras.
Your UHF wireless camera system column PT is comprised of the following components:
■ Bodypack receiver
■ Battery powered bodypack transmitter
The Bodypack receiver is characterized by:
■ Flexible antenna for optimum reception quality
■ Automatic frequency scanning
Infrared interface for sending the frequency selection from the receiver to the transmitter
■ Very high sensitivity at very high signal-to-noise ratio
■ Noise barrier (squelch) adjustable in three steps
■ Output: 3.5 mm phone socket
■ Attaches to the camera with a fixed flash shoe adapter
■ Voltage supply: 2 AA cells (LR6, 1.5 V) or corresponding rechargeable batteries
column PT
th·mann MUSIC IS OUR PASSION
4 Installation and starting up
4.1 General Information
Unpack and check carefully there is no transportation damage before using the unit. Keep the equipment packaging. To fully protect the product against vibration, dust and moisture during transportation or storage use the original packaging or your own packaging material suitable for transport or storage, respectively.
Create all connections while the device is off. Use the shortest possible high-quality cables for all connections. Take care when running the cables to prevent tripping hazards.
Notes on wireless transmission
This device utilizes frequencies that are not harmonized within the European Union (EU) and therefore may only be used in certain EU member states. In all European countries, the frequencies used for the transmission of audio signals are strictly regulated. Before you start, make sure the frequencies are allowed in the respective country and check whether the operation must be reported to the appropriate authority.
For more information, please visit: http://www.thomann.de.
■ Make sure that transmitter and receiver are both tuned to the same channel.
■ Never set multiple transmitters to the same channel.
■ Make sure that there are no metal objects between the transmitter and receiver.
- Avoid interference from other radio or in-ear systems.
column PT
th·mann MUSIC IS OUR PASSION
4.2 Bodypack receiver
Installing and removing the retaining clamp and the hot shoe adapter
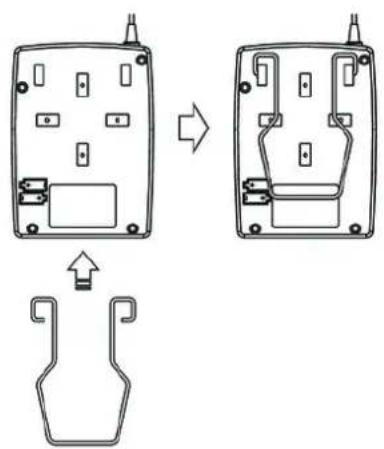
Attach the retaining clamp to the rear of the device as shown in the illustration.
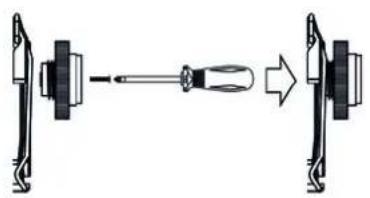
Lift the clamp evenly with two fingers and slide the hot shoe adapter under the clamp. Slide the hot shoe adapter all the way up. Release the retaining clamp. The hot shoe adapter is fixed by the ends of the retaining clamp.
natural_image
Diagram showing a screwdriver connecting two mechanical components (no text or symbols)To disassemble, lift the retaining clamp and slide the hot shoe adapter downwards.
4.3 Bodypack transmitter and receiver
Inserting batteries
Open up the lateral battery compartment. Insert the batteries. Pay attention to the correct location of the poles. The correct arrangement of the batteries is shown on the back of the unit next to the battery compartment. Close the battery compartment and switch the device on.
column PT

5 Connections and controls
5.1 Bodypack receiver
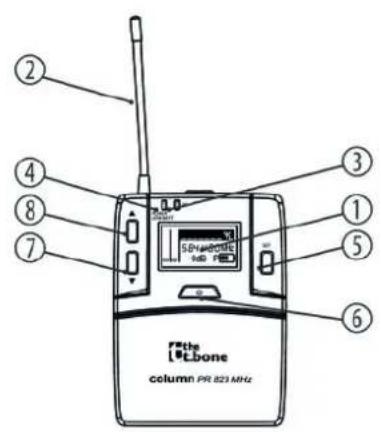
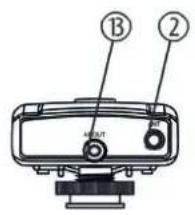
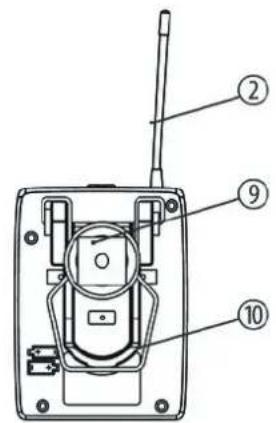
1 Display
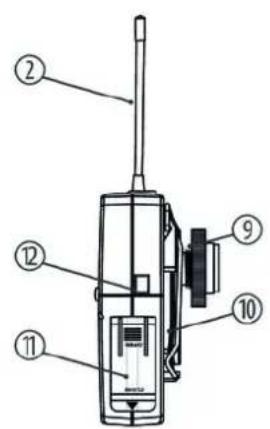
2 Flexible antenna
3 [RF]
Indicates that a signal is being received.
4 [POWER/LOW BATT]
Lights up when the device is turned on. Blinks when the remaining capacity of the batteries gets too low.
5 [SET]
Opens the menu and selects a menu item.
6 Main switch. Turns the device on and off.
7,8 ▲,▼
Toggles between the menu items of a menu level, increases or decreases the displayed value by one.
9 Flash shoe adapter for attaching to a camera.
10 Retaining clamp
11 Battery compartment for two AA batteries (LR06), 1.5 V or comparable rechargeable batteries.
column PT
th·mann MUSIC IS OUR PASSION
12 Infrared sensor
13 [AF OUT]
3.5 mm TRS phone socket for audio signal output and direct connection to a camera.
Display
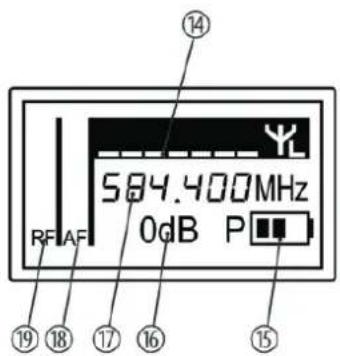
14 Displays the name of the transmission path, if it has been set.
15 Battery level indicator. Replace the batteries as soon as the symbol flashes. Reduces the voltage of the batteries even further if the transmitter is automatically switched off.
16 Displays the set attenuation of the audio signal level.
17 Indicates the frequency that is assigned to the set combination of frequency group and channel.
18 [AF]
Indicates the audio signal level.
19 [RF]
Shows the level of the radio signal received.
column PT

5.2 Bodypack transmitter
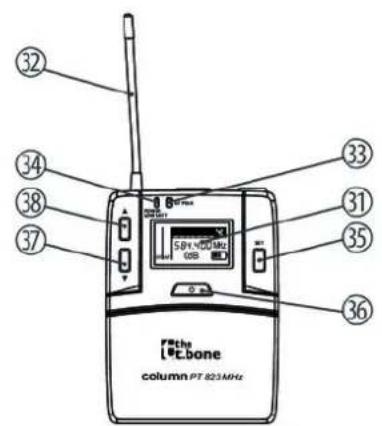
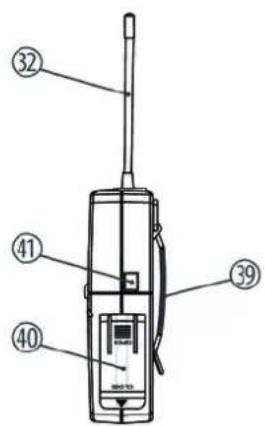
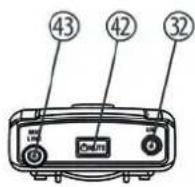
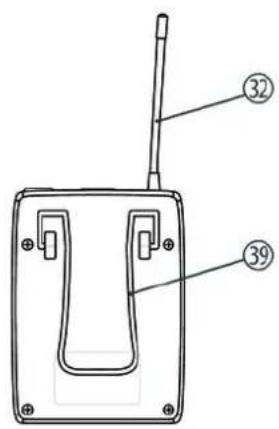
31 Display
32 Flexible antenna
33 [AF PEAK]
Indicates that an audio signal is present at the input.
34 [POWER/LOW BATT]
Lights up when the device is turned on. Blinks when the remaining capacity of the batteries gets too low.
35 [SET]
Opens the menu and selects a menu item.
36 Main switch. Turns the device on and off.
37,38

Toggles between the menu items of a menu level, increases or decreases the displayed value by one.
39 Retaining clamp
40 Battery compartment for two AA batteries (LR06), 1.5 V or comparable rechargeable batteries
41 Infrared sensor
column PT
th·mann MUSIC IS OUR PASSION
Connections and controls
42 [MUTE]
Temporarily mutes or unmutes the transmitter.
43 [MIC/LINE]
3.5 mm TRS phone socket for audio signal input.
Display
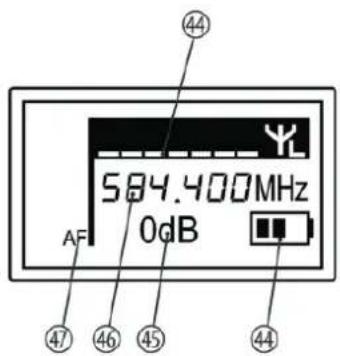
44 Displays the name of the transmission path, if it has been set.
45 Battery level indicator. Replace the batteries as soon as the symbol flashes. Reduces the voltage of the batteries even further if the transmitter is automatically switched off.
46 Displays the set attenuation of the audio signal level.
47 Indicates the frequency that is assigned to the set combination of frequency group and channel.
48 [AF]
Indicates the audio signal level.
49 [RF]
Shows the level of the radio signal sent.
column PT

6 Operating
6.1 Bodypack receiver
Switching the device on / off
- To turn the unit on, press the main switch for two seconds.
⇒ The LED [POWER/LOW BATT] is lit.
- To turn the unit off, press the main switch for several seconds.
⇒ The 'Power&lock' menu opens up.
- Use the arrow buttons to select the menu item 'Power off' and confirm with 'SET'.
⇒ The message 'OFF' appears in the display, die LED [POWER / LOW BATT] turns off, the device is being switched off.
Automatic search for a free channel
- Press [SET].
⇒ The main menu opens up.
- Use the arrow buttons to select the submenu 'Scan New List'.
Press [SET] to confirm the selection.
⇒ The system tests the entire frequency range and determines the free channels. As a result, the number of free channels is displayed.
- Use the arrow keys to select one of the free channels.
Press [SET] to confirm the selection.
⇒ The display shows that the receiver is being adjusted to the new frequency. After a few seconds, the display shows the normal sate again.
- Press the main switch to close the menu.
column PT
th·mann MUSIC IS OUR PASSION
Select channel
- Press [SET].
⇒ The main menu opens up.
- Use the arrow buttons to select the submenu 'Freq. preset'.
Press [SET] to confirm the selection.
⇒ The 'CHxxx' display appears.
- Use the arrow buttons to select a channel between 1 and 90. The bottom line of the display shows the corresponding frequency.
Select channel U to enter the frequency directly.
Press [SET] to confirm the selection.
⇒ The display shows that the receiver is being adjusted to the new frequency. After a few seconds, the display shows the normal sate again.
- Press the main switch to close the menu.
Entering the frequency directly (channel U)
- Press [SET].
→ The main menu opens up.
- Use the arrow buttons to select the submenu 'Advanced'.
Press [SET] to confirm the selection.
- Use the arrow buttons to select the submenu 'Tune'.
Press [SET] to confirm the selection.
- First use the arrow buttons to set the value before the decimal point, then press [SET] and set the value after the decimal point.
Press [SET] to confirm the entry.
⇒ The display shows that the receiver is being adjusted to the new frequency. After a few seconds, the display shows the normal sate again.
- Press the main switch to close the menu.
column PT
th·mann MUSIC IS OUR PASSION
Synchronizing transmitter and receiver
- Ensure that the transmitter is switched on.
- Press [SET] on the receiver.
⇒ The main menu opens up.
- Use the arrow buttons to select the submenu 'Sync'.
Press [SET] to confirm the selection.
⇒ The 'sync' display appears. The receiver now synchronizes its settings with the transmitter.
- Hold the infrared sensor of the transmitter near the infrared interface of the receiver within ten seconds.
- When the synchronization is complete, the display returns to showing the basic state.
- Press the main switch to close the menu.
Setting squelch
This setting sets a threshold value in the reception sensitivity under which the receiver is muted.
- Press [SET].
→ The main menu opens up.
- Use the arrow buttons to select the submenu 'Advanced'.
Press [SET] to confirm the selection.
- Use the arrow buttons to select the menu item 'Squelch'.
Press [SET] to confirm the selection.
- Use the arrow buttons to choose between 'High', 'Mid' and 'Low'.
Press [SET] to confirm the entry.
- Press the main switch to close the menu.
column PT
th·mann MUSIC IS OUR PASSION
Turning the pilot tone on / off
By transmitting an inaudible pilot tone, the devices involved can automatically detect whether the radio link is working.
- Press [SET].
→ The main menu opens up.
- Use the arrow buttons to select the submenu 'Advanced'.
Press [SET] to confirm the selection.
- Use the arrow buttons to select the menu item 'Pilot Tone'.
Press [SET] to confirm the selection.
- Use the arrow buttons to select between 'Activate' (pilot tone on), 'Deactivate' (pilot tone off).
Press [SET] to confirm the entry.
- Press the main switch to close the menu.
Showing software version
- Press [SET].
⇒ The main menu opens up.
- Use the arrow buttons to select the submenu 'Advanced'.
Press [SET] to confirm the selection.
- Use the arrow buttons to select the menu item 'Software Revision'.
Press [SET] to confirm the selection.
⇒ The software version of the device is displayed.
- Press the main switch to close the menu.
column PT
th·mann MUSIC IS OUR PASSION
Resetting to basic settings
- Press [SET].
⇒ The main menu opens up.
- Use the arrow buttons to select the submenu 'Advanced'.
Press [SET] to confirm the selection.
- Use the arrow buttons to select the menu item 'Reset'.
Press [SET] to confirm the selection.
- Use the arrow buttons to select the option 'Yes'.
Press [SET] to confirm the selection.
⇒ The display shows 'Stored', the factory settings are being restored.
- Press the main switch to close the menu.
Adjusting the display contrast
- Press [SET].
⇒ The main menu opens up.
- Use the arrow buttons to select the submenu 'LCD contrast'.
Press [SET] to confirm the selection.
- Use the arrow keys to select a value between 1 and 15.
Press [SET] to confirm the selection.
⇒ The display shows 'Stored', the settings are being applied.
- Press the main switch to close the menu.
column PT
th·mann MUSIC IS OUR PASSION
Labelling the device
To clearly identify the device in the display, you can assign a name to it
- Press [SET].
⇒ The main menu opens up.
- Use the arrow buttons to select the submenu 'Name'.
Press [SET] to confirm the selection.
- Use the arrow buttons to select a character at the current cursor position.
Press [SET] to confirm the selection and move the cursor one position to the right.
⇒ After the last digit, the display will show 'Stored', the setting will be applied.
- Press the main switch to close the menu.
Locking or unlocking the buttons
- Press the main switch for two seconds.
⇒ The 'Power&lock' menu opens up.
- Use the arrow buttons to select the menu item 'Lock' and confirm with 'SET'.
⇒ The message 'System locked', appears in the display, the device is getting locked. After a few seconds, the menu is closed. The symbol appears on the display.
-
Even when the buttons are locked, you can change the output level (volume) using the arrow buttons.
-
To cancel the key lock, press [SET] until the message 'System unlock' appears.
⇒ The keys have their original function again. The symbol is no longer visible.
column PT
th·mann MUSIC IS OUR PASSION
Adjusting the output level (volume)
- Press [SET].
→ The main menu opens up.
- Use the arrow buttons to select the submenu 'Output'.
Press [SET] to confirm the selection.
- Use the arrow buttons to select a value between 0 dB und -42 dB.
Press [SET] to confirm the selection.
⇒ The display shows 'Stored', the settings are being applied.
- Press the main switch to close the menu.
6.2 Bodypack transmitter
Switching the device on / off
- To turn the unit on, press the main switch for several seconds.
⇒ The LED [POWER/LOW BATT] is lit.
- To turn the unit off, press the main switch for several seconds.
⇒ The 'Power&lock' menu opens up.
- Use the arrow buttons to select the menu item 'Power off' and confirm with 'SET'.
⇒ The message 'OFF' appears in the display, die LED [POWER / LOW BATT] turns off, the device is being switched off.
column PT
th·mann MUSIC IS OUR PASSION
Select channel
- Press [SET].
⇒ The main menu opens up.
- Use the arrow buttons to select the submenu 'Freq. preset'.
Press [SET] to confirm the selection.
⇒ The 'CHxxx' display appears.
- Use the arrow buttons to select a channel between 1 and 90. The bottom line of the display shows the corresponding frequency.
Select channel U to enter the frequency directly.
Press [SET] to confirm the selection.
⇒ The display shows that the receiver is being adjusted to the new frequency. After a few seconds, the display shows the normal sate again.
- Press the main switch to close the menu.
Entering the frequency directly (channel U)
- Press [SET].
→ The main menu opens up.
- Use the arrow buttons to select the submenu 'Advanced'.
Press [SET] to confirm the selection.
- Use the arrow buttons to select the submenu 'Tune'.
Press [SET] to confirm the selection.
- First use the arrow buttons to set the value before the decimal point, then press [SET] and set the value after the decimal point.
Press [SET] to confirm the entry.
⇒ The display shows that the receiver is being adjusted to the new frequency. After a few seconds, the display shows the normal sate again.
- Press the main switch to close the menu.
column PT
th·mann MUSIC IS OUR PASSION
Turning the pilot tone on / off
By transmitting an inaudible pilot tone, the devices involved can automatically detect whether the radio link is working.
- Press [SET].
→ The main menu opens up.
- Use the arrow buttons to select the submenu 'Advanced'.
Press [SET] to confirm the selection.
- Use the arrow buttons to select the menu item 'Pilot Tone'.
Press [SET] to confirm the selection.
- Use the arrow buttons to select between 'Activate' (pilot tone on), 'Deactivate' (pilot tone off).
Press [SET] to confirm the entry.
- Press the main switch to close the menu.
Showing software version
- Press [SET].
⇒ The main menu opens up.
- Use the arrow buttons to select the submenu 'Advanced'.
Press [SET] to confirm the selection.
- Use the arrow buttons to select the menu item 'Software Revision'.
Press [SET] to confirm the selection.
⇒ The software version of the device is displayed.
- Press the main switch to close the menu.
column PT
th·mann MUSIC IS OUR PASSION
Resetting to basic settings
- Press [SET].
⇒ The main menu opens up.
- Use the arrow buttons to select the submenu 'Advanced'.
Press [SET] to confirm the selection.
- Use the arrow buttons to select the menu item 'Reset'.
Press [SET] to confirm the selection.
- Use the arrow buttons to select the option 'Yes'.
Press [SET] to confirm the selection.
⇒ The display shows 'Stored', the factory settings are being restored.
- Press the main switch to close the menu.
Adjusting the display contrast
- Press [SET].
⇒ The main menu opens up.
- Use the arrow buttons to select the submenu 'LCD contrast'.
Press [SET] to confirm the selection.
- Use the arrow keys to select a value between 1 and 15.
Press [SET] to confirm the selection.
⇒ The display shows 'Stored', the settings are being applied.
- Press the main switch to close the menu.
column PT
th·mann MUSIC IS OUR PASSION
Labelling the device
To clearly identify the device in the display, you can assign a name to it
- Press [SET].
⇒ The main menu opens up.
- Use the arrow buttons to select the submenu 'Name'.
Press [SET] to confirm the selection.
- Use the arrow buttons to select a character at the current cursor position.
Press [SET] to confirm the selection and move the cursor one position to the right.
⇒ After the last digit, the display will show 'Stored', the setting will be applied.
- Press the main switch to close the menu.
Locking or unlocking the buttons
- Press the main switch for several seconds.
⇒ The 'Power&lock' menu opens up.
- Use the arrow buttons to select the menu item 'Lock' and confirm with 'SET'.
⇒ The message 'System locked', appears in the display, the device is getting locked. After a few seconds, the menu is closed. The symbol appears on the display.
- To cancel the key lock, press [SET] until the message 'System unlock' appears.
⇒ The keys have their original function again. The symbol is no longer visible.
column PT
th·mann MUSIC IS OUR PASSION
Setting the input sensitivity
- Press [SET].
⇒ The main menu opens up.
- Use the arrow buttons to select the submenu 'Sensitivity'.
Press [SET] to confirm the selection.
- Use the arrow buttons to select a value between -21 dB and +22 dB.
Press [SET] to confirm the entry.
- Press the main switch to close the menu.
7 Technical specifications
7.1 Bodypack receiver
| Frequency band UHF band (823 MHz...832 MHz) | |
| Bandwidth 9 MHz | |
| Number of channels 90 | |
| Modulation type Frequency modulation (FM) | |
| Sensitivity (RF) <-98 dBm (@ 30 dB) | |
| Image frequency rejection >75 dB | |
| Pilot tone 32.768 kHz (switchable) | |
| NF frequency response 50 Hz...15 kHz (±3 dB) | |
| THD < 0.5 % | |
| Signal-to-noise ratio >105 dB (A) |
column PT

| Audio output level 0 dBV | |
| Output impedance 600 Ω | |
| Operating supply voltage 2 AA cells (LR6, 1.5 V) or corresponding rechargeable batteries | |
| Dimensions (W × H × D) 66 mm × 90 mm × 26 mm (15.35in. × 15.55in. × 5.31in.) | |
| Weight (without batteries) 160 g | |
7.2 Bodypack transmitter
| Transmission power 20 mW | |
| Pilot tone 32.768 kHz (switchable) | |
| Input impedance 5 kΩ | |
| Operating supply voltage 2 AA cells (LR6, 1.5 V) or corresponding rechargeable batteries | |
| Operating time > 8 h (with alkaline cells) 1300 mAh) | |
Dimensions (W × H × D) 66 mm × 90 mm × 26 mm (15.35in. × 15.55in. × 5.31in.)
Weight (without batteries) 160 g
Frequency band, number of channels, bandwidth, and modulation type correspond to those of the receiver.
column PT
th·mann MUSIC IS OUR PASSION
8 Plug and connection assignment
Introduction
This chapter will help you select the right cables and plugs to connect your valuable equipment in such a way that a perfect sound experience is ensured.
Please note these advices, because especially in 'Sound & Light' caution is indicated: Even if a plug fits into the socket, an incorrect connection may result in a destroyed power amp, a short circuit or 'just' in poor transmission quality!
Balanced and unbalanced transmission
Unbalanced transmission is mainly used in semi-professional environment and in hifi use. Instrument cables with two conductors (one core plus shielding) are typical representatives of the unbalanced transmission. One conductor is ground and shielding while the signal is transmitted through the core.
Unbalanced transmission is susceptible to electromagnetic interference, especially at low levels, such as microphone signals and when using long cables.
In a professional environment, therefore, the balanced transmission is preferred, because this enables an undisturbed transmission of signals over long distances. In addition to the conductors 'Ground' and 'Signal', in a balanced transmission a second core is added. This also transfers the signal, but phase-shifted by 180^ .

UHF wireless system
Since the interference affects both cores equally, by subtracting the phase-shifted signals, the interfering signal is completely neutralized. The result is a pure signal without any noise interference.
Three-pole 1/8" mini phone jack (stereo, unbalanced)
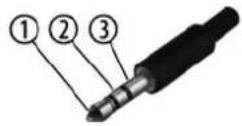
1 Signal (left)
2 Signal (right)
3 Ground, shielding
column PT

9 Troubleshooting
In the following we list a few common problems that may occur during operation. We give you some suggestions for easy troubleshooting:
| Symptom Remedy | |
| No sound 1. Check the power supply of transmitter and receiver. | |
column PT

If the procedures recommended above do not succeed, please contact our Service Center. You can find the contact information at www.thomann.de.
10 Protecting the environment
Disposal of the packaging material

For the transport and protective packaging, environmentally friendly materials have been chosen that can be supplied to normal recycling.
Ensure that plastic bags, packaging, etc. are properly disposed of.
Do not just dispose these materials with your normal household waste, but make sure that they are fed to a recovery. Please follow the notes and markings on the packaging.
Disposal of batteries

Batteries must not be disposed of as domestic waste or thrown into fire. Dispose of the batteries according to national or local regulations regarding hazardous waste. To protect the environment, dispose of empty batteries at your retail store or at appropriate collection sites.
column PT

Disposal of your old device
This product is subject to the European Waste Electrical and Electronic Equipment Directive (WEEE) in its currently valid version. Do not dispose with your normal household waste.
Dispose this device through an approved waste disposal firm or through your local waste facility. When discarding the device, comply with the rules and regulations that apply in your country. If in doubt, consult your local waste disposal facility.

natural_image
Solid olive green background with no visible text, symbols, or patterns- the t.bone
- Table of contents
- General information
- Further information
- Notational conventions
- Letterings
- Instructions
- Example:
- Symbols and signal words
- Signal word Meaning
- Warning signs Type of danger
- Safety instructions
- Intended use
- Safety
- DANGER!
- Danger for children
- NOTICE!
- Operating conditions
- External power supply
- Risk of fire due to incorrect polarity
- Possible damage by leaking batteries
- Features
- Installation and starting up
- General Information
- Notes on wireless transmission
- Bodypack receiver
- Bodypack transmitter and receiver
- Connections and controls
- Bodypack receiver
- Bodypack transmitter
- Connections and controls
- Operating
- Bodypack receiver
- Automatic search for a free channel
- Select channel
- Entering the frequency directly (channel U)
- Synchronizing transmitter and receiver
- Setting squelch
- Turning the pilot tone on / off
- Showing software version
- Resetting to basic settings
- Adjusting the display contrast
- Labelling the device
- Locking or unlocking the buttons
- Adjusting the output level (volume)
- Bodypack transmitter
- Switching the device on / off
- Setting the input sensitivity
- Technical specifications
- Bodypack receiver
- Bodypack transmitter
- Plug and connection assignment
- Introduction
- Balanced and unbalanced transmission
- Troubleshooting
- Protecting the environment
Brand : the t.bone
Model : column PT
Category : Microphone