
MiVue 658 WiFi - Camcorder MIO - Free user manual and instructions
Find the device manual for free MiVue 658 WiFi MIO in PDF.


| Product Type | Dash Cam (Camcorder) |
| Brand | Mio |
| Model | MiVue 658 WiFi (also known as N484) |
| Dimensions (Approx.) | 6.5 cm × 5.0 cm × 3.0 cm |
| Weight (Approx.) | 100 g |
| Power Supply | Car charger 5V DC / 1.0 A; internal rechargeable lithium-ion battery |
| Display | Touch screen LCD |
| Memory Card | microSD (up to 128 GB, Class 10 or higher); two slots on Touch model |
| Video Resolution | Full HD (specific resolution not stated, typical 1080p) |
| GPS | Built-in GPS/GLONASS for speed and location logging |
| WiFi | Built-in WiFi for smartphone connection and file transfer via MiVue app |
| Recording Modes | Continuous driving recording, event recording (G-sensor triggered or manual), parking mode (motion detection and G-sensor) |
| Safety Camera Alerts | Built-in database with visual and audio alerts (fixed, mobile, red light, etc.) |
| G-Sensor | 3-axis accelerometer with 6 sensitivity levels for event detection |
| Mount | Adhesive mount for windshield; adjustable angle |
| Computer Connectivity | Mini-USB for data transfer (cable not included) |
| Maintenance | Clean with soft, lint-free cloth; do not use paper towels; avoid moisture and extreme temperatures |
| Safety Precautions | Do not disassemble, modify, or drop; use only supplied charger; keep lens clean; do not obstruct driver view |
| Spare Parts / Accessories | Memory card not supplied; optional Mio Smart Box for extended parking mode; replacement mount available |
| General Information | Complies with CE; WEEE compliant; manufactured by MiTAC; user manual available online |
Frequently Asked Questions - MiVue 658 WiFi MIO
User questions about MiVue 658 WiFi MIO
0 question about this device. Answer the ones you know or ask your own.
Ask a new question about this device
Download the instructions for your Camcorder in PDF format for free! Find your manual MiVue 658 WiFi - MIO and take your electronic device back in hand. On this page are published all the documents necessary for the use of your device. MiVue 658 WiFi by MIO.
USER MANUAL MiVue 658 WiFi MIO
Getting to know the dash cam 2
Power button....3
Event/Share button 3
LED indicators....3
Setting up the device....4
Using your recorder in a vehicle 4
Inserting a memory card....6
Connecting to your computer 7
Operating basics....8
Turning the recorder on....8
Using the touch screen 8
Setting the date and time....9
Setting up a WIFI connection 10
Recording in driving mode....11
Recording in Parking mode....12
Camera mode 13
Playback mode 13
Safety camera alerts....14
Adding a safety camera 15
Updating safety camera data 15
System settings 16
The Menu screen....16
Advanced settings.... 17
MiVue Manager 20
Installing MiVue Manager 20
Playing the recording files....20
For more information....23
Caring for your device 23
Precautions and notices....24
Safety precautions....24
About GPS....25
Regulatory information....26
WEEE 26
Getting to know the dash cam
Note: The screenshots and other presentations shown in this manual may differ from the screens and presentations generated by the actual product.
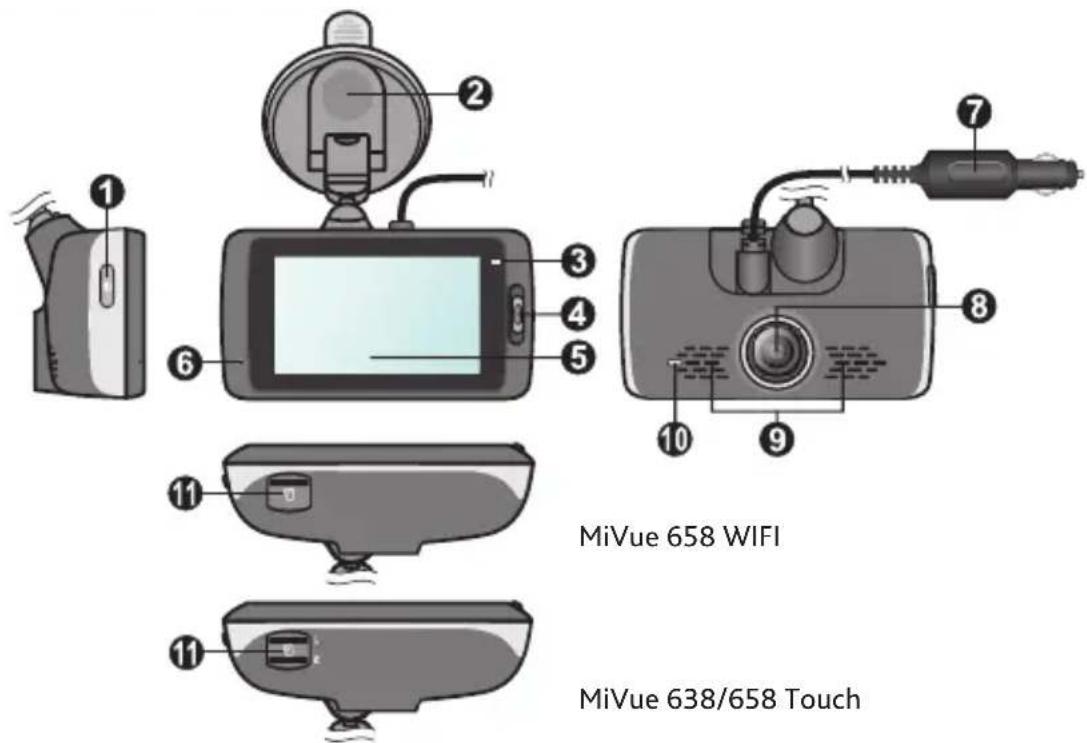
① Power button
2 Device mount
③ System indicator
4 Event/Share* button
5 Touch screen
6 Microphone
⑦ Car charger
⑧ Camera lens
9 Speaker
10 Parking indicator
⑪ Memory card slot(s)
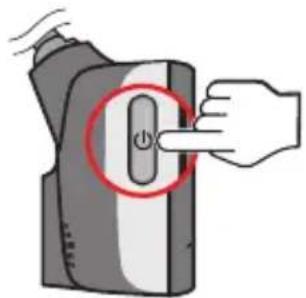
Power button
- Press and hold for 2 seconds to manually turn the recorder on and off.
- When the recorder is turned on, press to switch the LCD screen on and off.
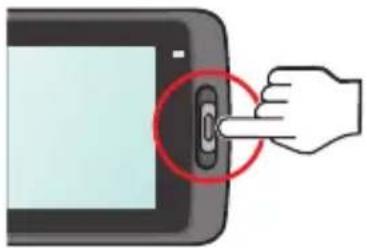
Event/Share button
■ Press to manually start an event recording.
- On MiVue 658 WIFI model, the recorded event videos will be transferred to the connected smartphone automatically*.
natural_image
Illustration of a hand interacting with a touchscreen device (no text or symbols visible)* This function requires a smartphone that has the MiVue app installed, and is paired with your device. Search for, download and install the app onto your smartphone. For more information of using MiVue app, start the app on the phone and see the online instructions.
LED indicators
■ System indicator
Glows in green when the recorder is charging. During charging, the LED flashes in green and amber alternately while the recording is in progress.
- Parking indicator
Flashes in red when Parking recording is in progress.
Setting up the device
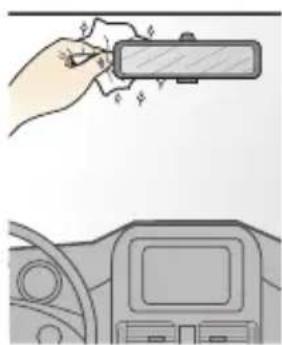
Using your recorder in a vehicle
- Make sure that your car is parked on level ground.
- Follow the instructions below to securely mount your recorder in a vehicle.
natural_image
Illustration of a hand holding a rectangular object above a dashboard, with no visible text or symbols.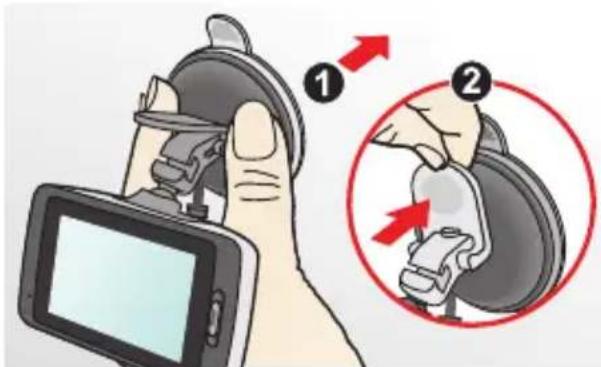
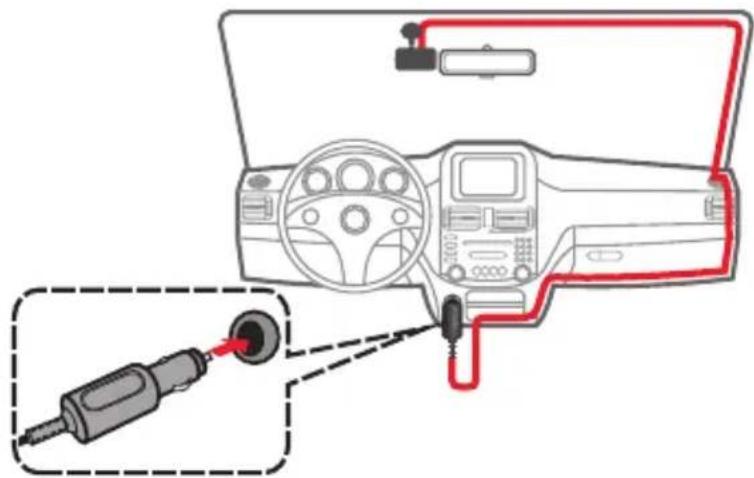
- Connect the car charger to the cigarette lighter. Route the cables through the top ceiling and the A-pillar so that it does not interfere with driving. Make sure that the cable installation does not interfere with the vehicles airbags or other safety features.
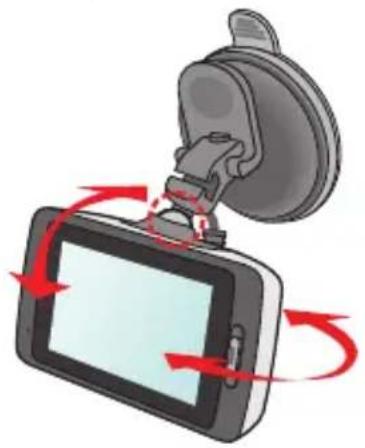
- When adjusting the angle of mounting, make sure that the camera's view is parallel with the level ground, and the ground/sky ratio is close to 6/4.
natural_image
Diagram of a device mounted on a wall-mounted device with red motion arrows indicating rotation (no text or symbols)Note:
- To ensure the highest quality recordings, you are advised to place the recorder near the rear view mirror.
- Select an appropriate location for mounting the device in a vehicle. Never place the device where the driver's field of vision is blocked.
- If the car's windscreen is tinted with a reflective coating it may be athermic and impact the GPS reception. In this instance please mount your device where there is a "clear area."
- The system will automatically calibrate the G sensor of the device during start-up. To avoid G sensor malfunction always turn the device on AFTER you mount it in the vehicle properly.
Inserting a memory card
You must insert a memory card (not supplied) before you can start recording. The recorder supports memory cards with up to 128GB capacity.
The recorder provides two memory card slots on MiVue 638/658 Touch model. In this case, always insert the primary memory card into Slot 1 and then the second card (if available) into Slot 2. The recorded files are stored to the card in Slot 1; the card in Slot 2 is for you to back up files manually.
-
Hold the card by the edges and gently insert it into the slot with the label facing the rear side of the recorder.
-
To remove a card gently push the top edge of the card inwards to release it and pull it out of the slot.
Note:
■ DO NOT apply pressure to the centre of the memory card.
- You are advised to use a Class 10 memory card with at least 8GB capacity.
- MiTAC does not guarantee the product's compatibility with memory cards from all manufacturers.
■ Before you start recording please format the memory card to avoid malfunction caused by files not created by the recorder.
■ You are recommended to turn the device off before removing the memory card.
Connecting to your computer
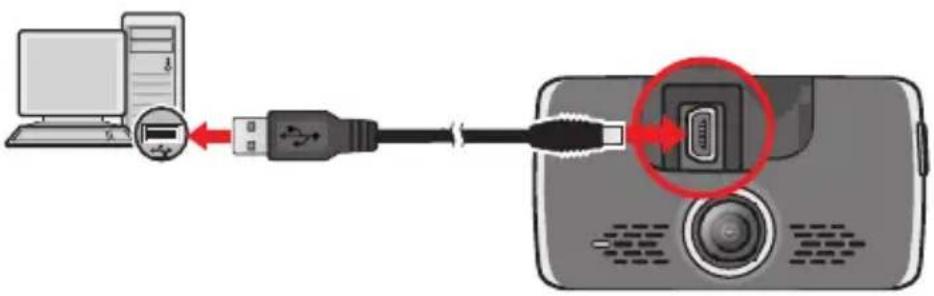
You can connect the recorder to your computer to access data on the memory card.
Disassemble the back cover to locate the Mini-USB connector on the rear side of the device.
Follow the instruction below to connect the recorder to the computer via the USB cable (not supplied).
Operating basics
Turning the recorder on
Complete the installation according to the instructions in the "Using your recorder in a vehicle" section. Once the vehicle engine is started the recorder automatically turns on.
Note: Occasionally you may need to perform a hardware reset when the recorder stops responding or if it appears to be "frozen" or unresponsive. To restart the recorder press and hold the Power button until the system is shut down; press the Power button again to turn the recorder on.
Using the touch screen
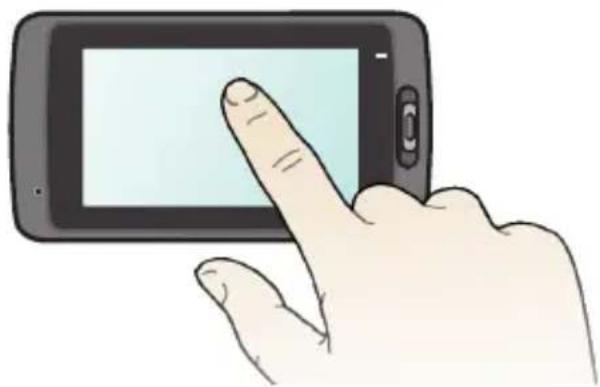
To operate your recorder touch the screen with your fingertip. The device provides the control buttons and system icons on the screen. Depending upon your settings and usage, the displayed buttons and icons may be different to provide various functions and information of your device.
natural_image
Illustration of a hand pointing at a smartphone screen (no text or symbols visible)Example: Recording screen
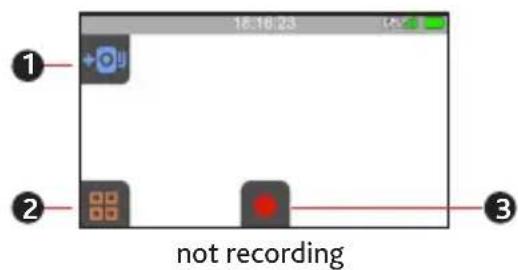
- Button
① Adds a custom safety (speed) camera
② Opens the Menu screen
3 Starts recording
4 Takes a photo
⑤ Enters Parking mode
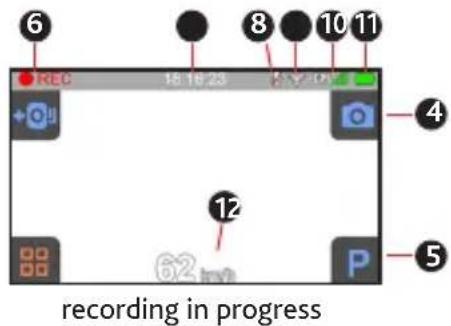
■ Icon
6 Recording indicator
7 Time display
8 Recording with sound is disabled
9 WIFI signal*
10 GPS signal
11 Battery power
⑫ Your current speed
* For MiVue 658 WIFI only.
Setting the date and time
To make sure that the date and time of your recordings are correct, check the settings before you begin recording.

-
Select (Automatic) or (Manual):
-
When you select Automatic, the system will set date and time according to the GPS location.
- When you select Manual, the system will display the date and time setting screen.
Tap /+ to adjust the value of the selected field; tap and repeat the step until all fields have been changed. When completed, tap √
en
Setting up a WIFI connection
MiVue 658 WIFI features the WIFI function that allows you to connect the recorder to your smartphone.
- The WIFI function is enabled by default. You can manually enable or disable WIFI by tapping and then select or .
- The WIFI setting screen displays the SSID and password of the device.
- To use the recorder's Event/Share button to transfer files you will need to install the MiVue app onto your smartphone. Search for, download and install the app onto your smartphone.
Follow the steps below to build the wireless connection between the recorder and your smartphone:
- When you use the smartphone* to connect for the first time, turn WLAN on from the phone's Settings menu. The phone will automatically scan for available wireless devices.
Tap the WLAN option to display the detected devices. From the list select the recorder's name (MiVue-xxxxxx) and enter the password (xxxxxxxxxx). When done, tap Connect.
The next time you use your smartphone to connect to the recorder you will not be prompted to enter the password again (unless you reset your phone to the factory default settings).
* The instructions about operating the smartphone are for reference only. The actual setting options and methods may vary depending upon your phone type/model.
- Check the WIFI connection status by reading the WIFI icon on the recorder:

: The recorder is connected to the smartphone and paired with MiVue app.

: WIFI is turned on but the recorder is not connected to the smartphone.

: WIFI is turned on and the recorder is connected to the smartphone but not paired with MiVue app yet.
- By starting the MiVue app on your smartphone the recorder will be ready to transfer video files by simply pressing the Event/Share button.
Recording in driving mode
Continuous recording
By default the system will automatically begin with continuous recording in a few seconds after start up. The recording may be divided into several video clips; recording will not stop between video clips.
■ To stop continuous recording, tap
■ To start recording manually, tap


- The continuous recordings can be found in the "Video" category for file playback.
Event recording
By default if an event happens such as a sudden impact, high speed driving, an aggressive turn or an accidental crash the G sensor* will prompt the recorder to start recording the event.
* You can change the sensitivity level (6 levels, from Low to High) of the G sensor by
tapping > > .
- If you want to manually start an event recording while continuous recording is in progress, press the Event/Share button on the device.
- The event recordings can be found in the "Event" category for file playback.
Recording in Parking mode
en
Your recorder supports the parking recording function. Depending upon how long the car is parked, you may need an additional power source (e.g. an uninterruptible power cable like Mio Smart Box which is sold separately) to record the video during Parking mode.
- The Parking mode function is disabled by default. You have to enable the function by tapping > > P OK ✓
Before enabling Park mode please check your device memory storage allocation. Go to > > > to set a proper allocation for parking recording. Changing the allocation will erase the memory card so save any videos or photos to your computer first. -
When the Parking mode detection is enabled the system will enter Parking mode when you:
-
disconnect the device's power (e.g. the vehicle engine is stopped or the power cable is disconnected) or when the car stops moving for about 5 minutes*; or
- tap manually start Parking mode while continuous recording is in progress.
* The feature is triggered by the G sensor of the device. You can change the configuration by tapping > . P P
- To stop Parking mode and resume continuous recording, tap.
- If movements were detected and recorded during Parking mode you will be asked to playback the video when you stop Parking mode.
- The parking recordings can be found in the “Parking” category for file playback.
Camera mode
You can take a photo by:
- tapping while the recording is in progress; or
- tapping > .
- The photos can be found in the "Photo" category for file playback.
Playback mode
To select a video or photo for playback:
- Tap and select the desired type.
The types include: (Video), (Event), (Parking) and (Photo).
- Tap / to browse the list.
- Tap the desired file to start playback.
- During playback, you can:
■ While playing videos, tap 📋 to play the previous/next video.
Tap / to start or pause the playback.
- While viewing photos, tap / to display the previous/next photo.
- Tap to return to the list.
- Tap to delete the file.
- Tap to move the file to the "Event" category.
- Tap to copy the file to the second memory card (for MiVue 638/658 Touch) or tap to copy the file to your smartphone (for MiVue 658 WIFI).
Safety camera alerts
Caution: For legal reasons the safety camera function is not available in all countries.
You can receive alerts to warn you about the locations of safety (speed) cameras which will enable you to monitor your speed through these areas.
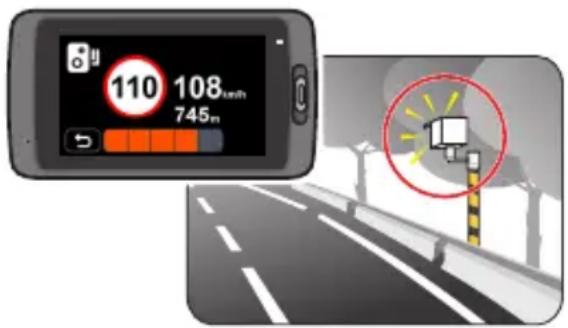
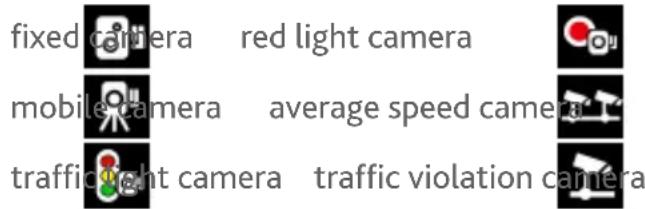
- When a safety camera appears and is positioned in the detectable direction you will receive alerts. The screen will display the visual alert* and you will also receive audio warnings (Beep, Voice, or Mute).
* The displayed icon may vary depending on the type of the safety camera:
- When the alert sound setting is set to Beep:
- When your car approaches a safety camera you will receive a normal beep alert.
- When your car approaches a safety camera at a speed over the set threshold you will receive a persistent beep alert until your car speed drops lower than the appropriate speed limit.
- When your car passes through a safety camera you will be notified by a different beep alert.
- You can change the settings about how you want to receive the safety camera alerts. See the “System settings” section for information.
Adding a safety camera
Note: You can add a custom safety camera only when a GPS fix is established.
Your recorder allows you to customise the safety camera database. You can add up to 100 custom safety cameras in your recorder.
Follow the steps to configure a custom safety camera:
- To add a custom safety camera in the current location tap-on the recording screen.
- The next time when you pass by the location you will receive alerts by the recorder.
- To view the information of the user-added safety camera tap >> and then tap the safety camera that you want to check.
- Tap to remove the custom safety camera from the recorder.
Updating safety camera data
MiTAC does not warrant that all types and locations of safety camera data are available as cameras may be removed, relocated or new cameras installed.
Occasionally MiTAC may offer you updates of safety camera data. Visit the MiTAC website for available downloads and follow the instructions to complete update.
System settings
The Menu screen
Tap access the Menu screen that includes the following functions:
| Button Description | ||
 | File Playback | Plays the recorded videos and photos.For more information on playback see the "Playback mode" section. |
 | Camera Tap to enter Camera mode. | |
 | Sound Recording | Sets if you want to include sounds in the recordings. The default setting is On. |
 | WIFI | Enables or disables WIFI. The default setting is On.Refer to the "Setting up a WIFI connection" section to learn how to connect the recorder to your smartphone. |
 | Settings | Allows you to change the system settings of the device.For more information see the "Advanced settings" section. |
Note: While browsing the setting menus you can tap to return to the previous screen or tap to return to the recording screen.
Advanced settings
The Settings option in the Menu allows you to change the system settings of the device including:

SafetyCam
- Alert Sound: The options are Beep, Voice and Mute.
- Alert Distance: The options are Short, Medium and Long.
- Alert Method: The options are By Driving Speed and By Speed Limit.
- Threshold: Sets the speed value for the recorder to start offering alerts.
- Cruise Speed Alert: Sets the limit for cruise speed. When you drive at a cruise speed over the set value you will receive alerts by the recorder.
- Custom SafetyCam: Lists all user-added safety cameras which are sorted by created time.

Parking Mode
- Detection: When enabled the recorder will automatically start recording when it detects movements or if an event happens in Parking mode.
- Detection Method: The options are G-Sensor, Motion and Both.
- Auto Entry: Sets the mode (Low, Medium, High or Manual) for the system to enter Parking mode automatically.
- Motion Detection: The options are Low, Medium and High.
- G-Sensor Sensitivity: Sets the sensitivity level (Low, Medium or High) of the G sensor that allows automatic triggering of the parking recording when the recorder is in Parking mode.
- LED Indicator: The options are On and Off.

Video Recording
- Video Clip Length: Sets the length of each video clip for a continuous recording (1 min, 3 min or 5 min).
- Video Resolution: Sets the resolution of the video.
- EV: Sets the proper exposure level (-1 \~ +1) to adjust the brightness of the image. The default setting is 0.
- G-Sensor Sensitivity: Sets the sensitivity level (6 levels, from Low to High) of the G sensor that allows automatic triggering of the event recording while continuous recording is in progress.
- Stamps: Sets the information (Coordinates or G-Sensor) that will be displayed on the recorded video.
- Text Stamp: This option allows you to display the customised information on the recorded video.

System
- GPS Status: Displays the status of GPS/GLONASS signal reception.
- Date/Time: Sets the system date and time. For more information see the "Setting the date and time" section.
- Beep Alert: Enables or disables system notification sounds.
- Volume: Adjusts the volume level.
- Standby: Selects Always On to keep the LCD on; or sets the timer for the LCD to turn off automatically (10 sec, 1 min or 3 min) after recording starts. Selecting Standby will turn off the LCD (in specified time) but still display the time and speed information.
- Language: Sets the language.
-
Distance Unit: Sets the preferred distance unit.
-
Storage Allocation: The system provides 3 default memory configurations to store the videos (including continuous recordings, event recordings and parking recordings) and photos. Select the proper configuration based on your usage.
- Restore to Defaults: Restores system settings to factory defaults.
- Version: Displays the software information.

Format: Formats a memory card. (All data will be erased.)
MiVue Manager
en
MiVue Manager™ is a tool for you to view the videos recorded on a recorder. Not all features are available for every model.
Installing MiVue Manager
Download MiVue Manager from the Support page of our website (www.mio.com/support) and follow the on-screen prompts to install it. Make sure to download the correct software version (Windows or Mac) according to your computer's operating system.
Playing the recording files
-
Remove the memory card from the recorder and access the card on the computer via a card reader. You are advised to copy the recording files to your computer for backup and playback.
You may also leave the memory card inserted in the MiVue device and connect the device to your computer via a USB cable. -
Start MiVue Manager on the computer.
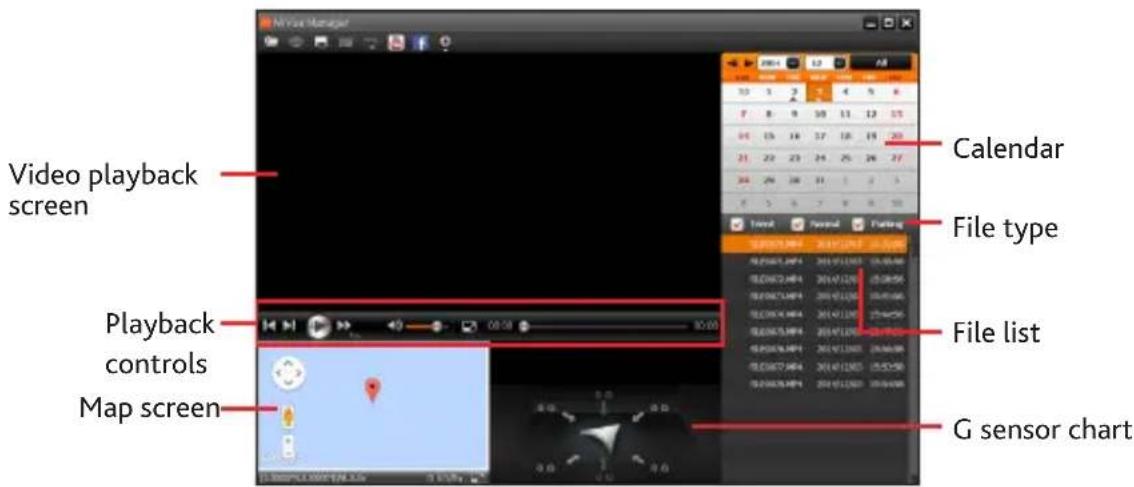
Note:
- The Map screen may not display when the computer is not connected to the Internet or when your MiVue model does not support the GPS function.
-
G sensor chart displays data in 3-axis waveform about the car's shift forward/backward (X), to the right/left (Y) and upward/downward (Z).
-
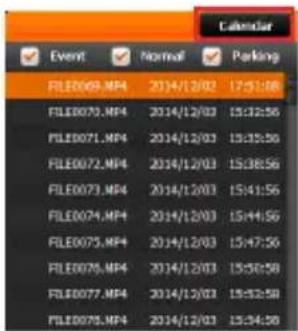
By default MiVue Manager shows the calendar and the file list on the right.
-
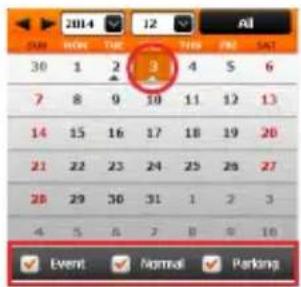
When a recording file exists you will see the date marked with “▲.” Click that date to display the files that were recorded on that date.
- You can choose the file type to display: Event (event recordings); or/and Normal (continuous recordings); or/and Parking (parking recordings).
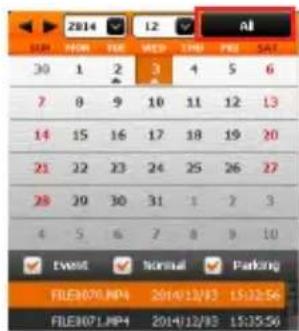
- To display all files in the current folder click All. To return to the calendar view click Calendar.
You can also click for the upper-left corner to select the folder that stores the recording files.
- Double-click the desired file on the file list to start playback.
- The playback controls are described as follows:
■ / Starts or pauses the playback.
- / Skips to the previous / next file on the list.
■ Changes the playback speed to 1/4x, 1/2x, 1x (default), 1.5x, or 2x.
■ / Mutes or unmutes the volume.
■ : Adjusts the volume level.
■ : Plays the video in full screen. Click return to the normal view.
- 00:28 03:00 : Displays the playback progress. You can click on a point along the track bar to move directly to a different location for the playback.
-
The tool bar allows you to do the following:
-
Click to select the folder that stores the recording files.
- Click preview and print the current video image.
- Click to back up the selected files to the specified location on your computer.
- Click to capture and save the current video image to the specified location on your computer.
- Click 📊 to upload the selected file to YouTube™/Facebook.
- Click KML export the GPS information of the selected file in the KML format to the specified location on your computer.
-
Click open the Settings Menu. The Settings items are described as follows:
-
Change Language: Sets the display language of MiVue Manager.
- Change Skin: Sets the color scheme of MiVue Manager.
- Check for Update: Checks if there is any new version of MiVue Manager. Internet access is required for this feature.
- About: Displays the version and copyright information of MiVue Manager.
For more information
Caring for your device
Taking good care of your device will ensure trouble-free operation and reduce the risk of damage.
- Keep your device away from excessive moisture and extreme temperatures.
- Avoid exposing your device to direct sunlight or strong ultraviolet light for extended periods of time.
- Do not place anything on top of your device or drop objects on your device.
- Do not drop your device or subject it to severe shock.
- Do not subject your device to sudden and severe temperature changes. This could cause moisture condensation inside the unit, which could damage your device. In the event of moisture condensation, allow the device to dry out completely before use.
- The screen surface can easily be scratched. Avoid touching it with sharp objects. Non-adhesive generic screen protectors designed specifically for use on portable devices with LCD panels may be used to help protect the screen from minor scratches.
- Never clean your device with it powered on. Use a soft, lint-free cloth to wipe the screen and the exterior of your device.
■ Do not use paper towels to clean the screen. - Never attempt to disassemble, repair or make any modifications to your device. Disassembling, modifying or any attempt to repair could cause damage to your device, may inflict bodily harm or damage to property and will void any warranty.
- Do not store or carry flammable liquids, gases or explosive materials in the same compartment as your device, its parts or accessories.
- To discourage theft do not leave the device and accessories in plain view in an unattended vehicle.
■ Overheating may damage the device.
Precautions and notices
- For your own safety do not operate the controls of the product while driving.
- A window mount is needed when using the recorder in a car. Make sure that you place the recorder in an appropriate place, so as not to obstruct the driver's view or deployment of airbags.
- Make sure that no object is blocking the camera lens and no reflective material is placed near the lens. Please keep the lens clean.
- If the car's windscreen is tinted with a coating it may impact the recording quality.
Safety precautions
About charging
- Use only the charger supplied with your device. Use of another type of charger may result in malfunction and/or danger.
- This product is intended to be supplied by a LISTED Power Unit marked with “LPS”, “Limited Power Source” and output rated + 5 V dc / 1.0 A.
About the charger
- Do not use the charger in a high moisture environment. Never touch the charger when your hands or feet are wet.
- Allow adequate ventilation around the charger when using it to operate the device or charge the battery. Do not cover the charger with paper or other objects that will reduce cooling. Do not use the charger while it is inside a carrying case.
- Connect the charger to a proper power source. The voltage requirements are found on the product case and/or packaging.
- Do not use the charger if the cord becomes damaged.
- Do not attempt to service the unit. There are no serviceable parts inside. Replace the unit if it is damaged or exposed to excess moisture.
About the battery
CAUTION! This unit contains a non-replaceable internal Lithium Ion battery. The battery can burst or explode, releasing hazardous chemicals. To reduce the risk of fire or burns do not disassemble, crush, puncture or dispose of in fire or water.
■ Use a specified battery in the equipment.
■ Important instructions (for service personnel only)
- Caution! Risk of explosion if battery is replaced by an incorrect type. Dispose of used batteries according to the instructions.
- Replace only with the same or equivalent type recommended by the manufacturer.
■ The battery must be recycled or disposed of properly.
■ Use the battery only in the specified equipment.
About GPS
- GPS is operated by the United States government, which is solely responsible for the performance of GPS. Any change to the GPS system can affect the accuracy of all GPS equipment.
- GPS satellite signals cannot pass through solid materials (except glass). When you are inside a tunnel or building, GPS positioning is not available. Signal reception can be affected by situations such as bad weather or dense overhead obstacles (e.g. trees, tunnels, viaducts and tall buildings).
■ The GPS positioning data is for reference only.
Regulatory information
en
For regulatory identification purposes, Mio™ MiVue™ 6 series is assigned a model number of N484.

Products with the CE marking comply with the Electromagnetic Compatibility Directive (2004/108/EC) - issued by the Commission of the European Community.
Compliance with these directives implies conformity to the following European Standards:
ETSI EN 301 489-1 V1.9.2 (2011)
EN 61000-4-6 : 2009
ETSI EN 301 489-3 V1.6.1 (2013-06)
EN 61000-4-8 : 2010
ETSI EN 301 489-17 V2.2.1 (2012)
ETSI EN 300 328 V1.8.1 : 2012
EN 55022 : 2010 + AC2011
ETSI EN 300 440-1 V1.6.1:2010
EN 55024:2010
ETSI EN 300 440-2 V1.4.1:2010
EN 61000-4-2 : 2009
IEC60950-1/A1:2009
The manufacturer cannot be held responsible for modifications made by the User and the consequences thereof, which may alter the conformity of the product with the CE Marking.
Declaration of conformity
Hereby, MiTAC declares that this N484 is in compliance with the essential requirements and other relevant provisions of Directive 2004/108/EC.
WEEE

This product must not be disposed of as normal household waste, in accordance with the EU directive for waste electrical and electronic equipment (WEEE – 2002/96/EC). Instead, it should be disposed of by returning it to the point of sale, or to a municipal recycling collection point.
Revision: R00
(04/2015)
Disclaimer
Specifications and documents are subject to change without notice. MiTAC does not warrant this document is error-free. MiTAC assumes no liability for damage incurred directly or indirectly from errors, omissions or discrepancies between the device and the documents.
Notes
Not all models are available in all regions.
Depending upon the specific model purchased, the color and look of your device and accessories may not exactly match the graphics shown in this document.
Do not operate the device while driving. Using this product does not change the requirement for a driver to take full responsibility for his or her behavior. This responsibility includes observing all traffic rules and regulations in order to avoid accidents, personal injury or property damage.
MiTAC Europe Ltd
www.mio.com
- Getting to know the dash cam
- Power button
- Event/Share button
- LED indicators
- Setting up the device
- Using your recorder in a vehicle
- Note:
- Inserting a memory card
- Connecting to your computer
- Operating basics
- Turning the recorder on
- Using the touch screen
- Setting the date and time
- Setting up a WIFI connection
- Recording in driving mode
- Continuous recording
- Event recording
- Recording in Parking mode
- Camera mode
- Playback mode
- Safety camera alerts
- Adding a safety camera
- Updating safety camera data
- System settings
- The Menu screen
- Advanced settings
- SafetyCam
- Parking Mode
- Video Recording
- System
- MiVue Manager
- Installing MiVue Manager
- Playing the recording files
- For more information
- Caring for your device
- Precautions and notices
- Safety precautions
- About charging
- About the charger
- About the battery
- About GPS
- Regulatory information
- Declaration of conformity
- WEEE
- Disclaimer
- Notes
Brand : MIO
Model : MiVue 658 WiFi
Category : Camcorder