
FZI 2300-B - Generator Fieldmann - Free user manual and instructions
Find the device manual for free FZI 2300-B Fieldmann in PDF.


| Product Type | Generator |
| Brand | Fieldmann |
| Model | FZI 2300-B |
| Peak Power Output | 2300 W |
| Continuous Power Output | 1800 W |
| Engine Type | 4-stroke, single cylinder |
| Fuel Type | Unleaded petrol |
| Fuel Tank Capacity | 4.2 L |
| Run Time (50% Load) | Approx. 8 hours |
| Starting System | Recoil start |
| Output Sockets | 2x 230V AC, 1x 12V DC |
| Weight | 25 kg |
| Dimensions (L x W x H) | 500 x 350 x 400 mm |
| Noise Level (at 7 m) | 95 dB(A) |
| Oil Capacity | 0.4 L |
| Spark Plug Type | F6RTC |
| Safety Features | Low oil shutdown, overload protection |
| Maintenance | Change oil every 50 hours; clean air filter regularly |
| Warranty | 2 years |
Frequently Asked Questions - FZI 2300-B Fieldmann
User questions about FZI 2300-B Fieldmann
0 question about this device. Answer the ones you know or ask your own.
Ask a new question about this device
Download the instructions for your Generator in PDF format for free! Find your manual FZI 2300-B - Fieldmann and take your electronic device back in hand. On this page are published all the documents necessary for the use of your device. FZI 2300-B by Fieldmann.
USER MANUAL FZI 2300-B Fieldmann
natural_image
Abstract black-and-white spiral pattern with no text or symbolsFIELDMANN®
Home & Garden Performance
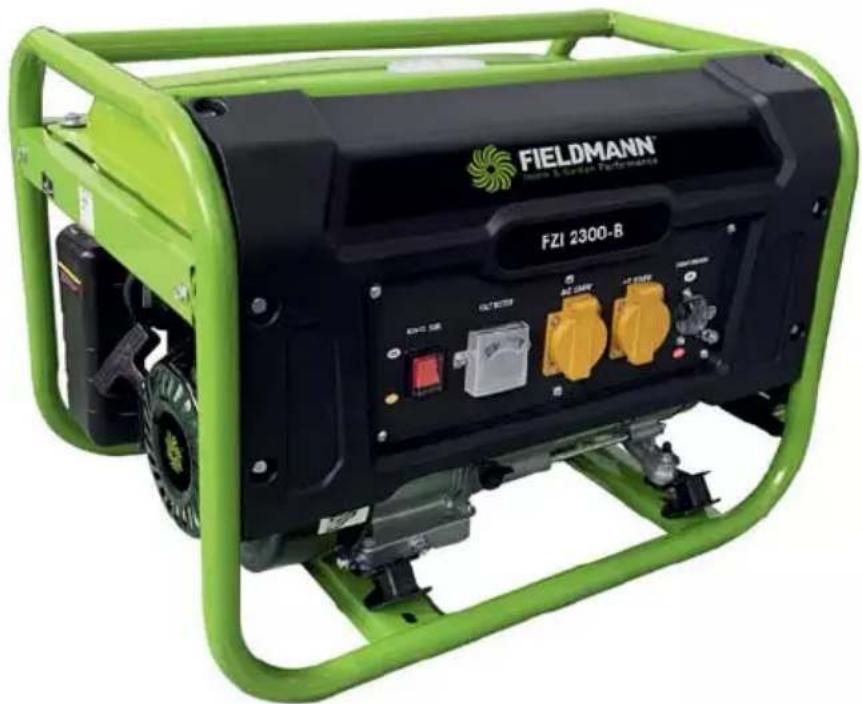
natural_image
Green industrial FZI 2300-B power grid generator with visible control buttons and battery (no text-heavy labels or symbols)FZI 2300-B
English 5-16
Češina....17–28
Slovenčina....29-40
Magyarul 41–52
Polski 53-64
natural_image
Mechanical assembly diagram showing a component labeled 'D' with no visible text or symbols beyond the label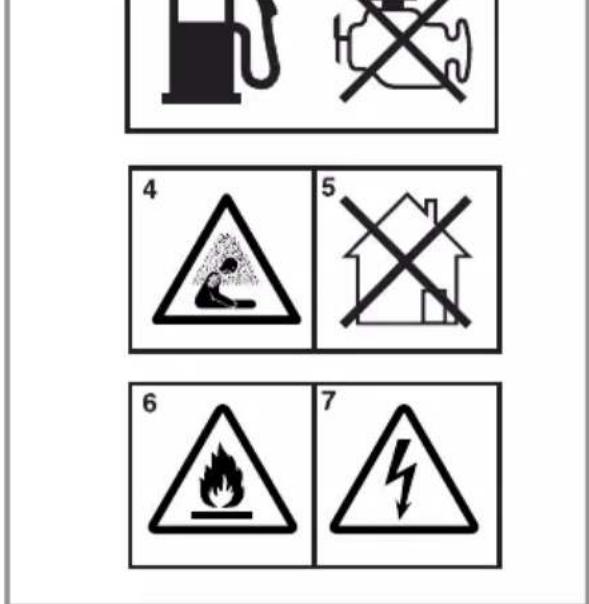
Generator
USER MANUAL
Thank you for purchasing this Generator. Before using the inverter, please carefully read this user manual and keep it for future reference.
TABLE OF CONTENTS
- SAFETY INFORMATION......6
Safety label 6
- LAYOUT AND ITEMS SUPPLIED 8
2.1 Layout (Fig. 1-3)....8
2.2 Items supplied 8
-
PROPER USE....9
-
BEFORE STARTING THE EQUIPMENT 9
4.1 Electrical safety: 9
4.2 Environmental protection....9
4.3 Connecting to earth....9
- OPERATION....10
5.1 Starting the engine 10
5.2 Connecting consumers to the generator....10
5.3 Overload cut-out 2 × 230 V socket-outlets.....11
5.4 Switching off the engine....11
- CLEANING, MAINTENANCE, STORAGE AND ORDERING OF SPARE PARTS....11
6.1 Cleaning....11
6.2 Air filter 11
6.3. Spark plug 12
6.4 Changing the oil and checking the oil level (before using the machine)....12
6.5 Automatic oil cut-out 12
6.6 Maintenance....12
6.7 Storage 12
6.8 Ordering replacement parts: 12
- TECHNICAL DATA....13
- DISPOSAL....14
- TROUBLESHOOTING 15
- DECLARATION OF CONFORMITY....16
1. SAFETY INFORMATION
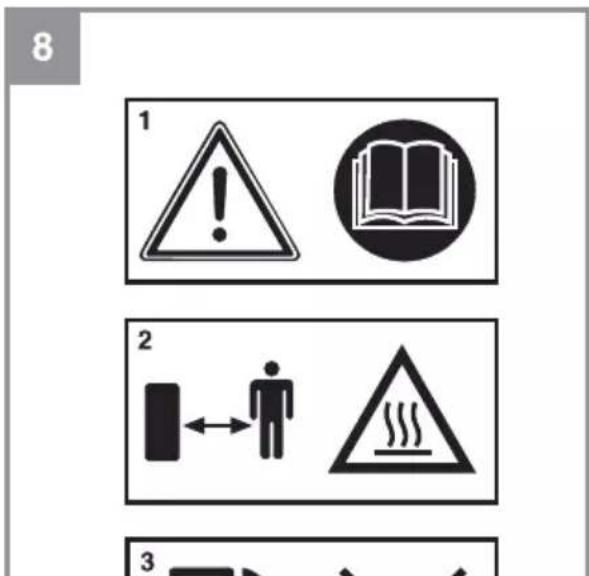
⚠️ Please read the following information carefully so that personal and property safety can be guaranteed.
Before using your generator, please read and understand the user's manual.
Engine emissions contain poisonous carbon monoxide. Operate the generation in a ventilated location.
During the generator operation and before it has cooled down, please don't touch the hot exhaust silencer.
Under the specified conditions, the petrol is explosive and combustible. When replenishing the fuel, the generator should be turned off and no smoking and no flame sources are allowed in its neighbourhood.
In order to prevent risk of electric shock or fire, don't connect the equipment to the building's grid or other generator.
The running generator should be positioned at least one meter apart from frameworks and other electric appliances.
* Position the generator on flat surface to prevent overturning or fuel spilling.
* Keep your children and pets away from the work area.
Don't handle with wet hands.
Don't expose the generator to rain, moisture and snow.
During operation, position the generator at least 1 m apart from buildings and other equipment.
* Bigger repairs may only be performed by a professionally trained person.
Don't use the generator for underground applications.
Don't use the generator in a potentially explosive environment.
When operating or servicing your generator, use personal protective equipment: gloves, mask and ear plugs.
SAFETY LABEL
DANGER!
Using the generator indoors MAY CAUSE DEATH WITHIN A COUPLE OF MINUTES.
The generator's exhaust fumes contain carbon monoxide.
This is a poisonous substance neither to be seen nor smelled.
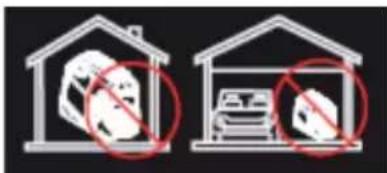
NEVER operate the equipment in your house or garage, EVEN IF the doors and windows are open.
natural_image
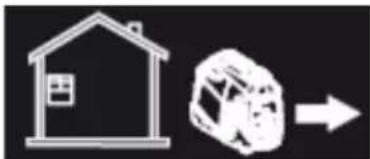
Simple line drawing of a house and a vehicle with an arrow indicating direction (no text or symbols)Use only OUTDOORS and away from windows, doors and vents.
ATTENTION

Failure to read and adhere to the instructions in the user's manuals may lead to death, personal injury or property damage.
The running engines emit carbon monoxide, poisonous gas without smell and colour. Inhaling carbon monoxide may lead to nausea, fainting or death. DON'T START the equipment in enclosed spaces even if the windows and doors are open.
The generator poses a risk of potential electric shock. Don't expose the equipment to moisture, rain or snow. Don't operate with wet hands of feet.
* Petrol and its vapours are combustible and explosive. Prior to replenishing the fuel, turn the engine off and let it cool down for at least 2 minutes.
Failure to provide a proper grounding of the generator may lead to death as a consequence of electric shock especially in the generator is equipped with trundles.
FOR MAINTENANCE SCHEDULE, PLEASE REFER TO THE USER'S MANUAL CHANGE OIL AFTER NO LONGER THAN 50 HOURS
Detach the panel on the inverter rear side to access the oil cap.
Failure to observe the specified service intervals leads to shortening the engine lifetime.
DON'T REMOVE THIS MARK
2. LAYOUT AND ITEMS SUPPLIED
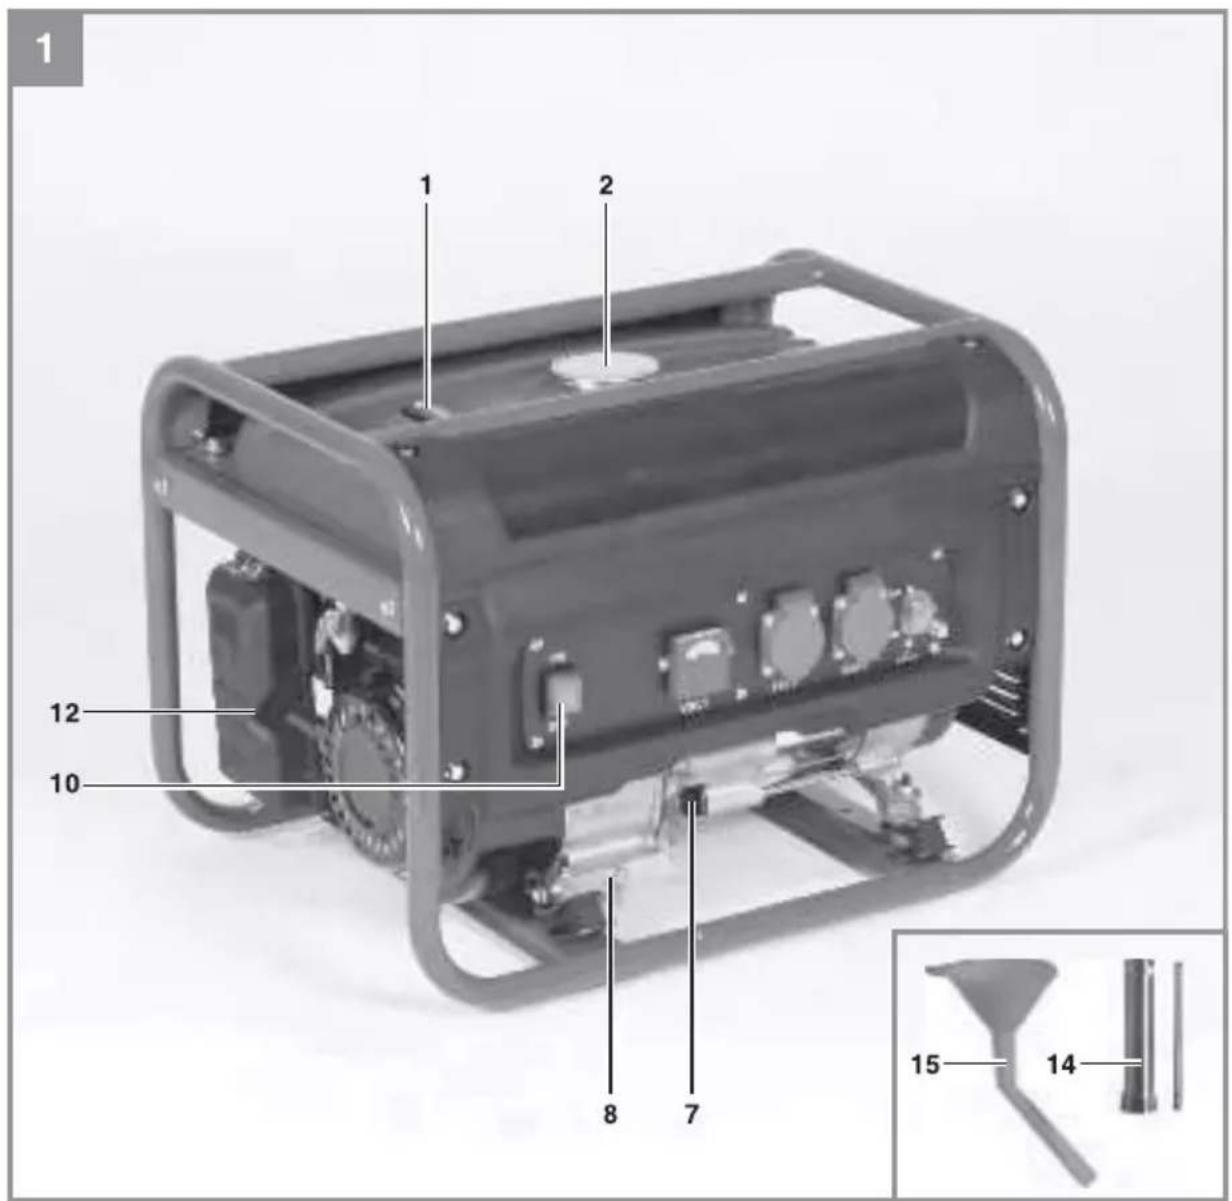
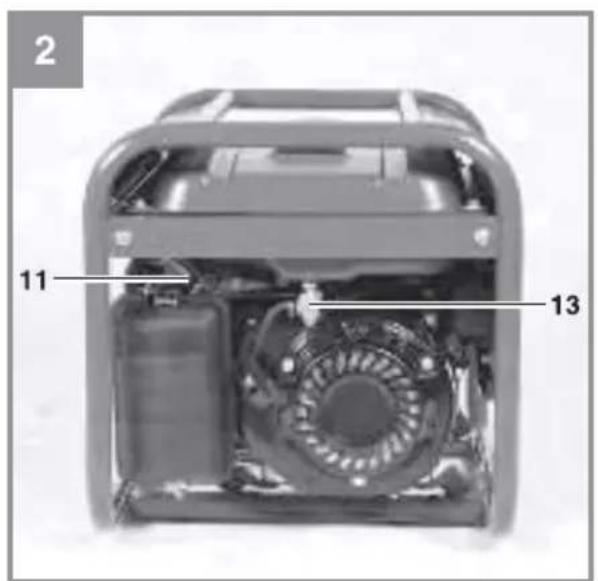
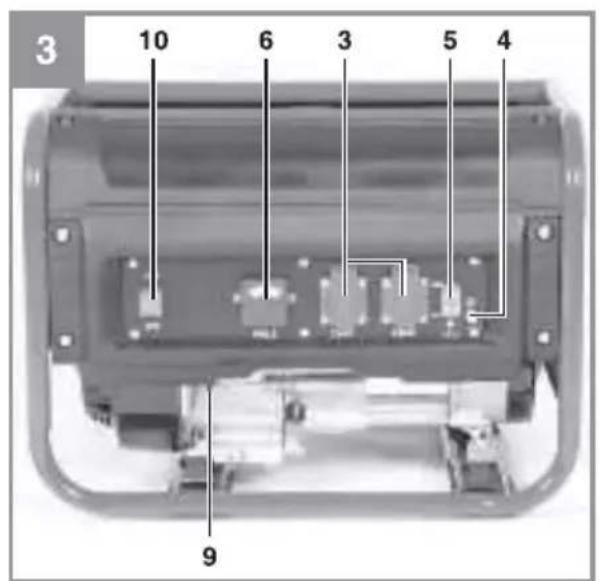
2.1 LAYOUT (FIG. 1-3)
1 Tank indicator
2 Tank cover
3 2 × 230 V \~ socket-outlets
4 Earth connection
5 Safety tripping element 230 V
6 Voltmeter
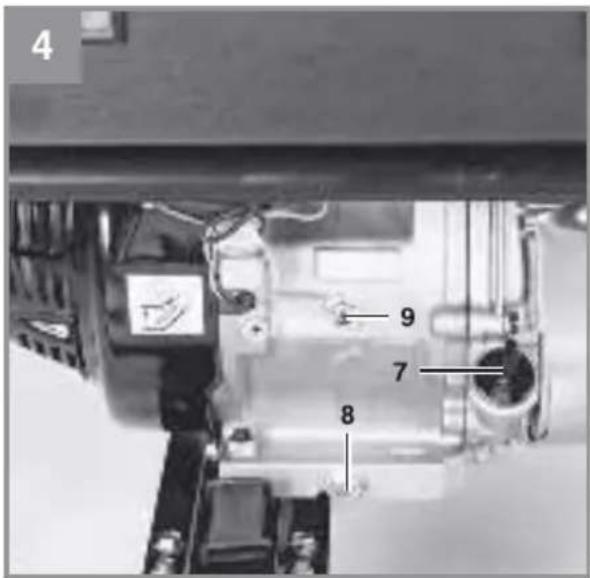
7 Oil filler screw
8 Oil drainage screw
9 Oil shortage cut-out
10 On/Off switch
11 Choke lever
12 Reversing starter
13 Petrol cock
14 Spark plug wrench
15 Oil filler funnel
2.2 ITEMS SUPPLIED
Please check that the article is complete as specified in the scope of delivery. If parts are missing, please contact our service center or the sales outlet where you made your purchase at the latest within 5 working days after purchasing the product and upon presentation of a valid bill of purchase.
Also, refer to the warranty table in the service information at the end of the operating instructions.
Open the packaging and take out the equipment with care.
Remove the packaging material and any packaging and/or transportation braces (if available).
* Check to see if all items are supplied.
* Inspect the equipment and accessories for transport damage.
If possible, please keep the packaging until the end of the guarantee period.
DANGER!
The equipment and packaging material are not toys. Do not let children play with plastic bags, foils or small parts. There is a danger of swallowing or suffocating!
Original operating instructions
3. PROPER USE
The device is designed for applications operated with a 230 V alternating current source. Be sure to observe the restrictions in the safety instructions.
The generator is intended to provide electric tools and light sources with electricity.
When using the device with household appliances, please check their suitability in accordance with the relevant manufacturer's instructions. In case of doubt, ask an authorized dealer of the respective appliance.
The equipment is to be used only for its prescribed purpose. Any other use is deemed to be a case of misuse. The user / operator and not the manufacturer will be liable for any damage or injuries of any kind caused as a result of this.
Please note that our equipment has not been designed for use in commercial, trade or industrial applications. Our warranty will be voided if the machine is used in commercial, trade or industrial businesses or for equivalent purposes.
4. BEFORE STARTING THE EQUIPMENT
4.1 ELECTRICAL SAFETY:
Electric supply cables and connected equipment must be in perfect condition.
The generator is to be operated only with
* equipment whose voltage specifications conform with the generator's output voltage.
* Never connect the generator to the power supply (socket-outlet).
* Keep the cable length to the consumer as short as possible.
4.2 ENVIRONMENTAL PROTECTION
* Dispose of soiled maintenance material and
- operating materials at the appropriate collection point.
- Recycle packaging material, metal and plastics.
4.3 CONNECTING TO EARTH
The housing is allowed to be connected to earth in order to discharge static electricity. To do this, connect one end of a cable to the earth connection on the generator (Fig. 4) and the other end to an external earth (for example an earthing rod).
5. OPERATION
IMPORTANT!
You must fill up with engine oil and fuel before you can start the engine.
* Check the fuel level and top it up if necessary
Make sure that the generator has sufficient ventilation
Make sure that the ignition cable is secured to the spark plug
* Inspect the immediate vicinity of the generator
* Disconnect any electrical equipment which may already be connected to the generator
5.1 STARTING THE ENGINE
* Open the petrol cock (13) by turning it down
Move the ON/OFF switch (10) to position „ON“ with the key.
* Move the choke lever (11) to position |∅.
* Start the engine with the reversing starter (12) by pulling the handle forcefully. If the engine does not start, pull the handle again.
- Push the choke lever (11) back again after the engine has started.
IMPORTANT!
When starting with the reserve starter, the motor may recoil suddenly as it starts up, resulting in hand injuries. Wear protective gloves when starting the equipment.
5.2 CONNECTING CONSUMERS TO THE GENERATOR
* Connect the equipment you want to use to the 230 V \~ sockets (3).
IMPORTANT!
These sockets may be loaded continuously (S1) with 2100W and temporarily (S2) for a maximum of 5 minutes with 2300 W or for a maximum of 2 minutes (with a cold motor) with 2400W.
The generator is suitable for 230 V \~ AC appliances only.
Do not connect the generator to the household mains system as this may result in damage to the generator itself or to other electrical appliances in your home.
Note:
Some electrical appliances (power jigsaws, drills, etc.) may have a higher level of power consumption when used in difficult conditions.
Some electrical appliances (for example televisions, computers, etc.) must not be powered by a generator.
If in doubt, consult the manufacturer of your appliance.
5.3 OVERLOAD CUT-OUT 2 × 230 V SOCKET-OUTLETS
IMPORTANT!
The generator is fitted with an overload cut-out.
This shuts down the sockets (3). You can restart the sockets (3) by pressing the overload cut-out (5).
IMPORTANT!
If this happens, reduce the electric power you are taking from the generator or remove any defective connected appliances.
IMPORTANT!
Defective overload cut-outs must be replaced only by overload cut-outs of identical design and with the same performance data. If repairs are necessary, please contact your customer service center.
5.4 SWITCHING OFF THE ENGINE
Before you switch off the generator, allow it to run briefly with no consumers so that it can „cool down“
Move the ON/OFF switch (10) to position „OFF“ with the key.
Close the petrol cock
6. CLEANING, MAINTENANCE, STORAGE AND ORDERING OF SPARE PARTS
Switch off the motor and pull the spark plug boot from the spark plug before doing any cleaning and maintenance work on the equipment.
NOTICE!
Switch off the machine immediately and contact your service station:
* In the event of unusual vibrations or noise
If the engine appears to be overloaded or misfires
6.1 CLEANING
Keep all safety devices, air vents and the motor housing free of dirt and dust as far as possible. Wipe the equipment with a clean cloth or blow it with compressed air at low pressure.
We recommend that you clean the device immediately each time you have finished using it.
Clean the equipment regularly with a moist cloth and some soft soap. Do not use cleaning agents or solvents; these could attack the plastic parts of the equipment. Ensure that no water can seep into the device.
6.2 AIR FILTER
In this connection, please also read the service information.
- Clean the air filter at regular intervals, and replace it if necessary.
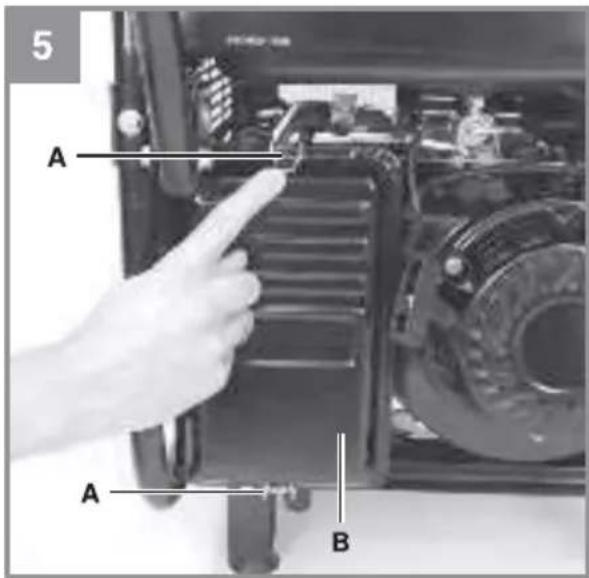
Open both clips (Fig. 5/A) and remove the air filter cover (Fig. 5/B).
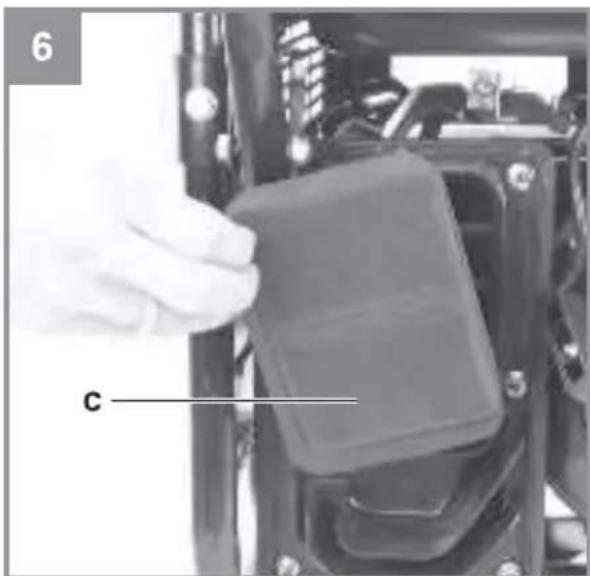
Remove the filter elements (Fig. 6/C)
Do not use abrasive cleaning agents or petrol to clean the elements.
Clean the elements by tapping them on a flat surface. In cases of stubborn dirt first clean with soapy water, then rinse with clear water and air-dry.
Assemble in reverse order
6.3. SPARK PLUG
Check the spark plug for dirt and grime after 20 hours of operation and if necessary clean with a copper wire brush. Thereafter service the spark plug after every 50 hours of operation.
* Pull off the spark plug boot with a twist.
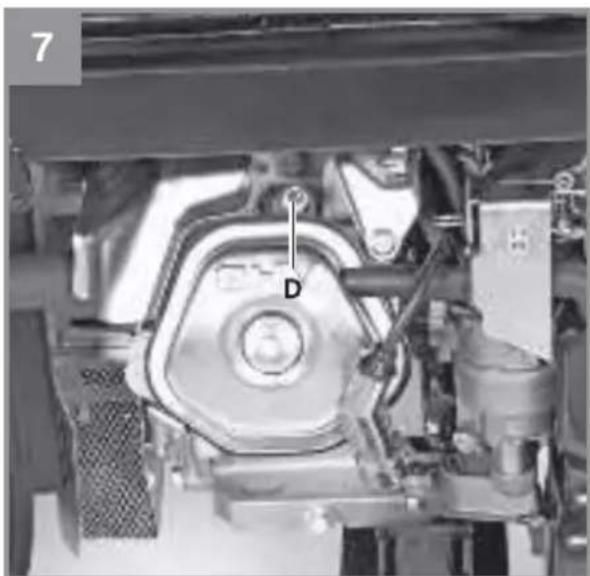
Remove the spark plug (Fig. 7/D) with the supplied spark plug wrench.
Assemble in reverse order
6.4 CHANGING THE OIL AND CHECKING THE OIL LEVEL (BEFORE USING THE MACHINE)
The motor oil is best changed when the motor is at working temperature.
Place the generator on a slightly inclined surface so that the oil drain plug is at the lower end.
Open the oil filler plug.
Open the oil drain plug and let the hot engine oil drain out into a drip tray.
After the old oil has drained out, close the oil drain plug and place the generator on a level surface again
Fill in engine oil up to the top mark on the oil dip stick.
Important: Do not screw the dipstick in to check the oil level, simply insert it up to the thread.
◆ Dispose of the waste oil properly.
6.5 AUTOMATIC OIL CUT-OUT
The automatic oil cut-out responds if there is too little oil in the engine. In this case it will not be possible to start the engine or it will cut out automatically after a short period of time. It cannot be started again until the engine oil has been topped up (see point 7.4).
6.6 MAINTENANCE
There are no parts inside the equipment which require additional maintenance.
6.7 STORAGE
Leave the machine to cool (approx. 5 minutes).
* Clean the exterior housing of the machine.
Store the machine in a cold, dry place where it is out of the reach of ignition sources and inflammable substances.
6.8 ORDERING REPLACEMENT PARTS:
Please quote the following data when ordering replacement parts:
* Type of machine
Article number of the machine
Identification number of the machine
* Replacement part number of the part required.
For our latest prices and information please go to www.Einhell-Service.com.
7. TECHNICAL DATA
| Generator Synchronous | |
| Protection type: IP 23M | |
| Continuous rated power P_rated (S1): 2100 W/230 V | ~ |
| Maximum power P_max (S2 5 min): 2300 W/230 V | ~ |
| Maximum power P_max (2 min): 2400 W/230 V | ~ |
| Rated voltage U_rated : 2 × 230 V | ~ |
| Rated current I_rated : 9.1A (230V) | ~) |
| Frequency F_rated : 50 Hz | |
| Drive engine design: 4-stroke, air-cooled | |
| Displacement: 212 cm | 3 |
| Max. power: | 4.15 kW / 5.6 hp |
| Fuel: | normal unleaded petrol (E10) |
| Tank capacity: 15 l | |
| Engine oil: | ca. 0.6 l |
| Consumption at 2/3 load: | approx. 1.2 l/h |
| Weight: | 37 kg |
| Sound pressure level L_pA : | 73.36 dB(A) |
| Sound power level L_WA : /K uncertainty | 96 dB (A)/1.53 dB(A) |
| Power factor cos φ: | 1 |
| Power class: | G1 |
| Max. temperature: 40°C | |
| Max. altitude (above mean sea level): | 1000 m |
| Spark plug: | LD F6RTC |
Operating mode S1 (continuous operation)
The machine can be continuously operated with the quoted power output.
Operating mode S2 (temporary operation)
The machine may be temporarily operated with the quoted power output (5 min.). Afterwards the machine must be stopped for a while to prevent it from overheating (5 min.).
8. DISPOSAL
INSTRUCTIONS AND INFORMATION REGARDING THE DISPOSAL OF USED PACKAGING MATERIALS
Dispose of used packaging material at a site designated for waste in your municipality.
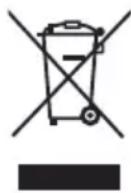
The appliance and its accessories are manufactured from various materials, e.g. metal and plastic.
Take damaged parts to a recycling centre. Inquire at the relevant government department.
Changes in the text, design and technical specifications may be made without prior notice and we reserve the right to make these changes.
Translation of the original user's manual.
9. TROUBLESHOOTING
| Fault Mögliche Ursache Behebung | ||
| Engine does not start Automatic oil out-out has not responded | Check oil level, top up engine oil | |
| No fuel Refuel / have the petrol cock checked | checked | |
| Generator has too little or no voltage | Controller or capacitor defective Contact your dealer | |
| Overcurrent circuit-breaker has triggered | Actuate the circuit-breaker and reduce the consumers | |
| Air filter dirty Clean or replace the filter | ||
10. DECLARATION OF CONFORMITY
FAST®
FAST ČR, a.s.
U Sanitasu 1621, 251 01 Říčany, Czech Republic
tel.: +420 323 204 111, fax: +420 323 204 110
EU DECLARATION OF CONFORMITY
Product / brand: Generator / FIELDMANN
Type / model: FZI 2300-B as factory model EYG2600G
Engine 212cm ^3 ; 4,15kW; 3000/min ^-1
AC Output 230V/50Hz; 9,1A; 2,1kW
L_pA = 78dB(A);L_wA = 96dB(A)
Manufacturer: FAST ČR, a.s.
U Sanitasu 1621, 251 01 Říčany, Czech Republic
VAT no: CZ24777749
This declaration of conformity is issued under the sole responsibility of the manufacturer.
Person in charge of completing the technical documentation: FAST ČR, a.s.
The object of the declaration described above is in conformity with the relevant Union
harmonization legislation:
Directive MD 2006/42/EC Directive EMC 2014/30/EU
Directive NEOE 2000/14/EC Directive RoHS 2011/65/EU
Directive Emission of gaseous 2016/1628/EU
The relevant harmonized standards and the other technical specifications:
EN ISO 8528-13:2016 EN 55012:2007+A1 EN IEC 61000-6-1:2019
CE
Place of issuance: Prague
Date of issuance: 18.10.2022
Name: Petr Uher - Responsible Person
Signature:
FAST FAST CR, a.s.
U Sanitásu 1621,251 01 Ričany
tel:+420-323 204 111
ICO:247 77 249, DIC:CZ 247 77 749
ICO:24777749, DIC:CZ24777749
FZI 2300-B as factory model EYG2600G
Engine 212cm3; 4,15kW; 3000/min-1
AC Output 230V/50Hz; 9,1A; 2,1kW
LpA = 78 dB(A); LwA = 96 dB(A)
Producent: FAST ČR, a.s.
U Sanitasu 1621, 251 01 Říčany, Czech Republic
VAT no: CZ24777749
Directive MD 2006/42/EC Directive EMC 2014/30/EU
Directive NEOE 2000/14/EC Directive RoHS 2011/65/EU
Directive Emission of gaseous 2016/1628/EU
i norm:
EN ISO 8528-13:2016
EN 55012:2007+A1 EN IEC 61000-6-1:2019

Petr Uher - Responsible Person
Data: 18.10.2022
Podpis i pieczątki:
IČO:24777749, DIČ:CZ24777749
natural_image
Abstract black and white spiral pattern with no text or symbolsFIELDMANN®
Home & Garden Performance
Model /Modell /Modelis:
Conditions of guarantee
This product is warranted for the period of 24 months from the adate aof purchase to the end-user. Warranty is limited to the following conditions. Warranty is referred only to the customer goods using for common domestic use. The claim forservice can be applied either at dealer's shop where the product was bought, or at below mentioned authorized service shops. The end-user is obligated to set up a claim immediately when the defects appeared but only till the end of warranty period. The end-user is obligated to cooperate to certify the claiming defects. Only completed and clean (according to hygienic standards) product will be accepted. In case of eligible warranty claim the warranty period will be prolonged by the period from the date of claim application till the date of taking overthe product by end-user, or the date the end-user is obligated to take it over. To obtain the service under this warranty, end-user is obligated to certify his claim with duly completed following documents: receipt, certificate of warranty, certificate of installation ...
This warranty is avoid aespecially if aapply as follows: ■ Defects which were put on sale. ■ Wear-out aor adamage caused by acommon use. ■ The aproduct awas adamaged aby aunprofessional aor wrong installation, used in contrary to the applicable instruction manual, used in contrary to legal enactment and common process of use or used for another purpose which has been designed for. ■ The product was damaged by uncared-for or insufficient maintenance. ■ The product was damaged by dirt, accident of force majeure (natural disaster, fire, flood, ...). ■ Defects on functionality caused by low duality of signal, electromagnetic field interference etc. ■ The product was mechanically damaged (e.g. broken button, fall...). ■ Damage caused by use of unsuitable media, fillings, expendable supplies (batteries) or by unsuitable working conditions (e.g. high temperatures, high humidity, quakes,...). ■ Repair, modification or other failure action to the product by unauthorized person ■ End-user did not prove enough his right to claim (time and place of purchase). ■ Data on presented documents differs from data on products. ■ Cases when the claiming product can not be identified according to the presented documents (e.g. the serial number or the warranty seal has been damaged).
fasthungary@fasthungary.hu
www.fasthungary.hu
natural_image
Green industrial portable power supply unit (FZI 2300-8) with black casing and control buttons, no visible text or symbols on body.
FIELDMANN®
Home & Garden Performance

- FIELDMANN®
- Generator
- USER MANUAL
- TABLE OF CONTENTS
- SAFETY INFORMATION
- ⚠️ Please read the following information carefully so that personal and property safety can be guaranteed.
- SAFETY LABEL
- DANGER!
- ATTENTION
- FOR MAINTENANCE SCHEDULE, PLEASE REFER TO THE USER'S MANUAL CHANGE OIL AFTER NO LONGER THAN 50 HOURS
- LAYOUT AND ITEMS SUPPLIED
- LAYOUT (FIG. 1-3)
- ITEMS SUPPLIED
- PROPER USE
- BEFORE STARTING THE EQUIPMENT
- ELECTRICAL SAFETY:
- ENVIRONMENTAL PROTECTION
- CONNECTING TO EARTH
- OPERATION
- IMPORTANT!
- STARTING THE ENGINE
- CONNECTING CONSUMERS TO THE GENERATOR
- Note:
- OVERLOAD CUT-OUT 2 × 230 V SOCKET-OUTLETS
- The generator is fitted with an overload cut-out.
- SWITCHING OFF THE ENGINE
- CLEANING, MAINTENANCE, STORAGE AND ORDERING OF SPARE PARTS
- NOTICE!
- CLEANING
- AIR FILTER
- SPARK PLUG
- CHANGING THE OIL AND CHECKING THE OIL LEVEL (BEFORE USING THE MACHINE)
- AUTOMATIC OIL CUT-OUT
- MAINTENANCE
- STORAGE
- ORDERING REPLACEMENT PARTS:
- TECHNICAL DATA
- Operating mode S1 (continuous operation)
- Operating mode S2 (temporary operation)
- DISPOSAL
- INSTRUCTIONS AND INFORMATION REGARDING THE DISPOSAL OF USED PACKAGING MATERIALS
- TROUBLESHOOTING
- DECLARATION OF CONFORMITY
- EU DECLARATION OF CONFORMITY
- Model /Modell /Modelis:
- Conditions of guarantee
Brand : Fieldmann
Model : FZI 2300-B
Category : Generator