
FDSP 200651-E - Paint gun Fieldmann - Free user manual and instructions
Find the device manual for free FDSP 200651-E Fieldmann in PDF.


| Product Type | Paint Gun |
| Brand | Fieldmann |
| Model | FDSP 200651-E |
| Power Source | Electric Corded |
| Voltage | 230 V / 50 Hz |
| Power Consumption | 650 W |
| Paint Capacity | 600 ml |
| Max Viscosity | 50 DIN-s |
| Spray Pattern | Adjustable (Vertical/Horizontal) |
| Nozzle Size | 2.0 mm |
| Flow Control | Variable |
| Weight | 1.4 kg |
| Dimensions (LxWxH) | 30 x 10 x 25 cm |
| Hose Length | 1.5 m |
| Cleaning | Disassemble and rinse with solvent |
| Safety Features | Trigger lock, thermal overload protection |
| Spare Parts Available | Nozzles, seals, needle |
| Warranty | 2 years |
| Maintenance | Clean after each use, lubricate moving parts |
| Intended Use | DIY and professional painting |
Frequently Asked Questions - FDSP 200651-E Fieldmann
User questions about FDSP 200651-E Fieldmann
0 question about this device. Answer the ones you know or ask your own.
Ask a new question about this device
Download the instructions for your Paint gun in PDF format for free! Find your manual FDSP 200651-E - Fieldmann and take your electronic device back in hand. On this page are published all the documents necessary for the use of your device. FDSP 200651-E by Fieldmann.
USER MANUAL FDSP 200651-E Fieldmann
Home & Garden Performance

natural_image
Product photo of a Fieldmann air purifier with attached hose and spray bottle (no visible text or symbols on main subject)FDSP 200651-E
natural_image
Two spray gun holders labeled A and B, each with a different tool (no text or symbols on the devices themselves)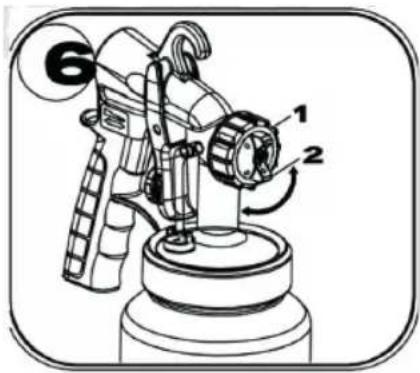
Electric spray gun INSTRUCTION MANUAL
Thank you for your purchase of the electric spray gun. For your personal safety, read and understand the Instruction Manual before using. Keep the Instruction Manual in a safe place for future reference.
CONTENTS
- GENERAL SAFETY INSTRUCTIONS 8
- SYMBOLS 13
- GENERAL DESCRIPTION 14
- TECHNICAL SPECIFICATIONS 18
- DISPOSAL 20
1. GENERAL SAFETY INSTRUCTIONS
⚠ WARNING! Carefully read the instruction manual before use.
Important safety warnings
* Unpack the product carefully and be sure not to throw away any part of the package before having found all components of the product.
Keep the product in a dry place out of reach of children.
Read all cautions and instructions. The failure to adhere to warning cautions and instructions may result in an accident, fire and/or a serious injury.
Packaging
The product is placed in a package preventing damage during transport. This package is a raw material therefore it can be handed-over for recycling.
Instructions for use
Before beginning to work with the machine, read the following safety rules and instructions for use. Familiarize with operating elements and the proper use of the device. Keep the manual in a safe place for future reference. We recommend keeping the original package including the inner packaging materials, cash voucher and guarantee card for a period of warranty at minimum. For a case of transportation, pack the machine into the original box from the manufacturer, thus ensuring a maximum protection of the product during a possible transport (e.g. moving or sending into a service station)..

Note: If you hand the machine over to next persons, hand it over together with the manual. Adherence to the attached instructions for use is a precondition for the proper use of the machine. The operation manual includes also instructions for operation, maintenance and repairs.
The manufacturer does not take any responsibility for accidents or damages resulting from the failure to adhere to this manual.
Carefully read, remember and keep these safety instructions
⚠ WARNING! In the use of electric machines and power tools, it is necessary to respect and follow the following safety instructions for the reasons of protection against electric shock, personal injury and danger of fire. The term "power tool" in the instructions below refers both to mains-operated (corded) power tool or battery-operated (cordless) power tool. Save all warnings and instructions for future reference.
Workplace
Keep the work area clean and well lit. Cluttered or dark areas in the workplace invite accidents. Store power tools that you don't currently use.
Do not operate power tools in environments with danger of occurrence of a fire or explosion, such as in the presence of flammable liquids, gases, or dust. Power tools create sparks which may ignite the dust or fumes.
- Keep unauthorised persons, especially children, away from the work area while operating a power tool! Distractions can cause you to lose control over the performed activity. In no event leave your power tool unattended. Keep the equipment away from animals.
Electrical Safety
Power tool plugs must match the mains socket outlet. Never modify the plug in any way. Do not use any adapter plugs with earthed (grounded) power tools. Undamaged plugs and matching outlets will reduce risk of electric shock. Damaged or fouled supply cables increase the risk of electric shock. If the power cord is damaged, it must be replaced by a new power cord which is available at the authorised service centre or the importer.
Avoid body contact with earthed or grounded surfaces such as pipes, radiators, cooking ranges and refrigerators. There is an increased risk of electric shock if your body is earthed or grounded.
Do not expose power tools to rain or wet conditions. Never touch the power tool with wet hands. Never wash the power tool under running water or immerse it in water.
* Never use the supply cable for other than intended purposes. Never use the cord for carrying or pulling the power tool. Never unplug the plug from the outlet by pulling the cable. Keep electric cables away from sharp or hot objects to prevent mechanical damage.
The power tool was designed to be powered solely by alternating electric current. Always check if the electric voltage matches the information specified in the type label of the power tool.
* Never use power tool with damaged electric cable or plug or which has been dropped or is in any way damaged.
If an extension cord is used, always check whether its technical parameters match the information specified in the type label of the power tool. When operating a power tool outdoors, use an extension cord suitable for outdoor use. If extension drums are used, these must be rolled out to prevent overheating of the cord.
If a power tool is operated in a damp location or outdoors, its operation is only permitted if connected to an electric circuit protected by a residual current device <30 mA. Use of residual current device (RCD) reduces the risk of electric shock.
Hold the power tool by insulated gripping surfaces only as the cutting or drilling tool may contact hidden wiring or its own power cord during operation.
Personal Safety
Be careful, stay alert and watch what you are doing when operating a power tool.
Concentrate on your work. Do not use a power tool while you are tired or under the influence of drugs, alcohol or medication. A moment of inattention while operating power tools may result in serious personal injury. Do not eat, drink and smoke while operating a power tool.
Use personal protective equipment. Always wear eye protection. Use protective equipment corresponding to the type of work you are doing. Protective equipment such as dust mask, non-skid safety shoes, hard hat, or hearing protection used in accordance with the working conditions will reduce the risk of personal injury.
* Prevent unintentional starting. Do not carry the power tool while it is energised or with your finger on the switch or trigger. Ensure the switch or trigger is in the "off" position before connecting to power source. Carrying power tools with your finger on the switch or energising power tools that have the switch on may result in serious injuries.
Remove any adjusting key or wrench before turning the power tool on. An adjusting wrench or a key left attached to a rotating part of the power tool may result in personal injury.
* Keep proper footing and balance at all times. Do not overreach. Never overestimate your own capabilities. Never use power tools while you are tired.
Dress properly. Wear work clothes. Do not wear loose clothing or jewellery. Keep your hair, clothing, gloves and other part of your body away from moving or hot parts of the power tool.
* Connect the equipment to dust exhaustion. If the tools are provided for the connection of dust collection or exhaustion devices, ensure these are properly connected and used. Use of such devices can reduce dust-related hazards.
Fix the work-piece tightly. Use a cabinet clamp or a cramp to fix the work-piece you are about to machine.
* Never use power tools if you are under the influence of alcohol, drugs, medication or other narcotic or addictive substances.
This equipment is not intended for use by persons (including children) with limited physical, sensual or mental capacities or lack of experience or knowledge unless they are supervised or instructed about the use of the equipment by a person responsible for their safety. Children must be supervised to make sure they are not playing with the equipment.
Power Tool Use and Maintenance
* Always disconnect the power tool from the mains in case of any problem during the work, before cleaning the power tool or its maintenance, during each transportation and after the completion of the work! Never operate a power tool if it is damaged in any way.
* Immediately stop working if the power tool generates abnormal noise or smell.
Do not overload the power tool. The power tool will operate better and safer if it is used at the rate for which it was designed. Use correct power tool which is intended for the given activity. The correct power tool will do the job it was designed for better and safer.
Do not use the power tool if it cannot be safely turned on and off using the control switch. Use of such power tool is dangerous. Defective switches must be repaired by a certified service provider.
* Disconnect the tool from the power source before making any adjustments, changing accessories or maintenance. Such preventive safety measure prevents the risk of starting the power tool accidentally.
Store idle power tools out of the reach of children and unauthorised persons. Power tools can be dangerous in the hands of untrained users. Store the power tools in a dry and safe place.
* Keep the power tool in good condition. Check the adjustment of moving parts and their mobility. Check for any damage to the protective guards or other parts which could affect safe operation of the power tool. If damaged, have the power tool properly repaired before further use. Many accidents are caused by poorly maintained power tools.
- Keep cutting tools sharp and clean. Properly maintained cutting tools with sharp cutting edges facilitate work, reduce the risk of injury and are easier to control. Use of accessories other than those specified in the instructions for use could result in damage to the power tool and cause injuries.
Use the power tool, accessories and tool bits etc. in accordance with these instructions and in the manner intended for the particular type of power tool taking into account the working conditions and the work to be performed. Use of the power tool for purposes other than those the power tool was intended for could result in hazardous situations.
Use of Cordless Power Tools
Before inserting the battery, make sure the switch is in the "O-OFF" position. Inserting a battery into a switched-on power tool could result in hazardous situations.
Charge batteries only using the chargers prescribed by the manufacturer. Using a charger intended for other battery type could result in its damage and occurrence of fire.
Use only batteries intended for particular power tool. Use of different batteries could cause injury or occurrence of fire.
If the battery is not used, keep it separately from metal objects such as clamps, keys, bolts and other small metal items which could cause connection of one battery contact with the other. Short-circuiting the battery could result in injury, burns or occurrence of fire.
* Handle the batteries with care. Rough handling could result in leak of chemical substance from the battery. Avoid contact with such substance and if, nonetheless, any contact occurs wash the affected area under running water. If eyes get into contact with the chemical substance seek immediately medical aid. Chemical substance from the battery can cause serious injuries.
Service
Do not replace parts of the power tool, do not make any repairs or interfere in any way with the construction of the power tool. Have your power tool repaired by qualified repair persons.
* Any repair or modification of the product without our company's authorisation is impermissible (it could cause injury or damage to the user).
* Always have your power tool repaired in a certified service centre. Use only original or recommended replacement parts. This will ensure that your safety and the safety of your power tool is maintained.
2. SYMBOLS

The product complies with the applicable standards and regulations.

ReadthelnstructionManual attentivelypriortouse.

Double-insulated.

Useeyesprotectiveequipment

Useearsprotectioveequipment

Wear a breathing mask.
Subjected to recycling
3. GENERAL DESCRIPTION
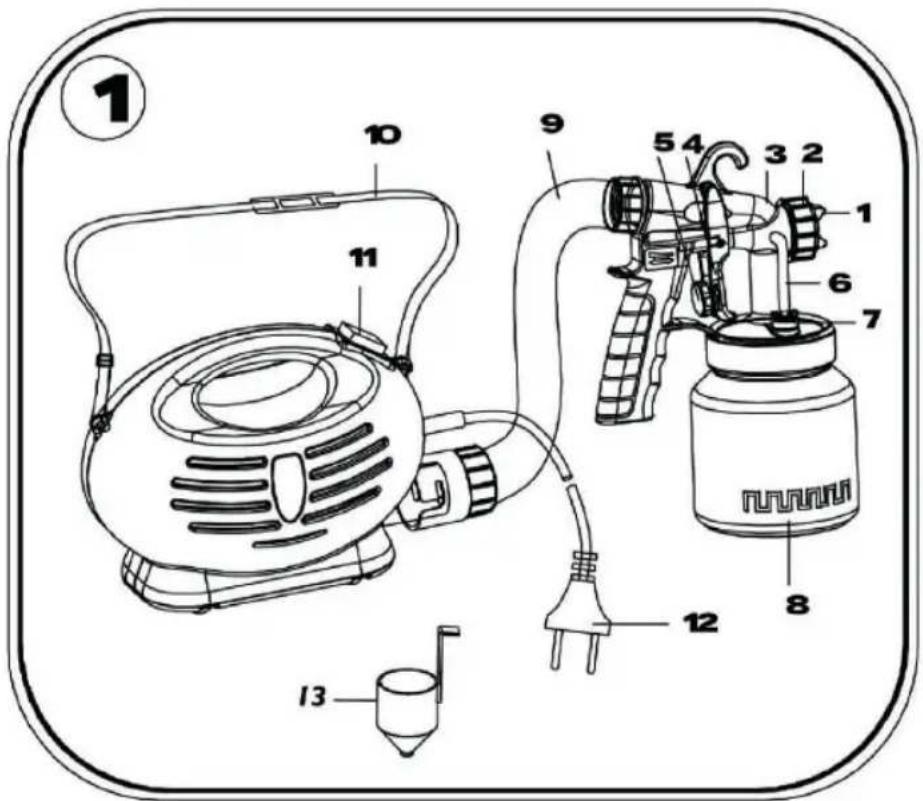
DESCRIPTION AND LOCATION OF MACHINE PARTS
- Nozzle
- Air Cap Ring
- Gun Body
- Trigger
- Fluid Adjusting Screw
- Air Tube
- Valve Cap
- Paint Container
- Hose
- Carrying Belt
- On/Off switch
- Plug
- Viscosity cup
- Pin
KINDS OF MATERIALS
* Only use materials recommended for spray guns. Preparing the coating material.
* You can use the spray gun to spray undiluted or slightly diluted paint, lacquer and varnish.
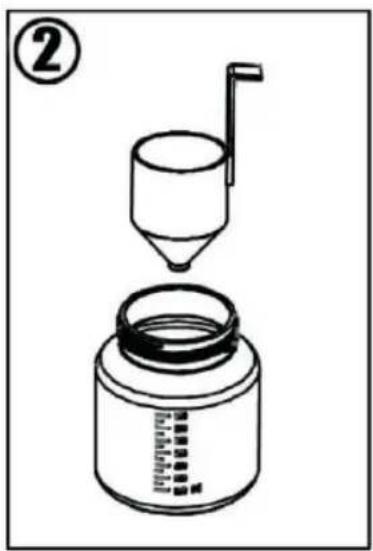
If the paint needs to be diluted, start by diluting it by 10%. Fill a container with one liter of the paint you wish to use. Keep in mind that the viscosity measuring cup holds up to one deciliter. Cover the opening and fill the cup with the required amount of thinner. Add the thinner to the paint and stir well. Measure the viscosity following the recommendations given below. If the paint needs to be diluted further, dilute it by another 5%(half the measuring cup) and measure the viscosity. If the paint still has not reached the recommended viscosity, repeat the previous step until the correct viscosity is reached.
This spray gun can be used with products with a viscosity index of 25 to 50 seconds. Submerge the viscosity measuring cup in the material to fill it. Time how long it takes for all the material to flow out of the cup (Figure 2).
* Use the following recommendations as a guide, but also consult the manufacturer's instructions on the material you wish to use to find out if the material needs to be diluted. Recommendations:
Water-based paint and emulsions 25-50 seconds
Enamel paint and water-and solvent-based colored lacquer-45-50 seconds
* Varnish-use undiluted
Primers 45-50 seconds
Wood coating, coloring agent, oil, disinfectants, phytosanitary products-use undiluted Follow these instructions only if there are no specific instructions for the material you wish to use. If material you wish to use has its own instructions, follow them.
USING THE DEVICE
Before plugging the device into the mains, make sure that the voltage of the power outlet corresponds to the voltage on the label with the technical characteristics of the spray gun.
Attach the carrying strap.
* Unscrew the container from the spray gun.
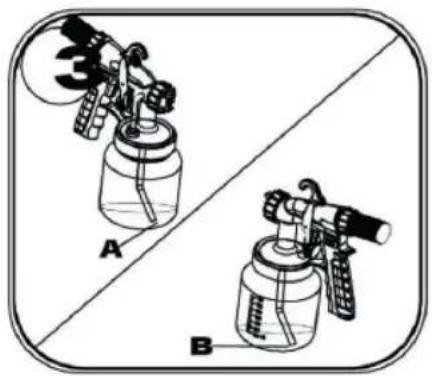
* Align the suction tube (Figure 3). If the suction tube is positioned correctly, the contents of the container can be sprayed with hardly any residue. When spraying horizontal surfaces, turn the suction tube forward (Figure 3A). When spraying objects overhead, turn the suction tube backward (Figure 3B).
Set the container on a sheet of paper and fill with the prepared coating material.
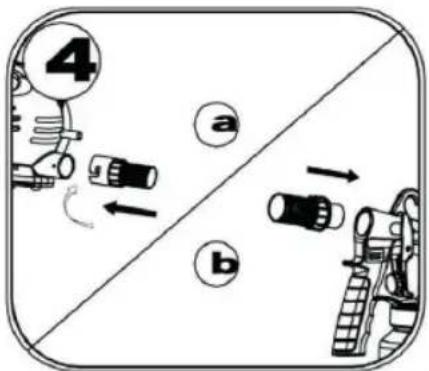
* Mount the flexible air hose. Insert the air hose into the connection of the main until and the spray gun handle (Figure 4).
* Place the spray gun in the gun holder on the main unit.
* Place the device on a clean, level surface to keep the gun from sucking in dust and dirt. -Carry the device using the carrying strap.
* Point the spray gun at the surface to be sprayed.
To determine the volume of material and the spray pattern, test the spray on a piece of cardboard or any surface similar to the one you wish to spray. Press the ON/OFF to begin using the spray gun.
Spray Settings
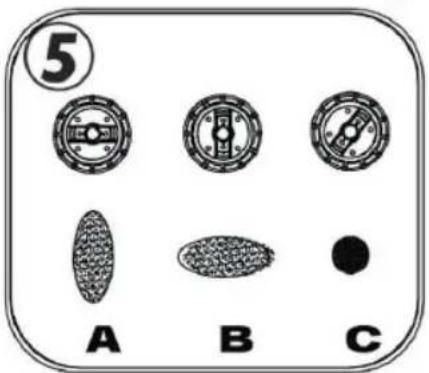
There are three spray settings:
Vertical flat jet for horizontal surfaces (Figure 5A)1.
-
Horizontal flat jet for vertical surfaces (Figure 5B)
-
Circular jet for corners, edges and hard-to-reach areas (Figure 5C)
Adjusting the spray Setting
* With the union nut slightly unscrewed, turn the air cap to the desired spray setting and tighten the union nut (Figure 6). Never press the trigger of the spray gun when adjusting the air cap.
Adjusting the Amount of Material
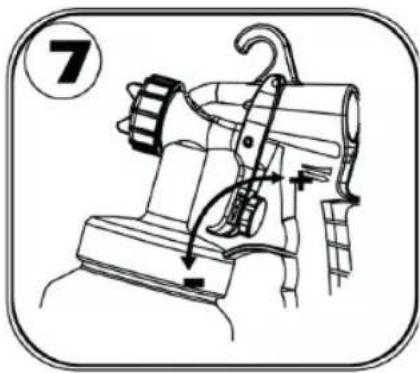
* To adjust the volume of material, turn the regulator on the trigger of the spray gun: -for a lower amount, turn to the left -for a greater amount, turn to the right (Figure 7)
Spraying Technique
For best results, make sure that the surface is completely clean and level before spraying. Carefully pre-treat the surface if necessary.
* Cover all surfaces that you do not want to spray, including screws and screw threads.
* To determine the amount of material and the spray pattern, test the spray on a piece of cardboard or any surface similar to the one you wish to spray. Always start spraying outside the target area. Avoid interruptions within the target area.
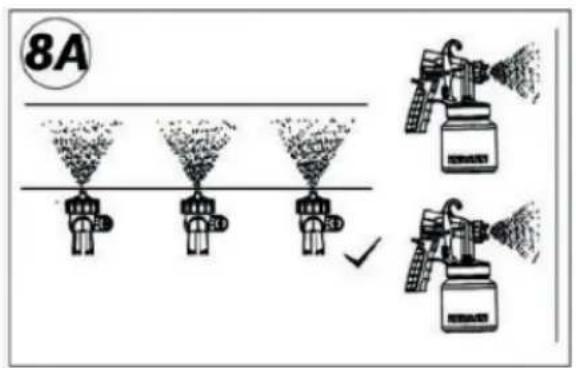
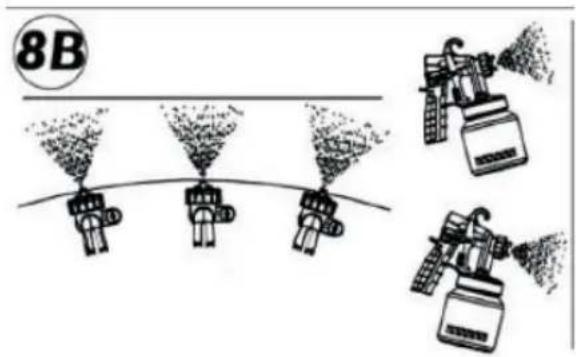
Make the spray movement with your arm and not with your wrist. This ensures that a uniform distance is maintained between the spray gun and the spraying surface. Select a distance of 5 cm to 15 cm, depending on the desired width of the spray jet. Figure 8B shows the incorrect position, where there is an irregular distance from the spray surface.
* Point the spray gun at a uniform distance from the spray surface. Spray horizontally or from top to bottom, depending on the selected spray setting.
Move the spray gun evenly to get an even coating.
If the coating material accumulates in the nozzle and air cap, clean both parts with water or solvent.
PAUSING THE DEVICE
Do the following if you need to stop using the device for period of no more than 4 hours: -Turn off the device
Place the spray gun in the gun holder.
When using 2-component varnishes, clean the device immediately.
TURNING OFF AND CLEANING THE DEVICE
* Clean the device carefully to keep it working properly.
* Unplug the device from the mains. Before long pauses and after finishing the paint job, flush the air in the container.
Do this by keeping the container open for short period of time and closing it again or by pulling the trigger of the spray gun and pouring all the remaining material back into its original container.
* Disassemble the spray gun
* Unscrew the container. Pour all the remaining coating material back into its original container.
* -Pour solvent or water into the container and screw it back on. Only use solvents with a flash point over 21°C.
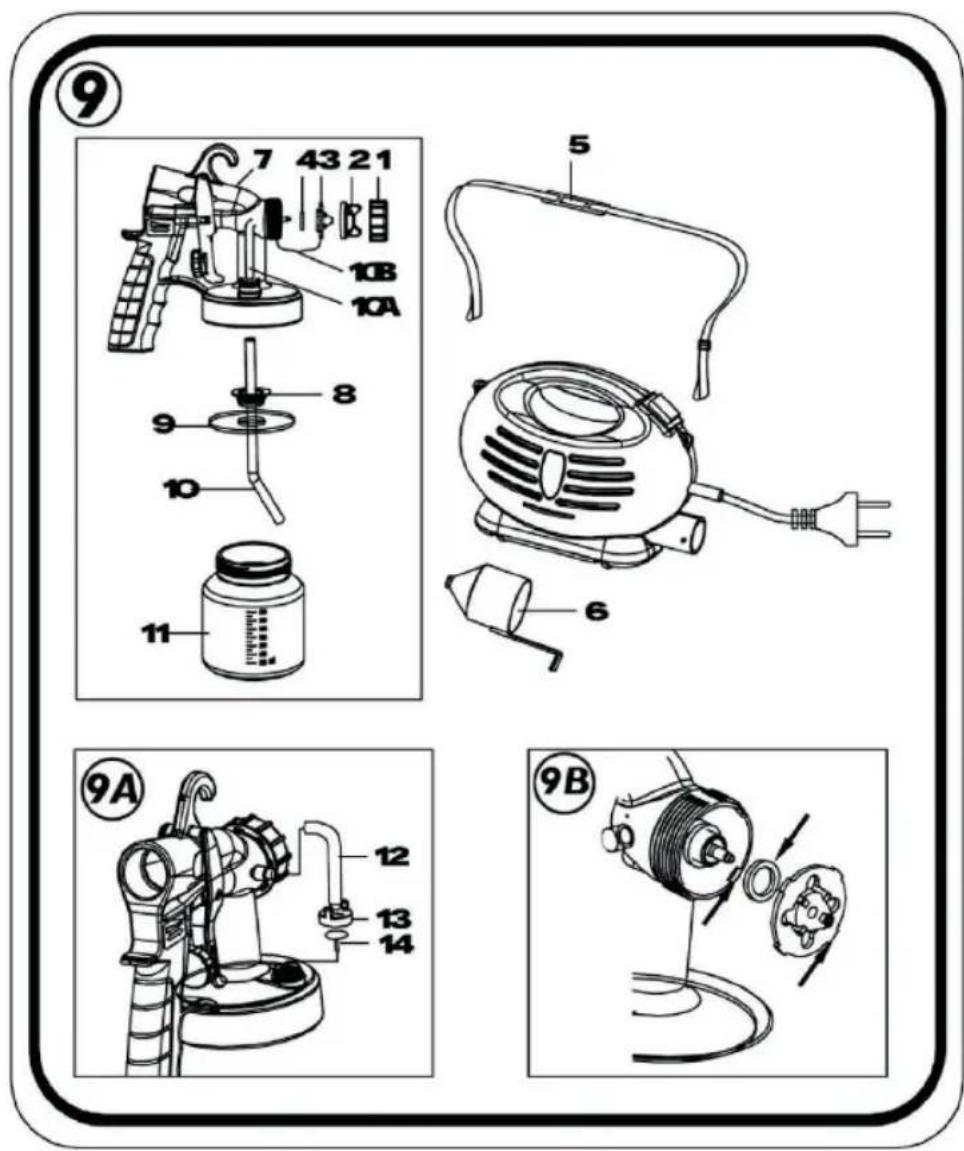
* Reassemble the spray gun (Figure 9).
Plug the device into the mains, turn on the device and spray the solvent or water on a container or cloth.
* Turn off the device and unplug it from the mains.
* Unscrew the container tube (Figure 9A-12) up from the body of the spray gun. Unscrew the valve cover (Figure 9A-13) and remove the membrane (Figure 9A-14). Clean all the parts carefully.
* Unscrew the union nut and remove the air cap and nozzle. Clean the air cap, nozzle joint and nozzle with a brush and water or solvent. Do not clean the joints, the membrane, the openings of the nozzle or the air vents of the spray gun with pointed metal objects.
- Clean the outside of the spray gun with a cloth and solvent or water.
-Reassemble the parts
ASSEMBLING THE DEVICE
Use the device only with the membrane intact (Figure 9A-14). Place the membrane on the lower part of the valve with the pin facing down. Look at the marking on the body of the spray gun. Carefully place the cover of the calve and screw spray gun. Place the nozzle joint with the slot in front of the nozzle
(Figure 9B).
* Insert the nozzle in the body of the spray gun and turn to the correct position. Place that air cap in the nozzle and fasten with the union nut.
Insert the container joint below the suction tube and slide them together. To do this, gently turn the container joint and insert the suction tube with the container joint in the body of the spray gun
THE SET INCLUDES
- Main unit
- Tube
- Carrying strap
- viscosity measuring cup
- Spray gun
- Paint aotainer
- Cleaning clip
4. TECHNICAL SPECIFICATIONS
| Electric spray gun | |
| Nominal frequency and power 230V/50Hz | |
| Nominal power: 650W | |
| Atomizing output: | 105W |
| Acoustic pressure level: 74dB(A) | |
| Container volume:l 800ml | |
| Acoustic power level 87dB(A) | |
| Insulation class II | |
| Weight 3.6kg | |
Instructions Manual - language version only.
Amendments to text and technical parameters are reserved.
Changes in the text, design and technical specifications may change without prior notice and we reserve the right to make these changes. keep it from turning as the drill bit rotates.
Troubleshooting
Suspected malfunctions are often due to causes the user can fix themselves. Therefore check the product using this section .In most cases the problem can be solved quickly .
WARNING!
Only perform the steps described within these instructions! All further inspection, maintenance and repair work must be performed by an authorized service centre or a similarly qualified specialist if you cannot solve the Aproblem yourself!
| ProblemAPossible Cause ASolution | ||
| 1.EProduct does not startE1.1ENot | connected Eto power supply1.2EPower cord or plug is defective1.3EOther Eelectrical Edefect to Ethe product | 1.1 Connect to power supply1.2 Check by a specialist electrician1.3 Check by a specialist electrician |
| 2.EProduct Edoes not reach full power | 2.1EExtension Ecord is not suitable for operaEtion with this product .2.2 Power source (e.g. generator ) has too low voltage2.3EAir vents are blocked | 2.1 Use a proper extension cord2.2 Connect to another power source2.3 Clean the air vents |
| 3.EUnsatisfactory result | 3.1EDisk bit is dull/damaged3.2EDisk bit is not suitable for work piece mEaterial | 3.1 Replace with new one3.2 Use proper drill bit |
| 4.EExcessive vibration or noise | 4.1EDisk bit is dull/damaged4.2EBolts /nuts are loose | 4.1 Replace with a new one4.2 Tighten bolts/nuts |
5. DISPOSAL
INSTRUCTIONS AND INFORMATION ON DISPOSAL OF USED PACKAGING
Put any used package material to the place determined by the municipality for waste disposal.
DISPOSAL OF USED ELECTRIC AND ELECTRONIC EQUIPMENT
This symbol on products or accompanying documents means that use electronic products must not be put to ordinary municipal waste. Hand over such products to determined collection points for proper disposal, restoration and recycling. Alternatively, in some countries of the European Union or other European countries you can return your products to your local dealer when you buy an equivalent new product. By dutiful disposal of this product you can preserve precious natural resources and you help prevent any potential adverse effects on the environment and human health which could be the results of wrong waste disposal. Ask your local authority or the nearest collection point for additional details. In case of improper disposal of this waste kind penalties can be imposed in accordance with national regulations.
FOR COMPANIES IN THE EUROPEAN UNION COUNTRIES
Should you want to dispose of electric and electronic devices, ask your dealer or vendor for necessary information.

DISPOSAL IN OTHER COUNTRIES OUTSIDE THE EUROPEAN UNION
Should you want to dispose of this product, ask your local authorities or your dealer for necessary information about disposal method
This product fulfils all basic requirements of the EU directives that apply to it.
Text, design and technical specifications can change without prior notice and we reserve the right for their change.
- Electric spray gun INSTRUCTION MANUAL
- CONTENTS
- GENERAL SAFETY INSTRUCTIONS
- Important safety warnings
- Packaging
- Instructions for use
- Carefully read, remember and keep these safety instructions
- Workplace
- Electrical Safety
- Personal Safety
- Power Tool Use and Maintenance
- Use of Cordless Power Tools
- Service
- SYMBOLS
- GENERAL DESCRIPTION
- DESCRIPTION AND LOCATION OF MACHINE PARTS
- KINDS OF MATERIALS
- USING THE DEVICE
- Spray Settings
- Adjusting the spray Setting
- Adjusting the Amount of Material
- Spraying Technique
- PAUSING THE DEVICE
- TURNING OFF AND CLEANING THE DEVICE
- ASSEMBLING THE DEVICE
- THE SET INCLUDES
- TECHNICAL SPECIFICATIONS
- Troubleshooting
- WARNING!
- DISPOSAL
- INSTRUCTIONS AND INFORMATION ON DISPOSAL OF USED PACKAGING
- DISPOSAL OF USED ELECTRIC AND ELECTRONIC EQUIPMENT
- FOR COMPANIES IN THE EUROPEAN UNION COUNTRIES
- DISPOSAL IN OTHER COUNTRIES OUTSIDE THE EUROPEAN UNION
Brand : Fieldmann
Model : FDSP 200651-E
Category : Paint gun