
FDW 202205-E - Pressure washer Fieldmann - Free user manual and instructions
Find the device manual for free FDW 202205-E Fieldmann in PDF.


| Product Type | Electric pressure washer |
| Model | FDW 202205-E |
| Brand | Fieldmann |
| Power Supply | 230 V ~ 50 Hz |
| Rated Power | 1800 W |
| Max Pressure | 150 bar (2175 psi) |
| Rated Pressure | 110 bar |
| Max Flow Rate | 450 L/h |
| Rated Flow Rate | 380 L/h |
| Hose Length | 8 m |
| Power Cable Length | 5 m |
| Weight | 8.5 kg |
| Dimensions (L x W x H) | 38 x 32 x 55 cm |
| Motor Type | Universal brush motor |
| Pump Type | Axial cam pump |
| Protection Class | IPX5 |
| Safety Features | Auto-stop, thermal overload protection |
| Included Accessories | High-pressure gun, lance, foam nozzle, rotary brush, surface cleaner (optional) |
| Water Supply | Garden hose connection (3/4") |
| Maintenance | Clean water inlet filter regularly; check oil level (if applicable) |
| Reparability | Spare parts available: seals, valves, hose, gun, pump |
Frequently Asked Questions - FDW 202205-E Fieldmann
User questions about FDW 202205-E Fieldmann
0 question about this device. Answer the ones you know or ask your own.
Ask a new question about this device
Download the instructions for your Pressure washer in PDF format for free! Find your manual FDW 202205-E - Fieldmann and take your electronic device back in hand. On this page are published all the documents necessary for the use of your device. FDW 202205-E by Fieldmann.
USER MANUAL FDW 202205-E Fieldmann
Home & Garden Performance
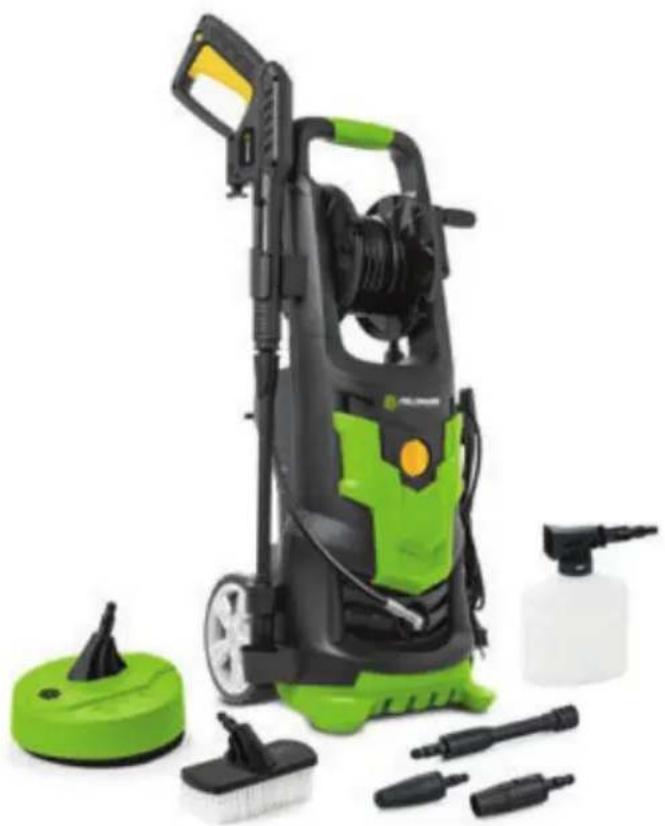
natural_image
Green and black power supply cleaner with cleaning tools and a spray bottle (no visible text or symbols)FDW 202205-E
English 5-24
Češtna 25-44
Slovenčina 45-64
Magyarul 65-84
Polski 85-112
1
High-pressure cleaner USER'S MANUAL
Thank you for purchasing this high pressure cleaner. Before using the product please carefully read this user's guide and keep it for future use
TABLE OF CONTENTS
- IMPORTANT SAFETY TIPS 6
- IMPORTANT SAFETY PRECAUTIONS 6
- GENERAL SAFETY PRECAUTIONS....7
- SYMBOLS....8
- SERVICING OF A DOUBLE-INSULATED APPLIANCE....10
- USE OF EXTENSION CORDS 10
- PROPER USE OF THE PRESSURE CLEANER....11
- MACHINE DESCRIPTION....12
- ASSEMBLY INSTRUCTIONS....13
- OPERATING INSTRUCTIONS....18
- CLEAN-UP AND STORAGE 20
- MAINTENANCE....21
- TECHNICAL SPECIFICATIONS....22
- DISPOSAL....23
- DECLARATION OF CONFORMITY....24
1. IMPORTANT SAFETY TIPS
Never point the high-pressure nozzle at people or animals.
Never drink alcohol or use drugs while operating the pressure cleaner.
Never operate the pressure cleaner while standing in water.
Never touch the electrical plug with wet hands.
Never let electrical connections rest in water.
Never operate pressure cleaner without the water turned on.
Never use hot water with this pressure cleaner.
2. IMPORTANT SAFETY PRECAUTIONS
⚠ WARNING! When using this product, basic precautions should always be followed, including the following:
- Read all instructions before using the product. Save all safety instructions.
- Do not operate the pressure cleaner when fatigued or under the influence of alcohol or drugs.
- Risk of injection or injury – do not direct the high pressure water stream at any people or animals.
- Do not allow children to operate the pressure cleaner at any time.
- To reduce the risk of injury, close supervision is necessary when the pressure cleaner is used near children.
- Know how to stop the unit and reduce pressure immediately. Be completely familiar with the controls.
- Stay alert – always be aware of where you are directing the high pressure spray
- Keep cleaning area clear of all people.
- Keep good footing and balance at all times – do not overreach or stand on an unstable support.
- The work area should have adequate drainage to reduce the possibility of a fall due to slippery surfaces.
- Follow the maintenance instructions specified in the manual.
- To reduce the risk of electrocution, keep all connections dry and off the ground. Do not touch plug with wet hands.
3. GENERAL SAFETY PRECAUTIONS
- Intended for outdoor household use only.
- High-pressure hose can develop leaks from wear, abuse, kinking etc. Do not use a damaged hose.
- Do not use the pressure cleaner in areas near combustible materials, combustible fumes, or dust.
- Some chemicals or detergents may be harmful if inhaled or ingested causing severe injury. Use a respirator or mask whenever there is a chance that vapors may be inhaled. Read all instructions included with the mask so you are certain the mask will provide the necessary protection against inhaling harmful vapors.
- Before starting the pressure cleaner in cold weather, check all of the parts of the equipment and be sure that ice has not formed. Do not store the unit anywhere that the temperature will fall below 0 °C (32 °F).
- DO NOT MAKE ANY MODIFICATIONS TO ANY OF THE COMPONENTS! Units with broken or missing parts, or without the protective housing or covers should NEVER be operated
- Keep the high-pressure hose connected to the pressure cleaner and the spray gun while the system is pressurized. Disconnecting the hose while the unit is pressurized is dangerous, and may cause injury.
- Do not leave the pressure cleaner unattended while the power switch is ON.
- Keep water spray away from electrical wiring or fatal electric shock may result.
4. SYMBOLS
Labels on your tools and in the manual may display symbols. They provide important information about the product or instructions for its use.
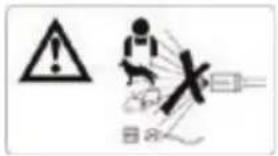
Warning! Never point the gun at people, animals, body parts, power sources or any electrical appliances.
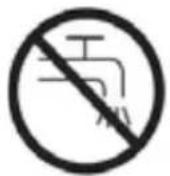
The appliance is not intended for connection to a drinking water supply.

Please read the instructions

Protection Class II.

This product has been designed in compliance with approved standards.
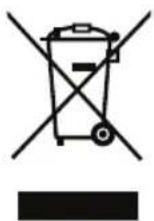
Electrical appliances are not to be thrown in the household waste.

Please use ear protection.

Always wear safety glasses with side shields and, if necessary, a full face shield when using this product.
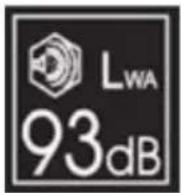
Acoustic power level.
5. SERVICING OF A DOUBLE-INSULATED APPLIANCE
In a double-insulated product, two systems of insulation are provided instead of grounding. No means of grounding is provided on a double-insulated product, nor should a means for grounding be added to the product. Servicing a double-insulated product requires extreme care and knowledge of the system, and should be done only by qualified service personnel. Replacement parts for a double-insulated product must be identical to the parts they replace. A double-insulated product is marked with the words "DOUBLE INSULATION" or "DOUBLE INSULATED".
This symbol □ may also be marked on the product.
6. USE OF EXTENSION CORDS
Use of an extension cord with this product is NOT RECOMMENDED. If you must use an extension cord, use only extension cords that are intended for outdoor use. These cords are identified by a marking "ACCEPTABLE FOR USE WITH OUTDOOR APPLIANCES, STORE INDOORS WHILE NOT IN USE." Use only extension cords having an electrical rating not less than the rating of the product. Examine extension cord before use. DO NOT USE DAMAGED EXTENSION CORDS! Do not pull on cord to disconnect from receptacle, always disconnect by pulling on plug. Keep cord away from heat and sharp edges. Always disconnect the extension cord from the receptacle before disconnecting the product from the extension cord.
⚠ WARNING! To reduce the risk of electrocution, keep all connections dry and off the ground. Do not touch the plug with wet hands.
Do not use the appliance if a supply cord or important parts of the appliance are damaged, e.g. safety devices, high pressure hoses, trigger gun.
If an extension cord is used, the plug and socket must be of watertight construction.
⚠ WARNING! Inadequate extension cords can be dangerous.
Remove the plug from the socket-outlet during cleaning or maintenance and when replacing parts or converting the machine to another function.
7. PROPER USE OF THE PRESSURE CLEANER
THIS UNIT IS INTENDED FOR USE WITH COLD WATER ONLY! DO NOT USE HOT WATER IN THIS PRESSURE CLEANER.
- Operate the pressure cleaner at no more than the fluid pressure rated for the pressure cleaner. Never run the pressure cleaner without a water supply. Running the unit without a water supply will cause irreparable damage to the unit.
- Make sure that the water supply you use for the pressure cleaner is not dirty, sandy, and does not hold any corrosive chemical products. Using a dirty water supply will compromise the long life of the pressure cleaner.
- CAUTION - The pressure cleaner can be used for a variety of applications including washing cars, boats, patios, decks, garages etc. where high pressure is necessary to remove dirt and debris. High-pressure water flow can damage the work surface if not used properly! See the section titled "Operating Instructions" for more details. Always test the spray in an open area first.
- NEVER move the unit by pulling on the high pressure hose. Use the handle provided on the top of the unit.
- Always hold the high pressure gun and wand with two hands. Keep one hand on the gun/trigger, while supporting the wand with the other hand (see diagram).
- When dispensing detergent, the pressure cleaner applies detergent to the cleaning area at low pressure only. Once the detergent has been applied, spray the detergent off of the work area by using the adjustable nozzle.
8. MACHINE DESCRIPTION
Unpacking the box
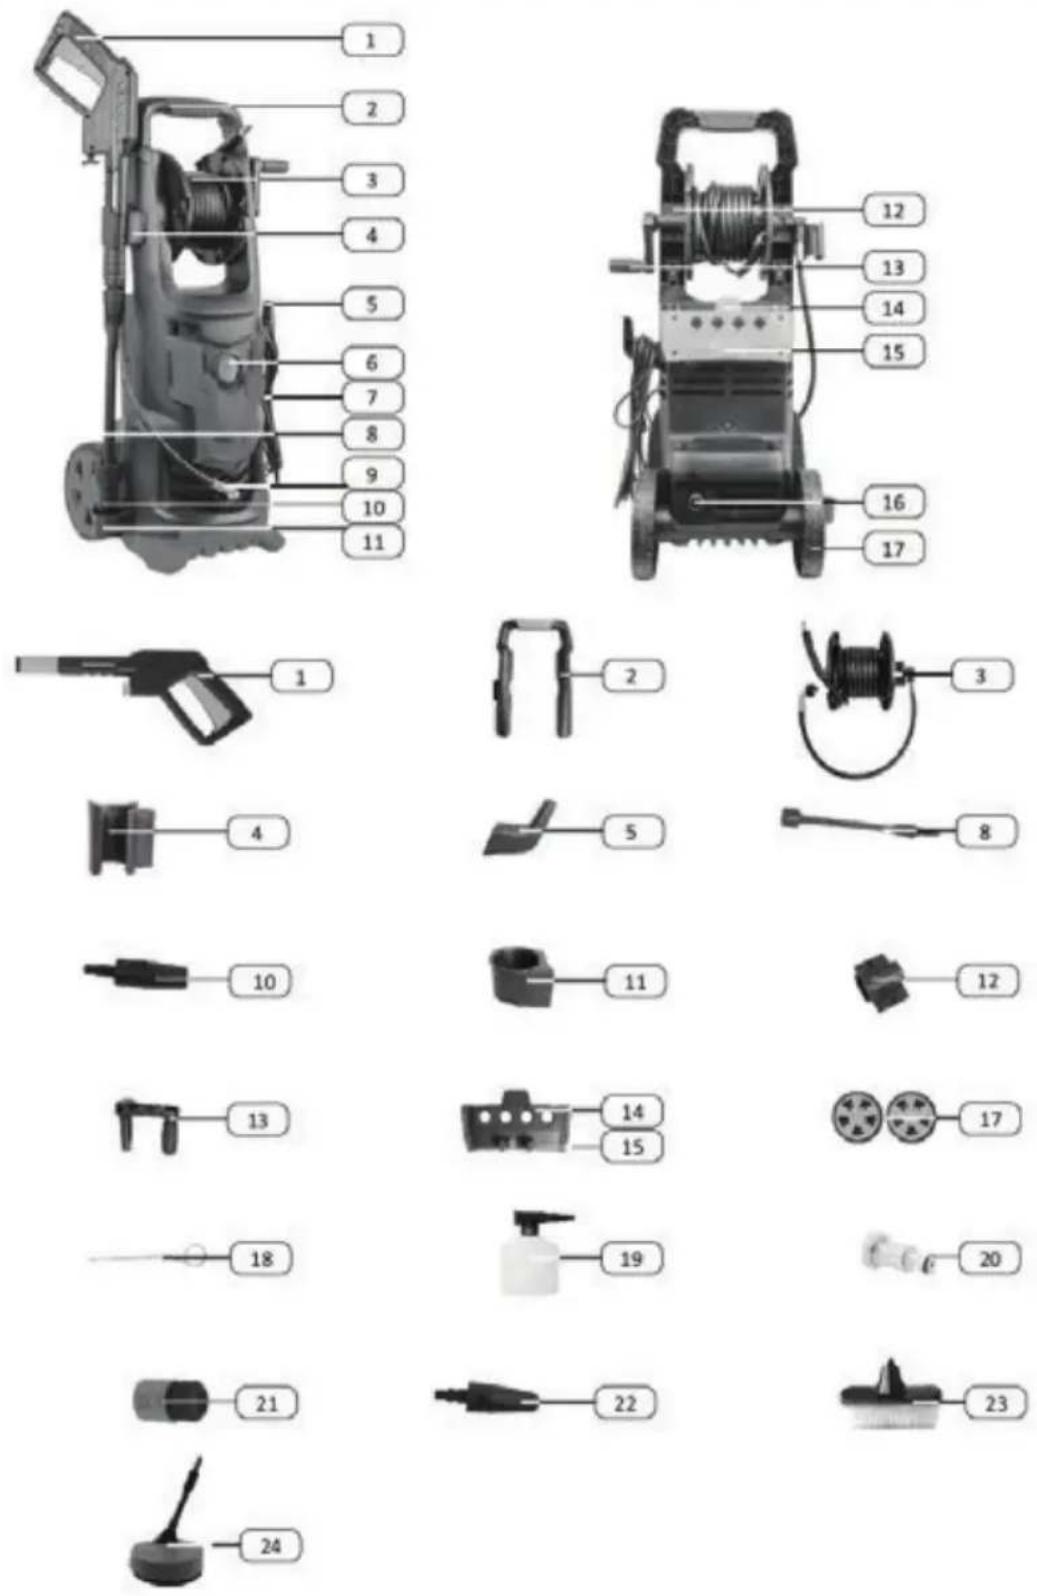
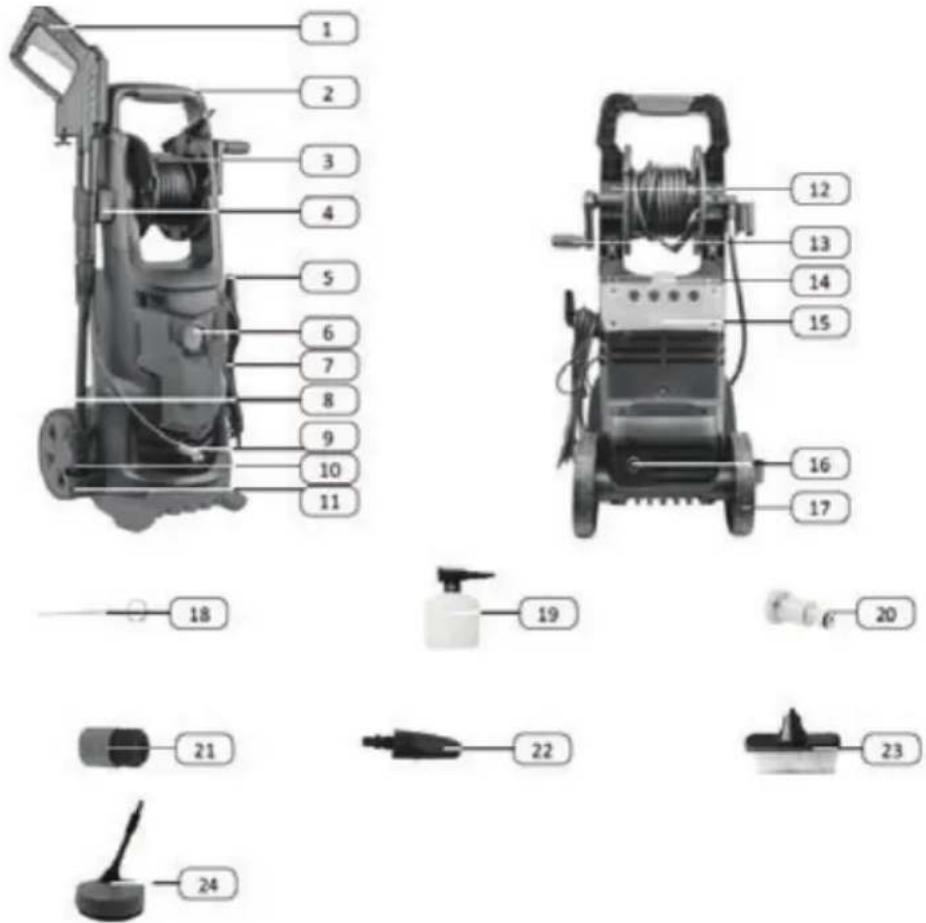
After opening the box, please remove all parts and check them against the following list of supplied components:
- Water gun
- Accessory holder
- Handle
- Shampoo container holder
- Hose winch - 5m
- Terminal input thread No.20
- Water gun A holder
- Wheels (2pcs)
- Mains cord holder
- Cleaning needle
- Power on/off switch
- Shampoo container
- Mains cord - 5m
- Inlet filter terminal
- Jet extension
- 12 " hose quick coupling
- Output thread
- Turbo jet
- Variable jet
- Car brush
- Water gun B holder
-
Surface cleaner
-
Holder to attach the winch and crank on the handrail
-
Hose winding crank
9. ASSEMBLY INSTRUCTIONS
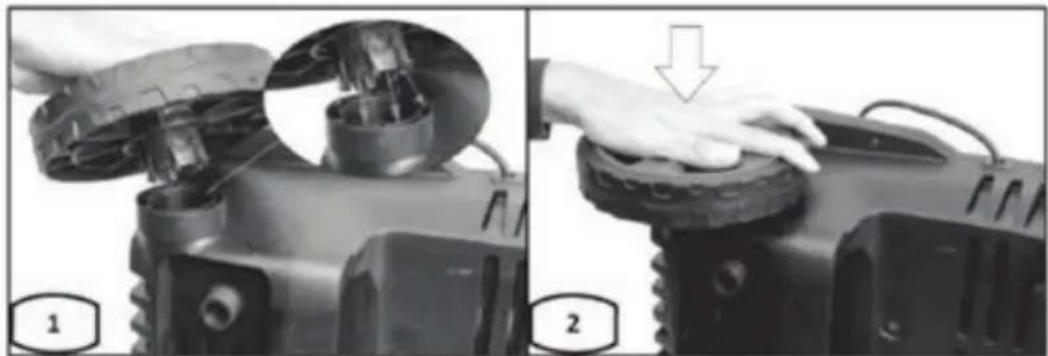
1. Installing the wheels
Mount the wheels on the machine body and press down. (See fig.1, 2)
natural_image
Two-panel black-and-white photo showing a hand pressing down on a mechanical component, labeled 1 and 2 (no text or symbols in the image itself)2. Installing the rear holder and accessories
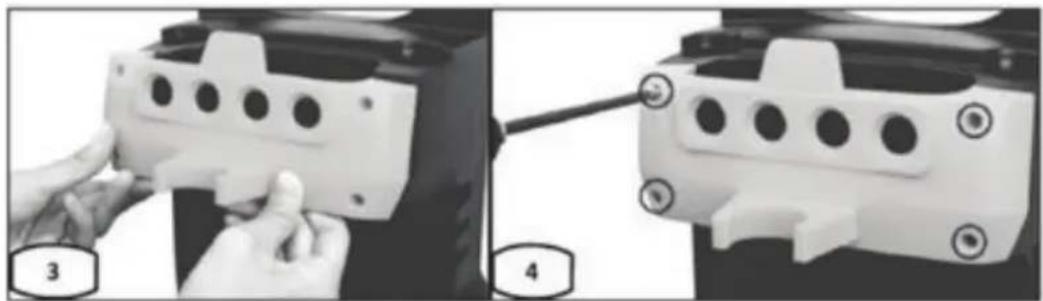
Mount the accessory holder on the back of the machine body and fasten with four screws (size: 4x16mm). (See fig.3, 4)
natural_image
Two-step assembly process showing hand positioning and tool application on a mechanical component (no text or symbols visible)3. Mounting the winch on the hose and handles
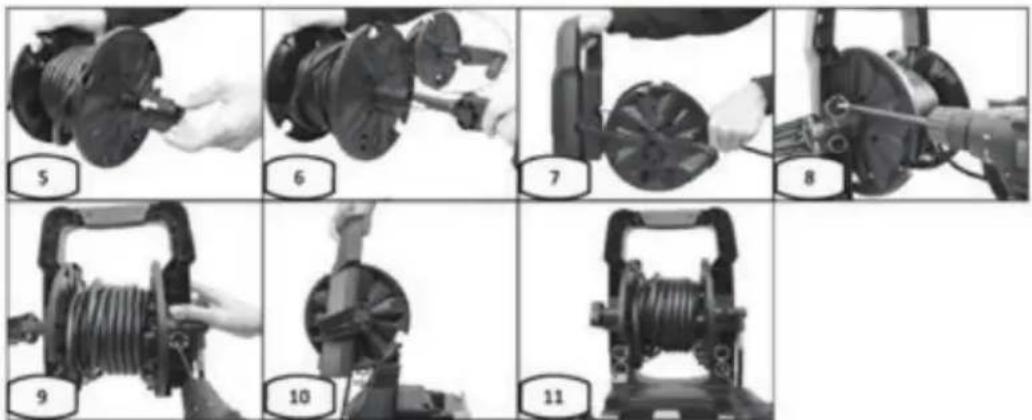
- First, slide the holder (No.12) onto the sides of the winch (fig.5) and then slide the handle (No.13) into the deepest point (fig.6).
- Then connect the winch (No.3) to the handle (No.2) with 4 screws (fig.7, 8, 9).
- Next, slide the handle with the winch onto the machine body (fig.10) and fasten with 4 screws (fig.11).
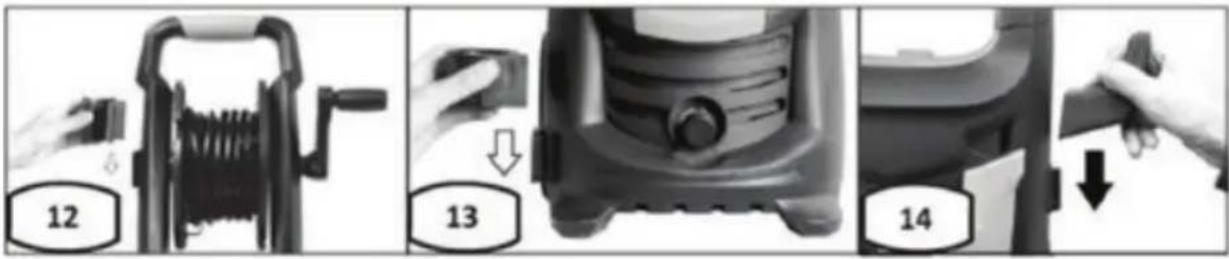
4. Attaching the gun and power cord holders (fig. 12, 13, 14 below)
- On one side of the machine, insert the gun A and the gun B holder (see fig.12, 13).
- Then, insert the power cord holder on the machine's other side. (see fig. 14)
5. High-pressure hose assembly
- Make sure the ON/OFF switch is in the OFF position.
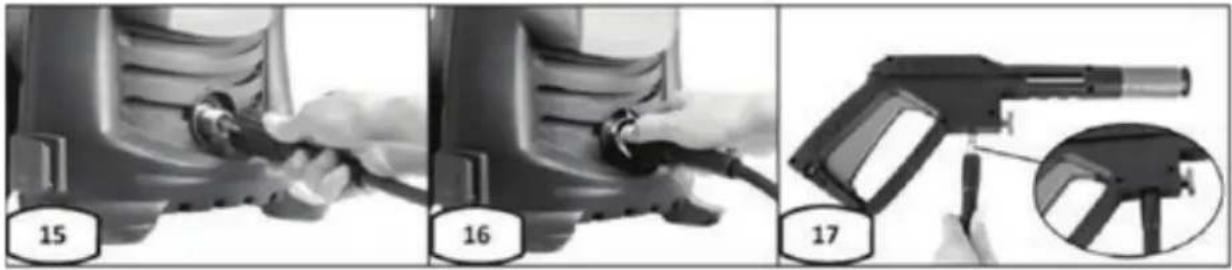
- Remove the protective cover from the outlet thread and connect the connecting hose from the winch (No.3) onto the outlet thread as shown on fig.15, 16.
- Attach the hose onto the gun as shown on figure 17.
natural_image
Three-step photo sequence showing a hand holding a tool, connected to a device in three stages (15, 16, 17), with an inset image of a handgun being held.6. Water gun assembly
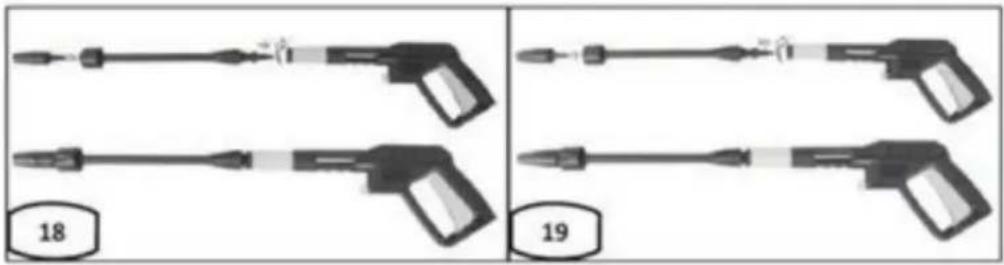
- Insert the nozzle attachment (No.8) into the spray gun (No.1) and turn by 90° (fig.18, 19).
- Then insert the required jet into the attachment (No.8). (fig.13, 14)
natural_image
Four identical black-and-white illustrations of a handheld tool with a pointed tip, shown from different angles (18 and 19), no text or symbols present.Gun safety lock
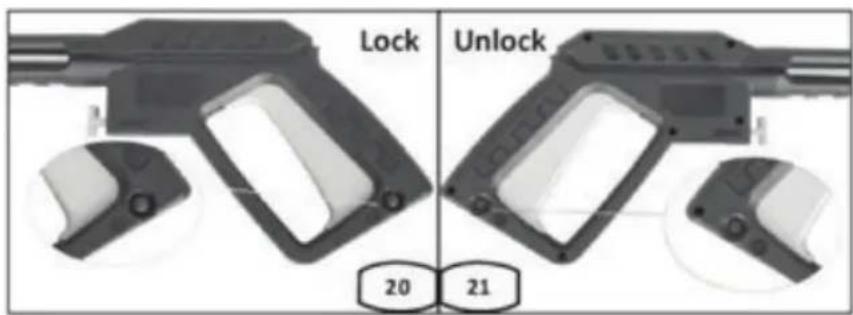
This pressure cleaner is equipped with a gun trigger safety lock. Use the safety lock to prevent accidental activation of the high-pressure jet when the pressure cleaner is not used.
7. Connecting the shampoo container
-
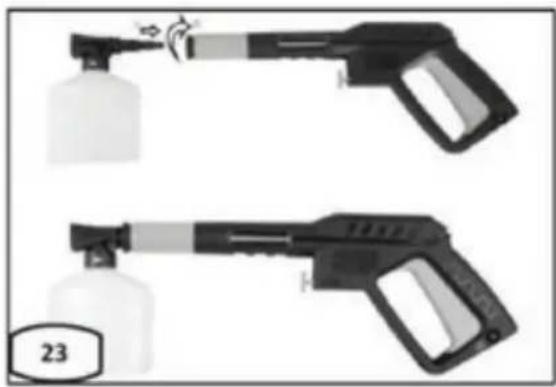
Insert the shampoo container (No.19) into the water gun (No.1) as shown on fig.23.
-
After inserting, turn it by 90°.
natural_image
Two identical black spray gun holders with spray bottles, shown from different angles (no text or symbols visible)Note: The detergent should be diluted with water to achieve the best possible effect.
WARNING! NEVER USE PRODUCTS WITH BLEACHES, CHLORINE OR ANY OTHER CORROSIVE MATERIALS, INCLUDING LIQUIDS-CONTAINING LIQUIDS (I.E. GASES, OILS, ETC.), PRODUCTS WITH SODIUM PHOSPHATE, AMMONIA OR ACID-BASED CLEANERS. THESE CHEMICALS WOULD DAMAGE THE APPLIANCE AND WILL ALSO CAUSE DAMAGE TO THE CLEANED SURFACE. ALWAYS READ THE LABEL INFORMATION.
8. Installing the inlet filter terminal
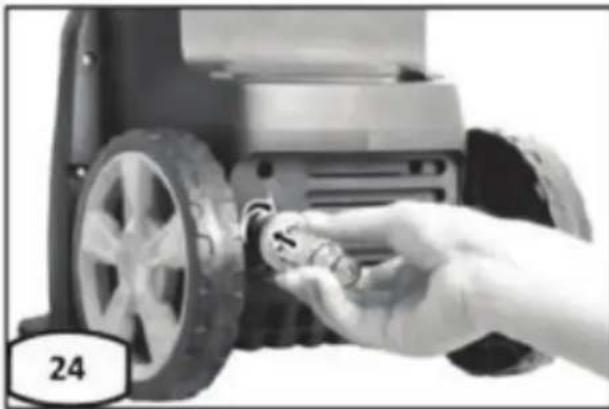
- First remove the protective cover from the inlet thread.
- Then screw the end with the filter onto the thread (fig.24, 25).

Note: The inlet filter must always be installed in the water supply line to filter out sand, limestone and other contaminants as they would damage the pump valves.

ATTENTION! Failure to install the filter voids the warranty.
natural_image
Hand inserting a small component into a wheeled robot wheel (no text or symbols visible)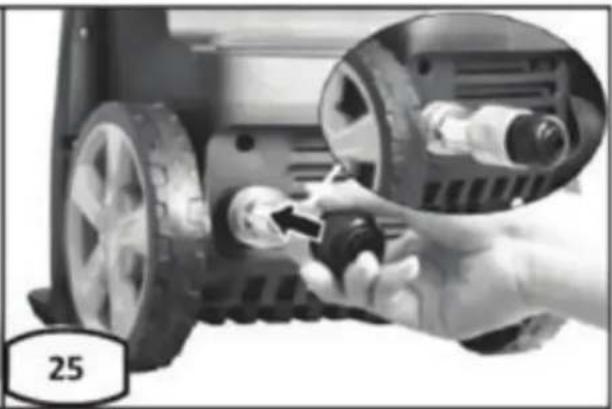
natural_image
Close-up of a hand inserting a component into a car tire, showing mechanical parts and a magnified inset (no text or symbols visible)9. Connecting 12 " diam. hose and quick coupling
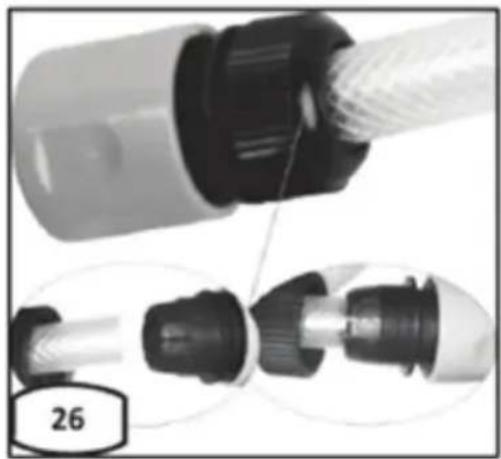
- Connect the 12 " garden hose to the standard quick coupling as shown on fig.26 (quick coupling is included in package - No.21).
- Then insert the quick coupling (No.21) onto the input terminal (No.20 on fig.25) until a click is heard, which means that the installation was successful. If not, water may leak at this point.
natural_image
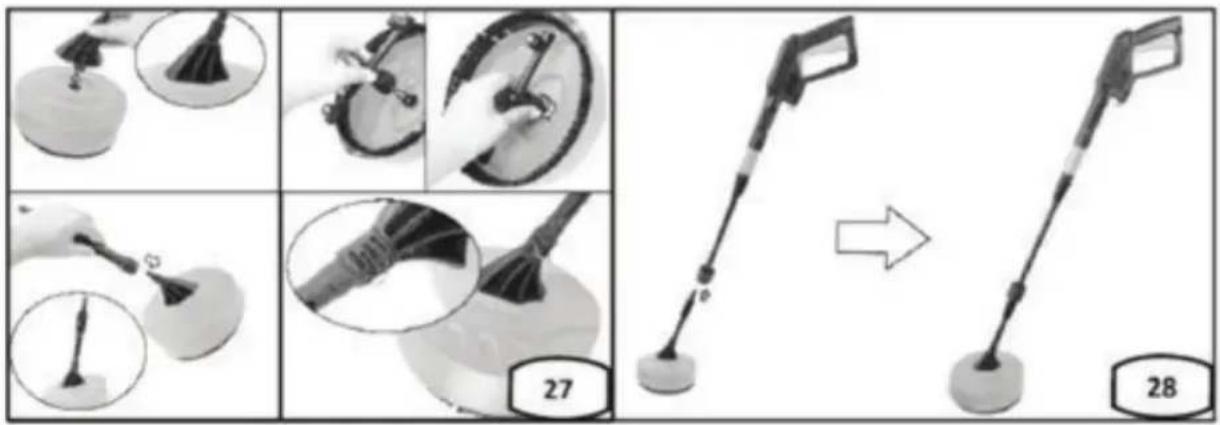
Close-up of a mechanical component with a transparent tube and two views showing internal parts (no text or symbols visible)10. Surface cleaner assembly (No.24)
- Proceed according to the fig.27, 28 below.
- Insert the U-pin and fasten the extension attachment.

Note: Make sure that the bottom of the cleaner is properly attached to the extension with the U-pin
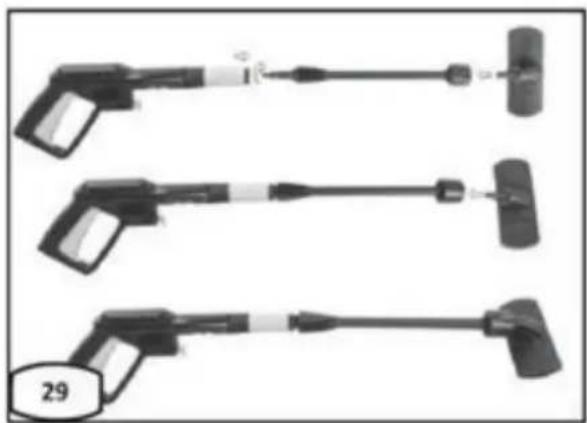
11. Car brush attachment (No.20)
- Insert the jet attachment (No.8) into the water gun (No.1).
- After inserting, turn it by 90° until the locking end of the jet appears (fig.29)
- Then insert the car brush (No.23) into the attachment (No.8). (fig.29)
natural_image
Three identical black handheld devices with attached connectors, arranged vertically (no visible text or symbols)9. OPERATING INSTRUCTIONS
THIS APPLIANCE IS INTENDED FOR USE WITH COLD WATER ONLY! DO NOT USE HOT WATER IN THIS HIGH-PRESSURE CLEANER!
Starting
After connecting the high-pressure cleaner to the cold water supply, proceed as follows:
Make sure the ON/OFF switch is in the OFF position.
* Connect the machine to a power source.
Assemble the machine as described in the Assembly instructions chapter.
* Fully open the water inlet valve.
Before turning on the instrument, press the trigger of the gun to remove any remaining air from the pump and hose.
To start the high-pressure cleaner, set the ON/OFF switch to the ON position and press the trigger.
REMINDER: The engine does not run continuously unless the trigger is depressed.
WARNING!
RISK OF INJECTION! Unit will start spraying when trigger is squeezed. When turning the unit off after use, high pressure still exists inside the hose and unit. Point the gun in a safe direction and discharge the excess pressure. NEVER direct the high pressure water stream at people or animals.
Automatic On/Off
The pressure cleaner is equipped with an automatic on/off switch. The pressure cleaner will only run when the power switch is in the ON position and the trigger on the gun is squeezed. When you release the trigger to stop spraying water through the gun, the motor on the pressure cleaner will automatically shut off. Simply squeeze the trigger again to resume using the cleaner. To stop using the pressure cleaner, release the trigger and switch the unit to the OFF position. The unit should be turned completely OFF while not in use or while unattended.
Bleeding the Gun
It is very important to bleed the gun before using the pressure cleaner. Refer to the "Assembly Instructions" to assemble the pressure cleaner. To bleed the gun, simply connect the garden hose to the pressure cleaner and squeeze the trigger BEFORE turning the electrical supply on. This allows any air trapped inside the pressure cleaner and gun to be removed before using the unit. Continue holding trigger for approximately one minute to allow any excess air out of the unit. Water will flow through the gun at low pressure during this procedure. For more bleeding tips, see the section titled "Operating Instructions."
Adjustable Spray Nozzle
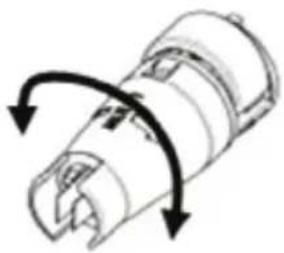
The adjustable nozzle will allow you to use any variety of spray patterns from a full fan spray to a direct stream spray. When using the pressure washer to clean wood decks, siding, vehicles etc., always start using the fan spray and begin spraying from a minimum 36" away to avoid damaging the surface of the material you are cleaning. Always begin by spraying in a testing area free and clear of people and objects.
natural_image
Diagram of a cylindrical mechanical component with directional arrows indicating rotation or movement (no text or symbols)⚠ Warning! Do not do this under operation to avoid that the hand hits the jet
⚠ Warning! High pressure jets can be dangerous if subject to misuse. The jet must not be directed at persons, live electrical equipment or the appliance itself.
Do not direct the jet against yourself or others in order to clean clothes or foot-wear.
10. CLEAN-UP AND STORAGE
Shutting Down the Pressure Cleaner
WHEN FINISHED USING THE PRESSURE CLEANER, FOLLOW THESE STEPS TO SHUT DOWN THE UNIT:
Turn the pressure cleaner to the OFF position.
Turn off the water supply.
Before disconnecting high-pressure hose connection, point the gun in a safe direction and discharge the high-pressure water.
* Disconnect high-pressure hose from the pressure cleaner and gun.
* Disconnect garden hose from the pressure cleaner.
Remove quick coupler fitting from garden hose and attach to the nipple portion of the fitting installed on the pressure cleaner for storage.
Remove excess water from the pump by tipping the unit on both sides to drain any remaining water from inlet and outlet fittings.
Remove Water Intake Filter and flush with water to remove dirt or debris. Return filter once cleaned.
Drain detergent reservoir and flush with running water.
Wipe away any remaining water on all parts and fittings.
Engage the gun safety lock.
Store the pressure cleaner, parts, and accessories in an area with a temperature above 0 °C (32 °F).
Winterizing and Long-Term Storage
FOLLOW ALL OF THE ABOVE SHUT-DOWN PROCEDURES, ADDING THE FOLLOWING STEPS....
After disconnecting the water supply, and before disconnecting the high-pressure hose, turn the pressure cleaner on for 2-3 seconds, until any remaining water in the pump exits.
TURN UNIT OFF IMMEDIATELY. CONTINUED USE OF THE PRESSURE CLEANER WITHOUT WATER SUPPLY ATTACHED WILL CAUSE SEVERE DAMAGE TO THE UNIT!
* Always store the pressure cleaner, parts, and accessories in an area with a temperature above 0 °C (32 °F).
WARNING!
FAILURE TO COMPLY WITH THESE STORAGE INSTRUCTIONS WILL RESULT IN DAMAGE TO THE PUMP ASSEMBLY.
11. MAINTENANCE
This pressure cleaner is supplied with a closed lubrication system, so no addition of oil is needed.
* Check all hoses and accessories for damage prior to use.
Check the inlet filter periodically for deposits. Clean this filter regularly for maximum performance.
CLEANING TIPS
WARNING!
ALWAYS TEST THE SPRAY IN AN AREA FREE AND CLEAR OF PEOPLE AND OBJECTS BEFORE YOU SPRAYAT THE INTENDED CLEANING SURFACE.
Wood and Vinyl Decks
Rinse deck and surrounding area with fresh water. If using detergent, fill the detergent reservoir and apply to the area being cleaned at low pressure. For optimal results, reduce your work area to smaller sections and clean each section one at a time. Allow the detergent to rest on the surface for a few minutes and then rinse at high pressure. DO NOT LET THE CLEANSER DRY. Always clean from left to right and top to bottom for best results.
Rinse at high pressure using the fan spray keeping the tip of the spray nozzle at least 6-9 inches from the cleaning surface. Maintain a further distance from the cleaning area when using a direct spray.
⚠️ CAUTION! For softer woods, increase the distance from the cleaning area.
Cement Patios, Stone, and Brick
Rinse cleaning and surrounding area with fresh water. If using detergent, fill the detergent reservoir and apply to the area being cleaned at low pressure. Rinse at high pressure using the fan spray in a sweeping motion keeping the tip of the spray nozzle at least 3-6 inches from the cleaning surface. Maintain a further distance from the cleaning area when using a direct spray.
Cars, Boats, and Motorcycles
Rinse cleaning and surrounding area with fresh water. If using detergent, fill the detergent reservoir and apply to the area being cleaned at low pressure. To achieve the best results, clean one side at a time. Allow the detergent to rest on the surface for a few minutes, but do not let the detergent dry. Rinse at high pressure using the fan spray in a sweeping motion keeping the tip of the spray nozzle at least 8 inches from the cleaning surface.
Maintain a further distance from the cleaning area when using a direct spray. Wipe surface dry for a polished finish.
Barbecue Grills, Power Equipment, and Garden Tools
Rinse cleaning and surrounding area with fresh water. If using detergent, fill the detergent reservoir and apply to the area being cleaned at low pressure. Allow the detergent to rest on the surface for a few minutes, but do not let the detergent dry. Rinse at high pressure using the fan spray keeping the tip of the spray nozzle at least 1-3 inches from the cleaning surface. Maintain a further distance from the cleaning area when using a direct spray.
12. TECHNICAL SPECIFICATIONS
| Rated voltage | 230–240V |
| Rated frequency | 50Hz |
| Rated power input | 2200W |
| Rated pressure | 110bar (11MPa) |
| Maximum pressure | 165bar (16.5Mpa) |
| Rated flow | 6l/min |
| Maximum flow rate | 7.5l/min |
| Max. water inlet temperature | 40°C |
| Protection class | II. |
| Weight | 9kg |
| Maximum water input pressure in pascals | 1.2Mpa |
| Acoustic power level (K = 3dB (A)): L_pA | 93dB |
WARRANTY
See the enclosed warranty conditions for warranty conditions.
ENVIRONMENT
If your appliance must be replaced after a prolonged period of being unused, do not throw it into the household waste, but dispose of it in an environmentally friendly way.
13. DISPOSAL

The machine, rechargeable batteries, accessories and packaging should be sorted for environmentalfriendly recycling.
Do not dispose of power tools and batteries/rechargeable batteries into household waste!
Only for EC countries:
According to the European Guideline 2012/19/EU, power tools that are no longer usable, and according to the European Guideline 2006/66/EC, defective or used battery packs/batteries, must be collected separately and disposed of in an environmentally correct manner.
INSTRUCTIONS AND INFORMATION ON DISPOSAL OF USED PACKAGING.
Put any used package material to the place determined by the municipality for waste disposal.
DISPOSAL OF USED ELECTRIC AND ELECTRONIC EQUIPMENT
This symbol on products or accompanying documents means that used electric or electronic products must not be put to ordinary municipal waste.
Hand over such products to determined collection points for proper disposal, restoration and recycling. Alternatively, in some countries of the European Union or other European countries you can return your products to your local dealer when you buy an equivalent new product. By dutiful disposal of this product you can preserve precious natural resources and you help prevent any potential adverse effects on the environment and human health which could be the results of wrong waste disposal. Ask your local authority or the nearest collection point for additional details. In case of improper disposal of this waste kind penalties can be imposed in accordance with national regulations.
For companies in the European Union countries
Should you want to dispose of electric and electronic devices, ask your dealer or vendor for necessary information..
Disposal in other countries outside the European Union
Should you want to dispose of this product, ask your local authorities or your dealer for necessary information about disposal method.

This product fulfils all basic requirements of the EU directives that apply to it.
Text, design and technical specifications can change without prior notice and we reserve the right for their change.
User manual in the original language.
14. DECLARATION OF CONFORMITY
FAST
FAST CR, a.s.
Černokostelecka 2111,100 00 Praha 10, Czech Republic tel.: +420 323 204 111, fax: +420 323 204 110
EU DECLARATION OF CONFORMITY
Product/ brand: Electric High Pressure Cleaner / FIELDMANN
Type/ model: FDW 202205-E as factory model HRB24P
AC 230–240 V, 50 Hz, 2200 W, max. 7,5 l/min, 16,5Mpa, IPX5, Class II LpA 87 dB(A), LwA 93 dB(A)
Manufacturer: FAST ČR, a.s.
Černokostelecká 2111, 100 00 Praha 10, Czech Republic VAT no: CZ26726548
The product is inline with directives and regulations listed below:
Directive MD 2006/42/EC
Directive EMC 2014/30/EU
Directive NOISE 2000/49/EC
Directive RoHS 2011/65/EU
and norms:
EN 60335-1:2012+A11+A13+A1+A14+A2
EN 60335-2-79:2012
EN 62233:2008
EN 55014-1:2017+A11:2020
EN 55014-2:2015
EN IEC 61000-3-2:2019
EN 61000-3-3:2013+A1:2019
EN IEC 61000-3-11:2019
CE
Place of issuance: Prague
Date of issuance: 4.8.2021
Name: Ing. Zdeněk Pech
Chairman of the Board
Signature:

FIELDMANN®
Home & Garden Performance
Model /Modell /Modelis:
Conditions of guarantee
This product is warranted for the period of 24 months from the date of purchase to the end-user. Warranty is limited to the following conditions. Warranty is referred only to the customer goods using for common domestic use. The claim for service can be applied either at dealer's shop where the product was bought, or at below mentioned authorized service shops. The end-user is obligated to set up a claim immediately when the defects appeared but only till the end of warranty period. The end-user is obligated to cooperate to certify the claiming defects. Only completed and clean (according to hygienic standards) product will be accepted. In case of eligible warranty claim the warranty period will be prolonged by the period from the date of claim application till the date of taking overthe product by end-user, or the date the end-user is obligated to take it over. To obtain the service under this warranty, end-user is obligated to certify his claim with duly completed following documents: receipt, certificate of warranty, certificate of installation...
This warranty is void especially if apply as follows: ■ Defects which were put on sale. ■ Wear-out or damage caused by common use. ■ The product was damaged by unprofessional or wrong installation, used in contrary to the applicable instruction manual, used in contrary to legal enactment and common process of use or used for another purpose which has been designed for. ■ The product was damaged by uncared-for or insufficient maintenance. ■ The product was damaged by dirt, accident of force majeure (natural disaster, fire, flood, ...). ■ Defects on functionality caused by low duality of signal, electromagnetic field interference etc. ■ The product was mechanically damaged (e.g. broken button, fall...). ■ Damage caused by use of unsuitable media, fillings, expendable supplies (batteries) or by unsuitable working conditions (e.g. high temperatures, high humidity, quakes,...). ■ Repair, modification or other failure action to the product by unauthorized person. ■ End-user did not prove enough his right to claim (time and place of purchase). ■ Data on presented documents differs from data on products. ■ Cases when the claiming product can not be identified according to the presented documents (e.g. the serial number or the warranty seal has been damaged).
natural_image
Green and black power supply unit with cleaning tools and spray bottle (no visible text or symbols)
FIELDMANN®
Home & Garden Performance

- High-pressure cleaner USER'S MANUAL
- TABLE OF CONTENTS
- IMPORTANT SAFETY TIPS
- IMPORTANT SAFETY PRECAUTIONS
- GENERAL SAFETY PRECAUTIONS
- SYMBOLS
- SERVICING OF A DOUBLE-INSULATED APPLIANCE
- USE OF EXTENSION CORDS
- PROPER USE OF THE PRESSURE CLEANER
- THIS UNIT IS INTENDED FOR USE WITH COLD WATER ONLY! DO NOT USE HOT WATER IN THIS PRESSURE CLEANER.
- MACHINE DESCRIPTION
- Unpacking the box
- ASSEMBLY INSTRUCTIONS
- Installing the wheels
- Installing the rear holder and accessories
- Mounting the winch on the hose and handles
- Attaching the gun and power cord holders (fig. 12, 13, 14 below)
- High-pressure hose assembly
- Water gun assembly
- Gun safety lock
- Connecting the shampoo container
- Installing the inlet filter terminal
- Connecting 12 " diam. hose and quick coupling
- Surface cleaner assembly (No.24)
- Car brush attachment (No.20)
- OPERATING INSTRUCTIONS
- THIS APPLIANCE IS INTENDED FOR USE WITH COLD WATER ONLY! DO NOT USE HOT WATER IN THIS HIGH-PRESSURE CLEANER!
- Starting
- WARNING!
- Automatic On/Off
- Bleeding the Gun
- Adjustable Spray Nozzle
- CLEAN-UP AND STORAGE
- Shutting Down the Pressure Cleaner
- WHEN FINISHED USING THE PRESSURE CLEANER, FOLLOW THESE STEPS TO SHUT DOWN THE UNIT:
- Winterizing and Long-Term Storage
- FOLLOW ALL OF THE ABOVE SHUT-DOWN PROCEDURES, ADDING THE FOLLOWING STEPS....
- TURN UNIT OFF IMMEDIATELY. CONTINUED USE OF THE PRESSURE CLEANER WITHOUT WATER SUPPLY ATTACHED WILL CAUSE SEVERE DAMAGE TO THE UNIT!
- MAINTENANCE
- CLEANING TIPS
- Wood and Vinyl Decks
- Cement Patios, Stone, and Brick
- Cars, Boats, and Motorcycles
- Barbecue Grills, Power Equipment, and Garden Tools
- TECHNICAL SPECIFICATIONS
- WARRANTY
- ENVIRONMENT
- DISPOSAL
- Only for EC countries:
- INSTRUCTIONS AND INFORMATION ON DISPOSAL OF USED PACKAGING.
- DISPOSAL OF USED ELECTRIC AND ELECTRONIC EQUIPMENT
- For companies in the European Union countries
- Disposal in other countries outside the European Union
- DECLARATION OF CONFORMITY
- EU DECLARATION OF CONFORMITY
- FIELDMANN®
- Home & Garden Performance
- Model /Modell /Modelis:
- Conditions of guarantee
Brand : Fieldmann
Model : FDW 202205-E
Category : Pressure washer