
GLS 1401 - Lawn mower Gardenline - Free user manual and instructions
Find the device manual for free GLS 1401 Gardenline in PDF.


| Product Type | Electric Scarifier |
| Brand | Gardenline |
| Model | GLS 1401 |
| Power Input | 1400 W |
| Mains Voltage | 230 V ~ 50 Hz |
| Working Width | 33 cm |
| Number of Blades | 20 |
| Scarifying Depths | Transport (0 mm), 3 mm, 7 mm, 9 mm |
| Collection Bag Capacity | 28 litres |
| Handlebar Adjustment | Height adjustable, double folding for storage |
| Safety Features | 2-hand safety switch, safety lock-off, cable strain relief |
| Sound Pressure Level (LpA) | 81.3 dB(A) |
| Hand/Arm Vibration (ahv) | 2.6 m/s² |
| Power Cable Requirements | Min. 3 x 1.5 mm², H05RN-F or better, max. 50 m length |
| Residual Current Device (RCD) | Required, max. 30 mA |
| Weight | Approx. 12 kg (estimated based on similar models) |
| Dimensions (folded) | Approx. 60 x 40 x 30 cm (estimated) |
| Maintenance | Clean housing regularly; keep motor free of debris; check cable and bolts |
| Warranty | 3 years parts and labour |
| Intended Use | Private domestic lawns, max. 10 hours/year |
Frequently Asked Questions - GLS 1401 Gardenline
User questions about GLS 1401 Gardenline
0 question about this device. Answer the ones you know or ask your own.
Ask a new question about this device
Download the instructions for your Lawn mower in PDF format for free! Find your manual GLS 1401 - Gardenline and take your electronic device back in hand. On this page are published all the documents necessary for the use of your device. GLS 1401 by Gardenline.
USER MANUAL GLS 1401 Gardenline
GLSI40IELECTRIC SCARIFIER
1400W ELECTRIC SCARIFIER


Now you have purchased a Gardenline® product you can rest assured in the knowledge that as well as your 3 year parts and labour warranty you have the added peace of mind of dedicated helplines.

AFTER SALES SUPPORT
UK / N. IRELAND HELPLINE NO 0151 649 1500 REP. IRELAND HELPLINE NO 1890 946 244
MODEL NUMBER: 6396
MONTH ON SALE: 03/2008 36
THIS BOX INCLUDES:
• 1 x ELECTRIC SCARIFIER
- 1 x COLLECTION BAG
THE POWER GUIDE
Contents
03 Introduction
04 General Information and Safety Instructions
11 Assembly and Parts List
18 Getting Started
20 Features
21 Instructions
24 FAQ's
25 Other Useful Information
Packaging
The unit is supplied in packaging to prevent its being damaged in transit. This packaging is raw material and can therefore be reused or can be returned to the raw material system.
Introduction
1
Congratulations on choosing to buy a Gardenline® product. By doing so you now have the assurance and peace of mind that comes with purchasing a product made by one of Europe's leading manufacturers.
All products brought to you by Gardenline® are manufactured to the highest standards of performance and safety, and, as part of our philosophy of customer service and satisfaction, are backed by our comprehensive 3 Year Warranty.
Great care has gone into the manufacture of this product and it should therefore provide you with years of good service when used properly. In the event of product failure within its intended use over the course of the first 3 years after date of purchase, we will remedy the problem as fast as possible once it has been brought to our attention. In the unlikely event of such an occurrence, or if you require any information about the product, please contact us via our helpline support services, details of which are to be found both in this manual and on the product itself.
Please fill in and return the Warranty Card to the address provided.
We hope you will enjoy using your purchase for many years to come.
HELPLINE No. UK / N.IRELAND 0151 649 1500 REP. IRELAND HELPLINE NO 189 094 6244 Model Number: 6396
Safety Instructions
2
When using equipment, a few safety precautions must be observed to avoid injuries and damage:
- Read the operating instructions carefully and comply with them. It is important to consult these instructions in order to acquaint yourself with the unit, its proper use and safety regulations.
- Keep this manual in a safe place, so that the information is available at all times.
- If you give the equipment to any other person, hand over these operating instructions as well.
We accept no liability for damage or accidents which arise due to non-observance of these instructions.
This electric scarifier is only designed to scarify grass. Familiarize yourself with the operator controls and proper operation of the equipment. Improper operation of the electric scarifier can lead to serious injuries.
General safety regulations
1 Never allow children or other persons who are not familiar with the operating instructions to use the scarifier. Contact your local governmental agency for information regarding minimum age requirements for operating the scarifier.
2 Always disconnect the power cable before carrying out any checks, maintenance or repairs.
3 The person operating the scarifier is liable for any damages sustained by third parties within the machines's working radius as a result of its use.
4 Work only in broad daylight or with suitable artificial lighting.
5 Always check the machine for signs of damage prior to using it.
6 Make sure that all the guards are fitted and that they are in good working order.
7 Never use the machine when you are tired.
8 Switch off the motor and pull the power plug before you carry out any checks, cleaning, maintenance or other work on the scarifier, and whenever the scarifier hits a foreign body.
9 Switch off the motor and disconnect the power plug before you carry out any checks, cleaning, maintenance or other work on the scarifier, and whenever the scarifier hits a foreign body.
10 Before using the scarifier, always visually examine the spike drum for excessive wear or damage.
11 It is imperative to follow the instructions when fitting or dismantling the spike drum.
12 Examine the site where you want to use the scarifier and remove all objects which could be struck and thrown up. Foreign objects must be removed before operation. Watch out for foreign objects during operation. Watch out for any extension cables you
HELPLINE No. UK / N.IRELAND 0151 649 1500 REP. IRELAND HELPLINE NO 189 094 6244 Model Number: 6396
may be using to operate the scarifier. Keep power cables away from the cutting unit.
13 Always wear sturdy, non-slip footwear and long trousers while scarifying. Never scarify in bare feet or when wearing light sandals.
14 Always use the scarifier with the ejector flap closed, or with grass bag.
15 Never use the machine with damaged or missing safety equipment, e.g. without deflector plates and/or the grass collecting device.
16 Do not raise the scarifier when you start the motor.
17 Never move your hands or feet toward or under any rotating parts. Keep clear of the ejector opening at all times.
18 Slopes have to be scarified along the slope and not up and down.
19 Do not use the scarifier on gradients exceeding 15 %.
20 Switch off the motor, pull out the power cable and wait for the spike drum to come to a standstill before you lift the scarifier for transporting.
21 Make sure there are no persons and particularly no children or animals in the direct vicinity of the scarifier while it is being used. Make sure that a safety distance of 10 meters is observed.
22 Store the scarifier in a dry place that is inaccessible to children.
23 Entrust repairs to the electrical parts of the scarifier only to a qualified electrician.
24 The power cables used are not to be of a lighter duty class than light rubber-insulated H07RN-F in accordance with DIN 57282/VDE 0282 and they must have a cross section of at least 1.5 mm 2. The connection must be splash-proof. The power cable must be fed through the stress-relief clips and be plugged into the switch/plug block. Before use, check the cable for damage and signs of aging. Never use the scarifier with worn or damaged cables. If the cable is damaged while scarifying, pull the power plug immediately and only then inspect the damage. Do not touch the power cable until the plug has been pulled.
25 Do not tilt the scarifier when you start the motor unless the scarifier must be raised off the ground a little in order to start it. In the latter case, tilt the scarifier as little as absolutely necessary and only raise the side opposite the user.
26 Make sure that all nuts, bolts and screws are tightened securely and that the machine is in safe working condition.
27 If the scarifier strikes a foreign body, examine the machine for signs of damage and carry out any necessary repairs before restarting and continuing to work with the scarifier.
28 Do not expose the scarifier to rain. The grass should not be wet or very moist.
29 Always make sure that you have a solid footing while working with the scarifier.
30 Operate the machine at a walking pace only.
HELPLINE No. UK / N.IRELAND 0151 649 1500 REP. IRELAND HELPLINE NO 189 094 6244 Model Number: 6396
31 Be particularly careful when you change direction on a slope.
32 Be particularly careful when you turn the scarifier around or pull it toward yourself.
33 Stop the scarifier whenever it has to be lifted for transporting over areas other than lawns and whenever it has to be moved from or to the area you want to scarify.
34 Carefully actuate the starter switch in accordance with the manufacturer's instructions. Make sure your feet are far enough away from the spike drum.
35 Never lift or carry the scarifier with the motor running.
36 Switch off the motor and pull out the mains plug before you leave the scarifier.
37 Allow the motor to cool down before you put the machine in a closed room.
38 Switch the scarifier off and disconnect the power cable before performing any adjustment or cleaning work to the scarifier, and before checking to see if the mains connection is entwinded or damaged.
39 Socket couplers to connection elements must be made from rubber, soft PVC or other thermoplastic material of equal rigidity or coated with such material.
40 When scarifying, ensure that you avoid paths that could restrict the free movement of the extension cable.
41 Switch off the motor:
• before you try to remove any obstructions or blockages,
• before performing any cleaning, checking or adjustment work to the scarifier,
•after running over an obstruction.
42 If the machine should start to vibrate unusually, it must be checked immediately.
43 To prevent risk of fire, keep the motor free of grass, leaves and moss at all times.
44 For safety reasons you should always replace worn or damaged parts.
45 If the connecting line for the machine is damaged, it must be replaced by the manufacturer or its after-sales service or similarly trained personnel to avoid danger.
46 Safety equipment must not be removed or bypassed.
47 Make regular checks on the grass collecting device for wear or damaged parts.
48 Wear hearing and eye protection while operating the machine.
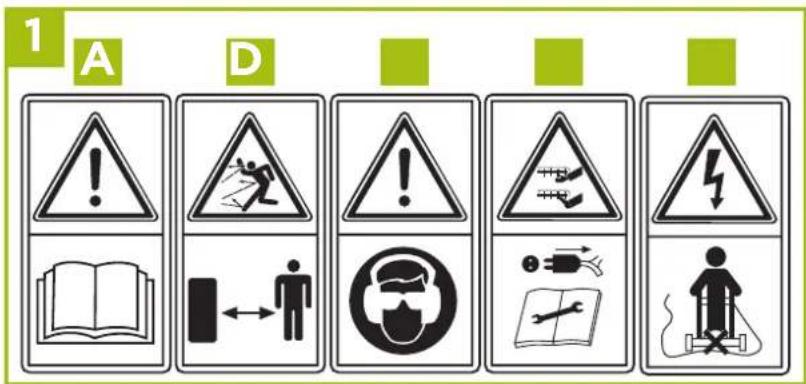
Description of the warning logos
A = Important!
Read the directions for use before operating the tool.
B = Keep other persons (and animals) away from the danger zone.
C = Wear hearing and eye protection.
D = Sharp work tools - Do not cut your fingers or toes! Switch off the device and pull the power plug before engaging in any maintenance/cleaning work or if the cable is tangled or damaged. Keep the power cable away from the cutting unit.
E = Keep the power cable away from the roller.
Assembly and Parts List
3
Layout and items supplied
- ON/OFF switch
- Safety lock-off
- Connector Plug
- Cable strain-relief clamp
- Top push bar
- Bottom push bar
- Push bar bracket
- Scarifying depth
- Grass basket
- Ejector flap
- Frame parts for grass basket
- Cable clips
- Fastening screws for push bar
HELPLINE No. UK / N.IRELAND 0151 649 1500 REP. IRELAND HELPLINE NO 189 094 6244 Model Number: 6396


Assembling the equipment
The equipment is delivered unassembled. The grass basket and the complete push bar must be assembled and mounted before using the equipment. Follow the operating instructions step-by-step and use the pictures provided as a visual guide to easily assemble the equipment.
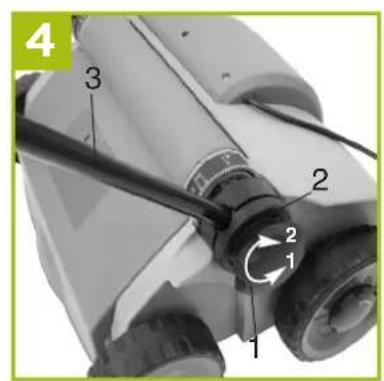
Fitting the push bar brackets (see Figs. 4 and 5)
Remove the star screw (Fig. 4/Item 1) and the pressure plate (Fig. 4/Item 2)
Connect the push bar bracket (Fig. 4/Item 3) to the fastening screw. Ensure that the curve in the tube (Fig. 5/Item 1) is facing outside.
Now remount the pressure plate and tighten with the star screw.
Important!
The identical tilt angle must be set for both push bar brackets.
Fitting the lower push bar (see Fig. 6)
Slide the lower push bar (Fig. 6/Item 1) over the push bar brackets. Do not forget to slide the stress-relief clip (Fig. 6/Item 2) onto the tube beforehand.
Now screw the tubes together using the screws supplied (Fig. 6/Item 3), the plastic sleeves (Fig. 6/Item 4) and the star screw (Fig. 6/Item 5).
Fitting the upper push bar (see Fig. 7)
Position the upper push bar (Fig. 7) such that its holes line up with the holes of the lower bar.
Now screw the tubes together using the screws supplied (Fig. 7/Item 1), the plastic sleeves
(Fig. 7/Item 2) and the star screw (Fig. 7/Item 3).
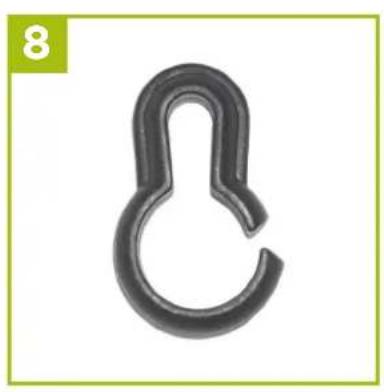
Using the cable clips supplied (Fig. 8), attach the power cable to the tubes of the push bars so that it is possible
HELPLINE No. UK / N.IRELAND 0151 649 1500 REP. IRELAND HELPLINE NO 189 094 6244 Model Number: 6396
to open and shut the ejector flap (Fig. 9/Item A). Important! Please ensure that the ejector flap can be opened and closed easily!
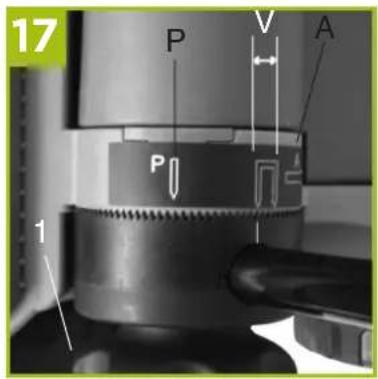
Adjusting the handlebar height (see Fig. 17) Loosen the star screw (Fig. 17/Item 1) on both sides of the scarifier by turning several revolutions. Now adjust the handlebar to the desired height.
Important!
The height of the handlebar may be adjusted only within the mark (Fig. 17/Item V) during operation. Retighten the star screws.
Important!
The identical tilt angle must be set on both sides.
The push bar has a P and an A position (Fig. 17) in order to save space during storage.
When the bar is moved to the P position, the scarifier can be pushed into a corner (Fig. 18).
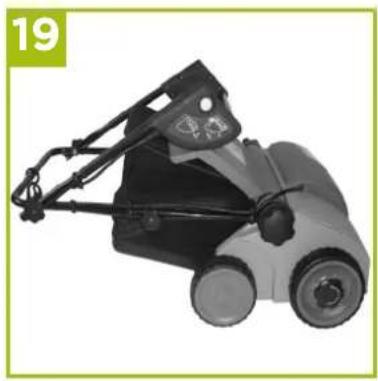
In the "A" position, the scarifier can be folded as shown in Fig. 19 to take up even less space.
Assembling the grass basket (see Figs. 10 and -13)
- Push both frame parts into each other (Fig. 10).
• Pull the grass basket over the metal frame (Fig. 11). - Pull the rubber clips over the metal frame (Fig. 12). To hang the grass basket on the scarifier you must lift the ejector flap (Fig. 13/Item 10) with one hand and with the other hand take hold of the grass bag by the handle and hook it onto the scarifier from above (Fig. 13).
Important!
Before you ever hook the grass basket to the scarifier you must ensure that the motor is switched off and the cutting unit is not rotating.


HELPLINE No. UK / N.IRELAND 0151 649 1500 REP. IRELAND HELPLINE NO 189 094 6244 Model Number: 6396



HELPLINE No. UK / N.IRELAND 0151 649 1500 REP. IRELAND HELPLINE NO 189 094 6244 Model Number: 6396
Getting Started
4
Adjusting the scarifier depth (see Fig. 14)
The scarifier depth is adjusted at both front wheels via the adjustment mechanism. For this, pull out the adjusting screw and turn the wheel to the left or right into one of the available positions (O/I/II/III).
Important!
The scarifier depth must always be identically set on both sides!
O = drive/transport position
I = scarifier depth 3 mm
II = scarifier depth 7 mm
III = scarifier depth 9 mm
Starting up
Connect the machine's power supply cable to the plug (Fig. 15/Item 1) and secure the power cable with the stress-relief clip (Fig 15/Item 2).
Important! To prevent accidental start-up of the equipment, the push-bar (Fig. 16 / Item 1) is equipped with a safety lock-off (Fig. 16 / Item 2) which must be pressed before the lever switch (Fig. 16 / Item 3) can be pressed. If the lever switch is released, the equipment switches off.
Repeat this process several times so that you are sure that the machine functions properly. Before you perform any repair or maintenance work on the machine, ensure
that the cutting unit is not rotating and that the power supply is disconnected.
Important! Never open the ejector flap when the motor is running. A rotating cutting unit can cause injuries. Always fasten the ejector flap carefully. The flap flips back to the “Closed” position by the tension springs! Always ensure that a safe distance (provided by the long handles) is maintained between the user and the housing. Be especially careful when scarifying and changing direction on slopes and inclines. Maintain a solid footing and wear sturdy, non-slip footwear and long trousers. Always scarify along the incline (not up and down).
For safety reasons, the scarifier may not be used to scarify inclines whose gradient exceeds 15 degrees. Use special caution when backing up and pulling the scarifier (tripping hazard)!
HELPLINE No. UK / N.IRELAND 0151 649 1500 REP. IRELAND HELPLINE NO 189 094 6244 Model Number: 6396
Features
5
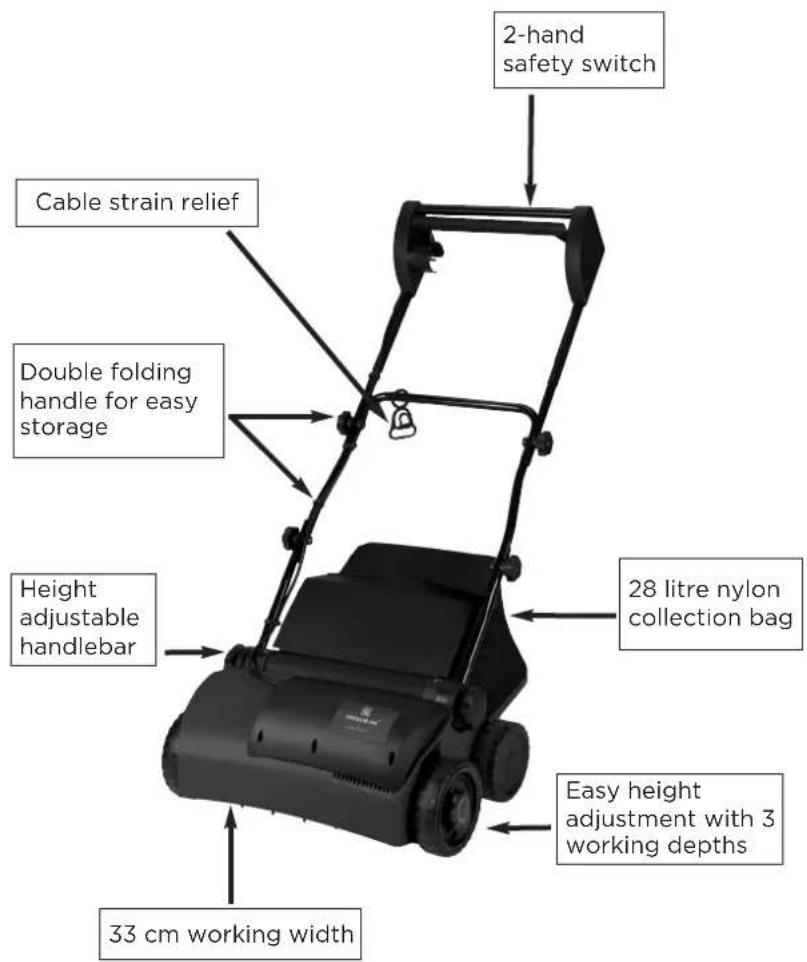
Instructions
6
Intended use
Please note that our equipment has not been designed for use in commercial, trade or industrial applications. Our warranty will be voided if the equipment is used in commercial, trade or industrial businesses or for equivalent purposes.
Power supply
The scarifier can be connected to any light socket (with 230 volts of alternating current). However, the socket outlet must have an earthing contact protected by a 16 A circuit breaker. Additionally, a residual current device (RCD) circuit-breaker with max. 30 mA must be used!
Power cable
Please only use power cables that are not damaged. The total length of the power cable should not exceed 50 meters; going beyond this distance will reduce the power output of the electric motor. The power cable must have a cross-section of 3 x 1.5 mm2. The insulating sheath of scarifier power cables is frequently damaged. Some of the causes for this are:
- Cracking from running over the cable
- Pinching when the power cable is dragging under doors and pulled through windows
- Cracking due to old age of the insulation
- Kinking by improperly fastening or guiding the power cable
Even though power cables with damaged insulation
HELPLINE No. UK / N.IRELAND 0151 649 1500 REP. IRELAND HELPLINE NO 189 094 6244 Model Number: 6396
sheaths pose a lethal hazard, some people still use them. Do not make this mistake!
Cables, plugs and socket couplers must meet the following requirements listed below. Power cables used to hook up lawn aerators must have a rubber insulation sheath.
The power cables must, at the very minimum, be of type HO5RN-F and 3-stranded. The cable type must be printed somewhere on the power cable. Only purchase power cables that are marked as such! Plugs and socket couplers for the power cables must be made from rubber and be splash-proof. There is a limit to how long power cables can be. Longer power cables require larger conductor cross-sections. Power cables and connecting lines must be regularly checked for damage. Ensure that the lines are de-energized before checking them. Completely unwind the power cable. Also check power cable entry points, plugs and socket couplers for kinks.
The equipment is intended for private use i.e. for use in home and gardening environments.
Scarifiers for private use are machines whose annual operating time generally does not exceed 10 hours, during which the machine is primarily used to maintain small-scale, residential lawns and home/hobby gardens. Public facilities, sports facilities, and agricultural/forestry applications are excluded.
The operating instructions as supplied by the manufacturer must be kept and referred to in order to ensure that the equipment is properly used and maintained. The instructions contain valuable information on operating, maintenance and servicing conditions.
Important!
Due to the high risk of bodily injury to the user, the equipment may not be used to grind up branch or hedge clippings. Moreover, the equipment may not be used as a power cultivator to level out high areas such as mole hills.
For safety reasons, the equipment may not be used as a drive unit for other work tools or tool sets of any kind.
Changing the roller
For safety reasons the cutting unit may be replaced only by an authorized professional (see address on warranty certificate).
Important!
Wear work gloves!
Only replace the cutting unit with a genuine Einhell cutting unit, as this will ensure top performance and safety under all conditions.
HELPLINE No. UK / N.IRELAND 0151 649 1500 REP. IRELAND HELPLINE NO 189 094 6244 Model Number: 6396
FAQ's
7
| Fault Possible | causes Rectification | |
| Motor does a) not start b) Cable defective b) Check c) Switch, switch/plug block c) defective d) Connections to motor d) Have machine checked or capacitor disconnected by a customer service center e) Housing clogged e) If necessary adjust working depth. Clean housing so that the roller can run freely | No electricity in plug a) Check line and fuse cable defective b) Check defective Have machine checked a customer service center d) Connections to motor d) Have machine checked or capacitor disconnected by a customer service center e) Housing clogged e) If necessary adjust working depth. Clean housing so that the roller can run freely | |
| Engine a) Soil is too firm a) Change working depth performance b) Housing clogged b) Clean housing drops c) Roller badly worn c) Replace roller | ||
| Imprecise scarifying result | a) roller worn b) Wrong working depth | a) Replace roller b) Correct working depth |
| Motor is a) Toothed belt is torn running, roller is not rotating | a) By customer service workshop |
by
Important notice!
To protect the motor it is equipped with a thermal overload switch which cuts out when overloaded and starts again automatically after a short cooling-down period.
Other Useful Information
8
Tips for proper working
It is recommended that you overlap scarifying paths a little.
Try to scarify in straight lines for a nice, clean look. Insodoing, the aeration swaths should always overlap each other by a few centimeters in order to avoid bare strips.
As soon as grass clippings start to trail the scarifier, it is time to empty the grass basket.
Important!
Before taking off the grass basket, switch off the motor and wait until the roller has come to a stop.
To remove the grass basket, lift up the ejector flap with one hand, while unhooking the basket with the other.
How frequently you should scarify your lawn is determined primarily by the speed at which the grass grows and the hardness of the soil.
Keep the underside of the equipment clean and remove soil and grass build-up. Deposits make it more difficult to start the aerator and decrease the quality of the scarifying.
Always scarify along inclines (not up and down). Switch off the motor before doing any checks on the roller. Important!
The roller rotates for a few seconds after the motor is switched off. Never attempt to stop the roller. In the
HELPLINE No. UK / N.IRELAND 0151 649 1500 REP. IRELAND HELPLINE NO 189 094 6244 Model Number: 6396
event that the rotating roller strikes an object, immediately switch off the equipment and wait for the roller to come to a complete stop. Then inspect the condition of the roller. Replace any parts that are damaged (see section 10).
Lay the power cable on the ground in loops in front of the power outlet. Scarify away from the power outlet and cable, making sure that the power cable always trails in the already scarified grass so that the equipment does not travel over the cable.
Maintenance, care and storage
Maintenance and cleaning work on the equipment as well as removal of the safety devices may only be performed when the motor is switched off and the power cable has been pulled.
Replace a worn or damaged roller immediately.
Do not clean the equipment with running water and particularly not with a pressure hose.
Ensure that all mounting components (i.e. screws, nuts etc.) are always tightened so that the equipment can be safely operated at all times.
Store the equipment in a dry room. In order to ensure that you enjoy your scarifier for many years to come, all screwed parts, as well as the wheels and axles, should be cleaned and lubricated.
Keeping your scarifier in good condition not only ensures a long lifespan and high performance, but also enables the equipment to thoroughly scarify your grass with minimal effort. For best results, clean the equipment with a brush or rag. Do not use any solvents to remove dirt.
At the end of the season, perform a general inspection of the equipment and remove any deposits which may have accumulated.
At the start of each season, ensure that you check the condition of the equipment. If repairs are necessary, please contact one of our customer service centers (see address on warranty certificate).
The push bar has a P and an A position (Fig. 17) in order to save space during storage.
When the bar is moved to the P position, the scarifier takes can be pushed into a corner (Fig. 18).
In the "A" position, the scarifier can be folded as shown in Fig. 19 to take up even less space.
Replacing the cutting unit
For safety reasons the cutting unit may be replaced only by an authorized professional (see address on warranty certificate).
Important!
Wear work gloves!
Only replace the cutting unit with a genuine Einhell cutting unit, as this will ensure top performance and safety under all conditions.
Ordering spare parts
The following information should be given when ordering replacement parts:
•Model/type of the equipment
• Art. No. of the equipment
• ID No. of the equipment
•Part number of the required spare part
For our latest prices and information please go to www.isc-gmbh.info
HELPLINE No. UK / N.IRELAND 0151 649 1500
REP. IRELAND HELPLINE NO 189 094 6244
Model Number: 6396
Technical data
Mains voltage: 230V \~ 50Hz
Power input: 1400 W
Working width: 33 cm
Number of blades: 20
Scarifying depth: -3 / 3 / 7 / 9 mm
LpA sound pressure level: 81,3 dB(A)
Hand/arm vibration ahv: 2,6 m/s2
Sound and vibration were measured in accordance with DIN EN 13684.

Disposal and recycling
The unit is supplied in packaging to prevent its being damaged in transit. This packaging is raw material and can therefore be reused or can be returned to the raw material system.
The unit and its accessories are made of various types of material, such as metal and plastic. Defective components must be disposed of as special waste. Ask your dealer or your local council.


For EU countries only
Never place any electric tools in your household refuse. To comply with European Directive 2002/96/EC concerning old electric and electronic equipment and its implementation in national laws, old electric tools have to be separated from other waste and disposed of in an environment-friendly fashion, e.g. by taking to a recycling depot. Recycling alternative to the demand to return electrical devices: As an alternative to returning the electrical device, the owner is obliged to cooperate in ensuring that the device is properly recycled if ownership is relinquished. This can also be done by handing over the used device to a returns center, which will dispose of it in accordance with national commercial and industrial waste management legislation. This does not apply to the accessories and auxiliary equipment without any electrical components which are included with the used device.
WARRANTY CERTIFICATE
The product described in these instructions comes with a 3-year manufactures warranty covering defects. This 3-year manufactures warranty period begins with the passing of risk or when the customer receives the product. For warranty claims to be accepted, the product has to receive the correct maintenance and be put to the proper use as described in the operating instructions.
Your statutory rights of warranty are naturally unaffected during these 3 years.
This warranty applies in Germany, or in the respective country of the manufacturer's main regional sales partner, as a supplement to local regulations. Please note the details for contacting the customer service center responsible for your region or the service address listed below.

Einhell UK Ltd
Unit 5 Morpeth Wharf
Twelve Quays
Birkenhead, Wirral
CH 41 1LF
Helpline-No.: GB 0151 649 1500
IRL 189 094 6244
GB
The reprinting or reproduction by any other means, in whole or in part, of documentation and papers accompanying products is permitted only with the express consent of ISC GmbH.
Technical changes subject to change
HELPLINE No. UK / N.IRELAND 0151 649 1500
REP. IRELAND HELPLINE NO 189 094 6244
Model Number: 6396
GLS1401 11/2007

- GLSI40IELECTRIC SCARIFIER
- AFTER SALES SUPPORT
- THE POWER GUIDE
- CONTENTS
- PACKAGING
- INTRODUCTION
- 1
- SAFETY INSTRUCTIONS
- 2
- WHEN USING EQUIPMENT, A FEW SAFETY PRECAUTIONS MUST BE OBSERVED TO AVOID INJURIES AND DAMAGE
- GENERAL SAFETY REGULATIONS
- DESCRIPTION OF THE WARNING LOGOS
- ASSEMBLY AND PARTS LIST
- 3
- LAYOUT AND ITEMS SUPPLIED
- ASSEMBLING THE EQUIPMENT
- FITTING THE PUSH BAR BRACKETS (SEE FIGS. 4 AND 5)
- IMPORTANT
- FITTING THE LOWER PUSH BAR (SEE FIG. 6)
- GETTING STARTED
- 4
- ADJUSTING THE SCARIFIER DEPTH (SEE FIG. 14)
- STARTING UP
- FEATURES
- 5
- INSTRUCTIONS
- 6
- INTENDED USE
- POWER SUPPLY
- POWER CABLE
- CHANGING THE ROLLER
- FAQ'S
- 7
- IMPORTANT NOTICE
- OTHER USEFUL INFORMATION
- 8
- TIPS FOR PROPER WORKING
- MAINTENANCE, CARE AND STORAGE
- REPLACING THE CUTTING UNIT
- ORDERING SPARE PARTS
- TECHNICAL DATA
- DISPOSAL AND RECYCLING
- FOR EU COUNTRIES ONLY
- WARRANTY CERTIFICATE
Brand : Gardenline
Model : GLS 1401
Category : Lawn mower