
FZN 4101-A - Hedge Trimmer Fieldmann - Free user manual and instructions
Find the device manual for free FZN 4101-A Fieldmann in PDF.


| Product Type | Cordless Grass Shear & Hedge Trimmer |
| Brand | Fieldmann |
| Model | FZN 4101-A |
| Battery Voltage | 3.6 V |
| Battery Capacity | 1300 mAh (1.3 Ah) |
| Battery Type | Li-ion |
| Charging Time | Approximately 4 hours |
| No-Load Speed | 1000 rpm |
| Hedge Trimmer Blade Length | 110 mm |
| Grass Shear Blade Width | 80 mm |
| Weight (without telescopic pole) | 0.6 kg |
| Weight (with telescopic pole, model FZN 4102-AT) | 1.0 kg |
| Swivel Head Positions | 5 positions: -90°, 0°, 90°, 180° |
| Safety Features | Safety switch, handle lock switch, blade guard, automatic shut-off when blades jam |
| Included Accessories | Grass blade, shrub blade, battery, charger, wheel assembly (for FZN 4102-AT), telescopic pole (for FZN 4102-AT), protective cover |
| Charger Input | 230 V ~ 50 Hz |
| Charger Output | 6 V DC, 500 mA |
| Cutting Height Settings (grass) | 25 mm, 40 mm (cutting); 40 mm, 65 mm, 80 mm (trimming) |
| Blade Change | Tool-free blade replacement via clip mechanism |
| IP Rating / Protection | Not specified; do not use in rain |
Frequently Asked Questions - FZN 4101-A Fieldmann
User questions about FZN 4101-A Fieldmann
0 question about this device. Answer the ones you know or ask your own.
Ask a new question about this device
Download the instructions for your Hedge Trimmer in PDF format for free! Find your manual FZN 4101-A - Fieldmann and take your electronic device back in hand. On this page are published all the documents necessary for the use of your device. FZN 4101-A by Fieldmann.
USER MANUAL FZN 4101-A Fieldmann
natural_image
Abstract black and white spiral pattern with no text or symbolsFIELDMANN®
Home & Garden Performance
natural_image
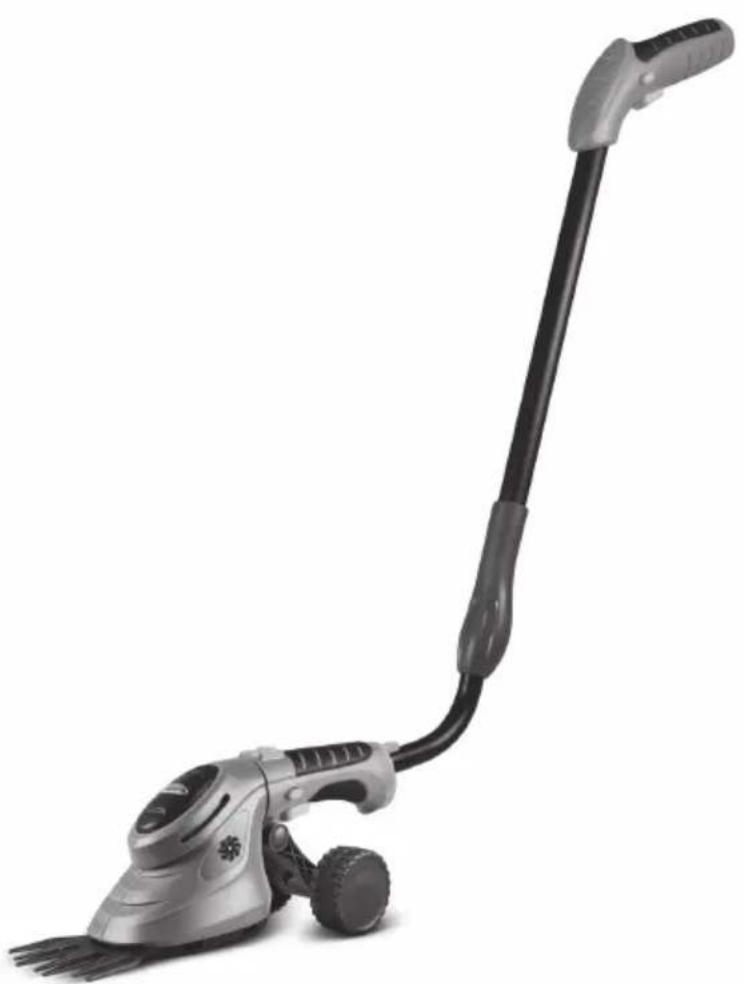
Exterior view of a silver hairless vacuum cleaner with a long black handle and black head (no text or symbols visible)FZN 4101-A
FZN 4102-AT
English....1 - 17
Čeština 18 - 31
Slovenčina 32 - 45
Magyarul 46 - 59
Polski 60 - 73
Русский 74 - 87
Lietuvių 88 – 101
1
2
4
Cordless Grass
Shear & Hedge Trimmer
USER'S MANUAL
Thank you for purchasing this cordless shear for trimming grass edges and shaping ornamental shrubs. Before you start using it, please, carefully read this user's manual and save it for possible future use.
CONTENTS
ILLUSTRATED ATTACHMENT....1
- GENERAL SAFETY REGULATIONS....5
Important safety notice Packaging Operating instructions
-
EXPLANATION OF INSTRUCTION LABELS ON THE MACHINE ....6
-
MACHINE DESCRIPTION AND INCLUDED CONTENTS....7
Machine description Supplied contents
- ASSEMBLY OF THE MACHINE....7
Attaching and removing the wheel assembly Assembly and disassembly of the telescopic pole
Operating the tool Working without the telescopic pole Working with the telescopic pole Function of the swivel head Charging the machine Turning on the machine Changing the blades Important safety instructions for chargers Important safety instructions for batteries
-
INSTRUCTIONS FOR PROPER USE 12
-
OPERATING INSTRUCTIONS 12
Operation Purpose of use Instructions for use Electrical safety
- MAINTENANCE AND STORAGE....14
Maintenance Storage
-
TECHNICAL SPECIFICATIONS 15
-
DISPOSAL....16
1. GENERAL SAFETY REGULATIONS
Important safety notice
Carefully unpack the product and take care not to throw away any part of the packaging before you find all the parts of the product.
Store the machine in a dry place out of reach of children.
Read all warnings and instructions. Not following warnings or instructions may lead to injury by electrical shock, a fire and/or serious injuries.
Packaging
The product is packed in a package that prevents damage during transport. This package is a resource and so can be handed over for recycling.
Operating instructions
Before you start working with the machine, read the following safety and usage instructions. Understand the operating elements and the correct use of the device. Keep the user's manual in a safe place where it can be easily retrieved for future use.

Note: If you hand over the machine to somebody else, do so together with the user's manual. Following the instructions in the included user's manual is a prerequisite for the proper use of the machine. The user's manual also contains operating, maintenance and repair instructions.
The manufacturer takes no responsibility for accidents or damages resulting from not following the instructions in this manual.
2. EXPLANATION OF INSTRUCTION LABELS ON THE MACHINE

Before putting into operation, carefully read the user's manual.

While working use protective aids.

While working use protective footwear.

Careful, sharp parts of the machine! Protect fingers and toes against injury.

Danger while running down after being turned off!

Watch out for objects deflected by the cutting blades!
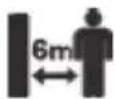
Make sure that no other person is present in the working radius. Minimum safe distance is 6 m.
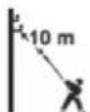
Do not use the shear in the vicinity of cables or live electricity or telephone lines. When working maintain a distance of at least 10 m from above ground live electric lines.

Do not work in the rain or in unfavourable climatic conditions.
Symbols on the charger unit

Protection Class II

Use the charger only in a dry room.

The charger is equipped with a safety transformer.
Negative poles
3. MACHINE DESCRIPTION AND INCLUDED CONTENTS
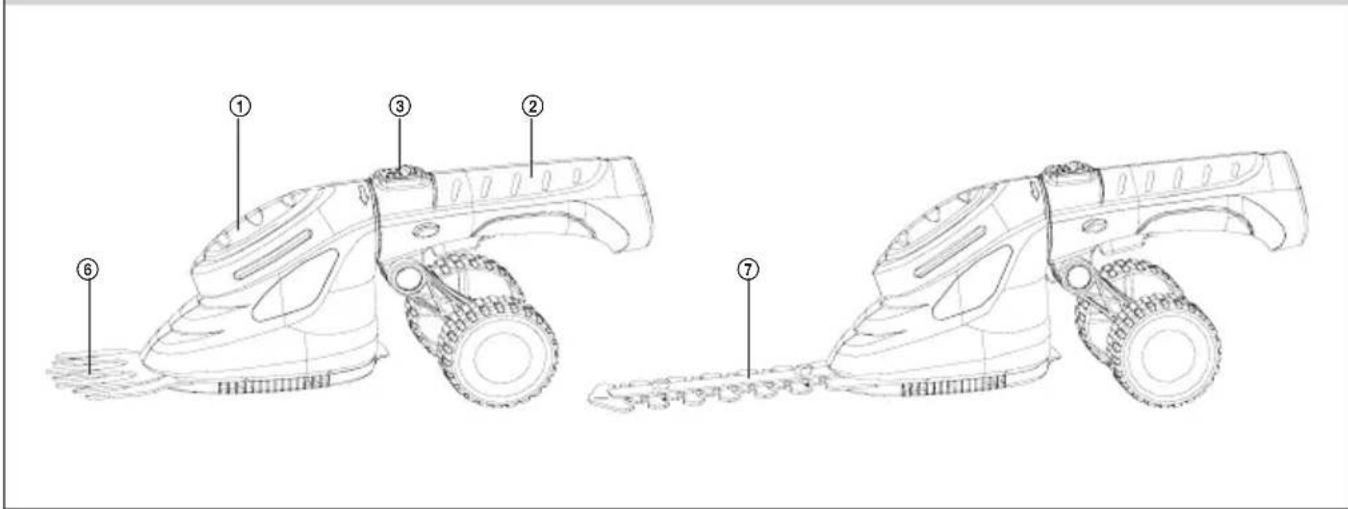
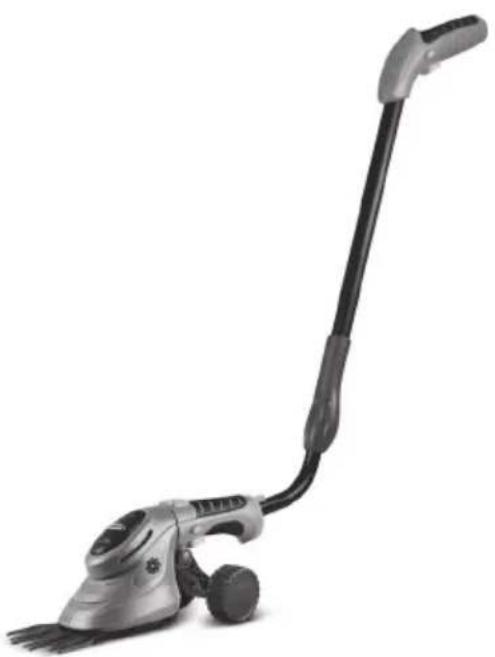
Machine description (see attached illustration)
① Machine body
② Swivel handle
③ Handle lock switch
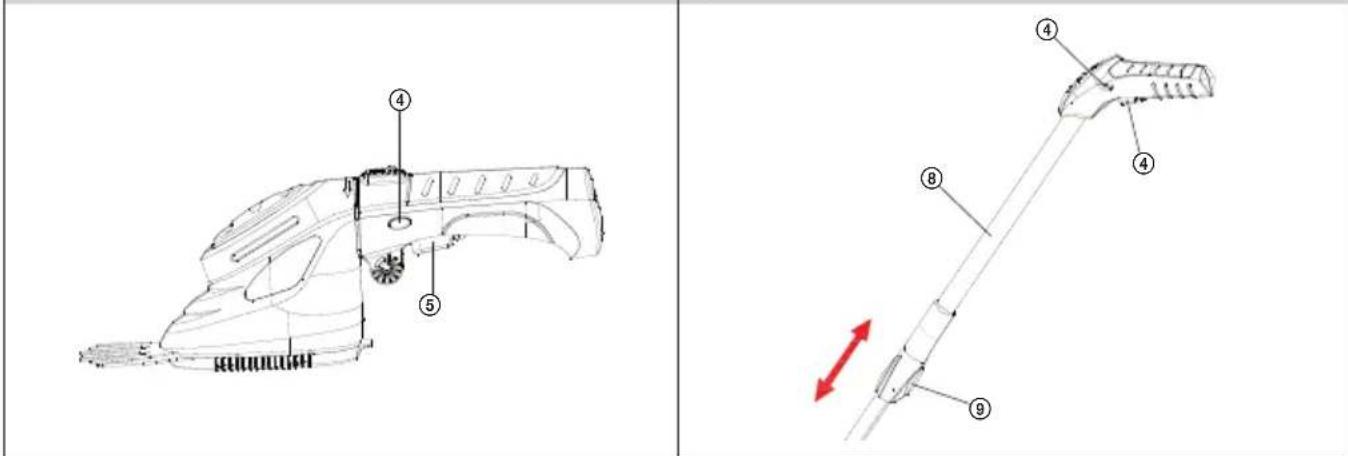
④ Safety switch
⑤ Main power switch
⑥ Blade assembly for cutting grass
⑦ Blade assembly for cutting shrubs
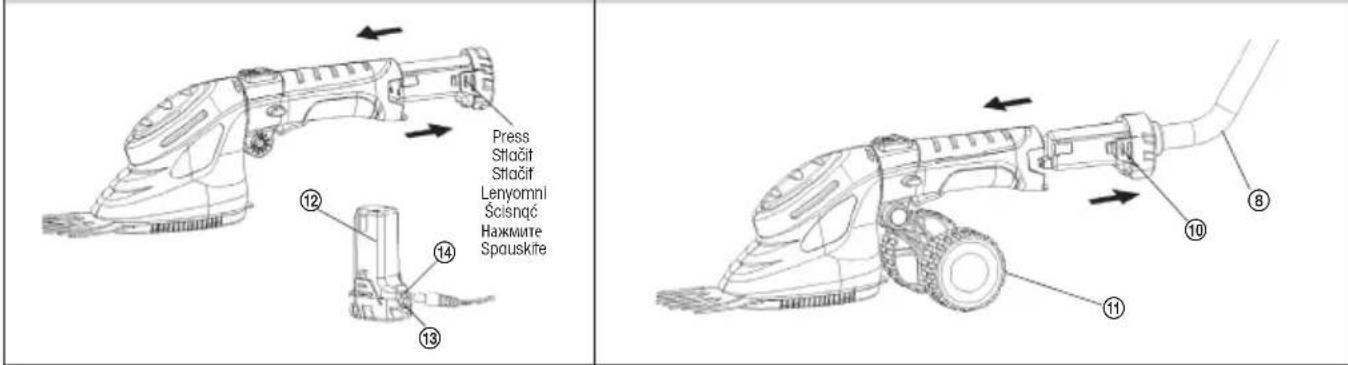
⑧ Telescopic pole*
* for model FZN 4102 AT
⑨ Lock switch for setting the height of the telescopic pole*
⑩ Safety lock for fastening the telescopic pole
⑪ Accessory wheels with fastening screw*
⑫ Removable battery
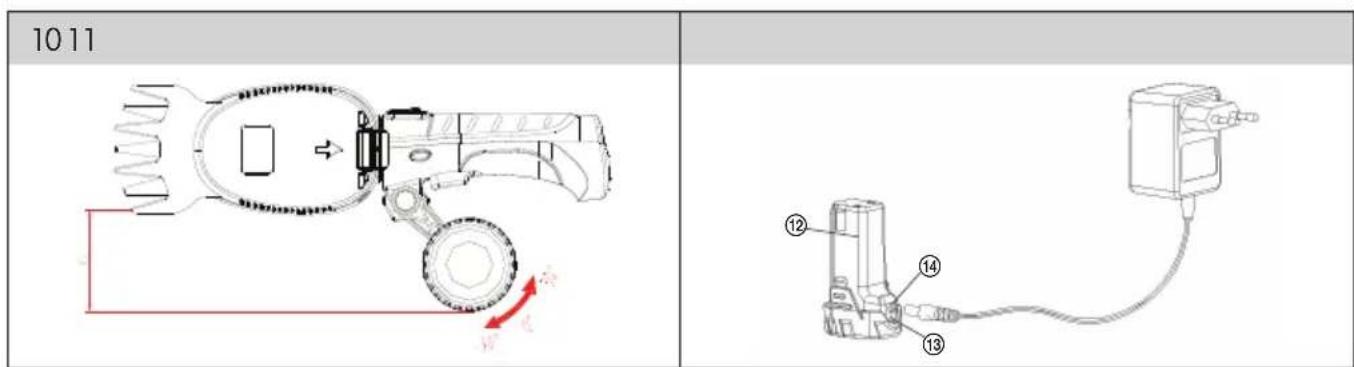
⑬ LED battery charge indicator
⑭ Power supply slot
Supplied contents
Carefully take the machine out of the packaging and check whether all the following parts are present:
Cordless shear with a blade assembly for cutting grass in a protective cover
3.6V Battery
Blade assembly for cutting shrubs
Wheels*
Telescopic pole*
Battery charger
User's manual
* for model FZN 4102 AT
If there are parts missing or they are damaged, please contact the vendor from whom you bought the machine.
4. ASSEMBLY OF THE MACHINE
- Product is fully assembled. Take off the protective plastic blade cover before use and store it so that it can be reused when the product is not being used.
- The battery must be recharged before use. Follow the instructions for charging.
- If while cutting branches the blades jam, IMMEDIATELY release the trigger switch and release the blocked tool. If you continue to hold the trigger switch while the blades are jammed you will cause damage to the motor.
- IMPORTANT: This is a power tool that is very easy and comfortable to use. Please pay special attention to the position of the blades during work with this tool so that you avoid injury.
Attaching and removing the wheel assembly (see pic. 2)
Slide on the wheel frame on to the projection on the handle and tighten the fastening bolt.
To remove the wheel assembly loosen the fastening bolt and take the wheel frame off the handle.
ATTENTION: Be careful not to press the main switch when attaching or removing the wheels. This could cause serious injuries.
Assembly and disassembly of the telescopic pole (see pic. 3)
Slide into the blade handle so that it is secured with the safety lock. The safety switch and the main switch on the handle will not function if the telescopic pole is mounted on the tool.
To remove the telescopic pole, press the safety lock and slide the swivel handle from the machine.
ATTENTION: Never remove or interfere with the function of the starting mechanism.
The start safety lock prevents your tool from being started accidentally.
Working without the telescopic pole
- Press the release button (1) backwards and press switch (2).
- Release the release button (1).
Note: If while using this tool the LED indicator light (3) is red, the battery is flat. Immediately stop work and recharge the battery in the charger supplied with this tool.
Working with the telescopic pole
The length of the telescopic pole is adjustable and can be adjusted to the height of the operator.
ATTENTION: Do not use the tool's main switch when adjusting the telescopic handle. This could cause serious injuries.
- Attach the telescopic pole.
- Hold the pole with one hand and then loosen the locking bolt.
- Set the handle to the desired height and secure the pole with the adjustment bolt.
- Press in the safety lock and press the main switch.
- After the machine is running you may release the safety switch.
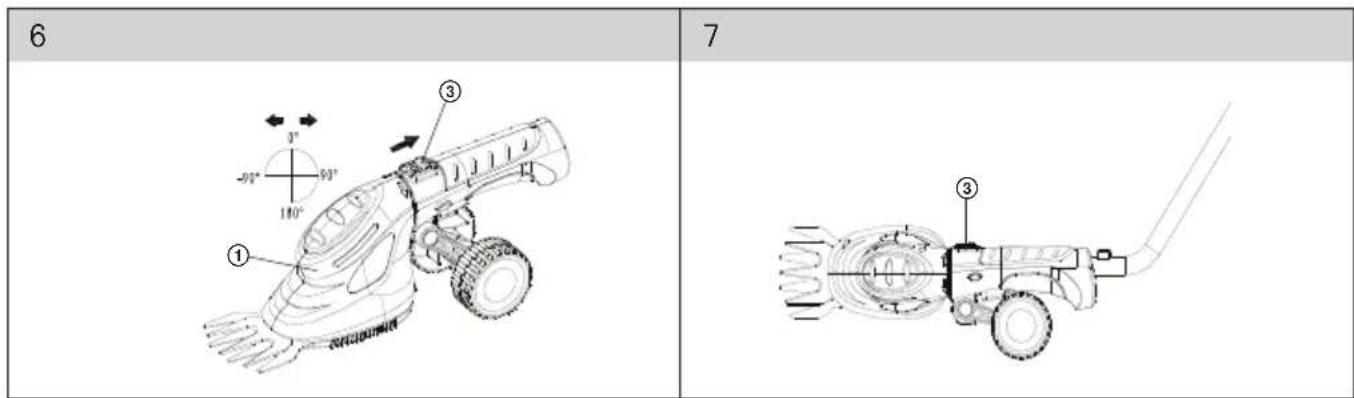
Function of the swivel head (see pic. 6)
Firmly hold the handle. Move the locking button upwards and then turn the tool's head to the desired position. Release the locking button and check that the tool's head is properly secured in the new position.

Note: The tool's head can be secured in five positions (-90°, 0°, 90°, 180°).
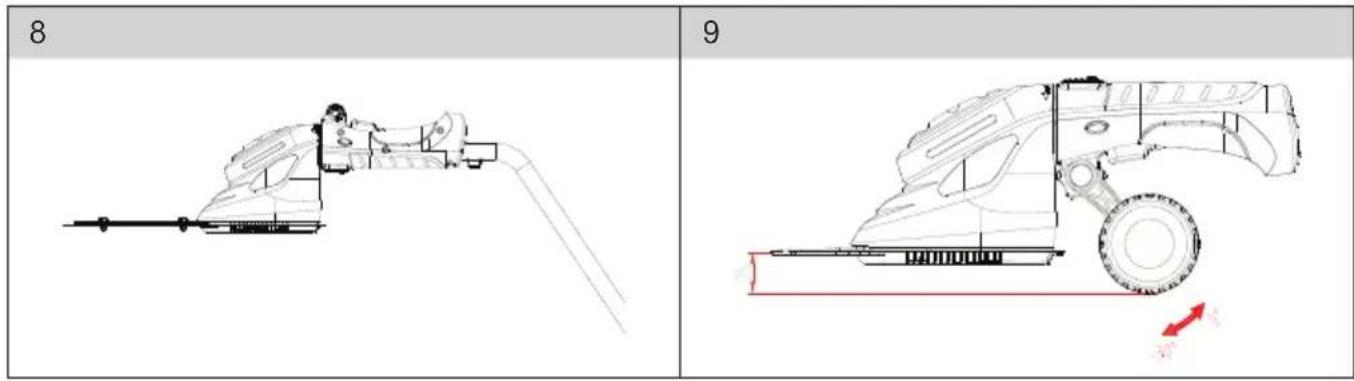
Turned at an angle of 90^ for vertical cutting of lawns - see pic. 7, 10.
Turned at an angle of 180^ for cutting at heights - see pic. 8.
Setting the height for cutting and trimming lawns - see pic. 9.
Appropriate height for cutting lawns is 40 and 25mm.
Appropriate height for trimming lawns is 80, 65 and 40mm.
Charging the machine (see pic. 11)
Remove the battery of the trimmer and connect the adapter to a power socket (230 V \~ 50 Hz). Insert the connector into the hole in the battery. A red indicator light will be lit on the battery, the battery is being charged. The red charging indicator light will turn on. The battery may be charged for approximately 4 hours. Make sure that you have read all the safety instructions before using the charger. This product must not be repaired by the user. There are no repairable parts inside the charger. The charger must be repaired by an authorised service centre or organised by the vendor so as to prevent damaging the internal components. Read all instructions contained in this user's manual in the section describing the charger before charging your tool's battery.
1. Charging procedure
These chargers do not require any setup and are designed so that their use is as easy as possible.
* Connect the charger to the battery.
Connect the charger power cord to a power socket. A LED charging indicator will turn light up on the tool. Now the LED charging indicator will be red. This means that the battery is charging.
The LED diode will turn green after approximately 4 hours. This means that the battery is fully charged.

Note: The start safety lock and the start button on the tool do not function during the charging process.
2. Important notes for charging.
You will achieve the longest operating lifetime and performance if the battery is charged at temperatures between 18 - 24 °C. Do not charge the battery at temperatures lower than +4.5 °C or higher than +40 °C. This instruction is very important and prevents major damage to the battery.
* While charging the charger and the battery may be warm to touch. This is a normal event and does not indicate any problem.
Whenever possible use the charger at standard room temperature. To prevent the charger from overheating do not cover the battery and do not charge in direct sunlight or in the vicinity of heat sources.
If the battery is not being properly charged:
① connect a lamp or another device to the power socket to check the current in the socket.
② check whether the socket is controlled via a light switch, which turns off the socket when the light is turned off.
③ place the charger and battery in a location where the temperature is in the range of approximately 18 - 24 °C.
④ if problems with charging persist, have the charger and tool repaired at an authorised service centre or the vendor.
The battery should be charged as soon as it stops delivering sufficient power for work which was performed easily with a fully charged battery. DO NOT CONTINUE using the tool in these conditions. Follow the provided procedure for charging.
Under certain conditions with the charger connected to the mains the exposed charging contacts inside the charger may be short circuited by foreign objects. No conductive materials such as steel wool, aluminium foil or other metal items may enter the charger opening. Always disconnect the charger from the mains power socket if there is no battery located in the charger. Before cleaning the charger always disconnect it from the mains power socket.
Do no submerge the charger in water or any other liquid.
WARNING: Take care that no liquid enters the charger. This could cause an injury by electrical shock. If you want to make it easier for the battery to cool down after being used with the tool, do not place the charger or the tool in warm places such as metal buildings or open trailers.
Turning on the machine
ATTENTION: Press or release the start switch carefully according to the manufacturer's instructions.
Turn on the charged machine using the On/Off switch (pic. 1, no. 5). Operation will be shown on the LED display (pic. 1, no. 1). Turn off the machine by releasing the switch, the chuck will stop turning.
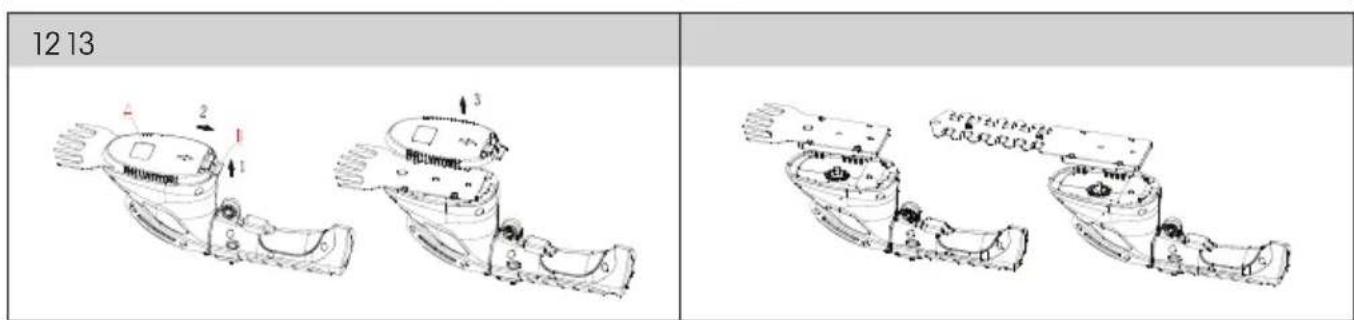
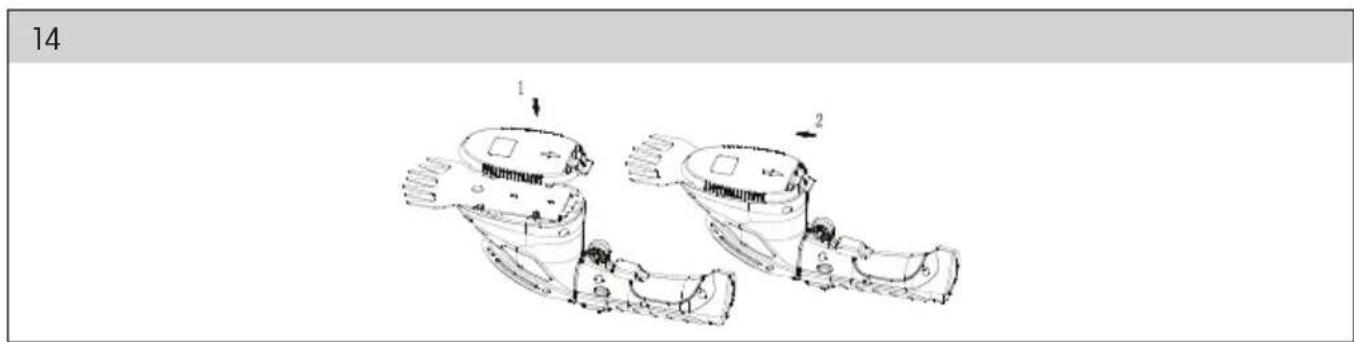
Changing the blades (see pic. 12-14)
ATTENTION: Do not use the start switch before attaching or removing the blades. Risk of injury!
The blades can be changed easily and quickly without the use of other tools.
- If you wish to change the blades, you must first remove cover (A). Follow the steps shown in the illustration above .
Hold the tool using one hand as shown on the illustration above. Slide out the clip (B) with your thumb and index finger of your other hand upwards.
* Firmly hold the cover and pull it backwards.
Remove the cover in the upward direction. - Remove the blades and attach new blades.
ATTENTION: Do not use the start switch before attaching the blade covers. Risk of injury!
- To attach the cover follow the steps shown on the illustration below.
① Attach the blade cover so that the two marks are aligned as shown in the top illustration.
② Push the blade cover forwards until it is secured by the clips in the correct position.
Important safety instructions for chargers
Read all instructions and warnings located on the charger, battery and tool before using the charger.
* DANGER: The charger clamps have 230V. Do not probe with conductive items. Danger of serious or fatal injury by electrical shock.
The charger and battery are specifically designed to work together. DO NOT ATTEMPT to charge the battery in a different charger than the charger specified in this user's manual.
Do not expose the charger to rain or snow.
This charger is not designed for any use other than charging rechargeable batteries. Any other use may lead to a fire or serious or fatal injury by electrical shock.
In order to limit the risk of damaging the power plug or cable, always disconnect by pulling on the plug and not the cable.
Make sure that the cable is not placed in such a way that it is stepped on, tripped over or that it is not damaged or otherwise exposed to stress.
The charger is ventilated by slot openings located in the top and bottom part of the charger. Do not place any items on the top part of the charger and do not place the charger on such surfaces, which could block these openings, which would lead to excessive temperatures inside the charger. Keep the charger at a sufficient distance from sources of heat.
Do not use the charger if it has been impacted by something, or if it has fallen or been damaged in any other way.
Do not disassemble the charger. Have the charger maintained or repaired at an authorised service centre or the vendor. Incorrectly performed assembly may lead to a fire or serious or fatal injury by electrical shock.
In order to limit the risk of injury by electrical shock, always disconnect the charger from the mains power socket before cleaning it. Taking the battery out of the charger does not lower this risk.
* Never attempt to connect two chargers to one another.
* DO NOT PLACE or use the tool in places where the temperature may reach or exceed 40 °C (places in a garage or metal buildings in the summer period).
The charger is designed to be used with a standard domestic power voltage (230 V). Do not attempt to use any other power voltage!
Important safety instructions for batteries
The battery is fully charged on delivery. First read the safety instructions below and follow the instruction and charging procedures.
* CAREFULLY READ ALL INSTRUCTIONS AND STORE THEM FOR FUTURE USE.
-
Do not burn the battery even if it is seriously damaged or completely worn out. The battery could explode in the fire.
-
During demanding work or at high temperatures there may be small leaks of fluid from the battery cells. In this case it is not a defect. However if the external seal is breached and the fluid comes in contact with your skin, do the following:
* Quickly wash yourself with soap and water.
Neutralise the affected area with a weak acid such as lemon juice or vinegar.
If the battery fluid gets into your eyes, flush out your eyes at least for several minutes with clean water and immediately seek medical treatment (information for doctors: the fluid is a 25 - 35 % potassium hydroxide solution)
-
Do not bridge the cathode and the anode battery contacts with metal objects. This could short circuit the battery, which could destroy the battery or cause burns or a fire.
-
Charge the battery only in the charger supplied with this product.
-
NOTE: This tool uses a Li-Ion type battery, which does not self-discharge and does not have a memory effect.
6. INSTRUCTIONS FOR PROPER USE
- Prevent children and animals access to the work area.
- Turn on the motor only in such a situation, where your hands and legs are not in the vicinity of the blades.
- Use only spare parts and accessories recommended by the manufacturer.
- If the tool and battery are not being used, they should be stored independently in a dry, higher and lockable location, out of the reach of children. Make sure that it is not possible for the battery contacts to be shorted by metal objects such as bolts, nails, etc.
- Do not apply excessive pressure on the tool during work. The tool will perform the work better and more safely if it is used for the purposes for which it was designed.
- Perform meticulous maintenance of the tool
Maintain the cutting mechanism sharp and clean to ensure better and safer operation. Follow the instructions for lubrication and replacement of accessories. - Prevent the situation where the tool is turned on accidentally
Do not carry the tool with the finger on the main trigger switch.
7. OPERATING INSTRUCTIONS
Operation
This product must not be used by children and persons with physical experienced persons, unless properly trained or schooled in the safe use of the product, or unless they have been properly supervised by a qualified person who will be responsible for their safety.
Use extra care if the product is used near children. Always keep the appliance out of reach of children. Children must be supervised to ensure that they do not play with the product.
* Never allow children or persons who do not know the contents of this user's manual to work with the device. Local regulations may set the minimum age of the user. The user is responsible for damages caused to third parties in the machine's working area as a result of its use.
Do not use the machine if your are tired, under the influence of alcohol or narcotics.
If necessary, use personal protection aids (gloves, work footwear, eye protection, respirators, etc.).
- Secure loose clothing, long hair or jewellery so that they cannot get caught by the moving parts of the machine.
Purpose of use
The cordless grass shear & hedge trimmer is intended for use in private gardens.
* Machines considered to be suitable for use in private gardens are such devices, where the annual operation as a rule does not exceed 50 operating hours and which are predominantly used for the maintenance of lawn areas, but not public facilities, parks, sports fields or in agriculture or forestry.
Do not use the product for purposes other than those intended.
For safety reasons the machine must not be used as a drive engine for any other work tools and tool sets, unless expressly permitted by the manufacturer.
Instructions for use
Turn on and operate the machine as described in the user's manual, carefully follow all instructions.
Before carrying out any kind of inspection, maintenance or repairs disconnect the charger power cable from the mains power supply.
Use tools in good working condition for tasks for which they are designed.
* Work only during good visibility or ensure sufficient artificial lighting.
Only store and use the product away from flammable or volatile materials and solutions.
* Keep the product away from extreme temperatures, direct sunlight and excessive humidity. Do not use in a dusty environment.
Do not place the product near heaters, open fires or other appliances or equipment that are sources of heat.
Do not spray the product with water or any other liquid. Do not pour water or any other liquids into the appliance. Do not submerge the appliance in water or any other liquid.
Never leave the appliance switched on without supervision.
Do not touch machine parts until they have come to a complete stop.
Allow the motor to cool down before storing the machine in a closed room.
Under no circumstances should you repair or alter the product yourself! Entrust all repairs and adjustments of this product to an authorised service centre or the vendor. Tampering with the appliance during the warranty period may void the warranty.
The manufacturer is not responsible for damages caused by incorrect use of this product or its accessories. Such damages include food spoilage, injuries, burns, scalding, fire, etc.
* Using accessories or attachments that are not recommended in this user's manual may increase the risk of injury.
Make sure that the correct battery for this tool is used.
Before connecting to the charger check that the surface of the tool and battery is clean and dry.
Make sure that the battery is charged using the correct charger, which is recommended by the manufacturer. Incorrect use may lead to a risk of injury by electrical shock, overheating of the battery or leakage of battery fluid.
* Have the tool repaired only by a qualified person
This tool is manufactured in accordance with the demands of respective safety regulations. Repairs should only be performed by qualified persons using original spare parts. Otherwise the user will be placed in significant danger.
Disposal of batteries
Ensure that the batteries are safely disposed of according to the manufacturer's instructions.
Electrical safety
The charger of the cordless grass shear & hedge trimmer can be connected to any power plug, preventing discharge, that is installed according to norms in force.
The plug must be powered at 230 V \~ 50 Hz.
* Disconnect the charger if you will not be using it for a long time, if you are changing the tool or performing maintenance on the tool.
8. MAINTENANCE AND STORAGE
Maintenance

ATTENTION: Disconnect the charger if you will not be using it for a long time, if you are changing the tool or performing maintenance on the tool.
* Check whether the device is showing signs of wear.
If the charger is damaged (cover, conductors or connector), immediately arrange their replacement at an authorised service centre or from the vendor.
* Regular care for the machine will ensure not only a long lifetime and performance
Before use always visually check for worn or damaged parts.
* Replace damaged or worn parts. To ensure that the machine always remains balanced, always replace the entire set of the worn or damaged tools.
Worn or damaged machine parts may only be replaced at an authorised service centre or arranged by the vendor.
Before cleaning disconnect this product from the power source.
To clean the plastic parts of the product, use a soft cloth dipped in lukewarm water. Do not use aggressive cleaning products and solvents as this could damage the surface of the appliance.
Do not clean the machine under running water or submerge under water.
After changing the working tool, check that the working tool is secured in its storage position.
After each use of the shear the blade must be cleaned and lubricated. If the shear is used non-stop for extended periods of time, lubrication should be performed during work.
Storage
Store the tool in a dry location at a sufficient distance from heat sources or dangerous vapours.
Do not place any other items on the machine.
9. TECHNICAL SPECIFICATIONS
| Battery 3.6 V/1300 mAh | |
| Battery type Li-ion | |
| Idling speed 1,000 rpm | |
| Length of blade assembly for cutting shrubs | 110 mm |
| Width of blade assembly for cutting grass | 80 mm |
| Battery capacity 1.3 Ah | |
| Charging time 4 hours | |
| Weight 0.6 kg | 1.0 kg (with telescopic pole - model FZN 4102-AT) |
| Charger | |
| Input charging voltage 230 V | ~ 50 Hz |
| Output voltage 6 V, direct current, 500 mA | |
Amendments to text and technical parameters are reserved.
Changes in the text, design and technical specifications may change without prior notice and we reserve the right to make these changes.
10. DISPOSAL
INSTRUCTIONS AND INFORMATION REGARDING THE DISPOSAL OF USED PACKAGING MATERIALS
Dispose of packaging material at a public waste disposal site.
DISPOSAL OF USED ELECTRICAL AND ELECTRONIC APPLIANCES
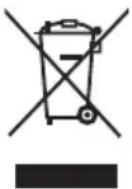
The meaning of the symbol on the product, its accessory or packaging indicates that this product shall not be treated as household waste. Please, dispose of this product at your applicable collection point for the recycling of electrical & electronic equipment waste. Alternatively in some states of the European Union or other European states you may return your products to your local retailer when buying an equivalent new product. The correct disposal of this product will help save valuable natural resources and help in preventing the potential negative impact on the environment and human health, which could be caused as a result of improper liquidation of waste. Please ask your local authorities or the nearest waste collection centre for further details. The improper disposal of this type of waste may fall subject to national regulations for fines.
For business entities in the European Union
If you wish to dispose of an electrical or electronic device, request the necessary information from your seller or supplier.
Disposal in other countries outside the European Union
If you wish to dispose of this product, request the necessary information about the correct disposal method from local government departments or from your seller.

This product meets all the basic EU regulation requirements that relate to it.
Changes to the text, design and technical specifications may occur without prior notice and we reserve the right to make these changes.
natural_image
Exterior view of a modern vacuum cleaner with long handle and black body (no text or symbols visible)
FIELDMANN®
Home & Garden Performance

- FIELDMANN®
- Cordless Grass
- Shear & Hedge Trimmer
- USER'S MANUAL
- CONTENTS
- GENERAL SAFETY REGULATIONS
- Important safety notice
- Packaging
- Operating instructions
- EXPLANATION OF INSTRUCTION LABELS ON THE MACHINE
- Symbols on the charger unit
- MACHINE DESCRIPTION AND INCLUDED CONTENTS
- Machine description (see attached illustration)
- Supplied contents
- ASSEMBLY OF THE MACHINE
- Attaching and removing the wheel assembly (see pic. 2)
- Assembly and disassembly of the telescopic pole (see pic. 3)
- Working without the telescopic pole
- Working with the telescopic pole
- Function of the swivel head (see pic. 6)
- Charging the machine (see pic. 11)
- Charging procedure
- Important notes for charging.
- Turning on the machine
- Important safety instructions for chargers
- Important safety instructions for batteries
- INSTRUCTIONS FOR PROPER USE
- OPERATING INSTRUCTIONS
- Operation
- Purpose of use
- Instructions for use
- Electrical safety
- MAINTENANCE AND STORAGE
- Maintenance
- Storage
- TECHNICAL SPECIFICATIONS
- DISPOSAL
- INSTRUCTIONS AND INFORMATION REGARDING THE DISPOSAL OF USED PACKAGING MATERIALS
- DISPOSAL OF USED ELECTRICAL AND ELECTRONIC APPLIANCES
- For business entities in the European Union
- Disposal in other countries outside the European Union
Brand : Fieldmann
Model : FZN 4101-A
Category : Hedge Trimmer