
KT3364 - Wall mount Emos - Free user manual and instructions
Find the device manual for free KT3364 Emos in PDF.


| Product Type | TV Wall Mount |
| Brand | Emos |
| Model | KT3364 |
| VESA Compatibility | 200x200, 100x200, 400x400 mm |
| Maximum TV Size | Up to 65 inches (estimated) |
| Maximum Load Capacity | 50 kg (estimated) |
| Tilt Angle | Yes, adjustable |
| Rotation Angle | Yes, adjustable |
| Material | Steel |
| Color | Black |
| Level Included | Magnetic level |
| Tools Included | Allen wrench, spanner wrench, screws, anchors |
| Installation Type | Wall-mounted, requires drilling |
| Recommended Number of Installers | At least two persons |
| Compliance | CE |
Frequently Asked Questions - KT3364 Emos
User questions about KT3364 Emos
0 question about this device. Answer the ones you know or ask your own.
Ask a new question about this device
Download the instructions for your Wall mount in PDF format for free! Find your manual KT3364 - Emos and take your electronic device back in hand. On this page are published all the documents necessary for the use of your device. KT3364 by Emos.
USER MANUAL KT3364 Emos
GB TV Wall Mount Installation Instructions
Caution:
-
It is recommended for this product to be installed by at least two persons, of which at least one person should be physically fit enough to handle heavy loads and technically skilled.
-
Before installing, please read this manual and make sure that there are no electrical cords, gas or water pipes in the place designated for mounting the holder.
-
We are not responsible for any damage incurred during installation, improper installation or subsequent use.
-
If doubt, contact your nearest dealer and ask for assistance with installation.
-
For installation it is necessary to use safe and appropriate tools. Despite regarding the instructions may cause property damage or injury.
-
If you intend to remove the TV from the wall, always make sure all electrical cards are unplugged.
-
If you are unsure of your wall load, select a different location for your installation or carrying capacity and increase the strength of the wall with renovation.
-
The product can be installed only for that screen televisions or televisions containing mounting holes and have a flat back wall. To ensure that this holder is compatible with your TV search for a compatible holder on the following website: www.cmos.eu/DTV
Tools necessary for installation (not included):
Electric or Portable Drill
Drill hit with 10mm in Diameter (or Wood, Concrete, or as needed) Plaster Board or Chipboard Anchors (as needed).
Pencil
Level (if not included)
Included:
| Picture Type of Installation Material Pieces | |||
| A | Anchor 10/50mm 3 | ||
| B | Wall Anchor Bolt 8/8mm 3 | ||
| C | Magnetic Level 1 | ||
| D | Anchor Bolt 4/12mm 4 | ||
| E | Anchor Bolt 4/22mm 4 | ||
| H | Anchor Bolt 6/12mm 4 | ||
| I | Anchor Bolt 6/22mm 4 | ||
| J | Anchor Bolt 8/15mm 4 | ||
| K | Anchor Bolt 8/30mm 4 | ||
| L | Screw Pads 4.5/10mm 4 | ||
| N | Screw Pads 6.3/14mm 4 | ||
| O | Allen wrench | 1 | |
| P | Spanner wrench | 1 | |
Prior to every installation, remove the entire contents of the package and carefully lay out all its parts. The installation kit is supplied with drawers, which are provided as a demo sample only. We strongly recommend purchasing and using quality brand towels from the nearest electric installation or EV engineering show. Only then we can guarantee the specified maximum carrying weight of the holder.
Diagram:
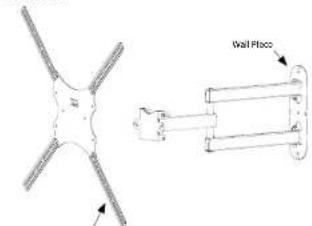
Mounting Rail
Attaching the Wall Mount:
Carefully consider the location of your TV screen. To install the wall mount it is necessary to drill into the wall, it is advisable to find the position of mounting holes on the back of your TV and mark their approximate position on the wall. Given the construction of the wall mount you can then determine the position of the so-called "wall piece".
Once you are sure of the place to position your TV and the "wall piece," take the "wall piece" (part of the wall mount used to attach to your walls) and with the help of a level measure its exact point on the wall. In the opening or openings draw a position of anchor bolts on the wall with a pencil 100. The number of bolts is at most types of wall mounts random (the more the better), but mostly 3 anchors are sufficient enough.
Take a drill and call holes deep and wide enough to accommodate the anchors. Hence the anchors into the wall and make sure it is fully semi-structured and fixed in the wall. If it easily falls out, it is possible that the drill hole is too big and the anchor bolt is not big enough to stay in the wall – repeat the burning with a drill with corresponding diameter a different place.
Grava the wall piece and attach it to the desired location. Attach it to the wall with anchor bolts and tighten the screws sufficiently. Mounting of the wall piece is completed.
NOTE: It is not recommended to install the mount straight on plasterboard walls. Should you still trust on the installation, we recommend consulting a building expert first. You must also use an act detector and special anchor for placement. If the width of studs supporting the deployment of plasterboard wall is larger than the width of the wall piece, try to fix the wall piece in its centre with the help of a tapping screw into the metal pool.
Mounting the TV:
Find out the dimension be seen the mounting holes on the rear side of your TV, if it is 200 x 200 mm at 100 x 200 mm the center mountinral willow sufficient. The dimensions bigger (400 x 400 mm) it is necessary to fix the center rail test. Use screws and nuts which are included in separate bag. The second part of the mount, the so-called "mountining rail" is to be attached to the television. Prior to the installation, it is recommended to first take the rail and try to attach it to the already mounted wall park. This way you can try out the way it is possible to attach your television to the wall mount or remove.
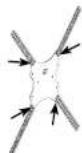
Before attaching the rail, first verify the diameter of screws securing the mounting holes ready on the back of the TV (usually 4, 5, 6 or 8 mm in
diameter -these rumin
ing screws are included, if not otherwise. Mounting screws are provided in two lengths. To select the proper screw length try to the screw it. In the mounting screw hole so there is remaining margin of 3.5 mm (CAUTO) never lighten with power - it can cause damage to your television. If there is more
2
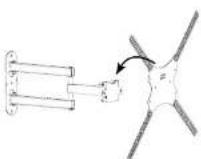
space left, it is necessary to use multiple. To ensure maximum capacity of the wall mount and present disinformation of the wall mount it is necessary to select appropriate types of mounting screws so that the mounting screws are fixed in the holes enough and threads are not exposed. Overage effect on the mounting hole of the TV and the mount cell can occur. Attach the whole mounting rail to your TV. Plate the mounting rail together with the TV into a wall piece which has already been situated in
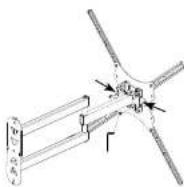
the wall. It is necessary to fix the mounting rail with a fastening screw with washer. It is loosely the screw into center rail through holes in well piece. Place TV into horizontal position and fix the screws. It is possible to adjust the position of your TV in the future again.
Manipulating the Stand:
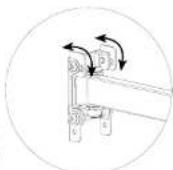
When tilting, rotating or correcting the stand, be cautious so you do not damage your TV. If necessary, you can change the position of your TV, loosen the Allen screws on the rear side of the wall piece with Allen key included, hold your TV on both sides and pull it gently. When plored in the correct position, use Allen key to fix it again. In case you need to change the position of your TV again, loose the screws with Allen key correct the position and fix again with Allen key.
Disposal of products
at the end of lifetime: Disposal of electric and electronic equipment sold in EU member countries and other European countries with an implemented recycling system. The represented symbol on the product or package means
the product shall not be tested as domestic waste. Hand over the product to the specified location for recycling electric and electronic equipment. Present negative impacts on human health and the environment by properly recycling your product. Recycling contributes to preserving natural resources. For more information on the recycling of the product, refer to your local authority, domestic waste processing organization or store, where you purchased the product.
CE conformity declaration
We declare under our sole responsibility that GAMMA LED 600 has been found in compliance with essential product requirements and objectives of EU direct use. This declaration loses validity with unauthorized changes of this product. We do not take responsibility for damages caused during transport, by incorrect use or a change or modification of any part of the product.
| H | Pitch/ha'd trouble 6/12mm | 4 | |
| I | Pitch/ha'd trouble 6/22mm | 4 | |
| J | Pitch/ha'd trouble 8/15mm | 4 | |
| K | Pitch/ha'd trouble 8/30mm | 4 | |
| L | Podicky one trouble 4.5/16mm | 4 | |
| N | Podicky one trouble 6.3/14mm | 4 | |
| G | Pro assembly #IC | 1 | |
| P | KIT | 1 |
What's a book is a new
Brand : Emos
Model : KT3364
Category : Wall mount